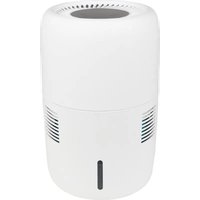
Oasis 303 Wifi - Air purifier Eurom - Free user manual and instructions
Find the device manual for free Oasis 303 Wifi Eurom in PDF.


| Product type | Air humidifier |
| Brand | Eurom |
| Model | Oasis 303 Wifi |
| Dimensions (L x W x H) | 229 x 229 x 363 mm |
| Weight | 2.3 kg |
| Adapter power supply | Input 100-240 V ~ 50/60 Hz, 0.5 A / Output 12 V, 1.7 A |
| Rated consumption | 12 W |
| Water tank capacity | 3 liters |
| Humidification rate | 125 - 300 ml/h |
| Maximum recommended area | 44 m² |
| Noise level | 24 - 52 dB |
| Fan speeds | Low, Medium, High, Turbo |
| Adjustable hygrostat | 40 - 75 % RH |
| Timer | 1 - 12 hours |
| Night light mode | Yes, with adjustable brightness |
| Wireless connectivity | Wi-Fi, compatible with Eurom Smart app |
| Automatic shut-off | When water runs out |
| Maintenance | Weekly cleaning of tank and evaporator element |
| Spare parts | Evaporator element (manufacturer reference) |
| Operating conditions | Temperature 5 - 40 °C, humidity 20 - 80 % RH |
Frequently Asked Questions - Oasis 303 Wifi Eurom
User questions about Oasis 303 Wifi Eurom
0 question about this device. Answer the ones you know or ask your own.
Ask a new question about this device
Download the instructions for your Air purifier in PDF format for free! Find your manual Oasis 303 Wifi - Eurom and take your electronic device back in hand. On this page are published all the documents necessary for the use of your device. Oasis 303 Wifi by Eurom.
USER MANUAL Oasis 303 Wifi Eurom
natural_image
White cylindrical air purifier with digital display and ventilation slots (no visible text or symbols)Oasis 303 Wifi
374995
Luchtbevochtiger / Luftbefeuchter / Air humidifier / Humidificateur / Umidificator
Dank
natural_image
White portable air purifier with a hand holding a cloth, emitting exhaust smoke (no text or symbols visible)
natural_image
Close-up of a cylindrical electronic component with an upward arrow indicator (no text or symbols)natural_image
Simple line drawing of a trash bin with diagonal lines crossing it, no text or symbols present.natural_image
White cylindrical device with a handle emitting a light-colored liquid, no visible text or symbolsnatural_image
Close-up of a mechanical component with an upward arrow indicator (no text or symbols present)natural_image
Simple line drawing of a trash bin with diagonal lines crossing it, no text or symbols present.Thank you very much for choosing for a EUROM device. You have made a good choice! We hope you will be satisfied about its functioning.
To get maximum profit from your product, it is important to read this manual attentive and totally before use, and to understand what is written. Read especially the safety instructions: they are there to protect you and your environment.
Keep the manual in a safe place for future reference. Store also the package: that is the best protection for your product in times of no-use. And if you at any time pass the appliance on, pass on the manual and package too.
We wish you a lot of fun with the Oasis 303 Wifi!
Eurom
Kokosstraat 20
8281 JC Genemuiden (NL)
info@eurom.nl
www.eurom.nl
This manual has been complied with the utmost care. Nevertheless, we reserve the right to optimize this manual at any time and to adjust it technically. The image used may differ.
Technical specifications
| Adapter input | 100-240V~50/60Hz, 0,5A |
| Adapter output | 12V 1,0A |
| Humidifier input | 12V --12W |
| Working Condition | 5 - 40°C and 20 - 80% Humidity |
| Hygrostat, adjustable | 40 - 75% |
| Humidification capacity | 125 - 300 ml/h |
| Water tank capacity | 3 liter |
| Fan speed | Low, Medium, High, Turbo |
| Noise level | 24-52 dB |
| Space | 44 m2 max |
| Air outlet | Spirally |
| Sight glass water level | + |
| Auto-stop if water runs out | + |
| Dimensions | 229 x 229 x 363 mm |
| Weight | 2,3 kg |
WHEN USING ELECTRICAL APPLIANCES, BASIC PRECAUTIONS SHOULD ALWAYS BE FOLLOWED TO REDUCE THE RISK OF FIRE, ELECTRIC SHOCK, AND INJURY TO PERSONS, INCLUDING THE FOLLOWING:
General safety guidelines
Before using the machine, carefully read this entire instruction manual. Keep this booklet in a safe place for reference.
This air humidifier is intended for household use; do not use for commercial or industrial purposes.
➢ After removing packaging, check device for damage or any evidence that may point to a defect/failure. If in doubt, do not use the device but refer to your supplier for checks/repairs.
Keep the packaging material outside the reach of small children; it could be dangerous!
➢ Always place the air humidifier in a vertical position on a sturdy, flat, stable and horizontal surface (never on a bed, sofa or a thick carpet, for example. Do not place the device on a wooden floor for extended periods; moisture may penetrate the wood and cause distortions! For the same reason do not point the moisture extractor at furniture or objects that should be treated with care.
Do not place the air humidifier near an outer wall or window. Find a location near a power source and maintain a distance of at least 10 cm from walls, large items of furniture etc for the best results. Ensure that the air inlet does not blow directly onto a wall or an other large object. Do not place the humidifier in the vicinity of heat sources such as (gas) boilers, radiators, a microwave, hob, open fire, etc.
The electrical cable is of a safe length. If necessary, you may use an extension cable with a capacity that is at least equal to that of the humidifier. Make sure the electricity cable does not get hot; keep it away from boilers, radiators and so on and do not run it under rugs or similar or hang or lay it across walkways. This could lead to trips and the humidifier being accidentally dragged out of position. Prevent twists in the cable and keep it out of reach of children, pets and so on.
Before connecting the humidifier, check to ensure that the data on the specification plate corresponds with the mains power and the technical data for the socket into which you wish to plug the air
humidifier. Only use approved sockets with a 30mA earth leak safeguard.
If the power outlet used to operate the humidifier is not properly connected, the power plug of the device will get hot. Ensure that you are using a properly connected power outlet for the humidifier.
The power plug must be connected is such a way as to avoid risks if the humidifier is tipped over or liquid is spilled
Use the device for its intended purpose (i.e. for humidifying the air) and as set out in this instruction booklet. Never experiment with the air humidifier – whether or not it's functioning – and never make any changes to it. Any changes made to the air humidifier and/or deviant usage will invalidate the guarantee and cancel the liability of the manufacturer or importer.
Keep the air humidifier clean and ensure that the air inlet and outlet openings in the device (internal, sides and on top) do not become blocked. Never cover the air humidifier! Do not place any objects on top of the humidifier. Do not sit and stand on the device.
Make sure there is close supervision if this device is used when there are children, incapacitated person or pets present. The device may be used by children over the age of 8 and persons with reduced physical, sensory, or mental abilities or with a lack of experience and knowledge only if such are supervised or have been instructed in the safe use of the device as well as the resulting risks. Cleaning and maintenance may not play with the device.
➢ Never leave a functioning air humidifier unsupervised in a closed room where a child is playing and/or sleeping. Never leave a functioning air humidifier unsupervised in a room; switch it off and remove the plug from the socket.
➢ Switch the humidifier off and remove the plug from the socket before you:
- Refill the water tank from the device in order to refill it
- Remove the upper using
- Clean it or carry out maintenance
- Move the device (do not forget to empty the water tank first)
➢ Never pour water into the moisture outlet or any other opening on the device, except via the filling of the water tank. This will damage the device!
➢ Fill the water basin only with water. Make sure that the water in the tank is pure and clean and does not exceed 40^ C. Use only cold water (tap water, distilled water, mineral water or other drinking
water). Do not add any substances (soap, cleaning agents, medicinal or any other substances) to the water in the tank; they may damage the device!
Do not drink the water used in the water tank and do not use it for animals or plants. Empty the water tank into a drain.
If the temperature in the room containing the humidifier falls below 0^ C, you should remove all moisture from the device in order to avoid freezing.
➢ Use only the orginal evaporation mat by manufacturer, which is specially suited for this humidifier.
Bacteria and mould can form on the evaporation mat if the humidifier is not used for a longer time. Inspect the evaporation mat before using the humidifier again. The evaporation mat should be changed if it has stains.
➢ Clean the water basin and evaporation mat every week to ensure optimum hygiene.
Do not expose the device to direct sunlight or warm air currents.
➢ Never hold the device under flowing water and/or submerge it in liquid.
➢ Never move an air humidifier that is switched on. Do not let it topple over or move it and try not to empty it while it is being used.
Make sure that objects are never pushed into the opening on the humidifier. This could cause an electric shock, fire, burns or damage to the device itself.
Do not spray flammable materials, e.g. pesticides or fragrances, near the humidifier,
Do not use the humidifier after using sprays for insect protection, in places with oil residue, chemical vapors or where incense sticks are burnt.
Make sure your hands are dry when you plug the device into the socket; wet hands can cause electric shocks! Never submerge the plug, cable or any other part of the humidifier in water!
➢ Never use harsh cleaning agents or abrasive substances, benzene, glass cleaner, furniture polish, thinners or any other household cleaning product to clean any part of the humidifier. This could damage the materials!
In order to turn the humidifier off, switch it off on the device and then remove the plug from the socket. Do not do so by tugging on the cable; always remove the plug from the socket by hand! Never leave a humidifier that is not being used, connected to the mains.
Do not programme the air humidifier and/or leave it to work on the basis of a timer. You must always check for safe conditions before using the device!
This appliance may be used manually or using a timer and an app. Whichever method you choose, make sure that you follow the safety instructions at all times. Do not operate the appliance using an external clock, timer, voltage regulator (e.g. as a dimmer), or any other piece of equipment that automatically switches the appliance off.
Do not switch the humidifier on if the cable or plug is damaged, if the device is not working properly or if the humidifier has fallen over or become damaged in any way. In the event of problematic functioning, breakdown or defects, switch the device off immediately, take the plug out of the socket and consult your supplier or a recognised service point for repairs or checks. Please request original parts if the device needs to be repaired.
➢ Never open the humidifier yourself or attempt to repair the device or implement changes to any part of it (including cable and plug). This will invalidate the guarantee and the manufacturer, importer and supplier will not accept any liability if the user has tampered with the device! The device does not contain any internal parts that require maintenance by the user (except for the replacement of the evaporation element); leave servicing to qualified personnel!
Note! If condensation forms on windows, walls, etc. switch the humidifier off. The room is then sufficiently humid and further moisture could cause damage!
Note! Never block the air inlet or outlet!
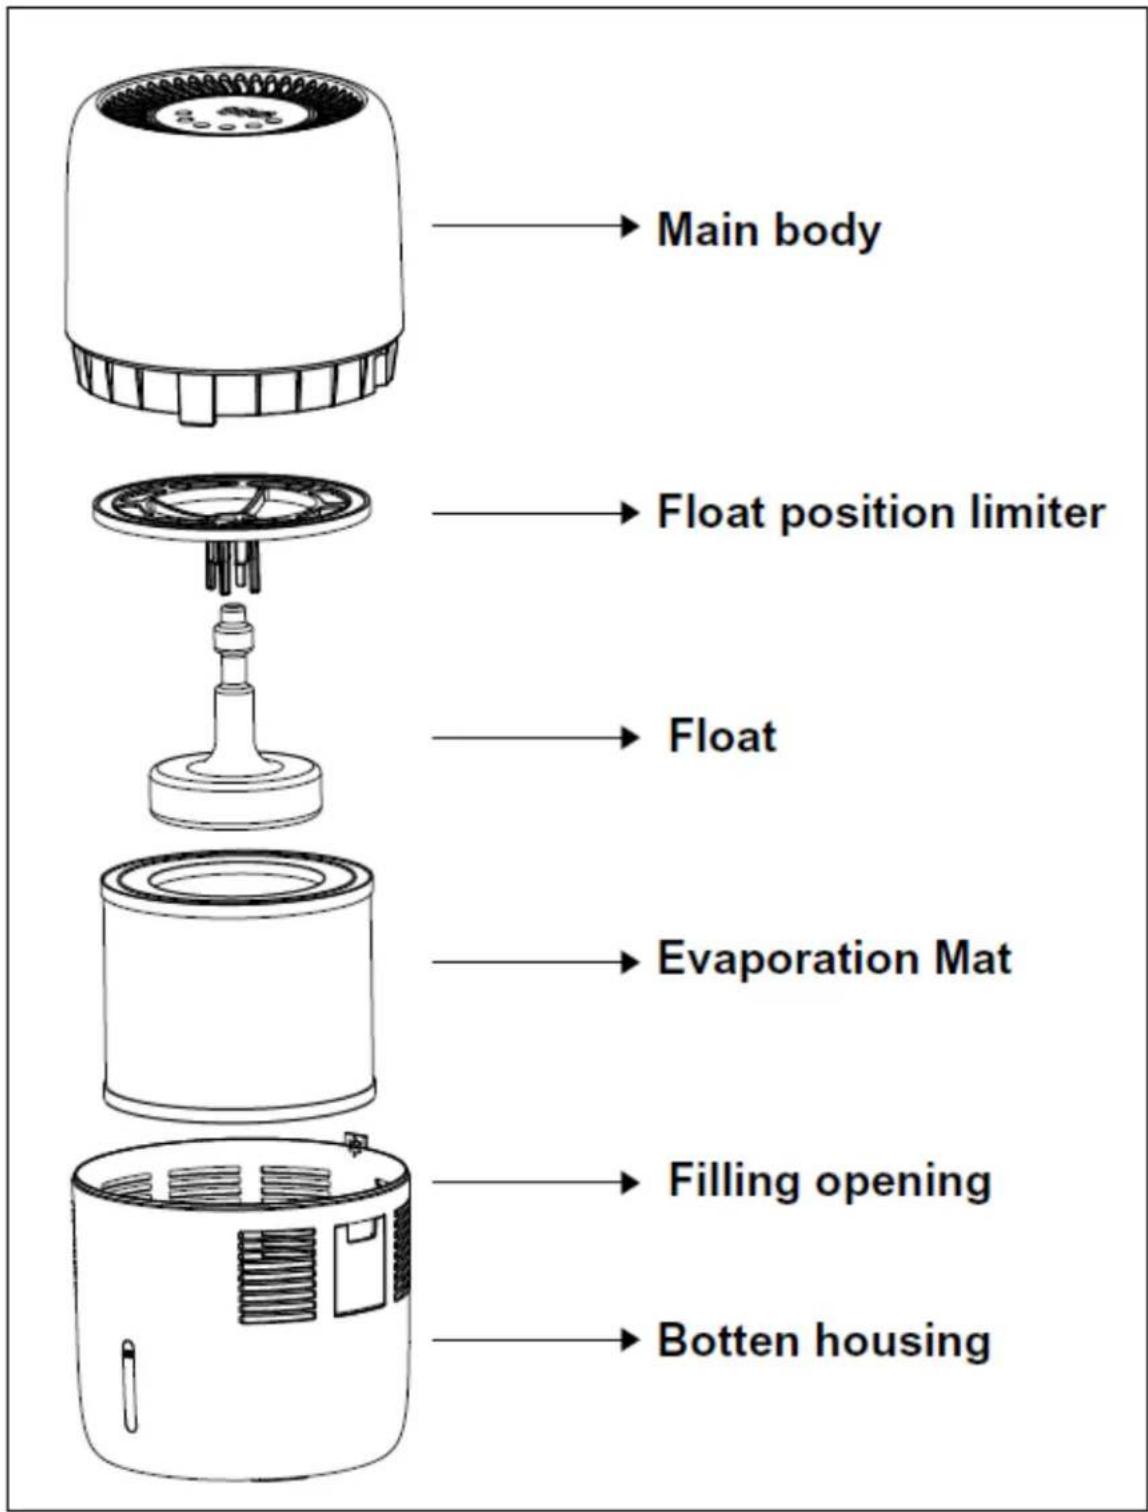
Description
Installation and connection
- Remove the packaging materials.
- Check for any damage. If you have any doubts, do not use the device!
- Make sure the plug is not inserted into the socket.
- Place the humidifier upright on a sturdy, flat, moisture-proof and horizontal surface, at least 10 cm from the wall. Never place it on a bed or bank. We recommend that you do not place the device on valuable or treasured items of furniture.
- To ensure optimum performance of the device, please ensure that air inlets an air outlets are not covered.
- Lift the upper housing from the bottom housing.
- Remove the packaging from the evaporation mat and insert the evaporation mat into the bottom housing
- Place the upper housing back on the lower housing and ensure it is placed securely and correctly.
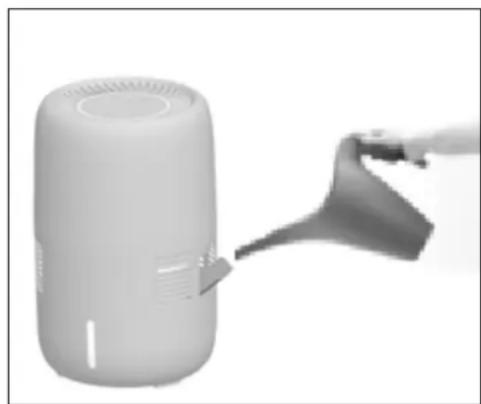
- Fill the tank with clean, fresh, soft water (low lime or lime free). Do not use hot water.
- Open the filling opening and carefully fill the water tank with maximum 3 litres of water. Keep an eye on the sight-glass of the water level and never fill the tank above the 'maximum' sign on the sight-glass! If you fill the water tank too much, the water will flow out of the ventilation openings and that might cause damage. After filling, close the filling opening.
- Now insert the plug into the socket.
- The device is ready for use.
natural_image
White cylindrical device with a handle emitting powder, no visible text or symbolsInstruction for use
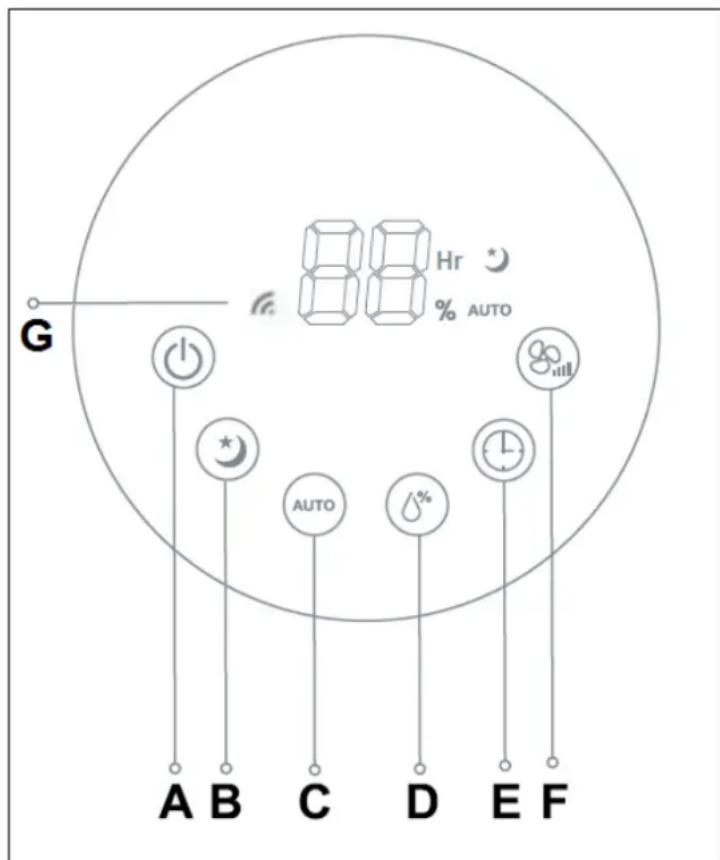
A. ON/OFF button
B. Illumination / Sleep mode button
C. Auto butten
D. Humidity percentage setting button
E. Timer button
F. Ventilator speed button
G. Wifi symbol
ON/OFF button
Press the ON/OFF button to turn the apparatus on or off. When the apparatus is turned on, the display will show the current humidity percentage, the ventilator speed will be set to 'medium', and the apparatus will humidify continuously (this is without setting the target humidity percentage).
Illumination / Sleep Mode button
Using this button, the light intensity of the control panel can be adjusted and the apparatus can be turned on of off in sleep mode.
By consecutively pressing this button you can set the following:
Position 1 - Dimmed light
Position 2 - Normal light
Position 3 - Bright light
Position 4 - Turns on sleep mode. The corresponding symbol lights up.
In sleep mode, the ventilator speed is automatically set to 1 (low) and the illumination of the control panel is switched off.
You cannot use the humidity percentage setting button in sleep mode.
The other buttons can be used. If you press the AUTO button, sleep mode will be switched off.
Position 5 - Turns off sleep mode. The corresponding symbol will be off.
The device returns to the previous humidification level and timer setting.
AUTO button
If you press the AUTO button, the apparatus will keep the humidity on the ideal level of 50%. (This means that the apparatus will not operate when the humidity in the room is above 50%!
Humidity Percentage Setting button
Use this button to set the desired humidity percentage. The display shows the set humidity percentage for a few seconds and subsequently the currently measured humidity percentage. The humidity can be set to between 40% and 75%.
As soon as the desired humidity level is reached the apparatus will stop operating.
When the humidity drops below the set value, the apparatus will resume its operation. If you select 'CO' (continuously), the apparatus will operate continuously i.e., without stopping.
Timer button
Press the Timer button to set the desired operating time. Press this button a few times to set the number of hours (1 - 12 hours). The display shows the remaining time.
Ventilator Speed button
Use this button to set the desired ventilator speed:
1 - Low, 2 - Medium, 3 - High, 4 - Turbo
Low water level
The display shows two flashing lines when the water level in the water tank is too low. The ventilator will continue to rotate for a number of hours to dry the apparatus and will then stop working automatically. In normal mode, the ventilator will continue to run in mode 2 for 7 hours to dry the device. The display continues to show flashing lines while the ventilator dries the device. In sleep mode, the ventilator continues to operate in mode 1 for 10 hours to dry the device. The display continues to show the lines while the ventilator dries the device.
Using the app via Wi-Fi
It is possible to operate the appliance using an app on your smartphone. To do this, the appliance must be connected to a Wi-Fi modem. You then activate the app on your smartphone or tablet to operate the appliance using the smartphone or tablet. The Wi-Fi symbol will light up on the display if the appliance is connected to Wi-Fi.
Once the appliance is logged onto the Wi-Fi network it will automatically connect when it is switched on. The Wi-Fi symbol will then light up on the display. If the Wi-Fi symbol blinks rapidly, it has not yet connected.
You can reset the Wi-Fi settings by pressing and holding the AUTO button. Existing connections will be removed and the Wi-Fi symbol will blink rapidly, showing that it is ready to connect.
You can switch off the Wi-Fi connection (and the Wi-Fi symbol) by pressing and holding the ON/OFF switch together with the VENTILATOR SPEED button. You will hear a peep when the Wi-Fi turns off and the Wi-Fi symbol will no longer be displayed. Press and hold the ON/OFF switch together with the VENTILATOR SPEED button again to switch the Wi-Fi connection back on (again, you will hear a peep). The Wi-Fi symbol will also be displayed again.
How to download the Eurom Smart App:
- Scan the QR code below or search for 'Eurom Smart' in the App store or Google Play and follow the download instructions.


- Go to the Eurom Smart App on your smartphone/tablet.
- For more information about the app, please go to: www.eurom.nl/nl/manuals.
Safety instructions for remote operation
You can operate your Eurom appliance on the same WLAN, a different WLAN or a 3G or 4G mobile network. This makes it possible to operate the appliance remotely, even if you cannot see it. Please be aware that you must follow the safety instructions delivered with the appliance at all times, also when operating it
remotely. Make sure that you have read and understood the safety instructions and that you comply with them at all times, also when operating the appliance remotely.
Detailed user instructions for the Eurom Smart App can be found by scanning the QR code displayed below:

or on our website: http://www.eurom.nl/nl/manuals
Maintenance and storage
An air humidifier protects your health. In order to gain these benefits, ensure your humidifier works effectively and prevent breakdowns, it is important to keep the device clean. A lack of hygiene could lead to the proliferation of micro-organisms in the water. In extreme cases, Legionella bacteria may multiply. Legionella bacteria will grow in warm water that is stagnant for long periods. Therefore, refresh water regularly!
Daily maintenance
- Switch the air humidifier off and take the plug out of the socket before cleaning or maintaining the device!
- Remove the main housing from the bottom housing / water tank.
- Remove the vaporisation element.
- Clean the water tank using lukewarm water and a soft cloth.
- Return the vaporisation element to its place and return the main housing onto the bottom housing / water tank. Ensure that both housings fit correctly onto each other.
Weekly maintenance
Repeat steps 1 to 3 as described above in daily maintenance
- Clean the water tank using a solution of 50% water and 50% vinegar. Never use aggressive, corrosive or abrasive cleaning agents.
- Leave it for 15 minutes. Remove the vinegar solution and the deposits, and dry the apparatus using a dry and soft cloth.
- Return the vaporisation element to its place and return the main housing onto the bottom housing / water tank. Ensure that both housings fit correctly onto each other.
- Clean the outside of the apparatus using a soft and dry or lightly moistened cloth.
Maintenance warnings
- Make sure that the main body is never submerged in water
-
Do not use solvents or aggressive cleaning products when cleaning
-
Clean internal parts with a soft cloth; hard materials could damage the device!
- Never let water sit in the water tank or casing for longer than a few days. Change it/throw it away; rinse the tank and let the humidifier dry if you are not planning to use it for a while.
Transport
WARNING!
Always switch the device off before transporting it. Always disconnect the power plug from the power outlet. Transport the device only when it is empty.
Storing the humidifier
- Clean the air humidifier as set out above. Allow to dry thoroughly.
We recommend carefully cleaning the humidifier before storing it. Ensure that all parts are clean and dry prior to storing the device. Do not leave water in the lower housing. Water that remains in the humidifier may result in mineral deposits and promotes the growth of undesired micro-organisms. - Store in original packaging if you have it.
- Place it straight up in a cool, dry place. Prevent excess heat!
Vvaporisation element
Replacing the vaporisation element
Use only original supplied evaporation mat
- Switch the device off and remove the plug from the socket.
- Remove the main housing from the bottom housing / water tank.
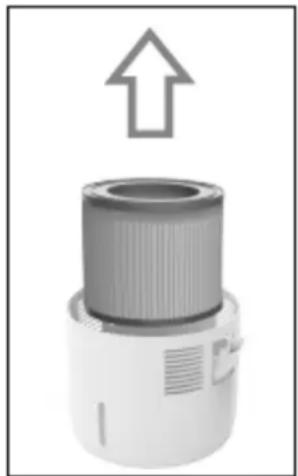
- Remove the vaporisation element.
- Insert a new vaporisation element. Make sure the float is in the correct place again.
- Return the main housing onto the bottom housing / water tank. Ensure that both housings fit correctly onto each other.
- To reset the built-in hour counter, press the ON/OFF button for 3 seconds, until you hear the sound signal.
natural_image
Close-up of a cylindrical mechanical component with an upward arrow indicator (no text or symbols)Lifespan of the vaporisation element
The vaporisation element has a lifespan of 4,320 hours (180 days) of continuous operation. After using the apparatus for 4,320 hours, the letters FR will appear on the display and the apparatus will stop operating. To reset the built-in hour counter, press the ON/OFF button for 3 seconds, until you hear the sound signal.
Condensation on windows or walls is a sign that your room is sufficiently humidified. In this event, switch the air conditioning unit off and remove the plug from the socket.
Troubleshooting
If your air humidifier is not working properly, check for the following issues:
| Problem: | Possible cause: | Solution: |
| The device does not work | Control button at OFFNo electricityIs the water tank sufficiently full and does the main housing fit the bottom housing correctly? | Switch OnPlug in socketIs the fuse/earth leakage circuit breaker engagedFill the water tank and place the main housing correctly onto the bottom housing.No power failure? |
| The device is giving an unpleasant odour | Dirty water or water that has been in the device to long | Replace the water and clean the tank |
| The humidity level does not or hardly change | Vaporisation element is installed incorrectly.Vaporisation element is dirty.Too much ventilation in the roomThe room is too large for the apparatus. | Install the vaporisation element correctly.Clean or replace the vaporisation element.Compare the dimensions of the room with the recommended dimensions. |
If your problem is not resolved by the tips outlined above, please consult your supplier or a recognised servicing point. Never attempt to carry out repairs yourself! This will invalidate the guarantee and no liability will be taken by the supplier, manufacturer or importer!.
Removal
natural_image
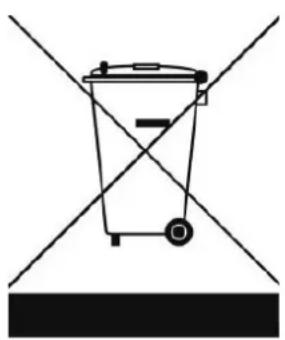
Simple line drawing of a trash bin with diagonal lines crossing it, no text or symbols present.In the EU this symbol indicates that this product may not be disposed of as ordinary household waste. Old equipment contains valuable materials, suitable for recycling. These materials should be made suitable for reuse in order to prevent any adverse effects to health and the environment caused by unregulated waste collection. Therefore, please make sure that you bring old equipment to a designated collection point. Alternatively, contact the original supplier, who can make sure that as many of the components as possible can be recycled.
CE-statement
Eurom - Genemuiden-NL hereby declares that the EUROM Humidifier, type Oasis 303 Wifi, complies with the following guidelines and meets the following standards:
LVD 2014/35/EU
EMC 2014/30/EU
EN 60335-1:2012+A11:2014+A13:2017 EN 55014-1:2017
EN 60335-2-98:2003+A1:2005+A2:2008 EN 55014-2:2015
EN 62233:2008 EN 61000-3-2:2014
EN 61000-3-3:2013
RED 2014/53/EU
Rohs
EN 300 328 V2.1.1
2011/65/EU&(EU)2015/863
natural_image
White cylindrical device emitting a spray bottle, no visible text or symbolsnatural_image
Close-up of a mechanical component with an upward arrow indicator (no text or symbols)natural_image
Simple line drawing of a trash bin with no text or symbolsnatural_image
White portable air purifier with a hand holding a cloth, emitting vapor (no text or symbols visible)natural_image
3D rendering of a cylindrical mechanical component with an upward arrow indicating direction (no text or symbols)natural_image
Simple line drawing of a trash bin with crossed lines indicating no waste or prohibition (no text or symbols)
- Oasis 303 Wifi
- Dank
- WHEN USING ELECTRICAL APPLIANCES, BASIC PRECAUTIONS SHOULD ALWAYS BE FOLLOWED TO REDUCE THE RISK OF FIRE, ELECTRIC SHOCK, AND INJURY TO PERSONS, INCLUDING THE FOLLOWING:
- General safety guidelines
- Description
- Installation and connection
- Instruction for use
- ON/OFF button
- Illumination / Sleep Mode button
- AUTO button
- Humidity Percentage Setting button
- Timer button
- Ventilator Speed button
- Low water level
- Using the app via Wi-Fi
- Safety instructions for remote operation
- Maintenance and storage
- Daily maintenance
- Weekly maintenance
- Maintenance warnings
- Transport
- WARNING!
- Storing the humidifier
- Vvaporisation element
- Replacing the vaporisation element
- Lifespan of the vaporisation element
- Troubleshooting
- Removal
- CE-statement
Brand : Eurom
Model : Oasis 303 Wifi
Category : Air purifier