H6 ID25B4LYTB - Oven HAIER - Free user manual and instructions
Find the device manual for free H6 ID25B4LYTB HAIER in PDF.

User questions about H6 ID25B4LYTB HAIER
0 question about this device. Answer the ones you know or ask your own.
Ask a new question about this device
Download the instructions for your Oven in PDF format for free! Find your manual H6 ID25B4LYTB - HAIER and take your electronic device back in hand. On this page are published all the documents necessary for the use of your device. H6 ID25B4LYTB by HAIER.
USER MANUAL H6 ID25B4LYTB HAIER
text_image
Haier Full User ManualHaier.com
English
Español
Hrvatski
Čeština
Română
Magyar
Slovenčina
Português
Polski
Lietuvių
Latviešu
Eesti
Français
Italiano
Deutsch
Ελληνικά
Nederlands
Slovenščina
Српски
Български
Dansk
Suomi
Norsk
Svenska
Українська
Türkçe
Қазақ
Русский
قَيْبِرْعُلَا
中文
قيبرعلا
WELCOME
Thank you for choosing our product. To ensure your safety and get the best results, please read this manual carefully, including the safety instructions, and keep it for future reference.
Before installing the oven note the serial number, which you might need for repairs. Check for any damage during transportation and consult a technician if you're unsure before using it. Keep packaging materials away from children.
NOTE: Please note that the oven's features and accessories may vary depending on the model you purchased.
SUMMARY
1. SAFETY INFORMATION
2. PRODUCT INTRODUCTION
2.1. Overview of the product
2.2. Accessories
2.3. Control panel
2.4. Connectivity
3. BEFORE STARTING
3.1. Information to start
3.2. First usage
3.3. Preliminary cleaning
4. OPERATION OF PRODUCT
4.1. How the product works
4.2. Cooking functions
4.2.1. Standard functions
4.2.2. Special functions
4.2.3. Multi Step Feature
5. COOKING GUIDELINES
5.1. General Cooking tables
5.2. Everyday Cooking tables
6. CARE & CLEANING
6.1. General recommendations
6.2. Cleaning the oven
6.2.1. Inside the oven: cleaning functions
6.2.2. Outside the oven: removal and cleaning the glass door
6.3. Cleaning of accessories
6.4. Maintenance
7. TROUBLESHOOTING
8. ENVIRONMENTAL PROTECTION & DISPOSAL
8.1. Appliance disposal
8.2. Saving and respecting the environment
9. INSTALLATION
GENERAL WARNINGS
- Do not use a steam cleaner for cleaning operations.
- CAUTION: in order to avoid a hazard due to inadvertent resetting of the thermal cut-out, this appliance must not be supplied through an external switching device, such as a timer, or connected to a circuit that is regularly switched on and off by the utility
- During use the appliance become hot. Care should be taken to avoid touching heating elements inside the oven.
Use in accordance with attendend use
- Only use the oven for its intended purpose, that is only for the cooking of foods: any other use, for example as a heat source, is considered improper and therefore dangerous. The manufacturer cannot be held responsible for any damage resulting from improper, incorrect or unreasonable usage.
Use limitations
- The appliance can be used by children aged from 8 years and above and persons with reduced physical, sensory or mental capabilities or lack of experience and knowledge if they have been given supervision or instruction concerning use of the appliance in a safe way and understand the hazards involved. Children shall not play with the appliance. Cleaning and maintenance shall not be made by children without supervision.
- This appliance is not intended to be used by persons (including children) with reduced physical, sensory or mental capabilities, or lack of experience and knowledge, unless they have been given supervision or instruction concerning use of the appliance by a person responsible for their safety.
- Children should be supervised to ensure that they do not play with the appliance.
- WARNING: the appliance and its accessible parts become hot during use. Care should be taken to avoid touching heating elements. Children less than 8 years of age shall be kept at away unless continuously supervised.
- WARNING: Accessible parts may become hot during use. Young children should be kept away.
INSTALLATION WARNINGS
- The oven can be located high in a column or under a worktop.
- Before fixing, you must ensure good ventilation in the oven space to allow proper circulation of the fresh air required for cooling and protecting the internal parts. Make the openings specified on the illustrations according to the type of fitting. Always fix the oven to the furniture with screws provided with the appliance.
- No additional operation/setting is required in order to operate the appliance at the rated frequencies.
- The appliance must not be installed behind a decorative door in order to avoid overheating.
- During installation the oven should be disconnected from the mains to avoid overheating.
- If the assistance of the manufacturer is required to rectify faults arising from incorrect installation, this assistance is not covered by the guarantee. The installation instructions for professionally qualified personnel must be followed.
- Incorrect installation may cause harm or injury to people, animals or belongings. The manufacturer cannot be held responsible for such harm or injury.
- Installation must be carried on by a qualified technician who must know and respect the laws in force in the country of installation and the manufacturer's instruction.
- After unboxing the appliance, always check it is not damaged, in case of issue contact the customer service before installing and do not connect to the power supply.
- Remove the packaging material before operating the appliance.
- During installation do not use the oven door's handle to lift and move the oven.
- The installation furniture and the adjacent ones must with stand temperatures of 95°C.
- It is recommended to wear protective gloves during installation to avoid cut injuries.
- Do not install the product in open environments exposed to
atmospheric agents.
- This appliance is designed to be used at altitude lower than 2000m.
- To remove protective films and advertisement stickers on front surface of the oven before first usage.
ELECTRICAL WARNINGS
- The socket must be suitable for the load indicated on the tag and must have ground contact connected and in operation. The earth conductor is yellow-green in colour. This operation should be carried out by a suitably qualified professional.
- Connection to the power source can be made by plug or by fixed wiring placing an omnipolar breaker, with contact separation compliant to the requirements for overvoltage category III, between the appliance and the power source that can bear the maximum connected load and that is in line with current legislation.
- In case of incompatibility between the socket and the appliance plug, ask a qualified electrician to substitute the socket with another suitable type. The plug and the socket must be conformed to the current norms of the installation country.
- The yellow-green earth cable should not be interrupted by the breaker. The socket or omnipolar breaker used for the connection should be easily accessible when the appliance is installed.
- If the supply cord is damaged, it must be replaced by the manufacturer, its service agent or similarly qualified persons in order to avoid a hazard.
- For any repairs, refer only to the Customer Care Department and request the use of original spare parts.
- Disconnect the appliance from the mains electricity supply before carrying out any work or maintenance on it.
- WARNING: ensure that the appliance is switched off before replacing the bulb, to avoid the possibility of electric shocks.
- The oven must be switched off before removing the removable parts. After cleaning, reassemble them according the instructions.
- The use of any electrical appliance implies the observance of some fundamental rules:
- do not pull on the power cable to disconnect the appliance from the power source;
- do not touch the appliance with wet or damp hands or feet;
– in general the use of adaptors, multiple sockets and extension cables is not recommended;
- in case of malfunction and/or poor operation, switch off the appliance and do not tamper with it.
- NOTE: as the oven could require maintenance work, it is advisable to keep another wall socket available so that the oven can be connected to this if it is removed from the space in which it is installed.
- Any repair, installation and maintenance not carried out correctly can seriously endanger the user.
- The manufacturing company hereby states that it does not assume any responsibility for direct or indirect damages caused by incorrect installation, maintenance, or repair work. Furthermore, it is not liable for damages caused by the absence or interruption of the grounding system (e.g., electric shock).
- CAUTION: in order to avoid a hazard due to inadvertent resetting of the thermal cut-out, this appliance must not be supplier through an external switching device, such as a timer, or connected to a circuit that is regularly switched on and off by the utility.
- The appliance is not designed to be activated by an external timer or separate remote control system.
USE & MANTEINANCE
- The dripping pan collects the residues that drip during cooking.
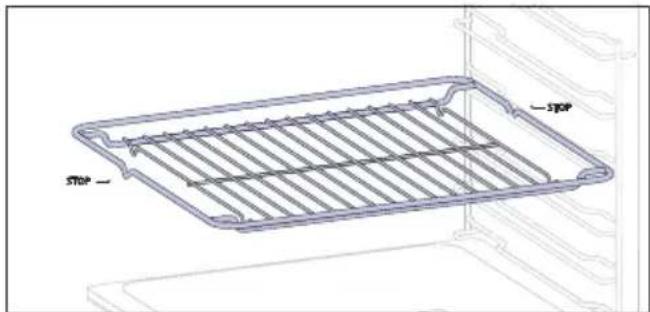
- When you place the Airfry tray or the grid on the side racks, make sure that the shorter section of the side (between the stop and the extremity) is directed towards the interior of the oven. If the grid has a decorative metal bar, pay attention to position it on the exterior of the oven so that the brand logo can be visible and readable. For the correct positioning refer also to the image in the Accessories section of this user manual.
- Do not use harsh abrasive cleaners or sharp metal scrapers to clean the oven door glasses, since they can scratch the surface, which may result in shattering of the glass.
- Only use the temperature probe recommended for this oven.
- During cooking, moisture may condense inside the oven cavity or on the glass of the door. This is a normal condition. To reduce this effect,
wait 10-15 minutes after turning on the power before putting food inside the oven. In any case, the condensation disappears when the oven reaches the cooking temperature.
- Cook the vegetables in a container with a lid instead of an open tray.
- Avoid leaving food inside the oven after cooking for more than 15/20 minutes.
- A long power supply failure during an occurring cooking phase may cause a malfunction of the monitor. In this case contact customer service.
- WARNING: Do not line the oven walls with aluminium foil or single-use protection available from stores. Aluminium foil or any other protection, in direct contact with the hot enamel, risk melting and deteriorating the enamel of the insides.
- WARNING: Never remove the oven door seal.
- CAUTION: Do not refill the cavity bottom with water during cooking or when the oven is hot.
- Oven trays and grids are not suitable for direct contact with food. Please use suitable cookware or baking paper.
- Wash all accessories before first use with a solution of hot water and washing up liquid.
WARNINGS (\*FOR PYRO OVENS)
- Excess spillage must be removed before cleaning.
- WARNING: before initiating the automatic cleaning cycle:
- Clean the oven door;
- Remove large or coarse food residues from the inside of the oven using a damp sponge. Do not use detergents;
- Remove all accessories and the sliding rack kit (where present);
-
Do not place tea towels.
-
During the pyrolytic cleaning process (if available), the surfaces may get hotter than usual and children should be kept away.
- If a hob has been fitted above the oven, never use the hob while the Pyrolizer is working, this will prevent the hob from overheating.
WARNINGS (\*FOR STEAM LITE)
WARNING: Risk of burn and damage to the appliance: using the steam function the released steam can cause burns: Open the door carefully to avoid injury after using a cooking function with steam
- Use only drinking water to fill in the tank.
- When filling in the oven with water use maximum 250ml of water.
2. PRODUCT INTRODUCTION
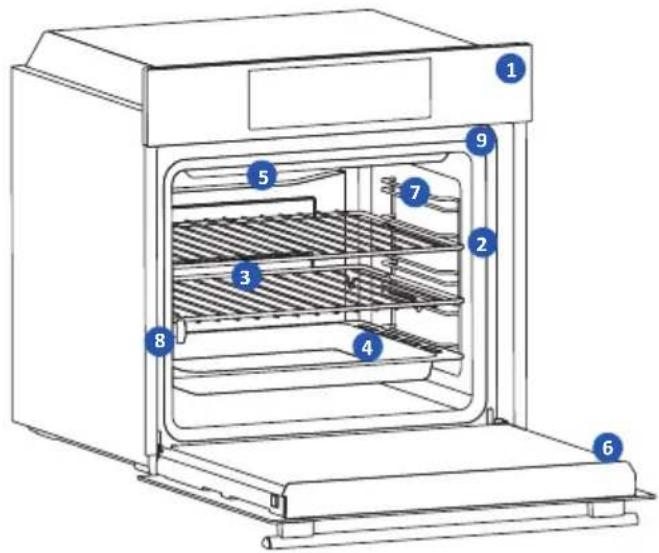
2.1. OVERVIEW OF THE PRODUCT
text_image
Technical diagram of an oven with numbered components for identification2.2 ACCESSORIES
1 Metal grid
text_image
→STEP STEP →A metal grid in an oven is a removable, adjustable shelf that supports cookware, ensuring even cooking, and makes cleaning easy. It can be used to hold plates and pans at different heights for various cooking needs.
3 Deeper Tray
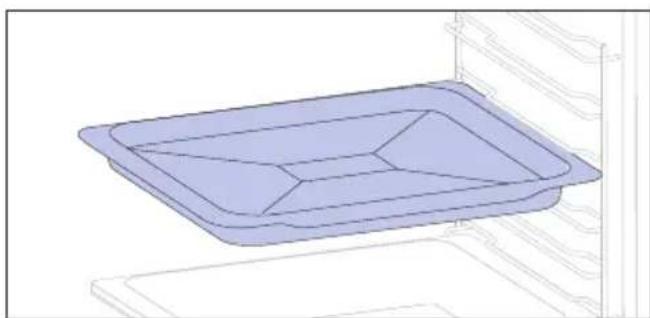
natural_image
3D diagram of a rectangular tray with internal compartments, placed inside an oven (no text or symbols)The deeper tray is ideal for recipes with added liquids or layers, such as casseroles or roasts. Its depth is specifically designed to ensure the desired consistency of the food prepared in it.
- Control panel
- Shelf positions numbers
- Metal grid
- Trays
- Fan cover
- Oven door
- Lateral wire grids (if present: only for flat cavity)
- Serial number & QRcode
- Steam Funnel Insertion
natural_image
Empty white rectangle with a thin gray border (no text or symbols)Write here your serial number for future reference.
2 Baking tray (only if present\*)
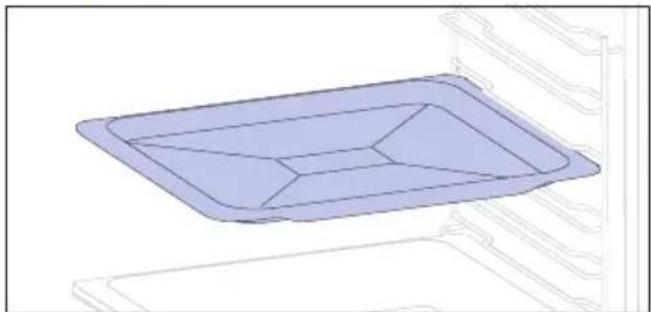
natural_image
3D diagram of a rectangular tray with internal compartments, placed inside an oven (no text or symbols)A baking tray is ideal for achieving even bottom browning, making it perfect for cookies and pastries due to its shallow, flat design. Additionally, placing it under a cooking grid can help collect drips and prevent messes in the oven.
4 Lateral wire grids (only if present\*)
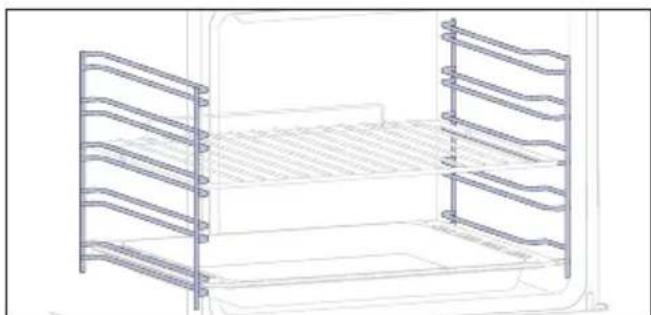
natural_image
Line drawing of a multi-tiered storage unit with horizontal and vertical metal racks (no text or symbols)Located on both sides of the oven cavity, the side racks are designed for placing baking tray and grids during the cooking.
5 Telescopic Guides (only if present*)
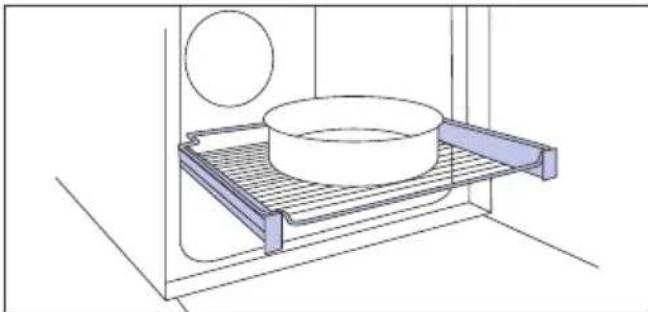
natural_image
Technical line drawing of a kitchen sink with a bowl, plate, and circular object (no text or symbols)Telescopic oven rails are shelves that can be extended, making it easier to place or remove items, without the need to reach deep inside a hot oven. They improve safety, stability, and can be adjusted at different level positions.
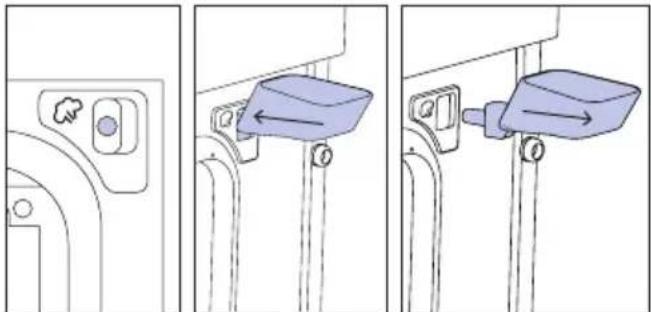
7 Softclose/Soft open hinges (only if present*)

natural_image
Illustration of a window with a circular icon and arrow, no text or symbols presentSoft close and open hinges control the door's motion, ensuring smooth movement and preventing slamming.
6 Steam Funnel
text_image
Diagram showing three steps of a door handle attachment mechanism with labeled parts and directional arrowsThe Steam Funnel is a useful accessory to add the necessary water, through the dedicated hole, for steam cooking programs.
2.3 CONTROL PANEL

text_image
1 2 3 4 5 6 7 220°CFunctions and function ranking can be changed depending on the model.
- Function selector knob
- Time
- Temperature
- LED display
- Remote control
- Lamp
- Dial control
MAIN FUNCTIONS
The display has 4 main functions:
| Symbol Function Description | ||
 | Time | Press once for cooking duration, twice for the minute minder (available in standby mode), three times for the time of day, and four times for delay start. In standby mode, only the kitchen timer is accessible. |
 | Temperature | Press once to check the cavity temperature, press and hold for 3 seconds to activate the fast-pre-heating option (only available during the oven's preheat phase). When the preheat is active, the released icon will be shown on the display. |
 | Remote Control on/off | Press the button to activate remote control, after pairing the oven with the hOn app (through the application). |
 | Light Press to turn on/off the oven cavity light. | |
DISPLAY FUNCTIONS (visible only when active)
| Symbol Function Description | ||
 | Dry Mode | The icon appears when the amount of water added through the Steam Funnel isn’t enough to carry out the steam cooking program. The cooking program will proceed in Dry Mode. |
2.4 CONNECTIVITY
Wireless parameters
| Technology Wi-Fi Bluetooth | ||
| Standard IEEE 802.11 | b/g/n Bluetooth v4.2, BR/EDR, BLE | |
| Frequency Band(s) [MHz] | 2401 ÷2483 2402÷2480 | |
| Maximum Power [mW] | 100 10 | |
Product information for networked equipment
Power consumption of the product in networked standby if all wired network ports are connected and all wireless network ports are activated: 2,0 W.
How to activate wireless network port:
WIFI module switches on as soon as the function knob is set to a position different to zero.
How to deactivate wireless network port:
WIFI module is always off when the function knob is set to zero position. If the knob is set to different position, go to WIFI menu and select off to deactivate the WIFI.
Hereby, Candy Hoover Group Srl declares that the radio equipment is in compliance with Directive 2014/53/EU and with the relevant statutory requirements for the UK market. The full text of the declaration of conformity is available at the following internet address: www.candy-group.com
HOW TO INTERACT WITH THE APP
Your appliance may be connected to your home wireless network and operated remotely using the app. Connect your appliance to ensure it stays up to date with the latest software and features.

NOTE
- Once the oven is turned on, the WIFI icons blinks for 30 minutes. During this period it's possible to enroll the product.
- Ensure your home Wi-Fi network is turned on.
- You will be given step by step guidance on both your appliance and mobile device.
- It may take up to 10 minutes to connect your oven.
- For further guidance and troubleshooting, please refer to the app.
Download on your smartphone.


text_image
Available on the App Store GET IT ON Google PlayNEW USER REGISTRATION
- Click on "Register"
- You can register through social accounts or sign up with your personal email

text_image
Welcome! Sign in to enter in your home page ENTER REGISTER Are you new to hOn? Click below to learn about our products TRY DEMO hOn Do you already have a thousand passwords? Register with your social accounts and log in in the easiest and fastest way. SIGN UP WITH GOOGLE SIGN UP WITH APPLE SIGN UP WITH FACEBOOK No information relating to you will be stored and we will not post anything from you OF SIGN UP WITH EMAIL Already registered? LOGINQUICK PAIR ENROLLMENT
Step 1
- Select "Add appliance".

text_image
Hello USERNAME YOUR APPLIANCES ADD Add appliance NOs Virtual Wine Bank second row 2 bottles there is a second row YOUR WIDGETS Seven/your door sit out. Scant to Care NEW YOUR NEWS What functions do smart appliances have! How to live sustain: home and reduce wStep 2
- Allow your location permission.

Allow your location permission
To enhance your experience, please allow location permission to hOn app in the next step.


CONTINUE
Step 3
- Select oven from the appliance category.

Select your appliance category

Search your appliance

Washing machine

Washer dryer

Tumble dryer

Dishwasher

Air conditionair

Air purifier

Air scanner
Step 4
- Turn on your appliance; if it is already on, turn it off and on again.

Appliance connection

Turn OFF and then ON your appliance
In case you can't switch OFF your appliance, unplug (for at least 10 seconds) and then plug its power supply.

natural_image
Circular icon with a blue 'Power' button surrounded by abstract geometric shapes (no text or symbols)OK, I DID IT
Step 5
• After turning on, the hOn app will start searching for your home appliance.
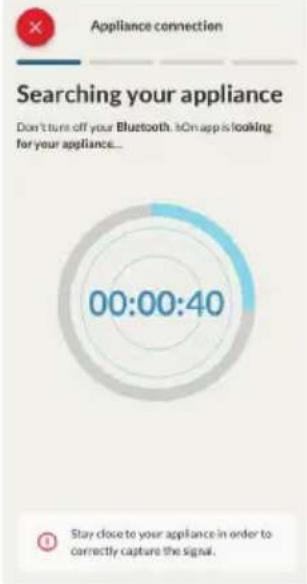
text_image
Appliance connection Searching your appliance Don't turn off your Bluetooth. iOn app is looking for your appliance... 00:00:40 Stay close to your appliance in order to correctly capture the signal.Step 6.1-6.2
- Select your home appliance, tap on "connect" and wait a few seconds.
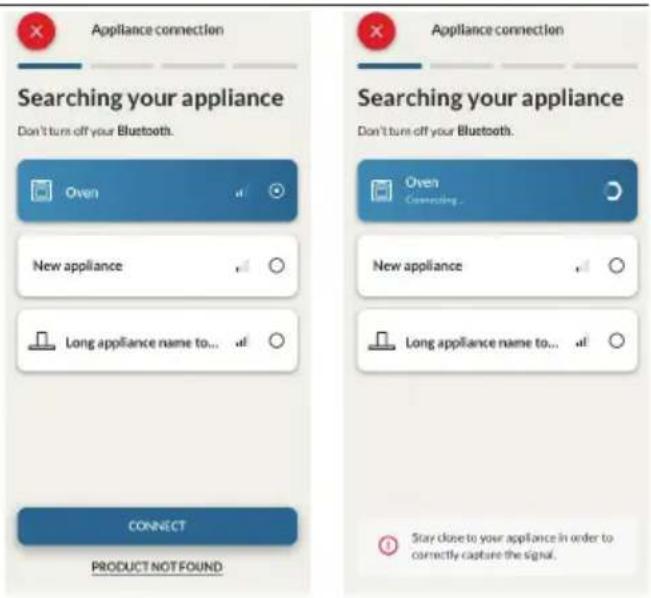
text_image
Appliance connection Searching your appliance Don't turn off your Bluetooth. Oven New appliance Long appliance name to... CONNECT PRODUCT NOT FOUND Appliance connection Searching your appliance Don't turn off your Bluetooth. Oven Connecting New appliance Long appliance name to... Stay close to your appliance in order to correctly capture the signal.Step 7
- Your Oven will be found and you can control it through hOn.
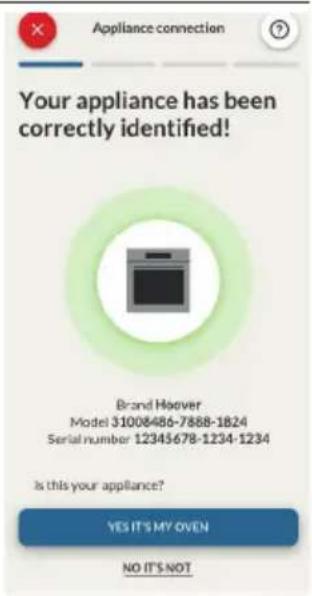
text_image
Appliance connection Your appliance has been correctly identified! Brand Hoover Model 31008486-7888-1824 Serial number 12345678-1234-1234 Is this your appliance? YES IT'S MY OVEN NO IT'S NOT
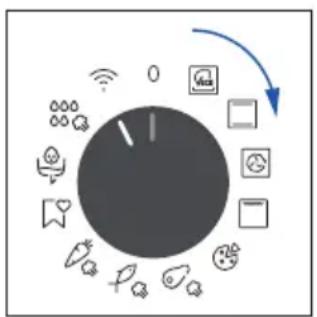
HOW TO CHANGE WIFI SETTINGS
Once the appliance is enrolled, the user can change the WIFI settings between:
-
WIFI ON: It is only possible to monitor the oven status by App.
• WIFI OFF: The oven is not connected but still enrolled with network credentials saved.
• WIFI RESET: The connection is reset and a new enrollment is possible. -
Turn the function knob on WIFI menu.
- On display appears "On".
- Rotate the dial control until "Off" or the reset setting "rSt" will be showed.
flowchart
graph TD
    A["Central Unit"] --> B["Device 1"]
    A --> C["Server 1"]
    A --> D["Desktop 1"]
    A --> E["Mobile 2"]
    A --> F["Cloud Services 3"]
    A --> G["Data Storage 4"]
    A --> H["Information System 5"]
text_image
ON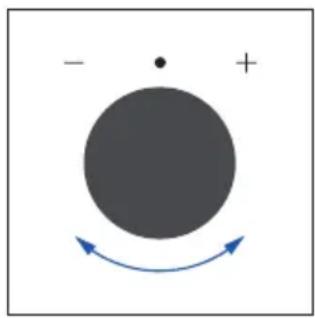
natural_image
Simple diagram with a large circle, a dot, and a curved arrow indicating rotation or direction (no text or symbols)
text_image
OFF 5K
REMOTE CONTROL
The Remote Control offers numerous advantages for users, enhancing convenience, efficiency, and the overall cooking experience, by giving the capability to control the product directly from both the appliance and hOn App
This function allows, through your device, to enjoy various features, such as: instant or scheduled start of recipes or cooking programs already available in the app; real-time monitoring of the progress of your recipes; adjustment of the cooking parameters in use; monitoring of the cooking process using the probe; managing saved recipes using the "Jolly function" on the product (see related section). Furthermore, it is possible to receive notifications once programs or recipes are completed. The Remote Control can be activated exclusively when the product is enrolled.
NOTE: It is available for all cooking functions on the product, except for Gratin and Supergrill programs.
How to activate Remote Control:
- Turn the function knob on WIFI menu.
- Press
- On display appears "hOn". Both WIFI and Remote Control icons will be shown.
- Access to the App, select a program and let the cooking starts. During the process is possible to control and change the program parameters from both product and App.
flowchart
graph TD
    A["Central Dial"] --> B["Mobile App"]
    A --> C["Data Transfer Icon"]
    A --> D["User Interface Icon"]
    A --> E["Information Icon"]
    A --> F["Smart Phone Icon"]
    A --> G["Global Display Icon"]
    A --> H["Remote Control Icon"]
    A --> I["External Data Link Icon"]

text_image
ON PRESS REMOTE CONTROL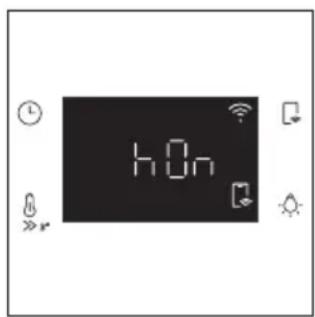
text_image
hOnIt's also possible to activate Remote Control during cooking process by pressing related button
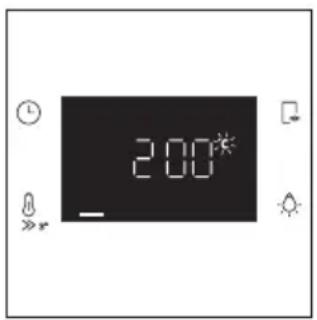
text_image
2:00*
text_image
PRESS REMOTE CONTROL 2:00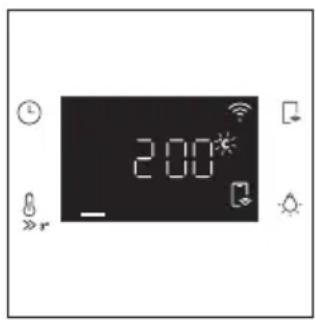
text_image
2:00*How to stop Remote Control:
While the cooking program is in progress, it can be stopped directly from the product itself by rotating the function knob to a different position. These actions interrupt the cooking process.
Another way is by pressing the corresponding button of Remote Control that came with your appliance. These actions interrupt the cooking process.

flowchart
graph TD
    A["Central Control Unit"] --> B["Module 1"]
    A --> C["Module 2"]
    A --> D["Module 3"]
    A --> E["Module 4"]
    A --> F["Module 5"]
    A --> G["Module 6"]
    A --> H["Module 7"]
    A --> I["Module 8"]
    A --> J["Module 9"]
    A --> K["Module 10"]
    A --> L["Module 11"]
    A --> M["Module 12"]
    A --> N["Module 13"]
    A --> O["Module 14"]
    A --> P["Module 15"]
    A --> Q["Module 16"]
    A --> R["Module 17"]
    A --> S["Module 18"]
    A --> T["Module 19"]
    A --> U["Module 20"]

text_image
2:00 c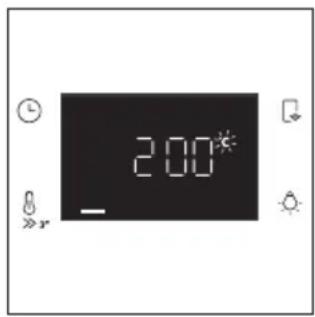
text_image
2:00 -You can also stop the cooking program remotely using the app by clicking the 'STOP' Button on display device. The oven will automatically stop the cooking.
NOTE: If the user stops the cooking in progress from the oven, simultaneously the stopped cooking will be seen in the App.

text_image
Cooking 1H:10M LEFT ADD:1 MIN STOP Current programs PROGRAMS Conventional 206°C Ttl Protect (214) Efficiency Protein (398) EDIT DETAILS →3. BEFORE STARTING
3.1. INFORMATION TO START
When you first turn on the oven, you might notice some smoke. Don't worry, just wait for the smoke to clear before using the oven.
How door works
During the pyrolytic cleaning process, the oven door remains locked at all times. If it's not locked, the oven will display error code 24 and pause the cleaning function.
How illumination works
The oven cavity is illuminated by one or more light bulbs, typically activated each time a cooking function begins.
For ovens equipped with a door switch (see below), the light automatically turns on when the door is opened.
For ovens equipped with lamp button, it can also be used to activate the lighting.
If the oven door remains open for more than 10 minutes, the lights will automatically turn off.
During pyrolytic cleaning process light remains off. *
How cooling fan works
The cooling fan is responsible for dissipating the heat, keeping the oven and its surroundings from getting too hot, as well as protecting kitchen appliances from the effects of high temperatures. For this reason, the cooling fan remains audible for a period of time even after the oven is turned off. It operates during and after cooking cycle in relation to the internal temperature of the oven.
When the cooling fan is operational, it usually generates a gentle humming or whirring noise. You may also notice a warm airflow emanating from the gap between the oven door and the control panel.
During pyrolytic cleaning and when door is locked, cooling fan is switched on. *
During ECO function the light will remain off.
(*only for pyro ovens)
How status bar works
The status bar, based on the set programs, simplifies monitoring of temperature and time. Specifically, for functions involving preheating, it displays the temperature increase during this phase. In cooking programs and the pyrolytic cleaning function, it shows the countdown of cooking time and the cleaning cycle, respectively.
3.2. FIRST USAGE
When the appliance is switched On for the first time, the initial step is to set time of day, choose between 13 ampere or 16 ampere, select brightness and sound level.
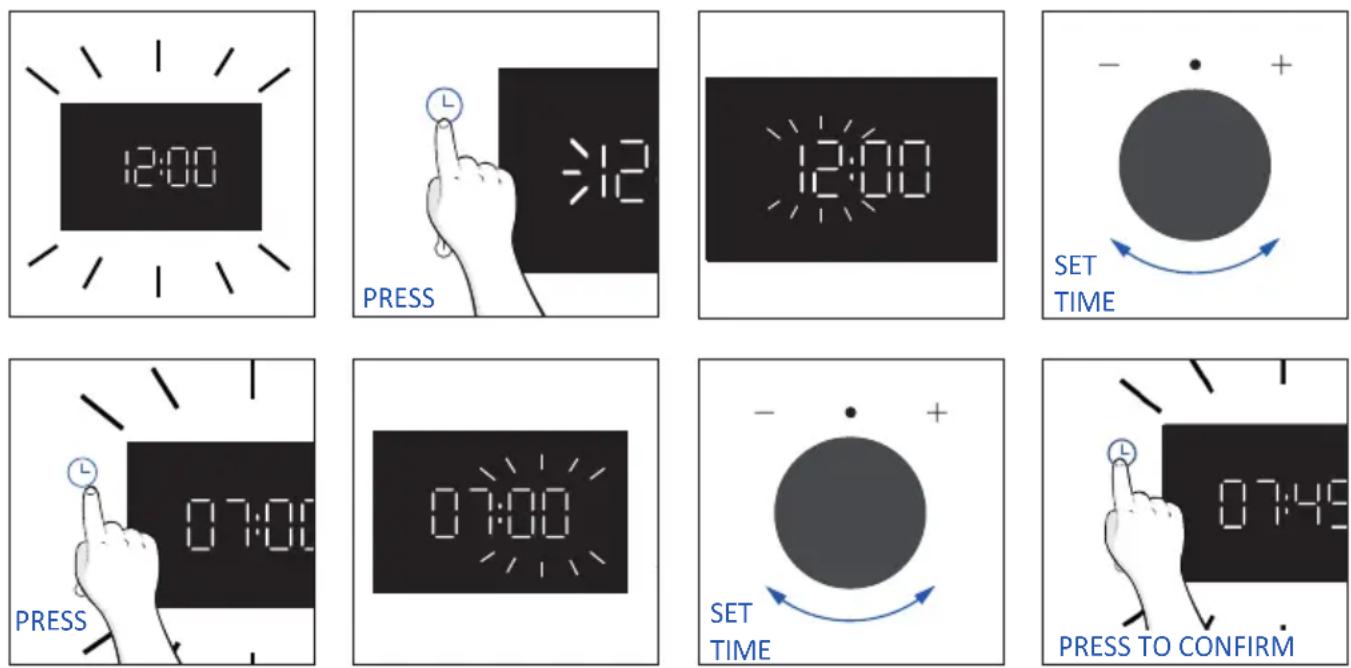
- SET THE TIME: The display will show the blinking preset time '12:00'. To modify it, press ⏚ and use the right knob to adjust the current hour. Press again ⏚ and follow the same procedure to set the minutes. To confirm, press ⏚ once more.
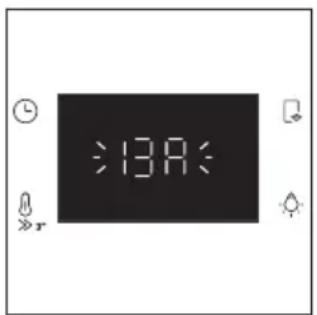
- AMPERAGE: By default, the oven is set to work with higher power suitable for households with more than 3 kW (16 A). If your home has lower power, you can change this setting to 13 A. This setting affects how quickly the oven heats up. Choosing the higher option (16A) means it heats up faster (because the power absorption is increased). On the display, you'll see two choices: 13A and 16A. Just turn the right knob to pick the one you want, then press ⏻ to confirm.
text_image
:13A:
text_image
- + SET AMPERAGE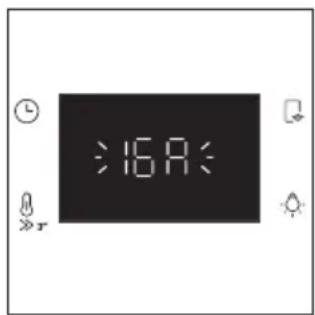
text_image
:16A:
text_image
L 07: PRESS TO CONFIRMNOTE: The option to set the amperage is only available during the initial installation. To modify the set amperage, please refer to the post-installation instructions.
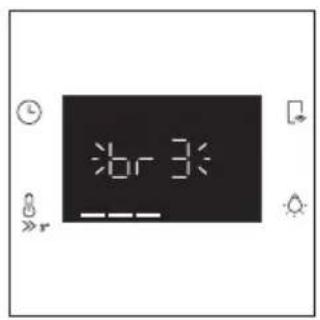
- BRIGHTNESS: The display shows the symbol "br". The numbers represent the level of brightness intensity, editable turning the right knob. To confirm press Ⓛ
text_image
6r3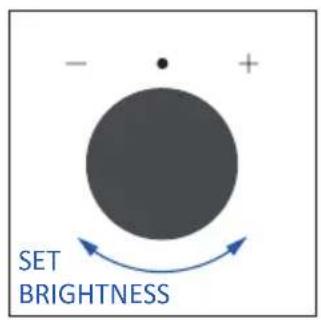
text_image
- + SET BRIGHTNESS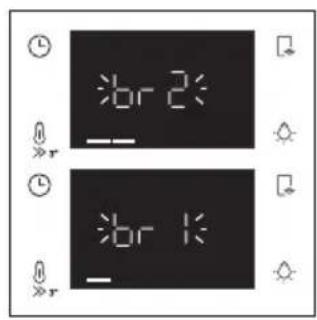
text_image
7br 2 7br 1
text_image
0 PRESS TO CONFIRM- SOUND: The display shows the symbol "Sn". The numbers represent the level of sound intensity, editable turning the right knob. To confirm press ⏻
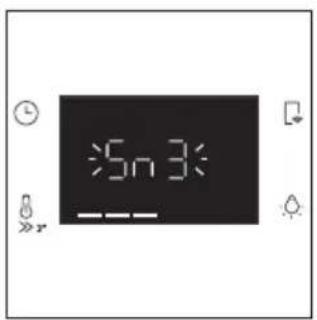
text_image
5n3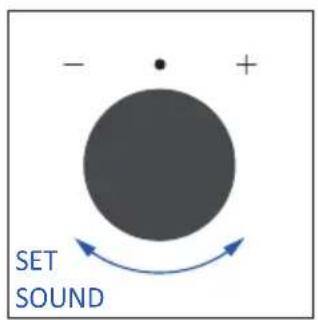
text_image
- + SET SOUND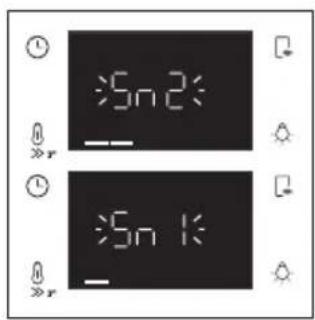
text_image
5n 2 5n 1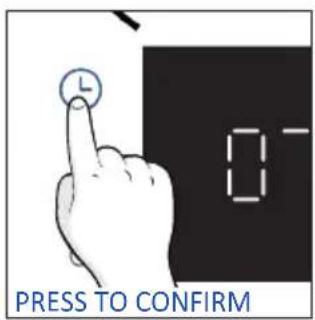
text_image
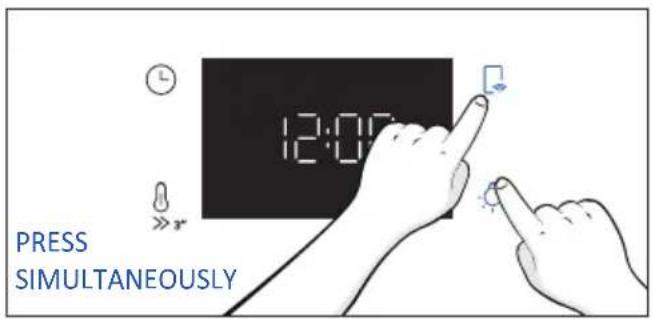
PRESS TO CONFIRM• POST INSTALLATION INSTRUCTIONS
When oven is in stand-by mode, it is possible to go back to initial settings by pressing simultaneously Temperature and Lamp buttons for 5 sec.

text_image
12:00 PRESS 5 SECONDS SIMULTANEOUSLY3.2. PRELIMINARY CLEANING
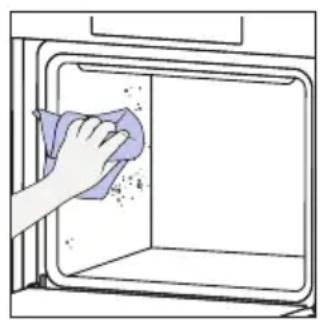
Clean the oven before using for the first time. Wipe over external surfaces with a damp soft cloth. Wash all accessories and wipe inside the oven with a solution of hot water and washing up liquid. Set the empty oven to the maximum temperature and leave on for about 1 hour, this will remove any lingering smells of newness.
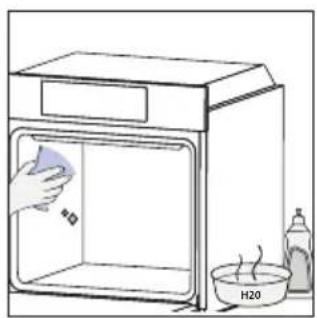
natural_image
Simple line drawing of a kitchen sink with a hand cleaning the interior, water bath, and a bottle (no text or symbols)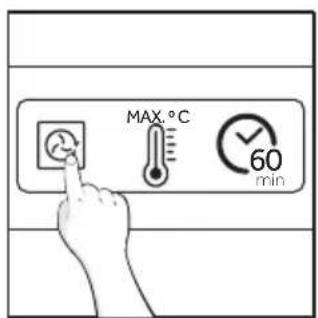
text_image
MAX.°C 60 min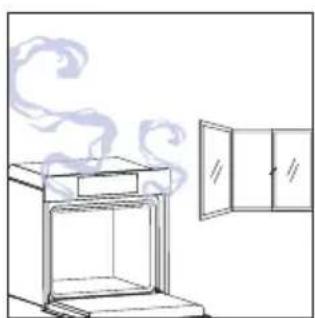
natural_image
Line drawing of a steam rising from an oven next to a cabinet (no text or symbols)4. OPERATION OF PRODUCT
4.1. HOW THE PRODUCT WORKS
SWITCHING ON/OFF THE OVEN
To turn ON the oven rotate the function knob (clockwise/counterclockwise) and select a cooking program. To turn it OFF, set the function knob to the '0' position.
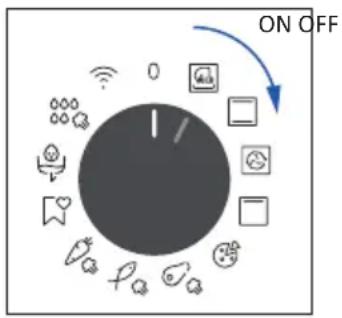
text_image
ON OFF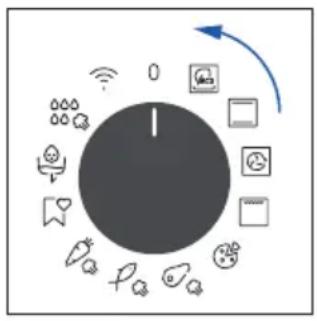
flowchart
graph TD
    A["Central Node"] --> B["Smart Lock Icon"]
    A --> C["Camera Icon"]
    A --> D["Smart Bag Icon"]
    A --> E["Smart Phone Icon"]
    A --> F["Smart Phone Mask Icon"]
    A --> G["Smart Phone Icon"]
    A --> H["Smart Phone Mask Icon"]
    A --> I["Smart Phone Icon"]
    A --> J["Smart Phone Mask Icon"]
    A --> K["Smart Phone Icon"]
SET COOKING PROGRAM
Turn the function knob and select the desired program. On display will appear a default temperature that can be edit in every moment turning the right knob (clockwise to increase and counterclockwise to decrease the temperature).
TIME MENU
Access the Time menu by pressing Ⓛ. To navigate into tap ☑ as many times as is needed to enter in the following settings:

text_image
PRESS TIME 20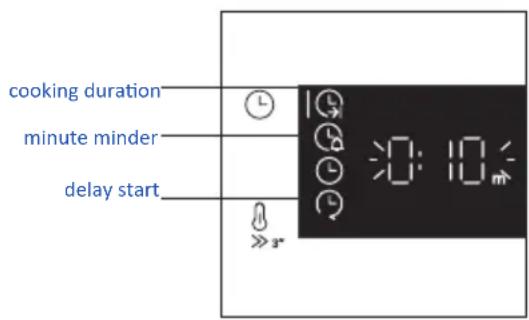
text_image
cooking duration minute minder delay startNOTE: several parameters cannot be set at the same time, therefore only the last set remains in the memory while the previous one is deleted.
COOKING DURATION
Allows to preset the cooking time required for the recipe chosen.
ACTIVATION: press ⏻ to enter in the Time menu. Tap ⓐ as many times as you need to select "Cooking duration" function. Then use the dial control to regulate the value.

The countdown starts at the end of preheating (if present). During cooking phase is possible to change the duration value by turning the right knob. When duration is elapsed the cooking stops.
MINUTE MINDER
Allows to use the oven as alarm clock.
ACTIVATION: press ⏻ to enter in the Time menu. Tap ⓐ as many times as you need to select "Minute minder" function. Then use the dial control to regulate the value.

text_image
PRESS TIME 20
text_image
0:00m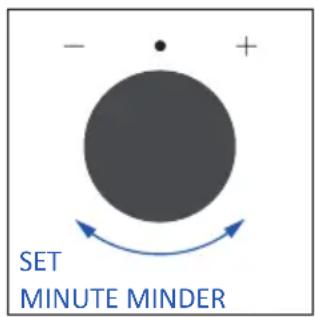
text_image
- + SET MINUTE MINDER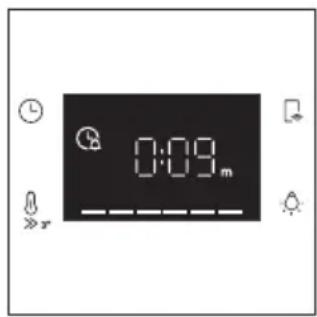
text_image
0:09.mWhen the function is set, the primary information showed on display is always the time. To edit the temperature, press ⏻ to enter dedicated edit mode. When duration is elapsed, the cooking continues until the left knob is turned in 0 position.
This function can be set also when the oven is in stand by mode by pressing ⏻. When activated, the minute minder operates independently of the oven's cooking functions.
DELAY START
Allows to choose the cooking start time.
ACTIVATION: press Ⓛ to enter in the Time menu. Tap as many times as you need to select "Delay start" function. Then use the dial control to set the start time of cooking.

text_image
PRESS TIME 20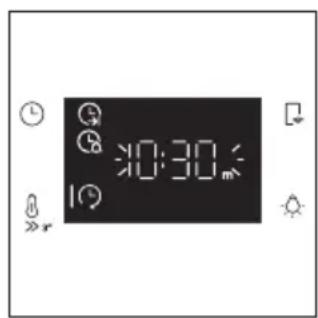
text_image
0:30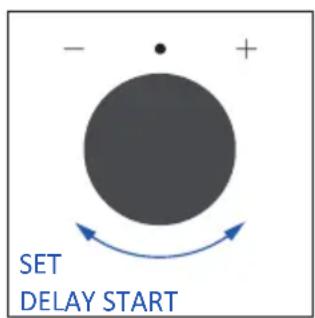
text_image
- + SET DELAY START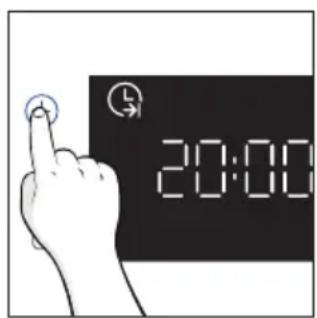
text_image
20:00NOTE: Delay start is activable only after setting Cooking Duration and it is not available with grill's functions.
ADDITIONAL FUNCTIONS
CHILD LOCK
This function allows you to lock the screen to prevent any unwanted use by minors. To activate it, simultaneously press the Lamp and Remote Control buttons for 3 seconds.
An icon with a padlock will appear on the user interface. In this condition, the oven user interface is locked, and no changes in settings can be made.
To deactivate the child lock, press the Lamp and Remote Control buttons again for 3 seconds (the icon with the key will disappear)
text_image
12:00 PRESS SIMULTANEOUSLY4.2. COOKING FUNCTIONS
FAST PREHEATING OPTION
In order to accelerate preheating phase, the fast-preheating option can be selected by pressing the temperature icon for 3s after having selected cooking program and temperature. This option will activate a combination of fan and heating elements regardless of the chosen cooking function. To save energy, when fast preheating is activated the lamp will be turned OFF until the oven reaches the desired temperature.
4.2.1. STANDARD FUNCTIONS
NOTE: for functions that require preheating, ensure all accessories are removed during this phase. Follow instructions in the table below for what regards preheating.
"YES/FAST PREHEAT" means that preheating is required and fast preheat option is available; "NO" means that preheat is not available and foods must be inserted with cold oven.
| Symbol Function | T°C default T°C range | Suggested shelf position | Preheat | Suggestions | |
 | *ECO | 190 °C 150-220 °C | L3/L4 NO | IDEAL FOR: cooking meat, fish or vegetablesThis function allows to save energy during cooking keeping the food moist and tender. Cavity lamp is switched off | |
 | *Conventional | 200°C 30-250°C | L2/L3 | YES/FAST PREHEAT | IDEAL FOR: cakes, breads, biscuits, quiches on one level using both upper and lower heating.Can be used with Preci Probe. |
 | Multi-Level | 160°C 50-250°C | L4 (one tray)L2+L5 (two trays)L2+L4+L6 (three trays) | YES/FAST PREHEAT | IDEAL FOR: cakes, biscuits and pizzas on one or more levels. Ideal to cook different foods. Can be used with Preci Probe. |
 | **Supergrill | 05 01-05 | L6 NO | IDEAL FOR: big quantities of sausages, steaks and toast bread.The entire area below the grill element becomes hot. Use with the door closed. Turn food two thirds of the way through cooking (If necessary). | |
4.2.2. SPECIAL FUNCTIONS
| Symbol Function | T°C default T°C range | Suggested shelf position | Preheat | Suggestions | |
 | Pizza | 300°C 200-300°C | L2/L3 NO | IDEAL FOR: all kind of pizzas without preheating the oven. Use lower temperatures for frozen items and 300°C for home-made recipes | |
 | Jolly --- | Add to the preset list of functions your favorite one that's not already present in your oven. You canconfigure it through the hOn app. | |||
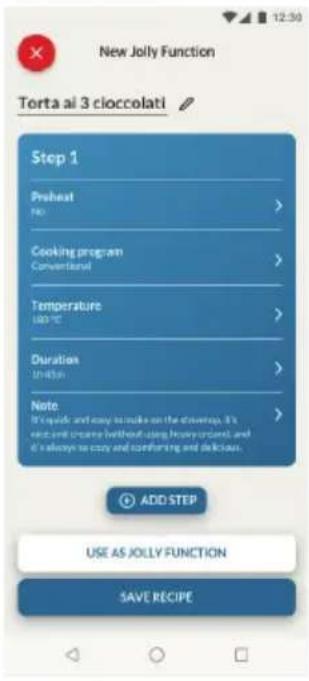
Jolly function
Thanks to the Jolly function, this product offers a fully customizable experience, allowing you to store your personalized recipes directly on the oven. You can execute these recipes as often as you like, even without the need to log into the app.
text_image
New Jolly Function Torta ai 3 cioccolati Step 1 Preheat PKI > Cooking program Conventional > Temperature 100 °C > Duration 1 min Note It's quicks and easy to make on the stewart. It's crying and creating without using heavy ordant, and it's always so easy and confusing and delicious. ADD STEP USE AS JOLLY FUNCTION SAVE RECIPEHow to Set the Jolly Function:
To set the Jolly function on your oven, open the app's recipe section, select the recipe you want to use, and click 'Use As Jolly Function'.
From this point onward, you can launch it from the product even without interaction with the app. Simply turn the function knob to the Jolly function to start the cooking process.
The display will show the preset temperature.
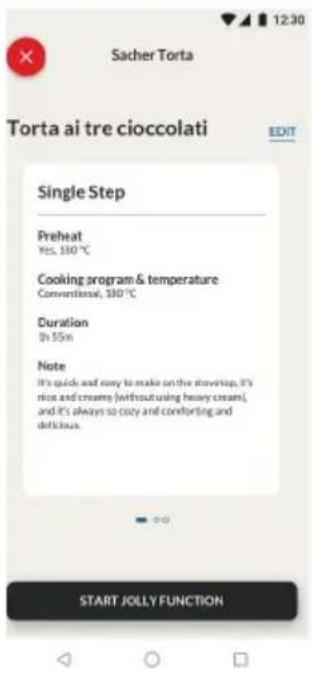
How to edit the Jolly function:
To edit a Jolly function, go to the app's recipe section and select the card of the recipe designated as a Jolly function. Tap the "edit" button to customize the recipe and modify the previously set settings.
A pop-up message will inform you that to save the newly modified Jolly function, you must remove the previous one. If you confirm, the previous Jolly function will be deleted, and the new parameters will be saved on the product and will be visible in the app.
text_image
Sacher Torta Torta ai tre cioccolati EDIT Single Step Preheat Yes, 100 °C Cooking program & temperature Conventional, 100 °C Duration On 55 min Note It's quick and easy to make on the stoveup, it's nice and creamy (without using heavy cream), and it's always so noisy and comforting and delicious. START JOLLY FUNCTION
text_image
OVEN U-CREATE MY RECIPES JOLLY FUNCTION CLEAR 1.Jolly Function DELETE Are you sure you want to delete the Jolly Function section? By doing this action all data will be lost. CANCEL YES, COAFIRMHow to Delete the Jolly Function:
To remove the Jolly function from the oven's user interface, access the app's recipe section.
By tapping on the card of the recipe designated as a Jolly function, it's possible to delete it by clicking the red button 'delete button'.
A pop-up will confirm the operation, asking for your confirmation. If you proceed, the Jolly function saved on the oven will be removed, and it will no longer be available in the app.
4.2.3. MULTI STEP FEATURE
The multi step feature allows to maintain previously set cooking parameters (temperature and time) while changing function during cooking.
Multi-step recipes can be created on hOn App through the U-Create function and saved on the oven.
The user can save the Multi-step recipe as a Jolly Function to store it on the oven, or save it on hOn to start it remotely from the App.
Step 1. From the U-Create section of the App, press "Create Recipe".

text_image
OVEN RECIPIES U-CREATE MY RECIPES JOLLY FUNCTION There are no recipes! Start creating your first recipe! CREATE RECIPEStep 2. Edit the recipe's name and choose the parameters for the first step of the recipe.
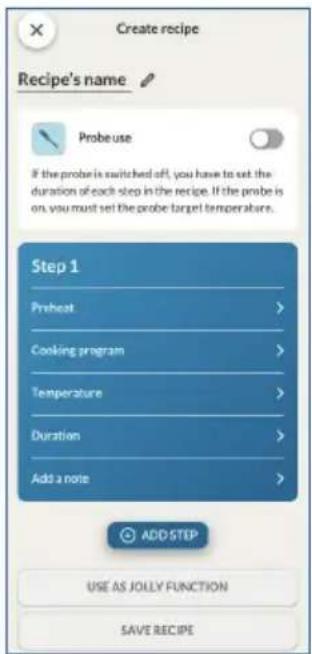
text_image
Create recipe Recipe's name Probe use If the probe is switched off, you have to set the duration of each step in the recipe. If the probe is on, you must set the probe target temperatures. Step 1 Preheat > Cooking program > Temperature > Duration > Add a note > ADD STEP USE AS JOLLY FUNCTION SAVE RECIPE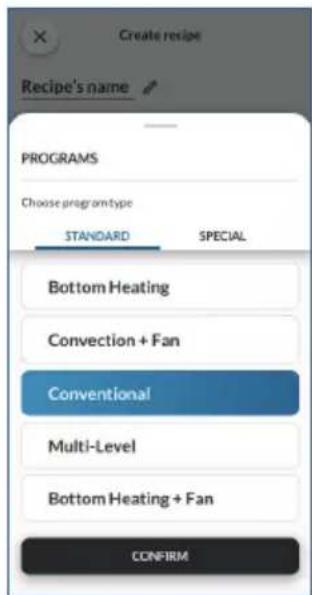
text_image
Create recipe Recipe's name PROGRAMS Choose programtype STANDARD SPECIAL Bottom Heating Convection + Fan Conventional Multi-Level Bottom Heating + Fan CONFIRM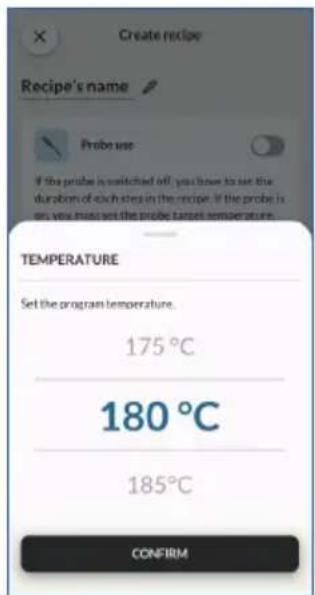
text_image
Create recipe Recipe's name Probe use If the probe is switched off, you have to set the duration of each step in the recipe. If the probe is on, you must set the probe target temperature. TEMPERATURE Set the program temperature. 175°C 180°C 185°C CONFIRM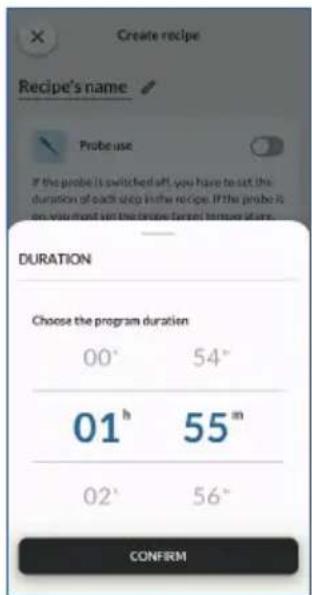
text_image
Create recipe Recipe's name Probe use If the probe is switched aft, you have to set the duration of each step in the recipe. If the probe is on you would set the probe's first time of up. DURATION Choose the program duration 00° 54° 01 h 55 m 02° 56° CONFIRMStep 3. After customizing the first step, press "Add step" to add another cooking function to the recipe and customize its parameters.
text_image
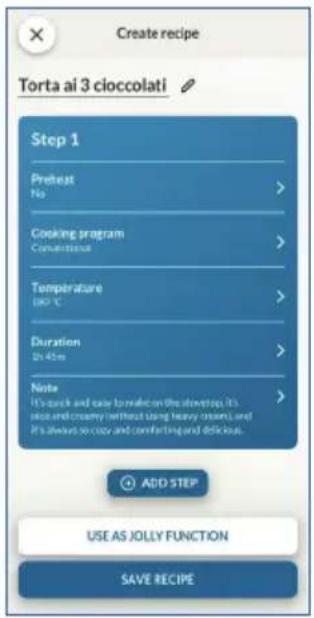
Create recipe Torta ai 3 cioccolati Step 1 Pretest No > Cooking program Conventional > Temperature (90°C) Duration 21:45m > Note It's quick and easy to make on the shootstop. It's wise and creamy (without using heavy berries) and It's always so busy and comforting and delicious. ADD STEP USE AS JOLLY FUNCTION SAVE RECIPEStep 4. Save the recipe on the app to start it from hOn remotely, or save it as a "Jolly Function" to find it directly on the oven.
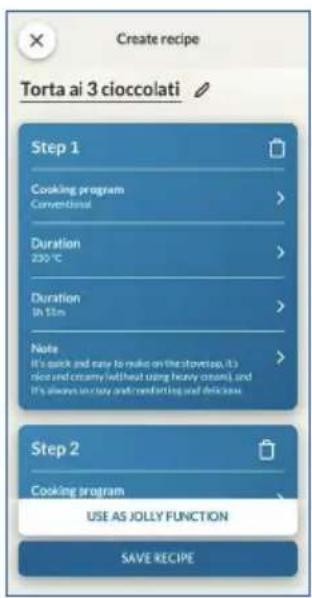
text_image
Create recipe Torta ai 3 cioccolati Step 1 Cooking program Conventional > Duration 200 °C > Duration In 50m > Note It's quick and easy to make on the stoveup, it's nice and creamy (without using heavy cream), and it's always sunny and comfortable and delicious. Step 2 Cooking program USE AS JOLLY FUNCTION SAVE RECIPE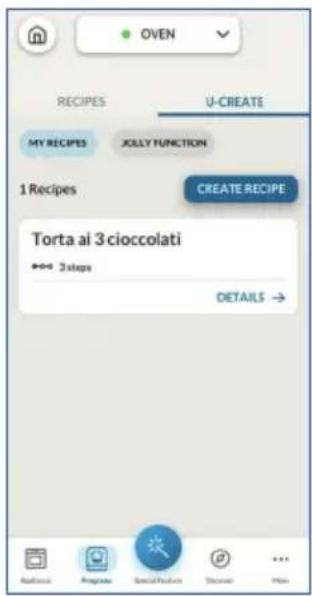
text_image
OVEN RECIPIES U-CREATE MY RECIPES XOLLY FUNCTION 1 Recipes CREATE RECIPE Torta al 3 cioccolati +→ 3 steps DETAILS → Applications Regulate Social Features Discover Min5. COOKING GUIDELINES
5.1. GENERAL COOKING TABLE
| Category Recipe | N°of levels | Cooking program | T°C | Preheat | Cooking accessory | Shelf position | Cooking time after preheating* (min) | |
| Sweet bakery | Small cakes /Muffins | 1 | Conventional Multilevel | 175°C 160°C | Y | Baking tray Baking tray | L3 L4 | 20-30 30-40 |
| 2 Multilevel 150°C | Baking + Deeper trays | L2+L5 30-40 | ||||||
| 3 Multilevel 140°C Baking trays L2+L4+L6 40-50 | ||||||||
| Sponge cakes (26 cm ∅) | 1 | Conventional 170°C | Y | Metal grid + Cake tin | L2 30-40 | |||
| Multilevel 150°C | Metal grid + Cake tin | L4 40-50 | ||||||
| 2 Multilevel 150°C | Metal grids + Cake tin | L1+L4 50-60 | ||||||
| Biscuits/Shortbreads | 1 | Conventional Multilevel | 150°C 150°C | Y | Baking tray Baking tray | L3 L4 | 25-30 30-40 | |
| 2 Multilevel 140°C | Baking + Deeper trays | L2+L5 30-40 | ||||||
| 3 Multilevel 140°C Baking trays L2+L4+L6 35-40 | ||||||||
| Choquettes | 1 Multilevel 190°C | Y L5 25-35 | Baking tray L3 | 25-35 | ||||
| 2 Multilevel 180°C Baking tray L2+ | ||||||||
| Yorkshire pudding | 1 Conventional 200°C | Y Baking tray L3 20-30 | ||||||
| Meringues | 1 Multilevel | 90°C | Y | Baking tray | 90-160 | |||
| Macaron | 1 Conventional | 150°C | Y | Baking tray | L3 | 15-20 | ||
| Apple pie | 1 Conventional 185°C | Y | Metal grid + Cake tin | L2 60-70 | ||||
| 1 Multilevel 170°C | Metal grid + Cake tin | L4 65-75 | ||||||
| Tarte tatin 1 Conventional 170°C Y | Metal grid + Cake tin | L2 40-60 | ||||||
| Chocolate souffle | 1 Conventional 200°C | Y | Baking tray + molds | L3 10-15 | ||||
| Cheesecake 1 Conventional 150°C Y | Metal grid + Cake tin | L2 50-65 | ||||||
| Frozen croissants | 1 Conventional 180°C | L2YL5 25-35 | Baking tray L3 | 20-25 | ||||
| 2 Multilevel 180°C Baking trays | ||||||||
| 3 Multilevel 160°C Baking trays L2+L4+L6 30-40 | ||||||||
| Strudel, frozen | 1 Conventional 210°C | Y Baking tray L3 30-45 | ||||||
| Breads and Flatbread | Toast bread | 1 Supergrill | 5°C | N | Metal grid | L6 | 4-6 | |
| Focaccia | 1 Conventional | 200°C | Y | Baking tray | L2 or L3 | 25-35 | ||
| Bread, whole | 1 Conventional | 200°C | Y | Baking tray | L3 | 35-50 | ||
| Category Recipe | N° of levels | Cooking program | T°C Preheat | Cooking accessory | Shelf position | Cooking time after preheating* (min) | ||
| Savory pies and casseroles | Salty cakes / Quiches (26 cm ∅) | 1 Conventional 200°C Y | Metal grid + Quiche tin | L1 or L2 30-50 | ||||
| 2 Multilevel 180°C Y | Metal grid + Quiche tin | L1+L4 50-70 | ||||||
| Cheese souffle | 1 Conventional 200°C Y | Baking tray + molds | L3 20-35 | |||||
| Lasagna, fresh | 1 Conventional 200°C Y | Metal grid + ovenproof dish | L3 40-60 | |||||
| Lasagna, frozen | 1 Conventional 180°C Y | Metal grid + ovenproof dish | L3 50-60 | |||||
| Cannelloni, frozen | 1 Conventional 180°C Y | Metal grid + ovenproof dish | L3 45-55 | |||||
| Baked pasta 1 | Multilevel 200°C Y | Metal grid + ovenproof dish | L4 20-30 | |||||
| Pizza | Pizza, fresh (Tray) | 1 Conventional 250°C Y Baking tray L2 or L3 15-20 | ||||||
| Pizza, fresh (Tray) | 1 Pizza 250°C N Baking tray L2 or L3 18-25 | |||||||
| 2 Multilevel 180°C Y | Baking + Deeper trays | L2+L5 25-35 | ||||||
| Pizza, fresh (Round) | 1 Conventional | 250°C | Y | Baking tray | L2 or L3 | 8-10 | ||
| Pizza, fresh (Round) | 1 Pizza 300°C N Baking tray L2 or L3 15-20 | |||||||
| 2 Multilevel 180°C Y | Baking + Deeper trays | L2+L5 30-40 | ||||||
| Pizza, frozen (thin crust) | 1 Conventional 220°C | Metal grid Metal grid | Metal grid | L3 10-15 | ||||
| 2 Multilevel 200°C | L2+L5 15-25 | |||||||
| 3 Multilevel 180°C | L2+L4+L6 20-30 | |||||||
| Pizza, frozen (thin crust) | 1 Pizza | 200°C | N | Metal grid | L2 | 10-15 | ||
| Meat & Poultry | Roasted whole chicken (1-1.2kg) | 1 Multilevel 220°C Y | Metal grid/L4 Place Backing tray at L1 with 150ml of water | L4 40-60 | ||||
| Chicken thighs | 1 Multilevel | 220°C | N | Airfry tray** | L4 | 30-50 | ||
| Roasted duck | 1 Multilevel 200°C Y | Metal grid + Ovenproof dish | L3 50-60 | |||||
| Category Recipe | N°of levels | Cooking program | T°C | Preheat | Cooking accessory | Shelf position | Cooking time after preheating* (min) | |
| Meat & Poultry | Rooster 1 Multilevel 220°C Y | Metal grid Place baking tray at L1 | L4 20-40 | |||||
| Roasted Turkey | 1 Multilevel 200°C Y | Metal grid + Ovenproof dish | L3 50-60 | |||||
| Pork ribs (1000-1200g) | 1 Conventional 200°C Y | Metal grid + Ovenproof dish | L3 80-100 | |||||
| Sausages 1 Supergrill 4 Y Metal grid L5 40-50 | ||||||||
| Roast beef (500g) | 1 Multilevel 220°C Y Baking tray | L3 20-40 | ||||||
| Meatloaf (1000-1500g) | 1 Conventional 180°C Y Baking tray | L3 40-50 | ||||||
| Roasted chicken with potatoes | 1 Multilevel 200°C Y | Deeper tray L4 45-60 | ||||||
| Fish and Seafood | Grilled seafood | 1 Supergrill 4 N | Metal grid L5 15-30 | |||||
| Frozen fish sticks | 1 Multilevel | 200°C | N | Air fry tray** | L4 | 20-25 | ||
| Baked fish | 1 ECO | 200°C | N | Metal grid Place baking tray at L1 | L3 40-60 | |||
| Vegetables | Vegetable gratin | 1 ECO | 200°C | N | Metal grid + Ovenproof dish | L3 80-90 | ||
| Frozen french fries (300-500g) | 1 Multilevel | 220°C | N | Air fry tray** | L4 | 18-25 | ||
| Potato gratin | 1 Multilevel 200°C Y | Metal grid + Ovenproof dish | L4 15-25 | |||||
| Roasted potatoes | 1 Conventional 200°C Y Baking tray | L4 30-50 | ||||||
Cooking times may vary according to consumer's recipe and ingredients.
*if preheating required
** Depending on the oven model.
NOTE: For cooking cakes, quiches and other recipes that require a mold or a container on 2 levels, place them staggered: the upper tray on the left side and the lower tray on the right side.
5.2. EVERYDAY COOKING TABLE
Food category menu allows to cook a variety of recipes without preheating the oven, thanks to dedicated cooking programs tailored to each category needs.
| Symbol | Description Preheat | Shelf position | Temperature range (°C) | Time Range (min) | Preci Probe temperature (if available) | Description | |
 | Meat+Steam | NO | L3-L4 | 200-230 | 20-120 | For beef, veal and pork roasts, poultry and cuts of meat. | For beef, veal and pork roasts, poultry and cuts of meat. |
 | Fish+Steam | NO | L3-L4 | 150-180 | 15-60 | For whole fish and fillets. | For whole fish and fillets. |
 | Vegetables +Steam | NO L3-L4 180-220 30-90 | For roasted vegetables and potatoes | For roasted vegetables and potatoes | |||
How to use the Steam Funnel for steam cooking programs
After selecting the steam cooking program, the UI will ask to add water through the dedicated accessory (Steam Funnel), proceed as following.
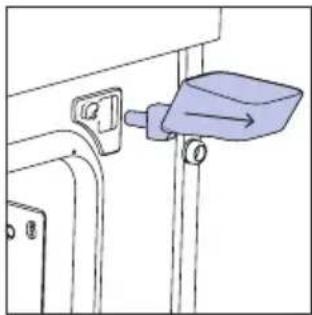
- Insert the Steam Funnel into the proper hole in the top right corner of the cavity
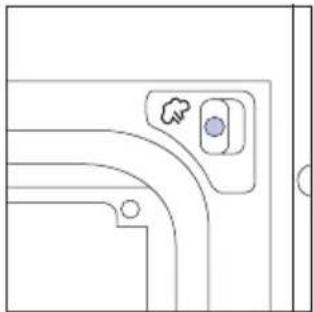
natural_image
Pure technical line drawing of a mechanical component with no text or symbols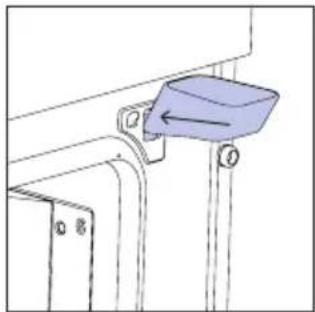
natural_image
Technical diagram of a mechanical bracket with a blue component and an arrow indicating direction (no text or symbols)- Add 250 ml of water to the Steam Funnel

text_image
H2O- Remove the Steam Funnel from the cavity hole and close the oven door.
natural_image
Simple line drawing of a mechanical component with a blue lever and attached bracket (no text or symbols)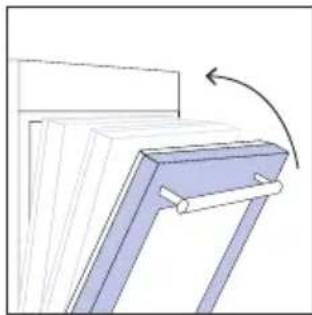
natural_image
Diagram of a mechanical component with a blue bracket and arrow indicating rotation (no text or symbols)The default time will be then shown and the cooking program will start automatically after one second. The time can be edited by turning the right knob; cooking temperature can be changed by pressing the dedicated icon. Both parameters can be set within a limited range as shown in the table above.
If the water amount added isn't enough or if no water is added at all, the cooking program will proceed regardless in "Dry Mode", a sound will be heard and will be shown on display.

natural_image
Simple black rectangle with small icons and symbols, no readable text or labelsNOTE: If too much water is loaded, the excess will come out from the draining nozzle.
NOTE: when cooking with steam, some residual water or condensation may be observable on the cavity bottom at the end of cooking.
NOTE: if, after turning off the oven, there is a need to continue cooking, it's recommended avoiding the use of everyday cooking programs and instead opting for standard functions.
| Recipe Serving size | Cooking program | T°C | Cooking accessory | Shelf position | Cooking time (min) | |
| Beef roast | 500-800g | Meat+Steam | 220°C | Metal grid | L3 | 30-40 |
| Beef fillet 200g | Meat+Steam 200°C | Metal grid L3 20-25 | ||||
| Meatloaf | 1000-1500g | Meat+Steam | 200°C | Metal grid | L3 | 40-50 |
| Beef wellington | 500g Meat+ | Steam 200°C Metal grid L3 50-80 | ||||
| Pot roast | 800-1000g | Meat+Steam | 200°C | Metal grid | L3 | 40-70 |
| Pork ribs | 1000-1200g | Meat+Steam | 200°C | Metal grid | L3 | 80 |
| Lamb rack | 800-1000g | Meat+Steam | 210°C | Metal grid | L3 | 60-80 |
| Lamb leg | 1500-2000g | Meat+Steam | 200°C | Metal grid | L3 | 80 |
| Salmon fillets | 200-600g | Fish+Steam | 170°C | Baking tray | L3 | 20-35 |
| Tuna steaks | 600g (app. 4 pcs) | Fish+Steam | 180°C Meta | grid L3 15-20 | ||
| Swordfish steaks | 700g (app. 4 pcs) | Fish+Steam | 180°C | Baking tray | L3 | 15-20 |
| Cod fillet | 600g (app. 4 pcs) | Fish+Steam | 160°C | Baking tray | L3 | 15-20 |
| Seabream, whole | 1 | Fish+Steam | 170°C | Baking tray | L3 | 35-45 |
| Seabream, fillet | 600g (app. 4 pcs) | Fish+Steam | 160°C | Baking tray | L3 | 15-20 |
| Seabass fillet | 600g (app. 4 pcs) | Fish+Steam | 160°C | Baking tray | L3 | 15-20 |
| Salt baked fish | 1 | Fish+Steam | 180°C | Baking tray | L3 | 30-40 |
| Fish skewers | 8 pieces | Fish+Steam | 160°C | Metal grid | L3 | 20-30 |
| Stuffed squid | 4 pieces | Fish+Steam | 180°C | Baking tray | L3 | 25-40 |
| Fennels 1 tray | Vegetables+-Steam | 200°C Metal | grid L3 30-40 | |||
| Mixed vegetables | 1 tray | Vegetables+-Steam | 190°C Metal | grid L3 40-45 | ||
| Cauliflowers 1 tray | Vegetables+-Steam | 190°C Metal | grid L3 40-50 | |||
| Pumpkins, cubed | 1 tray | Vegetables+-Steam | 200°C Metal | grid L3 30-40 | ||
| Stuffed peppers | 1 tray | Vegetables+-Steam | 180°C Metal | grid L3 70-80 | ||
| Stuffed zucchini | 1 tray | Vegetables+-Steam | 190°C Metal | grid L3 35-45 | ||
| Carrot sticks | 1 tray | Vegetables+-Steam | 180°C Baking | tray L3 35-40 | ||
| Broccoli 1 tray | Vegetables+-Steam | 190°C Baking | tray L3 30-40 | |||
| Ratatouille 1 tray | Vegetables+-Steam | 190°C Metal | grid L3 40-45 | |||
| Vegetable flan | 6 ramekins | Vegetables+-Steam | 180°C | Baking tray + molds | L3 25-35 | |
6. CARE & CLEANING
6.1. GENERAL RECOMMENDATIONS
Regular cleaning can extend the lifecycle of your appliance. Wait for the oven to cool before carrying out manual cleaning.
• After each use of the oven, a minimum of cleaning will help keep the oven perfectly clean.
- Do not line the oven walls with aluminum foil or single-use protection available from stores.
Aluminum foil or any other protection, in direct contact with the hot enamel, risks melting and deteriorating the enamel of the insides.
- In order to prevent excessive dirt of your oven and the resulting strong smokey smells, we recommend not using the oven at very high temperature. It is better to extend the cooking time and lower the temperature a little.
- In addition to the accessories supplied with the oven, we advise you only use dishes and baking molds resistant to very high temperatures.
6.2. CLEANING THE OVEN
6.2.1. INSIDE THE OVEN: cleaning functions
Pyrolytic cleaning (*depending on the oven model)
This process relies on the chemical process bearing the same name, which involves the decomposition of complex substances through the application of heat treatment.
Once initiated, it automatically locks the oven door and swiftly elevates the temperature to a searing 410^ C.
At the end of the cleaning cycle, food residues will leave a white coating on the enamel surfaces. To remove these particles, wipe with a cloth soaked in hot soapy water and use a brush or steel wool. Suitable cleaning agents are hot soapy water or oven cleaner.
How does it work:
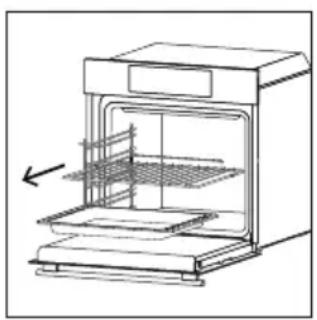
- Remove any accessories from the oven, such as grids, side racks and side racks screw;
- Turn function knob on ❖. Turn the dial control to set the Pyrolytic program;
Allow the function to operate for the preset time. During this process and the following cooling phase, the oven door will remain locked.
- When the appliance is cool, clean the inner surfaces of the oven with a cloth.
▲ WARNING: Make sure that the appliance is cool before you touch it. Care must be taken with all hot surfaces as there is a risk of burns. Use distilled or drinkable water.
natural_image
Line drawing of an oven with a rack inside, showing internal structure and airflow direction (no text or symbols)
text_image
PRE SET TIME