Turboclean XX PRO - Vacuum Cleaner Ulsonix - Free user manual and instructions
Find the device manual for free Turboclean XX PRO Ulsonix in PDF.

| Product type | Wet and dry vacuum for carpets and upholstery |
| Brand | Ulsonix |
| Model | Turboclean XX PRO |
| Power supply | 230 V~ / 50 Hz |
| Rated power | 1200 W |
| Protection class | II |
| IP rating | IPX4 |
| Dimensions (L x W x H) | 370 x 330 x 470 mm |
| Weight | 6.6 kg |
| Tank capacity | Not specified (stainless steel tank) |
| Main functions | Dry and wet vacuuming, carpet and upholstery cleaning, detergent spraying, blower function, integrated filter cleaning |
| Filters | HEPA filter, sponge filter, dust bag |
| Included accessories | Flexible hose with detergent gun, brushes (carpet washing, upholstery, floor), crevice nozzle, detergent container, wheels |
| Maintenance and cleaning | Clean filters with water (max 40°C), dry 24h; empty and rinse tank; do not immerse the appliance |
| Safety | Safety water valve, automatic shut-off if tank full, protection against electric shock (class II, IPX4) |
| Usage | Domestic only |
| Warranty | Not specified |
Frequently Asked Questions - Turboclean XX PRO Ulsonix
User questions about Turboclean XX PRO Ulsonix
0 question about this device. Answer the ones you know or ask your own.
Ask a new question about this device
Download the instructions for your Vacuum Cleaner in PDF format for free! Find your manual Turboclean XX PRO - Ulsonix and take your electronic device back in hand. On this page are published all the documents necessary for the use of your device. Turboclean XX PRO by Ulsonix.
USER MANUAL Turboclean XX PRO Ulsonix
natural_image
Technical line drawing of a mechanical assembly with gears and housing (no text or symbols)natural_image
Line drawing of a vacuum cleaner with attached digital device (no text or symbols)
natural_image
Line drawing of a vacuum cleaner with control panel and wheels (no text or symbols)3.2.3.Filter

natural_image
Technical line drawing of a mechanical component with no visible text or symbolsnatural_image
Line drawing of hands installing or adjusting a component inside a circular device (no text or symbols)natural_image
Technical line drawings of a vacuum cleaner device, showing top and side views (no text or symbols)natural_image
Line drawing of a vacuum cleaner with attached hose and control panel, showing assembly and component details (no text or symbols)
natural_image
Line drawing of a portable vacuum cleaner with control panel and wheels (no text or symbols)3.2.5. Waschmittel
natural_image
Technical line drawing of a mechanical component with internal structure and top-down view (no text or symbols)natural_image
Technical line drawings of a hair dryer with spray application and a magnified detail showing the connector (no text or symbols present)natural_image
Line drawing of a mop cleaning a surface near a cabinet (no text or symbols)natural_image
Technical line drawing of a robotic arm and mechanical device with no visible text or symbolsnatural_image
Technical line drawing of a mechanical assembly with a magnified inset showing internal components (no text or symbols)This User Manual has been translated for your convenience using machine translation. Reasonable efforts have been made to provide an accurate translation; however, no automated translation is perfect nor is it intended to replace human translators. The official User Manual is the English version. Any discrepancies or differences created in the translation are not binding and have no legal effect for compliance or enforcement purposes. If any questions arise related to the accuracy of the information contained in the User Manual, please refer to the English version of those contents which is the official version.
Technical data
| Parameter description | Parameter value |
| Product name | Carpet vacuum cleaner |
| Model | TURBOCLEAN XX PRO |
| Supply voltage [V~] / frequency [Hz] | 230V~/50Hz |
| Rated power [W]. | 1200 |
| Safety class | II |
| IP class | IPX4 |
| Dimensions (width x depth x height) [mm] | 370 x 330 x 470 |
| Weight [kg] | 6.6 |
1. General Description
The manual is intended to assist in safe and reliable use. The product is designed and manufactured strictly according to technical specifications using the latest technology and components and maintaining the highest quality standards.
CAREFULLY READ AND UNDERSTAND THIS MANUAL BEFORE STARTING THE WORK.
To ensure the long and reliable operation of the device, make sure to operate and maintain it properly following the guidelines in this instruction manual. The technical data and specifications in this manual are up-to-date. The manufacturer reserves the right to make changes to improve the quality. Taking the technical progress and the possibility of reducing noise into account, the unit is designed and built in such a way that risks resulting from noise emissions are reduced to the lowest possible level.
Explanation of symbols
| CE | The product complies with applicable safety standards. |
 | Read the manual before use. |
 | Recyclable product. |
 | CAUTION! or WARNING! or REMEMBER! General warning sign. |
 | CAUTION! Risk of electric shock! |

CAUTION! The figures in this manual are illustrative only and may vary in some details from the actual appearance of the product.
2. Safety of use

CAUTION!
Read all safety warnings and instructions. Failure to follow the warnings and instructions may result in electric shock, fire, and/or serious injury or death.
The term "device" or "product" in the warnings and the description of the instructions refers to Carpet vacuum cleaner
2.1. Electrical safety
a) The plug of this device must fit into the outlet. Do not modify the plug in any way. Original plugs and matching outlets reduce the risk of electric shock.
b) Avoid touching grounded parts, such as pipes, heaters, ovens, and refrigerators. There is an increased risk of electric shock if your body is grounded and touches the device while exposed to direct rain, wet pavement, or while working in a damp environment. If water enters the device, there is an increased risk of damage to the unit and electric shock.
c) Do not touch the device with wet or damp hands.
d) Do not use the cord in an unintended manner. Never use it to carry the device or to pull the plug out of the socket. Keep the cord away from heat sources, oil, sharp edges, or moving parts. Damaged or tangled cords increase the risk of electric shock.
e) If you cannot avoid using the product in a wet environment, use a residual current device (RCD) to connect it to electrical mains. Using an RCD reduces the risk of electric shock.
f) Do not use the device if the power cord is damaged or shows signs of wear. A damaged power cord should be replaced by a qualified electrician or the manufacturer's service department.
g) To avoid electric shock, do not immerse the cable, plug, or the device itself in water or other liquid. Do not use the appliance on wet surfaces.
2.2. Safety in the workplace
a) Keep the work area tidy and well-lit. Disorder or poor lighting can lead to accidents. Be foresighted, watch what you are doing, and use common sense when using the unit.
b) Do not use the unit in an explosive area, for example in the presence of flammable liquids, gases or dust. The unit produces sparks that can ignite dust or fumes.
c) If you find any damage or irregularities in the operation of the unit, immediately turn it off and report it to an authorized person.
d) If you have any doubts as to whether the product is working properly or if it is damaged, contact the manufacturer's service department.
e) Repairs to the device may only be carried out by the manufacturer's service. Do not attempt to repair the product on your own!
f) In the event of a fire or fire, use only powder or snow (CO2) fire extinguishers to extinguish the live device.
g) Check the condition of the safety stickers regularly. Replace them if they are illegible.
h) Keep these instructions for use for future reference. If the product is to be handed over to a third party, hand it over with this user manual.
i) Keep packaging components and small installation parts out of the reach of children.
j) Keep the device away from children and animals.
k) When using this product together with other devices, also follow the other instructions for use.

Remember! Keep children and other bystanders safe while operating the appliance.
2.3. Personal safety
a) Do not operate this device if you are tired, ill, or under the influence of alcohol, drugs, or medication that could impair your ability to operate the device.
b) The device is not intended to be used by persons (including children) with reduced mental, sensory, or intellectual functions or persons who lack experience and/or knowledge unless they are supervised or have been instructed by a person responsible for their safety on how to operate the device.
c) To prevent accidental start-up, make sure the switch is in the off position before connecting to a power source.
d) Do not overestimate your capabilities. Maintain body balance and equilibrium at all times during operation. This allows for better control of the machine in unexpected situations.
e) The product is not a toy. Children should be watched to ensure that they do not play with the appliance.
2.4. Safe use of the device
a) Do not overload the device. Use tools that are suitable for the application. A correctly selected product will do a better and safer job for which it was designed.
b) Do not use the device if the ON/OFF switch does not function properly (does not turn on and off). Units that cannot be controlled by the switch are unsafe, cannot operate, and must be repaired.
c) Disconnect the device from the power supply before adjusting, cleaning, or servicing. This precaution reduces the risk of accidental start-up.
d) Keep the unit in good working condition. Check before each use for general damage or damage to moving parts (cracks in parts and components or any other condition that may affect the safe operation of the device). If damaged, return the device for repair before use.
e) Repairs and maintenance should be carried out by qualified personnel using only original spare parts. This will ensure the safety of use.
f) To ensure the designed operational integrity of the device, do not remove factory-installed covers or loosen screws.
g) Do not leave the device switched on unattended.
h) Clean the device regularly to prevent permanent dirt build-up.
i) Do not obstruct the air inlet or outlet.
j) The product is not a toy. Cleaning and maintenance must not be performed by children without adult supervision.
k) Do not tamper with the device to alter its performance or design.
I) Keep the unit away from sources of fire and heat.
m) Do not aspirate embers or flammable objects with the device, e.g.: cigarettes/petrol/ink/thinner, etc.
n) Do not aspirate sharp-edged objects such as screws, etc. with the device.
o) Do not use the device to suck in substances that can settle on the fabric filter, such as lime powder, graphite powder, etc.
p) Do not tilt the device when there is water in its tank as this may damage the engine.
q) The device is not designed to pump out water!
r) Do not pull or lift the unit by pulling the hose as this may cause the unit to fall or damage the hose.
s) It is forbidden to direct the suction inlet toward other people, children, and animals!
t) Caution! It is forbidden to direct the suction inlet toward body parts (ears, mouth, eyes, nose, reproductive organs, and other sensitive body parts)!

CAUTION! Although the product has been designed to be safe and have adequate safeguards, and despite the additional safety features for the user, there is still a slight risk of accident or injury when handling the unit. Caution and common sense are advised when using the product.
3. Instructions for use
The device is designed for dry and wet vacuuming.
The product is intended for domestic use only.
The operator is responsible for any damage caused by misuse.
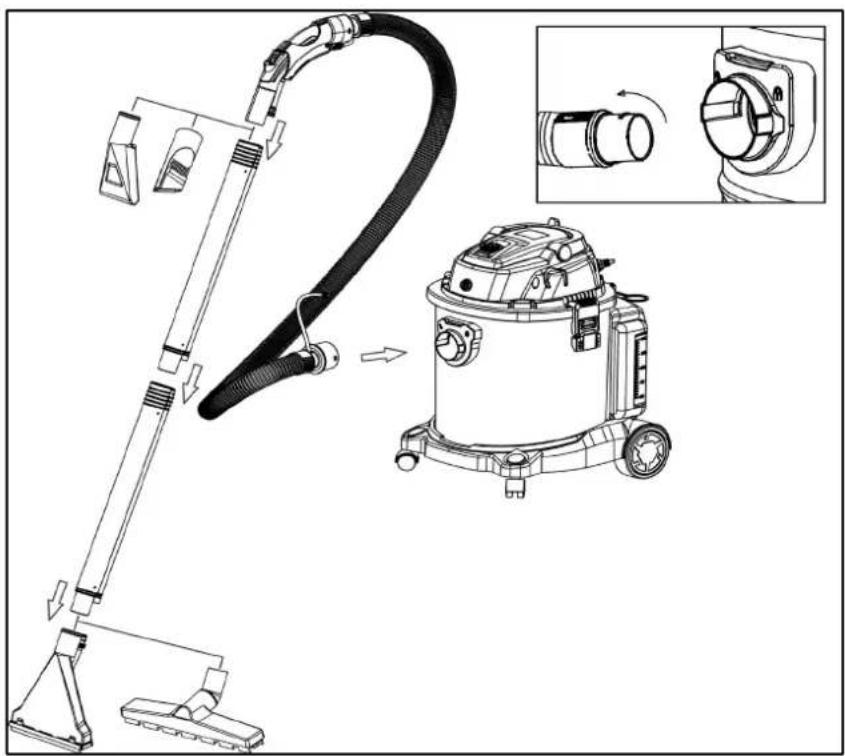
3.1. Product overview
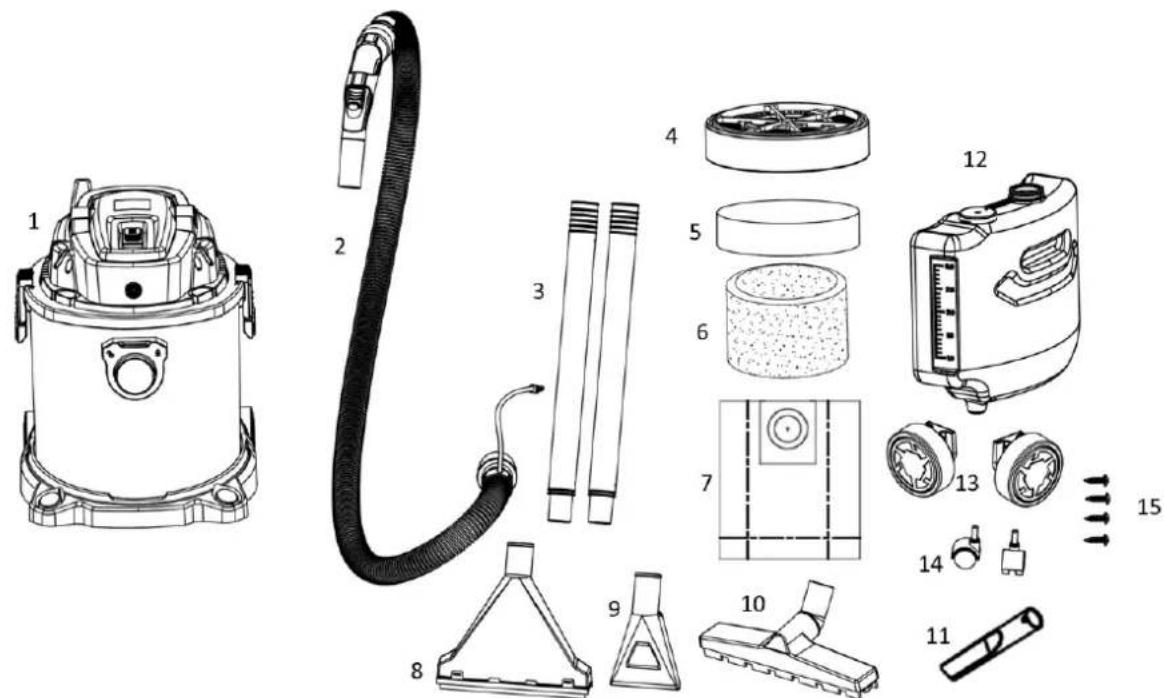
1 - Main unit (head, tank, base)
2 - Flexible hose + detergent spray gun
3 - Connecting pipes
4 - HEPA filter
5, 6 - Sponge filter
7 - Dust bag (for dry use)
8 - Washing brush (for carpets)
9 - Washing brush (for upholstery)
10 - Floor brush (dry and wet)
11 - Slot nozzle
12 - Detergent container
13 - Rear wheels
14 - Front wheels
15 - Wheel mounting screws
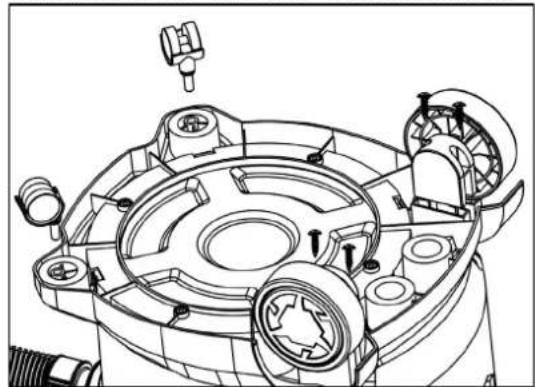
3.2. Installation of the unit
3.2.1. Base and wheels
Push the front wheels into the base; screw the rear wheels into place with the screws:
natural_image
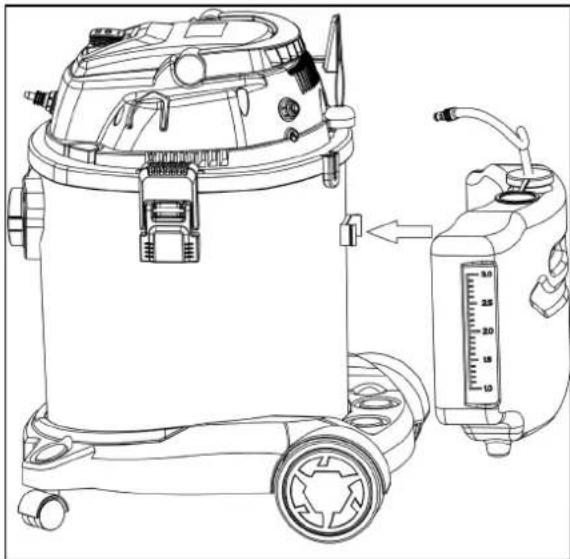
Technical line drawing of a mechanical assembly with no visible text or symbols3.2.2. Detergent container
Mount the detergent tank on the base, with tabs in the slots. Push the detergent tank over the stainless steel tank and fasten it:
natural_image
Line drawing of a vacuum cleaner with attached digital device (no text or symbols)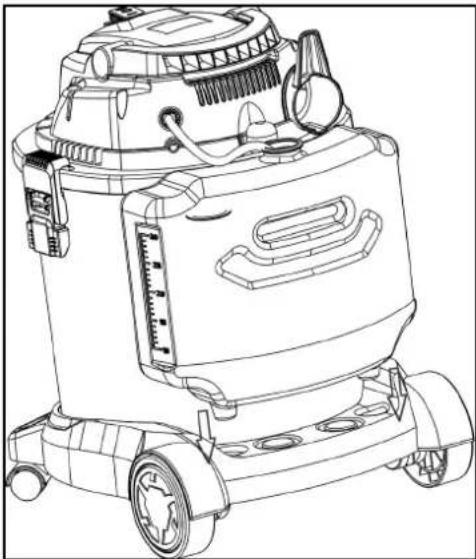
natural_image
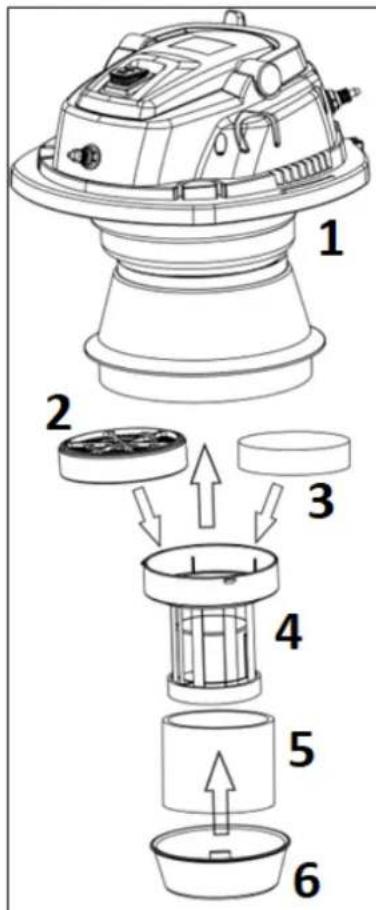
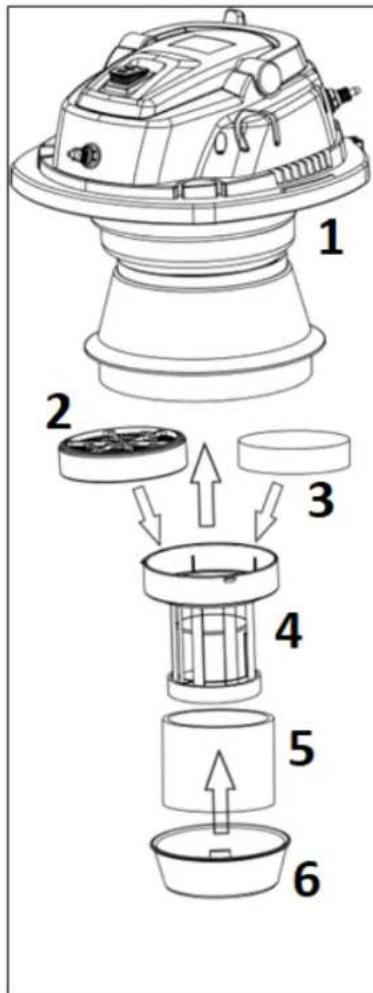
Line drawing of a vacuum cleaner with control panel and wheels (no text or symbols)3.2.3. Filters

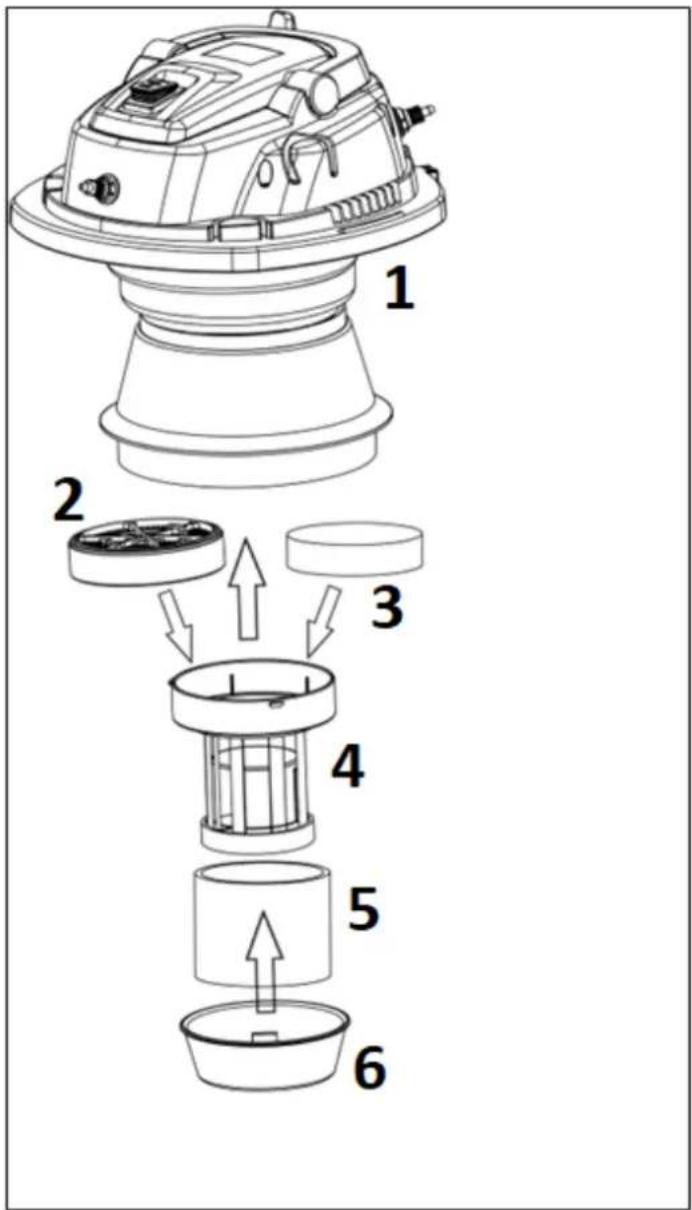
| 1 - Main unit2 - HEPA filter3 - Sponge filter | 4 - Water valve assembly5 - Sponge filter (optional)6 - Water separator cover |
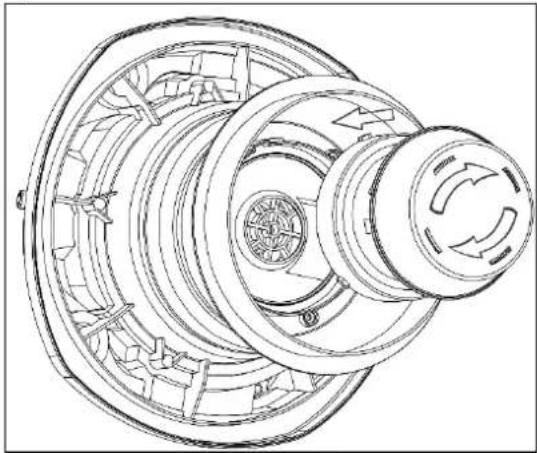
Insert the water valve assembly into the main unit and turn it clockwise to lock:
natural_image
Technical line drawing of a mechanical component with no visible text or symbolsAttach the dust bag to the suction port on the container:

natural_image
Line drawing of hands installing or adjusting a component inside a circular frame (no text or symbols)Fasten the main unit to the tank:
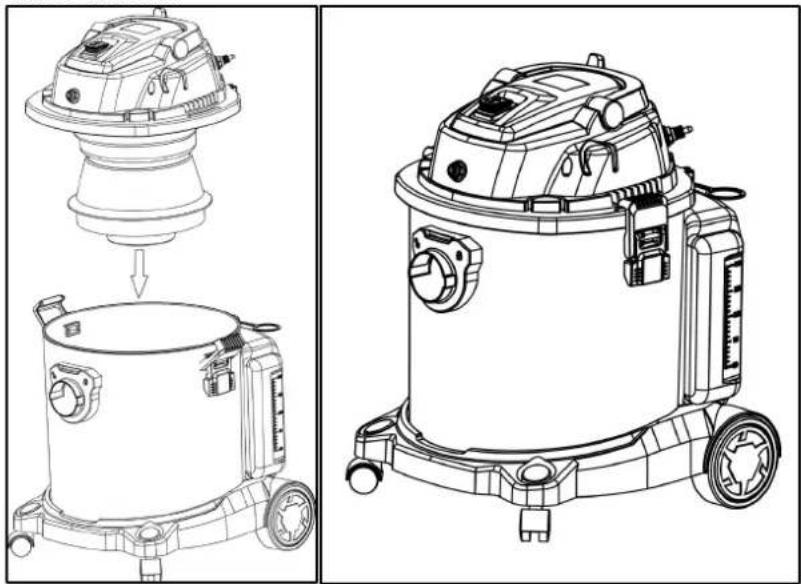
natural_image
Technical line drawings of a vacuum cleaner device, showing top and side views (no text or symbols)3.2.4. Hose, tube, brush, and tube for detergent
Check the tightness of the connections of various parts for water intake and leakage.
Connect the hose, tubes, and different types of brushes (as needed) together as shown in the figure; connect different brushes (as needed) or tubes respectively to the detergent gun; turn the hose end clockwise:
natural_image
Line drawing of a vacuum cleaner with attached hose and control panel, showing assembly and component details (no text or symbols)
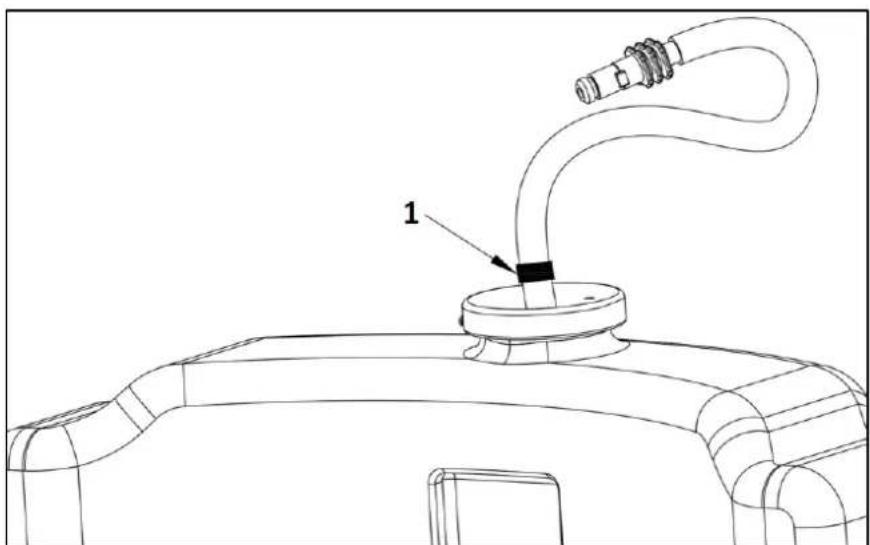
1 - a lock that seals the detergent tube
Before starting the detergent sprayer, install all sealing locks in the correct position and turn them clockwise:
natural_image
Line drawing of a portable vacuum cleaner with control panel and wheels (no text or symbols)3.2.5. Detergent
Fill the tank with detergent. Thick detergent should be diluted to avoid pipe clogging:
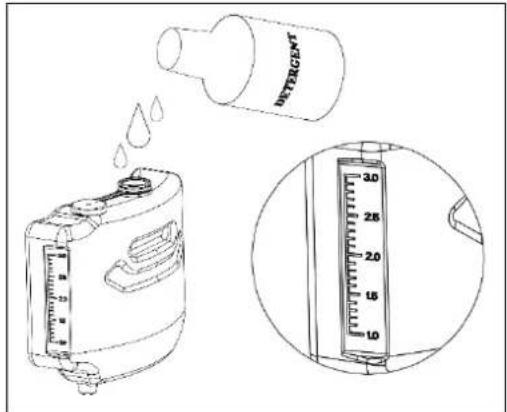
The detergent level indicator should always be under the opening of the detergent tank, otherwise, the detergent will be difficult to pump out:
1 - detergent level indicator
3.3. Working with the device
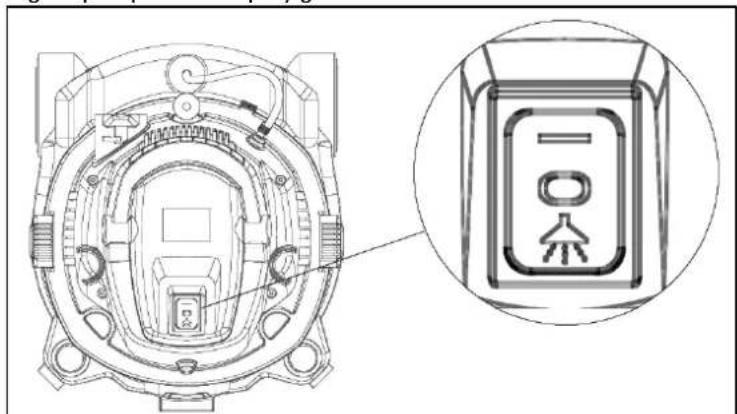
3.3.1. Main switch
In mode "I", the device works like a normal wet and dry vacuum cleaner.
In "O" mode, the device is turned off.
In the "The detergent pump and the spray gun work.
natural_image
Technical line drawing of a mechanical component with an inset close-up showing internal structure (no text or symbols)3.3.2. Wet-vacuuming of carpets and upholstery
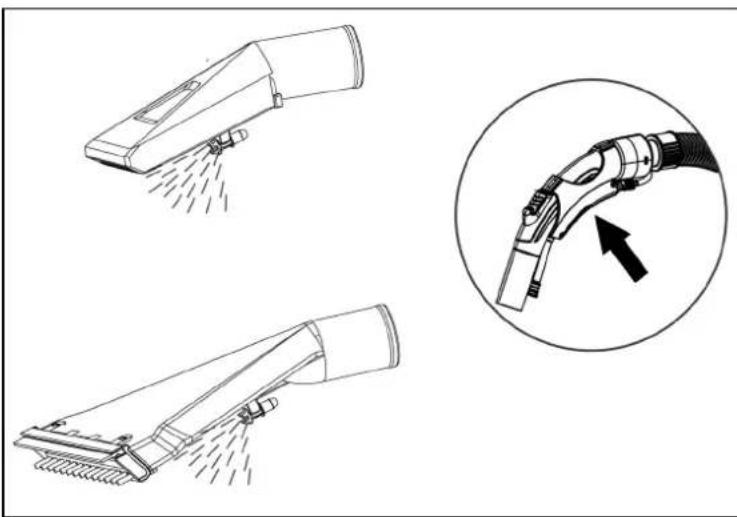
Select a suitable brush for wet cleaning. Make sure there is enough detergent in the tank for the best performance. The dust bag should be removed as dirty water will destroy it.
Press the detergent gun button, (the first time you use it, wait a few tens of seconds so that the detergent can be pumped out).
Move the brush evenly and slowly over the surface of the carpet or upholstery to ensure that the detergent is evenly sprayed.
Brush the carpet or upholstery, in the meantime, vacuum out the dirty water.
natural_image
Technical line drawings of hairless spray gun holders and a cable, showing spray application and insertion process (no text or symbols)3.3.3. Floor cleaning
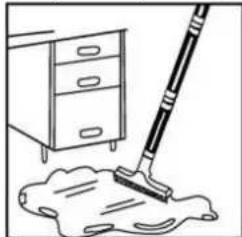
Use a wet and dry floor brush to clean the floor, of dust, debris, spills, etc.:
natural_image
Simple line drawing of a mop cleaning a surface near a cabinet (no text or symbols)3.3.4. Air flow regulation
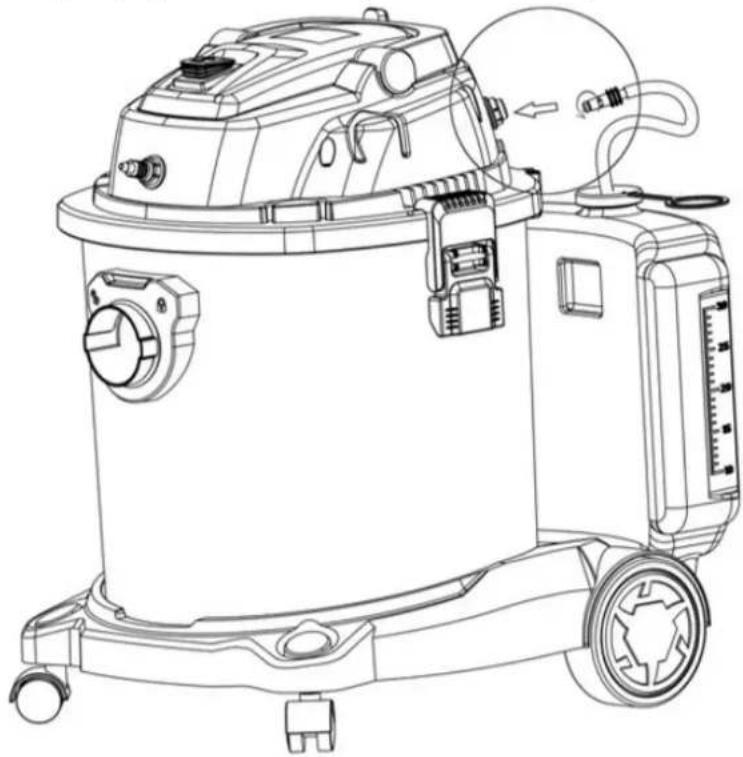
Press the button on the detergent spray gun to adjust the suction power:
Insert the end of the hose into the blower and turn it clockwise to lock. Turn on the vacuum cleaner to start the blower:
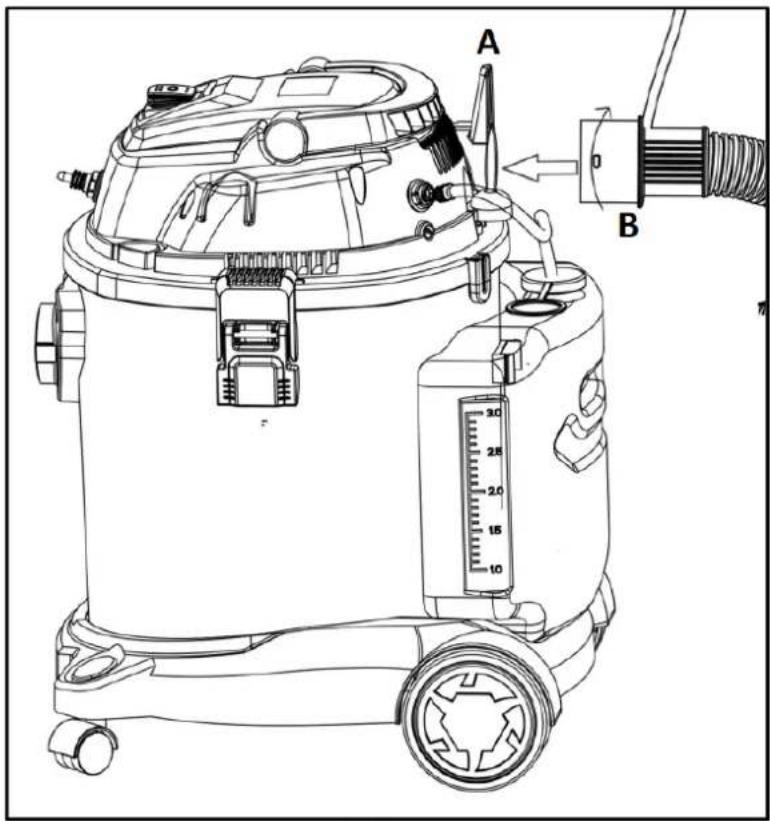
A - Blower B - The end of the hose
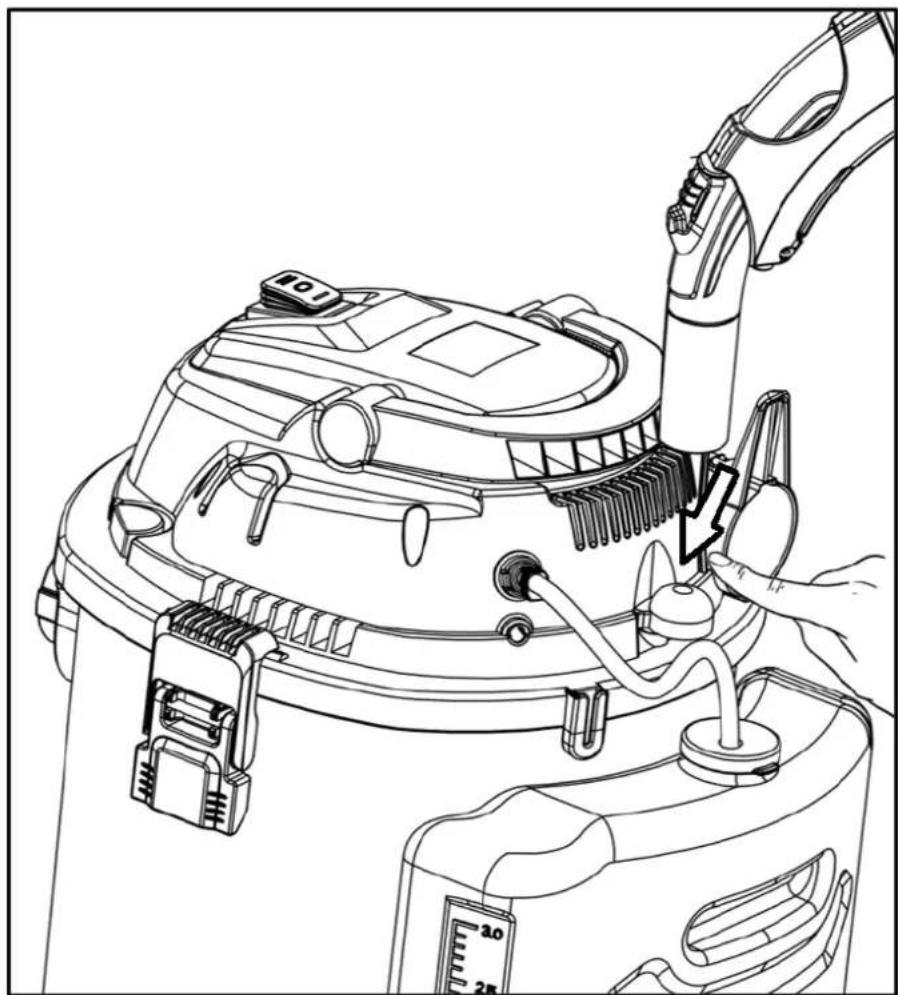
3.3.5. Filter cleaning function
Press the filter cleaning button on the back of the device head (with a finger or spray gun) several times to clean the filters - the nominal suction power will be momentarily restored. To clean the filters more effectively, block the suction inlet for a while:
natural_image
Technical line drawing of a robotic arm and mechanical device with no visible text or symbols3.3.6. Safety device (water valve)
When the water tank fills up, the device will make a sound that indicates that the engine is running at high speed. At this point, the suction power will disappear.
In this case, turn off the unit and empty the water from the tank.
The water valve will block the air inlet to the center, causing an abnormal sound if the device is inverted.
natural_image
Technical line drawing of a mechanical assembly with a magnified inset showing internal components (no text or symbols)3.4. Cleaning and maintenance
a) Pull the mains plug and let the unit cool down completely before cleaning, adjusting or replacing accessories and when the unit is not in use.
- Wait until the rotating parts stop.
b) Use only non-corrosive cleaning agents for cleaning surfaces.
c) After each cleaning, all parts should be thoroughly dried before the device is reused.
d) Store the unit in a dry and cool place protected from moisture and direct sunlight.
e) Do not spray the unit with a stream of water or immerse it in water.
f) Perform regular inspections of the unit, checking technical fitness and any damages.
g) Use a soft, damp cloth for cleaning.
h) Do not use sharp and/or metal objects (e.g. wire brush or metal spatula) as they may damage the surface of the material from which the appliance is made.
i) Do not clean the unit with acidic substances, medical agents, thinners, fuel, oils, or other chemicals. It may cause damage to the device.
j) If the liquid is leaking from the blower, do not turn the unit over during repair, as water will enter the engine and cause damage.
k) Do not use this machine as a pump.
I) Do not use the device in flammable and explosive areas, in case the spark of the engine causes a fire.
m) Do not block the air inlet, this may increase the operating temperature and damage the engine.
n) Do not use the device to vacuum flammable and explosive objects, such as glowing cigarettes, gasoline, etc.
o) Do not vacuum sharp objects such as pins and screws, this may damage the internal parts and filters.
p) Do not vacuum items that can easily stick to the filter, such as powders (e.g. graphite powder). This can block the airflow and damage the engine.
q) Do not tilt/overturn the unit - water may get into the engine and damage it.
r) After intensive work or when the tank is full of dust and dirty water, causing a decrease in suction power, follow the maintenance procedure:
Unfasten the clamps and remove the main unit.
Remove the filter bag, pour out the dirty water, and clean the tank of dust, then wipe the tank dry.
Wash and clean the filters, including the HEPA filter and sponge filters. The filters should be dried before the next use.
Wash the filters in water with a temperature of no more than 40^ C. Then dry them in the open air for at least 24 hours
Since filters are consumables, replace them properly to maintain the best performance.
DISPOSAL OF USED UNITS.
At the end of its useful life, this product should not be disposed of with normal household waste but should be taken to a collection point for the recycling of electrical and electronic equipment. This is indicated by the symbol on the product, operating instructions, or packaging. The materials used in this appliance are recyclable according to their marking. By reusing, recycling, or applying other forms of use of waste machines, you make a significant contribution to the protection of our environment.
Your local administration will provide you with information about the appropriate disposal point for used appliances.

natural_image
Technical line drawing of a mechanical assembly with gears and housing (no text or symbols)3.2.2. Zbiornik na detergenty
natural_image
Line drawing of a vacuum cleaner with attached digital device (no text or symbols)
natural_image
Line drawing of a vacuum cleaner with control panel and wheels (no text or symbols)3.2.3. Filtry
natural_image
Technical line drawing of a mechanical assembly with no visible text or symbolsnatural_image
Line drawing of hands installing or adjusting a component inside a circular device (no text or symbols)natural_image
Technical line drawings of a vacuum cleaner device, showing top and side views (no text or symbols)3.2.4. Wąż, rura, szczotka i rurka do detergentu
natural_image
Line drawing of a vacuum cleaner with attached hose and control panel, showing assembly and component details (no text or symbols)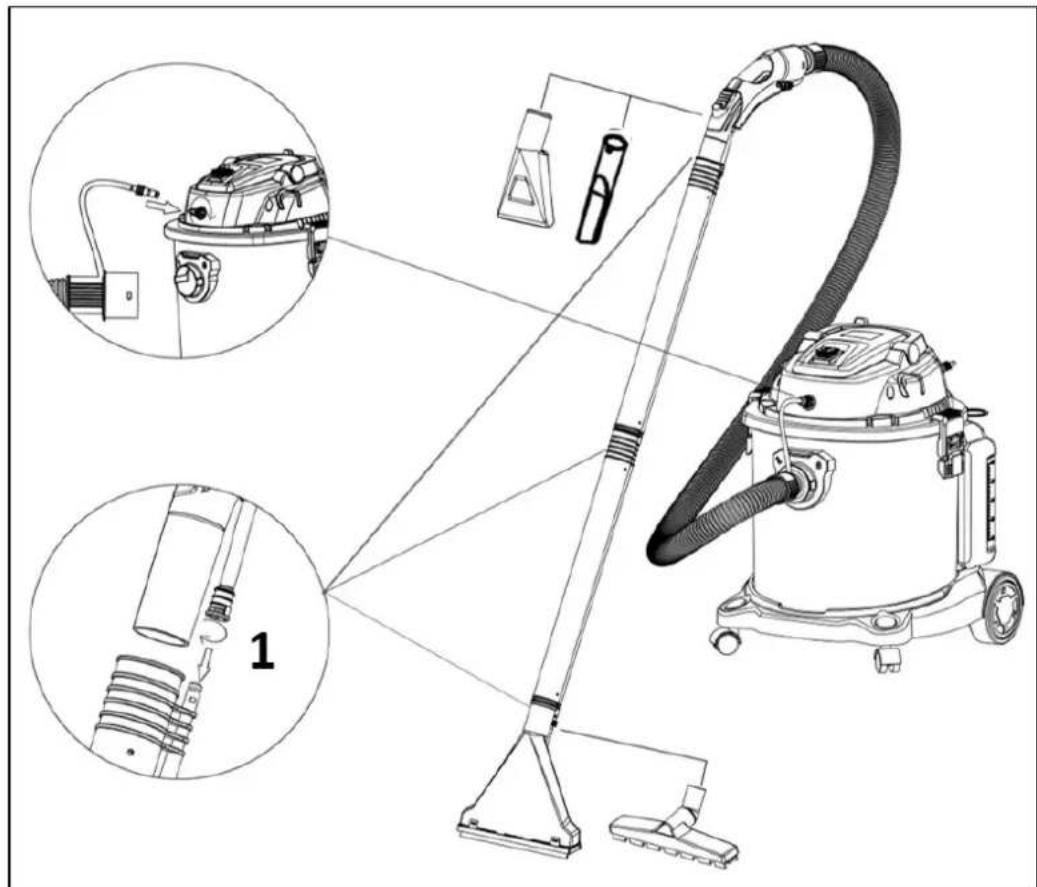
natural_image
Line drawing of a vacuum cleaner device with control panel and motor (no text or symbols)3.2.5. Detergent
natural_image
Technical line drawing of a mechanical component with an inset close-up showing internal structure (no text or symbols)natural_image
Technical line drawings of hairless spray gun holders and a cable connector, showing spray and tail behavior (no text or symbols)natural_image
Simple line drawing of a mop and bucket on a surface, next to a cabinet (no text or symbols)natural_image
Technical line drawing of a robotic arm and mechanical device with no visible text or symbolsnatural_image
Technical line drawing of a mechanical assembly with a magnified inset showing a cylindrical component (no text or symbols)natural_image
Technical line drawing of a mechanical assembly with no visible text or symbolsnatural_image
Line drawing of a vacuum cleaner with attached digital device (no text or symbols)
natural_image
Line drawing of a vacuum cleaner with control panel and wheels (no text or symbols)3.2.3. Filtry
natural_image
Technical line drawing of a mechanical component with no visible text or symbolsnatural_image
Line drawing of hands installing or adjusting a component inside a circular frame (no text or symbols)natural_image
Technical line drawings of a vacuum cleaner device, showing top and side views (no text or symbols)natural_image
Line drawing of a vacuum cleaner with attached hose and control panel, showing assembly and component details (no text or symbols)
natural_image
Line drawing of a medical or laboratory device with no visible text, numbers, or symbolsnatural_image
Technical line drawing of a mechanical component with internal structure and top-down view (no text or symbols)natural_image
Technical line drawings of hairless spray gun components with a magnified inset showing the lever mechanism (no text or symbols present)natural_image
Simple line drawing of a mop and bucket on a surface, next to a cabinet (no text or symbols)A - Dmychadlo
B - Konec hadice
natural_image
Technical line drawing of a robotic arm and mechanical device with no visible text or symbolsnatural_image
Technical line drawing of a mechanical assembly with a magnified inset showing internal components (no text or symbols)3.4. ČISTĚNÍ A ÚDRŽBA
natural_image
Technical line drawing of a mechanical assembly with gears and housing (no text or symbols)natural_image
Line drawing of a vacuum cleaner with attached digital device (no text or symbols)
natural_image
Line drawing of a vacuum cleaner with control panel and wheels (no text or symbols)3.2.3. Filtres
natural_image
Technical line drawing of a mechanical assembly with no visible text or symbolsnatural_image
Line drawing of hands installing or adjusting a component inside a circular device (no text or symbols)natural_image
Technical line drawings of a vacuum cleaner device, showing top and side views (no text or symbols)natural_image
Line drawing of a vacuum cleaner with attached hose and control panel, showing assembly and component details (no text or symbols)
natural_image
Line drawing of a portable vacuum cleaner with control panel and wheels (no text or symbols)3.2.5. Détergent
natural_image
Technical line drawing of a mechanical component with internal structure and top-down view (no text or symbols)natural_image
Technical line drawings of a hair dryer with spray application and a magnified detail showing the connector (no text or symbols)natural_image
Line drawing of a mop cleaning a surface with a cabinet in the background (no text or symbols)natural_image
Technical line drawing of a robotic arm and mechanical device with no visible text or symbolsnatural_image
Technical line drawing of a mechanical assembly with a magnified inset showing internal components (no text or symbols)natural_image
Technical line drawing of a mechanical assembly with gears and housing (no text or symbols)natural_image
Line drawing of a vacuum cleaner with attached digital device (no text or symbols)
natural_image
Line drawing of a vacuum cleaner with attached gauges and wheels (no text or symbols)3.2.3. Filtri
natural_image
Technical line drawing of a mechanical component with no visible text or symbolsnatural_image
Line drawing of hands installing or adjusting a component inside a circular device (no text or symbols)natural_image
Technical line drawings of a vacuum cleaner device, showing top and side views (no text or symbols)natural_image
Line drawing of a vacuum cleaner with attached hose and control panel, shown in two views (no text or symbols)
natural_image
Line drawing of a medical or laboratory device with no visible text, numbers, or symbols3.2.5. Detergente
natural_image
Technical line drawing of a mechanical component with an inset close-up showing internal structure (no text or symbols)natural_image
Technical line drawings of a hair dryer with spray application and a magnified detail showing the connector (no text or symbols)natural_image
Line drawing of a mop cleaning a surface near a cabinet (no text or symbols)natural_image
Technical line drawing of a robotic arm and mechanical device with no visible text or symbolsnatural_image
Technical line drawing of a mechanical assembly with a magnified inset showing internal components (no text or symbols)natural_image
Technical line drawing of a mechanical assembly with gears and housing (no text or symbols)natural_image
Line drawing of a vacuum cleaner with attached digital device (no text or symbols)
natural_image
Line drawing of a vacuum cleaner with control panel and wheels (no text or symbols)3.2.3. filtros
natural_image
Technical line drawing of a mechanical component with no visible text or symbolsnatural_image
Line drawing of hands installing or adjusting a component on a curved mechanical component (no text or symbols)natural_image
Technical line drawings of a vacuum cleaner device, showing top and side views (no text or labels)3.2.4. Manguera, tubo, cepillo y tubo para detergente
natural_image
Line drawing of a vacuum cleaner with attached hose and control panel, shown in two views (no text or symbols)
natural_image
Line drawing of a medical or laboratory device with no visible text, numbers, or symbols3.2.5. Detergente
natural_image
Technical line drawing of a mechanical component with an inset close-up showing internal structure (no text or symbols)natural_image
Technical line drawings of hairless spray gun components with a magnified inset showing the lever mechanism (no text or symbols)natural_image
Simple line drawing of a mop cleaning a surface with a cabinet (no text or symbols)A - Soplador
B - El final de la manguera
natural_image
Technical line drawing of a robotic arm and mechanical device with no visible text or symbolsnatural_image
Technical line drawing of a mechanical assembly with a magnified inset showing a cylindrical component (no text or symbols)natural_image
Technical line drawing of a mechanical assembly with no visible text or symbolsnatural_image
Line drawing of a vacuum cleaner with attached digital device (no text or symbols)
natural_image
Line drawing of a vacuum cleaner with control panel and wheels (no text or symbols)3.2.3. Szürök

natural_image
Technical line drawing of a mechanical assembly with no visible text or symbolsnatural_image
Line drawing of hands installing or adjusting a component inside a circular device (no text or symbols)natural_image
Technical line drawings of a vacuum cleaner device, showing front and side views (no text or symbols)natural_image
Line drawing of a vacuum cleaner with attached hose and control panel, showing assembly and component details (no text or symbols)
natural_image
Line drawing of a portable vacuum cleaner with control panel and wheels (no text or symbols)3.2.5. Mosószer
natural_image
Technical line drawing of a mechanical component with an inset close-up showing internal structure (no text or symbols)natural_image
Technical line drawings of a hair dryer with spray application and a magnified detail showing the connector (no text or symbols)natural_image
Simple line drawing of a mop cleaning a surface near a cabinet (no text or symbols)natural_image
Technical line drawing of a robotic arm and mechanical device with no visible text or symbolsnatural_image
Technical line drawing of a mechanical assembly with an inset showing a cylindrical component (no text or symbols present)1 - Hovedenhed (hoved, tank, bund)
natural_image
Technical line drawing of a mechanical assembly with no visible text or symbolsnatural_image
Line drawing of a vacuum cleaner with attached digital device (no text or symbols)
natural_image
Line drawing of a vacuum cleaner with control panel and wheels (no text or symbols)3.2.3. Filtre

| 1 - Hovedenhed2 - HEPA-filter3 - Svampefilter | 4 - Vandventilsamling5 - Svampefilter (valgfrit)6 - Dæksel til vandseparator |
natural_image
Technical line drawing of a mechanical component with no visible text or symbolsnatural_image
Line drawing of hands installing or adjusting a component inside a circular frame (no text or symbols)natural_image
Technical line drawings of a vacuum cleaner device, showing top and side views (no text or symbols)natural_image
Line drawing of a vacuum cleaner with attached hose and control panel, shown in two views (no text or symbols)
natural_image
Line drawing of a medical or laboratory device with no visible text, numbers, or symbols3.2.5. Vaskemiddel
natural_image
Technical line drawing of a mechanical component with cross-sectional view (no text or symbols)natural_image
Technical line drawings of a hair dryer with spray application and a magnified detail showing the connector (no text or symbols)natural_image
Simple line drawing of a mop cleaning a surface near a cabinet (no text or symbols)natural_image
Technical line drawing of a robotic arm and mechanical device with no visible text or symbols3.3.6. Sikkerhedsanordning (vandventil)
natural_image
Technical line drawing of a mechanical assembly with a magnified inset showing internal components (no text or symbols)For the disposal of the device please consider and act according to the national and local rules and regulations.
CONTACT
expondo Polska sp. z o.o. sp. k.