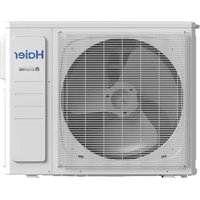
USER MANUAL HWQ08XCT HAIER
natural_image
Front view diagram of a server rack with ventilation grilles and indicator lights (no text or labels)
Design may vary by model number.
This user manual is to be only used for electronic control 6,000 BTU and 8,000 BTU. - Some models may have an additional letter after the model number.
0010580935
Important Safety Precautions....2-3
Operational Safety & Warnings 4
INSTALLATION REQUIREMENTS....5
Tools and Parts....5
Location Requirements 6
Electrical Requirements 7-9
HOW TO INSTALL 10
Unpacking the Air Conditioner....10
Preparing the Air Conditioner 10-11
Preparing the Window 12
Completing the Installation....13
USING YOUR AIR CONDITIONER....14
Starting the Air Conditioner....14-18
Using the Remote Control....18-20
Changing the Air Direction....20
CARING FOR YOUR AIR CONDITIONER....21
Cleaning the Air Filter 21
Cleaning the Front Panel 22
Customer Service 22
Normal Sounds of an Air Conditioner....23
TROUBLESHOOTING 24
LIMITED WARRANTY....25
PRODUCT REGISTRATION
Thank you for purchasing our Haier product. This easy-to-use manual will guide you in getting the best use of your product.
Remember to record the model and serial numbers. They are on a label on the side of your unit.
Model number
Serial number
Date of purchase
Staple your receipt to your manual. You will need it to obtain warranty service.
IMPORTANT SAFETY PRECAUTIONS
WARNING
THE INFORMATION IN THIS USE & CARE GUIDE MUST BE
FOLLOWED TO MINIMIZE THE RISK OF PERSONAL INJURY, FIRE,
ELECTRIC SHOCK OR OTHER UNSAFE CONDITIONS.
THE INSTRUCTIONS IN THIS USE & CARE GUIDE ARE NOT MEANT
TO INCLUDE EVERY POSSIBLE CONDITION OR SITUATION THAT
MAY OCCUR. USE CAUTION AND CARE WHEN INSTALLING, OPERATING
AND CLEANING THE AIR CONDITIONER.
- Use this air conditioner only for its intended application as described in this Use & Care Guide.
- This air conditioner must be properly installed and use the correct wall outlet that matches with the air conditioner's power supply cord in accordance with the Installation Section of this Use & Care Guide before it is operated.
- Never unplug the air conditioner by pulling on the power supply cord. Always grip the plug firmly and pull straight out from the wall outlet.
- Replace the power supply cord immediately if it becomes damaged in any way. A new power supply cord must be purchased from the air conditioner manufacturer and installed by a qualified technician. DO NOT use a power supply cord that is cracked, split, cut, or damaged anywhere along its length or either at the plug end or connector end.
- Turn off the air conditioner and unplug it from the wall outlet before performing any cleaning or maintenance.
- Do not store or use combustible or flammable materials or liquids on or near the air conditioner.
- If the wall outlet configuration does not match the plug configuration on the air conditioner, the wall outlet must be changed by a qualified electrician.
IMPORTANT SAFETY PRECAUTIONS
- This air conditioner contains R410a refrigerant and requires certified technicians to use the proper equipment, tools and safety standards that are approved for this refrigerant. Use only equipment certified for R410a refrigerant. In addition, under federal law, all refrigerant must be properly removed from the air conditioner prior to its disposal.
Please do not place any small objects into the outlet grill, such as coins, buttons, etc. This will damage the fan blade and potentially cause severe damage to the unit.
For responsible disposal of the product, please contact your local municipality for additional recycling options in your area.
READ AND FOLLOW THE SAFETY INSTRUCTIONS CAREFULLY.
SAVE THESE INSTRUCTIONS
State of California Proposition 65 Warnings:
WARNING: This product contains one or more chemicals known to the State of California to cause cancer.
WARNING: This product contains one or more chemicals known to the State of California to cause birth defects or other reproductive harm.
OPERATIONAL SAFETY & WARNINGS
- This air conditioner contains no consumer serviceable parts. If you have problems or questions regarding the operation of your air conditioner always call Haier Customer Service: 1-877-337-3639.
- Be sure that the air conditioner is properly and securely installed in the window according to the installation instructions included in this Use & Care Guide.
- DO NOT drill any holes in the base or sides of the air conditioner.
- DO NOT place fingers or objects in the air discharge or air intake in the front of the air conditioner.
- DO NOT operate the air conditioner with a protective cover on the outside section.
- DO NOT block the air discharge or air intake areas on the front panel.
- DO NOT block the side louvers on the outside of the air conditioner.
- DO NOT place any objects either on the indoor or outdoor sections of the air conditioner
- Operate the air conditioner with the air filter installed.
- Keep this Use & Care Guide, carton and packing material for future use in removing, storing and reinstalling the air conditioner.
Read and follow the instructions provided with any tools listed here.
☐ Phillips head screwdriver
□ Level
Drill and 1/8" bit
□ Scissors
□ Tape measure
□ Pencil
PARTS SUPPLIED:
Check that all parts for your specific air conditioner are included in the parts package.
NOTE: If parts are missing, call Haier Customer Service: 1-877-337-3639.
| IMAGE PART MATERIAL | | ESAQ406T HWQ08XCT |
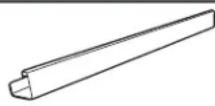 | Top channel Steel | 1 | 1 |
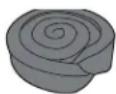 | Foam seal | PU | 1 | 1 |
 | Side bracket | Steel | 2 | 2 |
 | Window lock bracket | Steel | 1 | 1 |
 | 3/8" self- tapping screws | Steel | 4 | 4 |
 | 1" wood screws | Steel | 9 | 9 |
 | Side curtains | PS | 2 | 2 |
 | Side curtain frames | PS | 2 | 2 |
 | Remote control | / | 1 | 1 |
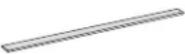 | Weather seals | PU | 3 | / |
 | Side curtain foam | PE | 2 | / |
LOCATION REQUIREMENTS
IMPORTANT: evresbO all governing codes and ordinances. Check the location where the air conditioner will be installed. Make sure you have everything necessary for correct installation.
THE LOCATION SHOULD PROVIDE:
- A grounded electrical outlet within 6 ft. (183 cm) of where the power supply cord exits the air conditioner, for models: ESAQ406T HWQ08XCT
NOTE: Do not use an extension cord, plug adapter, surge protector or multi-outlet adapter.
• Free movement of air in the room to be cooled.
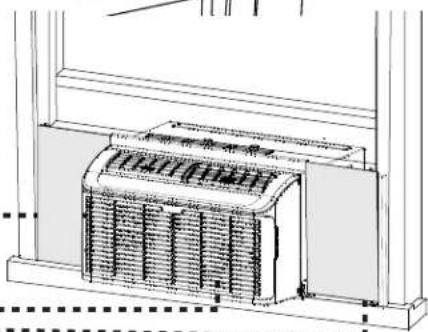
• A large enough window opening for the air conditioner. (See Fig.2)
- The air conditioner must not be installed in a through-the-wall sleeve or in a wall. It can only be installed in a double-hung window.
NOTE: The outside cabinet louvers and air discharge must not be obstructed by bushes, trees, etc. Air must be able to pass freely through the cabinet louvers. (See Fig. 1)
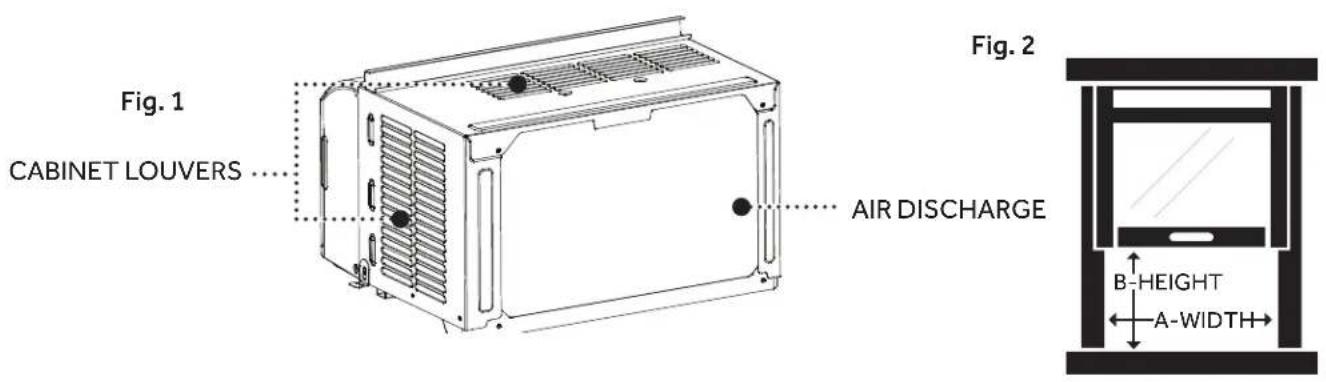
WINDOW INSTALLATION
Window opening measurements:
| ESAQ406THWQ08XCT |
| A. Width | 26-1/16" - 39-1/4" |
| B. Height | 13-3/8" |
WARNING
ELECTRICAL SAFETY and WARNINGS
- DO NOT cut or remove the grounding prong on the attached power supply cord. Doing so may cause sparks or fire, and voids all warranties. For safety purposes the air conditioner must be properly grounded.
- To avoid a fire hazard or possible electric shock, DO NOT use an adapter plug, extension cord, surge protectors, or multi-outlet adapters with the air conditioner.
- The power supply cord is equipped with a 3-prong plug which mates with a standard 115 volt wall outlet to minimize the possibility of electrical shock from this air conditioner.
- The power supply cord includes a leakage current detection interrupter device (LCDI). A RESET and TEST button are on the plug case. The device should be tested on a periodic basis by pressing the TEST button and then the RESET button while it is plugged into the wall outlet. If the TEST button does not trip or the RESET will not stay engaged, do not use the air conditioner and contact a qualified service technician.
- Have the wall outlet and circuit inspected by a qualified electrician to ensure that the wall outlet is properly grounded.
- If there is a 2-prong wall outlet present and not a 3-prong wall outlet, it is the responsibility of the user to have it replaced with a properly grounded 3-prong outlet.
- The air conditioner should always be plugged into a dedicated electrical outlet which has a voltage rating that matches the serial label on the side of the air conditioner.
- The electrical ratings for your air conditioner are listed on the Model/Serial Number label. The Model/Serial Number label is located on the side of the air conditioner cabinet.
- Specific electrical requirements are listed in the chart below. Follow the requirements for the type of plug on the power supply cord.
POWER SUPPLY CORD
Wiring Requirements
• 115-Volt (103.5 min. to 126.5 max.)
• 15-Amp time-delay grounded fuse or circuit breaker
- Use on single outlet circuit only.
ELECTRICAL REQUIREMENTS cont.
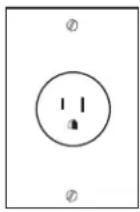
REQUIRED GROUNDING METHOD (See Fig.3)
This air conditioner must be grounded. This air conditioner is equipped with a power supply cord that has a 3 prong grounding plug. The power supply cord must be plugged into a mating, grounded 3 prong outlet, and grounded in accordance with all local codes and ordinances. If a mating outlet is not available, it is the customer's responsibility to contact a qualified electrician and ensure that a properly grounded 3 prong outlet is installed.
Fig. 3
POWER SUPPLY CORD (See Fig.4)
NOTE: Your air conditioner's plug may differ slightly in appearance from the one shown.
A. Reset button
B. Test button
Fig. 4
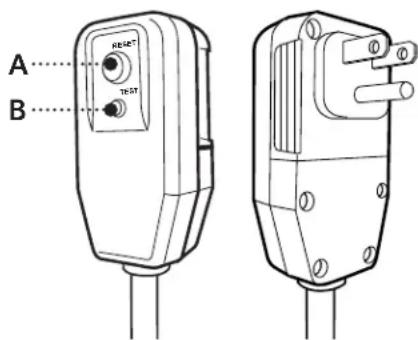
This room air conditioner is equipped with an a leakage current detection interrupter (LCDI) power supply cord required by UL. This power supply cord contains a current detection device. If the power supply cord is crushed, this device will detect current leakage and power will be disconnected from the air conditioner. If this power supply cord is damaged, it cannot be repaired and must be replaced with a cord from the product manufacturer. If the power supply cord is damaged call Haier Customer Service: 1-877-337-3639.
WARNING
• Electrical shock hazard
- Plug into a mating, grounded 3 prong outlet.
- Do not remove the ground prong from the power supply cord.
- Do not use a plug adapter, extension cord, surge protector, or multi-outlet adapter
- Failure to follow these instructions can result in injury, fire, or electrical shock.
TO TEST YOUR POWER SUPPLY CORD:
- Plug power supply cord into a mating, grounded 3 prong outlet. (See Fig.5)
- Press RESET (on some devices, a green light will turn on).
- Press TEST (listen for click; Reset button will trip, and on some devices, a green light will turn off).
- Press and release RESET (listen for click; Reset button will latch, and on some devices, a green light will turn on). The power supply cord is ready for operation.
Fig. 5

natural_image
Line drawing of an electrical outlet with a socket and plug, no text or symbols present
NOTE:
- The RESET button must be pushed in completely for proper operation. (See Fig.6)
- The power supply cord must be replaced if it fails to trip when the test button is pressed or fails to reset.
- DO NOT turn the air conditioner on or off by unplugging the power supply cord from the outlet. Always turn the air conditioner on or off at the control panel or by using the remote control.
- A damaged power supply cord must be replaced with a new power supply cord obtained from the product manufacturer and installed my a qualified service professional. It cannot be purchased at a retail store and must not be repaired by the user.
If the power supply cord is damaged please call Haier Customer Service: 1-877-337-3639.
- The power supply cord contains no user-serviceable parts.
- Opening the tamper-resistant case voids all manufacturer warranties.
Fig. 6

UNPACKING THE AIR CONDITIONER
WARNING
EXCESSIVE WEIGHT HAZARD
When moving or lifting the air conditioner, use two or more people. Wear gloves when handling the air conditioner to protect against possible sharp edges and metal fins.
REMOVE PACKAGING MATERIALS
- Remove packaging materials. Save the carton and the foam packaging for storing the unit when not in use.
NOTE: There are NO internal packing materials inside the air conditioner to remove—Do Not open the cabinet.
- Handle the air conditioner gently.
- Keep the air conditioner upright and level. Do not set the air conditioner on its side, front, back or upside down.
- The air conditioner must be standing upright for 2 hours prior to installation and operation.
PREPARING THE AIR CONDITIONER
INSTALL TOP CHANNEL


3/8" Screw (Actual Size)

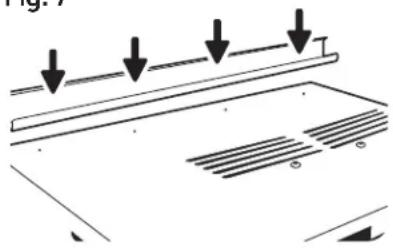
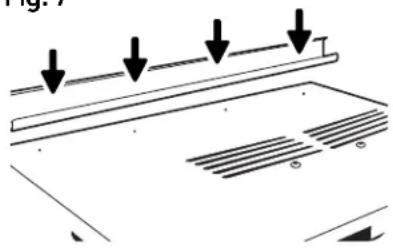
- Place the top channel on the top of the air conditioner, lining up the holes in the top channel with the holes in the top of the unit. Make sure the channel is facing forward as indicated by the illustrations. (See Fig.7 & 8)
- Using 3/8" self-tapping screws, attach the top channel to the top of the air conditioner. (See Fig.8)
Use four (4) 3/8" self-tapping screws for models: ESAQ406T HWQ08XCT
Fig. 7
natural_image
Pure technical diagram showing a beam with downward arrows and striped pattern below, no text or symbols present

natural_image
Illustration of a hand using a pipette to measure a component, labeled 'Fig. 8' (no text or symbols on the diagram itself)
PREPARING THE AIR CONDITIONER cont.
INSTALL SIDE CURTAINS
NOTE: Attach side curtains to the air conditioner before placing the unit in the window.
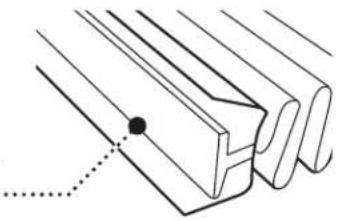
- ecalP the tabbed side of the side curtain in the track on the right-hand side of the air conditioner cabinet. (See Fig.9)
Fig. 9
TABBED SIDE OF
SIDE CURTAIN
natural_image
Pure technical line drawing of a mechanical component with no text or symbols
Fig. 10
natural_image
Pure technical line drawing of a mechanical joint or bracket (no text or symbols)
-
edilS the tabbed side of the side curtain down over all 3 tracks until the curtain is aligned with the top and bottom of the air conditioner cabinet. (See Fig.11)
-
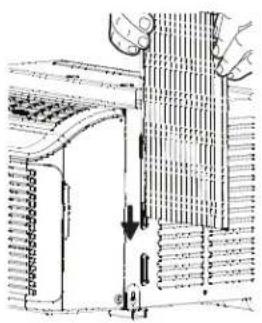
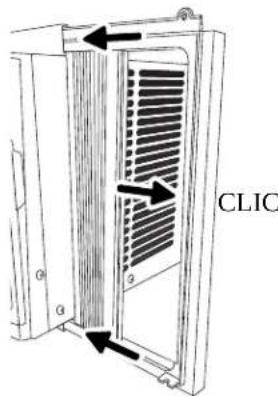
edilS the side curtain frame over the top of the side curtain, then into the channel on the top of the air conditioner and into the track on the bottom of the air conditioner. (See Fig.12)
-
edilS the side curtain frame as close to the air conditioner cabinet as necessary to lock the side curtain to the frame. Gently press the frame until it clicks. (See Fig.10 & Fig.12)
-
Repeat above steps for the left-hand side curtain and frame. Make sure no gaps are left to ensure that air does not escape into or out of the room.
-
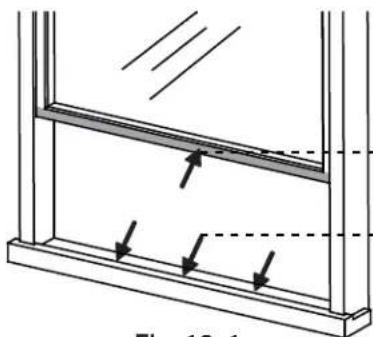
Apply the weather seals provided to the bottom, top & sides of the window to seal around the perimeter of the air conditioner. (Fig 12-1 & 12-2)
Fig. 12
natural_image
Technical line drawing of a mechanical assembly with no visible text or symbols


natural_image
Technical diagram of a window frame structure with arrows indicating direction (no text or symbols)
Cut and apply weather strip to front and bottom edge of window frame.
- Cut and apply weather strip to back edge of the window sill.
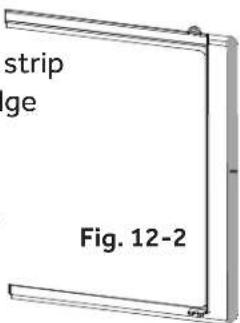
Cut and apply a weather strip to side of the curtain frame.(One each side)
PREPARING THE WINDOW
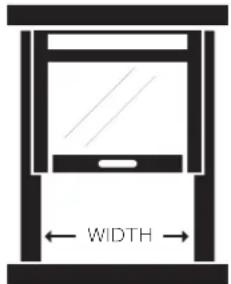
- Measure the width of the window opening. (See Fig.13)
- Mark the center line on the inside of the windowsill with a pencil. (See Fig.14)
WIDTH OF
WINDOW OPENING
Fig. 13
CENTER LINE
Fig. 14

natural_image
Pure architectural line drawing of a vertical structure with a horizontal base labeled 'CENTER' (no text or symbols beyond label)
NOTES AND WARNINGS:
- Be sure your air conditioner does not fall out of the window opening during installation or removal.
- Do not block the air discharge or air intake areas on the front panel.
- Do not block the louvers on the outside of the air conditioner.
- Center the air conditioner in the window sill.
Make sure to place the unit so that it is resting on the windowsill with a 14 " to 12 " downward tilt towards the outside. Lower the window sash behind the top channel to hold the unit in place.
(See Fig.15)
NOTE: The appearance of your model may differ from the one shown.
- Loosen the screw located on the lower-right hand corner of the air conditioner.
- Slide the side bracket over the screw. The side bracket should be resting on the window sill. (See Fig.16)
- Partially tighten the screw. Secure the unit before tightening completely.
- Use 1/8" drill bit to drill a starter hole through the holes in the side bracket.
- Using two (2) 1" wood screws, attach the side bracket to the window sill.
- Repeat for side bracket installation on the left-hand side of the air conditioner.


natural_image
Illustration of a hand adjusting a wall-mounted device with a downward arrow (no text or symbols)
Fig. 16
COMPLETING THE INSTALLATION
ATTACH SIDE CURTAINS TO WINDOW
- Pull the right-hand curtain and frame out until it fits flush to the side of the window frame. (See Fig.17)
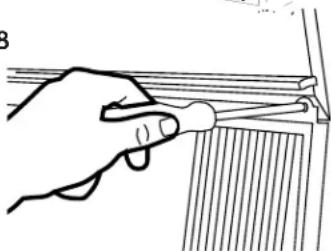
- Use a 1/8" drill bit to drill a starter hole through the top hole in the side curtain and into the window sash.
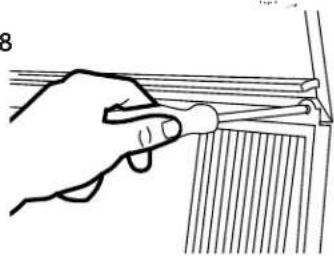
- Insert one (1) 1" wood screws through the top hole of the right-hand curtain and into the window sash. (See Fig.18)
- Repeat for the left-hand curtain.
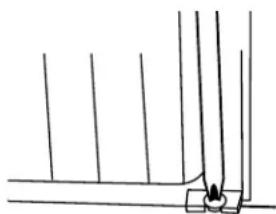
- Use a 1/8" drill bit to drill a starter hole into the window sill using the bottom hole in the side curtain as a guide.
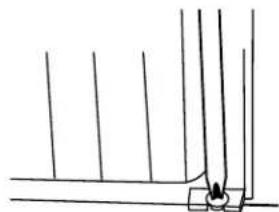
- Insert one (1) 1" wood screws through the bottom hole of the right-hand curtain and into the window sill. (See Fig.19)
- Repeat for the left-hand curtain.
FINAL INSTALLATION
- Uncoil the included foam seal. (See Fig.20)
- Insert the foam seal behind the top of the lower window sash and against the glass of the upper window.
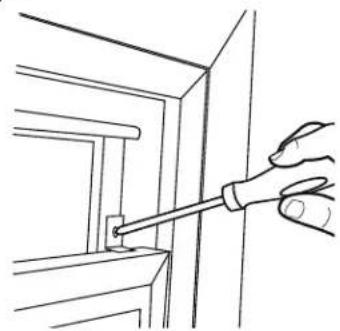
- Place the window lock bracket as shown in the diagram using a screwdriver. Use a 1/8" drill bit to drill a starter hole through the hole in the window lock bracket and into the upper window. (See Fig.21)
- Attach the window lock bracket to the upper window with one (1) 1" wood screw to secure the unit in place.
- Plug unit into a grounded 3 prong outlet.
- Press RESET on the power supply cord on some devices. A green light will come on. See "Electrical Requirements" for full detail.
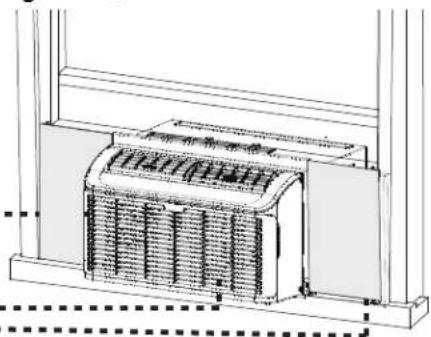
- For additional energy savings, measure and cut the adhesive backed foam sheets, and apply over the side curtains and frames to seal air leakage.(Fig. 21-1)
Fig. 17

natural_image
Technical line drawing of a mechanical assembly or enclosure with internal vertical divisions and mounting brackets (no text or symbols)

natural_image
Line drawing of a hand using a tool to adjust or install a mechanical component, labeled 'Fig. 18' (no other text or symbols)
Fig. 19

natural_image
Pure line drawing of vertical supports and a small object at the base (no text or symbols)
Fig. 20
Fig. 21
natural_image
Line drawing of a hand using a screwdriver to lift a door handle (no text or symbols)
Fig. 21-1
Side curtain foam
Weather seals
natural_image
Technical line drawing of a mechanical component with internal structure and mounting bracket (no text or symbols)
HOW TO INSTALL PAGE 13
STARTING THE AIR CONDITIONER

Operating your air conditioner properly helps you to obtain the best possible results.
This section explains how to operate this air conditioner.
IMPORTANT:
- When you turn off the air conditioner, either at the control panel or with the remote control, wait at least 3 minutes before turning it back on. This prevents the compressor from overloading. This 3 minute delay also applies when switching from cool mode to fan and back.
Note: There is a built in 3 minute delay. You may notice the compressor might not start right away. This was designed to protect the unit.
- Do not operate your air conditioner in the Cool mode when the outside temperature is below 61^ (16°C). The inside evaporator coil will freeze up, and the air conditioner will not operate properly.
Note:
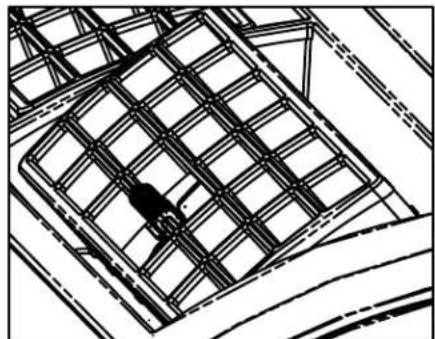
COOL MIN: To reduce cooling capacity, point air directional louvers up.
COOL MAX: To maximize cooling capacity, point air directional louvers down.

natural_image
Technical line drawing of a structural grid assembly (no text or symbols)
COOL MIN

natural_image
Architectural line drawing of a grid-patterned structure with no visible text or symbols
COOL MAX
STARTING THE AIR CONDITIONER cont.
- Please put batteries into the remote control.
- rP ess POWER once to turn on the air conditioner.
NOTE: When the air conditioner is first plugged in, the LED display will show "88" for 3 seconds. After the air conditioner is turned on for the first time, the display will show the temperature 72 °F and the fan is automatically set to Quiet speed and the Mode indicator will show ENERGY SAVE.
NOTE: To switch the temperature display between Fahrenheit (°F) and Celsius(°C), the air conditioner must be plugged in and turned on. On the control panel on the front of the AC, press the UP and DOWN button at the same time and hold for 3 seconds. Press F/C button on remote control to switch between Fahrenheit (°F) and Celsius (°C).
NOTE: Each time this ENERGY STAR Qualified air conditioner is turned on, it will operate in energy save mode per the EPA requirements. You can select any other mode to satisfy your needs.
- Select Mode. Refer to "Mode."
- Select Speed. Refer to "Speed."
- Set Timer. Refer to "Temp/Time"
- Reset the filter. Refer to "Filter Reset"
MODE
- Press MODE until you see the indicator light come on next to the desired setting.
- Choose Fan, Cool, Energy Save, or Dehum.
FAN—Only the fan runs. Press SPEED to select High, Med or Quiet fan speed. The display shows the current room temperature.
NOTE: In fan mode, the temperature cannot be set.
ENERGY SAVE—In this mode the fan runs only when cooling is needed. The fan will run for 3 minute after the compressor shuts off. The fan then cycles on for 2 minutes at 10 minute intervals until the temperature in the room is above the set temperature. The compressor then turns back on.
COOL—Cools the room. Press SPEED to select High, Med, Quiet or Auto Cool fan speed. Press the TEMP/TIME ∧ or ∨ arrow button to adjust the temperature. The fan will run continuously in cool mode.
DEHUM—Aids in removing humidity from the room. Dehum mode cannot be used to cool room.
NOTE: In Dehum mode, when the set temperature is close to ambient temperature, the compressor may stop and the fan will run in Quiet speed only.
STARTING THE AIR CONDITIONER cont.

SPEED
- Press SPEED until you see the indicator light come on next to the desired setting.
- Choose High, Med, Quiet or Auto Cool
HIGH—For maximum cooling
MED—For normal cooling
QUIET—For minimum cooling & noise
AUTO COOL – Adjusts the fan speed automatically to provide ideal cooling based on the room temperature.
TIMER OFF
To set the air conditioner to turn off between 1 hour and 24 hours (The air conditioner must be ON to set):
- Press TIMER button until Timer Off indicator light illuminates. The display will show the remaining hours before the air conditioner will turn off.
- Press the TEMP/TIME ∧ or √row button to change the delay time from 1 hour to 24 hours.
- Timer Off indicator light will remain on. The display will show the remaining time to Timer Off.
TIMER ON
To set the air conditioner to turn on bwtween 1 and 24 hours:
- Press TIMER until Timer On indicator light illuminates. The display will show the remaining hours before the air conditioner will turn on.
- Press the TEMP/TIME^ or 'arrow button to change the delay time from 1 hour to 24 hours.
- Timer On indicator light will remain on. The display will show the remaining time to Timer On.
STARTING THE AIR CONDITIONER cont.
TO CLEAR TIMER PROGRAM:
NOTE: Air conditioner can be either on or off.
Press TIMER until Timer indicator light turns off.
TO VIEW OR CHANGE THE REMAINING TIME (IN HOURS):
TIMER OFF
- Press the TEMP/TIME on arrow button to increase or decrease the time.
- The display will show the remaining time to Timer OFF.
TIMER ON
- The display will show the remaining time.
- Press the TEMP time on arrow button to increase or decrease the time.
- The display will show the remaining time to Timer ON.
NOTE: In TIMER and SLEEP mode, temperature cannot be adjusted.
SLEEP
- Press the TIMER button to choose Sleep mode. The indicator light will turn on.
- The temperature will increase by 2^ F 1 hour after the mode is chosen. The temperature then increases another 2^ F after 1 hour. The unit will hold this temperature for 6 hours then stops.
- To turn off Sleep mode, press the TIMER button until the indicator light is off.
TEMP/TIME
-
Press the TEMP/TIME Arrow button to raise the temperature. Each time you press the TEMP/TIME up arrow button, the temperature will go up 1°F until it reaches 86°F (30°C).
-
Press the TEMP/TIME arrow button to lower the temperature. Each time you press the TEMP/TIME down arrow button, the temperature will go down 1°F until it reaches 61°F (16°C).
NOTE: Under Fan mode, the display will show the current temperature. Under Energy Save, Cool or Dehum mode, the display will show the set temperature.
STARTING THE AIR CONDITIONER cont.
FILTER RESET
This feature automatically notifies you that the air filter must be cleaned. The indicator light will come on after 240 hours of operation. Clean the air filter (refer to Care and Cleaning), place it back in the front panel, and press the Filter Reset button. The light will turn off.
USING THE REMOTE CONTROL
Remote control may differ in appearance from the image shown.
NOTE: Please remove the back of the controller and insert two AAA batteries. Replace batteries after 6 months of use or when remote control starts to lose power.
NOTE: DO NOT mix old and new batteries.
POWER
Press the button to turn on the air conditioner. When you first press the button, the air conditioner will operate in Energy Save mode, Quiet fan speed and temperature of 72^ F. You can select any other mode to satisfy your needs.
Speed
High - rP ess High button to choose high fan speed.
Med - rP ess Med button to choose medium fan speed.
Quiet - rP ess Quiet button to choose quiet fan speed.
Auto Cool - rP ess Auto Cool button to choose auto cool fan speed.
MODE
To set the air conditioner to turn off after a set amount between 1 hour and 24 hours (unit must be ON):
- Press the TIME ON/OFF button on the remote control to select the time off function.
- Press the TIMER UP or TIMER DOWN arrow button to change the delay time from 1 hour to 24 hours. Timer OFF indicator light on the air conditioner control panel will illuminate.
- The buzzer beeps twice after 5 seconds, then Timer OFF countdown will initiate.
Fig. 22

To set the air conditioner to turn on between 1 hour and 24 hours:
- Press the TIME ON/OFF button on the remote control to select the time on function.
- rP ess the TIMER UP or TIMER DOWN arrow button to change the delay time from 1 hour to 24 hours. Timer ON indicator light on the air conditioner control panel will illuminate.
- The buzzer beeps twice after 5 seconds, then Timer ON countdown will initiate.
TO CLEAR TIMER DELAY PROGRAM:
NOTE: Air conditioner can be either on or off.
Press TIMER ON/OFF button until Timer indicator light turns off.
TEMP UP / TEMP DOWN
- Press the TEMP UP button to raise the temperature. Each time you press the TEMP UP button, the temperature will go up 1°F until it reaches 86°F (30°C).
- rP ess the TEMP DOWN button to lower the temperature. Each time you press the TEMP DOWN button, the temperature will go down 1°F until it reaches 61°F (16°C).
SLEEP
- rP ess the SLEEP button to choose Sleep mode. This display will show (08) and the indicator light will turn on.
- The temperature will increase by 2^1 hour after the mode is chosen. The temperature then increases another 2^ after 1 hour. The unit will hold this temperature for 6 hours then stops.
- To turn off Sleep mode, press the SLEEP button until the indicator light is off.
- rP ess the F/C button to choose between Farenheit and Celcius.
LOCK
- rP ess the LOCK button on the remote to disable button functionality. Press the lock button again to activate the remote control functionality.
LIGHT
- When you press the LIGHT button, the display on the unit will turn off, but the unit is still operating normally. When you press the LIGHT button again or press any button on the remote control, the display will be illuminate again.
RESET
- Press the reset button to reset the unit to factory settings.
USING THE REMOTE CONTROL cont.

WARNING:
- Chemical Burn Hazard. Keep batteries away from children.
- This product contains a lithium button/coin cell battery. If a new or used lithium button/coin cell battery is swallowed or enters the body, it can cause severe internal burns and can lead to death in as little as 2 hours. Always completely secure the battery compartment. If the battery compartment does not close securely, stop using the product, remove the batteries, and keep it away from children. If you think batteries might have been swallowed or placed inside any part of the body, seek immediate medical attention.
- The cells shall be disposed of properly, including keeping them away from children;
- Even used cells may cause injury.
CHANGING THE AIR DIRECTION
ESAQ406T HWQ08XCT
4-Way Air Flow: The air directional louvers let you control the direction of the airflow. The airflow can be directed up-down and left to right. (See Fig.23)

natural_image
Line drawing of a portable air conditioner unit with a hand pointing to the grille (no text or symbols)
CLEANING THE AIR FILTER
The air filter is removable for easy cleaning. A clean air filter helps remove dust, lint, and particles from the air for optimal cooling and operating efficiency. The Filter Reset light will turn on to notify you that the air filter must be cleaned. The light goes on after the air conditioner has been operating for 240 hours.
- Turn off the air conditioner and unplug the power supply cord from the outlet.
- Remove the air filter by opening the front panel and removing the air filter. Some models may have a filter that slides out instead and does not require opening of the front panel.
(See Fig.24)

-
Use a vacuum cleaner with the hose attachment to clean the air filter. If the air filter is very dirty, wash it in warm water with a mild detergent. Do not wash the air filter in a dishwasher or clothes washer, or use any chemical cleaners. Do not use a clothes dryer or microwave oven to dry it. Air-dry the air filter completely before placing it back in the unit.
-
Place the air filter back in the air conditioner.
-
Close the front panel.
-
Plug the power supply cord into the outlet, turn on the air conditioner and press the filter reset button to turn off the indicator light.
NOTE: Do not operate the air conditioner without the filter in place.
CLEANING THE FRONT PANEL
- Turn off the air conditioner and unplug the power supply cord from the outlet.
- Clean the front panel with a soft cloth. Do not use chemical cleaners, especially spray cleaners, sharp instruments, or flammable fluids. These products can damage the surface of your air conditioner.
- Air-dry the front panel completely.
- Plug the power supply cord in the outlet and turn on the air conditioner.
In the event that the filter is damaged and needs replacing, call Haier Customer Service: 1-877-337-3639
CUSTOMER SERVICE
IMPORTANT
DO NOT RETURN THIS PRODUCT TO THE STORE
If you have a problem with this product, please contact the Haier Customer Satisfaction Center at 1-877-337-3639.
DATED PROOF OF PURCHASE, MODEL # AND SERIAL # REQUIRED FOR WARRANTY SERVICE

NORMAL SOUNDS OF AN AIR CONDITIONER
NORMAL SOUNDS
Your new air conditioner is designed to give you many years of dependable service. This section tells you how to clean and care for your air conditioner properly.
While your air conditioner is operating, it is normal to hear the following sounds:
| SOUNDS REASON |
| Air movement Air rotating around the fan. |
| Window vibration Installation not correct. Refer to Install section |
| Pinging | Water droplets being thrown against the outside coil. This helps cool the condenser coil.You can reduce this noise by removing the subbase water plug. (See Fig.25) Removing this plug will lower the Energy Efficiency of your unit.NOTE: Do not drill hole in base pan. |
| High pitched hum The compressor turning on and off. |
| Clicking The thermostat turning on and off. |
| Gurgling Refrigerant moving through the inside coil. |
Fig. 25

natural_image
Technical line drawing of a computer case panel with ventilation slots and mounting brackets (no text or symbols)
TROUBLESHOOTING
| POSSIBLE PROBLEM | POSSIBLE CAUSE REMEDY | |
| Air Conditioner does not start or operate | Power supply cord is not plugged into an outlet. | Plug unit into a mating grounded outlet. |
| Power supply cord has tripped. Press and release RESET button on the power supply cord. |
| Unit is turned off. Turn on unit using remote control or on control panel. |
| A household fuse or circuit breaker has blown. | Replace the fuse or reset the circuit breaker. |
| Remote control is not working | Batteries are dead. Replace the batteries. |
| Batteries inserted wrong. Make sure batteries are inserted in the correct position. |
| Room does not feel cold enough | The room is too hot. Allow time for the room to cool down when you turn on the unit. |
| The temperature control may not be set correctly. | Adjust the temperature control on the control panel or remote control. |
| Air flow is restricted. Make sure the air discharge area is not blocked. |
| Room feels too cold | Temperature set too low. Raise the set temperature. |
| Air conditioner cycles on and off too often | Air filter is dirty or restricted. Clean the air filter. |
| Air flow is restricted. Make sure the air discharge area is not blocked. |
| Outside air temperature is below 61°F. | Do not operate the unit when the outside temperature is below 61°F. |
| Outside temperature is very hot. Raise the FAN speed to the highest setting. |
| Water drips into your house | Air conditioner is not properly leveled. | Tilt unit slightly from the front to the back. Refer to Installation section. DO NOT drill a hole in the cabinet base. |
| Water drips outside your house | Hot, humid weather. This is normal during days with high humidity. |
| Water collects in cabinet base | Humidity drains into cabinet base. This is normal during days with high humidity. DO NOT drill a hole in the cabinet base. |
| Air conditioner is freezing up; ice forming on coil | Temperature outside is too low, below 61°F. | To defrost coil, set to FAN ONLY setting. |
LIMITED WARRANTY
ONE YEAR LIMITED WARRANTY
This warranty covers all defects in workmanship or material for the mechanical and electrical parts (including labor costs) contained in this product for a period of 12 months from the date of purchase. For commercial or rental application, the warranty is 90 days. You must keep and be able to provide your original sales receipt as proof of the date of purchase.
FIVE YEAR LIMITED WARRANTY ON THE SEALED SYSTEM
The sealed system and compressor (hermetic compressor, condenser and evaporator) contained in this product is for a period of 5 years from the date of purchase (excluding labor costs after the initial 12-month period). In commercial or rental use, the additional limited compressor warranty is for 1 year and 9 months (excluding labor costs after the initial 90-day period). You must keep and be able to provide your original sales receipt as proof of the date of purchase.
WHO IS COVERED
The original retail purchaser of this product.
WHAT WILL BE DONE
Haier America will repair or replace any mechanical, electrical part or the compressor, which proves defective in normal household use for a period of 12 months.
HOW CAN YOU GET SERVICE
Contact your nearest manufacturer-authorized Service Depot. For the name of the Service Depot nearest you, contact Haier America at 1-877-337-3639.
All service must be performed by a manufacturer-authorized Service Depot.
THIS WARRANTY DOES NOT COVER
- Damages from improper installation.
- Damages in shipping.
- Defects other than manufacturing.
-
segamaD from misuse, abuse, accident, alteration, lack of proper care and maintenance or incorrect current or voltage.
-
Damage from other than household use.
- segamaD from service by other than an authorized dealer or service center.
- Decorative trims.
- robaL , service, transportation and shipping charges for the removal of defective parts and installation of replacement parts beyond the initial 12-month period.
- Credit or refund for products over 30 days past date of purchase, or for any loss or injury caused by the product or defects to the product including but not limited to incidental or consequential damages.
- Refurbished product purchased as/like new or second-hand.
THIS LIMITED WARRANTY IS GIVEN IN LIEU OF ALL OTHER WARRANTIES, EXPRESS OR IMPLIED, INCLUDING THE WARRANTIES OF MERCHANTABILITY AND FITNESS FOR A PARTICULAR PURPOSE.
The remedy provided in this warranty is exclusive and is granted in lieu of all other remedies. This warranty does not cover incidental or consequential damages. Some states do not allow the exclusion of incidental or consequential damages, so this limitation may not apply to you. Some states do not allow limitations on how long an implied warranty lasts, so this limitation may not apply to you. This warranty gives you specific legal rights and you may also have other rights which vary from state to state.
This warranty covers units within the continental United States, Canada and Puerto Rico.
Haier Appliances
Louisville, KY 40225
TABLE DES MATIÈRES
RENSEIGNEMENTS SUR LA SÉCURITÉ ...... 2
natural_image
Line drawing of an electrical outlet with a bulb and socket (no text or symbols)
REMARQUE :
ESAQ406R HWQR06XCR HWQR08XCR
Fig. 7
natural_image
Pure technical diagram showing a beam with downward arrows and a grid pattern below (no text or symbols)

natural_image
Illustration of a hand using a pipette to measure a component, labeled 'Fig. 8' (no other text or symbols)
PRÉPARATION DU CLIMATISEUR (suite)
INSTALLATION DES PANNEAUX LATÉRAUX
natural_image
Pure technical line drawing of a mechanical component with no text or symbols
CÔTÉ À ENCLENCHEMENT
DU PANNEAU LATÉRAL……

natural_image
Pure technical line drawing of a mechanical component with no text or symbols
natural_image
Technical line drawing of a mechanical assembly with no visible text or symbols
Fig. 12

ENCLEN-CHEMENT
natural_image
Technical diagram of a structural frame with arrows indicating force or direction (no text or symbols)
Fig. 12-1
natural_image
Pure architectural line drawing of a symmetrical structure with no text or symbols
REMARQUES ET AVERTISSEMENTS :
natural_image
Illustration of a hand using a tool to adjust or install a wall-mounted heating element (no text or symbols present)
Fig. 16
ACHÈVEMENT DE L'INSTALLATION
natural_image
Technical line drawing of a multi-level container or storage unit with internal compartments and structural elements (no text or symbols)
Fig. 18
natural_image
Line drawing of a hand using a tool to cut or trim a piece of wood (no text or symbols)
Fig. 19
natural_image
Simple line drawing of a vertical structure with a base and a small flame or marker (no text or symbols)
Fig. 20
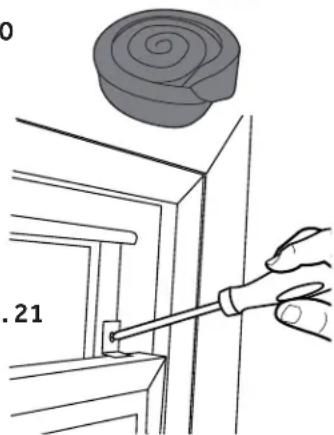
Fig. 21

natural_image
Technical line drawing of a heat exchanger or cooling unit with cooling fins and ventilation grilles (no text or symbols)
natural_image
Architectural line drawing of a building facade with grid structure and window (no text or symbols)
natural_image
Architectural line drawing of a grid-patterned structure with no visible text or symbols
NE PAS RETOURNER CE PRODUIT AU MAGASIN.
natural_image
Technical line drawing of a computer case panel with ventilation slots and mounting brackets (no text or symbols)
DÉPANNAGE
GARANTIE LIMITÉE D'UN AN
CETTE GARANTIE NE COUVRE PAS
Louisville, KY 40225
ÍNDICE
natural_image
Line drawing of an electrical outlet with a socket and plug, no text or symbols present
NOTA:
natural_image
Pure technical diagram showing a beam with downward arrows and striped pattern below, no text or symbols present

natural_image
Illustration of a hand using a pipette to measure a piece of paper or tool, labeled 'Fig. 8' (no other text or symbols)
natural_image
Pure technical line drawing of a mechanical component with no text or symbols
ASEGURE EL LADO
DEL BORDE DE LA
CORTINA LATERAL

natural_image
Pure technical line drawing of a mechanical component with no text or symbols
natural_image
Technical line drawing of a mechanical assembly with no visible text or symbols
Fig. 12

natural_image
Diagram of a structural frame with arrows indicating direction, labeled as Fig. 12-1 (no text or symbols on the diagram itself)
natural_image
Technical line drawing of a structural frame with vertical supports and internal channels (no text or symbols)
Fig. 18
natural_image
Line drawing of a hand using a tool to adjust or trim a metal strip (no text or symbols)
Fig. 19
natural_image
Pure technical line drawing of a structural support bracket without any text or symbols
Fig. 20

Fig. 21-1
natural_image
Technical line drawing of a mechanical ventilation unit with cooling fins and ventilation grilles (no text or symbols)
ENCENDIDO DEL AIRE ACONDICIONADO

natural_image
Architectural line drawing of a building interior with grid structure (no text or symbols)
Enfriamiento mínimo

natural_image
Architectural line drawing of a grid-patterned structure with no visible text or symbols
Enfriamiento máximo
PÁGINA 14 USO DEL AIRE ACONDICIONADO
natural_image
Line drawing of a portable air conditioner unit with a hand pointing to the grille (no text or symbols)
LIMPIEZA DEL FILTRO DE AIRE
natural_image
Technical line drawing of a computer case panel with ventilation slots and mounting brackets (no text or symbols)
QUÉ SE LLEVARÁ A CABO
Louisville, KY 40225
www.Haierappliances.com
Model # ESAQ406T, HWQ08XCT
Issued Date: September 2017
Haier Appliances
Louisville, KY 40225