
EBA 2748 - Microphone MIELE - Free user manual and instructions
Find the device manual for free EBA 2748 MIELE in PDF.

| Product type | Built-in kit for microwave oven |
| Brand | Miele |
| Model | EBA 2748 |
| Compatibility | Miele M 2241 SC microwave oven |
| Required niche width | 724 mm (28 1/2 in) |
| Niche width after reduction | 560 mm (22 1/16 in) |
| Niche height | 460 mm (18 1/8 in) or 470 mm (18 1/2 in) |
| Material | Plastic with adhesive strips |
| Supplied accessories | Spacers (L 19 mm and R), hooks, screws, risers for 470 mm height |
| Estimated weight | Approximately 0.5 kg |
| Approximate dimensions (W x H x D) | 560 x 470 x 10 mm |
| Fixing | Adhesive strips at the back and screws into clip nuts |
| Installation | In a furniture niche with wooden strips (min. thickness 16 mm) |
| Recommended cleaning | Hot water, dish soap and soft cloth |
| Prohibited products | Steam cleaners, abrasives, solvents, aggressive detergents |
| Safety precautions | Do not use the microwave before installation is complete; avoid contact with inappropriate cleaners |
| Spare parts available | Adhesive strips, hooks, spacers (upon request) |
| Repairability | Adhesive strips can be replaced; contact Miele for accessories |
| Warranty | 2 years (Miele standard) |
| Origin | Made in Germany |
Frequently Asked Questions - EBA 2748 MIELE
User questions about EBA 2748 MIELE
0 question about this device. Answer the ones you know or ask your own.
Ask a new question about this device
Download the instructions for your Microphone in PDF format for free! Find your manual EBA 2748 - MIELE and take your electronic device back in hand. On this page are published all the documents necessary for the use of your device. EBA 2748 by MIELE.
USER MANUAL EBA 2748 MIELE
The EBA 2748 is designed for installing the M 2241 SC microwave oven into a 28口 1 / 2^ (724mm) wide and 18口 1 / 8^ (460mm) or 18口 1 / 2^ (470mm) high niche.
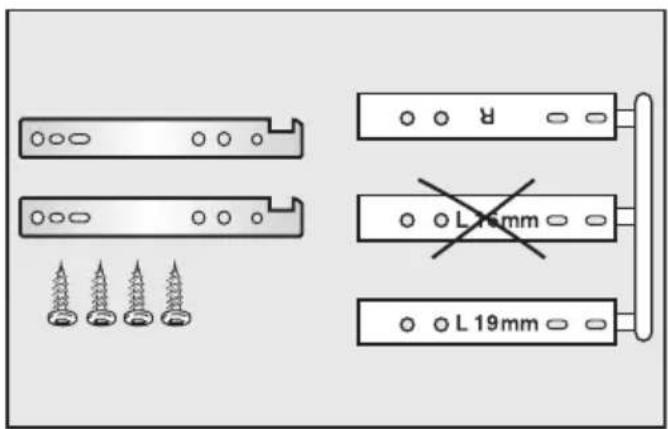
For the installation you need the spacers "R" and "L19 mm" supplied with the microwave oven M2241SC as well as the hooks and screws.
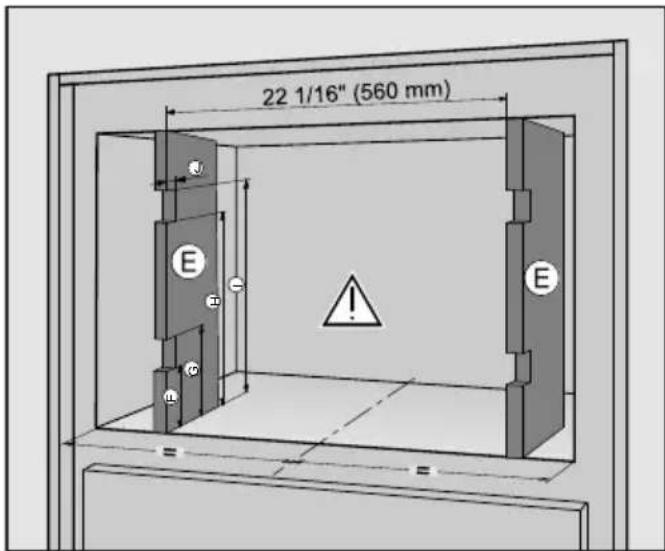
In order for the microwave oven to be held securely by the hooks, the cabinet niche has to be reduced in size from a width of 28口1 / 2'' (724mm) to a width of 22口1 / 16'' (560mm).
For this purpose, additional wooden strips must be inserted into the cabinet niche.
The wooden strips must be at least 5 / 8'' (16mm) thick and must be at least as long as the spacers.
The wooden strips must be inserted in such a way so that a centrally positioned cabinet niche with a width of 22口 1 / 16'' (560mm) is created.
F:31/8"(80mm)
G:51/8"(130mm)
:13" (330mm)
①: 14 15/16" (380mm)
J:3/8"(10mm)
Discuss your requirements with your architect, kitchen designer, and installer.
During the planning phase, it is essential to read the chapter "Installation" in the Operating and Installation Instructions of the M2241SC microwave oven. There you will also find the specifications for the placement of the electrical connection described in detail.
Further installation drawings are available on the Miele homepage.
■ Ask your kitchen builder or carpenter to adapt the cabinet niche so that the spacers can be installed as required.
Fasten the clip nuts on the right and left sides of the microwave oven at the level of the screw holes in the EBA2748.
Only for installing in a 18 1/2" (470 mm) high niche:
Mount the elevations under the feet of the microwave oven.
The front of the microwave oven should be free of dust and grease before the EBA2748 is attached.
Clean the front of the microwave oven, so that the adhesive strips onthe back of the EBA2748 stick permanently.
Remove the protective foil from the adhesive strips at the back of the EBA2748.
Slide the EBA2748 over the front of the microwave oven and press down the adhesive strips firmly.
Fasten the EBA2748 additionally with the screws in the clip nuts.
en - Installing the microwave oven
For safety reasons, only use the microwave oven when it has been fully installed.
Securing the microwave oven in the cabinet niche
The following items are supplied in the accessory pack for installing the appliance:
You need only one of the "L" spacers: L 19 mm.
- Attach the left-hand spacer L 19 mm to one of the hooks supplied.
- Attach the other hook to the right-hand spacer (R).
The spacers must be attached to the inserted wooden strips that are at least 5/8'' (16 mm) thick.
Draw a line on both sides of the cabinet 16 15/16" (429.7 mm) above the floor of the cabinet to mark the distance between the bottom of the cabinet and the lower edge of the spacer.
Height of niche Distance
18 1/8" 16 9/16"
(460,0 mm) (420,0 mm)
18 1/2" 16 15/16"
(470,0 mm) (429,7 mm)
Position the lower edge of the spacer on this line and align the stopper at the front of the spacer with the front of the cabinet wall.
-
To secure the spacers and hooks, place a screw in one of the front two holes and another in the middle of the long hole at the back. The long hole allows the position to be adjusted. The two additional holes are in case additional screws are required.
-
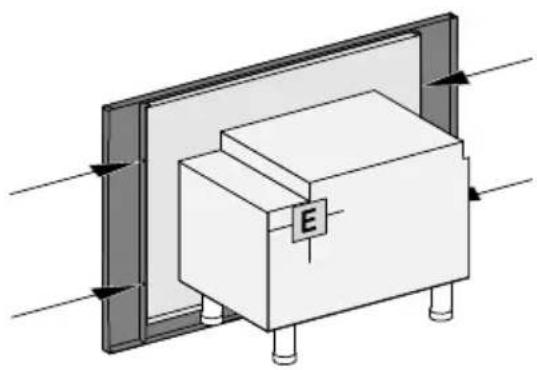
Slide the microwave oven into the cabinet niche. Guide the power cord through the cabinet niche with the plug.
-
Secure the microwave oven at the front by lifting it over the hooks and lowering it into position.
Check that the appliance is secure by pushing lightly on the upper edge of the front frame.
Check that it is correctly aligned. - Connect the microwave oven to the electrical supply.
en - Cleaning and care
Risk of injury due to electric shock
The steam from a steam cleaner could reach live electrical components and cause a short circuit.
Never use a steam cleaner for cleaning.
All surfaces could become discolored or damaged if unsuitable cleaning agents are used. The front of the microwave oven is particularly susceptible to damage from oven cleaners.
All surfaces are susceptible to scratching. Scratches on glass can lead to breakage in some circumstances.
Remove all cleaning agent residues immediately.
Unsuitable cleaning agents
To avoid damaging the surfaces of your appliance, do not use:
- Cleaning agents containing soda, ammonia, acids, or chlorides
- Cleaning agents containing descending agents on the front
- Abrasive cleaning agents (e.g., powder cleaners and cream cleaners)
- Solvent-based cleaning agents
- Stainless-steel cleaners
- Dishwasher cleaning agents
- Oven cleaners
- Glass cleaners
- Cleaning agents for ceramic-glass cooktops
- Hard, abrasive brushes or sponges (e.g., pot scourers, brushes, or sponges which have been previously used with abrasive cleaning agents)
- Eraser sponges
Sharp metal scrapers - Steel wool
- Spot cleaning with mechanical cleaning agents
- Stainless-steel spiral pads
If soiling is allowed to sit for any length of time, it may become impossible to remove.
If the appliance is used frequently without being cleaned, it may become very difficult to clean.
It is therefore best to remove any.
soiling immediately.
Removing soiling
- Remove soiling immediately with warm water, liquid dish soap, and a clean sponge or a clean, damp microfiber cloth.
- Remove all cleaning agent residues thoroughly with clean water.
After cleaning, wipe the surfaces dry using a soft cloth.
Brand : MIELE
Model : EBA 2748
Category : Microphone