
SKSRT480GS - Cooker SIGNATURE - Free user manual and instructions
Find the device manual for free SKSRT480GS SIGNATURE in PDF.

| Product Type | Built-in Gas Cooktop |
| Brand | Signature Kitchen Suite |
| Model | SKSRT480GS |
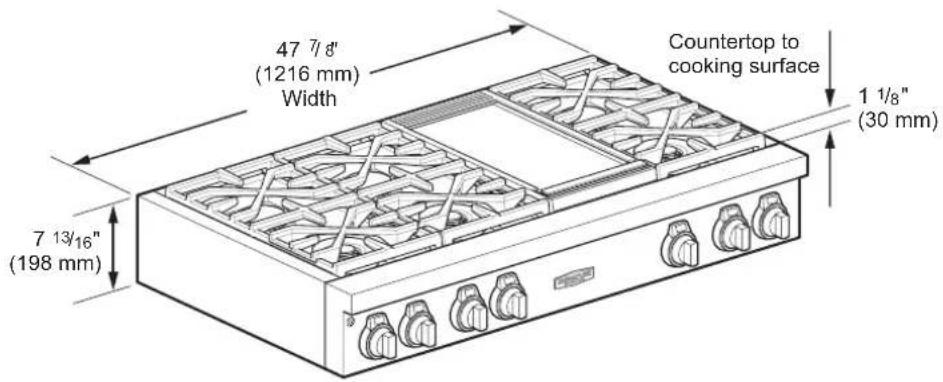
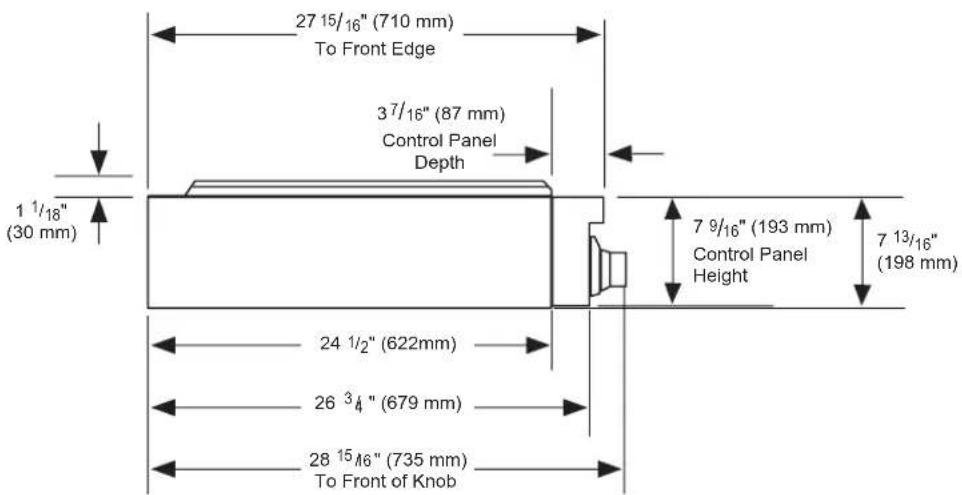
| Dimensions (W x H x D) | 47 7/8 in (1216 mm) x 8 15/16 in (228 mm) x 26 3/4 in (679 mm) |
| Countertop Cutout (W x H x D) | 48 in (1219 mm) x 7 13/16 in (198 mm) x min. 24 in (610 mm) / max. 25 in (635 mm) |
| Electrical Supply | 120 VAC, 60 Hz, 444 W, 4 1/4 ft (1.3 m) power cord with grounding plug |
| Gas Type | Natural gas or LPG (convertible) |
| Required Gas Pressure | Natural gas: 5 in WC; LPG: 10 in WC |
| Number of Burners | 6 gas burners (4 large, 2 small including 2 with Extra Low Simmer) |
| Burner Power | Large: 23,000 BTU/h max; Small: 15,000 BTU/h max; Extra Low Simmer: down to 310 BTU/h |
| Integrated Griddle | Griddle cooking surface, adjustable from 200 °F to 450 °F (93 °C to 232 °C) |
| Special Features | Extra Low Simmer, digital timer per burner, Sabbath mode, Wi-Fi, Smart Diagnosis |
| Grates | Removable cast iron grates, convertible wok grate (for max 14 in round bottom wok) |
| Surface Material | Brushed stainless steel with painted trim |
| Cleaning | Dishwasher-safe burners and grates; non-stick griddle; removable grease tray |
| Safety | Manual gas shutoff, electric ignition, control lock in Sabbath mode, flame detection |
| Connectivity | Wi-Fi 2.4 GHz via LG ThinQ app (monitoring, history, notifications) |
| Warranty | 3 years parts and labor (functional internal parts) |
| Included Accessories | Grease tray, owner's manual, LPG conversion kit |
Frequently Asked Questions - SKSRT480GS SIGNATURE
User questions about SKSRT480GS SIGNATURE
0 question about this device. Answer the ones you know or ask your own.
Ask a new question about this device
Download the instructions for your Cooker in PDF format for free! Find your manual SKSRT480GS - SIGNATURE and take your electronic device back in hand. On this page are published all the documents necessary for the use of your device. SKSRT480GS by SIGNATURE.
USER MANUAL SKSRT480GS SIGNATURE
Read this owner's manual thoroughly before operating the appliance and keep it handy for reference at all times.

WARNING
If the information in this manual is not followed exactly, a fire or explosion may result causing property damage, personal injury or death.
-
Do not store or use gasoline or other flammable vapors and liquids in the vicinity of this or any other appliance.
• WHAT TO DO IF YOU SMELL GAS -
Do not try to light any appliance.
- Do not touch any electrical switch.
- Do not use any phone in your building.
- Immediately call your gas supplier from a neighbor's phone. Follow the gas supplier's instructions.
- If you cannot reach your gas supplier, call the fire department.
• Installation and service must be performed by a qualified installer, service agency, or the gas supplier.

WARNING
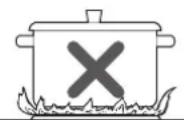
Never Operate the Top Surface Cooking Section of this Appliance Unattended
- Failure to follow this warning statement could result in fire, explosion, or burn hazard that could cause property damage, personal injury, or death.
- If a fire should occur, keep away from the appliance and immediately call your fire department.
• DO NOT ATTEMPT TO EXTINGUISH AN OIL/GREASE FIRE WITH WATER.
SKSRT360GS SKSRT480GS

MFL71677607_02
www.signaturekitchensuite.com
Copyright © 2024 Signature Kitchen Suite. All Rights Reserved.
2 TABLE OF CONTENTS
TABLE OF CONTENTS
3 IMPORTANT SAFETY INSTRUCTIONS
9 PRODUCT OVERVIEW
9 Parts
9 Accessories
10 INSTALLATION
10 Product Specifications
10 Before Installing the Rangetop
12 Ventilation Requirements
12 Proper Location
15 Gas Supply
15 Installing the Rangetop
17 Connecting the Rangetop to Gas
18 Electrical Connections
19 Checking Ignition of the Surface Burners
20 OPERATION
20 Control Panel Overview
21 Changing Settings
21 Sabbath Mode
21 Wi-Fi
21 Smart Diagnosis™
22 Using the Cooktop
22 Cooktop Modules
22 Cooktop Timers
23 The Gas Surface Burners
23 Before Use
23 Using the Gas Surface Burners
24 Setting the Flame Size
24 In Case of Power Failure
24 Cookware for Gas Burners
25 Extra Low Simmer (Small Burners Only)
25 Using a Wok
25 Using Stove-Top Grills
26 The Gas Built-in Griddle
28 SMART FUNCTIONS
28 LG ThinQ Application
29 Smart Diagnosis™ Function
29 Open Source Software Notice Information
29 FCC Notice
29 FCC RF Radiation Exposure Statement
30 Industry Canada Statement
30 IC Radiation Exposure Statement
31 MAINTENANCE
31 Control Panel
31 Gas Surface Burners
32 Burner Grates
32 Gas Cooktop Surface
33 Griddle
34 Exterior
34 Front Manifold Panel and Knobs
35 TROUBLESHOOTING
35 FAQs
36 Before Calling for Service
37 LIMITED WARRANTY
37 USA
38 CANADA
40 Not Covered by Warranty (for all countries)
IMPORTANT SAFETY INSTRUCTIONS
Read and follow all instructions when using the rangetop to prevent the risk of fire, electric shock, personal injury, or damage. This guide does not cover all possible conditions that may occur. Always contact your service agent or manufacturer about problems that you do not understand.
Download this owner's manual at: www.signaturekitchensuite.com

This is the safety alert symbol. This symbol alerts you to potential hazards that can result in property damage and/or serious bodily harm or death.
All safety messages will follow the safety alert symbol and either the word WARNING or CAUTION. These words mean:

WARNING - Indicates a hazardous situation which, if not avoided, could result in death or serious injury.

CAUTION - Indicates a hazardous situation which, if not avoided, could result in minor or moderate injury.
INSTALLATION SAFETY PRECAUTIONS
Have the installer show you the location of the rangetop gas shut-off valve and how to shut it off if necessary.

WARNING
- Make sure the appliance is properly installed and grounded by a qualified installer, according to the installation instructions. Any adjustment and service should be performed only by qualified gas range installers or service technicians.
- Make sure the appliance is properly adjusted by a qualified service technician or installer for the type of gas (natural or LP) that is to be used. The appliance can be converted for use with either type of gas. See the installation instructions.
- These adjustments must be done by a qualified service technician according to the manufacturer's instructions and all codes and requirements of the authority having jurisdiction. Failure to follow these instructions could result in serious injury or property damage. The qualified agency performing these adjustments assumes responsibility for the conversion.
- Disconnect the electrical supply before servicing the appliance.
- This product should not be installed below ventilation type hood systems that direct air in a downward direction.
Doing so may cause ignition and combustion problems with the cooktop resulting in personal injury and may affect the cooking performance of the unit. - To prevent fire hazard or electrical shock, do not use an adapter plug or an extension cord, or remove the grounding prong from the electrical power cord. Failure to follow this warning can cause serious injury, fire or death.
- To prevent poor air circulation, place the appliance out of the kitchen traffic path and out of drafty locations.
- Do not attempt to repair or replace any part of the appliance unless it is specifically mentioned in this manual. All other services should be referred to a qualified technician.
- Make sure that all packaging materials are removed from the appliance before operating it to prevent fire or smoke damage should the packaging material ignite.
SAFETY PRECAUTIONS
Gas appliances can cause minor exposure to four potentially harmful substances, namely benzene, carbon monoxide, formaldehyde and soot, caused primarily by the imperfect combustion of natural or LP gas. Correctly adjusted burners, indicated by a bluish rather than a yellow flame, will minimize imperfect combustion. Exposure to these substances can be minimized by opening windows or using a ventilation fan or hood.
- Do not repair or replace any part of the appliance unless specifically recommended in the manual. All other servicing should be performed by a qualified technician.
- Do not use plastic to cover food. Use foil or oven-safe lids only.
- Do not allow anyone to climb, stand or hang on the rangetop. They could damage the appliance causing severe personal injury.
- Never use your appliance for warming or heating the room.
- Always use pot holders or oven mitts when removing food from the surface elements. Cookware will be hot. Use only dry pot holders. Moist or damp pot holders on hot surfaces may result in burns from steam. Do not let the pot holder touch hot heating elements. Do not use a towel or other bulky cloth to move cookware.
- Do not heat unopened food containers. Pressure in the containers may cause them to burst which may result in injury.
- Leak testing of the appliance must be conducted according to the manufacturer's instructions.
- To eliminate the risk of burns or fire by reaching over heated surface units, cabinet storage space located above the surface units should be avoided. If cabinet storage is to be provided, the risk can be reduced by installing a range hood that projects horizontally a minimum of 5 inches beyond the bottom of the cabinets.

WARNING
- NEVER use this appliance as a space heater to heat or warm the room. Doing so may result in carbon monoxide poisoning.
- Gas leaks may occur in the system and result in a serious hazard. Gas leaks may not be detected by smell alone. Gas suppliers recommend you purchase and install a UL/CSA approved gas detector. Install and use in accordance with the gas detector manufacturer's instructions.
- To prevent staining or discoloration, clean appliance after each use.

CAUTION
- Wear gloves when cleaning the rangetop to avoid injury or burns.
FLAMMABLE MATERIALS

WARNING
Be certain that all packing materials are removed from the appliance before operating. Keep plastic, clothes, paper, and other flammable materials away from parts of the appliance that may become hot.
- Do not store or use flammable material near or on the cooktop. Flammable materials include paper, plastic, pot holders, linens, wall coverings, curtains, and gasoline or other flammable vapors and liquids such as grease or cooking oil. These materials can be ignited when the cooktop is in use.
- Wear proper apparel. Do not wear loose-fitting or hanging garments, which may ignite if they contact hot surfaces, and cause severe burns.
- If cabinet storage is provided directly above cooking surface, use it to store items that are not frequently used and can be safely stored in an area subjected to heat. Temperatures may be unsafe for volatile items such as flammable liquids, cleaners or aerosol sprays.
ELECTRICAL SAFETY

CAUTION
Be certain that all packing materials are removed from the appliance before operating. Keep plastic, clothes, paper, and other flammable materials away from parts of the appliance that may become hot.
• Always disconnect power from the appliance before servicing.
- Do not allow aluminum foil to contact heating elements.
DEEP FAT FRYER
- Use extreme caution when moving or disposing of hot grease.
• Always heat fat slowly, and watch as it heats. - If frying combinations of oils and fats, stir them together before heating.
- Use a deep fat thermometer, if possible, to prevent overheating fat beyond the smoking point.
- Use the least possible amount of fat for effective shallow or deep-fat frying. Filling the pan with too much fat can cause spillovers when food is added.
CHILD SAFETY
- Do not leave small children unattended near the rangetop.

WARNING
Do not leave children alone or unsupervised near the appliance when it is in use or is still hot. Children should never be allowed to sit or stand on any part of the appliance as they could be injured or burned.

CAUTION
Do not store items of interest to children in cabinets above a range or on the back guard of the appliance – children climbing on the appliance to reach items could be seriously injured.
- Let hot utensils cool in a safe place, out of reach of small children.
- Children should not be allowed to play with controls or other parts of the appliance.
SURFACE BURNERS

WARNING
- Even if the top burner flame goes out, gas is still flowing to the burner until the knob is turned to the Off position. If you smell gas, immediately open a window and ventilate the area for five minutes prior to using the burner. Do not leave the burners on unattended.
- Use proper pan size. Do not use pans that are unstable or that can be easily tipped. Select cookware with flat bottoms large enough to cover burners. To avoid spillovers, make sure the cookware is large enough to contain the food properly. This will both save cleaning time and prevent hazardous accumulations of food, since heavy spattering or spillovers left on the cooktop can ignite. Pans should not be larger than 11 in.(280 mm) in diameter. Use of oversized pans may discolor the stainless areas around the cooktop perimeter. Clean discolored areas with stainless steel appliance cleaner. Use pans with handles that can be easily grasped and remain cool.

CAUTION
- Be sure that all surface controls are set in the Off position prior to supplying gas to the rangetop.
- Never leave the surface burners unattended at high flame settings. Boilovers may cause smoke and greasy spillovers that may ignite.
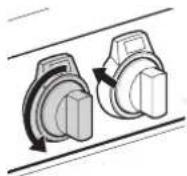
- Always turn the knobs to the Lite position when igniting the top burners and make sure the burners have ignited.
- Control the top burner flame size so it does not extend beyond the edge of the cookware. Excessive flame is hazardous.
- Only use dry pot holders- moist or damp pot holders on hot surfaces may result in burns from steam. Do not let pot holders come near open flames when lifting cookware. Do not use towels or other bulky cloth items. Use a pot holder.
- If using glass cookware, make sure the cookware is designed for range-top cooking.
- To prevent burns from ignition of flammable materials and spillage, turn cookware handles toward the side or back of the cooktop without extending them over adjacent burners.
- Never leave any items on the cooktop. The hot air from the vent may ignite flammable items and will increase pressure in closed containers, which may cause them to burst.

CAUTION
- Carefully watch foods being fried at a high flame setting.
• Always heat fat slowly, and watch as it heats. - If frying combinations of oils and fats, stir together before heating.
- Use a deep fat thermometer if possible to prevent fat from heating beyond the smoking point.
- Use the least possible amount of fat for effective shallow or deep fat frying. Filling the pan with too much fat can cause spillovers when food is added.
- Do not cook foods directly on an open flame on the cooktop.
- Foods for frying should be as dry as possible. Frost or moisture on foods can cause hot fat to bubble up and spill over the sides of the pan.
- Never try to move a pan of hot fat, especially a deep fryer. Wait until the fat is cool.
- Do not place plastic items on the cooktop units— they may melt if left too close to the vent.
- Keep all plastics away from the surface burners.
- To prevent burns, always be sure that the controls for all burners are in the Off position and all grates are cool before attempting to remove them.
- If you smell gas, turn off the gas to the appliance and call a qualified service technician. Never use an open flame to locate a leak.
- Always turn the knobs to the Off position before removing cookware.
- Do not lift the cooktop. Lifting the cooktop can cause damage and improper operation of the appliance.
- If the appliance is located near a window, do not hang long curtains that could blow over the surface burners and catch on fire.
- Use care when cleaning the cooktop. The pointed metal ends on the electrodes could cause injury.
- Stand away from the appliance while frying.
- Keep an eye on foods being fried at high or medium high heat settings.
USING GRIDDLE

CAUTION
- Don't touch the griddle before it has cooled.
- Don't allow grease to accumulate in the griddle tray. Empty the griddle tray after every use. If you do not, a grease fire may occur.
- Do not block the griddle vent by placing objects in front of the vent.
- Do not pour cold water on the hot griddle. Doing so may crack the griddle.
- Clean and dry the griddle thoroughly before first use to remove any residual oils from manufacturing.
FOOD PACKAGING AND STORAGE SAFETY INFORMATION
• Always wash your hands carefully with soap and water before and after handling food.
- Keep all work surfaces and utensils clean and disinfected before and after packaging foods.
- Temperature, moisture, acidity, and salt or sugar content of foods can influence the growth of potentially harmful microorganisms in food.
- For safety, vacuum-sealed fresh (perishable) foods should be kept in the "safe zones": cooled to 40^ / 4^ or below or heated to 130^ / 55^ or above.
• Vacuum-sealed pouches of cooked foods can be quick chilled by submerging them in ice water (half ice/half water) for 30 to 60 minutes and then refrigerated for up to 48 hours or frozen for up to a year.
ENERGY SAVING TIPS
- Match the size of the cookware to the amount of food being cooked to save energy when heating. Heating 12 quart of water requires more energy in a 3-quart pot than in a 1-quart pot.
- Match the size of the cooktop burner or element to the size of the cookware in use. Using a large element for a small pan wastes heating energy, and the exposed surface of the element is a burn or fire hazard.
SAFETY DURING USE
- Accessible parts may become hot when the grill is in use.
- When disposing of the rangetop, cut off the power cord.
SAFETY WHEN CLEANING
- For your safety, do not use high-pressure water cleaners or steam jet cleaners to clean the product.
COOK MEAT AND POULTRY THOROUGHLY
- To protect against food-borne illnesses, cook meat and poultry thoroughly. The USDA has indicated the following as safe minimum internal temperatures for consumption:
• Ground meats: 160 °F - All poultry: 165 °F
- Beef, veal, pork, or lamb: 145 °F
- Fish/seafood: 145 °F
PRODUCT OVERVIEW
Parts
Model: SKSRT360GS
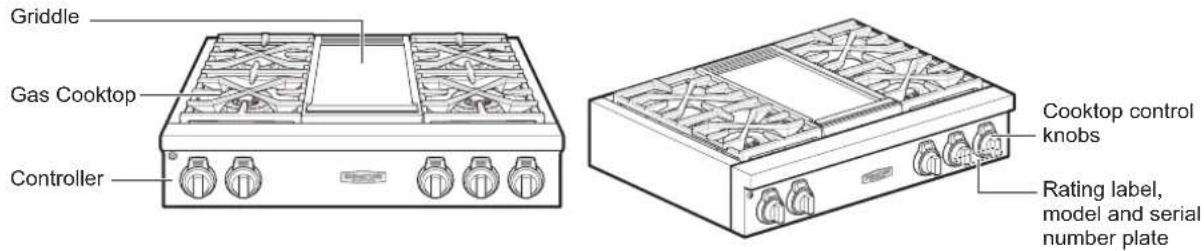
Model: SKSRT480GS

Accessories
Included Accessories
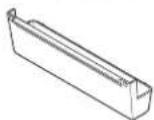
Grease Tray (1ea)

Owner's manual (1 ea)
LP Nozzle Conversion Kit
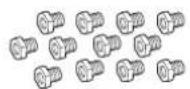
Cooktop nozzles
SKSRT360GS (8 ea)
SKSRT480GS (12 ea)

Griddle nozzle (1ea) Installation guide (1 ea)
NOTE
- If accessories are missing, call [ 1-888-289-2802 (CANADA), 1-855-790-6655 (USA) ] or visit our website at: www.signaturekitchensuite.com
- For your safety and for extended product life, only use authorized components.
- The manufacturer is not responsible for product malfunction or accidents caused by the use of separately purchased, unauthorized components or parts.
- The images in this guide may be different from the actual components and accessories, which are subject to change by the manufacturer without prior notice for product improvement purposes.
INSTALLATION
Product Specifications
The appearance and specifications listed in this manual may vary due to constant product improvements.
| Rangetop Models SKSRT360GS, SKSRT480GS | |
| Description | SKSRT360GS : 36" Gas RangetopSKSRT480GS : 48" Gas Rangetop |
| Electrical requirements 120 VAC 60 Hz 444 W | |
| Power Cable 4 1/4 ft. (1.3 m) 3-Prong Grounding Plug | |
| Gas / Electric Location Left Rear | |
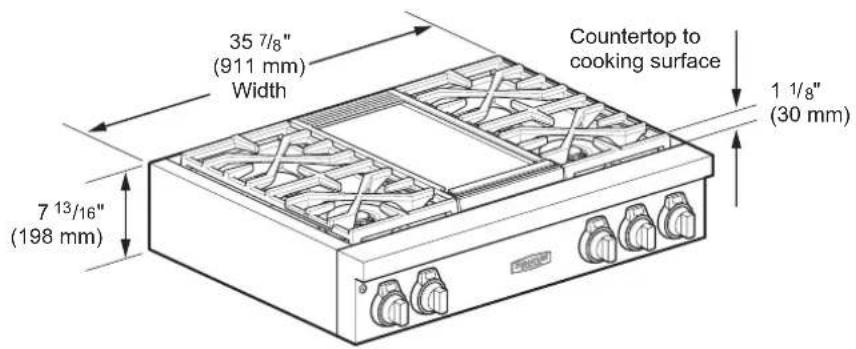
| Rangetop Dimensions | SKSRT360GS : 35^7/_8" (911 mm) (W) x 8^15/_16" (228 mm) (H) x 26^3/_4" (679 mm) (D)SKSRT480GS : 47^7/_8" (1216 mm) (W) x 8^15/_16" (228 mm) (H) x 26^3/_4" (679 mm) (D) |
| Countertop Cutout Dimensions | SKSRT360GS : 36" (914.4 mm) (W) x 7^13/_16" (198 mm) (H) x min. 24" (610 mm),max. 25" (635 mm) (D)SKSRT480GS : 48" (1219.2 mm) (W) x 7^13/_16" (198 mm) (H) x min. 24" (610 mm),max. 25"(635 mm) (D) |
| Height to Cooking Surface | 36" (91.4 cm) |
Before Installing the Rangetop

WARNING
- The information in this manual should be followed exactly. Failure to do so may result in fire, electrical shock, property damage, personal injury, or death.
- Wear gloves during the installation procedure. Failure to do so can result in bodily injury.
- Make sure no parts came loose during shipping.
In the Commonwealth of Massachusetts
- This product must be installed by a licensed plumber or gas fitter.
- When using ball type gas shut-off valves, they must be the T-handle type.
- When using a flexible gas connector, it must not exceed 3 feet in length.
NOTE
- Observe all governing codes and ordinances.
- Have the installer show you the location of the circuit breaker or fuse. Mark it for easy reference.
- As when using any appliance generating heat, follow basic safety precautions.
- Be sure your appliance is installed and grounded properly by a qualified installer or service technician according to the installation instructions.
- Any adjustment and service should be performed only by qualified gas range installers or service technicians.
Preparing for Installation
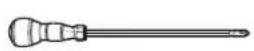
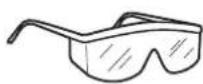
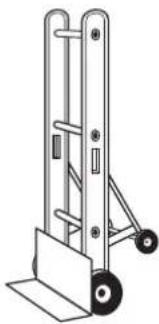
Tools Needed


1/4" Nut driver Pliers
Phillips screwdriver Flat-blade screwdriver


Level Open-end or
adjustable wrench
Safety glasses Pipe wrench (2)
(one for support)
natural_image
Line drawing of a hand truck with wheels and handle (no text or symbols)Dolly
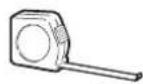
Tape measure Gloves
Materials You May Need
• Gas line shut-off valve
- Pipe joint sealant that resists action of natural and LP gases
- Flexible metal appliance connector ( ^3/4 " or ^1/2 " NPT x ^1/_2 " I.D.)
Never use an old connector when installing a new rangetop.
- Flare union adapter for connection to gas supply line (3/4" or 1/2" NPT x 1/2" I.D.)
- Flare union adapter for connection to pressure regulator on rangetop (1/2" NPT x 1/2" I.D.)
• Liquid leak detector or soapy water
Ventilation Requirements
It is recommended that these rangetops be installed in conjunction with a suitable overhead vent hood.
Due to the high heat capacity of this unit, particular attention should be paid to the hood and ductwork installation to assure it meets local building codes.

WARNING
Do not install this product with an air curtain hood or other range hood that operates by blowing air down on the cooktop. This airflow may interfere with operation of the gas burners resulting in fire or explosion hazard.
See below for the minimum clearance from the cooking surface to any horizontal surface above the rangetop. Failure to observe this clearance may result in a fire hazard.
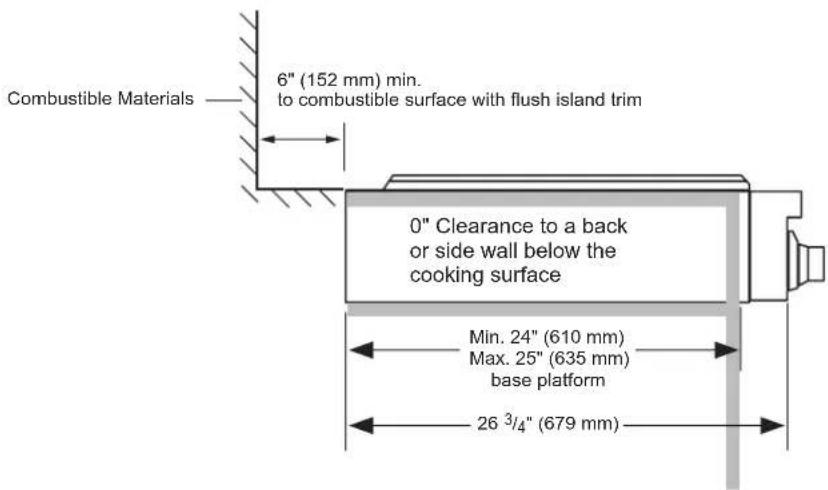
- Installations without a hood require a 36" minimum distance to any overhead combustible surface.
Proper Location
- If the unit is to be placed adjacent to cabinets, the clearances shown in "Install Clearances" are required. The same clearances apply to island installations, except for overhead cabinets, which must have a space wide enough to accept the flared island hood.
- The rangetop should not be recessed into the cabinets beyond the edge of the front face. (See "Product Dimensions and Clearances".)
- The maximum depth of overhead cabinets installed on either side of the hood is 13" (330 mm). Wall cabinets must be 18" (457 mm) above the countertop.
- There is a 36" (914 mm) minimum clearance required between the top of the cooking surface and the bottom of an unprotected cabinet. A 30" (762 mm) clearance can be used when the bottom of the wood or metal cabinet is protected by not less than 1/4" (6 mm) of a flame retardant material covered with not less than no. 28 MSG sheet steel, 0.015" (0.38 mm) thick stainless steel, 0.024" (0.61 mm) aluminum, or 0.02" (0.51 mm) thick copper.
- Non-combustible surfaces are defined in the National Fuel Gas Code (ANSI Z223.1, curr. ed.). Clearances from non-combustible materials are not part of the ANSI Z21.1 scope and are not certified by CSA. Clearances of less than 36 inches (914.4 mm) must be approved by local codes and/or by the local authority having jurisdiction.

CAUTION
- The rangetop must be level to operate properly.
- Avoid placing cabinets above the rangetop. To minimize the hazard caused by reaching over the open flames of operating burners, install a ventilation hood over the rangetop that projects forward at least five inches beyond the front of the cabinets.
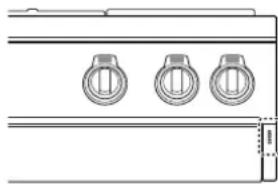
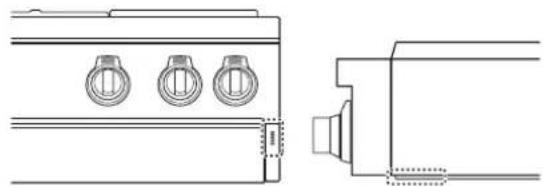
- Do not locate your rangetop where it may be subject to strong drafts. The left and right side panels are 5 mm higher than the base of the rangetop. Make sure that the sides of the rangetop that supply fresh air for ventilation are not blocked.
natural_image
Pure technical line drawing of a mechanical component with three circular features, no text or symbols present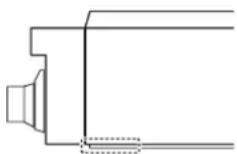
- This rangetop is for indoor, household use only.
- If the rangetop is located near a window, do not hang long curtains or paper blinds on that window.
- Make sure that the wall coverings, countertop and cabinets around the rangetop can withstand the heat (up to 194 °F) generated by the appliance. Discoloration, delamination or melting may occur. This appliance has been designed to comply with the maximum allowable wood cabinet temperature of 194 °F.
Install Clearances
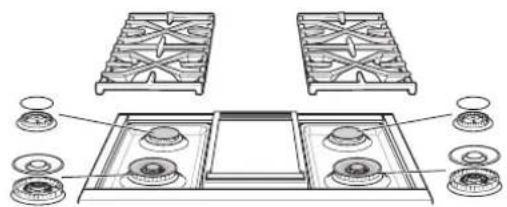
The location of gas burners and cooktop modules vary depending on the rangetop model.
Model: SKSRT360GS
Model: SKSRT480GS
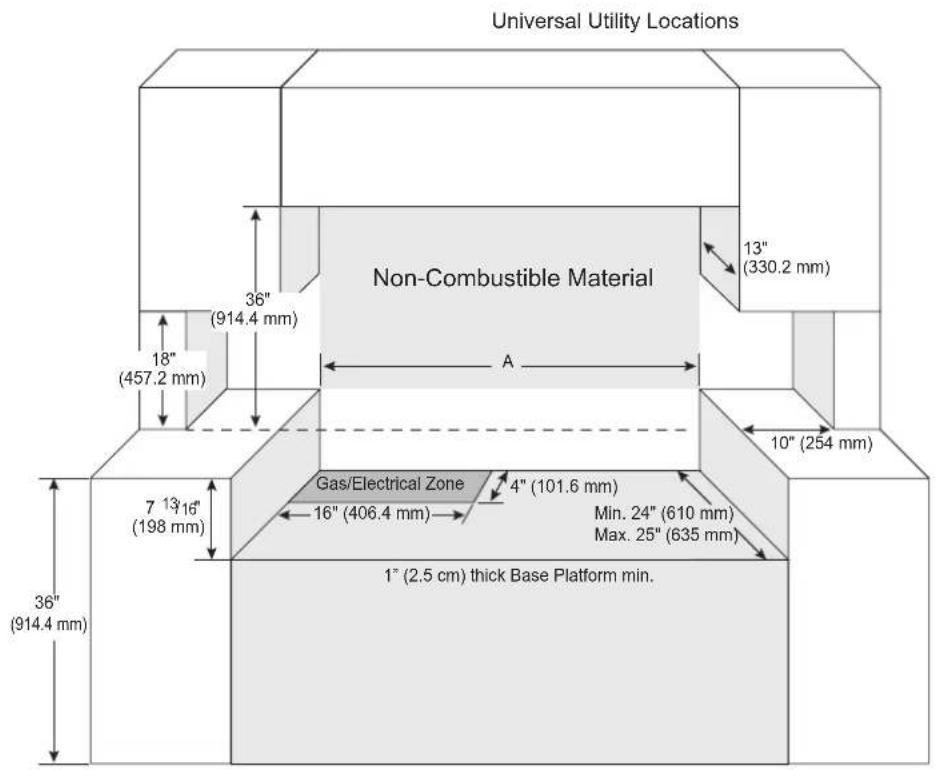
| Model | SKSRT360GS | SKSRT480GS |
| A | 36"(914.4 mm) | 48"(1219.2 mm) |
Product Dimensions and Clearances
Ventilation
- Do not locate your rangetop where it may be subject to strong drafts. The left and right side panels are 5 mm higher than the base of the rangetop. Make sure that the sides of the rangetop that supply fresh air for ventilation are not blocked.
natural_image
Technical line drawing of a battery pack with three rotary buttons and a side-view inset showing a speaker (no text or symbols)Gas Supply
The rangetop is designed to operate at a pressure of 5" of water column on natural gas or 10" of water column on LP.
Make sure that you are supplying the rangetop with the type of gas for which it is configured.
This rangetop is convertible for use with natural or LP gas. When using this rangetop with LP gas, conversion must be made by a qualified LP installer before attempting to operate the rangetop.
For proper operation, the pressure of natural gas supplied to the regulator must be between 6" and 10.5" of water column.
For LP gas, the pressure supplied to the regulator must be between 11" and 13" of water column. When checking for correct operation of the regulator, the inlet pressure must be at least 1" more than the operating (manifold) pressure as given above.
The pressure regulator located at the inlet of the rangetop must remain in the supply line regardless of which type of gas is being used.
A flexible metal appliance connector used to connect the rangetop to the gas supply line should have an I.D. of 58 " and a maximum length of 5 feet. In Canada, flexible connectors must be single wall metal connectors less than 6 feet in length.
Installing the Rangetop
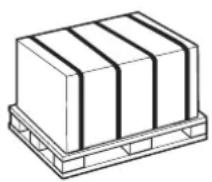
Unpacking the Rangetop

CAUTION
- Excessive Weight Hazard: You should use 2 or more people to move and install the appliance. Failure to do so can result in back or other injury.
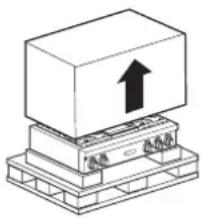
natural_image
Isometric diagram of a mechanical assembly with a central block and upward arrow (no text or symbols)1 Cut the packing straps. Lift the carton straight up. Remove packing material, tape and any temporary labels from the appliance before using. Leave the adhesive-backed foam layer over the brushed-metal surface, to protect the finish from scratches. Do not remove any warning-type labels, the model and serial number label, or the Tech Sheet that is located on the back of the rangetop.
2 The grates, burner heads, burner caps, and trays must be removed to facilitate handling. Do not remove the griddle element.
Moving the Rangetop

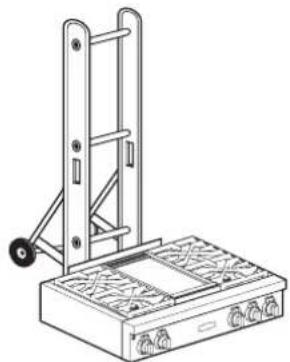
CAUTION
- Do not lift the rangetop by its control panel.
- Remove rings, watches, and any other loose items that may damage or become entangled with the unit.
- Hidden surfaces may have sharp edges. Wear gloves and use caution when reaching behind or under the appliance.
- Do not use a hand truck or appliance dolly on the front of the unit. Handle from the back only when using dolly.
- Due to the weight, it is strongly recommended that a furniture dolly with soft wheels or an air lift be used to move this product. The weight must be supported uniformly across the bottom.
1 Carefully lift the rangetop from the pallet and insert the dolly at the back of the rangetop. Use additional help as required to remove the product from the pallet. To prevent damage to the sides of the rangetop, pad the corners beneath the straps on the dolly.
natural_image
Technical line drawing of a mechanical lifting device with a roller and base (no text or symbols)2 Transport the rangetop on the furniture dolly close to its final location, tip the rangetop back to level, and carefully remove the dolly.
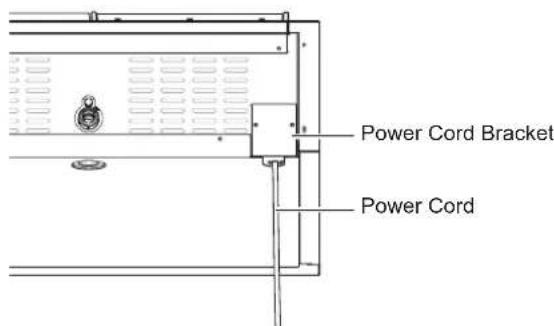
Installing the Power Cord Bracket
1 The rangetop ships with the power cord bracket facing backward.
2 During installation, remove the 2 screws holding the bracket in place and reverse the bracket so that the U-shaped opening is on the bottom.
Power Cord Bracket

natural_image
Simple line drawing of a 3D L-shaped metal bracket with mounting holes (no text or symbols)As shipped
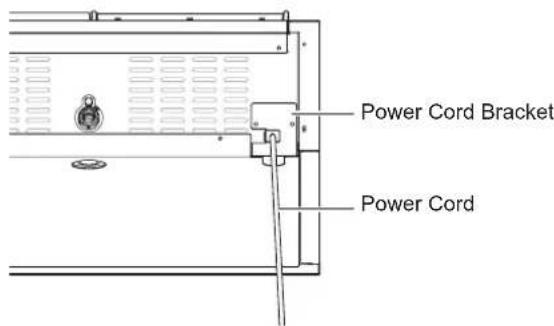
Reassembled for installation
Connecting the Rangetop to Gas
This appliance must be installed in accordance with local codes or, in the absence of local codes, with the National Fuel Gas Code, ANSI Z223.1/NFPA 54 or, in Canada, the Natural Gas and Propane Installation Code, CSA B149.1.
Shut off the appliance gas supply valve before removing the old appliance and leave it off until the new hook-up has been completed.
Because hard piping restricts movement of the appliance, a CSA International-certified flexible metal appliance connector should be used unless local codes require a hard-piped connection.
A manual valve must be installed in an accessible location in the gas piping external to the appliance for the purpose of turning on or shutting off gas to the appliance.
Never reuse an old connector when installing a new appliance.
To protect against gas leaks, use a qualified pipe joint sealant on all external threads.
1 An inlet pipe is set on the left rear of the appliance. Connect a gas hose that has a 12 " NPT internal thread to the inlet pipe using a wrench.
2 Apply sealing compound or Teflon tape at the connection.
3 When all connections have been made, turn all appliance controls to the Off position and turn on the main gas supply valve. Gas leaks may occur in your system and create a hazard. Gas leaks may not be detected by smell alone.
Check all gas connection joints and fittings for leaks with a non-corrosive leak detection fluid. Wipe off fluid after checking.
Gas suppliers recommend that you purchase and install a UL/CSA approved gas detector. Install and use in accordance with the installation instructions.

WARNING
- Do not use a flame to check for gas leaks.
- The appliance and its individual shut-off valve must be disconnected from the gas supply piping system during any pressure testing of that system at test pressures in excess of 1/2 psi (3.5 kPa).
- The appliance must be isolated from the gas supply piping system by closing its individual manual shut-off valve during any pressure testing of the gas supply piping system at test pressures equal to or less than 12 psi (3.5 kPa).
Flexible Connector Hookup
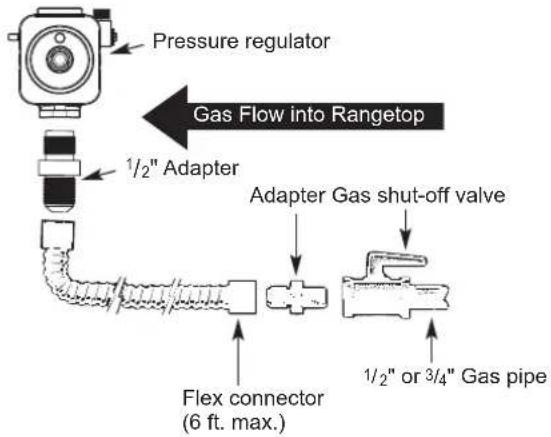
Installer: Inform the consumer of the location of the gas shutoff valve.
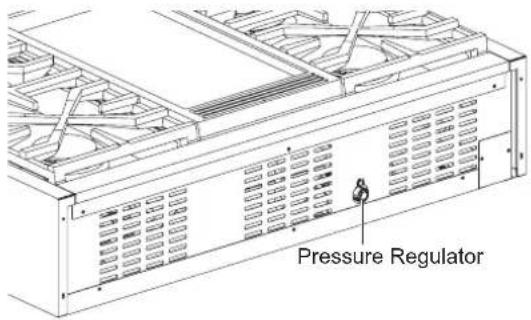
Pressure Regulator Location
The pressure regulator is located at the rear of the rangetop, on the left side.
NOTE
This rangetop leaves the factory set for use with natural gas. When converting to LP gas, read the LP (propane) gas conversion instructions located in the conversion kit accessory bag.
Electrical Connections
Electrical Requirements
Connect to a 120 Volt, 60 Hz, properly grounded dedicated circuit protected by a 15 or 20 Amp circuit breaker, or slow blow fuse.
If an external electrical source is utilized, the appliance, when installed, must be electrically grounded in accordance with local codes or, in the absence of local codes, with the National Electrical Code, ANSI/NFPA 70 or the Canadian Electric Code, CSA C22.1-02.
Grounding
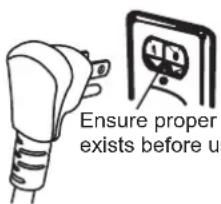
IMPORTANT: FOR PERSONAL SAFETY, THIS APPLIANCE MUST BE PROPERLY GROUNDED.
The power cord of this appliance is equipped with a 3-prong (grounding) plug which mates with a standard 3-prong grounding wall receptacle to minimize the possibility of electric shock hazard from this appliance.
The customer should have the wall receptacle and circuit checked by a qualified electrician to make sure the receptacle is properly grounded.
Where a standard two-prong wall receptacle is encountered, it is the personal responsibility and obligation of the customer to have it replaced with a properly grounded three-prong wall receptacle.
DO NOT, UNDER ANY CIRCUMSTANCES, CUT OR REMOVE THE THIRD (GROUND) PRONG FROM THE POWER CORD.
Required Method

CAUTION
Have the circuit checked by a qualified electrician to make sure the receptacle is properly grounded.
Do not use an adapter plug. Disconnecting the power cord places undue strain on the adapter and leads to eventual failure of the adapter ground terminal.
Installation must conform with local codes or, in the absence of local codes, with the National Fuel Gas Code, ANSI Z223.1/NFPA 54 or, in Canada, the Natural Gas and Propane Installation Code, CSA B149.1.
Checking Ignition of the Surface Burners
Electric Ignition
Select a surface burner knob and simultaneously push in and turn to the Lite position. You will hear a clicking sound indicating proper operation of the spark module.
Once the air has been purged from the supply lines the burner should ignite within 4 seconds. After the burner ignites, rotate the knob out of the Lite position. Try each burner in succession until all burners have been checked.
Quality of Flames
The combustion quality of the burner flames needs to be confirmed visually.

A Yellow flames - Call for service.

B Yellow tips on outer cones - This is normal for LP gas.

C Soft blue flames - This is normal for natural gas.
NOTE
- With LP gas, some yellow tipping on outer cones is normal.
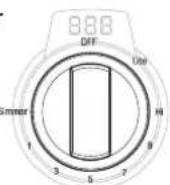
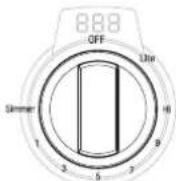
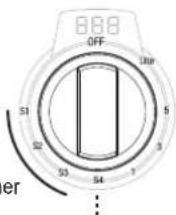
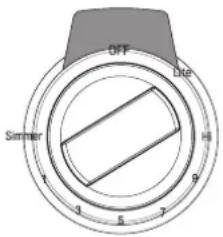
Adjusting the Surface Burner to the Low Flame (Simmer) Setting
- The continuous simmer setting (Simmer or S4 position) needs to be adjusted on all burners.
- The Extra Low Simmer settings (S1 to S3 position) on the small burners are adjusted automatically as the flame cycles off and on.
1 Remove the knob on the burner being adjusted.
2 Unscrew the 2 screws to remove the locking plate.

natural_image
Technical diagram of a mechanical component with a tool and screw (no text or symbols)Screws for locking plate (2ea)
3 Reassemble the burner knob.
4 Light all surface burners.
5 Turn the knob on the burner being adjusted to the Simmer or S4 position, and remove the knob.
6 Insert a small, flat-blade screwdriver into the valve shaft opening on the left, and turn the adjustment screw until the flame reaches the desired size.
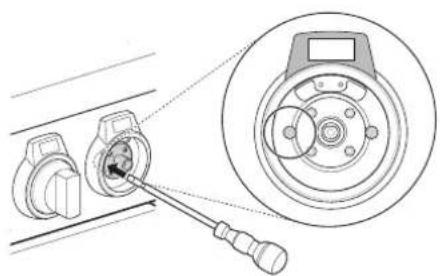
natural_image
Technical diagram showing a mechanical component being inserted into a housing, with a close-up view of the wheel assembly (no text or symbols present)NOTE
- Hold the valve shaft with one hand while turning the screw to adjust with the other.
7 Reassemble the locking plate and burner knob.
8 Test the flame stability.
Test 1: Quickly turn the knob from the highest setting to the Simmer or S4 position. If the flame goes out, increase the flame size and test again.
9 Repeat steps 1-8 for each gas surface burner.
OPERATION
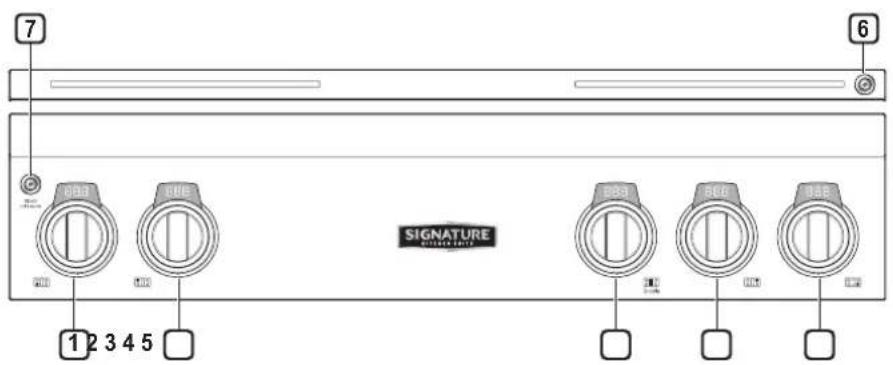
Control Panel Overview
The position of the control knobs and buttons varies by model.
Model: SKSRT360GS
① Left Front Burner Control
② Left Rear Burner Control
③ Griddle Control
④ Right Rear Burner Control
⑤ Right Front Burner Control
⑥ Night Light On/Off
⑦ Wi-Fi On/Off
Model: SKSRT480GS
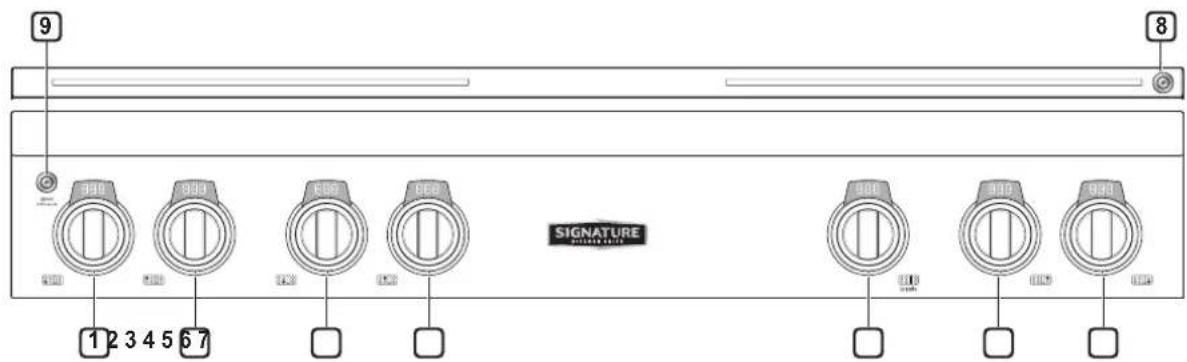
① Left Front Burner Control
② Left Rear Burner Control
③ Center Front Burner Control
④ Center Rear Burner Control
⑤ Griddle Control
⑥ Right Rear Burner Control
⑦ Right Front Burner Control
⑧ Night Light On/Off
9 Wi-Fi On/Off


Changing Settings
Sabbath Mode
Sabbath mode is used on the Jewish Sabbath and Holidays.
While the rangetop is in Sabbath mode, the timer and alarm functions are disabled.
The cooktop modules are disabled in Sabbath mode, except for the gas burners.
The "Sb" displayed will not change when operating the gas burners.
Setting Sabbath Mode
1 Press and hold the Wi-Fi and Night Light buttons at the same time for 3 seconds.
2 A short beep sounds, and all knob rings display "Sb".
3 The Sabbath mode does not turn off automatically. To manually stop Sabbath mode, press and hold the Wi-Fi and Night Light buttons at the same time for 3 seconds.
NOTE
- The extra low simmer function on the small (15K BTU) burner is controlled electronically and automatically turns off and on. Do not use the simmer function on the small burner while in Sabbath mode.
- Gas burners in use when the power goes out will continue to operate in Sabbath mode.
Wi-Fi
Connect the appliance to a home Wi-Fi network to use smart functions. See the Smart Functions section for more details.
Setting Up Wi-Fi
1 Press and hold the Wi-Fi button for 3 seconds.
2 The Wi-Fi LED blinks to indicate it is ready for setup.
3 Connect the appliance to the Wi-Fi network using the smartphone app.
4 After Wi-Fi setup is complete, the Wi-Fi LED turns on.
5 To disconnect the appliance from the network, delete it from the registered appliances in the app.
Smart Diagnosis™
Smart Diagnosis™ can be run through a smartphone application. See "Smart Diagnosis Function" in the Smart Functions section for detailed instructions.
- The Audible Diagnosis function is not provided.
Using the Cooktop
Cooktop Modules
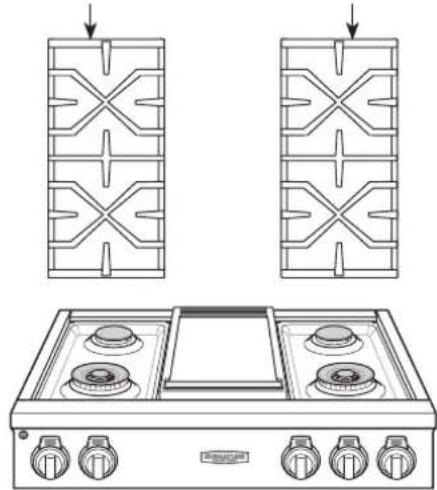
The size and location of gas burners vary depending on the rangetop model.
The large burners are the primary burners for most cooking. The small burners are used for delicate foods such as sauces or foods that require low heat for a long cooking time.
Depending on your model, some or all of the small burners are equipped with the Extra Low Simmer function, which controls heat by turning the flame on and off at preset intervals. The Extra Low Simmer function is available on the small burners marked with an asterisk below.
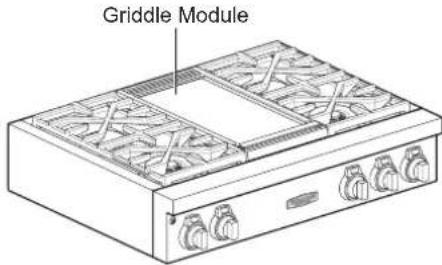
Use the griddle module for cooking eggs, burgers, pancakes, and other foods.
Cooktop Layouts
Model: SKSRT360GS
* Extra Low Simmer
Model: SKSRT480GS
* Extra Low Simmer
Cooktop Timers
Each cooktop control knob has an LED display at the top which provides information such as heat level, or time remaining. The gas control knobs include a timer function. The red LED numbers display heat levels and the blue LED numbers display the timer countdown.
Setting the Cooktop Timers
A cooktop timer can only be set when the element is in use. After the timer ends, a chime sounds until the element is turned OFF.
1 Push in and turn the knob to turn on the element.
2 Set a timer by turning the LED ring behind the knob. Turn the LED ring right or left and hold it to increase or decrease the time.
3 Release the LED ring when the desired time appears in the knob display.
4 The knob display shows the time counting down. A chime sounds when the time ends.
5 To cancel a timer, turn the LED ring to the left until 1 appears in the display. Then, turn the LED ring to the left again.
| Cooktop Time Range | |
| Gas Cooktop 1 min. | - 12 hr. |
| Griddle 1 min. ~ | 12 hr. |
The Gas Surface Burners
Before Use
Read all instructions before using.
Make sure that all burners are properly placed.
Burner locations differ depending on the rangetop model.
Burner locations can be found under "Using the Cooktop."
Make sure that all grates are properly placed before using the burners.

CAUTION
Do not operate the burners for an extended period of time without cookware on the grate.
The finish on the grate may chip without cookware to absorb the heat.
Make sure the burners and grates have cooled down before touching them, or placing a pot holder, cleaning cloth, or other materials on them.
Touching grates before they cool down may cause burns.

CAUTION
WHAT TO DO IF YOU SMELL GAS
- Open windows.
- Do not try to light any appliance.
- Do not touch any electrical switch.
- Do not use any phone in your building.
- Immediately call your gas supplier from a neighbor's phone. Follow the gas supplier's instructions.
- If you cannot reach your gas supplier, call the fire department.
NOTE
Electric spark igniters from the burners cause a clicking noise. If the flame goes out, the reignition system reignites the burners automatically.
Using the Gas Surface Burners
1 Be sure that all of the surface burners and grates are placed in the correct positions.
2 Place cookware on the grate.
3 Push the control knob and turn to the Lite position until the flames have ignited.
The electric spark ignition system makes a clicking noise.
4 Turn the control knob to control the flame size.
Large Burner with Continuous Simmer function
Equivalent to 650 BTU/HR
Equivalent to 23,000 BTU/HR
Small Burner with Continuous Simmer function
Equivalent to 1,300 BTU/HR
Equivalent to 15,000 BTU/HR
Small Burner with Extra Low Simmer function
Equivalent to 310 BTU/HR
Extra Low Simmer
Equivalent to 15,000 BTU/HR
Equivalent to 1,300 BTU/HR

CAUTION
Do not attempt to disassemble or clean around any burner while another burner is on. All the burners spark when any burner is turned to Lite. An electric shock may result causing you to knock over hot cookware.
NOTE
- It is normal for the flames to turn off and on periodically during Extra Low Simmer(S1, S2 and S3).
- It is normal to occasionally hear the spark igniters operating while using the gas burner. For safety, the spark igniters are activated if the flame is blown in the wind or momentarily disappears.
- The burner settings on the control knobs are not consistent across all burners. For example, the HI setting on a large burner may be hotter than the HI setting on a small burner. The actual power for each setting varies based on burner characteristics such as the BTU and whether the burner uses a Continuous Simmer function or an Extra Low Simmer function.
Setting the Flame Size
Watch the flame, not the knob, as you reduce heat. Match the flame size on a gas burner to the cookware being used for fastest heating.


CAUTION
Never let the flames extend up the sides of the cookware.
NOTE
- The flames on the surface burners may burn yellow in the presence of high humidity, such as a rainy day or a nearby humidifier.
- After LP gas conversion, flames can be bigger than normal when you put a pot on the surface burner.
- When turning a surface burner from high heat to simmer quickly, make sure the flames stay lit. See page 19 to adjust the burner flames, if necessary.
In Case of Power Failure
If you experience a power outage, you can carefully light the gas surface burners on the rangetop with a match. Gas burners in use when the power goes out will continue to operate normally.
1 Hold a lit match to the burner, then push in the control knob.
2 Turn the control knob to the 1 position.

CAUTION
Use extreme caution when lighting burners with a match. Doing so can cause burns and other damage.
Cookware for Gas Burners
| Aluminum | Medium-weight cookware is recommended because it heats quickly and evenly. Most foods brown evenly in an aluminum skillet. Use saucepans with tight fitting lids when cooking with minimum amounts of water. |
| Cast-Iron | If heated slowly, most skillets will give satisfactory results. |
| Stainless Steel | This metal alone has poor heating properties and is usually combined with copper, aluminum or other metals for improved heat distribution. Combination metal skillets work satisfactorily if they are used with medium heat as the manufacturer recommends. |
| Enamelware | Under some conditions, the enamel of this cookware may melt. Follow cookware manufacturer's recommendations for cooking methods. |
| Glass | There are two types of glass cookware. Those for oven use only and those for top-of-range cooking. |
| Heatproof Glass Ceramic | Can be used for either surface or oven cooking. It conducts heat very slowly and cools very slowly. Check cookware manufacturer's directions to be sure it can be used on gas ranges. |


Extra Low Simmer (Small Burners Only)
- Extra Low Simmer is available on some small burners, depending on your model. On these burners, the S1 to S3 settings are for Extra Low Simmer and the S4 setting is for a continuous simmer. The Simmer setting on the other small and large burners applies heat to food continuously.
Extra Low Simmer controls the heat by turning the flame on and off at preset intervals. This allows foods such as sauces, chocolate and jam to simmer longer without scorching.
- The intervals without flame become longer as you move from S3 to S1.
- The S4 simmer setting keeps the flame lit continuously.
NOTE
- It may look like the burners are turned off during Extra Low Simmer.
- It is normal for the flames to turn off and on periodically during Extra Low Simmer.
- The electric igniters automatically operate periodically to reignite the burners.
Using a Wok
- The large burner grates can be used as wok grates. 14-inch or smaller flat-bottom woks can be set directly on the grate, if the wok bottom is large enough to sit flat on the grate.

CAUTION
If using a round-bottomed wok, use the included wok grate. Do not use a wok support ring. Placing the ring over the burner or grate may cause the burner to work improperly, resulting in carbon monoxide levels above allowable standards. This can be hazardous to your health.
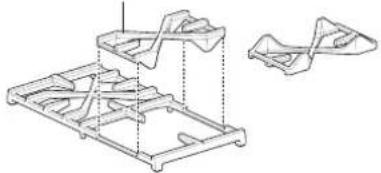
Using the Wok Grates
The large burner grates can be flipped over to handle a wide variety of round-bottom woks.
1 Turn off all burners and allow the grates and cooktop to cool before reversing the grates.
2 Flip the large burner grate so the wok grate is facing up.
3 Use a 14" round-bottomed wok. Do not use a wok that does not rest securely in the wok grate.
Wok Grate
natural_image
Technical line drawing of a mechanical assembly with two views (no text or symbols)NOTE
- Do not use the wok grate with cookware other than a wok.
- Clean the wok grate with hot, soapy water. Do not use oven cleaners, steel wool, or abrasive cleansers.

CAUTION
- Turn off all burners and allow wok grate, burner grates, and cooktop to cool before reversing or removing wok grate.
- The wok grate retains heat for a long time. Always use an oven mitt when installing or removing the wok grate. Do not store the wok grate on another burner grate.
- Do not use flat-bottomed cookware or incorrectly sized woks with the wok grate. The cookware or wok could tip and cause personal injury.
- Do not use a wok larger than 14" with the wok grate. Doing so could cause burner flames to spread excessively and damage the cooktop.
Using Stove-Top Grills
Do not place stove-top grills on the burner.


CAUTION
Do not use stove top grills on the surface burners. Using a stove top grill on the surface burner will cause incomplete combustion and can result in exposure to carbon monoxide levels above allowable current standards. This can be a health hazard.
The Gas Built-in Griddle
Use the built-in griddle instead of a saucepan for foods such as eggs, burgers, and pancakes.
Clean and dry the griddle thoroughly before using it for the first time, to remove any residual oil from manufacturing.
Griddle Grease Tray
Be sure to install the provided grease tray before using the griddle.
The grease tray should be removed and cleaned after every use.
- Allow the tray to cool before removing it.

Using the Griddle
1 Turn the Griddle knob to set the desired cooking temperature. The available temperature range is 200 °F to 450 °F (93 °C to 232 °C).
2 Wait for the preheat chime to sound before placing food on the griddle. The griddle has a non-stick coating. Use oil or butter to prevent foods like eggs, pancakes, bread or fish from sticking.
3 Turn the knob to the OFF position after cooking.
NOTE
- It is normal for the griddle to become discolored over time.
• To prevent splatters, blot moisture from food items with a paper towel before grilling.

CAUTION
- Do not remove the griddle until the cooktop surface and the griddle have completely cooled. The griddle may become very hot when the cooktop, oven or broiler are in use.
IMPORTANT NOTES
- Avoid cooking extremely greasy foods as grease spillover can occur.
- The griddle can become hot when surrounding burners are in use.
- Do not use metal utensils that can damage the griddle surface. Do not use the griddle as a cutting board.
- Do not place or store items on the griddle. The griddle can become hot when the cooktop or oven are in use.
- Cooking sprays and corn oil are not recommended for use with the griddle. Their high sugar content can make them difficult to remove after cooking.
Setting Griddle Cook Time Alarm
Use the control knob and LED ring to set the temperature and cook time for the griddle.
The temperature can be set from 200^ F to 450^ F in 25-degree increments ( 93^ C to 232^ C).
The cook time defaults to 30 minutes, but can be set from 1 minute to 12 hours in 1-minute increments.
Once the cook time is complete, a chime sounds, but the griddle remains on.
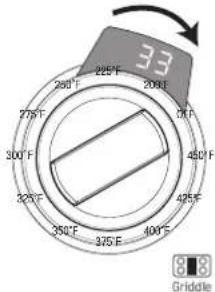
For example, to set 225 °F, 33 min.
1 Turn the knob to select 225°F. The display shows 225°F.
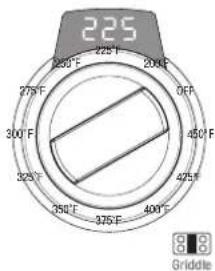
2 Turn the LED ring clockwise 3 times to set 33 minutes. To increase or decrease the time quickly, turn the LED ring and hold it.
Most foods benefit from a preheated griddle. Use the chart below as a guide and adjust as preferred. Preheat for approximately 10 minutes at 450^ F(232°C) before cooking food.
Griddle Cooking Recommendations
| Food Setting | |
| Eggs | 325 °F - 350 °F(160 °C - 180 °C) |
| Bacon, Breakfast Sausage | 375 °F - 400 °F(190 °C - 200 °C) |
| Toasted Sandwiches | 350 °F - 375 °F(180 °C - 190 °C) |
| Boneless Chicken Breasts | 375 °F - 400 °F(190 °C - 200 °C) |
| Boneless Pork Chops,1" (25.4 mm) thick | 375 °F - 400 °F(190 °C - 200 °C) |
| Steaks, 1" (25.4 mm) thick | 400 °F - 425 °F(200 °C - 220 °C) |
| Ground Beef Patties, 6 ounces | 375 °F - 400 °F(190 °C - 200 °C) |
| Hot Dogs | 350 °F - 375 °F(180 °C - 190 °C) |
| Ham Slices,1/2" (12.7 mm) thick | 350 °F - 375 °F(180 °C - 190 °C) |
| Pancakes, French Toast | 375 °F - 400 °F(190 °C - 200 °C) |
| Potatoes, Hash Browns | 375 °F - 400 °F(190 °C - 200 °C) |
NOTE
After cooking on the griddle for an extended period, adjust the griddle temperature settings as the griddle retains heat.
SMART FUNCTIONS
LG ThinQ Application
This feature is only available on models with Wi-Fi. The LG ThinQ application allows you to communicate with the appliance using a smartphone.
LG ThinQ Application Features
- Smart Diagnosis™
- This function provides useful information for diagnosing and solving issues with the appliance based on the pattern of use.
- Monitoring
- This function helps you check the current status, remaining time, cook settings and end time in one place.
- Usage History
- See the total usage time for each burner by day, week, or month.
• Product Notifications
- Turn on the Push Alerts to receive appliance status notifications. The notifications are triggered even if the LG ThinQ application is not open.
NOTE
- If you change your wireless router, Internet service provider, or password, delete the registered appliance from the LG ThinQ application and register it again.
- This information is current at the time of publication. The application is subject to change for product improvement purposes without notice to users.
Installing LG ThinQ Application and Connecting an LG Appliance
Models with QR Code
Scan the QR code attached to the product using the camera or a QR code reader application on your smartphone.

...

LG ThinQ

Models without QR Code
1 Search for and install the LG ThinQ application from the Google Play Store or Apple App Store on a smartphone.
2 Run the LG ThinQ application and sign in with your existing account or create an LG account to sign in.
3 Touch the add (+) button on the LG ThinQ application to connect your LG appliance. Follow the instructions in the application to complete the process.
NOTE
- To verify the Wi-Fi connection, check that the Wi-Fi indicator on the control panel is lit.
- The appliance supports 2.4 GHz Wi-Fi networks only. To check your network frequency, contact your Internet service provider or refer to your wireless router manual.
- LG ThinQ is not responsible for any network connection problems or any faults, malfunctions, or errors caused by network connection.
- The surrounding wireless environment can make the wireless network service run slowly.
- If the distance between the appliance and the wireless router is too far, the signal becomes weak. It may take a long time to connect or fail to install the application.
- If the appliance is having trouble connecting to the Wi-Fi network, it may be too far from the router. Purchase a Wi-Fi repeater (range extender) to improve the Wi-Fi signal strength.
- The network connection may not work properly depending on the Internet service provider.
- The Wi-Fi may not connect or the connection may be interrupted because of the home network environment.
- If the appliance cannot be connected due to problems with the wireless signal transmission, unplug the appliance and wait about a minute before trying again.
- If the firewall on your wireless router is enabled, disable the firewall or add an exception to it.
- The wireless network name (SSID) should be a combination of English letters and numbers. (Do not use special characters.)
- Smartphone user interface (UI) may vary depending on the mobile operating system (OS) and the manufacturer.
- If the security protocol of the router is set to WEP, network setup may fail. Change the security protocol (WPA2 is recommended), and connect the product again.
Smart Diagnosis™ Function
Should you experience any problems with the appliance, it has the capability of transmitting troubleshooting data to the LG ThinQ application on a smartphone.
LG ThinQ Smart Diagnosis™
Use the Smart Diagnosis feature in the LG ThinQ application for help diagnosing issues with the appliance without the assistance of the SIGNATURE KITCHEN SUITE Customer Information Center. Follow the instructions in the LG ThinQ application to perform a Smart Diagnosis using your smartphone.
1 Download the LG ThinQ application on your smart phone.
2 Open the LG ThinQ application on your smart phone. Touch the Smart Diagnosis™ button to advance to the next screen.
3 Follow the directions in the application.
4 Touch [?] in the LG ThinQ application for a more detailed guide on how to use the Wi-Fi function.
NOTE
- Smart Diagnosis™ cannot be activated unless the appliance can be turned on. If the appliance cannot be turned on, troubleshooting must be done without using Smart Diagnosis™.
Open Source Software Notice Information
To obtain the source code under GPL, LGPL, MPL and other open source licenses, that is contained in this product, please visit https://opensource.lge.com. In addition to the source code, all referred license terms, warranty disclaimers and copyright notices are available for download.
SIGNATURE KITCHEN SUITE will also provide open source code to you on CD-ROM for a charge covering the cost of performing such distribution (such as the cost of media, shipping, and handling) upon email request to opensource@lge.com. This offer is valid for a period of three years after our last shipment of this product. This offer is valid to anyone in receipt of this information.
RF Module Specifications
| Type Frequency Range Output Power (Max.) | |
| Wi-Fi 24 | 12 – 2462 MHz < 30 dBm |
| Bluetooth | 2402 – 2480 MHz < 30 dBm |
FCC Notice
The following notice covers the transmitter module contained in this product.
This equipment has been tested and found to comply with the limits for a Class B digital device, pursuant to Part 15 of the FCC Rules. These limits are designed to provide reasonable protection against harmful interference in a residential installation. This equipment generates, uses, and can radiate radio frequency energy and, if not installed and used in accordance with the instructions, may cause harmful interference to radio communications. However, there is no guarantee that interference will not occur in a particular installation. If this equipment does cause harmful interference to radio or television reception, which can be determined by turning the equipment off and on, the user is encouraged to try to correct the interference by one or more of the following measures:
- Reorient or relocate the receiving antenna.
- Increase the separation between the equipment and the receiver.
- Connect the equipment into an outlet on a circuit different from that to which the receiver is connected.
- Consult the dealer or an experienced radio/TV technician for help.
This device complies with Part 15 of the FCC Rules. Operation is subject to the following two conditions:
1) This device may not cause harmful interference and
2) This device must accept any interference received, including interference that may cause undesired operation.
Any changes or modifications in construction of this device which are not expressly approved by the party responsible for compliance could void the user's authority to operate the equipment.
FCC RF Radiation Exposure Statement
This equipment complies with FCC radiation exposure limits set forth for an uncontrolled environment. This transmitter must not be co-located or operating in conjunction with any other antenna or transmitter.
This equipment should be installed and operated with a minimum distance of 20 cm (7.8 inches) between the antenna and your body. Users must follow the specific operating instructions for satisfying RF exposure compliance.
Industry Canada Statement
This device contains licence-exempt transmitter(s)/receiver(s) that comply with Innovation, Science and Economic Development Canada's licence-exempt RSS(s). Operation is subject to the following two conditions:
(1) This device may not cause interference.
(2) This device must accept any interference, including interference that may cause undesired operation of the device.
IC Radiation Exposure Statement
This equipment complies with IC radiation exposure limits set forth for an uncontrolled environment. This equipment should be installed and operated with a minimum distance of 20 cm (7.8 inches) between the antenna and your body.
NOTE
- The manufacturer is not responsible for any radio or tv interference caused by unauthorized modifications to this equipment. Such modification could void the user's authority to operate the equipment.
MAINTENANCE
NOTE
- Depending on the model, your appliance may contain different cooktop modules requiring different maintenance procedures. Take care when cleaning the appliance to apply cleaners only as recommended.

CAUTION
- Do not clean this appliance with bleach.
• To prevent burns, wait until the cooktop has cooled down before touching any of its parts.
• Always wear gloves when cleaning the cooktop. - Do not block the vents and air openings of the rangetop. They provide the air inlet and outlet that are necessary for the rangetop to operate properly with correct combustion.
Control Panel
Clean up splatters with a damp cloth using a glass cleaner. Remove heavier soil with warm, soapy water. Do not use abrasives of any kind.
Gas Surface Burners
Removing and Replacing the Gas Surface Burners
Grates and burner heads/caps can be removed for care and cleaning.
natural_image
Technical line drawing of a gas stove with four fans and three wheels, no text or symbols present| General burner | |
| Burner cap is properly set. |  |
| Burner cap is NOT properly set. |  |
Cleaning Burner Heads/Caps
For even and unhampered flame, the slits in the burner heads must be kept clean at all times. The burner heads and caps can be lifted off.
- Wash the burner caps in hot soapy water and rinse with clean water. Run water through the burner from the bottom stem to flush out debris.
- Use care when cleaning the cooktop. The pointed metal ends on the electrodes could cause injury. Hitting an electrode with a hard object may damage it.
- To remove burnt-on food, soak the burner heads in a solution of mild liquid detergent and hot water for 20–30 minutes. For stubborn stains, use a toothbrush.
- The burners will not operate properly if the burner ports or electrodes are clogged or dirty.
- Burner caps and heads should be cleaned routinely, especially after excessive spillover.
- Burners will not light if the cap is removed.

CAUTION
- Do not hit the electrodes with anything hard. Doing so could damage them.
- Do not use steel wool or scouring powders to clean the burners.
- Do not scratch or gouge the port features of the brass burner bases.
- It is normal for brass burners to become tarnished with use.
NOTE
• To clean the brass burners, use mild abrasive cleaners or liquid cleaners.
- To clean port openings, use a stiff, nylon bristle tooth brush.
- Do not use steel wool or steel bristle brushes as they can scratch the brass burner surface.
After Cleaning the Burner Heads/Caps
Shake out any excess water and then let them dry thoroughly. Placing the burner upside down will allow the water to drain out more easily. Replace the burner heads and caps over the electrodes on the cooktop in the correct locations according to their size. Make sure the hole in the burner head is positioned over the electrode.
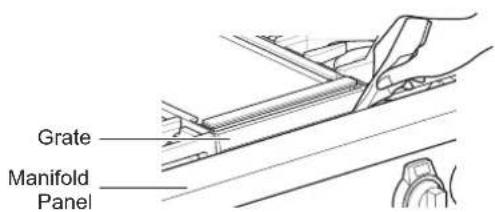
Burner Grates
The convertible wok grates should be used in the front, and the remaining grates in the back.
Left Grate Right Grate
natural_image
Line drawing of a gas stove with two identical panel designs and a separate gas stove on the same side (no text or symbols)NOTE
Do not operate a burner for an extended period of time without cookware on the grate. The finish on the grate may chip without cookware to absorb the heat.
Cleaning the Burner Grates

CAUTION
- Do not lift the grates out until they have cooled.
- Do not put the grate in an oven during self cleaning mode.
- Grates should be washed regularly and after spillovers.
- Wash the grates in hot, soapy water and rinse with clean water.
• After cleaning the grates, let them dry completely and securely position them over the burners.
Gas Cooktop Surface

CAUTION
• To avoid burns, do not clean the cooktop surface until it has cooled.
- Do not lift the cooktop surface. Lifting the cooktop surface can lead to damage and improper operation of the rangetop.
- When water is spilled on the cooktop, wipe up water immediately. If water is left on the cooktop for a long time, discoloration may occur.
Foods with high acid or sugar content may cause a dull spot if allowed to set. Wash and rinse soon after the surface has cooled. For other spills such as oil/ grease spattering, etc., wash with soap and water when the surface has cooled, then rinse and polish with a dry cloth.
Griddle
Clean the griddle plate using hot water and liquid dish soap.
To clean heavy soil, soak the griddle plate then use a brush to remove soil. Allow the griddle plate to dry thoroughly before using.

CAUTION
- Don't touch or clean the griddle or the grease tray until they have cooled completely.
- Grease in the grease tray may cause a grease fire. Drain and clean the grease tray after every use.
- Do not pour cold water on the hot griddle. Doing so may warp or crack the griddle.
- After using the griddle, use a heatproof silicone or wood spatula to clear grease and debris off the plate into the grease tray at the front of the griddle.
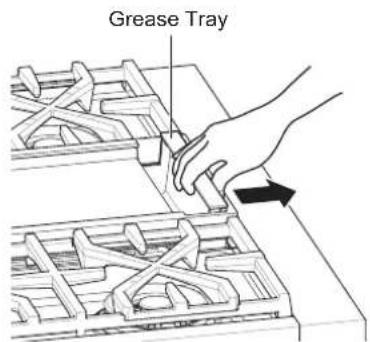
Removing the Grease Tray
The grease tray is positioned in front of the griddle.
Leave the grease tray in place while cleaning the griddle. Allow the griddle and grease tray to cool before removing the grease tray.
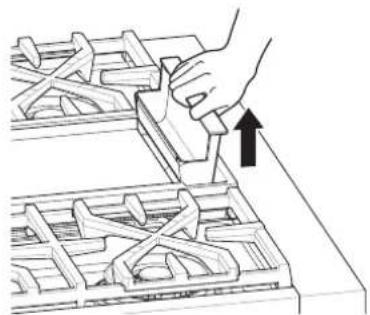
1 Use the grease tray handle to pull the grease tray toward the front of the range.
2 Carefully lift the grease tray up to remove it.
natural_image
Line drawing of a hand using a tool to press or install a component into a grid-like structure (no text or symbols)Cleaning the Griddle
1 Scrape off large food debris with a heatproof silicone or wood spatula immediately after cooking. Do not use metal utensils on the griddle.
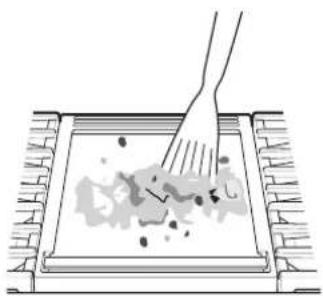
natural_image
Illustration of a hand sweeping debris on a brick-lined surface (no text or symbols)2 Push oil and small debris into the grease tray at the front of the griddle.
3 Allow the griddle to cool completely, wipe off remaining oil with a paper towel, then clean the griddle with hot soapy water.
4 Use a sponge to remove remaining soil.
5 Remove the grease tray and empty it.
6 Clean the grease tray with warm water and dish soap and dry thoroughly.
7 Rinse the griddle in clean water, wipe it dry with a cloth, and allow it to dry thoroughly before use.
NOTE
• To clean the corners of the griddle, use a soft brush and hot, soapy water.
Exterior
Painted and Decorative Trim
For general cleaning, use a cloth with hot soapy water. For more difficult soils and built-up grease, apply a liquid detergent directly onto the soil. Leave it on for 30 to 60 minutes. Rinse with a damp cloth and dry. Do not use abrasive cleaners.
Stainless Steel Surfaces
To avoid scratches, do not use steel wool pads.
1 Place a small amount of stainless steel appliance cleaner or polish on a damp cloth or paper towel.
2 Clean a small area, rubbing with the grain of the stainless steel if applicable.
3 Wipe with a clean, dry paper towel or soft cloth.
4 Repeat as necessary.
NOTE
- Use warm soapy water or a stainless steel cleaner or polish.
• Always wipe in the direction of the metal surface finish.
• Stainless steel appliance cleaner or polish can be purchased online or from most retailers of appliances or home goods.
Front Manifold Panel and Knobs
It is best to clean the manifold panel after each use of the rangetop. To clean, use a damp cloth and mild soapy water or a 50/50 solution of vinegar and water. Rinse with clean water and polish dry with a soft cloth.
The control knobs may be removed for easy cleaning.
1 To clean the knobs, make sure that they have the position indicator centered at the top or Off position and pull them straight off the stems.
2 To replace the knobs, make sure that the knobs have the position indicator centered at the top or Off position, and slide the knobs directly onto the stem.
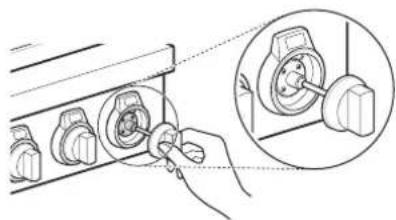
natural_image
Technical line drawing showing a hand adjusting a mechanical component with an inset close-up of the tool (no text or symbols present)
CAUTION
- Do not use abrasive cleansers, strong liquid cleaners, plastic scouring pads or oven cleaners on the manifold panel. Doing so will damage the finish.
- Do not try to bend the knobs by pulling them up or down, and do not hang a towel or other objects on them. This can damage the gas valve shaft.
- Do not try to remove the LED rings behind the control knobs.
NOTE
To prevent scratching, do not use abrasive cleaners on any of these materials.
Remove debris which collects in the crevices with a folded cloth or table knife.
NOTE
Take care not to scratch the surface.
TROUBLESHOOTING
FAQs
What types of cookware are recommended for use with the cooktop?
- The pans must have a flat bottom and straight sides.
- Only use heavy-gauge pans.
- The pan size must match the amount of food to be prepared and the size of the surface element.
- Use tight fitting lids.
- Only use flat-bottom woks or 14" round-bottom woks when using a SIGNATURE KITCHEN SUITE supplied wok grate.
Do I need to season the griddle before using it for the first time?
No. You should clean the griddle thoroughly with hot, soapy water before using it to remove any residual oil from manufacturing. The griddle does not have a nonstick coating, so use oil or butter when cooking eggs, pancakes, French toast, or fish.
Before Calling for Service
Before you call for service, review this list. It may save you time and expense. The list includes common occurrences that are not the result of defective workmanship or materials in this appliance.
| Symptoms Possible Causes / Solutions | |
| Gas cooktop burners do not light or do not burn evenly. | Make sure that the appliance is properly connected to electrical supply and grounded.Remove the burners and clean them. Check the electrode area for burnt on food or grease. See Cleaning Burner Heads/Caps in the MAINTENANCE section.Make sure that the burner parts are installed correctly.See Removing and Replacing the Gas Surface Burners in the MAINTENANCE section.It is normal for small burners that have the Extra Low Simmer function to turn off and on periodically when using the S3 to S1 settings. For more details, see the Using the Extra Low Simmer section. |
| Burner flames are very large or yellow. | If the rangetop is connected to LP gas, contact the technician who installed your rangetop or made the conversion. |
| Appliance does not operate. | Make sure that the appliance is properly connected to electrical supply. Check circuit breakers.Service wiring is not complete. Contact your electrician for assistance.Power outage. Check house lights to be sure. Call your local electric company for service. |
| Trouble connecting appliance and smartphone to Wi-Fi network | The password for the Wi-Fi network was entered incorrectly.- Delete your home Wi-Fi network and begin the registration process again.Mobile data for your smartphone is turned on.- Turn off the Mobile data on your smartphone before registering the appliance.The wireless network name (SSID) is set incorrectly.- The wireless network name (SSID) should be a combination of English letters and numbers. (Do not use special characters.)The router frequency is not 2.4 GHz.- Only a 2.4 GHz router frequency is supported. Set the wireless router to 2.4 GHz and connect the appliance to the wireless router. To check the router frequency, check with your Internet service provider or the router manufacturer.The distance between the appliance and the router is too far.- If the appliance is too far from the router, the signal may be weak and the connection may not be configured correctly. Move the router closer to the appliance or purchase and install a Wi-Fi repeater. |
| Griddle surface is scratched or dull. | Metal utensils will scratch the surface of the griddle. Do not use the griddle as a cutting board. Use only silicone or wood utensils when cooking on the griddle. |
| Food is not cooking properly on the griddle. | Wait until the griddle preheat chime sounds before starting to cook food. |
LIMITED WARRANTY
USA
Should your SIGNATURE KITCHEN SUITE Rangetop ("Product") fail due to a defect in materials or workmanship under normal and proper use, during the warranty period set forth below, SIGNATURE KITCHEN SUITE will, at its option, repair or replace the Product. This limited warranty is valid only to the original retail purchaser of the Product and applies only when purchased lawfully and used within the United States including U.S. Territories.
| Warranty Period Scope of Warranty HOW SERVICE IS HANDLED | ||
| Three (3) years from date of original retail purchase | Parts and Labor | SIGNATURE KITCHEN SUITE will provide parts and labor to repair or replace defective parts. |
- Replacement Products and parts are warranted for the remaining portion of the original warranty period or ninety (90) days, whichever is greater.
- Replacement Products and parts may be new, reconditioned, refurbished, or otherwise factory remanufactured.
- Replaced Product or part(s) will be the property of SIGNATURE KITCHEN SUITE.
- Proof of original retail purchase specifying the Product model and date of purchase is required to obtain warranty service under this limited warranty.
EXCEPT TO THE EXTENT PROHIBITED BY APPLICABLE LAW, ANY IMPLIED WARRANTY OF MERCHANTABILITY OR FITNESS FOR A PARTICULAR PURPOSE ON THE PRODUCT IS LIMITED IN DURATION TO THE DURATION OF THE ABOVE LIMITED WARRANTY. UNDER NO CIRCUMSTANCES SHALL SIGNATURE KITCHEN SUITE OR ITS U.S. DISTRIBUTORS/DEALERS BE LIABLE FOR ANY INDIRECT, INCIDENTAL, CONSEQUENTIAL, SPECIAL, OR PUNITIVE DAMAGES, INCLUDING, WITHOUT LIMITATION, LOST GOODWILL, LOST REVENUES OR PROFITS, WORK STOPPAGE, IMPAIRMENT OF OTHER GOODS, COST OF REMOVAL AND REINSTALLATION OF THE PRODUCT, LOSS OF USE, OR ANY OTHER DAMAGES WHETHER BASED IN CONTRACT, TORT, OR OTHERWISE. SIGNATURE KITCHEN SUITE'S TOTAL LIABILITY, IF ANY, SHALL NOT EXCEED THE PURCHASE PRICE PAID BY YOU FOR THE PRODUCT.
SOME STATES DO NOT ALLOW THE EXCLUSION OR LIMITATION OF INCIDENTAL OR CONSEQUENTIAL DAMAGES OR LIMITATIONS ON HOW LONG AN IMPLIED WARRANTY LASTS, SO THE ABOVE EXCLUSIONS OR LIMITATIONS MAY NOT APPLY TO YOU. THIS LIMITED WARRANTY GIVES YOU SPECIFIC LEGAL RIGHTS AND YOU MAY ALSO HAVE OTHER RIGHTS THAT VARY FROM STATE TO STATE.
THIS LIMITED WARRANTY DOES NOT COVER:
- Service trips to deliver, pick up, or install, educate how to operate, correct wiring, or correct unauthorized repairs.
- Damage or failure of the Product to perform during power failures and interrupted or inadequate electrical service.
- Damage or failure caused by leaky or broken water pipes, frozen water pipes, restricted drain lines, inadequate or interrupted water supply or inadequate supply of air.
- Damage resulting from operating the product in a corrosive atmosphere or contrary to the product owner's manual.
- Damage or failure to the Product caused by accidents, pests and vermin, lightning, wind, fire, floods, acts of God, or any other causes beyond the control of SIGNATURE KITCHEN SUITE.
- Damage or failure of the Product caused by unauthorized modification or alteration, or if the Product is used for other than the intended purpose, or any water leakage where the Product was not properly installed.
- Damage or failure of the Product caused by incorrect electrical current, voltage, or plumbing codes.
- Damage or failure of the Product caused by transportation, storage, and/or handling, including scratches, dents, chips, and/or other damage to the finish of the Product, unless such damage is reported within one (1) week of delivery.
- Damage or failure of the Product resulting from misuse, abuse, improper installation, repair, or maintenance. Improper repair includes the use of parts not authorized by SIGNATURE KITCHEN SUITE. Improper installation or maintenance includes installation or maintenance contrary to the Product owner's manual.

- Damage or failure of the Product caused by the use of parts, components, accessories, consumable cleaning products, or any other products or services that were not authorized by SIGNATURE KITCHEN SUITE.
- Damage or missing items to any display or open box Product.
- Refurbished Product or any Product sold "As Is", "Where Is", "With all Faults", or similar disclaimer.
- Products with original serial numbers that have been removed, altered, or cannot be readily determined.
- Increases in utility costs and additional utility expenses.
- Any noises associated with normal operation.
- Products used for other than normal and proper household use (e.g., commercial or industrial use) or contrary to the Product owner's manual.
- Costs associated with removal and reinstallation of the Product for repairs, or the removal and reinstallation of the Product if it is installed in an inaccessible location or not installed in accordance with the Product Owner's manual.
- Accessories, removable components, or consumable parts (e.g. Shelves, door bins, drawers, water/air filters, racks, light bulbs, batteries, etc., as applicable), except for internal/functional parts covered under this limited warranty.
CANADA
Should your SIGNATURE KITCHEN SUITE Dual Fuel Rangetop fail due to a defect in materials or workmanship under normal and proper use, during the warranty period set forth below, SIGNATURE KITCHEN SUITE will, at its option, repair or replace the Product upon receipt of proof of the original retail purchase. This limited warranty is valid only to the original retail purchaser of the Product and applies only to a Product distributed, purchased and used within Canada, as determined at the sole discretion of SIGNATURE KITCHEN SUITE.
WARRANTY PERIOD: (Note: If the original date of purchase cannot be verified, the warranty will begin sixty (60) days from the date of manufacture).
Dual Fuel Rangetop
Three (3) years from the date of original retail purchase.
Parts and Labor (internal/functional parts only)
- Replacement products and parts are warranted for the remaining portion of the original warranty period or ninety (90) days, whichever is greater.
- Replacement products and parts may be new, reconditioned, refurbished, or otherwise factory remanufactured, all at the sole discretion of SIGNATURE KITCHEN SUITE.
- Proof of original retail purchase specifying the Product model and date of purchase is required to obtain warranty service under this Limited Warranty.
SIGNATURE KITCHEN SUITE'S SOLE LIABILITY IS LIMITED TO THE LIMITED WARRANTY SET OUT ABOVE. EXCEPT AS EXPRESSLY PROVIDED ABOVE, SIGNATURE KITCHEN SUITE MAKES NO, AND HEREBY DISCLAIMS, ALL OTHER WARRANTIES AND CONDITIONS RESPECTING THE PRODUCT, WHETHER EXPRESS OR IMPLIED, INCLUDING BUT NOT LIMITED TO, ANY IMPLIED WARRANTY OR CONDITION OF MERCHANTABILITY OR FITNESS FOR A PARTICULAR PURPOSE, AND NO REPRESENTATIONS SHALL BE BINDING ON SIGNATURE KITCHEN SUITE. SIGNATURE KITCHEN SUITE DOES NOT AUTHORIZE ANY PERSON TO CREATE OR ASSUME FOR IT ANY OTHER WARRANTY OBLIGATION OR LIABILITY IN CONNECTION WITH THE PRODUCT. TO THE EXTENT THAT ANY WARRANTY OR CONDITION IS IMPLIED BY LAW, IT IS LIMITED TO THE WARRANTY PERIOD SET OUT ABOVE. UNDER NO CIRCUMSTANCES SHALL SIGNATURE KITCHEN SUITE, THE MANUFACTURER OR DISTRIBUTOR OF THE PRODUCT, BE LIABLE FOR ANY INCIDENTAL, CONSEQUENTIAL, SPECIAL, DIRECT, INDIRECT, PUNITIVE OR EXEMPLARY DAMAGES, INCLUDING, WITHOUT LIMITATION, LOSS OF GOODWILL, LOST PROFITS, LOSS OF ANTICIPATED PROFITS, LOST REVENUE, LOSS OF USE, OR ANY OTHER DAMAGE, WHETHER ARISING DIRECTLY OR INDIRECTLY FROM ANY CONTRACTUAL BREACH, FUNDAMENTAL BREACH, TORT OR OTHERWISE, OR FROM ANY ACTS OR OMISSIONS. SIGNATURE KITCHEN SUITE'S TOTAL LIABILITY, IF ANY, SHALL NOT EXCEED THE PURCHASE PRICE PAID BY YOU FOR THE PRODUCT.
This Limited Warranty gives you specific legal rights. You may also have other rights that vary from province to province depending on applicable provincial laws. Any term of this Limited Warranty that negates or varies any implied condition or warranty under provincial law is severable where it conflicts with such provincial law without affecting the remainder of this warranty's terms.
THIS LIMITED WARRANTY DOES NOT COVER:
- Service trips to i) deliver, pick up, or install or; educate on how to operate the Product; ii) correct wiring or plumbing; or iii) correct unauthorized repairs or installations of the Product;
- Damage or failure of the Product to perform during power failures and interrupted or inadequate electrical service;
- Damage or failure resulting from operating the Product in a corrosive atmosphere or contrary to the instructions outlined in the Product's owner's manual;
- Damage or failure to the Product caused by accidents, pests and vermin, lightning, wind, fire, floods, acts of God, or any other causes beyond the control of SIGNATURE KITCHEN SUITE or the manufacturer;
- Damage or failure resulting from misuse, abuse, improper installation, repair, or maintenance of the Product. Improper repair includes use of parts not authorized or specified by SIGNATURE KITCHEN SUITE. Improper installation or maintenance includes installation or maintenance contrary to the Product's owner's manual;
- Damage or failure caused by unauthorized modification or alteration of the Product, or if used for other than the intended household purpose/use of the Product, or damage or failure resulting from any water leakage due to improper installation of the Product;
- Damage or failure caused by incorrect electrical current, voltage or plumbing codes;
- Damage or failure caused by use that is other than normal household use, including, without limitation, commercial or industrial use, including use in commercial offices or recreational facilities, or as otherwise outlined in the Product's owner's manual;
- Damage or failure caused by transportation and handling, including scratches, dents, chips and/or other damage to the finish of the Product, unless such damage results from defects in materials or workmanship and is reported to SIGNATURE KITCHEN SUITE within one (1) week of delivery of the Products;
- Damage or missing items to any display, open box, refurbished or discounted Product;
- Refurbished Product or any Product sold "As Is", "Where Is", "With all Faults", or any similar disclaimer;
- Products with original serial numbers that have been removed, altered or cannot be readily determined at the discretion of SIGNATURE KITCHEN SUITE;
- Increases in utility costs and additional utility expenses in any way associated with the Product;
- Any noises associated with normal operation of the Product;
- Replacement of light bulbs, filters, fuses or any other consumable parts;
- Replacement of any part that was not originally included with the Product;
- Costs associated with removal and/or reinstallation of the Product for repairs; and
- Shelves, drawers, handle and accessories to the Product, except for internal/functional parts covered under this Limited Warranty.
- Conversion of products from natural gas or L.P. gas;
Not Covered by Warranty (for all countries)
| Problem Cause Prevention | ||
Burners do not light Clogged or dirty burner ports or electrodes will not allow the burner to operate properlySmall burner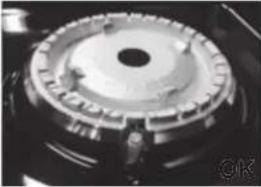 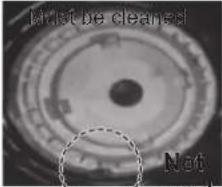 Large burner working Large burner working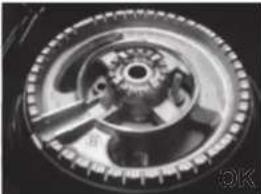  | Check and clean the gas electrode. | |
Uneven flame 1. Improper burner cap installationBurner cap is NOTproperly seated.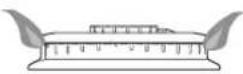 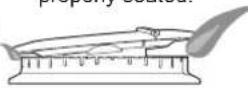 2. Burner ports clogged by food residuePorts blocked by dirt Flames uneven 2. Burner ports clogged by food residuePorts blocked by dirt Flames uneven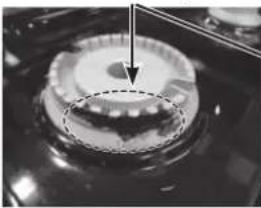  | Check installation of burner head and capHardened residue should be removed using a toothbrush. | |
| Burner cap is dull or has changed color | ScratchingUse of detergent or abrasive cleansersSmall burner cap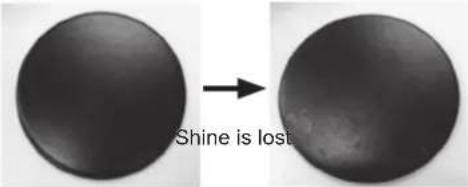 Large burner cap Large burner cap | Do not use steel wool or abrasive cleansers to clean.To remove burnt-on food, soak the burner heads in hot water for 20–30 minutes. (Do not use detergent) |
| Unit has no power 1. House power turned off (power supply)Tripped breakerThe power cord is not installed properly. | Check power at main board before calling for service.Match power cord type and outlet typeProperly install the power cord | |
| Flames too big on converted cooktop (NP → LP) | The installer missed part of the conversion. (Check 2 parts: regulator, cooktop valve).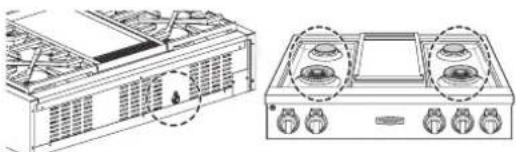 Pressure Regulator cooktop valve Pressure Regulator cooktop valve | Check with installer firstRefer to installation manual |
| Flame is too small or too large | Variable gas pressureInstaller did not check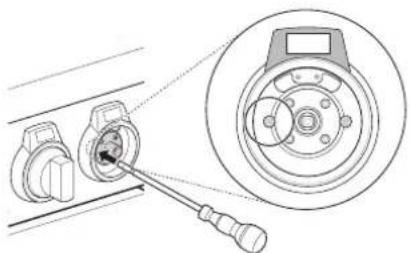 Center adjustment screw Center adjustment screw | Check with installer first |
| Problem Cause Prevention | ||
Gas smell Improper connectionFlexible Connector Hookup | Check with installer first | |
The cost of repair or replacement under these excluded circumstances shall be borne by You.
TO OBTAIN WARRANTY SERVICE AND ADDITIONAL INFORMATION
Call [ 1-888-289-2802 (CANADA), 1-855-790-6655 (USA) ] and select the appropriate option from the menu.
Visit our website at https://www.signaturekitchensuite.com.
By mail (Canada) : 20 Norelco Drive, North York, ON, M9L 2X6
Or by mail (U.S.A) : SIGNATURE KITCHEN SUITE Customer Service P.O. Box 240007 Huntsville, AL 35813 ATTN: CIC
SIGNATURE
KITCHEN SUITE
MANUAL DEL PROPIETARIO
ESTUFA
SKSRT360GS SKSRT480GS

MFL71677607_02
www.signaturekitchensuite.com
natural_image
Line drawing of a hand truck with wheels and handle (no text or symbols)Plataforma móvil
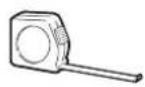
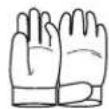
natural_image
Technical line drawing of a mechanical component with three circular features and a dimension line (no text or symbols)
natural_image
Technical line drawing of a front panel with three circular buttons and a side view showing a speaker (no text or symbols)Suministro de gas
natural_image
Isometric diagram of a mechanical assembly with a central block and mounting base (no text or symbols)natural_image
Technical line drawing of a ladder-mounted electrical switch with a motor and control panel (no text or symbols)natural_image
Simple line drawing of a 3D L-shaped metal bracket with mounting holes (no text or symbols)Como se envía
natural_image
Diagram of a mechanical component with a labeled arrow pointing to a central feature, marked 'Tom' (no text or symbols beyond label)natural_image
Technical diagram showing a mechanical component being inserted into a housing, with an inset close-up of the circular component (no text or symbols present)NOTA
natural_image
Line drawing of a kitchen appliance with four stovels and a front panel, no text or symbols presentnatural_image
Line drawing of a gas stove with four panes and three side panels, showing top-down assembly (no text or symbols)NOTA
natural_image
Line drawing of a hand using a tool to press or install a component into a grid-like structure (no text or symbols)natural_image
Illustration of a hand sweeping debris on a tiled surface (no text or symbols)natural_image
Illustration of a hand adjusting a mechanical component with an inset close-up showing the pin insertion (no text or symbols present)
PRECAUCIÓN
SKSRT360GS SKSRT480GS

MFL71677607_02
www.signaturekitchensuite.com
natural_image
Two technical line drawings: a rectangular bracket and a rectangular block, both without any text or symbols.natural_image
Three simple line drawings: a grid of small cylindrical objects, a 3D cube, and a flat rectangular block (no text or symbols)Buses de surface de cuisson
SKSRT360GS (8 ch.)
SKSRT480GS (12 ch.)
Buse de grille (1 ch.) Guide d'installation (1 ch.)
REMARQUE
natural_image
Line drawing of a hand truck with wheels and handle (no text or symbols)natural_image
Pure mechanical component diagram showing three circular components mounted on a horizontal bar (no text or symbols)
natural_image
Technical line drawing of a front panel with three circular buttons and a side view showing a speaker (no text or symbols)Alimentation en gaz
natural_image
Isometric diagram of a mechanical assembly with a block and mounting base (no text or symbols)natural_image
Technical line drawing of a mechanical lifting device with a roller support and base (no text or symbols)natural_image
Simple line drawing of a 3D L-shaped metal bracket with mounting holes (no text or symbols)Tel qu'expédié
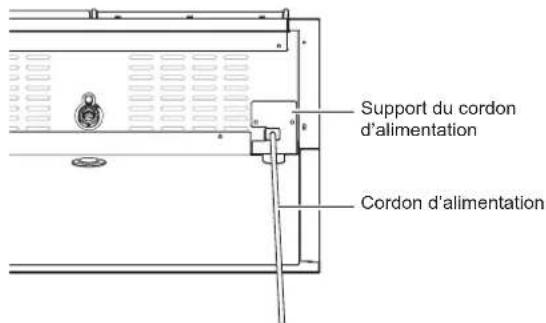
natural_image
Technical illustration of a mechanical component with a tool inserted, showing a close-up view of the wheel assembly (no text or symbols present)REMARQUE
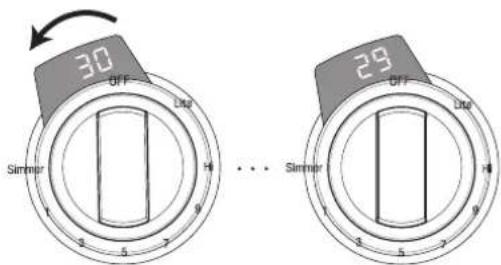
natural_image
Technical line drawing of a mechanical assembly with no visible text or symbolsREMARQUE
Application LG ThinQ
natural_image
Line drawing of a gas stove with four fans and four ovens, no text or symbols presentnatural_image
Line drawing of a gas stove with four panes and three side fans, shown above and below (no text or symbols)REMARQUE
natural_image
Line drawing of a hand using a tool to cut or press a component into a grid-like structure (no text or symbols)natural_image
Illustration of a hand sweeping debris on a tiled surface (no text or symbols)natural_image
Illustration of a hand inserting a small component into a device panel, with an inset showing the same component (no text or symbols present)
MISE EN GARDE
Customer Information Center
For inquiries or comments, call:
1-855-790-6655 USA
1-888-289-2802 CANADA
Printed in Korea