
RX50KV1B - Air Conditioning DAIKIN - Free user manual and instructions
Find the device manual for free RX50KV1B DAIKIN in PDF.

User questions about RX50KV1B DAIKIN
0 question about this device. Answer the ones you know or ask your own.
Ask a new question about this device
Download the instructions for your Air Conditioning in PDF format for free! Find your manual RX50KV1B - DAIKIN and take your electronic device back in hand. On this page are published all the documents necessary for the use of your device. RX50KV1B by DAIKIN.
USER MANUAL RX50KV1B DAIKIN
Installation manual R410A Split series
- Read these Safety Precautions carefully to ensure correct installation.
- This manual classifies the precautions into WARNING and CAUTION.
Be sure to follow all the precautions below: they are all important for ensuring safety.
WARNING.....Failure to follow any of WARNING is likely to result in such grave consequences as death or serious injury.
CAUTION .......Failure to follow any of CAUTION may result in grave consequences in some cases.
- The following safety symbols are used throughout this manual:

Be sure to observe this instruction.

Be sure to establish an earth connection.

Never attempt.
- After completing installation, test the unit to check for installation errors. Give the user adequate instructions concerning the use and cleaning of the unit according to the Operation Manual.
- The English text is the original instruction. Other languages are translations of the original instructions.

WARNING
- Installation should be left to the dealer or another professional. Improper installation may cause water leakage, electrical shock, or fire.
Install the air conditioner according to the instructions given in this manual. Incomplete installation may cause water leakage, electrical shock, or fire. - Be sure to use the supplied or specified installation parts. Use of other parts may cause the unit to come to lose, water leakage, electrical shock, or fire.
Install the air conditioner on a solid base that can support the weight of the unit. An inadequate base or incomplete installation may cause injury in the event the unit falls off the base. - Electrical work should be carried out in accordance with the installation manual and the national electrical wiring rules or code of practice. Insufficient capacity or incomplete electrical work may cause electrical shock or fire.
- Be sure to use a dedicated power circuit. Never use a power supply shared by another appliance.
- For wiring, use a cable length enough to cover the entire distance with no connection. Do not use an extension cord. Do not put other loads on the power supply, use a dedicated power circuit. (Failure to do so may cause abnormal heat, electric shock or fire.)
- Use the specified types of wires for electrical connections between the indoor and outdoor units.
Firmly clamp the interconnecting wires so their terminals receive no external stresses. Incomplete connections or clamping may cause terminal overheating or fire. - After connecting interconnecting and supply wiring be sure to shape the cables so that they do not put undue force on the electrical covers or panels. Install covers over the wires. Incomplete cover installation may cause terminal overheating, electrical shock, or fire.
- If any refrigerant has leaked out during the installation work, ventilate the room. (The refrigerant produces a toxic gas if exposed to flames.)
After all installation is complete, check to make sure that no refrigerant is leaking out. (The refrigerant produces a toxic gas if exposed to flames.) - When installing or relocating the system, be sure to keep the refrigerant circuit free from substances other than the specified refrigerant (R410A), such as air.
(Any presence of air or other foreign substance in the refrigerant circuit causes an abnormal pressure rise or rupture, resulting in injury.) - During pump-down, stop the compressor before removing the refrigerant piping. If the compressor is still running and the stop valve is open during pump-down, air will be sucked in when the refrigerant piping is removed, causing abnormal pressure in the freezer cycle which will lead to breakage and even injury.
- During installation, attach the refrigerant piping securely before running the compressor. If the compressor is not attached and the stop valve is open during pump-down, air will be sucked in when the compressor is run, causing abnormal pressure in the freezer cycle which will lead to breakage and even injury.
- Be sure to establish an earth. Do not earth the unit to a utility pipe, arrester, or telephone earth. Incomplete earth may cause electrical shock, or fire. A high surge current from lightning or other sources may cause damage to the air conditioner.
- Be sure to install an earth leakage breaker. Failure to install an earth leakage breaker may result in electric shocks, or fire.

CAUTION
- Do not install the air conditioner in a place where there is danger of exposure to inflammable gas leakage. If the gas leaks and builds up around the unit, it may catch fire.
- Establish drain piping according to the instructions of this manual. Inadequate piping may cause flooding.
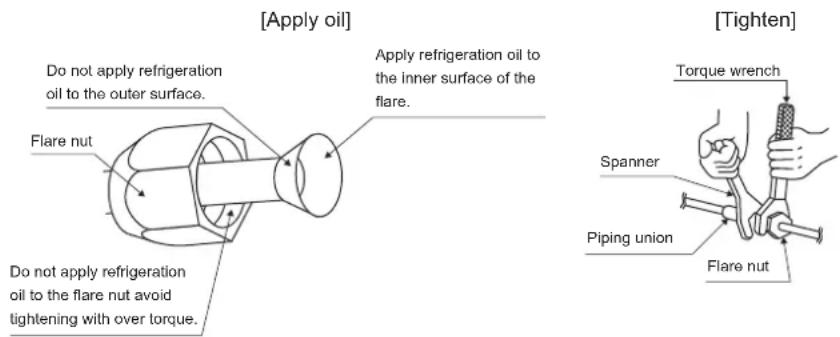
- Tighten the flare nut according to the specified method such as with a torque wrench. If the flare nut is tightened too hard, the flare nut may crack after a long time and cause refrigerant leakage.
| ·Make sure to provide for adequate measures in order to prevent that the outdoor unit be used as a shelter by small animals. Small animals making contact with electrical parts can cause malfunctions, smoke or fire. Please instruct the customer to keep the area around the unit clean. |
| ·This appliance is intended to be used by expert or trained users in shops, in light industry and on farms, or for commercial and household use by lay persons. |
| ·Sound pressure level is less than 70 dB(A). |
Accessories
Accessories supplied with the outdoor unit:
| (A) Installation Manual | 1 | (B) Drain plug (Heat pump-Models) It is on the bottom of the packing case. | 1 |
| (C) Refrigerant charge label Contains fluorinated greenhouse gases R410A ①= kg GWP: 2087.5 ②= kg ③+④= kg GWP + kg / 1000 = lCO2eq | |||
| (D) Multilingual fluorinated greenhouse gases label | 1 | ||
Precautions for Selecting the Location
1) Choose a place solid enough to bear the weight and vibration of the unit, where the operation noise will not be amplified.
2) Choose a location where the hot air discharged from the unit or the operation noise will not cause a nuisance to the neighbors of the user.
3) Avoid places near a bedroom and the like, so that the operation noise will cause no trouble.
4) There must be sufficient spaces for carrying the unit into and out of the site.
5) There must be sufficient space for air passage and no obstructions around the air inlet and the air outlet.
6) The site must be free from the possibility of flammable gas leakage in a nearby place.
7) Install units, power cords and inter-unit cables at least 3 meter away from television and radio sets. This is to prevent interference to images and sounds. (Noises may be heard even if they are more than 3 meter away depending on radio wave conditions.)
8) In coastal areas or other places with salty atmosphere of sulfate gas, corrosion may shorten the life of the air conditioner.
9) Since drain flows out of the outdoor unit, do not place under the unit anything which must be kept away from moisture.
NOTE
Cannot be installed hanging from ceiling or stacked.

CAUTION
When operating the air conditioner in a low outdoor ambient temperature, be sure to follow the instructions described below.
1) To prevent exposure to wind, install the outdoor unit with its suction side facing the wall.
2) Never install the outdoor unit at a site where the suction side may be exposed directly to wind.
3) To prevent exposure to wind, it is recommended to install a baffle plate on the air discharge side of the outdoor unit.
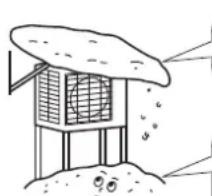
4) In heavy snowfall areas, select an installation site where the snow will not affect the unit.
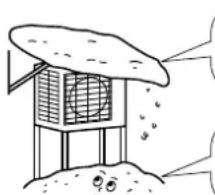
Construct a large canopy.
- Construct a pedestal.
Install the unit high enough off the ground to prevent burying in snow.
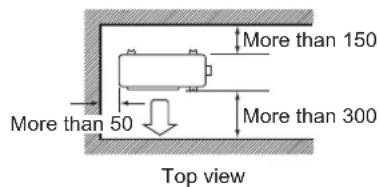
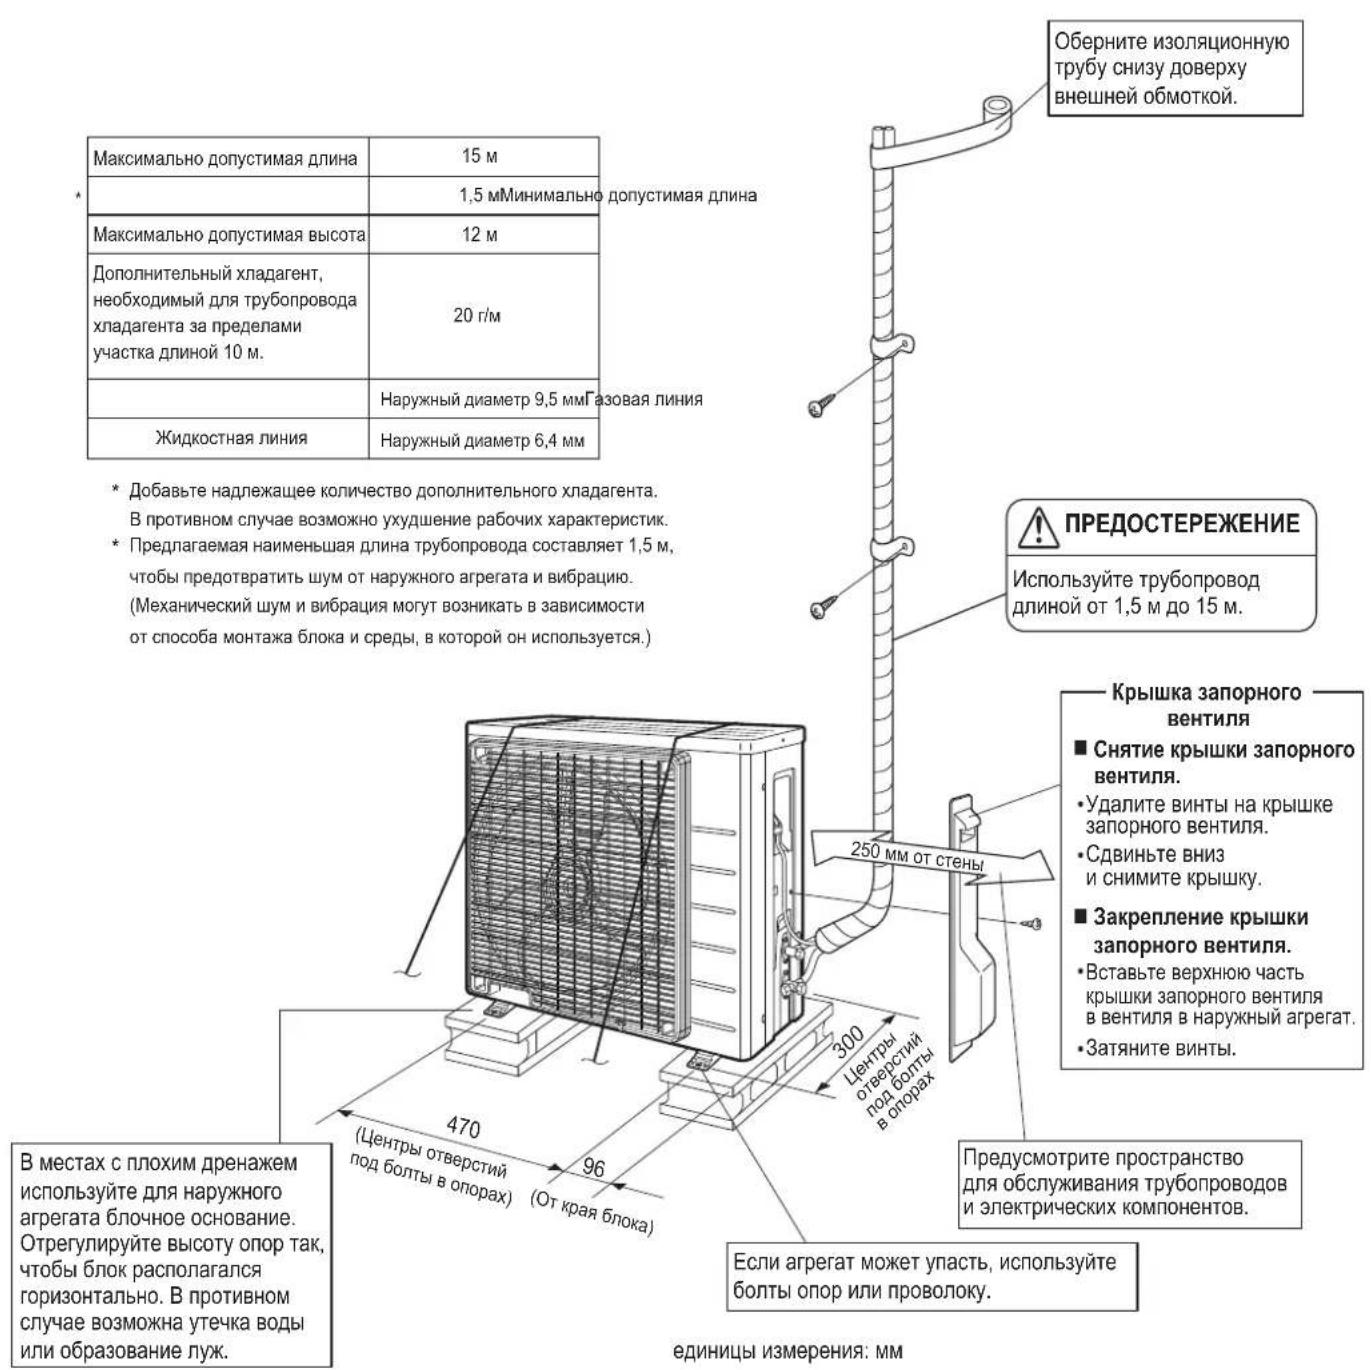
Outdoor Unit Installation Drawings
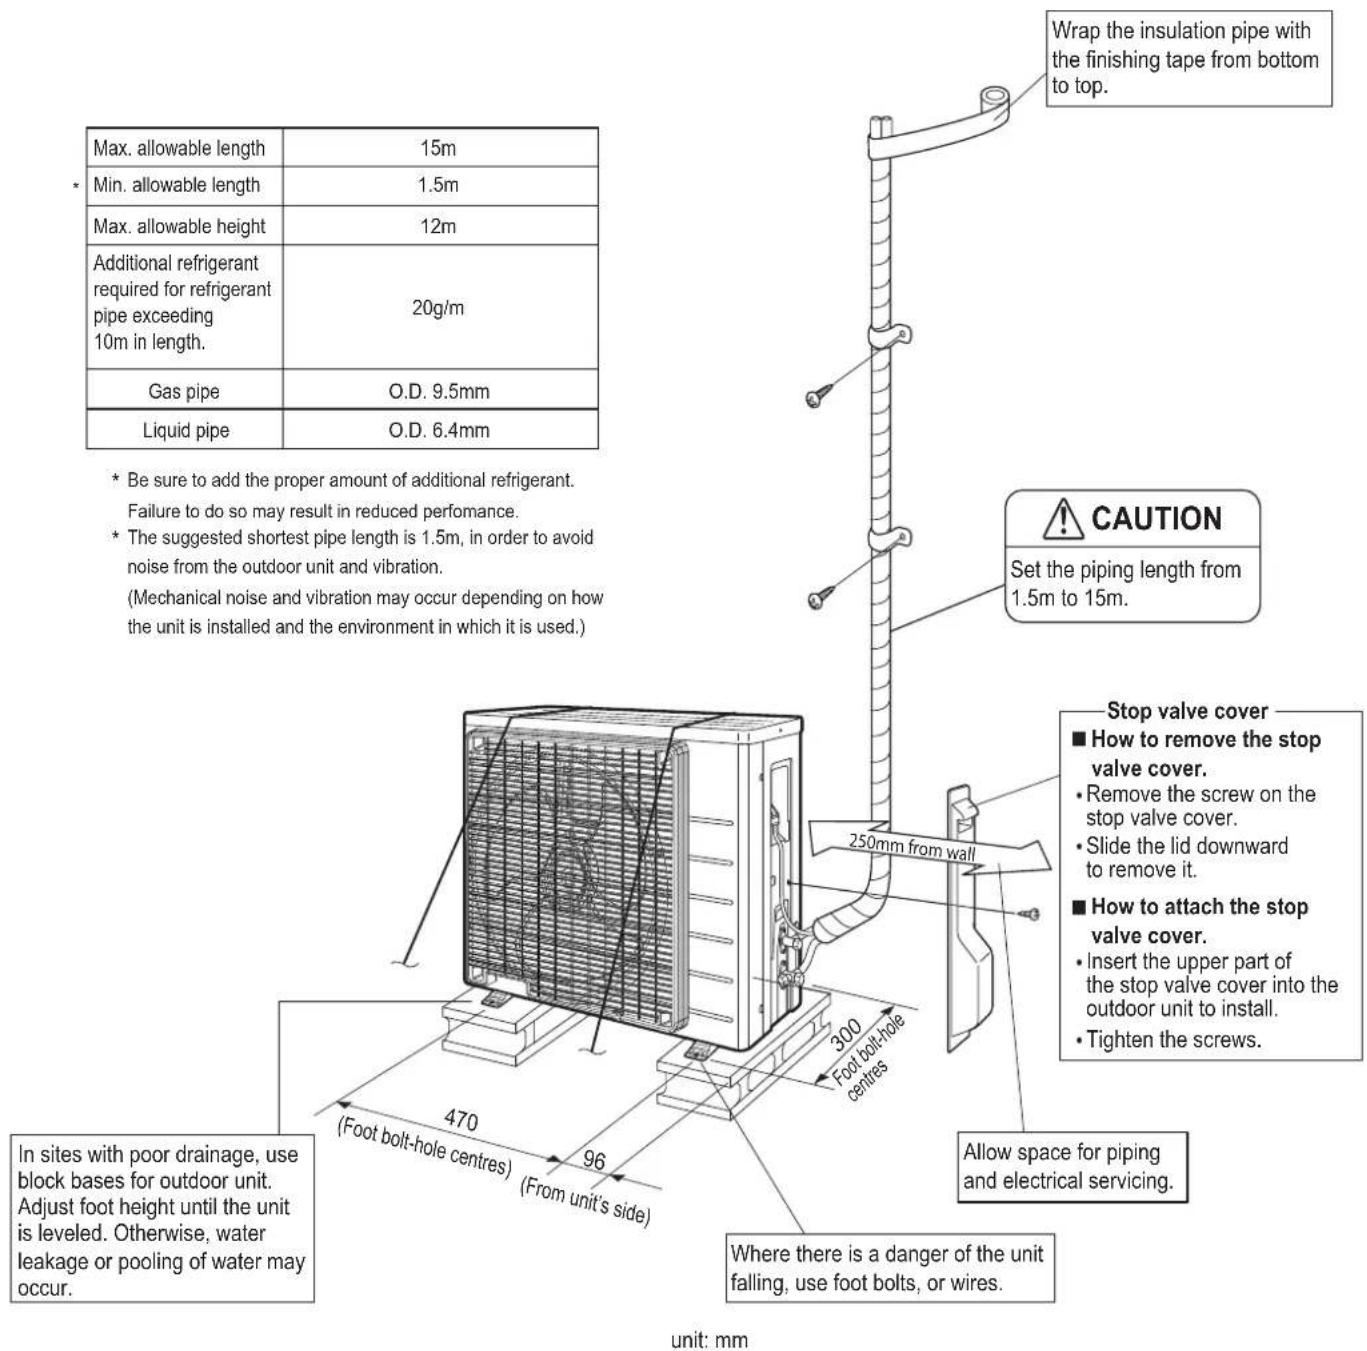
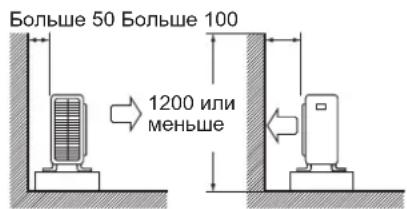
Installation Guidelines
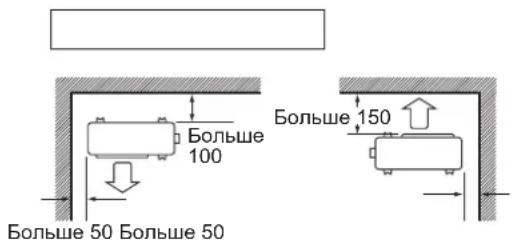
- Where a wall or other obstacle is in the path of outdoor unit's intake or exhaust airflow, follow the installation guidelines below.
- For any of the below installation patterns, the wall height on the exhaust side should be 1200mm or less.
Wall facing one side Walls facing two sides
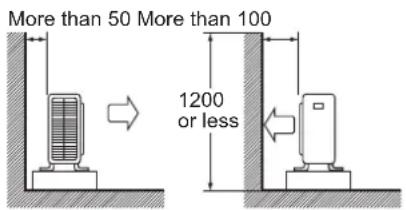
Side view
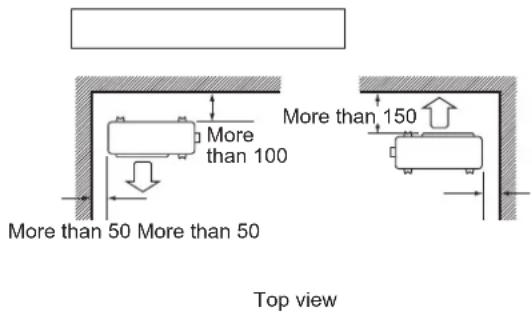
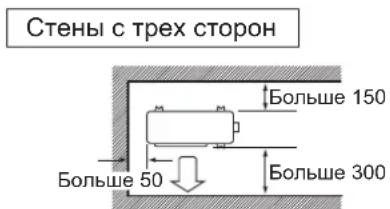
Walls facing three sides
Unit: mm
Precautions on Installation
- Check the strength and level of the installation ground so that the unit will not cause any operating vibration or noise after installed.
- In accordance with the foundation drawing, fix the unit securely by means of the foundation bolts. (Prepare four sets of M8 or M10 foundation bolts, nuts and washers each which are available on the market.)
- It is best to screw in the foundation bolts until their length are 20mm from the foundation surface.

Outdoor Unit Installation
1. Installing outdoor unit.
1) When installing the outdoor unit, refer to "Precautions for Selecting the Location" and the "Outdoor Unit Installation Drawings."
2) If drain work is necessary, follow the procedures below.
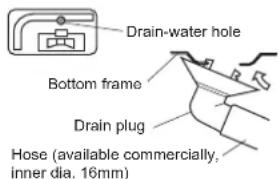
2. Drain work. (Heat pump-models.)
1) Use drain plug for drainage.
2) If the drain port is covered by a mounting base or floor surface, place additional foot bases of at least 30mm in height under the outdoor unit's feet.
3) In cold areas, do not use a drain hose with the outdoor unit. (Otherwise, drain water may freeze, impairing heating performance.)
Outdoor Unit Installation
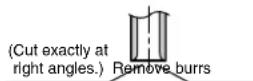
3. Flaring the pipe end.
1) Cut the pipe end with a pipe cutter.
2) Remove burrs with the cut surface facing downward so that the chips do not enter the pipe.
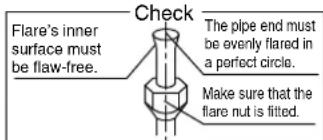
3) Put the flare nut on the pipe.
4) Flare the pipe.
5) Check that the flaring is properly made.
Flaring
| Flare tool for R410A | Conventional flare tool | |
| Clutch-type | Clutch-type (Rigid-type) | Wing-nut type (Imperial-type) |
| A 0-0.5mm | 1.0-1.5mm | 1.5-2.0mm |
WARNING
1) Do not use mineral oil on flared part.
2) Prevent mineral oil from getting into the system as this would reduce the lifetime of the units.
3) Never use piping which has been used for previous installations. Only use parts which are delivered with the unit.
4) Do never install a drier to this R410A unit in order to guarantee its lifetime.
5) The drying material may dissolve and damage the system.
6) Incomplete flaring may cause refrigerant gas leakage.
4. Refrigerant piping.
CAUTION
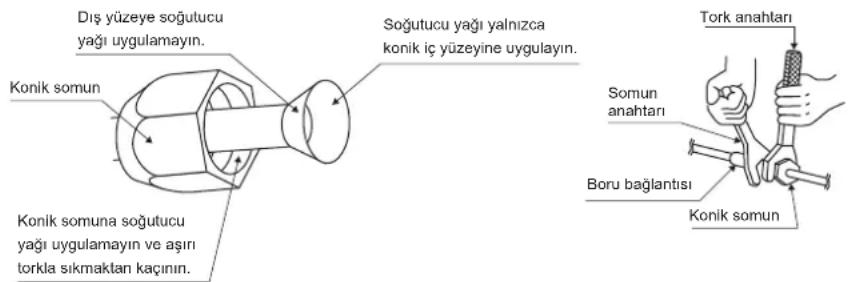
1) Use the flare nut fixed to the main unit. (To prevent cracking of the flare nut by aged deterioration.)
2) To prevent gas leakage, apply refrigeration oil only to the inner surface of the flare. (Use refrigeration oil for R410A.)
3) Use torque wrenches when tightening the flare nuts to prevent damage to the flare nuts and gas leakage.
Align the centres of both flares and tighten the flare nuts 3 or 4 turns by hand. Then tighten them fully with the torque wrenches.
| Flare nut tightening torque |
| Gas side Liquid side |
| 3/8 inch 1/4 inch |
| 32.7-39.9N·m 14.2-17.2N·m (333-407kgf·cm) (144-175kgf·cm) |
| Valve cap tightening torque | |
| Gas side Liquid side | |
| 3/8 inch 1/4 inch | |
| 21.6-27.4N·m 21(220-280kgf · cm) | .6-27.4N·m(220-280kgf · cm) |
| Service port cap | 10.8~14.7N·m |
| tightening torque | (110~150kgf·cm) |
Outdoor Unit Installation
5. Purging air and checking gas leakage.
- When piping work is completed, it is necessary to purge the air and check for gas leakage.

WARNING
1) Do not mix any substance other than the specified refrigerant (R410A) into the refrigeration cycle.
2) When refrigerant gas leaks occur, ventilate the room as soon and as much as possible.
3) R410A, as well as other refrigerants, should always be recovered and never be released directly into the environment.
4) Use a vacuum pump for R410A exclusively. Using the same vacuum pump for different refrigerants may damage the vacuum pump or the unit.
- If using additional refrigerant, perform air purging from the refrigerant pipes and indoor unit using a vacuum pump, then charge additional refrigerant.
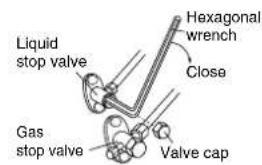
- Use a hexagonal wrench (4mm) to operate the stop valve rod.
- All refrigerant pipe joints should be tightened with a torque wrench at the specified tightening torque.

1) Connect projection side of charging hose (which comes from gauge manifold) to gas stop valve's service port.

2) Fully open gauge manifold's low-pressure valve (Lo) and completely close its high-pressure valve (Hi). (High-pressure valve subsequently requires no operation.)

3) Do vacuum pumping and make sure that the compound pressure gauge reads -0.1MPa(-76cmHg)^*1

4) Close gauge manifold's low-pressure valve (Lo) and stop vacuum pump. (Keep this state for a few minutes to make sure that the compound pressure gauge pointer does not swing back.)*2.

5) Remove caps from liquid stop valve and gas stop valve.

6) Turn the liquid stop valve's rod 90 degrees counterclockwise with a hexagonal wrench to open valve. Close it after 5 seconds, and check for gas leakage. Using soapy water, check for gas leakage from indoor unit's flare and outdoor unit's flare and valve rods. After the check is complete, wipe all soapy water off.

7) Disconnect charging hose from gas stop valve's service port, then fully open liquid and gas stop valves. (Do not attempt to turn valve rod beyond its stop.)

8) Tighten valve caps and service port caps for the liquid and gas stop valves with a torque wrench at the specified torques.
1. Pipe length vs. vacuum pump run time.
Pipe length Up to 15 metres
Run time Not less than 10 min.
2. If the compound pressure gauge pointer swings back, refrigerant may have water content or a loose pipe joint may exist. Check all pipe joints and retighten nuts as needed, then repeat steps 2) through 4).
Outdoor Unit Installation
6. Refilling the refrigerant.
Check the type of refrigerant to be used on the machine nameplate.
Precautions when adding R410A
Fill from the liquid pipe in liquid form.
It is a mixed refrigerant, so adding it in gas form may cause the refrigerant composition to change, preventing normal operation.
1) Before filling, check whether the cylinder has a siphon attached or not. (It should have something like "liquid filling siphon attached" displayed on it.)
Filling a cylinder with an attached siphon
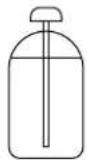
Stand the cylinder upright when filling.
There is a siphon pipe inside, so the cylinder need not be upside-down to fill with liquid.
Filling other cylinders
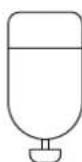
Turn the cylinder upside-down when filling.
- Be sure to use the R410A tools to ensure pressure and to prevent foreign objects entering.
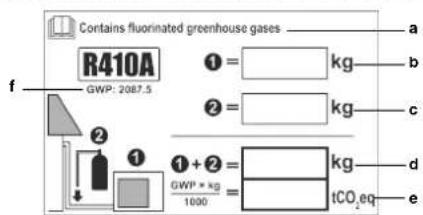
To fix the fluorinated greenhouse gases label
Fill in the label as shown in the illustration.
a If a multilingual fluorinated greenhouse gases label is delivered with the unit (see accessories), peel off the applicable language and stick it on top of a.
b Factory refrigerant charge: see unit name plate
c Additional refrigerant amount charged
d Total refrigerant charge
e Greenhouse gas emissions of the total refrigerant charge expressed as tonnes CO_2 equivalent
f GWP = Global warming potential
!
NOTICE
In Europe, the greenhouse gas emissions of the total refrigerant charge in the system (expressed as tonnes CO_2 -equivalent) is used to determine the maintenance intervals. Follow the applicable legislation.
Formula to calculate the greenhouse gas emissions: GWP value of the refrigerant × Total refrigerant charge [in kg] / 1000
Use the GWP value mentioned on the greenhouse gases label. This GWP value is based on the 4th IPCC Assessment Report. The GWP value mentioned in the manual might be outdated (i.e., based on the 3rd IPCC Assessment Report).
2 Fix the label on the unit according to the instructions in the manual.
7. Refrigerant piping work.
7-1 Cautions on pipe handling.
1) Protect the open end of the pipe against dust and moisture.
2) All pipe bends should be as gentle as possible. Use a pipe bender for bending.
7-2 Selection of copper and heat insulation materials.
When using commercial copper pipes and fittings, observe the following:
1) Insulation material: Polyethylene foam Heat transfer rate: 0.041 to 0.052W / mK (0.035 to 0.045kcal/(mh ·^) Refrigerant gas pipe's surface temperature reaches 110^ max. Choose heat insulation materials that will withstand this temperature.
2) Be sure to insulate both the gas and liquid piping and to provide insulation dimensions as below.
| Gas side Liquid | side | Gas pipe thermal insulation | Liquid pipe thermal insulation |
| O.D. 9.5mm O.D. | 6.4mm I.D. 12-15mm | I.D. 8-10mm | |
| Minimum bend radius Thickness | 10mm Min. | ||
| 30mm or more | |||
| Thickness 0.8mm (C1220T-O) | |||

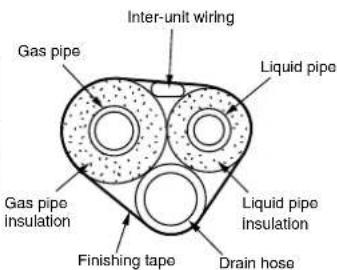
3) Use separate thermal insulation for gas and liquid refrigerant pipes.
Pump Down Operation
In order to protect the environment, be sure to pump down when relocating or disposing of the unit.
1) Remove the valve cap from liquid stop valve and gas stop valve.
2) Carry out forced cooling operation.
3) After five to ten minutes, close the liquid stop valve with a hexagonal wrench.
4) After two to three minutes, close the gas stop valve and stop forced cooling operation.
How to force cooling operation mode
Using the indoor unit operation/stop button
Press the indoor unit operation/stop button for at least five seconds. (Operation will start.)
- Forced cooling operation will stop automatically after around 15 minutes.
To force a test run to stop, press the indoor unit operation/stop button.
Using the main unit's remote controller
1) Press the "operation/stop" button. (Operation will start.)
2) Press the temperature button and the "operation select" button at the same time.
3) Press the "operation select" button twice.
will be displayed and the unit will enter test run mode.)
4) Press the "operation select" button to return the operation mode to cooling.
- Test run mode will stop automatically after around 30 minutes. To force a test run to stop, press the operation/stop button.

CAUTION
1) When pressing the switch, do not touch the terminal block. It has a high voltage, so doing so may cause electric shock.
2) After closing the liquid stop valve, close the gas stop valve within three minutes, then stop the forced operation.
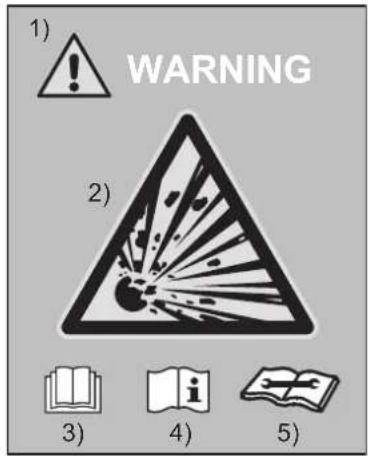
WARNING
The unit is accompanied with the label below.
Please read the following instructions carefully.

- When the refrigeration circuit has a leak, do not execute pump down with the compressor.
Use recovery system into separate cylinder - Warning, explosive hazard exists when executing pump down.
- Pump down with compressor can lead to self-combustion due to air entering during pump
Used symbols:
Warning sign (ISO 7010-W001)
2 Warning, Explosive material (ISO 7010-W002)
3 Read Operator's manual (ISO 7000 - 0790)
Operator's manual; operating instructions (ISO 7000 - 1641)
5 Service indicator; read technical manual (ISO 7000 - 1659)
Wiring

WARNING
1) Do not use tapped wires, stranded wires, extension cords, or starburst connections, as they may cause overheating, electrical shock, or fire.
2) Do not use locally purchased electrical parts inside the product. (Do not branch the power for the drain pump, etc., from the terminal block.) Doing so may cause electric shock or fire.
3) Be sure to install an earth leakage breaker. (One that can handle higher harmonics.) (This unit uses an inverter, which means that it must be used an earth leakage breaker capable handling harmonics in order to prevent malfunctioning of the earth leakage breaker itself.)
4) Use an all-pole disconnection type breaker with at least 3mm between the contact point gaps.
5) Do not connect the power wire to the indoor unit. Doing so may cause electric shock or fire.
- Do not turn ON the power supply until all work is completed.
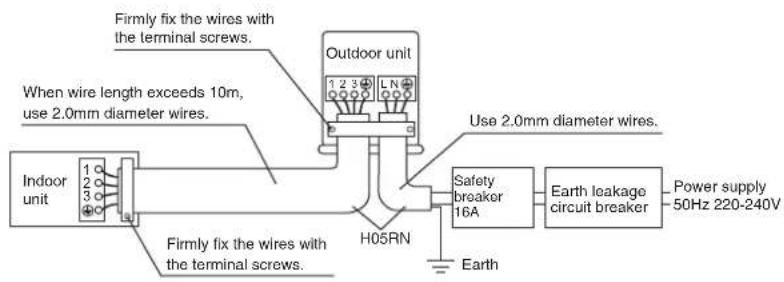
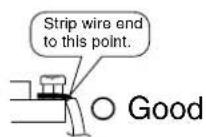
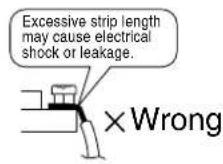
1) Strip the insulation from the wire (20mm).
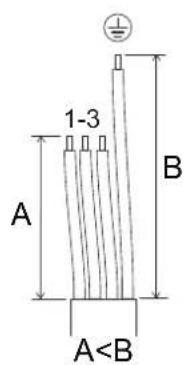
2) Connect the connecting wires between the indoor and outdoor units so that the terminal numbers match. Tighten the terminal screws securely. We recommend a flathead screwdriver be used to tighten the screws. The screws are packed with the terminal board.
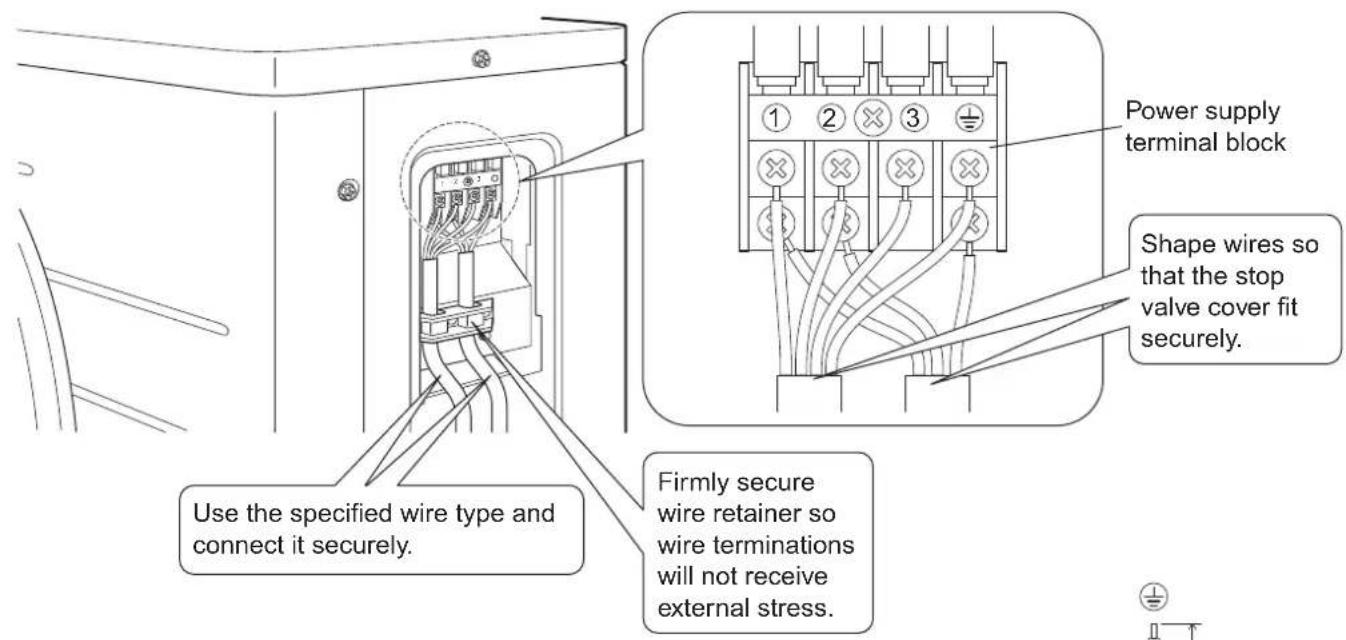
Observe the notes mentioned below when wiring to the power supply terminal board.
Precautions to be taken for power supply wiring.
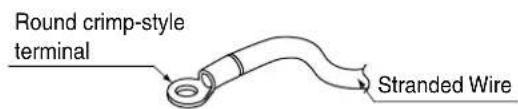
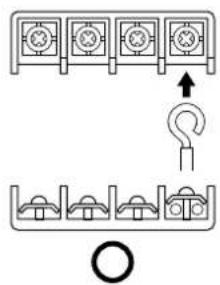
Use a round crimp-style terminal for connection to the power supply terminal board. In case it cannot be used due to unavoidable reasons, be sure to observe the following instruction.
Place the round crimp-style terminals on the wires up to the covered part and secure in place.
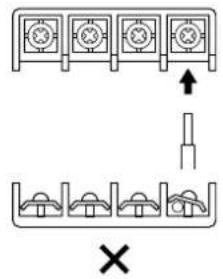
When connecting the connecting wires to the terminal board using a single core wire, be sure to perform curling. Problems with the work may cause heat and fires.
Stripping wire at terminal block
3) Pull the wire and make sure that it does not disconnect. Then fix the wire in place with a wire stop.
Wiring
Wiring diagram
:Terminal strip :Field wiring
=□
:Connector:Terminal

:Connection
BLK:Black ORG:Orange
BLU:Blue RED:Red
BRN: Brown WHT: White
GRN:Green
YLW
:Yellow
Notes : Refer to the nameplate of the unit for power requirements.
:OUTDOOR
Outdoor
: CONDenser
Condenser
: DISCHARGE
Discharge
Wiring diagram parts table
C1,C2,C400,C405.. Capacitor
V1R. Diode bridge
E1, E2, HL1, HN1,
S,HR1,HR2......... Connection
FU2, FU3.. Fuse
IPM1, IPM2 ............ Intelligent power module
L. Live
L1R. Reactor
M1C. Compressor motor
M1F. Fan motor
K30R,K10R,MR4 Magnetic relay
N. Neutral
A1P.. Printed circuit board
PS. .Power supply
Q1M Overload protector
R1T, R2T, R3T, PTC ....Thermistor
S20,S30,S40,
S71,S80,S90.........Connector
F1S. Surge arrester
V2,V3. Varistor
X1M. Terminal strip
Y1E Electronic expansion valve coil
Y1S. Four way valve coil
Z1C,Z2C,Z3C. Ferrite core
Protective earth
Earth
Test Run and Final Check
1. Trial operation and testing.
1-1 Measure the supply voltage and make sure that it falls in the specified range.
1-2 Trial operation should be carried out in either cooling or heating mode.
For heat pump
- In cooling mode, select the lowest programmable temperature; in heating mode, select the highest programmable temperature.
1) Trial operation may be disabled in either mode depending on the room temperature.
2) After trial operation is complete, set the temperature to a normal level (26°C to 28°C in cooling mode, 20°C to 24°C in heating mode).
3) For protection, the system disables restart operation for 3 minutes after it is turned off.
For cooling only
1) Trial operation in cooling mode may be disabled depending on the room temperature.
2) After trial operation is complete, set the temperature to a normal level (26^ to 28^)
3) For protection, the unit disables restart operation for 3 minutes after it is turned off.
1-3 Carry out the test operation in accordance with the operation manual to ensure that all functions and parts, such as louver movement, are working properly.
- The air conditioner requires a small amount of power in its standby mode. If the system is not to be used for some time after installation, shut off the circuit breaker to eliminate unnecessary power consumption.
- If the circuit breaker trips to shut off the power to the air conditioner, the system will restore the original operation mode when the circuit breaker is opened again.
2. Test items.
| Test items | Symptom (diagnostic display on RC) | Check |
| Indoor and outdoor units are installed properly on solid bases. Fall, vibration, | noise | |
| No refrigerant gas leaks. | Incomplete cooling/heating function | |
| Refrigerant gas and liquid pipes and indoor drain hose extension are thermally insulated. | Water leakage | |
| Draining line is properly installed. Water leakage | ||
| System is properly earthed. Electrical leakage | ||
| The specified wires are used for interconnecting wire connections. | Inoperative or burn damage | |
| Indoor or outdoor unit's air intake or exhaust has clear path of air. Stop valves are opened. | Incomplete cooling/heating function | |
| Indoor unit properly receives remote control commands. Inoperative |
Sicherheitshinweise
K30R, K10R, MR4 ....... Magnetrelais
R1T, R2T, R3T, PTC ...Thermistance
S20,S30,S40,
S71, S80, S90............Connecteur
F1S .Parasurtenseur
V2, V3.......Variance
X1M. .Barrette de raccordement
R1T, R2T, R3T, PTC ....Thermistor
S20,S30,S40,
S71,S80,S90.........Connector
F1S .Spanningsbeveiling
V2, V3.......Varistor
R1T, R2T, R3T, PTC ....Termistor
S20,S30,S40,
S71,S80,S90.....Conector
K30R, K10R, MR4 ....... Relè magnetico
N .Neutro
R1T, R2T, R3T, PTC ....Termistor
S20,S30,S40,
S71,S80,S90..Conector
F1S .Dscarregador de sobretensao
V2, V3.......Varistor
MepbI npeOcTOPOXHOCTH
-ДяобсесеняправиьноCTMOHTакаВHIMATEJIbHOИЗУHTEДAHьIEМрblпpeOCTOPOKHOCTN.
B 3T om pykoOoCTBe Mepbl npeIOctOpoxHocTn nomueHbI naIncamn "PPEyIPPEKDEHNE" n "PPEIOCEPEXHEHNE".
PpIMnTe Bce yka3aHbIe HnKe MepbI npeOCTOpOKHOCTN: Bce OHN BaXhbl Iy oecneueHn 6e3oNaCHOCTN.

I PEPYPEXEHNIE .... IrhOpnoBaHne IIO6oI PEPYPEXEHNIA MOKeT pNBecTN K TAKIM TAKKIM NocJeCTBnM KAK CMeptb Hn CepBe3HaT TaPBA.

IPEIOCTEPEXEHNE....IrhopnoBaHne IIO6oRo IPEIOCTEPEXEHNMOKET npBecT N K cepbe3HbIM NocJeCTBnM.
B daHHOM pyKOBOcTBe nCIOJIb3yIOTc cIeIyIoune npEduynpeKdaiOuJe 3HaKn:

Co6HIOJaIe TaHHyIO INCTpyKUIO.

PpOBepbTe HAnuue 3a3eMnEHH.

HnKoIa He nbItaTeCb.
- После завершени мотата на снытайе бok, утосы поверпь на подmet ошбок мотата.
PonHCTpykTpyte Nb30BaTeNHaIeXaUIM O6pa3OM OTHOCHTbHO IcNoJIb3OBAHn I OvNCTkN 6noka corlaCHO pyKOBOCTBy NO EKcnJyatauN.
OpunHaonom pykoOCTBa YBnEeTc TaekT Ha aHrnnckom 3bike. TeKCT Ha npynx 3bikax YBnEeTcpeboDom copnHa n a
| ΔРЕДУПЕХДЕНЕ |
| ·МоNTаЖ должен Вьлеловпддурп Ддургспддургспддургспддургспддургспддургспддургспддургспддургспддургспддургспддургспддургспддургспддургспдддургспддургспддургспддургспддургспддургспддургспддургспддургспддургспддургспддургспддургспддургспд徴 HelenpabinbnaJy ctsanobka mojet prinbeCTN K poteKahnIIM BoDJI, nopaxeHInO 3neKTPuceckIM TOKOM IINI BOZTROPAHIO. |
| ·Установпткондционер соглacno Инстурачимя, садржашимь C 3TOM рухOBODCTBE. HelenpabinbnaJy ctsanobka mojet prinbeCTN K poteKahnIIM BoDJI, nopaxeHInO 3neKTPuceckIM TOKOM IINI BOZTROPAHIO. |
| ·Испοлбучий Вхорддддддддддддддддддддддддддддддддддддддддддддддддддддддддддддддддддддддддддддддддддддддддддддддддддддd Испοлбэване дугнДу теталу можet prinbeCTN K падeHInO 6blOKA, уtecham BoDJI, nopaxeHInO 3neKTPuceckIM TOKOM IINI IOXAPY. |
| ·UsthanablnBaIte KOндционер соглacno Инстурачимя, садржашимь C 3TOM рухOBODCTBOM NO MOТАКУ, a TAOKE HelenpabinbnaIIM npabinlAmNo 3neKTPoPpOBOJKe N pakTNUpeKIM REKOMENDAQUIMN. HedocTAtOnHЯ MOnuHcStbI HesabepHHe 3neKTPoxHueCCKNe praboTb MOrT bByBbATb pOAPeHHE 3neKTPuCEckIM TOKOM IINI BOZTROPAHIO. |
| ·Ды пітANHЯ ССТЕМБI HeobxOДмma OTeBbHЯ ZeBbHЯ CToBc BcNIOBOr 3neKTPoPpOHTAHIA. He donyuCAETc NaOKnIOUHc K 3neKTPuCEckO ZeHIN, KOTOPaR YUke NTaET Dpyme Notpe6bnte#. |
| ·Ды пірВОднК HeobxOДмma ɪncollb3Obatb KaBéL DoctaTOChHДоINbI, UTObI OXBatNTB BCEpacSTOHHe 6e3 CoedHEnH. ɪncollb3ObaHЯуdlnHITeH He doynsKaETcB. B zuHc 3neKTPoPpOHTAHIA He doynHc 6bIt bduRyHx Hargy3OK. ɪncollb3yIte OTdEhHyU ΚeB. (HebIpoHHeHNE 3tOTo TRe6OBaHЯ MOpET prinbeCTN K Upe3MepHOMu HargBy, nopaxeHInO 3neKTPuCEckIM TOKOM IINI IOXAPY.) |
| ·Ды 3neKTPuCEckIX COeDInHem Mexdy BNYTpErHHM IN HapuyHbIM arperaTAMI NcNoIb3yIte PPOBDA yka3aHbIX TINOB HadEgXHO 3aKMMte CoedInHITbIbIe PrOBoDA, UTObI Ha IX KIeMMbI He Bo3dIeCTBOBaII BHeiHHe Hargy3KI. Ecln prOBOHa HeHaJeGHO NodcoeHInHЯ IIIN 3aKbABy, Bo3MOeH JepetpeB KIeMMI INI IOXAP. |
| ·Посle podkIquHЯ COeDInHITbIbIe H doynsKaETcB. B zuHc 3neKTPoPpOHTaHIA He doynHc 6bIt bduRyHx Hargy3OK. UteHMeHbIbX Hargy3OK Ha KpbIbIK N paHeHIL 3neKTPoOboOpOvBaHOBHIA. YCTAHOBHe KpbIbIK NOBEX prOBOOB. HefpaBmHЯ yctANOBKa KpbIbIK Mochet prinbeCTN K pepeRpeBy KJIeMM, nopaxeHInO 3neKTPuCEckIM TOKOM IINI BOZTROPAHIO. |
| ·В StCyae YeTecK XlaDareHЯ BO BpEMa MoTAnGa, prOBeTrPte NOMEseHne. (XlaDareHbOxbayet YdoBnI ra3 priu copnPKoCHOBENH C pIaMeHem.) |
| ·Посle 3aBepShenry MOtAnGa Yb6dIteB B OTCyTCTBnY UTeCek XlaDareHtA. (XlaDareHbOxbayet YdoBnI ra3 priu copnPKoCHOBENH C pIaMeHem.) |
| ·При MOtAnge IINI PeremeeHЯ CnCTeMbI B KOHyp XlaDareHtA He DOJKNbI PONaDaTb BeSeCTBa, OTJINuHbIe OT yka3aHnOro XlaDareHtA (R410A), takne kak Bo3dYx. (BO3dYx IINI dpyruHne NoCTOpOHHe BWeCTBxaBor A HEPOMaHbOMu NobIaSeHIO DaBLeHnI INI paz3bBy, KOTOpB MokET CTaB pInuHNO TpABMbI.) |
| ·В ВрмЯ OTKaUk,ПресдучЕ MTOeOeDInHbT TrpybOpOBd XlaDareHtA, BbKIIIOUHte KOMPpeCCop. Ecln BO VpEBA MOrTOKaPpeCCop PrOdoJbAeT pa60Tb, a ZaOpHbI BBeHTNb OKtpbI, pri OTOeDInHbM ToPb6OBoDA XlaDareHtA Bo3dYx БуETB CbSbBaTbC,чTOBcOBet HEnOpMaHbHOe DabJIeHne B XOLOINHOM KOnType, KOTOpOE MokET PrinBeCTN K pONOMke I daXe TpABMe. |
| ·Пусу STaHOBKe,пождуч eч MTaYSCaTb KOMPpeCCop,пожно зakpenite TrpybOpOBd XlaDareHtA. Ecln BO VpEBA MOrTOKaPpeCCop He NDcoeDInHbE, a ZaOpHbI BBeHTNb OKtpbI, BTOdYbSbET BcSbBaTbC, KOTa DcKppeCCop pa60TaET,чTOBcOBet HEnOpMaHbHOe DabJIeHne B XOLOINHOM KOnType, KOTOpOE MokET PrinBeCTN K pONOMke I daXe TpABMe. |
| ·П探测у ТелANe 3a3eMLEHnE. He 3a3eMlye Tb6knpocdoInHnE M Tpyb6KOMMyHaHbON cny6b,КразрndNKу IINI K TepeФOnHOMу 3a3eMLEHnO. HecoOTBcTBYIOUe 3a3eMLEHnE MOpET PrinBeCTN K pONaKHeHIO 3neKTPuCeCKIM TOKOM IINI IOXAPY. CINbIbIe BCnPeCKIN TOKOB OT MOLINI IINI OT dpyruHx IInOTHNIOB MOrBy B3bIbAtb NOBpeZdeHnE KOnDiunIOHepa. |
| ·П探测у ТелANe 3a3eMLEHnE. YCTAHOBKу BbIKNoUaTeTЯ TOKa YteKn 3a3eMLEHnE. OTCYCTBne PrpBbAtelЯ YteKn Ha 3eMIO MOKET pyBbTc PriuHNO nopaxeHnE 3neKTPuCeCKIM TOKOM IINI IOXAPa. |
| ПЕДОCTEPEЖЕHINE |
| • He установливаite КONDицноер в таком месе, в кOTOPOM сухесыET onaCHOCb yTeчkn orHeonachoro ra3a. В сlyаe yTeчkn i skonления ra3a bOKpyr 6noka BO3MOJEN noxap. |
| • UstahOBITE ДрЕнжьй TrpБОп罗БOD сгласо HO HNCTPyKuzma, COdEpXaUIMC8 B 3TOM ryKOBODCTBE. He otBeeuAnoi Tpe6OBAHЯm TrpБОп罗БOD может ривс'tу K pa3nivy Bovbl. |
| • 3atЯнITE НakindHyо raay Ka NaDJIeGaZIM MBApoZOM, HApRIMeР DiHAMOMETPruYeCKIM KIIOYOM. Ecni HAKINHЯraKa 3aTAYa CnIIKOM cInlNo, Chee3 HeKOTOpoe BvEma OHa MoXet TpeChTy, YTo pRiVeBET K yTEyKe XlaDAreHtA. |
| • 6bIaTeJIbNo PrIMMITE aDeKBaTHbIe МрБу NO HeDOnuSceHIO NOJaDAHnB B HApUxHbI aRperaT MeLKNIX JXIBOTbIX. Пи КOLTakte MeLKnIX JXIBOTbIX C DeTAlaIMN IOd HApRJaHem Bo3MOxHbI c6bN B pa6Ote 6noka, 3aDbIMLeHne IINI BO3FopAHne. РoMHcHTpyKtpye 3aKa3UHka O TOM, YTo nPoCTpaHCTBO BOKpyr aRpera T Heo6XoDImo CoepKATb B YHCTOTE. |
| • Данhoe УстюсТВО может ИСПONьЗВОВТбСеЧИАЛСТAm NII OByeHbIM NОьЗВОВТeЯМN B Marga3INHax, Нa ПрEDПриЯТnx ЛergК ПрOMbIшлЕHNOCTN, Ha ФeрMax, ЛбО HeCpeZuAJIncTAm NДЯ KOMMepYeCKINx Ib 6bITobbIx Huxk. |
| •Уровен 3bYkoBOrO дaВлeNHЯ: Mehee 70 d5(A). |
Принолжносту
PnHaJneXHocTn, NOCTaBJIeMbIe C HApYKbIM arperaTom:
He donyckaetcnoDBeWNBaTb arperaTbHa noTOnKe uN yCTaHabINBaTb nx dpyr Ha dpyra.

ПЕДОCTEPEЖЕНЕ
Pn3KcNlIyatauNN KOHdNIOHepa B yCNOBnx Hn3KoTEmnePaTypb OkpykaIoUeBO3Dyxa 06a3aTeNbHO CNeNyIe HxKe npBeDeHHbIM NHCTpykUm.
1)Bo n36eKaHHe DeIcTBnBETpa yCTaHaBnBaIte HApyKbI arperat CTopoHOB BCacBHaHnK CTEHe.
2) He yctaHaBnBaIte HapyKbI aRperaT B MecTe, Ie CTopoHa BCacbBaHm MOKeT 6bITb NOBepHyTa HENOCpeDCTBeHHOMy DeiCTBIO BeTpa.
3)ДязаuntbIOTBepa peKOMeHnyetc3aKpbItb CTOpOHy BblNycka BO3dyxa HApYxHoro arperata 3aUHTbIM 3kpaHOM.
4) B pernohax, Ie obuHNO bInaae MHoro chera, arperat Heo6xOIMO yCTaHbNbaTb B TAKOM MeTe, UTo6bl CHer He npenrTcBOBAn ero HopMaIbHo pa6ote.
YCTaHOBtBe 6nK Ha DocTaOuHOB
BbICote HAD NOBepXHOCTbIO EMNI,
4TObI pTeoTbPAiTb 3acbinaHHe
CHAECFOM.
CdelaIte6oIbwoKo3bipeK.
CdetaIte noCDTaBky.
Mонтajхьий черпж НapyжHoro arperata
ПразвILA мOLTажа
- Ecnn Ha nytn Bnycka BO3dyxa nnno NOTOKa BbIXOJaIero BO3dyxa HApyXHoro arperata ectb CTeHa nn npenrTCTBne, BblIOJIHHte cNeDyUoiue DeiCTBn no MOHTaxy.
-ДяВСЕОПСАнБИХ HNKe CXeM yCTaHOBKn BbICOTa CTeHb Ha CTopoHc BbInycka ДОЛЖHa 6bITb He 6OJee 1200 MM.
CTeHa C OndHoi CTOpOHbI CTeHbIC DByx CTOpOH
Budc6oky
Budcpexy
BudcBepxu
EduHnUbi N3MepeHnA: MN
C1, C2, C400, C405....KoHdeHcaTop
V1R. ⅡIOHbIMoCT
E1, E2, HL1, HN1,
S,HR1,HR2. CoeDInHeHne
FU2, FU3 ...PpeoxpaHnTeB
K30R, K10R, MR4 ....... MarHHtoe pepe
N. Heitpab
A1P. .NeeuTHa nnata
PS. .NctouHnK nTahn
Q1M ...YcTpoIcTB03aunTbO T nepepy3kn
R1T, R2T, R3T, PTC ...TepMnctop
S20,S30,S40,
S71,S80,S90..Pa3beM
F1S ...Mmnybchb pa3pndnK
V2,V3.......Bapncstop
X1M. KneMMna KOJIOka
Y1E 3MeeBnK 3JIeKtpoHHoro TepMopepyu npuyoero BeHTnIa
Y1S ...KaTyuKa YeTbIpeXxoOBOrO KnaNaHa
Z1C,Z2C,Z3C. .FeppntoBb cepDeuHnK

3aunTHoe 3a3eMJIeHHe

3emJra
[Yauguyulayin] [Sikin]
| Konik somun sikma torku | |
| Gaz tarafi Sivi tal | afifi |
| 3/8 inc 1/4 inc | |
| 32,7-39,9 N·m (333-407 kgf·cm) | 14,2-17,2 N·m (144-175 kgf·cm) |
| Vana tapasi sikma torku | |
| Gaz tarafi Sıvi tarafi | |
| 3/8 inc 1/4 inc | |
| 21,6-27,4 N·m (220-280 kgf·cm) | 21,6-27,4 N·m (220-280 kgf·cm) |
| Servis portu kapaşa sikma torku | 10,8~14,7 N·m (110~150 kgf·cm) |