
CaffeExperto CEP 5464 DX - Coffee machine BEKO - Free user manual and instructions
Find the device manual for free CaffeExperto CEP 5464 DX BEKO in PDF.
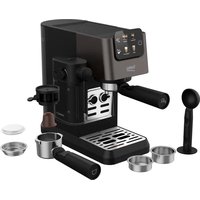


| Brand | Beko |
| Model | CaffeExperto CEP 5464 DX |
| Product type | Espresso coffee machine |
| Color | Black / Stainless steel |
| Dimensions (W × H × D) | 20.5 cm × 30.8 cm × 42.3 cm |
| Net weight | 4.35 kg |
| Power supply | 220-240 V ~, 50-60 Hz |
| Nominal power | 1376-1628 W |
| Cable length | 90 cm |
| Water tank capacity | 1.1 L (±5%) |
| Drip tray capacity | 0.2 L |
| Supported coffee types | Ground coffee, Nespresso® capsules, E.S.E. pods |
| Included filters | Single filter (10 g), double filter (17 g), capsule holder, E.S.E. pod basket |
| Main functions | Single/double espresso, Cappuccino, Latte Macchiato, milk froth |
| Adjustable volume | Yes (espresso 30-55 ml single, 65-95 ml double; milk 30-45 s) |
| Preheating | Less than 55 seconds |
| Automatic shutdown | Yes (after 29 minutes of inactivity) |
| Integrated milk carafe | Yes (with foam adjustment) |
| Cleaning | Automatic rinsing, cleaning function (16 s), programmed descaling |
| Safety | Burn protection, hot surfaces, child safety |
| Removable parts | Water tank, drip tray, filter holder, milk carafe, filters |
| Warranty | 2 years (subject to manufacturer's conditions) |
Frequently Asked Questions - CaffeExperto CEP 5464 DX BEKO
User questions about CaffeExperto CEP 5464 DX BEKO
0 question about this device. Answer the ones you know or ask your own.
Ask a new question about this device
Download the instructions for your Coffee machine in PDF format for free! Find your manual CaffeExperto CEP 5464 DX - BEKO and take your electronic device back in hand. On this page are published all the documents necessary for the use of your device. CaffeExperto CEP 5464 DX by BEKO.
USER MANUAL CaffeExperto CEP 5464 DX BEKO
Semi-Automatic Espresso Machine With Integrated Milk Cup
User Manual

CEP 5464 DX
EN - TR - DE - FR - ES - PL - RO - IT - CS - SK - SR - AR

UK CA CE
01M-8916693200-3124-03
01M-8917721200-3124-03
CONTENTS
| ENGLISH | 3-20 |
| TÜRKÇE | 21-40 |
| DEUTSCH | 41-60 |
| FRANÇAIS | 61-79 |
| ESPAÑOL 80-98 | |
| POLISH | 99-117 |
| ROMÂNĂ 118-138 | |
| ITALIANO | 139-157 |
| ČESKY 158-173 | |
| SLOVENSKÝ 174-190 | |
| СРПСКИ 191-207 |
Please read this user manual first!
Dear Customer,
Thank you for selecting this Beko product. We hope that you get the best results from your product, which has been manufactured to a high quality with state-of-the-art technology. Please read this entire user manual and all other accompanying documents carefully before using the product and keep them as a reference for future use. If you pass on the product to someone else, please give them the user manual as well. Please take into consideration all warnings and information in the user manual.
Explanation of symbols
The following symbols are used in the various sections of this manual:

Important information or useful hints about usage.

DANGER: This warning is for dangerous situations with regard to life and property.

WARNING: This warning indicates potentially dangerous situations.

CAUTION: This warning indicates the potential for material damage.

Materials are suitable for food contact.
1 Important instructions for safety and environment
This section includes the safety instructions that will help providing protection against personal injury and material loss risks. Failure to follow these instructions invalidates the granted warranty.
1.1 Danger of electric current
Danger to life by electric current!
Contact with live wires or components could lead to serious injury or even death!
Observe the following safety precautions to avoid electric shocks:
- Do not use the coffee machine if the connecting cable or mains plug are damaged.
- Before reusing the coffee machine, the mains cable must be renewed by a qualified electrician.
- Do not open the housing of the coffee machine. Danger of electric shock if live connections are touched and/or the electrical and mechanical configuration is changed.
1.2 Danger of burning or scalding
Parts of the coffee machine can become very hot during operation! Dispensed drinks and escaping steam are very hot!
Observe the following safety precautions to avoid burning/scalding yourself and/or others:
- Do not touch either of the metal sleeves on both coffee spouts.
- Avoid direct contact of the skin with escaping steam or hot rinsing, cleaning and descaling water.
1.3 Fundamental safety precautions
Observe the following safety precautions to ensure safe handling of the coffee machine:
- Never play with packaging material. Risk of suffocation.
- Inspect the coffee machine for visible signs of damage before use. Do not use a damaged coffee machine.
- If the supply cord is damaged, it must be replaced by the manufacturer or its agent or similarly qualified person in order to avoid hazard.
• Repairs to the coffee machine must only be carried out by an authorised specialist or by the works customer service. Unqualified repairs can lead to considerable danger for the user. They will also void the warranty. • Repairs to the coffee machine during the warranty period may only be carried out by service centres authorised by the manufacturer, otherwise the warranty will become void in the event of subsequent damage. - Defective parts may only be replaced with original spare parts. Only original spare parts guarantee that the safety requirements are met. - Appliances can be used by persons with reduced physical, sensory or mental capabilities or lack of experience and knowledge if they have been given supervision or instruction concerning use of the appliance in a safe way and understand the hazards involved. - This appliance can be used by children aged from 8 years and above if they have been given supervision or instruction concerning use of the appliance in a safe way and if they understand the hazards involved. Cleaning and user maintenance shall not be made by children unless they are older than 8 and supervised. Keep the appliance and its cord out of reach of children aged less than 8 years. •Children shall not play with the appliance. - This appliance is intended to be used in household and similar applications such as:
-staff kitchen areas in shops, offices and other working environments;
-farm houses; -by clients in hotels, motels and other residential environments; -bed and breakfast type environments.
- Protect the coffee machine against the effects of weather such as rain, frost and direct sunlight. Do not use the coffee machine outdoors. •The appliance must not be immersed.
- Do not clean the coffee machine or accessories in a dish washer.
- Do not pour any other liquids apart from water or place foodstuffs into the water tank.
1 Important instructions for safety and environment
- Do not fill the water tank beyond the maximum mark (lower edge of the filling hole) (1.1 litres).
- Only operate the machine when the waste container, drip tray and the cup grate are fitted.
- Do not pull the cable to remove the plug from the mains socket or touch with wet hands.
- Do not hold the coffee machine with the mains cable.
- Keep the appliance and its cord out of reach of children aged less than 8 years.
- Before removing the water tank to fill or empty it, always turn the machine off.
- Always place the unit on a flat, stable, heat-resistant work surface.
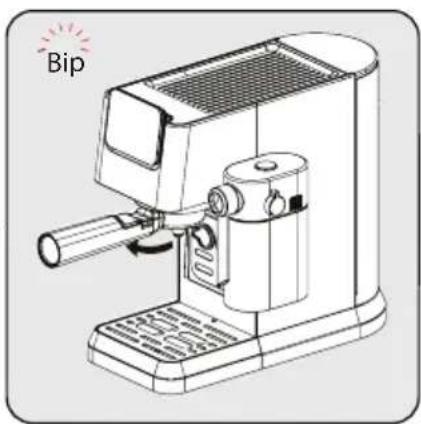
- Before brewing, the portafilter must be turned to the right as tight as possible to prevent the portafilter from loosening due to high pressure.
- Serious injury may result from misuse. To protect against a fire, electric shock or personal injury, do not immerse cord, electric plugs, heating base in water or other liquids. Do not operate any appliance with a damaged cord or plug, after the appliance malfunctions, or is dropped or damaged in any manner. Please contact the manufacturer or his customer service.
- Heating element surface is subject to residual heat after use, do not touch the hot surface, use the handle or the button. Always keep hands out of container and machine while in use and afterward to reduce the risk of injury to persons.
- Coffee-maker shall not be placed in a cabinet when in use.
- Cleaning: Do not place the appliance in water or other liquids. Clean the housing only with a sponge/cloth moistened in warm, soapy water. Do not use harsh, abrasive cleaners. See chapter 6 for detailed cleaning instructions.
- The heating element surface is subject to residual heat after use.
1.4 Intended use
The manual espresso machine Beko is intended for use in homes and similar applications, for instance in staff kitchens, shops, offices and similar areas or by customers in bed & breakfast, hotels, motels and other living accommodation. This coffee machine is not intended for commercial use. The machine is only intended for preparing coffee and heating milk and water. Any other use other than previously stated is considered as improper use.
Danger resulting from improper use!
If not used for its intended purpose or used in any other way, the coffee machine may be or become a source of danger.

Therefore, the coffee machine may only be used for its intended purpose. Observe the procedures described in this user manual.
No claims of any kind will be accepted for damage or injury resulting from use of the coffee machine for other than its intended purpose.
The risk has to be borne solely by the machine owner.
1.5 Limitation of liability
All technical information, data and instructions on installation, operation and maintenance of the coffee machine contained in these operating instructions represent the current status at the time of printing and are based on the best possible knowledge gained by experience and know-how.
No claims can be derived from the information, illustrations and descriptions in this user manual.
The manufacturer assumes no liability for damage or injury resulting from failure to observe the user manual, use for other than the intended purpose, unprofessional repairs, unauthorized modifications or use of non-approved spare parts.
1 Important instructions for safety and environment
1.6 Compliance with the WEEE Directive and Disposing of the Waste Product:
This product complies with EU WEEE Directive (2012/19/EU). This product bears a classification symbol for waste electrical and electronic equipment (WEEE).
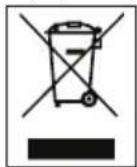
This symbol indicates that this product shall not be disposed with other household waste at the end of its service life. The used device must be returned to an official collection point for the recycling of electrical and electronic devices. To find these collection points, please contact your local authority or retailer where the product was purchased. Each household performs an important role in the restoring and recycling of old appliances. The appropriate disposal of used appliance helps prevent potential negative consequences for the environment and human health.
1.7 Compliance with RoHS Directive
The product you have purchased complies with EU RoHS Directive (2011/65/EU). It does not contain harmful and prohibited materials specified in the Directive.
1.8 Package information

Packaging materials of the product are manufactured from recyclable materials in accordance with our National Environment Regulations. Do not dispose of the packaging materials together with the domestic or other wastes. Take them to the packaging material collection points designated by the local authorities.
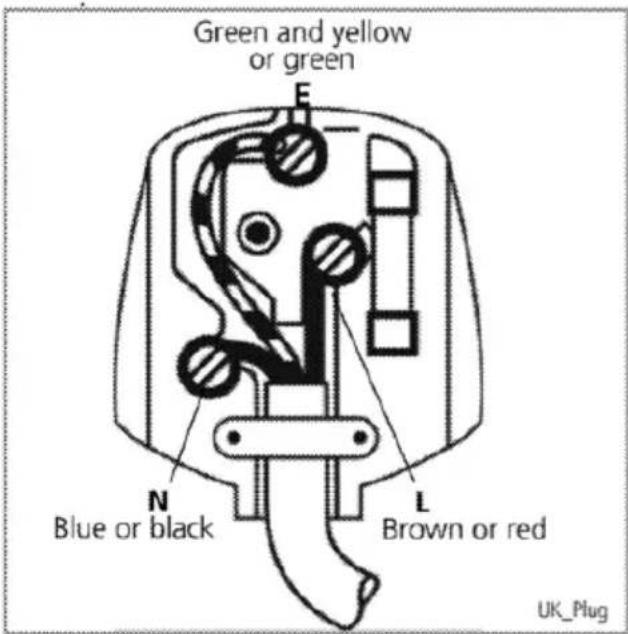
1.9 Plug Wiring
The moulded plug on this appliance incorporates a 13 A fuse. Should the fuse need to be replaced, an ASTA approved BS1362 fuse of the same rating must be used. Do not forget to refit the fuse cover. In the event of losing the fuse cover, the plug must not be used until a replacement fuse cover has been fitted. The colour of the replacement fuse cover must be the same colour as that visible on the pin face of the plug. Fuse covers are available from any good electrical store.
- Fitting a different plug
- As the colours of the wires in the mains lead of this appliance may not correspond with the coloured markings identifying the terminals on your plug, proceed as follows:
- Brown cable = L (Live)
- Blue cable = N (Neutral)
- Green/yellow cable must be connected to ground (E)
- With alternative plugs, a 13 A fuse must be fitted either in the plug or adaptor, or in the main fuse box. If in doubt, contact a qualified electrician.
2 Overview & Control panel
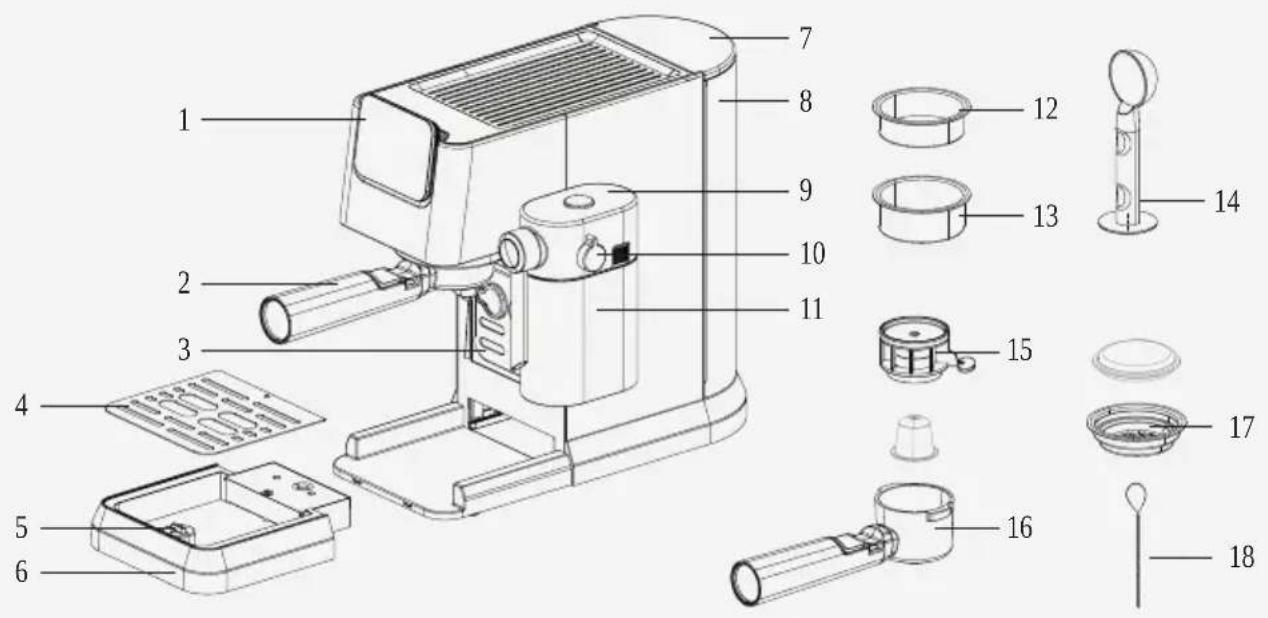
- Control panel
- Portafilter
- Cup holder
- Drip tray grid
- Floater
- Drip tray
- Water tank lid
- Water tank
- Milk tank cover
- Milk foam adjustment knob
- Milk tank
- Single espresso basket
- Double espresso basket
- Coffee Scoop / Tamper
- Capsule piercer
- Capsule portafilter
- Pod basket
- Cleaning needle
2.1 Control Panel
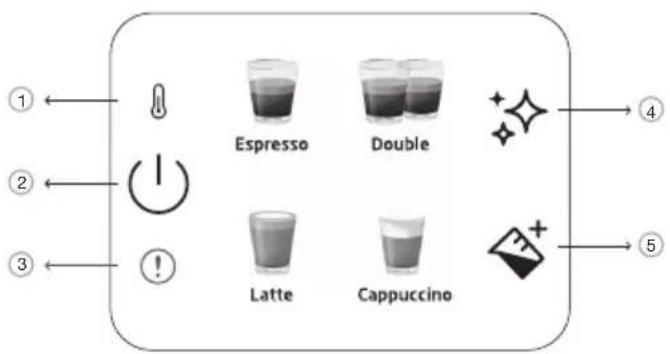
| 1 | Pre-heating indicator | |
| 2 | On/off & cancel button | |
| 3 | General error | |
| 4 | Cleaning and descaling button | |
| 5 | Milk button |
All declared values on the product and on the printed leaflets are picked up after laboratory measurements performed according to related standards. These values may differ upon usage and ambient conditions.
3 Technical data
Power supply: 220-240 V~, 50-60 Hz
Power: 1376 - 1628 W
The right to make technical and design changes is reserved.
All declared values on the product and on the printed leaflets were obtained from laboratory measurements performed according to the relevant standards. These values may differ depending on usage and ambient conditions.
Product Dimensions:
20.5 cm (Width) x 30.8 cm (Height) x 42.3 cm (Depth)
[Width w/out milk cup: 14.4 cm]
Depth w/out portafilter: 32.5 cm]
Weight: 4.35 kg
Cable Length: >90 cm
Basket Capacities
Single: 10 g
Double: 17 g
Drip Tray Capacity: Up to 0.2 L
Water Tank Capacity: 1.1±5%L
Machine Pre-heating time: <55s
Volume of coffee* (Default settings):
Espresso: 30-55ml
Double: 65-95ml
Latte: 170-280 ml milk, 30-55 ml coffee
Cappuccino: 114-190 ml milk, 30-55 ml coffee
*Amounts may vary based on different capsule and pod usage.

This button " will light up as orange when machine needs descaling.

If the NTC is not connected to the power board, the red light of the error indicator will be on at the time, and there will be no response if any button is pressed.
4 Preparation
4.1 First Time Use

Remove any protective films, stickers and any other packaging material from the appliance.
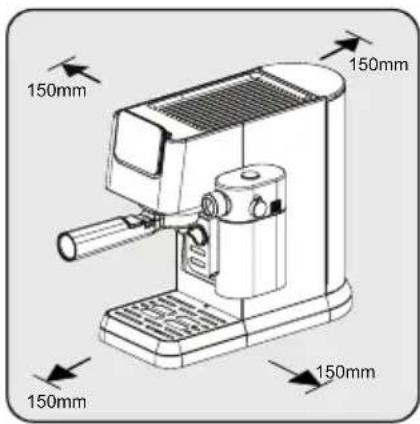
Choose a safe and stable surface with an easily reachable power supply and allow the minimum distance from the sides of the machines.

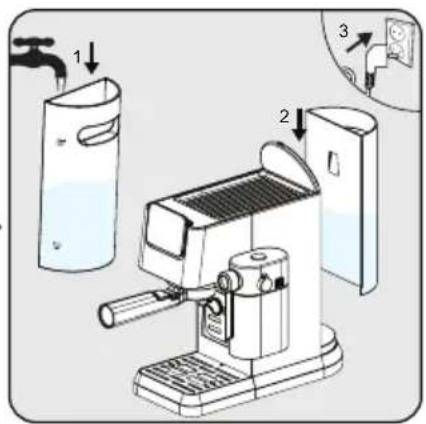
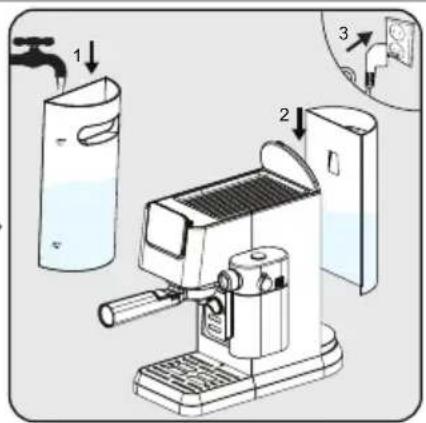
Fill the water tank with fresh, cold pure water at least up to the MIN marking and at most up to the MAX marking. (Do not add hot water)
Then insert the tank onto the machine and plug the other end of the power cord into a wall socket with the appropriate voltage.

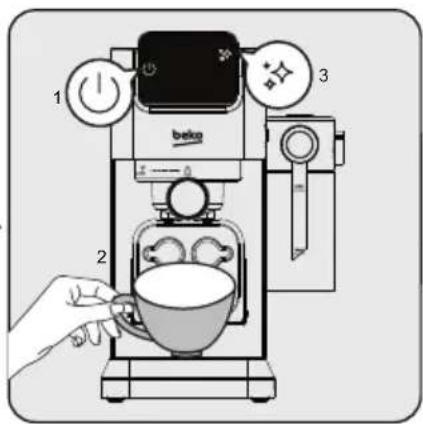
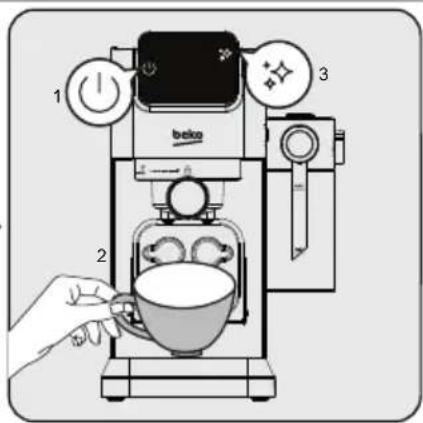
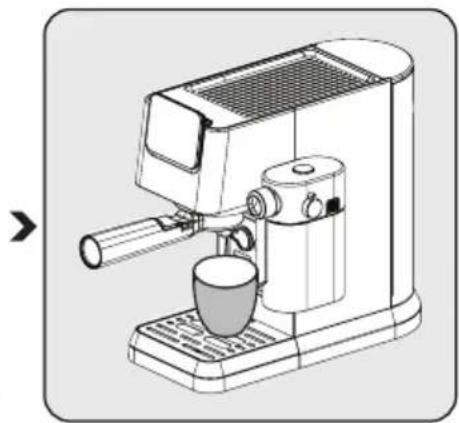
The power on/off button on the control panel will light up. Press that button to turn on the machine. Place a cup under the brewing head and press the cleaning button. The machine will beep once and start cleaning. Once completed, the machine will be ready to use.
4 Preparation
4.2 Brewing Single / Double Espresso
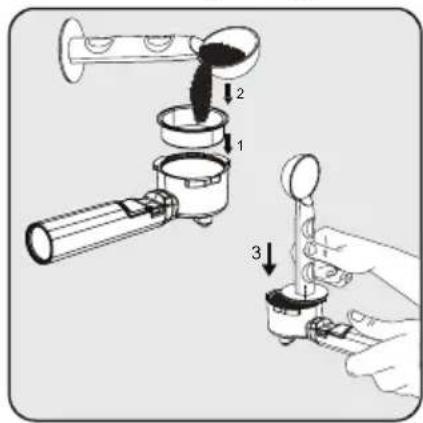
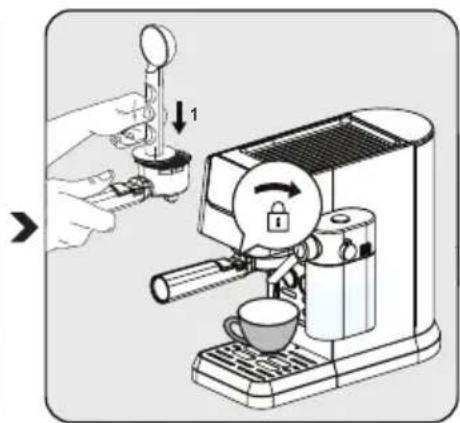
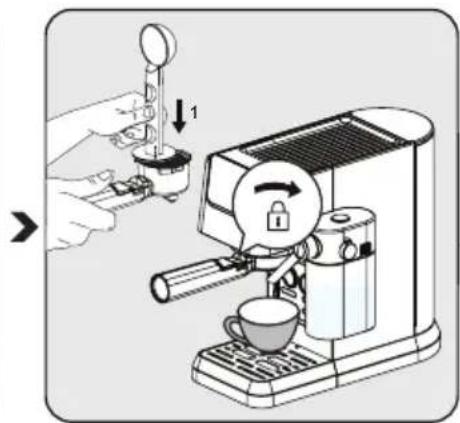
Place the single or double espresso basket into the filter holder. Fill the filter with freshly ground coffee powder using the measuring spoon (approx. 8-15g) and use the spoon to level off the excess powder. With the tamping end of the spoon, apply about 15 kg of pressure to press the powder down evenly and firmly.
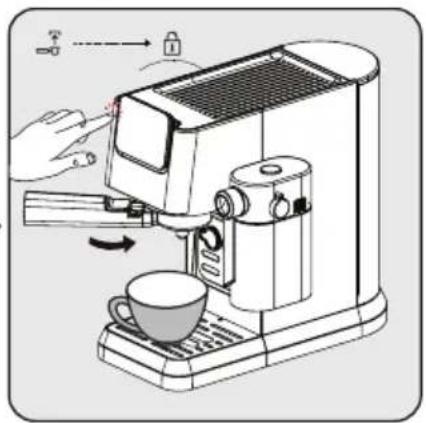
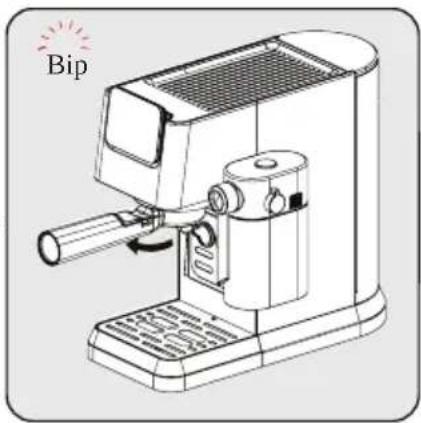
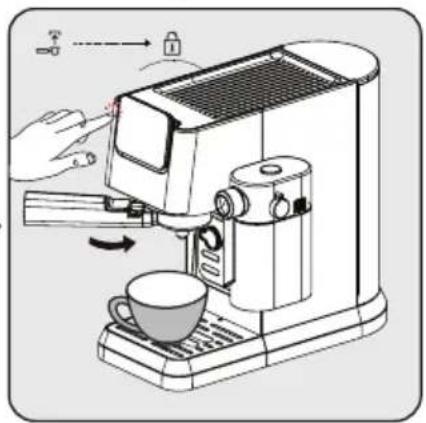
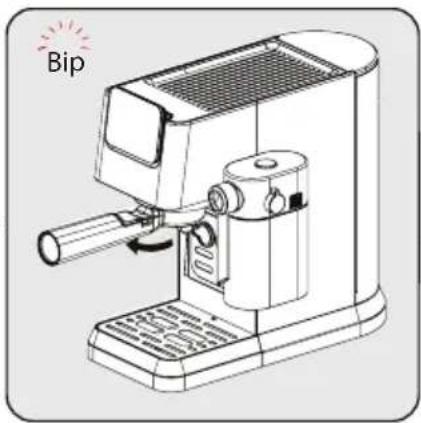
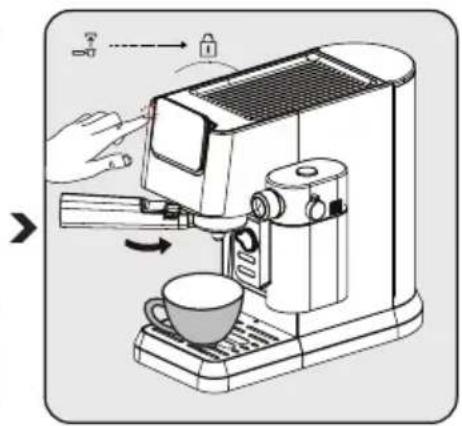
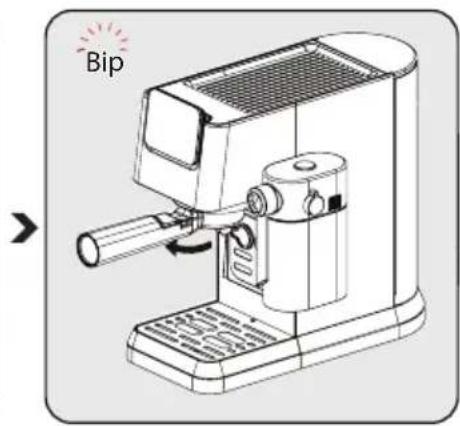
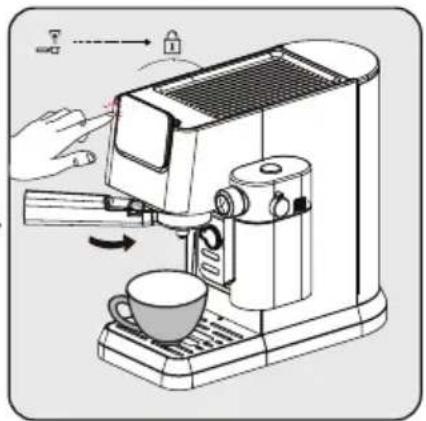
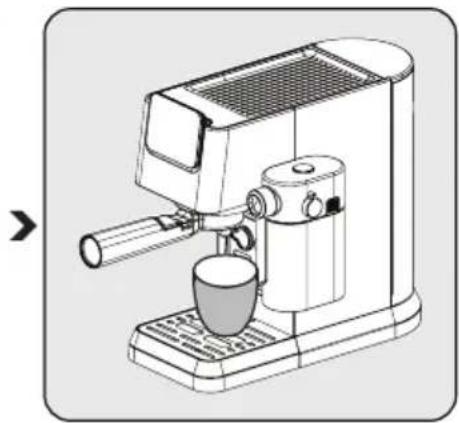
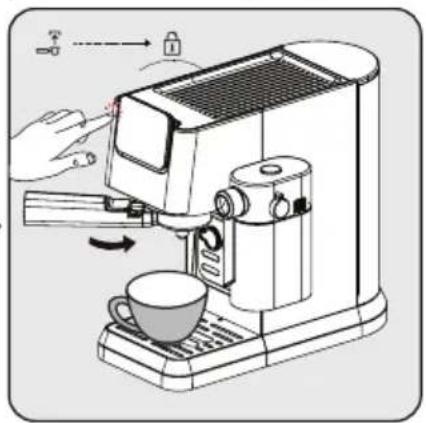
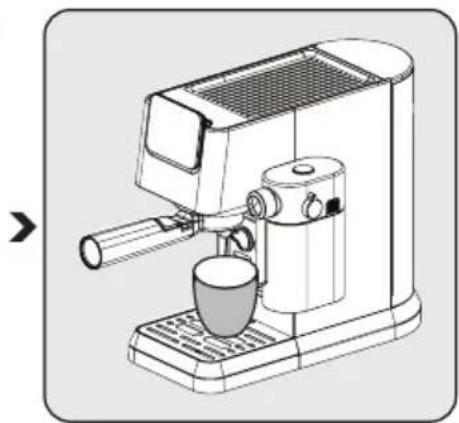
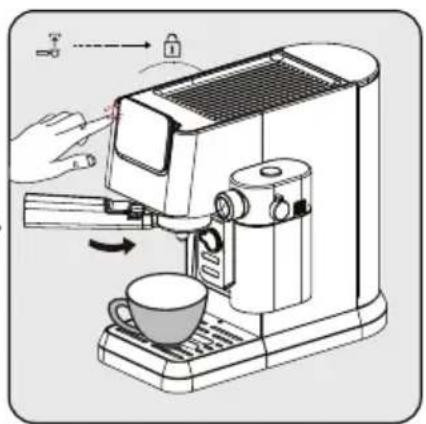
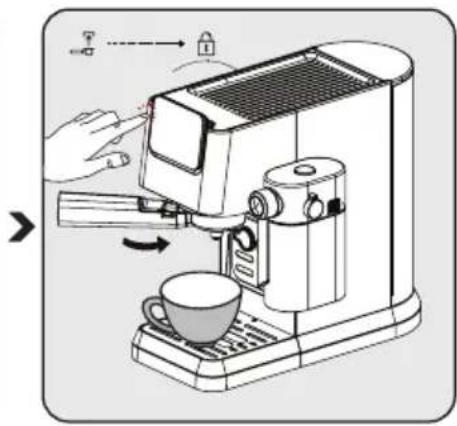
Install the portafilter under the coffee outlet. Align it with the unlock symbol, slide it into the groove, and slowly rotate it to the right to the lock symbol.
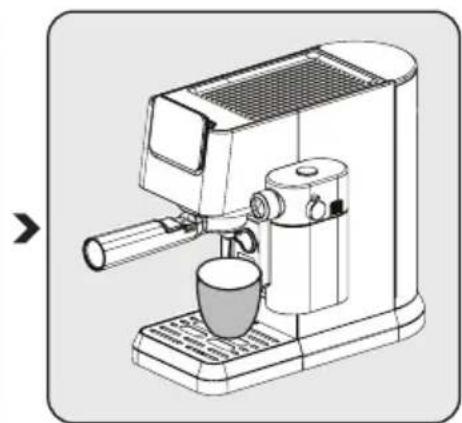
- Place a coffee cup directly under the coffee outlet.
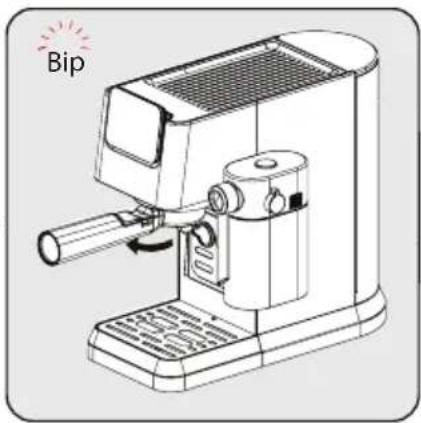
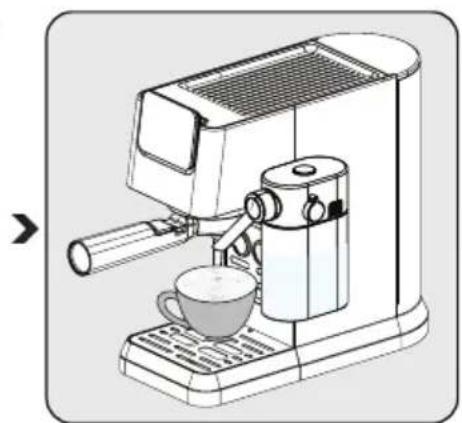
- Press the single or double button; a beep will sound.
- The selected coffee button will start blinking, and beverage preparation will begin.
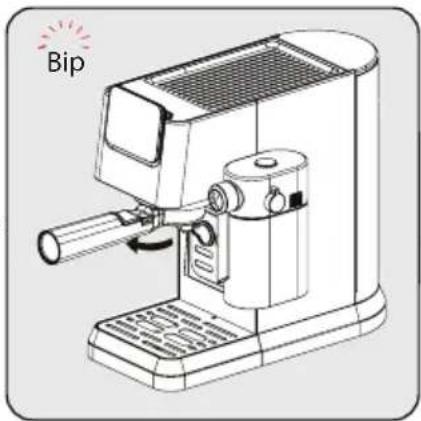
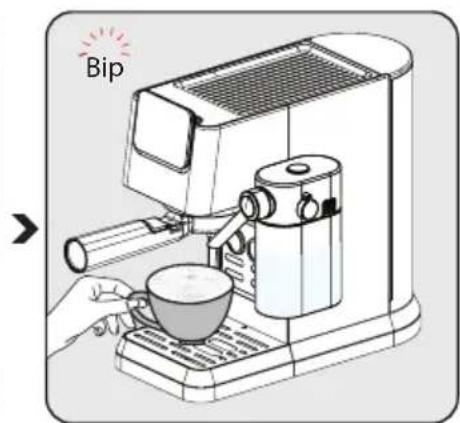
After brewing is complete, the machine will beep once and enter idle mode. Remove the portafilter by turning it clockwise. Clean the portafilter and dry it after each use.

- Wait 5 seconds after brewing before removing the filter. This will help remove the moving filter easily.
• Used coffee powder cannot be reused.
- Use the handle extension to knock out the coffee residue while keeping the basket in place.
- To ensure your espresso stays at the optimal temperature, we recommend preheating your cups.
- To extract the fullest flavor from your coffee beans, we recommend using whole beans that are freshly ground each time you prepare espresso.
- In addition to the coffee used, using fresh cold water that is free of chlorine, odors and other impurities will help ensure the perfect espresso.
- Store your espresso grounds in an airtight container, and in a cool, dry place to retain the flavor. Grounds should not be kept for long periods of time as the flavor will be reduced.
4 Preparation
4.3 Brewing Cappuccino & Latte
Cappuccino or Latte are combinations of one shot of espresso with different amounts of hot milk and milk froth.
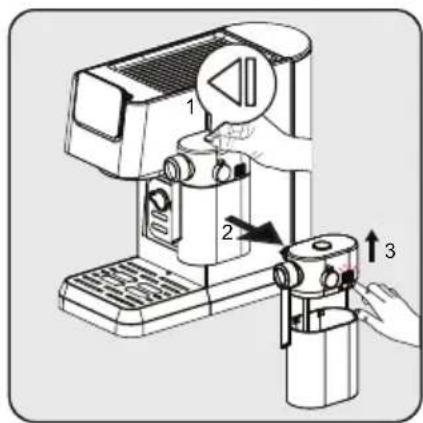
Holding the milk tank with one hand, press the button on the top of the milk tank lid to remove the milk tank rightwards. Remove the lid of the milk tank by pressing the release button on the right side of the lid body.
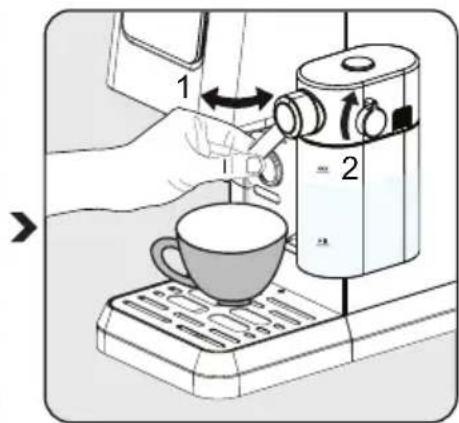
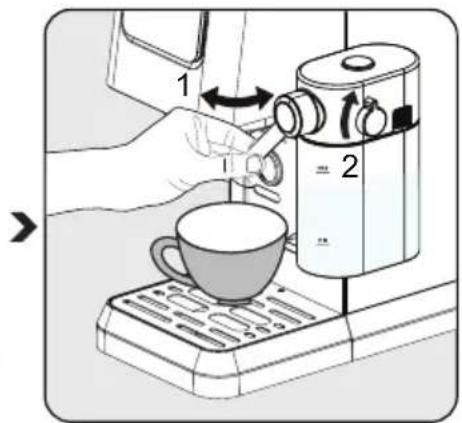
Add milk to the milk tank. The milk should always be below the max mark. The recommended temperature for milk is 4-8 °C (~ 40-46 °F). Put on the lid of the milk tank and attach the milk tank to the appliance, it must click audibly into place. Make sure that the milk tank fits correctly. Adjust the angle of the milk foam outlet over the cup. Adjust the milk foam density with the help of knob based on your preferences.

Insert the single basket into the portafilter. Fill the filter with finely ground espresso powder (approx. 8-15 g). Press the powder down with the flat side of the coffee spoon. Install the portafilter under the coffee outlet. Align it with the unlock symbol, slide it into the groove, and slowly rotate it to the right to the lock symbol.

This machine allows the user to set the foam ratio by turning the knob from Max to Min to enjoy the desired foam. Suggested setting for Latte is min-mid, Cappuccino is mid-max. Adjust the milk foam density based on your preferences.
4 Preparation
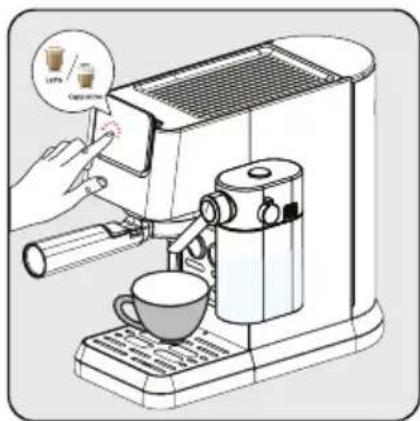
Press the "cappuccino or latte" button, then one beep sounds. The selected beverages button will start blinky and brewing will start.

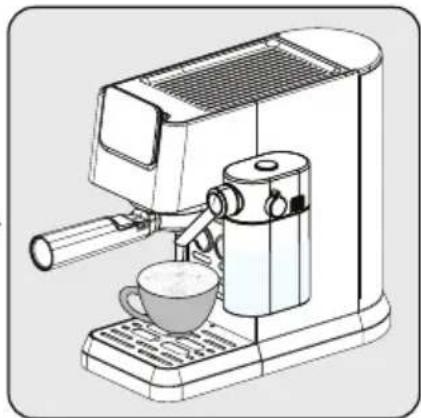
The pump will work intermittently as the milk froth first enters your cup. After the milk froth is ready, the device automatically starts to brew the coffee.

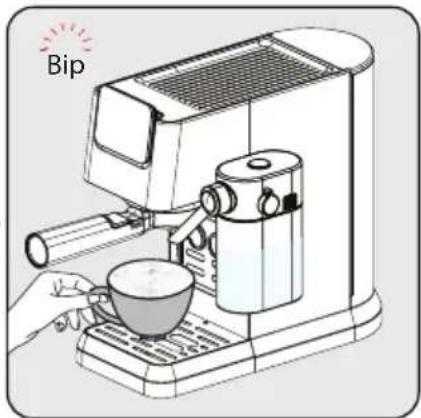
When the unit beeps once, the beverages is ready enjoy! - The machine will revert to idle mode.
4.4 Brewing / Adding Milk Foam
Fill in the milk tank and adjust the knob into position. Press the milk foam button "Machine will start milk dispensing automatically (90-140 ml). Once completed machine will revert back to idle stage.

Always make sure the milk tank is placed correctly. If not fitted well, the cappuccino, latte & milk foam buttons will light off and the functions will not be available. Buzzer will sound as 3 beeps to indicate this.

The removal of the milk tank has no impact on the coffee brewing, single/double espresso programs can be used.
4 Preparation
4.5 Adjusting Height for Different Cup Size
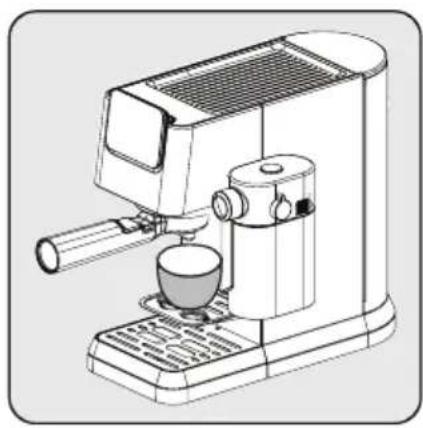
For smaller cups, the cup tray (3) can be used.
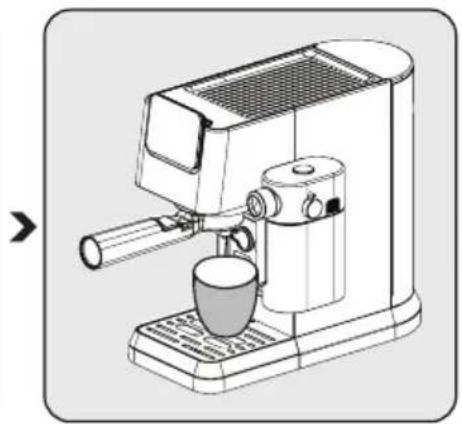
For average size cups, place cup over the drip tray (6) in normally inserted position.

If drip tray is removed for bigger cups, it should be placed back into the machine right after beverage preparation is completed. If drip tray is not placed back after beverage preparation, due to internal system release, water might come to the base and would need a manual cleaning with dry cloth.
5 Operation and use
5.1 Capsule Usage
Capsule coffee can be used besides powder coffee by using the capsule accessories. Product is only suitable for original Nespresso type capsules.
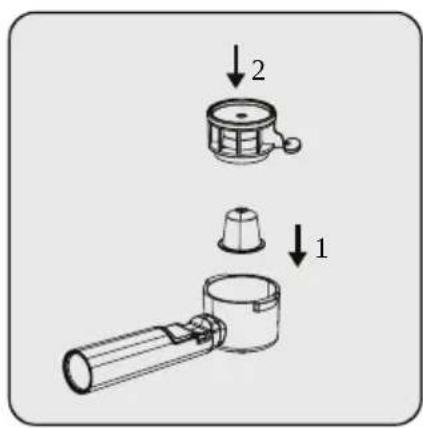
Capsule should be placed inside the capsule portafilter. Then place the capsule piercer onto the capsule inside the portafilter. Make sure to insert all the way through.
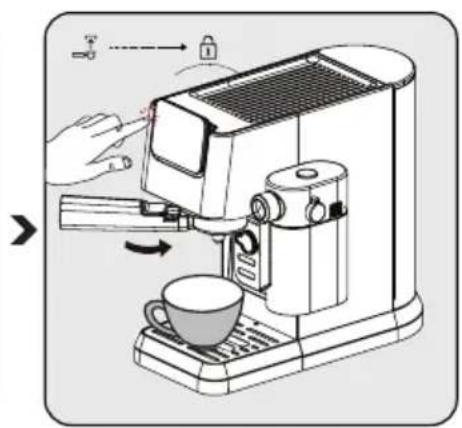
After this, same as for powder coffee, place the portafilter onto the device and turn right to lock.
Press the beverage of your choice to prepare your coffee. If you are going to choose a milk beverage make sure that milk tank is filled.
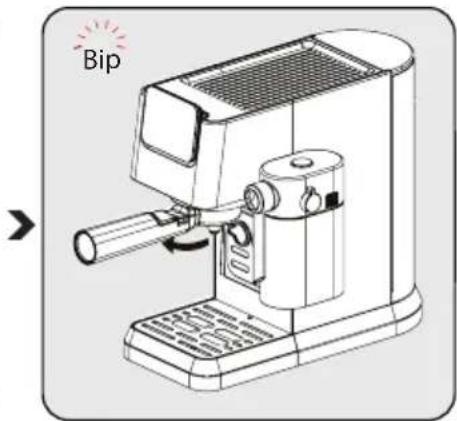
Once completed, take out the capsule piercer. Residual capsule will stay inside the portafilter. Without touching the capsule, you can throw it out by holding the portafilter handle.

Capsule cannot be used after brewing.

Do not wash the portafilter in the dishwasher.

Do not put your hand directly into the inside of the capsule holder to avoid puncture wounds.

Make sure all accessories and portafilter are cleaned before next use to ensure best performance.
5 Operation and use
5.2 E.S.E. Pod Usage
In addition to powder & capsule coffee options, Easy-Serve-Espresso pods can also be used to prepare your beverages.
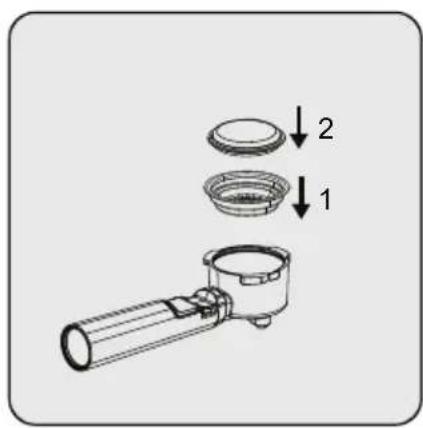
Pod basket should be placed inside the main portafilter. Pod should be placed inside the pod basket.
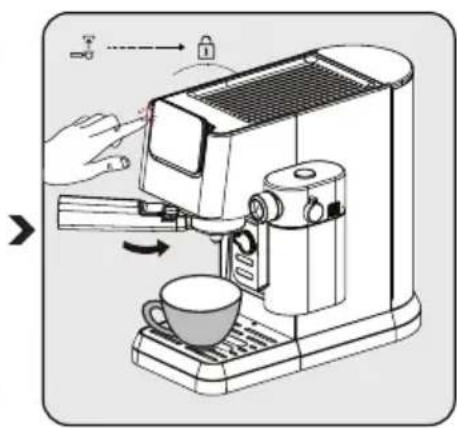
Place the portafilter onto the device and turn right to lock. Press the beverage of your choice to prepare your coffee. If you are going to choose a milk beverage make sure that milk tank is filled.
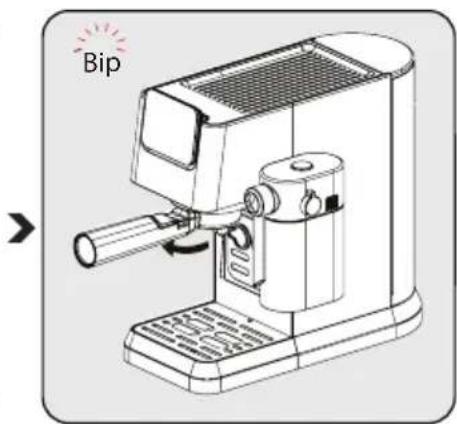
Once completed, remove the portafilter to dispose the residual pod. You can use the small handle on the portafilter in place while knocking out the residual pod.

E.S.E pod cannot be used after brewing.
5.3 Adjusting the Volume of your Coffee / Milk
Setting amounts for Single & Double Espresso
- Select the function that is to be reprogrammed. Press the appropriate button (single or double espresso) and keep it held down. You will hear one beep. [single/double espresso programmable amounts (min: 30/60ml, max: 50/100ml)]
- Only let go of the button once the desired amount of coffee has passed through. You will hear two beeps. This amount is now saved under the corresponding function.
Setting amounts for Latte, Cappuccino & Milk Foam
- Select the function that is to be reprogrammed. Press the appropriate button (cappuccino, latte or milk) and keep it held down. You will hear one beep. (The shortest time of brewing milk is 10s, the longest time is 45s.)
- Only let go of the button once the time of brewing milk that you want has passed through. You will hear two beeps. This time is now saved under the corresponding function.
- To change amount of black coffee; after milk dispensing is completed, press and hold down selected beverage icon until desired amount has passed through.
5 Operation and use

The adjusted beverage settings will be saved to device memory for future use until resetted or changed again.
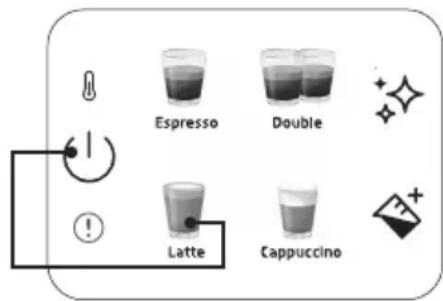
To reset single beverage to default/factory setting:
Press and hold down any beverage and power buttons together for more than 3 seconds to reset the selected beverage amount.
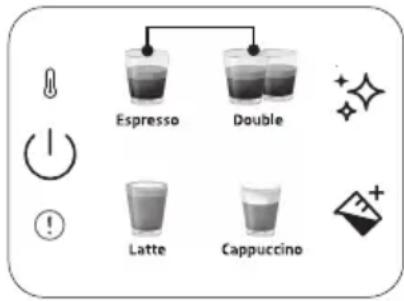
To reset all beverages to default/factory setting:
Press and hold down single and double espresso buttons together for more than 3 seconds to reset the all beverage amount.

Standby time: The machine will automatically shut down after 29 minutes without any operation (or after work).
6 Cleaning
6.1 Cleaning the Milk Tank
Pour water into the milk tank up to the MAX level and press the milk foam button. Once completed, take out the milk tank components (9) and (11) and clean them under clean water.

Clean the milk tank after each use to avoid milk residue.
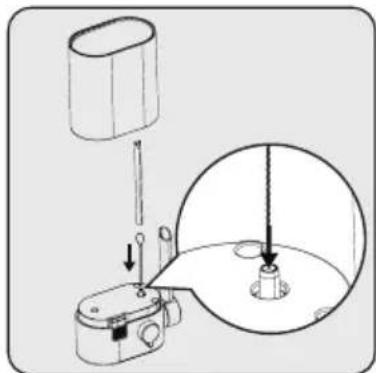
Use the cleaning needle (18) to clean inside the milk frother inlet.
6.2 Cleaning/Rinsing Function
For cleaning the brewing head, place a container under the brewing head and press the cleaning button. Cleaning will be completed within 16 seconds and the machine will be ready to use.
- If you do not use the machine for more than 5 consecutive days, rinse and drain the water tank.
- All accessories, the drip tray, and its grid (6) and (4) can be cleaned manually under clean water.
- Do not put the portafilters into the dishwasher.
6.3 Descale Function
When descaling is required, the descale icon will light up as orange. Place a container that can hold 1.5L under the brewing head. Pour water into the water tank until the MAX level and mix with scale remover or citric acid. Press and hold the descale button for more than 3 seconds and you will hear two beep sounds, which indicates that the first cycle of descaling has begun. The first cycle will take around 15 minutes.
Once completed, the descale icon will turn white.

6 Cleaning
Empty and replace the container under the brewing head. Clean and fill the water tank until the MAX level with clean water. Press and hold the descale button for more than 3 seconds and you will hear two beep sounds, which indicates that the second cycle of descaling has begun. The second cycle will take around 6 minutes. Once all complete, the machine will go back to idle stage and will be ready to use.
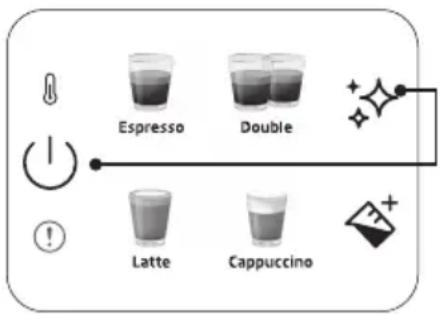
To reset descale warning status:
Press and hold the power and descale buttons together for more than 3 seconds.

- Descale is required after a predefined brewing cycle.
- Resetting the descaling warning status is not recommended for maintaining the best condition of the appliance.
7.1 Problems, possible causes and remedies
| Problem Cause Remedy | ||
| Coffee runs down the side of the portafilter. | Portafilter (2) is not properly inserted. | Turn the handle of the portafilter (2) further to the right. |
| Edge of sieve is not free of ground coffee | Turn off the machine, remove the portafilter (2) holder and clean the edges of the sieve. | |
| Screen inside brew head is dirty. | Clean the brew head using a wet cloth and run the cleaning function without placing the portafilter. | |
| Very little or no coffee flows through the portafilter. | No water in tank. Fill the tank with water. | |
| The screen inside the brew head is blocked. | Brew water through the screen without the portafilter (2) inserted. If no water comes through, unscrew the screen, clean and replace. | |
| The sieve is blocked. | Correction: Clean the sieve, insert into the portafilter (2) and pump water through without coffee. If no water comes through the sieve call Customer Service to order a replacement sieve. | |
| Espresso brews out only as drops. | Coffee grounds are too fine or packed down too firmly. | Do not tamp coffee grounds so firmly. Use a coarser grind of coffee. |
| Machine blocked by calcium deposits. | Descale the appliance. See page 15. | |
| Espresso brews too quickly. | Ground coffee is too coarse. Use a finer grind. | |
| Not enough coffee in the sieve. Use more ground coffee. | ||
| No crema. | Coffee old or too dry. Use fresh coffee. | |
| Coffee not pushed down firmly enough. Water pushes through the coffee too fast. | Tamp coffee grounds more firmly. Use a finer grind. | |
| Coffee too coarse. | Use a conical burr grinder to obtain a finer and more consistent grind. | |
| Coffee blend not suited to espresso coffee. | Change brand of espresso. | |
| Not enough froth when frothing milk. | Milk not fresh. Use fresh milk. | |
| Milk not suitable. Check that the milk is suitable for frothing. | ||
| Milk was too warm from the start. | Use milk straight from the refrigerator (34°F). | |
| Not enough milk to froth. Use more cold milk. | ||
| Milk inlet hole is blocked. | Use the cleaning needle (18) to clean inside the milk frother inlet. | |
12 months breakdown and repair guarantee
Guarantor: Beko plc, 1 Greenhill Crescent, Watford, Hertfordshire. WD18 8UF
The guarantee does not in any way diminish your statutory or legal rights.
Your appliance has the benefit of our manufacturer's guarantee which covers the product for 12 months from the date of original purchase.
This gives you reassurance that if within that time, your appliance is proven to be defective because of either workmanship or materials, we will at our discretion either repair or replace your appliance.
The appliance must be correctly installed, located and operated in accordance with the instructions contained in the user manual. The guarantor disclaims any liability for accidental or consequential damage.
The Guarantee is subject to the following conditions:
- Documentary proof of the original purchase date is provided.
- The appliance has been installed and operated correctly and in accordance with our operating and maintenance instructions. The appliance is used only on the electricity supply on the rating plate. The appliance has only been used for normal domestic purposes. The appliance has not been altered, serviced, dismantled or otherwise interfered with by any person. The appliance is used in the United Kingdom or Republic of Ireland.
- Any parts removed during repair work or any product that has been replaced becomes our property. The guarantee is not transferable if the product is resold.
The Guarantee does not cover:
- Transit, installation or delivery damage.
- Accidental damage.
- Misuse or abuse.
- Replacement of any consumable item or accessories. These include but are not limited to: plugs, cables, light bulbs, knobs, filters and flaps.
- Repairs or replacements required as a result of unauthorised repairs or inexpert installation that fails to meet the requirements contained in the user guide or instruction book.
- Repairs to products used in commercial or non-residential household premises.
How to obtain after sales service, help or general advice
Please keep your purchase receipt or other proof of purchase in a safe place as you will need to show us this document if your product requires attention within the guarantee period.
Please also record your product details below, which will allow you to access our services more quickly and help us identify your product. The model number is printed on the front of the user guide and the serial and model number is shown on your products rating plate.
| Model number | Serial number | Purchased from | Date of purchase |
Please call our UK based Customer Service department if you need help or advice from us:
United Kingdom and Northern Ireland: 0333 207 9710
Republic of Ireland: 01 862 3411
You can also contact us through our website: www.beko.co.uk
- https://twitter.com/beko_tr
- https://www.facebook.com/bekoturkiye/
- https://www.youtube.com/user/BekoChannel
Dear Customer,
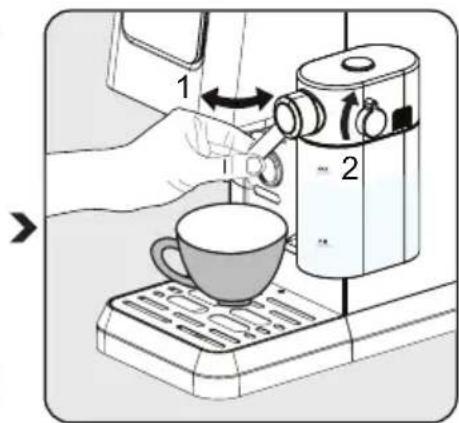
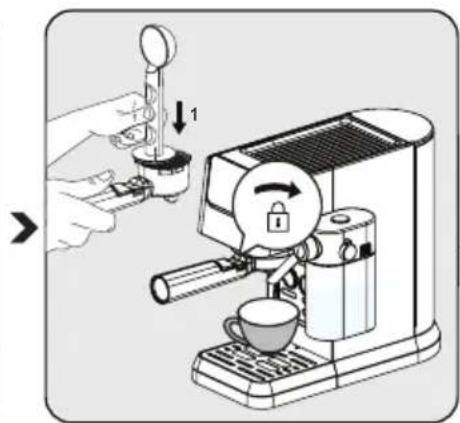
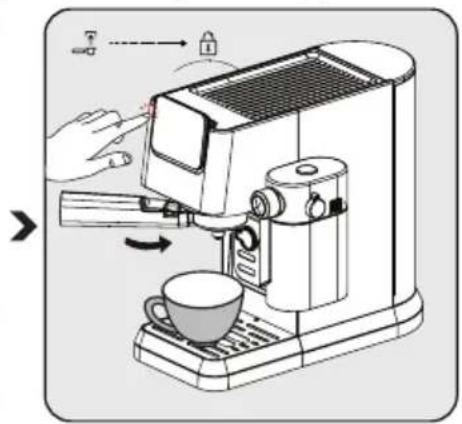
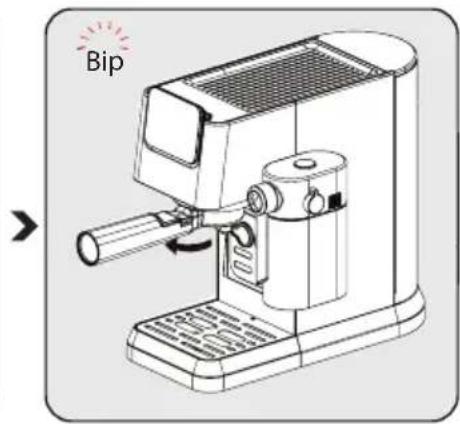
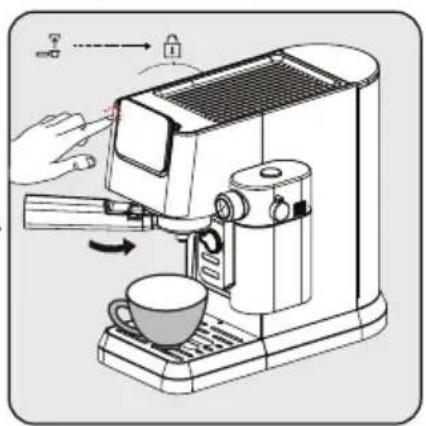
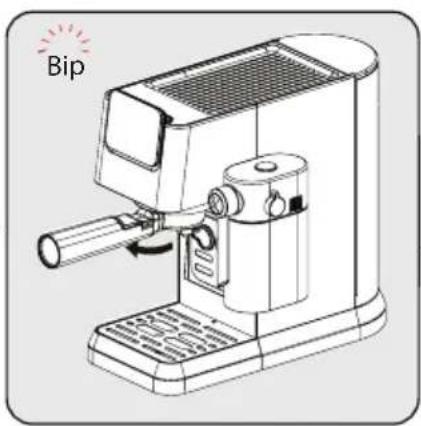
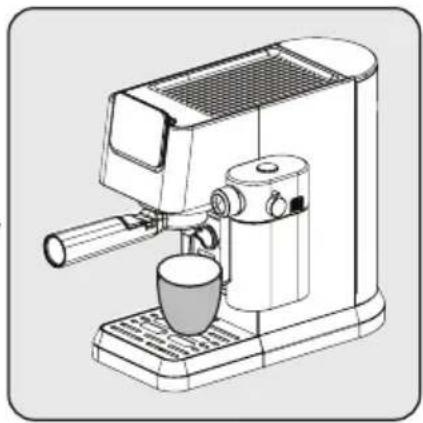
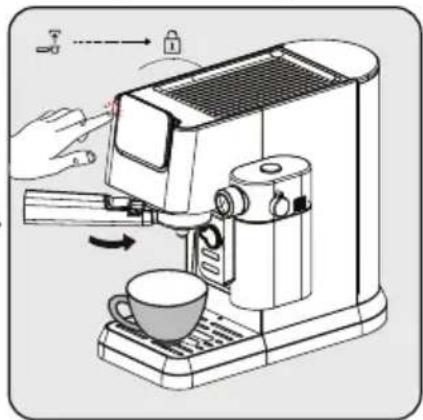
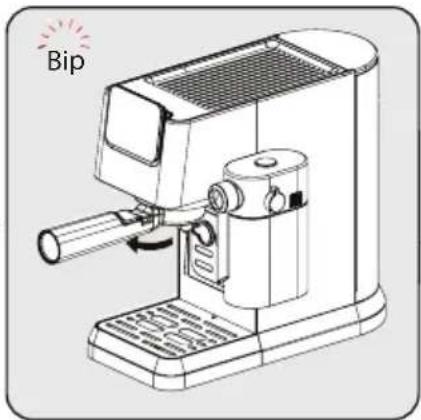
Insert a single or double espresso basket into the filter holder. Pour freshly ground coffee into the filter using the measuring spoon (approximately 8-15 g) and level off the excess powder with the spoon. Using the tamper end of the spoon, apply approximately 15 kg of pressure to press the powder evenly and firmly.
Install the portafilter under the coffee outlet. Align it with the unlock symbol, insert it into the groove, and slowly turn it to the right toward the lock symbol.
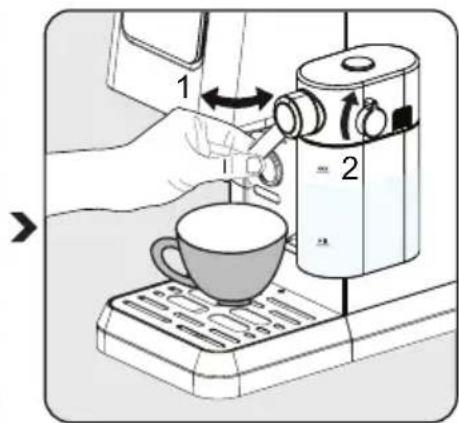
Place the capsule into the capsule portafilter. Then attach the capsule piercer onto the capsule inside the portafilter. Make sure to push it in until it stops.
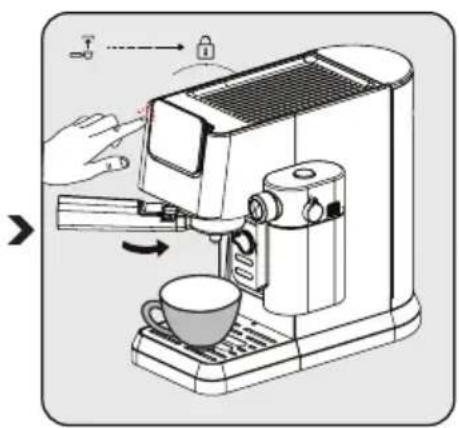
Place the portafilter on the machine and secure it by turning it to the right.
- Control panel
- Filter holder
- Cup holder
- Drip tray grid
- Float
- Drip tray
- Water tank lid
- Water tank
- Milk container lid
- Milk container
- Single espresso basket
- Double espresso basket
- Capsule piercer
- Capsule portafilter
- Cleaning needle
- Milk froth adjustment button
- Coffee grounds container / tamper
- Single-dose coffee pod holder
2.1 Control panel
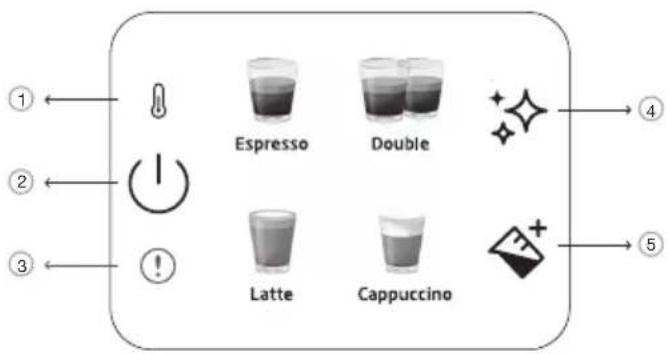
| 1 | Indikator predgrejanja | |
| 2 | Dugme za uključivanje/isključivanje i odustajanje | |
| 3 | Opšta greška | |
| 4 | Dugme za čišćenje iuklanjanje kamenca | |
| 5 | Dugme za mleko |
All values indicated on the product and in printed brochures are obtained after laboratory measurements carried out in accordance with relevant standards. These values may vary depending on usage and ambient conditions.
3 Technical specifications
Power supply: 220-240 V~, 50-60 Hz
Power: 1376 - 1628 W
We reserve the right to make technical and design changes.
All values stated on the product and in printed brochures were obtained after laboratory measurements carried out in accordance with relevant standards. These values may vary depending on usage and ambient conditions.
Product dimensions:
20.5 cm (Width) x 30.8 cm (Height) x 42.3 cm (Depth)
Fill the water tank with fresh, cold, clean water at least up to the MIN mark and at most up to the MAX mark. (Do not add hot water) Then insert the tank into the appliance, and plug the other end of the power cord into a wall outlet with the appropriate supply voltage.

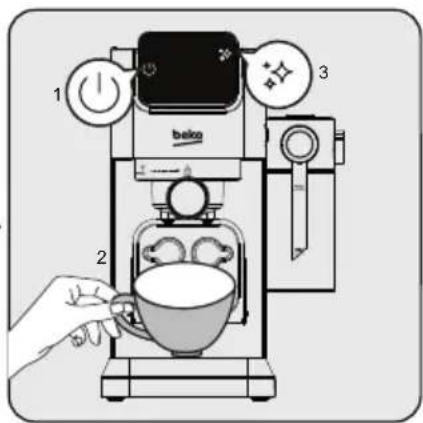
The on/off button on the control panel will light up. Press that button to turn on the appliance. Place a cup under the brewing head and press the cleaning button. The appliance will emit one beep and start cleaning. When it finishes, the appliance will be ready for use.
4 Preparation
4.2 Brewing a single / double espresso
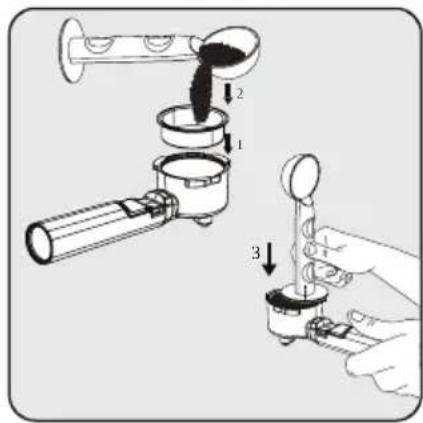
Place a single or double espresso basket into the filter holder. Pour freshly ground coffee powder into the filter using the measuring spoon (approx. 8-15 g) and level off the excess powder with the spoon. Using the tamper end of the spoon, apply about 15 kg to press the powder evenly and firmly.
Position the filter holder under the coffee outlet. Align it with the unlock symbol, push it into the slot, and slowly rotate it to the right to the lock symbol.
The capsule should be placed in the capsule portafilter. Then place the capsule piercer onto the capsule inside the portafilter. Make sure to insert it all the way.
After that, as with ground coffee, place the portafilter on the appliance and turn it to the right until it locks.
Press to select your preferred beverage and prepare coffee. If you wish to select a milk-based beverage, check that the milk tank is full.
The coffee pod holder should be placed inside the main portafilter. The coffee pod should be placed in the coffee pod holder.
Place the portafilter on the appliance and turn it to the right until it locks. Press to select your preferred beverage and prepare coffee. If you wish to select a milk-based beverage, check that the milk tank is full.
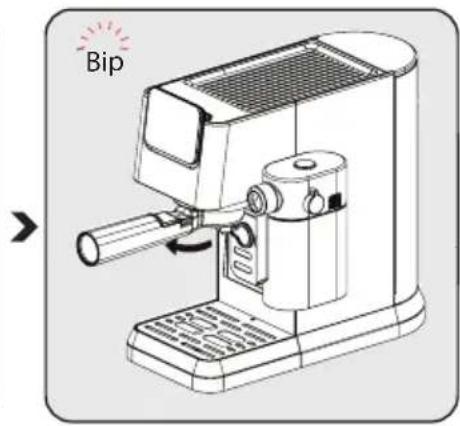
When finished, remove the portafilter to dispose of the empty coffee pod. You can use the small handle built into the portafilter while ejecting the empty coffee pod.

E.S.E. cannot be used after brewing.
5.3 Adjusting the amount of your coffee/milk
Adjusting the amount for single and double Espresso
- Select the function you wish to reprogram. Press the corresponding button (single or double Espresso) and hold it down. A short acoustic signal is heard. [single/double programmed espresso amounts (min.: 30/60 ml, max.: 50/100 ml)]
- Release the button only when the desired amount of coffee has passed. Two short acoustic signals are heard. This amount is now saved under the corresponding function.
Adjusting the amount for Latte, Cappuccino, and milk froth
- Select the function you wish to reprogram. Press the corresponding button (Cappuccino, Latte, or milk) and hold it down. A short acoustic signal is heard. (The shortest milk brewing time is 10 seconds, and the longest is 45 seconds.)
- Release the button only when the desired milk brewing time has passed. Two short acoustic signals are heard. This time is now saved under the corresponding function.
- To change the amount of black coffee; after dispensing milk, press and hold the icon of the selected beverage until the desired amount has passed.

Customized beverage settings will be saved in the appliance's memory for future use until reset or changed again.
5 Operation and use
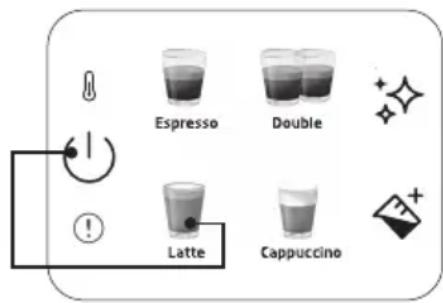
To reset a single drink to the default/factory setting:
Press and hold any drink button and the power button together for more than 3 seconds to reset the selected drink quantity.
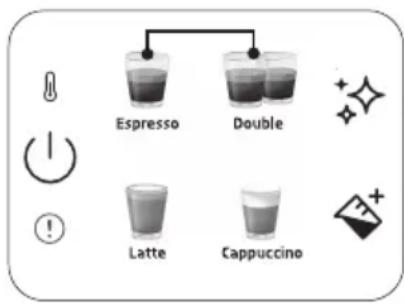
To reset all drinks to the default/factory setting:
Press and hold the single and double espresso buttons together for more than 3 seconds to reset all drink quantities.

Standby time: The machine will automatically turn off after 29 minutes without any operations (or after operation).
6 Cleaning
Use the cleaning needle (18) to clean the inside of the milk frother inlet.
6.2 Cleaning/rinsing function
| Yeuroy Yiyin Yiyin | [1234] | 1 |
| Zer Yiyin/Yiyin Yiyin Yiyin |  | 2 |
| Chap O'ay |  | 3 |
| Zer Yiyin/Yiyin Yiyin Yiyin |  | 4 |
| Zer Yiyin |  | 5 |



- SEMI-AUTOMATIC ESPRESSO MACHINE WITH INTEGRATED MILK CUP
- CONTENTS
- PLEASE READ THIS USER MANUAL FIRST
- EXPLANATION OF SYMBOLS
- IMPORTANT INSTRUCTIONS FOR SAFETY AND ENVIRONMENT
- DANGER OF ELECTRIC CURRENT
- DANGER OF BURNING OR SCALDING
- FUNDAMENTAL SAFETY PRECAUTIONS
- INTENDED USE
- DANGER RESULTING FROM IMPROPER USE
- LIMITATION OF LIABILITY
- COMPLIANCE WITH THE WEEE DIRECTIVE AND DISPOSING OF THE WASTE PRODUCT
- COMPLIANCE WITH ROHS DIRECTIVE
- PACKAGE INFORMATION
- PLUG WIRING
- FITTING A DIFFERENT PLUG
- OVERVIEW & CONTROL PANEL
- CONTROL PANEL
- TECHNICAL DATA
- PRODUCT DIMENSIONS
- BASKET CAPACITIES
- VOLUME OF COFFEE* (DEFAULT SETTINGS)
- PREPARATION
- FIRST TIME USE
- BREWING SINGLE / DOUBLE ESPRESSO
- BREWING CAPPUCCINO & LATTE
- BREWING / ADDING MILK FOAM
- ADJUSTING HEIGHT FOR DIFFERENT CUP SIZE
- OPERATION AND USE
- CAPSULE USAGE
- E.S.E. POD USAGE
- ADJUSTING THE VOLUME OF YOUR COFFEE / MILK
- SETTING AMOUNTS FOR SINGLE & DOUBLE ESPRESSO
- SETTING AMOUNTS FOR LATTE, CAPPUCCINO & MILK FOAM
- TO RESET SINGLE BEVERAGE TO DEFAULT/FACTORY SETTING
- TO RESET ALL BEVERAGES TO DEFAULT/FACTORY SETTING
- CLEANING
- CLEANING THE MILK TANK
- CLEANING/RINSING FUNCTION
- DESCALE FUNCTION
- TO RESET DESCALE WARNING STATUS
- MONTHS BREAKDOWN AND REPAIR GUARANTEE
- THE GUARANTEE IS SUBJECT TO THE FOLLOWING CONDITIONS
- THE GUARANTEE DOES NOT COVER
- HOW TO OBTAIN AFTER SALES SERVICE, HELP OR GENERAL ADVICE
- TECHNICAL SPECIFICATIONS
- BREWING A SINGLE / DOUBLE ESPRESSO
- ADJUSTING THE AMOUNT OF YOUR COFFEE/MILK
- ADJUSTING THE AMOUNT FOR SINGLE AND DOUBLE ESPRESSO
- ADJUSTING THE AMOUNT FOR LATTE, CAPPUCCINO, AND MILK FROTH
- TO RESET A SINGLE DRINK TO THE DEFAULT/FACTORY SETTING
- TO RESET ALL DRINKS TO THE DEFAULT/FACTORY SETTING
Brand : BEKO
Model : CaffeExperto CEP 5464 DX
Category : Coffee machine