
FPW082FS - Safe SentrySafe - Free user manual and instructions
Find the device manual for free FPW082FS SentrySafe in PDF.

| Product Type | Fire and water resistant safe |
| Power Supply | 2 CR123 lithium batteries (electronic lock); external 9V backup battery |
| Fire Resistance | 1 hour at 927°C (1,700°F) per UL |
| Digital Media Protection | 1 hour at 927°C for CDs, DVDs, memory cards, USB drives (ETL verified) |
| Lock Type | Mechanical combination dial or electronic keypad (depending on version) |
| Number of Programmable Codes | Up to 5 codes: 1 fixed factory code, 1 user code and 3 secondary codes |
| Emergency Key | Yes (depending on model) |
| Interior Lighting | LED, adjustable: off, 30 s or 60 s |
| Time Delay Function | 2 minutes after 3 consecutive incorrect codes |
| Floor Anchoring | Bolting possible (kit provided on some models) |
| Desiccant Included | Desiccant packet to keep inside the safe |
| Maintenance | Replace CR123 batteries about every year; clean with a dry cloth; open the safe every 2 weeks to prevent humidity |
| Warranty | 1 year limited manufacturer warranty; lifetime replacement in case of fire (subject to registration conditions) |
| Customer Service | 1 800 828-1438 (USA); www.sentrysafe.com |
| Dimensions (approximate) | Height: 40 cm, Width: 35 cm, Depth: 30 cm (estimate) |
| Weight (approximate) | 25 kg (estimate) |
Frequently Asked Questions - FPW082FS SentrySafe
User questions about FPW082FS SentrySafe
0 question about this device. Answer the ones you know or ask your own.
Ask a new question about this device
Download the instructions for your Safe in PDF format for free! Find your manual FPW082FS - SentrySafe and take your electronic device back in hand. On this page are published all the documents necessary for the use of your device. FPW082FS by SentrySafe.
USER MANUAL FPW082FS SentrySafe
Fire-Safe® Owner's Manual
natural_image
Top-down view of a black octagonal device with a battery, key, and circular dial (no text or symbols visible)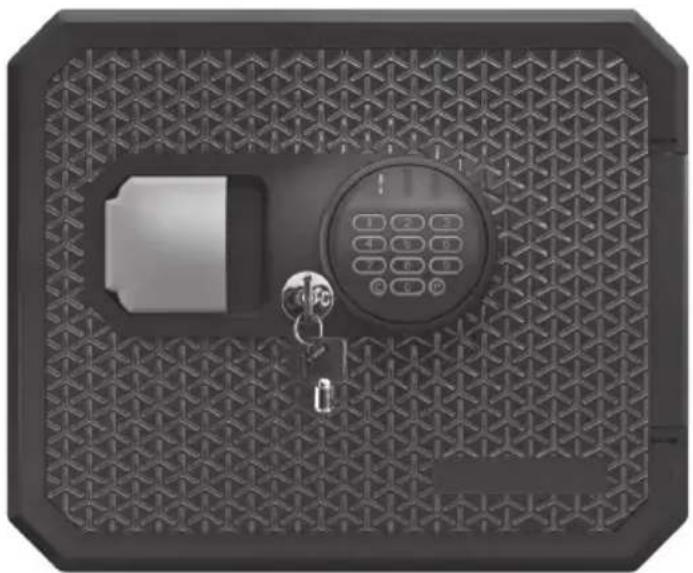
natural_image
Top-down view of a black octagonal metal door with a digital lock and key inserted, no visible text or symbols.
Instructions
Anleitung
Instructies
Instrucciones
Istruzioni
Instruções
Οδηγίες
Instruksjoner
Instruktioner
Ohjeet
Instruktioner
Instrukcja obsługi
Utasítások
Instrucțiuni
Pokyny
Инструкция
Talimatlar
説明書
تامي لعتلا
明
Instruksi
지침
คําแนะนํา
Hướng dẫn

WARNING
Gun warning
This product is not intended for the secure storage of all materials. Items such as firearms, other weapons, combustible materials, or medication should NOT be stored in this unit.
NOTICE
Do NOT store delicate items directly in your safe.
SentrySafe / Master Lock products which offer fire protection have a proprietary insulation that has a high moisture content. In addition, the SentrySafe / Master Lock advanced safes close airtight to offer water resistance, which may also cause moisture to accumulate inside your safe. The desiccant packet
included in your safe during shipment should be left in your safe. DO NOT DISCARD IT. It is intended to help absorb moisture which may accumulate inside your safe. Please open your unit once every two weeks to avoid moisture accumulation.
If you choose to store delicate items such as jewelry with working parts, watches, stamps, or photos in your safe, we recommend putting them in an air-tight container, prior to placing them in the safe for storage.
NOTE: SentrySafe / Master Lock Lock will not be responsible for any damage or loss of items placed in the unit due to moisture.
Do NOT store pearls in this safe.
In the event of a fire, potential damage to delicate pearls occurs at temperatures much lower than the 350°F (176°C) interior performance measure which the UL classification performance standard indicated guarantees. Therefore, DO NOT store pearls in your SentrySafe / Master Lock product.
Do NOT store magnetic media or photo negatives.
This product is not intended to protect magnetic media or photo negatives.
Your safe is only part of your total security protection.
SentrySafe / Master Lock recommends that you store your safe in closets, offices, basements, bedrooms and any other locations that are convenient for you but out of direct line of sight from prying eyes. The location of the safe does not affect the safe's ability to protect your valuables inside.
English
Warnings 2
Registration ....3
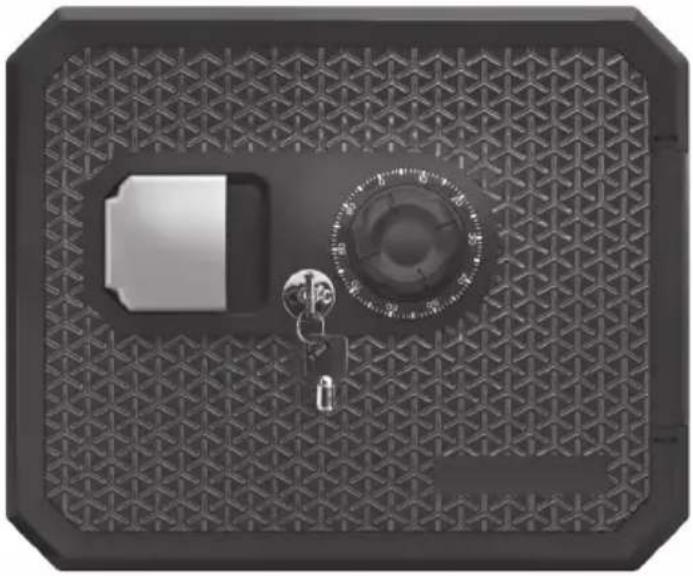
Mechanical Combination Lock 4-5
Programmable Electronic Lock 6-9
Operating the Light 10
Operating Sound Features 10
Bolting Down Your Safe....11-12
Troubleshooting 13
Replacement & Warranty 14
Fire/Water Specifications 15
Customer Service....16
Français 17
Español 33
IMPORTANT
If you experience any problems or challenges with your safe, please contact us. Many issues can be resolved quickly without the product being returned.
Our customer care team is available at 1-800-828-1438 to answer your questions.
Registration:
www.registermysafe.com
Reasons to register
By registering your SentrySafe / Master Lock product you can easily retrieve forgotten codes and combinations.
By registering your SentrySafe / Master Lock product you can be sure that in the unfortunate circumstance of a fire you will be guaranteed your replacement safe (provided official paperwork).
natural_image
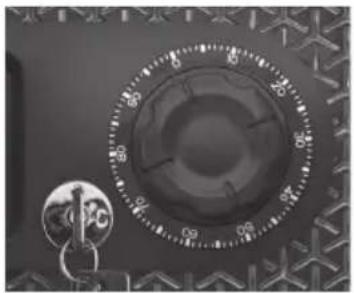
Close-up of a mechanical knob dial with a circular dial and handle, no visible text or symbolsNOTE: • Store combination (and keys if equipped) in a secure location (other than in the safe).
• Combination can not be changed.
Preparing your safe for first time use
- DO NOT RETURN! Questions or concerns, call us at 1-800-828-1438.
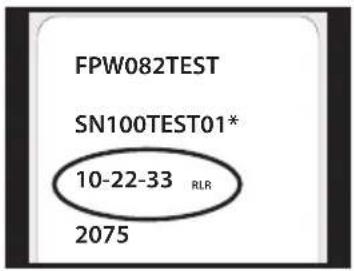
Find your combination on the back of this owner's manual.
Keys are shipped outside of the safe. Be sure to locate them before locking your safe.

WARNING
Test your combination several times before putting valuables inside.
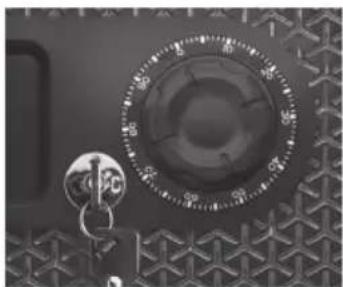
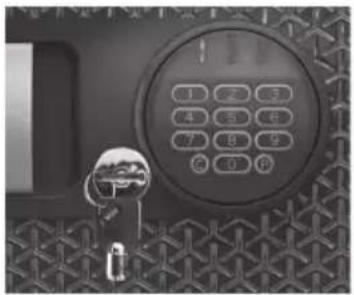
Unlocking your safe using the override key only (for select models)
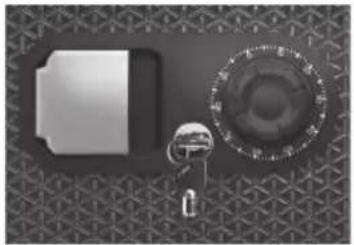
natural_image
Top-down view of a battery and a circular device with a knob, set against a patterned background (no text or symbols visible)1 Insert key into the cylinder, turn to the 'unlocked' position.
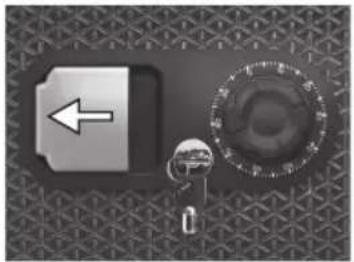
natural_image
Close-up of a mechanical component with an arrow pointing left and a knob on a textured surface (no text or symbols visible)2 Pull handle outward to open the door.
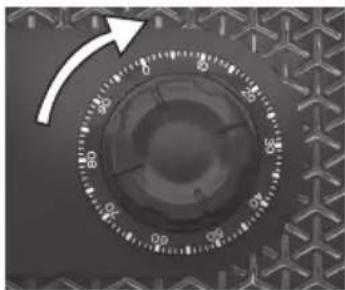
Unlocking your safe using the combination dial
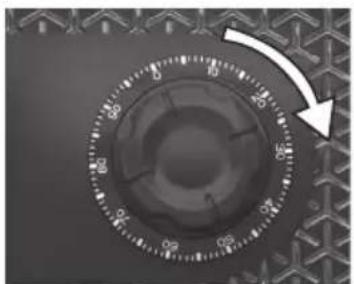
natural_image
Close-up of a circular dial with measurement markings and an arrow pointing to the center (no readable text or symbols)1 Rotate dial to '0', then rotate right (clockwise) passing '0' three times, continue rotating until you reach the first number in your combination.
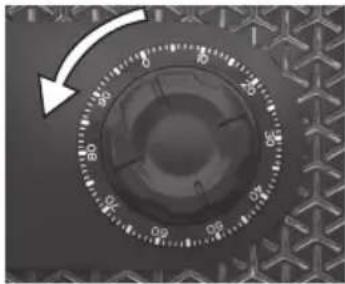
natural_image
Close-up of a circular dial with measurement markings and an arrow pointing to the left edge (no readable text or symbols)2 Rotate dial to the left (counterclockwise). Go PAST the second number of your combination ONCE and stop the SECOND time the dial reaches the number.
natural_image
Close-up of a mechanical dial with a curved arrow pointing to the left side (no text or symbols visible)3 Rotate the dial to the right (clockwise), stop when you reach the third number in your combination.

natural_image
Close-up of a black rectangular button with an arrow pointing left, set against a textured gray background (no text or symbols)4 Pull handle outward to open the door.
Locking your safe using the override key (for select models)
natural_image
Close-up of a mechanical knob with a dial and handle, set against a textured background (no visible text or symbols)① Close the door to re-engage locking bolts.
2 Turn key to the 'locked' position.
Locking your safe using the combination dial
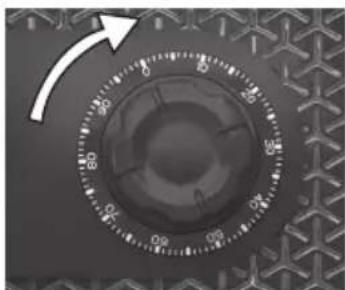
natural_image
Close-up of a circular mechanical dial with measurement markings (no readable text or symbols)① Close the door to re-engage locking bolts.
2 Spin the dial at least 2x to the right (clockwise) to scramble the lock.
NOTE: • Safe will not lock until the combination dial is scrambled.
- Safe will not lock unless key cylinder is turned to the locked position.
NOTE: • Store code (and keys if equipped) in a secure location (other than in the safe).
Preparing your safe for first time use
- DO NOT RETURN! Questions or concerns, call us at 1-800-828-1438.
Find your code on the back of this owner's manual.
Keys are shipped outside of the safe. Be sure to locate them before locking your safe.
WARNING
Test your code several times before putting valuables inside.
Unlocking your safe using the override key only (for select models)
natural_image
Close-up of a black metal door with a keypad and key inserted, set against a patterned metal panel background (no visible text or symbols)1 Insert key into the cylinder, turn to the ' unlocked' position.
natural_image
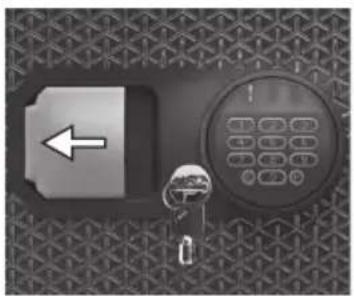
Close-up of a metallic door with an arrow pointing left and a digital keypad on a textured background (no visible text or symbols)2 Pull handle outward to open the door.
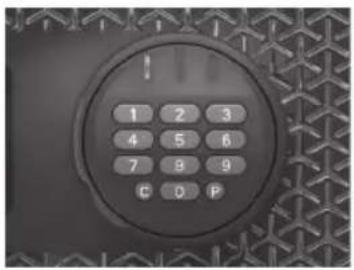
Unlocking your safe using the electronic keypad
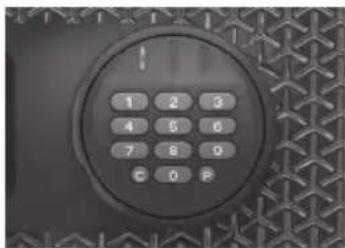
natural_image
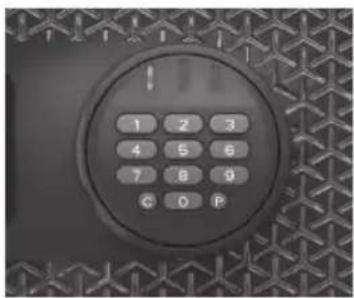
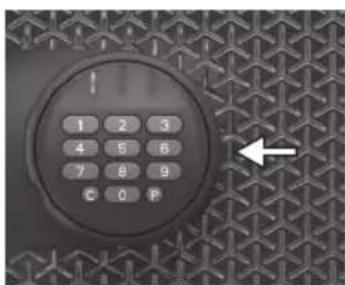
Close-up of a circular keypad with numbers 1-9 and a letter 'P' on the dial, set against a textured metallic background (no readable text or symbols beyond basic markings)① Enter the 5 digit factory code found on the back of the owner's manual.
2 The green light will stay illuminated to indicate the code is correct. You will have 5 seconds to open your safe.
natural_image
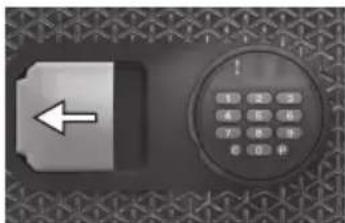
Close-up of a black rectangular device with a white left-pointing arrow on its side, next to a circular keypad (no visible text or symbols)3 Pull handle outward to open the door.
NOTE: • Factory installed batteries included.
- Delay mode will occur if three consecutive invalid entries have been tried. Red LED will blink on and off to let you know the safe is in delay mode. This will cause the system to shutdown for two minutes. DO NOT remove the batteries to restart the system it will only increase the length of time for the system shutdown.
Locking your safe using the override key only (for select models)
natural_image
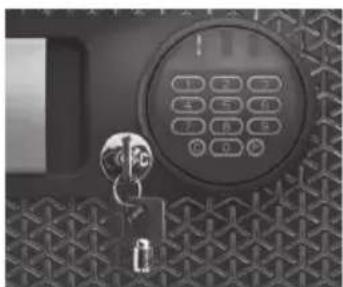
Close-up of a key inserted into a metal door with a digital keypad (no visible text or symbols)① Close the door to re-engage locking bolts.
2 Turn key to the 'locked' position.
Locking your safe using the electronic keypad
natural_image
Exterior view of a modern office building (no signage)① Close the door to re-engage locking bolts.
2 Wait 5 seconds and try to open your safe without entering any code or using the override key to ensure safe is locked.
NOTE: • If your safe does not appear to be working properly, please check to make sure you are using NEW CR123 lithium batteries before contacting customer Service.
Programming information
natural_image
Close-up of a circular digital keypad with numeric keypad and control buttons, set against a textured metal mesh background (no readable text or symbols)Three code options:
Factory code:
The safe will ALWAYS unlock using this 5 digit code (found on the back of the owner's manual). This code cannot be deleted.
User code:
A 5 digit programmable code of your choosing that can be changed or deleted.
Secondary code:
Up to 3 secondary 5 digit programmable codes can be changed or deleted. A secondary can only be programmed after a user code has been activated.
NOTE: • The "C" key is a clear key. This can be used at anytime to clear the system and return to standby mode – unless you are in delay mode (3 consecutive invalid entries).
- The 5 digit factory code cannot be deleted. However, you may add and delete additional codes.
This safe can store up to five codes at one time. One factory code and 4 additional programmable codes.
Programming the user code
To ADD a user code:
1 Press "P" on the keypad.
② Enter the 5 digit factory code found on the back of your owner's manual.
3 The light will flash green and then you will have five seconds to enter your own personal 5 digit user code.
To DELETE a user code:
1 Press "P" on the keypad.
2 Enter the 5 digit factory code.
3 Enter 0,0,0,0,0.
NOTE: • The electronic lock will NOT indicate that it has deleted the user code – please test the code to make sure it has been deleted.
Programming the secondary code
To ADD a secondary code:
1 Press "P" on the keypad two time.
2 Enter the 5 digit user code previously programmed.
3 The light will flash green and then you will have five seconds to enter your own personal 5 digit secondary code.
4 Repeat steps 1-3 in order to add an additional secondary code.
To DELETE a secondary code:
1 Press "P" on the keypad two time.
2 Enter the 5 digit user code.
3 Enter 0,0,0,0,0.
4 Repeat steps 1-3 in order to delete an additional secondary code.
NOTE: • The electronic lock will NOT indicate that it has deleted the secondary code – please test the code to make sure it has been deleted.
• Secondary codes will be deleted in the order they were programmed.
Changing your batteries
natural_image
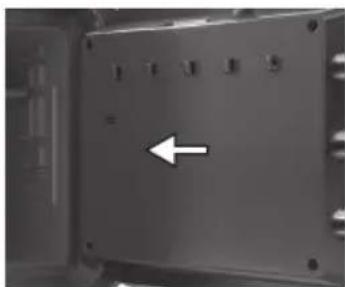
Close-up of a metallic enclosure with mounting holes and a white arrow pointing left (no text or symbols visible)① Locate the battery pack compartment on the inside of the door and remove the cover.
2 Insert two CR123 lithium batteries.
3 Replace battery pack cover.
NOTE: • Do not use rechargeable batteries or any other type of non-CR123 lithium battery. Do not mix old and new batteries.
Battery auxiliary override
If battery power in the safe is running low and cannot operate the safe, you will need to use the battery auxiliary override feature to open the safe.
IMPORTANT: This should not be used as a primary means to gain entry into the safe.
① Open the silicone cap found on the side of the lock.
2 Pull out the wire inside the lock and attach a 9 volt battery.
3 Enter your five digit code.
4 Pull handle outward to open the door.
How to operate the light
natural_image
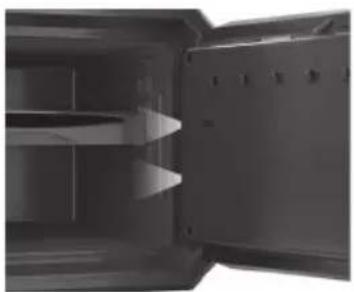
Interior view of a modern kitchen appliance with open door and side shelves (no visible text or symbols)The safe you have purchased may include a long-last LED interior light. Not all safes include a light.
The batteries that operate the keypad are the same batteries that operate the light. If the light in your unit does not turn on, please change your batteries. Refer to page 9 to change the batteries.
The light will turn on every time you enter your code and will remain on for 30 seconds. The light duration has three options – off, 30 seconds, and 60 seconds.
To turn the light off:
1 Press "0" on the keypad.
2 Press "P" on the keypad.
3 Press "3" on the keypad.
To turn the light on for 30 seconds:
1 Press "0" on the keypad.
2 Press "P" on the keypad.
3 Press "4" on the keypad.
To turn the light on for 60 seconds:
1 Press "0" on the keypad.
2 Press "P" on the keypad.
3 Press "5" on the keypad.
NOTE: • If the light duration is 60 seconds, the battery life will be reduced at a faster rate.
Operating sound features
For Programmable Electronic Lock Only
The tones of the keypad may be turned on and off depending on user preference.
Turn sound off:
1 Press "O" on the keypad.
2 Press "P" on the keypad.
3 Press "1" on the keypad.
Turn sound on:
1 Press "O" on the keypad.
2 Press "P" on the keypad.
3 Press "2" on the keypad.
Bolt-down instructions
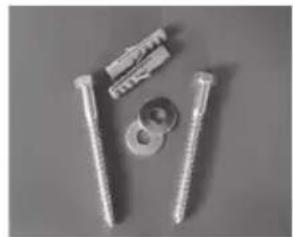
Bolt-down kit contents (in select models only):
- 2 lag screws
- 2 gasket washers
• 2 masonry anchors
natural_image
Close-up of four metal fasteners and bolts on a plain surface (no text or symbols visible)Tools needed to bolt safe to the floor:
- Drill
- Wrench
- 7/16'' (11 mm) drill bit – for drilling into the safe
- ^9/_32 " (7.2 mm) drill bit – for drilling into a wood floor
- 3/8'' (9.5 mm) drill bit – for drilling into a masonry floor
Warning: • DO NOT drill from any location inside the safe.
• DO NOT bolt through the walls.
natural_image
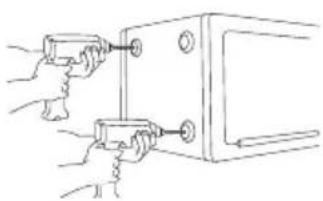
Line drawing of two hands holding a rectangular device with buttons and connectors (no text or symbols)① Tip the safe onto its right side (door hinges horizontal with the floor).
2 Unlock the safe and open the door. Turn the safe on its side so the bottom of the safe is accessible. Using the 7/16" (11mm) bit; drill a hole through two perpendicular feet on the bottom of the safe. DO NOT drill from any location inside the safe.
3 Tip the safe upright, place the safe in the desired location and open the door.
4 Use a screw or pencil to mark the floor through both holes.
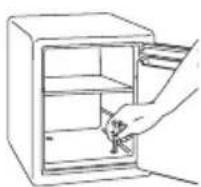
Bolt-down instructions... continued
natural_image
Line drawing of a hand using a tool to adjust or install an open shelf (no text or symbols)5 Move the safe aside to clear both marked spots for drilling.
6 Drill into the floor:
A. For wood: Using the ^9/32 " drill bit, drill a hole 2^1/2 " (64 mm) deep in each marked spot.
B. For masonry: Using the 38 " drill bit, drill a hole 212 " (64 mm) deep in each marked spot. Install a masonry anchor in each hole.
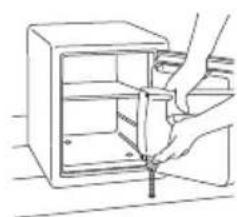
⑦ Replace the safe in the desired position, with the holes in the safe aligned with those in the floor.
8 Securing the safe:
A. For wood: Pass each lag screw through a washer, then through the safe and into a hole. Tighten with the wrench.
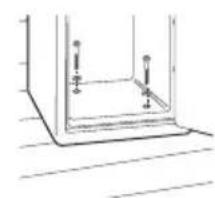
natural_image
Simple line drawing of a corner structure with two vertical posts and horizontal lines (no text or symbols)B. For masonry: Pass each lag screw through a washer, then through the safe and into a masonry anchor. Tighten with the wrench.

natural_image
Pure technical diagram of a mechanical assembly with no text, numbers, or symbolsNOTE: • The safe should not be bolted to a wall, this will compromise the fire rating. Drill holes through the feet only. DO NOT drill through the back or sides.
- Bolting/unbolting the unit is at the consumer's expense and discretion.
- SentrySafe / Master Lock is not responsible for any costs incurred if the unit is to be replaced.
- When bolting down, ensure the gasket washer is facing down.
- If rubber pads are in place, remove them before drilling.
Not all SentrySafe products come with a bolt-down kit.
Please go to www.sentrysafe.com to learn more about the recommended hardware for your safe.
| The Problem: Why it is Happening: The Solution: | ||
| The door will not close and lock. | 1. Confirm that there is no obstruction in the door.2. Bolted down incorrectly. | 1. Remove all items and accessories from inside the safe. If this resolves the issue, re-set the accessories and organize items to properly fit.2. See pages 11 for proper bolt-down instructions. |
| After inputting the programmable code, the door does not open. | 1. Battery Power may be low.2. May be the wrong battery type. | 1. Use override key to open the safe and replace batteries.2. Use 9 volt battery to open your safe and replace the batteries. |
| Red indicator light blinks three times and there are three beeps. | An incorrect code has been entered. | Verify code and re-enter. If the programmable code you are using does not work then use the factory code. If successful re-program your programmable code. |
| Red indicator light blinks five times and there are five beeps. | Keypad communication error. Please call our Customer Service center. | |
| Red indicator light blinks once and there is one beep. | 1. Program button is pressed out of sequence.2. 5 seconds has lapsed between button entries. | Start over. |
| Red indicator light is blinking. | An incorrect code has been entered three times and system has entered delay mode. | Wait two minutes and start over. |
| Yellow indicator light is on. | 1. Battery power is low.2. Battery may be the wrong type. | Replace with new CR123 lithium batteries. |
Limited Lifetime After-Fire Replacement Program
If this product is damaged by fire at any time while still owned by you, the original, registered owner (the original purchaser), Master Lock will either ship a replacement or provide a credit or refund equal to the purchase price paid, at Master Lock's own and sole discretion.
To be eligible for this Limited Lifetime After-Fire Replacement Program, the original purchaser must have registered the product within 30 days of purchase, online at www.registermysafe.com or using the card included with the product. Do not ship your product back to Master Lock.
To obtain service under the Limited Lifetime After-Fire Replacement Program, please contact Master Lock Customer Care by phone at 1-800-828-1438 or via www.sentrysafe.com. Do not ship your product back to Master Lock.
When contacting Master Lock Customer Care, you should have the following information available:
1) A description of the fire event; 2) unit model number; 3) serial number; 4) a photo of the burned unit; and 5) a copy of the report from the fire department, insurance or police.
THIS AFTER-FIRE REPLACEMENT PROGRAM IS LIMITED TO REPAIR OR REPLACEMENT ONLY. The limited warranty does not cover labor for removing, reinstalling or refinishing the product or part, or other materials removed, reinstalled or refinished in order to repair or replace the product or part. TO THE EXTENT PERMITTED BY LAW, MASTER LOCK DISCLAIMS ALL OTHER IMPLIED OR EXPRESS WARRANTIES INCLUDING ALL WARRANTIES OF MERCHANTABILITY AND/OR FITNESS FOR A PARTICULAR PURPOSE. TO THE EXTENT THAT ANY IMPLIED WARRANTIES MAY NONETHELESS EXIST BY OPERATION OF LAW, SUCH WARRANTIES ARE LIMITED TO THE DURATION PROVIDED BY LAW.
Limited One-Year Manufacturing Warranty
This product is warranted to the original purchaser for one (1) year from the date of purchase. If during that one year period, this product or any part of the product fails due to a defect in materials or workmanship, Master Lock Company LLC ("Master Lock") will at its own and sole discretion, repair or replace the product or part free of charge for the original purchaser. Simply contact Master Lock at the most convenient site listed below for instructions on obtaining repair or replacement. Return of the defective product or part at the customer's expense, along with proof of purchase, may be required. This limited warranty applies only to defects in materials and workmanship, and does not cover products which have been abused, altered, or misused. This limited warranty also does not cover damage resulting from fire (except for fire-resistant products) or from water (except for water-resistant products), or from theft or vandalism.
Limitations Of Warranty
The statements made herein are your sole and exclusive remedy against Master Lock and Master Lock shall not be liable for any damages, whether direct, indirect, incidental, special, consequential, exemplary, or otherwise, including property damage or property loss (including loss or damage of the contents of any product), lost data, lost revenues and lost profits, arising out of any theory of recovery, including statutory, contract or tort. Notwithstanding the term of any limited or implied warranty, or in the event that any of these limited warranties fails of its essential purpose, in no event will Master Lock's entire liability exceed the purchase price of this product. Some states and provinces do not allow the exclusion or limitation of incidental or consequential damages so the above limitations or exclusions may not apply to you. Some states and provinces do not allow limitation on how long a limited warranty lasts, so the above limitation may not apply to you. These limited warranties gives you specific legal rights, and you may also have other rights which vary from state to state and province to province.
Products purchased in the EU are governed by consumer laws which provide statutory guaranty rights in addition to the warranty stated on any packaging or website associated with this product.
Any warranty stated on any packaging or website associated with this product is not valid in Australia. Product sold in Australia is governed by the consumer warranty contained in the Australian Consumer Law.
Fire/Water specifications
Fire Endurance:
(UL Classified protection) Subjected to temperatures up to 1700°F (927°C) for a duration of 1 hour for all FPW base models.
Data Protection:
(ETL Verified) 1 hour fire protection of CDs, DVDs, memory sticks and USB drives up to 1700°F (927°C) for all FPW base models. These products are NOT intended to protect computer floppy or 21/4" diskettes, cartridges, tapes, audio or video cassettes, or photo negatives. For fire-resistant storage of these materials, ask your retailer for the SentrySafe Fire-Safe® media storage products. (ETL Verified) FPW082 base models include 24 hour water protection for valuables in up to 5 inches (127 mm) of water.
Customer Service
Customer Service
www.sentrysafe.com
Customer Service: 1-800-828-1438
How to order replacement keys and combinations
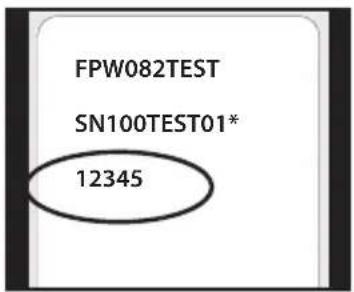
To order replacement keys and/or combinations, we must have the correct model and serial number of your safe. Find your safe's Serial Number on the small label located on the outside of your safe and on the original owner's manual. Once you locate this information, please visit www.sentrysafe.com or call customer service at 1-800-828-1438.
How to order accessories
To optimize your safe's organization consider purchasing SentrySafe accessories for your safe. Available accessories include a tray and shelf. For more items please go to the SentrySafe store at www.sentrysafe.com or call our customer service number 1-800-828-1438.
Most safes are sold with 1 desiccant bag included inside the safe. Desiccant bags provide 3 months of moisture absorption to provide additional protection for your valuables. To purchase new replacement desiccant bags, please visit www.sentrysafe.com.
natural_image
Black octagonal device with a battery and key inserted into a mesh-patterned panel (no text or symbols visible)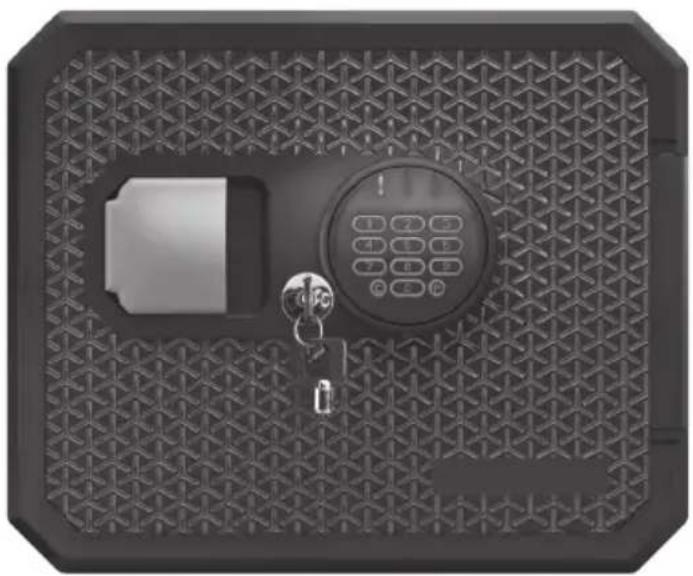
natural_image
Top-down view of a black octagonal metal enclosure with a central keypad and keyhole (no text or symbols visible)
AVERTISSEMENT
Service client....32
English 1
Español 33
IMPORTANT
www.registermysafe.com
natural_image
Close-up of a mechanical knob dial with a circular dial and handle, no visible text or symbolsnatural_image
Close-up of a metallic key and circular dial on a textured surface (no text or symbols visible)natural_image
Close-up of a mechanical component with an arrow pointing left and a circular dial on a textured surface (no text or symbols visible)natural_image
Close-up of a circular mechanical dial with measurement markings and a white arrow pointing to the dial (no text or symbols visible)natural_image
Close-up of a circular mechanical knob with a curved arrow indicating rotation (no text or symbols visible)
natural_image
Close-up of a mechanical knob dial with a curved arrow indicating rotation (no text or symbols)
natural_image
Close-up of a button with an arrow pointing left, set against a textured background (no text or symbols)natural_image
Close-up of a mechanical knob with a key inserted, set against a textured metal surface (no visible text or symbols)natural_image
Close-up of a circular mechanical dial with numbered degrees and an arrow pointing to the left edge (no text or symbols visible)natural_image
Close-up of a hand holding a key next to a large circular keypad (no visible text or symbols)natural_image
Close-up of a black padlock with an arrow pointing left and a small lock icon on a textured gray background (no text or symbols visible)natural_image
Close-up of a circular keypad with numbers 1-9 and a letter 'P' on the right side, set against a textured metal border (no readable text or symbols beyond basic markings)natural_image
Close-up of a black rectangular device with a white left-pointing arrow on its side, placed on a textured gray background (no text or symbols visible)natural_image
Close-up of a metallic key inserted into a wall-mounted digital lock, no visible text or symbolsnatural_image
Exterior view of a modern office building (no signage)natural_image
Close-up of a circular digital keypad with numeric keypad and control buttons, set against a metal mesh background (no text or symbols visible)natural_image
Close-up of a dark electronic component with a white arrow pointing to a small feature (no text or symbols visible)natural_image
Close-up of a circular keypad with numbered buttons and a white arrow pointing to the right side (no readable text or symbols)natural_image
Interior view of a modern refrigerator with open door and side shelves (no visible text or symbols)natural_image
Close-up of four metal fasteners and bolts on a plain surface (no text or symbols visible)natural_image
Pure mechanical diagram showing two hands connecting a component with spring-like springs (no text or symbols)natural_image
Line drawing of a hand using a tool to adjust or install an open shelf (no text or symbols)natural_image
Simple line drawing of a corner structure with two vertical supports and horizontal lines (no text or symbols)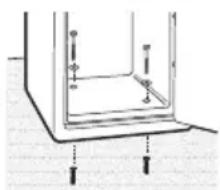
natural_image
Pure technical diagram of a mechanical assembly with no text, numbers, or symbolsnatural_image
Black octagonal device with a battery and key inserted into a mesh-patterned panel (no text or symbols visible)
natural_image
Top-down view of a black octagonal metal door with a keypad and keyhole, placed on a textured metal panel (no text or symbols visible)
ADVERTENCIA
www.registermysafe.com
natural_image
Close-up of a mechanical knob dial with a circular dial and handle, no visible text or symbolsnatural_image
Top-down view of a mechanical component with a key and circular dial (no visible text or symbols)natural_image
Close-up of a mechanical component with an arrow pointing left and a circular dial on a textured surface (no text or symbols visible)natural_image
Close-up of a circular mechanical dial with measurement markings and an arrow indicating rotation (no text or symbols)natural_image
Close-up of a circular mechanical dial with measurement markings and a curved arrow indicating rotation (no text or symbols)natural_image
Close-up of a mechanical knob dial with a curved arrow pointing to the left side (no text or symbols visible)natural_image
Close-up of a button with an arrow pointing left, set against a textured gray background (no text or symbols)natural_image
Close-up of a mechanical knob with a key inserted, set against a textured metal surface (no visible text or symbols)natural_image
Close-up of a circular mechanical dial with numbered degrees and an arrow indicating rotation (no text or symbols)natural_image
Close-up of a metallic door with a keypad and lock mechanism, set against a textured metal panel background (no visible text or symbols)natural_image
Close-up of a metallic key inserted into a digital lock, with a document icon and gear mechanism visible (no text or symbols)natural_image
Close-up of a circular digital keypad with numbered buttons, set against a textured metal mesh background (no readable text or symbols)natural_image
Close-up of a black rectangular device with a circular keypad and an arrow pointing left, set against a patterned background (no text or symbols visible)natural_image
Close-up of a metallic key inserted into a wall-mounted control panel (no visible text or symbols)natural_image
Exterior view of a black octagonal electronic device with a control panel and a rectangular door (no visible text or symbols)natural_image
Close-up of a circular digital keypad with numeric keypad and control buttons, set against a textured metal border (no readable text or symbols)natural_image
Close-up of a metallic panel with a white arrow pointing left (no text or symbols visible)natural_image
Interior view of a modern office or storage unit with open door and shelves (no visible text or symbols)natural_image
Close-up of four metal fasteners and bolts on a plain surface (no text or symbols visible)natural_image
Pure mechanical diagram showing two hands holding a rectangular block with circular ports and arrows indicating motion (no text or symbols)natural_image
Line drawing of a hand using a tool to adjust or install an open shelf (no text or symbols)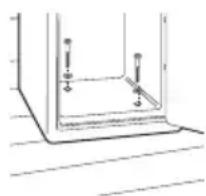
natural_image
Simple line drawing of a mechanical or architectural component with no text, numbers, or symbols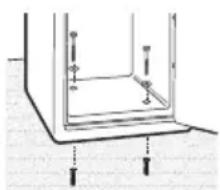
natural_image
Pure technical diagram of a mechanical assembly with no text, numbers, or symbolsMaster Lock Company LLC
Milwaukee, Wisconsin USA
Master Lock Europe SAS
Master Lock UK Sales Limited
M11 Business Link,
Parsonage Lane, Unit 26.
Stansted, England, CM24 8GF
sales_uk@mlock.com
Germany : vertrieb_de@mlock.com
Benelux: mlbenelux@mlock.com
Spain & Portugal : mliberica@mlock.com
www.masterlock.eu
- Fire-Safe® Owner's Manual
- WARNING
- Gun warning
- NOTICE
- Do NOT store delicate items directly in your safe.
- Do NOT store pearls in this safe.
- Do NOT store magnetic media or photo negatives.
- Your safe is only part of your total security protection.
- English
- IMPORTANT
- Registration:
- www.registermysafe.com
- Reasons to register
- Preparing your safe for first time use
- Unlocking your safe using the override key only (for select models)
- Unlocking your safe using the combination dial
- Locking your safe using the override key (for select models)
- Locking your safe using the combination dial
- Unlocking your safe using the electronic keypad
- Locking your safe using the override key only (for select models)
- Locking your safe using the electronic keypad
- Programming information
- Factory code:
- User code:
- Secondary code:
- Programming the user code
- To ADD a user code:
- To DELETE a user code:
- Programming the secondary code
- To ADD a secondary code:
- To DELETE a secondary code:
- Changing your batteries
- Battery auxiliary override
- How to operate the light
- To turn the light off:
- To turn the light on for 30 seconds:
- To turn the light on for 60 seconds:
- Operating sound features
- For Programmable Electronic Lock Only
- Turn sound off:
- Turn sound on:
- Bolt-down instructions
- Bolt-down kit contents (in select models only):
- Tools needed to bolt safe to the floor:
- Bolt-down instructions... continued
- Not all SentrySafe products come with a bolt-down kit.
- Limited Lifetime After-Fire Replacement Program
- Limited One-Year Manufacturing Warranty
- Limitations Of Warranty
- Fire/Water specifications
- Fire Endurance:
- Data Protection:
- Customer Service
- How to order replacement keys and combinations
- How to order accessories
- AVERTISSEMENT
- ADVERTENCIA
- Master Lock Company LLC
- Master Lock Europe SAS
- Master Lock UK Sales Limited
Brand : SentrySafe
Model : FPW082FS
Category : Safe