
410EC - Saw Shindaiwa - Free user manual and instructions
Find the device manual for free 410EC Shindaiwa in PDF.


User questions about 410EC Shindaiwa
0 question about this device. Answer the ones you know or ask your own.
Ask a new question about this device
Download the instructions for your Saw in PDF format for free! Find your manual 410EC - Shindaiwa and take your electronic device back in hand. On this page are published all the documents necessary for the use of your device. 410EC by Shindaiwa.
USER MANUAL 410EC Shindaiwa
GB English (Original instructions)
FR Français
DE Deutsch
IT Italiano
ES Español
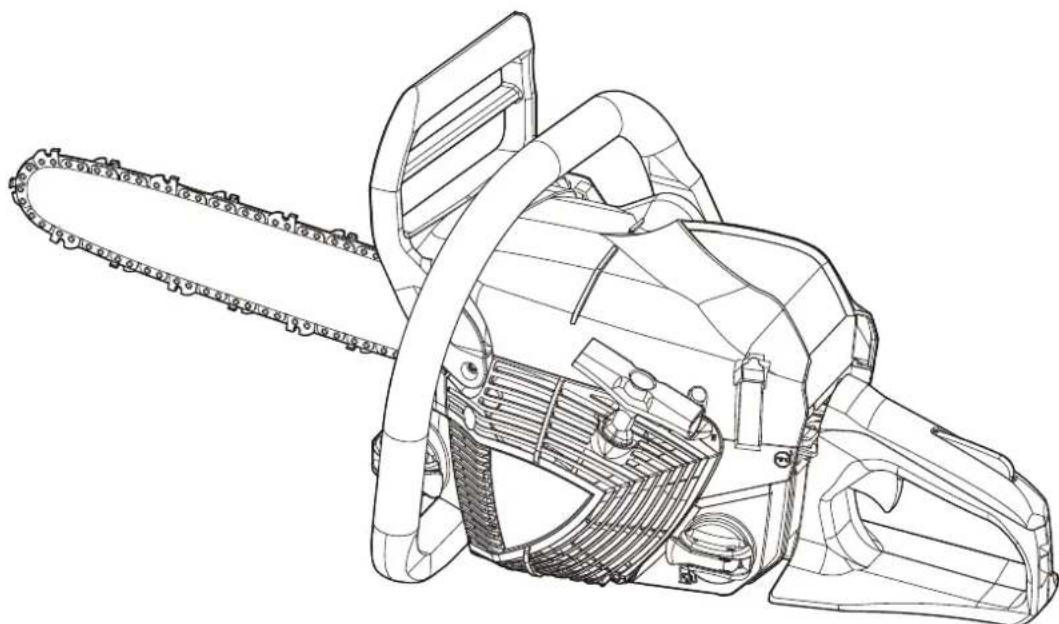
natural_image
Technical line drawing of a chainsaw with visible blades and handle (no text or symbols)Read the instructions carefully and follow the rules for safe operation.
Failure to do so could result in serious injury.
This chain saw is designed for cutting wood or wood products.
Do not cut solid metal, sheet metal, plastic or any non-wood materials.
National or local regulation can restrict the use of this chain saw.
It is important for you to understand all safety precautions correctly before using your chain saw.
Misuse of the chain saw can cause serious bodily injury.
Never let children operate the saw.
This manual shows rules of safe operation, proper use, servicing, and maintenance of your shindaiwa chain saw.
Follow these instructions in order to maintain a good operating condition and a long service life.
For future reference, you should keep this operator's manual.
If this operator's manual has become illegible through impairment or is lost, please purchase a new one from your shindaiwa dealer.
When renting or lending this machine to a person who will operate it, always include this operator's manual, which provides explanation and instructions.
When transferring a product, please deliver it attaching the operator's manual.
Specifications, descriptions and illustrative material in this literature are as accurate as known at the time of publication, but are subject to change without notice.
Illustrations may include optional equipment and accessories, and may not include all standard equipment.
The unit is delivered with guide bar and saw chain separated.
Install guide bar and chain.
If there is any clause in this manual that is hard to be understood, please contact your shindaiwa dealer.
- Our goods come with guarantees that cannot be excluded under the Australian Consumer Law. You are entitled to a replacement or refund for a major failure and compensation for any other reasonably foreseeable loss or damage. You are also entitled to have the goods repaired or replaced if the goods fail to be of acceptable quality and the failure does not amount to a major failure.
For warranty service, find the nearest Authorised Service Dealer in our dealer locator map at www.echo-australia.com.au/en_au/finder, or by calling 1300 274 447, or by emailing or writing to salesenquires@briggsandstratton.com.au, Briggs & Stratton Australia Pty Ltd, Locked bag 5004, St Clair, NSW 2759.
Decals and symbols....4
Rules for safe operation....5
- General precautions .... 5
- Kickback safety precautions 7
- Other safety precautions....8
Description....10
Assembly 11
Mounting guide bar and chain 11
Operation 13
Fuel and lubricant 13
Chain lubricant....13
Cap indication....13
Winter operation 14
Starting the cold engine 15
Starting the warm engine.... 16
Running 16
Stopping the engine....17
Checking chain tension....17
Chain lubrication test 17
Pre cutting test....17
Correct use of chain brake.... 18
Chain brake 18
Checking the brake function of the brake 19
Release the chain brake.... 19
Non-manual chain brake.... 19
Cutting instruction 20
General....20
Felling a tree....21
Limbing 22
Bucking 22
Tension and compression in timber.... 23
Service maintenance guide 24
Troubleshooting 25
Saw chain maintenance....26
Service 28
Air filter 28
Check fuel system 28
Fuel filter 28
Oil filter 28
Spark plug 28
Guide bar....29
Sprocket / Clutch drum 29
Carburettor 29
Cylinder fins (Cooling system).... 29
Silencer....30
Replacement guide bar and chain.... 30
Storage 31
Long term storage (Over 30 days).... 31
Disposal procedure....32
Specifications....33
Declaration of conformity 34
UK Declaration of Conformity 35
Decals and symbols

DANGER WARNING ⚠AUTION
This symbol accompanied by the word "DANGER" calls attentions to an act or a condition which will lead to serious personal injury or death of operators and bystanders.
This symbol accompanied by the word "WARNING" calls attentions to an act or a condition which can lead to serious personal injury or death of operators and bystanders.

"CAUTION" indicates a potentially hazardous situation which, if not avoided, may result in minor or moderate injury.

Circle and slash symbol means whatever is shown is prohibited.
NOTE IMPORTANT
This enclosed message provide tips for use, care and maintenance of the unit.
Framed text featuring the word "IMPORTANT" contains important information about the use, checking, maintenance and storage of the product described in this manual.
| Symbol form / shape | Symbol description / application Symbol form / shape Symbol description / application | ||
 | Carefully read the operator's manual Chain oil  | ||
 | Wear eyes, ears and head protection Oil and manufacture  | ||
 | Warning! Kickback may occur!  | Purge bulb (Primer) | |
 | Emergency stop Carburettor adjustment  | - Idle speed | |
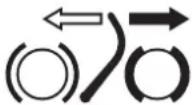 | Chain brake operation Guaranteed sound power level  | ||
Locate this safety decal on your unit.
The complete unit illustration found in the "Description" section will help you locate them.
Make sure the decal is legible and that you understand and follow the instructions on it.
If a decal cannot be read, a new one can be ordered from your shindaiwa dealer.


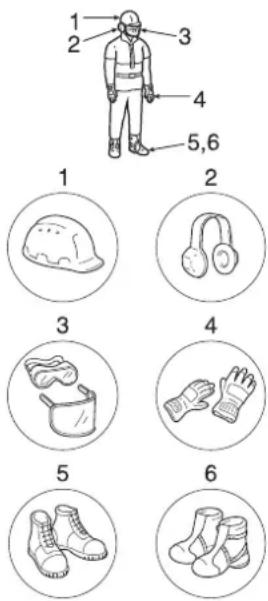
text_image
1 2 3 4 5,6 1 2 3 4 5 6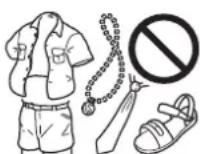
Rules for safe operation
1. General precautions
Operator's manual
Read the operator's manual for your chain saw carefully.
Be thoroughly familiar with the chain saw's controls and how to use the chain saw properly. Failure to follow instructions could lead to personal injury.
If you have any questions or problems, please contact your shindaiwa dealer.
Physical condition
Do not operate a chain saw when you are fatigued or under the influence of alcohol or drugs.
- You should be in good physical and mental health in order to handle your chain saw safely. Errors in judgement or execution can be serious or fatal.
If you have any physical condition which strenuous work could worsen, check with your physician before using a chain saw.
Do not operate when ill or fatigued, or under the influence of any substance or medication which could affect your vision, dexterity or judgement.
- The ignition system of this product generates electromagnetic fields during operation.
Magnetic fields can cause pacemaker interference or pacemaker failure.
To reduce health risks, we recommend that pacemaker users consult their physician and the pacemaker manufacturer before operating this product.
Personal equipment
CAUTION
Stuffing ears with cotton is not recommended.
- Always wear approved goggles to protect your eyes.
Wood chips, dust, snapping branches and other debris can be thrown by the cutting chain into the operator's facial area.
Goggles may also offer limited protection in the event of the cutting chain hitting the operator in the eye area.
If conditions warrant that a ventilated face shield be worn, goggles must be worn underneath it. - shindaiwa advises wearing hearing protection at all times.
If not followed, hearing loss can occur.
You should reduce the risk of hearing damage by wearing either "headset" type protectors or ear plugs which are approved by an authorized organization.
All persons who make part of their living using chain saws should be tested periodically for hearing deterioration. - Always wear a helmet when working with a chain saw.
A safety hard helmet is highly recommended when felling or working under trees, or when objects can fall on you. - Wear heavy duty, non-slip gloves for improved grip, and also for protection against cold and vibration.
- Safety tip shoes or boots with non-slip sole should be worn.
- Never wear loose clothing, unbuttoned jackets, flared sleeves and cuffs, scarves, tiestrings, neckties, cords, chains, jewellery, etc. which could snag the saw chain or underbrush.
♦ Clothing should be of sturdy, protective material.
It should be snug-fitting to resist snagging, but roomy enough for freedom of movement. - Trouser legs should not be flared or cuffed, and should be either tucked into the boot tops or trimmed short.
Safety vests, leg chaps and logger's pants of ballistic material are available.
It is the operator's responsibility to wear such additional protection if conditions warrant it.
♦ Never operate a chain saw when you are alone.
Arrange to have someone remain within calling distance in case you need help.

text_image
Diagram showing four types of emergency vehicles: a fuel can, fire extinguisher, shovet, and mechanical switch with labeled parts A and 2.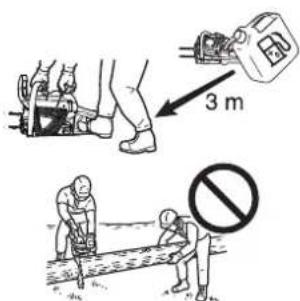
text_image
Illustration showing two methods of using a machine: one with 3 meters height and another with no warning sign.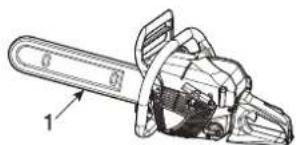
natural_image
Technical line drawing of a chain drive with labeled parts (no text or symbols present)Fuel
DANGER
♦ Petrol and fuel are extremely flammable.
If spilled or ignited by ignition source, it can cause fire and serious injury or property damage.
Extreme caution is required when handling petrol or fuel.
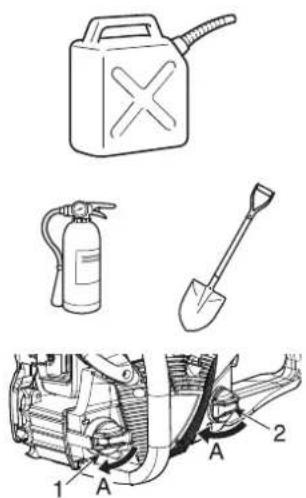
- After refuelling, tighten fuel cap firmly and check for leakage.
In case of fuel leakage, repair before starting operation since there is a danger of fire.
- Oil tank cap
- Fuel tank cap
A: Tightening direction
• Use an appropriate type of fuel container.
- Bring an extinguisher or shovel in case of fire.
Despite the precautions which can be taken, operating a chain saw, or just working in the forest, presents dangers.
- Do not smoke or bring flame or sparks near to fuel supplies.
- The fuel tank may be under pressure.
Always loosen the fuel cap and wait for pressure to be equalized before removing the cap.
Fill the fuel tank outdoors over bare ground and install the fuel cap securely.
Do not pour fuel indoors.
- Wipe any spilled fuel off the unit.
- Never refuel while the engine is still hot, or fuel a running engine.
Do not store the unit with fuel in its tank, because a fuel leak could start a fire.
- Always fill up the chain oil first, then fill up the fuel mixture.
Starting engine
- Move the chain saw at least 3 m from the fuelling point before starting the engine.
Do not allow other persons to be near the chain saw when you are starting or cutting with the chain saw.
Keep bystanders and animals out of the work area.
Do not let anyone hold wood for you to cut. - Do not start cutting until you have a clear work area, secure footing and a planned retreat path from the falling tree.
Before you start the engine, make sure that the saw chain is not contacting anything. - Keep the handles dry, clean, and free of oil or fuel mixture.
♦ Operate the chain saw only in well-ventilated areas.
Exhaust gas, oil mist (from chain saw lubrication) or saw dust is harmful to health.
Transportation
1. Guide bar cover
When transporting your chain saw, use the appropriate guide bar cover.
- Carry the chain saw with the engine stopped, the guide bar and saw chain to the rear, and the silencer away from your body.
Transport and storage
- Always keep the engine shut off and make it certain that cutting device is securely covered. When transporting the machine, activate the chain brake and secure it properly to prevent flipping over, fuel spills and damage to the unit.
2. Kickback safety precautions
DANGER
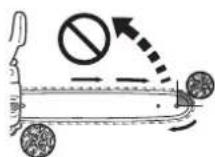
Kickback safety precaution for chain saw users: kickback may occur when the nose or tip of the guide bar touches an object or when the wood closes in and pinches the saw chain in the cut.
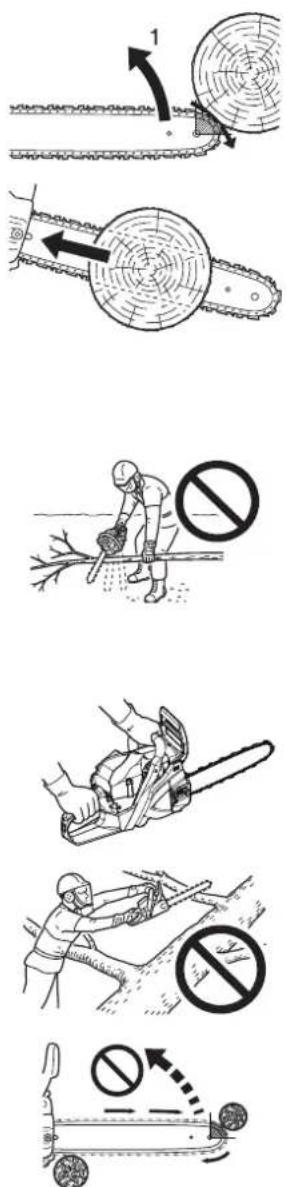
1. High kickback
In some cases, tip contact may cause a lightning-fast reverse reaction, kicking the guide bar up and back toward the operator (this is called a rotational kickback).
Pinching the saw chain along the top of the guide bar may push the guide bar rapidly back toward the operator (this is called a linear kickback).
Either or these reactions may cause you to lose control of the saw and come in contact with the moving chain, which could result in serious personal injury. As a chain saw user, you should take several steps to keep your cutting jobs free from accident or injury.
- With a basic understanding of kickback, you can reduce or eliminate the element of surprise.
Sudden surprise contributes to accidents.
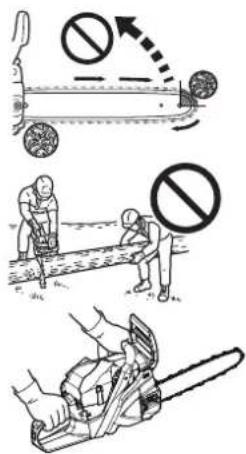
Understand that rotational kickback is preventable by keeping an unshielded bar nose from touching an object or the ground.
Do not operate a chain saw with one hand!
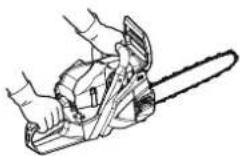
Serious injury to the operator, helpers or bystanders may result from one-handed operation. For proper control, always use two hands when operating a chain saw, one of which operates the trigger.
Otherwise, this can result in the chain saw "skating" or skidding, which can result in personal injury due to loss of control.
Be alert for the phenomena "skating" and "bouncing", greater risk from kickback.
Be cautious not to lose balance of your body due to "drop" at the end of a cut.
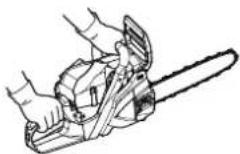
- Keep a good firm grip on the saw which both hands, with the right hand on the rear handle and the left hand on the front handle, when the engine is running. Use a firm grip with thumbs and fingers encircling the chain saw handles. A firm grip will help you reduce kickback and maintain control of the saw. Two hands must be used to control the saw at all times.
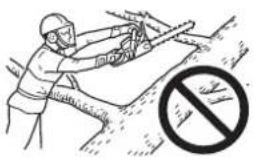
Do not overreach or cut above chest height.
Make sure that the area in which you are cutting is free from obstructions. Do not let the bar nose contact a log, branch, or any other obstruction which could be hit while you are operating the saw.
- Cutting at high engine speeds may reduce the likelihood of kickback. But cutting at part-throttle or low engine speeds may be preferable to control the chain saw in tight situations and may also reduce the likelihood of kickback.
- Follow manufacturer's sharpening and maintenance instructions for the saw chain.
Use only replacement guide bars and chains specified by the manufacturer, or the acceptable equivalents of these guide bars and chains.
3. Other safety precautions
Vibration and cold
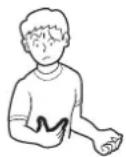
It is believed that a condition called Raynaud's Phenomenon, which affects the fingers of certain individuals, may be brought about by exposure to cold and vibration.
Accordingly, your shindaiwa chain saw has an anti-vibration device designed to reduce the intensity of vibration received through the handles.
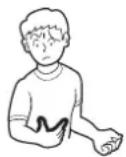
Exposure to cold and vibration may cause tingling and burning followed by loss of colour and numbness in the fingers. (White finger syndrome)
We strongly recommend you take the following precautions because the minimum exposure which might trigger the ailment is unknown.
- Keep your body warm, especially the head and neck, feet and ankles, and hands and wrists.
- Maintain good blood circulation by performing vigorous arm exercises during frequent work breaks and also by not smoking.
- Limit the number of hours of chain saw operation.
Try to fill a part of each work day with jobs other than chain sawing.
If you experience discomfort, redness and swelling of the fingers, followed by whitening and loss of feeling, consult your physician before further exposing yourself to cold and vibration.
Repetitive stress injuries
It is believed that over-using the muscles and tendons of the fingers, hands, arms and shoulders may cause soreness, swelling, numbness, weakness and extreme pain to the areas just mentioned.
To reduce the risk of repetitive stress injury, do the following:
- Avoid using your wrist in a bent, extended or twisted position.
Instead, try to maintain a straight wrist position.
Also, when grasping, use your whole hand, not just the thumb and index finger.
Take periodic breaks to minimize repetition and rest your hands. - Reduce the speed and force in which you do the repetitive movement.
Do exercises to strengthen the hand and arm muscles. - See a doctor if you feel tingling, numbness or pain in the fingers, hands, wrists or arms.
Relative to EU directive "Vibration"
EU Directive "Vibration" (2002/44/EC) was designed to protect people from safety and health risks arising from mechanical vibration of a machine by enforcing employers to limit a standardized 8 hour daily vibration exposure level, A(8).
Any person or organization that employs a person to operate a machine has to take the A(8) value into account when letting the person use it.
Mechanical vibration values (equivalent vibration value) of this machine, which shall be used as a guide to simplify the calculation of A(8) value, are as follows:
MODEL Type 410€C
| Front / Left handle (m/s ^2 ) | 1.8 |
| Rear / Right handle (m/s ^2 ) | 3.6 |
Machine conditions

WARNING
Do not modify a chain saw in any way.
Only attachments and parts supplied by shindaiwa or expressly approved by shindaiwa for use with the specific shindaiwa chain saw models are authorized.
Although certain unauthorized attachments are useable with the shindaiwa powerhead, their use may, in fact, be extremely dangerous.
Do not operate a chain saw that is damaged, improperly adjusted, or not completely and securely assembled.
Do not operate the chain saw with a loose or defective silencer.
Be sure that the saw chain stops moving when the throttle control trigger is released.
If your saw is subjected to high loads due to a fall or impact, always perform inspection and operation check in order to confirm if there is anything wrong before continuing work.
Cutting
natural_image
Illustration showing four different scenes of workers in a forest clearing, including climbing a tree, using a tool, and using a rope with no symbols.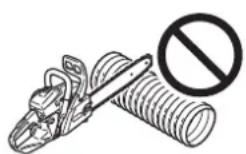

CAUTION
Do not touch hot surfaces of cylinder cover and silencer after you used the chain saw.
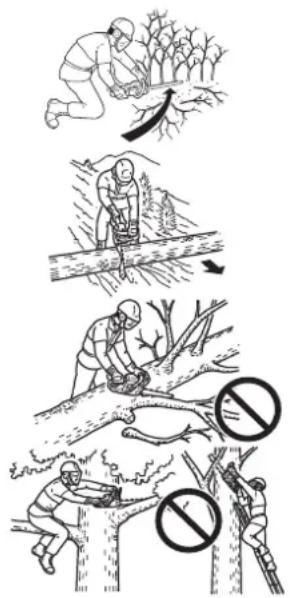
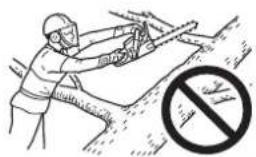
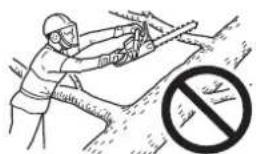
- Do not operate a chain saw in a tree unless you have been specifically trained to do so.
- Keep all parts of your body away from the saw chain when the engine is running.
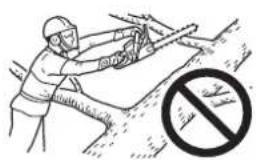
Use extreme caution when cutting small-size brush and saplings because slender material may catch the saw chain and be whipped toward you or pull you off balance. - Stay on the uphill side when bucking or limbing logs which might roll when cut.
When cutting a limb that is under tension, be alert for spring-back so that you will not be struck by the limb or chain saw when the tension in the wood fibres is released. - Cutting while on a ladder is extremely dangerous because the ladder can slip and your control of the chain saw is limited.
Working aloft should be left to professionals. - Keep both feet on the ground
Do not work from off-the-ground positions.
- Stop the engine before setting the chain saw down.
Wood practices
Operating a chain saw safely requires a chain saw in proper working order, sound judgement, and knowledge of the methods which should be applied in each cutting situation.
Do not let any person use your saw unless he has read this operator's manual and fully understands its instructions.
- Use your saw only to cut wood or wood products.
Do not cut solid metal, sheet metal, plastics or any non-wood materials.
Services
All chain saw service operations, other than items listed in the operator's manual maintenance instructions, should be performed by competent service personnel. (For example, if an improper tool is used to hold the flywheel in order to remove the clutch, structural damage to the flywheel could occur and subsequently could cause the flywheel to burst.)
Description

text_image
(X505-011820) 114 dB 21 20 19 18 17 16 15 14 13 12 11 10 9 8 7 6 5 4 3 2 1 2 (22) 23 24- Silencer - The silencer controls the exhaust noise and prevents hot, glowing particles of carbon from leaving the silencer.
- Front hand guard - Guard between the front handle and the saw chain for protecting the hand from injuries and aiding in control of the chain saw if the hand slips off the handle.
This guard is used to activate the chain brake which is to stop the saw chain rotation. - Rear handle (for the right hand) - Support handle located towards the rear of the engine housing.
- Rear hand guard - Extension on the lower part of the rear handle for protecting the hand from the chain if it breaks or degrooves.
- Purge bulb (primer pump) - When starting engine, push primer pump 3 or 4 times.
- Clutch cover - Protective cover to the guide bar, saw chain, clutch and sprocket when the chain saw is in use.
- Chain tension adjuster - Device to adjust chain tension.
- Chain catcher - A projection designed to reduce the risk of the operator's right hand from being hit by a chain which has broken or derailed from the guide bar during cutting.
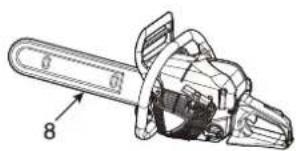
- Guide bar - The part that supports and guides the saw chain.
- Chain - Chain, serving as a cutting tool.
-
Type and serial number
-
Oil tank cap - For closing the oil tank.
-
Starter handle - The grip of the starter, for starting the engine.
-
Fuel tank cap - For closing the fuel tank.
-
Cylinder cover latch - Device for installing the cylinder cover.
-
Momentary stop switch - Button for momentarily shorting ignition voltage, causing the engine to stop. This is NOT an ON/OFF Ignition switch.
-
Throttle trigger - Device activated by the operator's finger, for controlling the engine speed.
-
Throttle trigger lockout - A safety lever which must be depressed before the throttle trigger can be activated in order to prevent the accidental operation of the throttle trigger.
-
Cylinder cover - The cooling air flow grill. It cover the cylinder, spark plug, air filter and silencer.
-
Front handle (for the left hand) - Support handle located at the front of the engine housing.
-
Safety decal - Part number X505-011820
-
Operator's manual - Included with unit. Read before operation and keep for future reference to learn proper, safe operating techniques.
-
Tools - 13 x 19 mm T-wrench (combination screwdriver / spark plug socket)
-
Guide bar cover - Device for covering the guide bar and saw chain during transport and other times when the chain saw is not in use.
NOTE
This product does not have a choke lever.
Assembly
Mounting guide bar and chain

WARNING
For your own safety, always stop the engine before performing any of the following operations.

CAUTION
- All adjustments should be made cold.
- Always wear gloves when working on chain.
- Do not operate with a loose chain.
NOTE
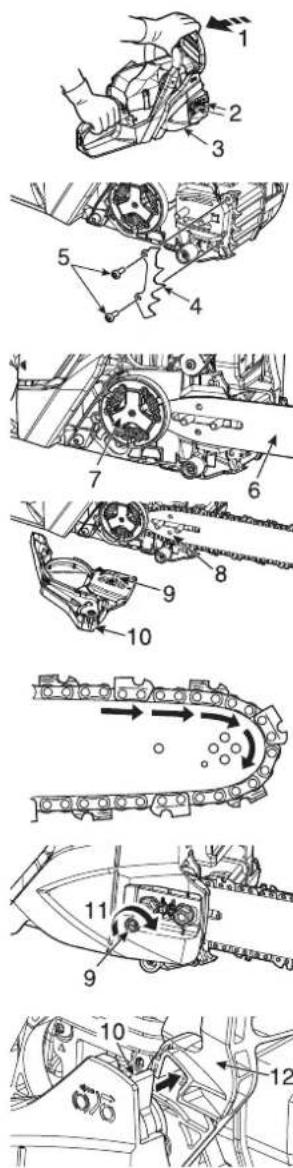
Move the chain brake lever (Front hand guard, Brake connector) fully rearward to remove or install the clutch cover to the chain saw.
- Release chain brake
- Two nuts
- Clutch cover
text_image
Technical diagram showing 12 labeled mechanical components with arrows indicating motion or assembly stepsInstall guide bar and chain as follows.
- Loosen two nuts and remove clutch cover.
- Option; Install the spiked bumper on the front of machine. (Use two bolts.)
- Spiked bumper; option (Part number C304-000010)
- Bolt; option (Part number V805-000000)
- Mount the bar and slide toward clutch to make saw chain installation easier.
-
Guide bar
-
Clutch
-
Bar hole
-
Tension adjuster
-
Brake connector
-
Direction to tension the chain
-
Front hand guard (Brake lever)
-
Install saw chain as shown.
(Ensure cutters are pointing in the right direction)
- Release the chain brake, and install the clutch cover over the guide bar studs. Tighten two nuts finger tight.
Ensure that chain tension adjuster fits into bar hole.
- Align the brake connector of the clutch cover to the groove on the side of the front hand guard.
text_image
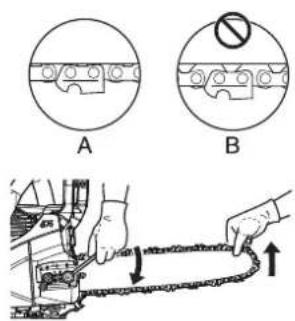
A BHold the bar nose up and turn the adjuster clockwise until the chain fits snugly against the underside of the bar.
A: Proper tension
B: Improper tension
- Tighten both nuts with the bar nose held up.
♦ Pull the chain around the bar by hand.
Loosen the adjustment if you feel tight spots.
Operation
Fuel and lubricant

CAUTION
Whenever opening up the fuel tank, always loosen the cap very slowly and wait for the tank pressure to be equalized before removing the cap.

- Fuel is a mixture of regular grade petrol and an air-cooled 2-stroke engine oil.
Minimum 89 Octane unleaded petrol is recommended.
Do not use fuel containing methyl alcohol or more than 10 % of ethyl alcohol.
Recommended mixture ratio; 50 : 1 (2 %) for ISO-L-EGD Standard (ISO 13738), JASO FC, FD grade and shindaiwa recommended oil. - Never use two-stroke oil intended for water-cooled engines, motor-cycle engines.
- Do not mix directly in engine fuel tank.
- Avoid spilling petrol or oil.
Spilled fuel should always be wiped up. - Handle petrol with care, it is highly inflammable.
- Always store fuel in approved container.
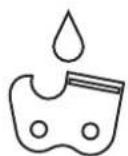
Chain lubricant
- Proper lubrication of the chain while in operation minimizes friction between the chain, the guide bar and sprocket and also clutch components such as needle bearing and clutch assembly.
Use shindaiwa genuine chain oil or shindaiwa recommended chain oil specially formulated for bars and chains for proper lubrication.
These oils contain tackifiers, anti-aging and anti-oxidizing agents.
Consult your shindaiwa dealer for the proper chain oil.
- Never use waste or reclaimed oil to avoid various malfunctions on oil system, clutch system, chain and guide bar.
Lubrication problems caused by the use of improper oil will void the warranty.
- Especially, vegetable based chain oil quickly turns to resin and adheres to oil pump, chain, guide bar, clutch needle bearing and clutch assembly.
It causes malfunctions and shorten product life.
Flush chain oil system with mineral or chemical based chain oil after use, if it is required to use vegetable oil due to local / municipal rule or any other reason.
For a short time emergency operation, fresh SAE 10W-30 motor oil can be used.
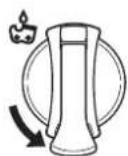
Cap indication
Fuel and oil tanks are indicated by the following illustrations.
Fuel tank cap
(Red)
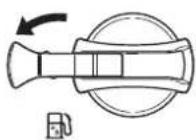
Chain oil tank cap
(Black)
Winter operation
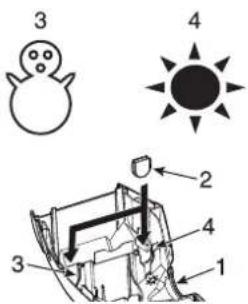
NOTE
- The plug should be installed to the "storage" position when the outside air temperature is 5 °C or lower.
For operation above 5 °C, return the plug of the cylinder cover to its original place.
♦ Failing to do so will cause the engine to be overheated.
text_image
3 4 2 3 4 1- Cylinder cover
- Plug
- Cold weather "storage" position
- Warm weather position
Use the plug to prevent carburettor troubles in winter.
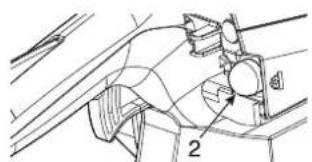
Release the cylinder cover latch and remove the cylinder cover.
- Remove the plug from warm weather position, and install into cold weather "storage" position.
For operation above 5 °C, return the plug to its original place.
Starting the cold engine
CAUTION
- Do not increase engine speed while chain brake is engaged.
- Use the chain brake only in starting the engine or in emergencies.
NOTE
Do not pull starter rope out to the maximum position.
Do not allow starter handle to snap back against the casing.
This product does not have a choke lever.
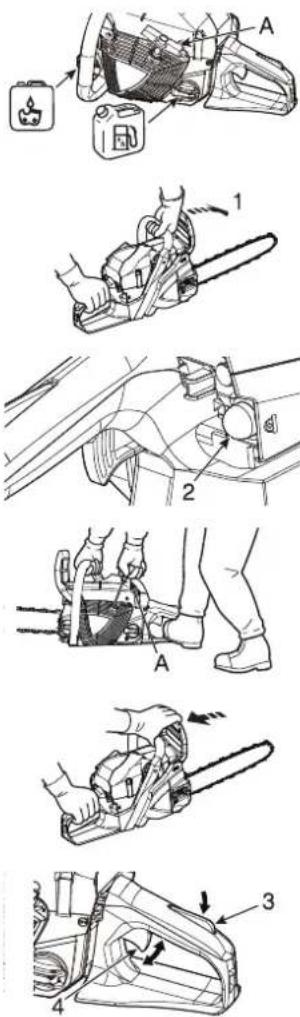
A: Starter handle
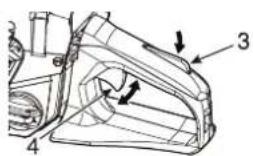
- Chain brake ACTIVATED position
- Purge bulb (Primer pump)
- Throttle trigger lockout
-
Throttle trigger
-
Fill the fuel tank with fuel mixture.
It is not permitted to fill fuel above the shoulder level of fuel tank. - Fill the chain oil tank with lubricant.
- Press the front hand guard forward (Chain brake ACTIVATED position)
-
Push primer pump until fuel is visible in primer pump.
-
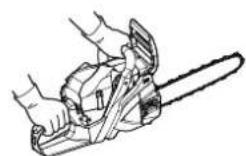
Securely hold the chain saw.
• Make sure guide bar and saw chain are not touching anything when starting the saw. - Pull starter handle several times until first firing sound is heard.
- Pull starter handle again.
• After engine starts, pull the front hand guard towards the operator. (Chain brake RELEASED position)
- Hold the chain saw by both handles.
- Squeeze and release the throttle trigger several times to increase engine speed and warm up the engine.
- Press the front hand guard forward. (Chain brake ACTIVATED position)
natural_image
Illustration of two manual car chainers in action, showing blade and foot positioning (no text or symbols)Starting the warm engine
-
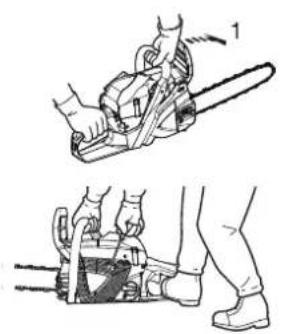
Chain brake ACTIVATED position
-
Confirm there is fuel and chain oil in the tanks.
-
Press hand guard forward. (Chain brake ACTIVATED position)
-
Securely hold the chain saw.
- Pull starter handle.
Running
- Chain brake RELEASED position
- Throttle trigger lockout
- Throttle trigger
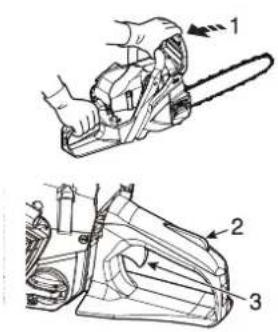
After engine starts, allow it to idle for a few minutes. - Pull front hand guard towards the operator immediately. (Chain brake RELEASED position)
text_image
Technical diagram showing a chain saw cutting process with labeled parts 1, 2, and 3- Squeeze throttle trigger gradually to increase engine revolution.
- The chain starts moving when the engine reaches 4200 r/min approximately.
- Ensure proper acceleration and lubrication of saw chain and guide bar.
♦ (Non-adjustable automatic oil pump) - Do not run the engine at high speed unnecessarily.
- Be sure that saw chain stops moving when throttle trigger is released.
Stopping the engine
NOTE
If the engine does not stop, repeat the operation to push and release the primer pump until the engine stops. (The timing for pushing the primer pump again is after the pump inflates) Return the unit to your authorized shindaiwa dealer to check and repair momentary stop switch before starting the engine again.

text_image
2 STOP 1-
Throttle trigger
-
Momentary stop switch
-
Release throttle trigger and allow engine to idle.
- Push the momentary stop switch down until the engine is stopped.
Checking chain tension

WARNING
Make sure that the engine is shut off when checking chain tension.
NOTE
Always loosen clutch cover nuts before turning the chain tension adjuster, otherwise the clutch cover and tensioner will be damaged.
natural_image
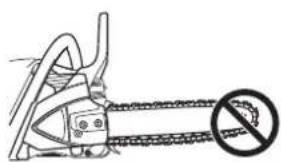
Diagram of a chain-link fence with a no-smoking symbol (no text or labels)- Chain tension should be checked frequently during work and corrected if necessary.
- Tension the chain as tight as possible, but so it can still be pulled easily along the bar by hand.
Chain lubrication test
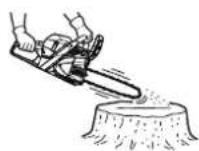
Hold the chain just above a dry surface and open the throttle to half speed for 30 seconds.
A thin line of "thrown" oil should be seen on the dry surface.
text_image
Illustration showing a person sitting on a bench with an arrow indicating direction, next to a bear and child running away.Pre cutting test
♦ Familiarize yourself with your chain saw before you start actual cutting.
For this purpose it may be wise to practice by cutting some small logs or limbs several times.
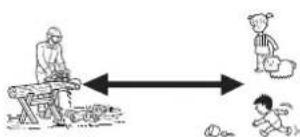
Do not allow either people or animals into the work area.
Multiple operators - Keep a safe distance between two or more operators when working together simultaneously.
Correct use of chain brake

DANGER
Kickback motion is very hazardous.
If the tip of the bar touches wood or the like, the guide bar kicks back in an instant.
The chain brake reduces the possibility of injury due to kickback.
Always check that chain brake works properly before use.
NOTE
For practice, while cutting a small tree, push the front guard forward to engage the brake.
At all times, confirm whether the brake works properly before each task.
If the chain brake is clogged with wood chips, function of the brake deteriorates a little. Always keep the device clean.
Do not increase engine revolutions while the chain brake is engaged.
- Chain brake is used in emergencies.
Do not use it unless absolutely necessary.
- Never test the brake in an area where petrol fumes are present.
Chain brake
The chain brake's function is to stop chain rotation after a kickback.
It neither prevents nor reduces kickback.
Do not depend on the chain brake for protection against kickback.
Even with a chain brake, depend on your own good sense and proper cutting methods just as though there were no chain brake.
Even with normal use and proper maintenance, the response time of the brake may lengthen.
The following may interfere with the brake's ability to protect the operator:
natural_image
Illustration of a person using a chain-linking power tool to cut a circular object (no text or symbols present)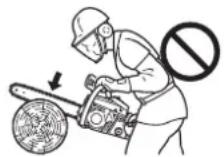
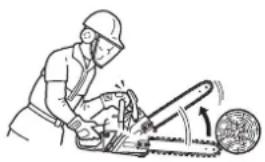
- Saw wrongly held too close to operator's body.
Kickback time may be too fast even for a perfectly maintained brake to work in time. - The operator's hand may not be in position to contact the hand guard.
Brake will not be tripped. - Lack of proper maintenance lengthens the brake's stopping time, making it less effective.
- Dirt, grease, oil, pitch, etc. getting into the working parts of the mechanism may lengthen the stopping time.
- Wear and fatigue of the activating brake spring, and wear of the brake / clutch drum and pivot points may lengthen the brake's stopping time.
- A damaged hand guard and lever may render the brake inoperative.
text_image
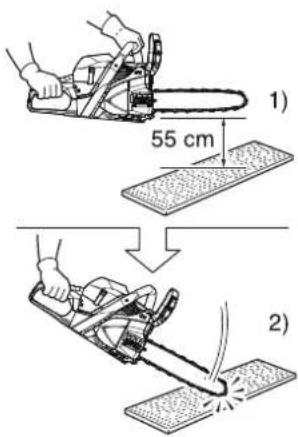
1) 55 cm 2)Checking the brake function of the brake
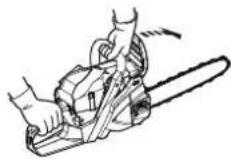
- Place the chain saw on the ground.
- Hold the handle with both hands and accelerate the engine to high speed by using the throttle trigger.
- Operate the chain brake by turning your left wrist against the front hand guard whilst gripping the front handle.
- The chain stop immediately.
- Release the throttle trigger.
If the chain does not stop immediately, take the saw to your shindaiwa dealer to repair.
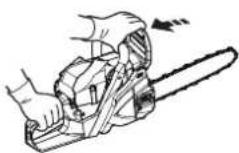
Release the chain brake
When front hand guard is fully pulled towards the operator, chain brake is released.
Non-manual chain brake
IMPORTANT
When checking the operation of the non-manual chain brake, use a soft surface substance like wood to provide the impact so the saw chain is not damaged.
1). End of the guide bar may be placed at the height about 55 cm.
2). Rear handle should be gripped lightly with the right hand.
The non-manual chain brake stops the operation of the saw chain in such a manner that the kickback action produced at the end of the guide bar non-manually actuates the chain brake. To make sure that the non-manual chain brake operates properly, proceed as follows:
- Stop the engine of the chain saw.
- Operate the front and rear handles with hands (grip them lightly), so that the guide bar may be placed at the height of about 55 cm as shown in Fig.
- Softly detach the left hand from the front handle, and touch the end of the guide bar against the wood or the like placed below so that the machine receives an impact. (* at this time the rear handle should be gripped lightly with right hand)
- The impact is transferred to the brake lever, which actuates the chain brake.
Cutting instruction

DANGER
Do not let the nose or tip of the guide bar touch anything while engine is running to avoid kickback.
General
text_image
Illustration showing three different methods of using a chainocorder: tool, manual labor, and mechanical cutting.In all circumstances the operation of the chain saw is a one-man job.
It is difficult at times to take care of your own safety, so don't assume the responsibility for a helper as well.
After you have learned the basic techniques of using the saw, your best aid will be your own good common sense.
The accepted way to hold the saw is to stand to the left of the saw with your left hand on the front handle so you can operate the throttle trigger with your right index finger.
Before attempting to fell a tree, cut some small logs or limbs.
Be thoroughly familiar with the controls and the responses of the saw.
Start the engine, see that is running properly.
Squeeze the trigger to open the throttle wide open, then start the cut.
It is not necessary to press down hard to make the saw cut.
If the chain is properly sharpened, the cutting should be relatively effortless.
Pushing the saw too hard will slow the engine and cutting will actually be more difficult.
Some material may adversely affect the housing of your chain saw.
(Example: palm tree acid, fertilizer etc.)
To avoid housing deterioration carefully remove all packed saw dust around clutch and guide bar area and wash with water.
text_image
3 m 45° 45° 2.5 - 5 cm 1/10 1/3 30° - 45°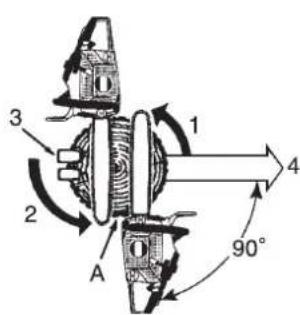
text_image
3 2 A 1 4 90°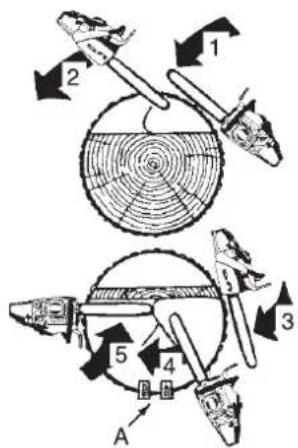
text_image
Diagram illustrating a mechanical or robotic system with labeled components and directional arrows indicating motion or movement.Felling a tree
A falling tree can seriously damage anything it may hit - a car, a house, a fence, a power-line or another tree.
There are ways to make a tree fall where you want it, so first decide where that is!
Before cutting, clear the area around the tree.
You will need good footing while working and you should be able to work the saw without hitting any obstacles.
Next select a path of retreat.
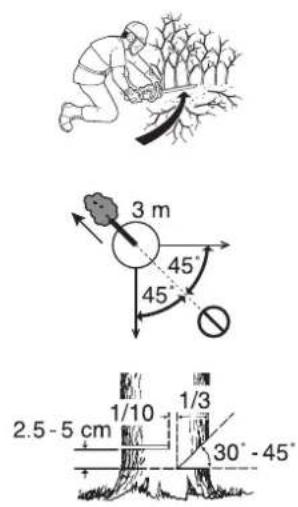
When the tree begins to fall you should retreat away from the direction of fall at a 45-degree angle and at least 3 m from the trunk to avoid the trunk kicking back over the stump.
Begin the cut on the side to which the tree is to fall.
♦ Notch: 1/3 of diameter and 30° to 45° angle
- Back cut: 2.5 to 5 cm higher
- Uncut hinge wood: 1/10 of diameter
Cut a notch approximately 1/3 of the way into the tree.
The position of this notch is important since the tree will try to fall "into" the notch.
The felling cut is made on the side opposite the notch.
Make the felling cut by placing spiked bumper 2.5 cm to 5 cm above the bottom of the notch and stop cutting at approximately 1/10 of diameter to the inner edge of the notch in order to leave the uncut portion of the wood as a hinge.
- Notch cuts
- Back cut
- Wedges (when room)
- Fall
A: Leave 1/10 of diameter hinge
Do not try to cut through to the notch with the felling cut.
The remaining wood between the notch cut and felling cut will act as a hinge when the tree falls, guiding it in the desired direction.
When the tree starts to fall, stop the engine, place the saw on the ground and make your retreat quickly.
Fell big tree.
- Notching cuts
- Draw-across method
- Back cut
- Draw-across method
- Felling cuts
A: Wedges
To fell big trees with a diameter exceeding twice the bar length, start the notching cuts from one side and draw the saw through to the other side of the notch.
Start the back cut on one side of the tree with the spiked bumper engaged, pivoting the saw through to form the desired hinge on that side.
Then remove the saw for the second cut.
Insert the saw in the first cut very carefully so as not to cause kickback.
The final cut is made by drawing the saw forward in the cut to reach the hinge.
Limbing
CAUTION
Don't saw above chest height.
Limbing a fallen tree is much the same as bucking.
Never remove a limb from a tree while it is supporting your weight.
Be careful of the tip touching other limbs.
Always use both hands.
Don't cut with the saw overhead or the bar in a vertical position.
If the saw should kickback, you may not have good enough control to prevent possible injury.
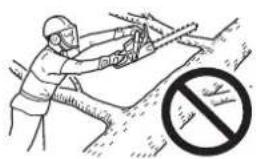
natural_image
Illustration of a person using a tool on a slope with a no-smoking symbol (no text or labels)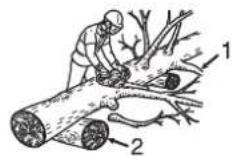
Know how limb is stressed
- Leave supporting limbs till last.
- Slide support logs under trunk.
- If you have thick branches, work from the outside to the inside to avoid your bar and chain get stuck.
Bucking
CAUTION
Stay on the uphill side of logs.
Bucking is the sawing of a log or fallen tree into smaller pieces.
There are a few basic rules which apply to all bucking operations.
Keep both hands on the handles at all times.
Support logs if possible.
When cutting on a slope or hillside, always stand uphill.
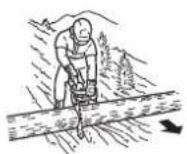
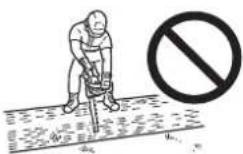
No standing on log.
Tension and compression in timber
CAUTION
If you have misjudged the effects of tension and compression, and cut from the wrong side, the timber will pinch the guide bar and chain, trapping it.
Racing the engine with the chain jammed will burn out your clutch.
If the chain should become jammed and the saw can not be removed from the cut do not force it out.
Stop the saw, force a wedge into the cut to open it up.
Never force the saw when it is jammed.
Do not force the saw into the cut.
A dull chain is unsafe and will cause excessive wear to the cutting attachments.
A good way to tell when the chain is dull is when fine saw dust comes out instead of chips.
text_image
Illustration showing nine steps of a wooden rolling operation, labeled 1 through 9 with arrows indicating movement and cutting.- Hinge
- Opened
- Closed
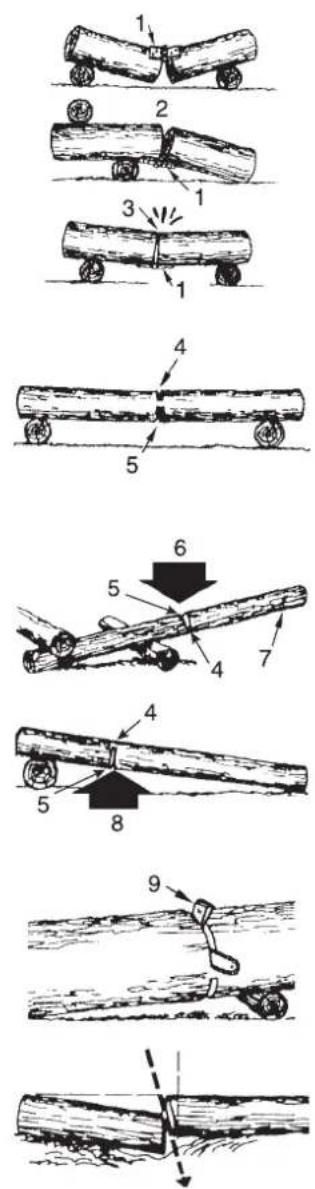
A length of timber lying on the ground will be subject to tension and compression, depending at which points the major support is.
When timber is supported at its ends the compression side is at the top and the tension side is at the bottom.
To cut between these support points, make the first cut downwards approximately 1/3rd the timber diameter.
The second cut is made upwards and should meet the first cut.
Heavy stress
- 1/3 diameter. To avoid split.
- Weakening cut to finish.
When the timber is supported at one end only, make the first cut upwards approximately 1/3rd the timber diameter.
The second cut is made downwards and should meet the first cut.
Overbuck
- Down
- Unsupported end
Underbuck
- Up
- Wedge
Make angled cut when one section may settle against the other.
Service maintenance guide
| Area Maintenance | Page Before use Monthly | |||
| Air filter Clean / Replace 28 | • | |||
| Fuel system Inspect 28 • | ||||
| Fuel filter Inspect / Clean / Replace 28 • | ||||
| Oil filter Inspect / Clean / Replace 28 • | ||||
| Spark plug Inspect / Clean / Adjust / Replace 28 • | ||||
| Cooling system Inspect / Clean | 29 • | |||
| Guide bar | Inspect / Clean | 29 • | ||
| Sprocket / Clutch drum | Inspect / Replace | 29 | • | • |
| Carburettor | Adjust / Replace and adjust | 29 | • | |
| Silencer | Inspect / Tighten / Clean | 30 | •O | |
| Chain brake | Inspect / Replace | 18 | •O | |
| Starter | Inspect 25 • | |||
| Screws, bolts and nuts | Inspect, Tighten / Replace | - | •O |

WARNING
- If not maintained properly, the product may pose a serious risk to physical health.
Momentary stop switch automatically returns to run position. Engine can start unintentionally. Always remove spark plug lead from spark plug before assembling or performing maintenance procedures or serious personal injury can result.

CAUTION
Before and after using the product, check the antivibration rubber or spring for making sure that it is not worn, cracked, or deformed.
NOTE
If not maintained properly, the product's performance may deteriorate.
IMPORTANT
Time intervals shown are maximum.
Actual use and your experience will determine the frequency of required maintenance.
If your saw is subjected to high loads due to a fall or impact, inspect each part.
If you continuously use vegetable based chain oil, inspect and do maintenance often.
When you find anything wrong, ask your shindaiwa dealer for repair.
Troubleshooting
| Trouble | Cause Remedy | |||
| Engine - hard to start- does not start | ||||
| Engine cranks | Fuel at carburettor | Not fuel at carburettor | • Fuel filter clogged• Fuel line clogged• Carburettor | • Clean or replace• Clean• Ask your shindaiwa dealer |
| Fuel at cylinder No fuel at cylinder • Carburettor• Solenoid valve failure | • Ask your shindaiwa dealer• Ask your shindaiwa dealer | |||
WARNING
All chain saw service operations, other than items listed in the Operator's Manual, should be performed by competent service personnel.
- Fuel vapors are extremely flammable and may cause fire and / or explosion.
Never test for ignition spark by grounding spark plug near cylinder plug hole, otherwise serious personal injury may result.
NOTE
When starter grip cannot be pulled lightly, the trouble is diagnosed as failure of engine inside.
Please consult your dealer.
If disassembled inadvertently, it can cause injury.
Saw chain maintenance

WARNING
Switch off the engine and activate the chain brake before sharpening the chain. Always wear gloves when working on chain.

CAUTION
The following faults will increase the risk of kickback considerably.
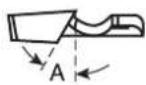
1) Top plate angle too large
2) File diameter too small
3) Depth gauge too large
NOTE
These angles are referred to as Oregon 95TXL saw chain. For other branded saw chain, follow it's chain manufacturer's instruction.
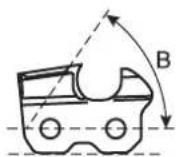
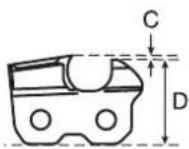
♦ Properly filed cutters are shown below.
A: Top plate angle 30^
text_image
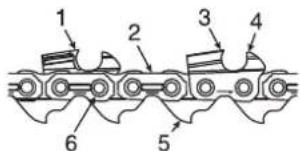
Technical diagram of a chain with numbered components, likely illustrating a mechanical or electrical assembly.B: Top plate cutting angle 55°
C: Depth gauge 0.65 mm
D: Parallel
- Left hand cutter
- Tie strap
- Right hand cutter
- Depth gauge
- Drive link
- Rivet
Never operate a chain saw with a dull or damaged chain.
If the chain requires excessive pressure to cut or produces dust instead of wood chips then inspect the cutters for damage.
When sharpening the chain the objective will be to maintain the same angles and profiles throughout its life as when it was new.
Inspect the chain for damage or wear every time you refuel your chain saw.
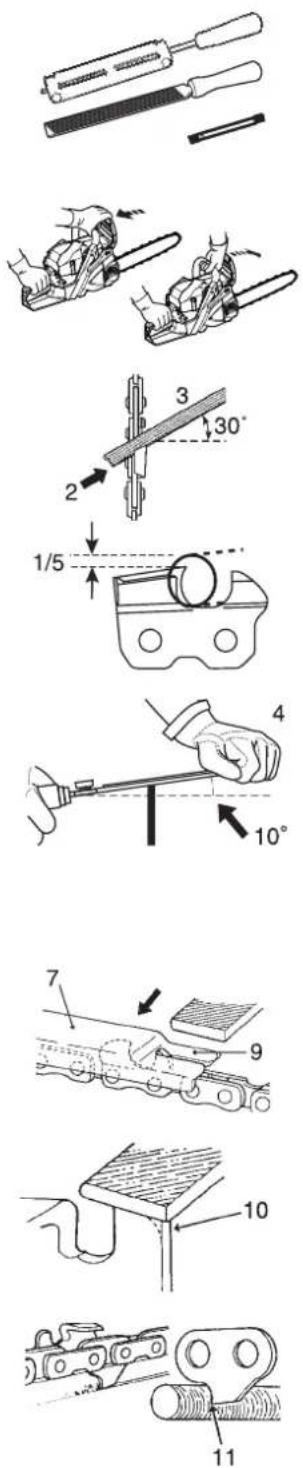
- Sharpening In order to file the chain correctly you need: round file and file holder, flat file and a depth gauge tool. By using the correct file size (4.8 mm Round file) and a file holder, it is easier to receive a good result.
Consult your shindaiwa dealer for correct sharpening tools and sizes.
-
Lock the chain - push the front hand guard forward. To rotate the chain - pull the front hand guard against front handle.
-
Your chain will have alternative left and right hand cutters. Always sharpen from the inside out.
-
Keep the angle lines of the file holder parallel to the line of the chain and file the cutter back until the damaged area (side plate and top plate) has been removed.
-
Hold the file tipped 10^ upward.
-
Avoid touching the tie straps with the file.
- Sharpen the most damaged cutter first and then take all the other cutters back to the same length.
- The depth control determines the thickness of wood chip produced and must be maintained correctly throughout the chain life.
- As the cutter length is reduced, the depth control height is altered and must be reduced.
-
Position the depth gauge, and file off any of the depth control which protrudes.
-
Round off the front of the depth control to allow smooth cutting.
-
Drive link serves to remove sawdust from the groove of the guide bar. Therefore, keep the lower edge of the drive link sharp.
When setting of the chain is finished, soak it in oil and wash away filings completely before using.
When the chain has been filed on the bar, supply sufficient oil to it, and rotate the chain slowly to wash away the filings before using again.
If the chain saw is operated with filings clogged in the groove, the saw chain and the guide bar will be damaged prematurely.
If the saw chain becomes soiled with resin for instance, clean it with kerosene and soak it in oil.
Service
If you have any questions or problems, please contact your shindaiwa dealer.
Air filter
text_image
Technical diagram of a mechanical component with labeled parts 1 and 2, showing motion paths and assembly details.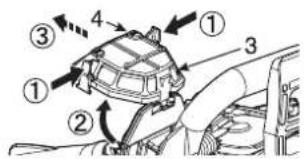
text_image
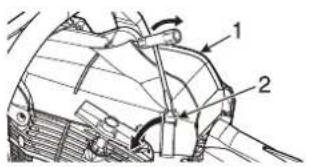
Diagram of a vehicle steering wheel with numbered parts and directional arrows indicating motion or movement.- Cylinder cover
- Cylinder cover latch
- Air filter
-
Tab
-
Check before every use.
- Press hand guard forward.
Release the two cylinder cover latches, and remove the cylinder cover.
While pressing the knobs on both sides of the air filter, lift it up and then remove it. Brush off dust lightly, or clean with compressed air, or replace the air filter. - Install air filter in the reverse order of removal.
Push the two tabs of the air filter and install it securely so that there is no gap.
♦ Reinstall the cylinder cover and engage the two latches.
Check fuel system
- Check before every use.
After refuelling, make sure fuel does not leak or exude from around fuel pipe, fuel grommet or fuel tank cap.
In case of fuel leakage or exudation there is a danger of fire.
Stop using he machine immediately and request your dealer to inspect or replace.
Fuel filter
text_image
Technical diagram showing mechanical assembly with labeled parts 1 and 2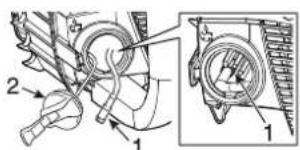
text_image
Technical diagram showing mechanical assembly with labeled parts 1 and 2, including a magnified inset view of a cylindrical component.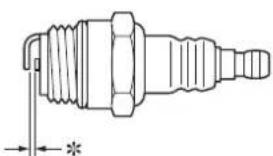
natural_image
Technical line drawing of a spark plug with threaded end and shaft (no text or symbols)
DANGER
Petrol and fuel are extremely flammable. Extreme caution is required when handling petrol or fuel.
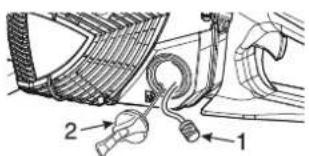
- Fuel filter
- Fuel tank cap
- Check periodically.
- Do not allow dust to enter fuel tank.
- A clogged filter will cause difficulty in starting engine or abnormalities in engine performance.
- Pick up the fuel filter through fuel inlet port with a piece of steel wire or the like.
- When the filter is dirty, replace it.
- When the inside of the fuel tank is dirty, it can be cleaned by rinsing the tank out with petrol.
Oil filter
- Oil filter
- Oil tank cap
- Check periodically.
- Do not allow dust to enter oil tank.
- A clogged oil filter will affect the normal lubricating system.
- Pick it up through oil filling hole with a piece of steel wire or the like.
- If the filter is dirty, wash it in petrol or replace it.
- When the inside of the oil tank gets dirty, it can be cleaned by rinsing the tank out with petrol.
- Put the oil filter in the position shown in the figure.
Spark plug
*Spark plug gap: 0.6 to 0.7 mm
- Check periodically.
- The standard spark gap is 0.6 to 0.7 mm.
- Correct the spark gap if it is wider or narrower than the standard gap.
- Fastening torque: 15 to 17 N·m (150 to 170 kgf·cm)
Guide bar
NOTE
When replacing guide bar or saw chain, ask your shindaiwa dealer.
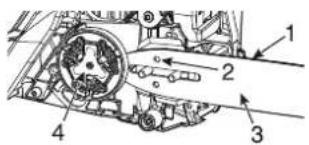
text_image
Technical diagram of a mechanical assembly with numbered components and directional arrows indicating motion or flow.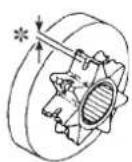
-
Groove 2. Oil hole 3. Guide bar 4. Sprocket
-
Clean before using.
- Clean the groove of the guide bar with a small screw driver, for example.
- Clean oil holes with a wire.
- Reverse guide bar periodically.
- Check sprocket and the clutch and clean the bar mount area before installation of the guide bar.
Replace either or both if worn.
Sprocket / Clutch drum
*Worn out: 0.5 mm
- The damaged sprocket will cause premature damage or wear of saw chain.
- When the sprocket has worn out 0.5 mm or more, replace it.
- Check sprocket when you install new chain.
Replace it if worn.
- Check clutch drum, if it rotates freely and smoothly.
If not, ask your dealer for repair.
Carburettor
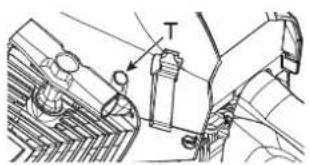
text_image
Technical diagram showing mechanical assembly with labeled components and directional arrows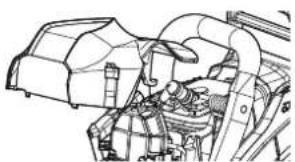
natural_image
Technical line drawing of a mechanical assembly with no visible text or symbols
CAUTION
When starting, idle speed adjuster (T) should be adjusted not to rotate the saw chain. When there is some trouble with the carburettor, contact your dealer.
T: Idle speed adjuster
Do not adjust the carburettor unless necessary.
- To adjust the carburettor proceed as follows:
- Start engine and allow it to run at high idle until warm.
- Turn the idle speed adjuster (T) anticlockwise until the saw chain stops moving.
- Turn idle speed adjuster (T) anticlockwise an additional 1/2 turn.
- Accelerate to full throttle to check for smooth transition from idle to full throttle.
Cylinder fins (Cooling system)
- Check periodically.
♦ Clogged fins will result in poor engine cooling. - Remove dirt and dust from between fins to let cooling air pass easily.
Silencer
NOTE
Carbon deposits in silencer will cause drop in engine output.
The spark arrester screen must be checked periodically.
text_image
Technical diagram of a vehicle's internal components with numbered parts labeled 1, 2, and 3.- Silencer
- Spark arrester screen
-
Screen cover
-
Remove the cylinder cover and the spark plug lead.
- Remove the spark arrester screen cover and the screen from the silencer body.
- Clean carbon deposits from the silencer components.
- Replace the screen if it is cracked, or has holes burned through.
- Assemble the components in reverse order.
Replacement guide bar and chain
IMPORTANT
Only use replacement bars and chains specified by the manufacture or the equivalent. Otherwise, there may be a risk of accidents and damage to the machine.
| Length cm | Guide bar | Chain | Clutch drum (Part number) |
| 38 | B38S95-64ML-SB | 95TXL-64E | (A556-000481) |
| Y38S20-64ML-SD | |||
| 45 | B45S95-72ML-SB | 95TXL-72E | |
| Y45S20-72ML-SD |
Storage
Long term storage (Over 30 days)

WARNING
Do not store in an enclosure where fuel fumes may accumulate or reach an open flame or spark.
Momentary stop switch automatically returns to run position. Engine can start unintentionally when starter handle is pulled. Always remove spark plug lead from spark plug before pulling starter handle, otherwise severe personal injury may result.
NOTE
For future reference, you should keep this operator's manual.
Do not store your unit for a prolonged period of time (30 days of longer) without performing protective storage maintenance which includes the following:
- Drain the fuel tank completely outdoors over bare ground and pull the recoil starter handle several times to remove fuel from the carburettor. Do not drain fuel indoors.
- Always store fuel in approved container.
- Remove accumulation of grease, oil, dirt and debris from exterior of unit.
- Perform all periodic lubrication and services that are required.
- Tighten all the screws, bolts and nuts.
- Remove the spark plug and pour 10 mL of fresh, clean, two-stroke engine oil into the cylinder through the spark plug hole.
A. Place a clean cloth over the spark plug hole.
B. Pull the recoil starter handle 2 or 3 times to distribute the oil inside the cylinder.
C. Observe the piston location through the spark plug hole.
Pull the recoil starter handle slowly until the piston reaches the top of its travel and leave it there.
- Install the spark plug (Do not connect ignition cable).
- Cover the chain and the guide bar with the guide bar cover before putting them in storage.
- Store unit in a dry, dust free place, out of the reach of children and other unauthorized persons.
text_image
6 8
Disposal procedure
- Dispose of waste oil in accordance with local regulations.
- Major plastic parts making up the product have codes showing their materials. The codes refer to the following materials; dispose of those plastic parts in accordance with local regulations.
| Mark Material | |
| >PA6-GF< Nylon 6 - Glass | fibre |
| >PA66-GF< Nylon 66 - Glass | fibre |
| >PP-GF< Polypropylene - Glass | fibre |
| >PE-HD< Polyethylene | |
| >POM< Polyoxymethylene |
Please contact your shindaiwa dealer in case you do not know how you should dispose of waste oil / plastic parts.
Specifications
| Model | 4IOEC | |
| External dimensions: Length × Width × Height mm 396 × | 237 × 274 | |
| Mass: Saw without guide bar and chain, empty tanks kg 4 | 2 | |
| Volume: Fuel tankTank for chain lubrication oilFuel (Mixture ratio)Oil (Chain oil) | cm3(mL)cm3(mL) | 350230Regular grade petrol.Minimum 89 Octane unleaded petrol is recommended.Do not use fuel containing methyl alcohol or more than 10 % of ethyl alcohol.50 : 1 (2 % ) for ISO-L-EGD Standard (ISO 13738),JASO FC, FD grade and shindaiwa recommended oil.shindaiwa recommended chain oil or equivalent |
| Cutting length:All specified usable cutting lengths of guide bar cm 38, 45 | ||
| Chain: Specified pitchSpecified gauge (thickness of drive links)Type of guide barGuide bar gaugeType of chainChain speed at the maximum engine speedChain speed at the maximum engine power speedLubrication | mmmmcmmmm/sm/sm/s | 8.26 (0.325 inch)1.27 (0.050 inch)38, 45 (shindaiwa)1.27 (0.050 inch)Oregon 95TXL24.518.8Non-adjustable automatic oil pump |
| Sprocket: Specified number of teethSpecified pitch mm | 78.26 (0.325 inch) | |
| Engine: TypeCarburettorMagnetoSpark plugStarterPower transmissionEngine displacementMaximum shaft brake power (ISO 7293)Recommended maximum speed with cutting attachmentRecommended speed at idling | cm3kWr/minr/min | Air cooled 2-stroke single cylinderDiaphragm typeFlywheel magneto, CDI systemNGK BPMR8YRecoil starterAutomatic centrifugal clutch41.61.91127003000 (2900 - 3100) |
| Sound pressure level: (ISO 22868) LpAeq =Uncertainty KpA=Sound power level: (ISO 22868) LwAeq =Uncertainty KwA= | dB(A)dB(A)dB(A)dB(A) | 100.41.5109.41.0 |
| Vibration: (ISO 22867) Equivalent values ahv,eqFront handle / Rear handleUncertainty K= | m/s2m/s2 | 2.7 / 5.31.3 |
| Other devices: Front hand guard, Rear hand guard, | Throttle trigger lockout, Chain catcher, Chain brake,Anti-vibration device, Spark arrester screen | |
| Option: Spiked bumper |
Declaration of conformity
The undersigned manufacturer:
YAMABIKO CORPORATION
1-7-2 SUEHIROCHO
OHME ; TOKYO 198-8760
JAPAN
This declaration of conformity is issued under the sole responsibility of the manufacturer.
declares that the hereunder specified new unit:
PORTABLE CHAIN SAW
Brand: shindaiwa
Type: 410EC
natural_image
Line drawing of a chainsaw with visible blade and handle (no text or symbols)complies with:
* the requirements of Machinery Directive 2006/42/EC (use of harmonized standard EN ISO 11681-1:2011)
* the requirements of Directive 2014/30/EU
(use of harmonized standard EN ISO 14982:2009, EN 55012:2007+A1:2009)
* the requirements of Directive 2011/65/EU (use of harmonized standard EN IEC 63000:2018)
* the requirements of Directive 2000/14/EC
Conformity assessment procedure followed ANNEX V
Measured sound power level: L_WA 111 dB(A)
Guaranteed sound power level: L_WA 114 dB(A)
410EC Serial Number F00240001001 to F00240100000
Tokyo, October 20, 2023
YAMABIKO CORPORATION

text_image
K. KoenKatsunori Kon
General Manager
Quality Assurance Dept.
The authorized representative in Europe who is authorized to compile the technical file:
Company: CERTIFICATION EXPERTS B.V.
Address: Amerlandseweg 7, 3621 ZC Breukelen, The Netherlands
Mr. Richard Glaser
UK Declaration of Conformity
Manufacturer: YAMABIKO CORPORATION
Address: 1-7-2 Suehirocho, Ohme, Tokyo 198-8760, JAPAN
Authorized representative: UKCA Experts Ltd. Mr. Richard Glaser
Address: Dept 302, 43 Owston Road, Carcroft, Doncaster, DN6 8DA, The United Kingdom
We, YAMABIKO Corporation, declare under our sole responsibility that the hereunder specified product conforms to the following regulations.
Product Name: PORTABLE CHAIN SAW
Brand: shindaiwa
Sales Model 410EC
Serial Number: Serial Number F00240001001 to F00240100000
Regulations Designated standards
Supply of Machinery (Safety) Regulations 2008 EN ISO 11681-1:2011
Electromagnetic Compatibility Regulations 2016 EN ISO 14982:2009,
EN 55012:2007+A1:2009
The Restriction of the Use of Certain Hazardous Substances in Electrical and Electronic Equipment Regulations 2012
EN IEC 63000:2018
Noise Emission in the Environment by Equipment for use Outdoors Regulations 2001
Sound Power Level:
Schedule 8
Measured: 111dB(A)
Guaranteed: 114dB(A)
Tokyo, October 20, 2023
K. Ken
Katsunori Kon
General Manager
Quality Assurance Department
YAMABIKO CORPORATION
YAMABIKO CORPORATION
natural_image
Technical line drawing of a chain-linking machine (no text or symbols)text_image
Diagram showing four different types of fire extinguishers and a mechanical component with labeled parts A and 2.text_image
Illustration showing two scenes: one of a person using a cart with a 3-meter weight, the other of a person handling a long object with a no-smoking symbol.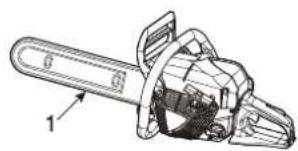
natural_image
Technical line drawing of a chain saw with labeled component (no text or symbols)Démarrage du moteur
text_image
Diagram showing a mechanical or structural component with labeled direction and arrow, likely illustrating a turning or cutting process.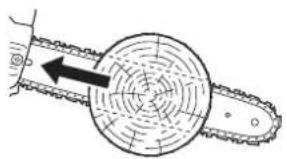
natural_image
Diagram of a chain saw cutting through a circular cutterhead with concentric grooves (no text or symbols)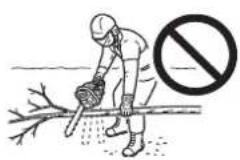
natural_image
Illustration of a worker using a tool on a slope with a prohibition symbol (no text or labels)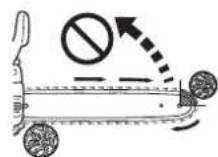
natural_image
Illustration showing four different tree clearing techniques: climbing, using a saw, cutting the tree trunk, and removing a prohibition symbol (no text or labels present)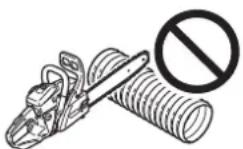

ATTENTION
text_image
Technical diagram showing 12 labeled mechanical components with arrows indicating motion or assembly stepstext_image
Diagram of a car interior with labeled components and a warning symbol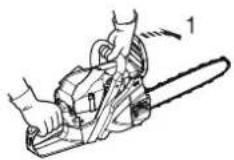
natural_image
Technical line drawing of a mechanical assembly with labeled component '2' (no text or symbols beyond label)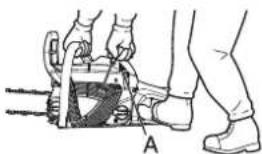
natural_image
Illustration of hands operating a mechanical device with labeled point A (no text or symbols on the device itself)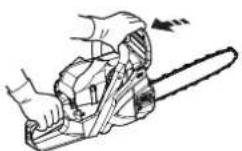
text_image
Technical diagram of a mechanical component with numbered parts and directional arrows indicating motion or flow.natural_image
Illustration of two manual car chainers in action, showing blade and foot positioning (no text or symbols)natural_image
Diagram of a chain-linking device with a diagonal line and a prohibition symbol (no text or labels)text_image
Diagram showing a person using a machine to interact with a bear and child, with directional arrows indicating interaction.natural_image
Illustration of a person using a chainsaw to cut a coin (no text or symbols present)text_image
Diagram illustrating three different methods of a mechanical tool: cutting, using a saw, and using a chain.natural_image
Illustration of a person using a tool on a slope with a prohibition symbol (no text or labels)text_image
Technical diagram of a mechanical component with labeled parts 1 and 2, showing motion paths and assembly details.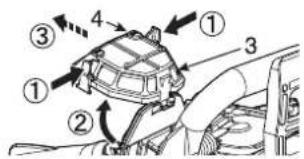
text_image
Diagram of a vehicle steering wheel with numbered parts and directional arrows indicating motion or movement.text_image
Technical diagram showing mechanical assembly with labeled parts 1 and 2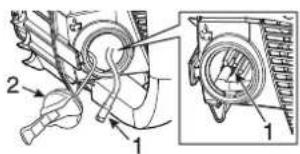
text_image
Technical diagram showing mechanical assembly with labeled parts 1 and 2, including a magnified inset view of the component.DANGER
natural_image
Technical line drawing of a spark plug (no text or symbols)Bougie d'allumage
text_image
Technical diagram of a mechanical assembly with numbered components and directional arrows indicating motion or flow.
text_image
Technical diagram showing mechanical assembly with labeled component T and directional arrow
natural_image
Technical line drawing of an engine compartment with hoses and valves (no text or labels)ATTENTION
text_image
Technical diagram of a vehicle's internal components with numbered parts labeled 1, 2, and 3natural_image
Technical line drawing of a chain-linking tool with labeled parts (no text or symbols beyond basic labels)
natural_image
Line drawing of a chainsaw with visible blade and handle (no text or symbols)est conforme :
natural_image
Technical line drawing of a chain-linking machine (no text or symbols)text_image
Illustration showing two scenes: one of a person using a cart with a 3-meter scale, the other of a person handling a large object with a no-smoking symbol.
natural_image
Technical line drawing of a chain-linking device with labeled parts (no text or symbols beyond part numbers)Starten des Motors
text_image
Diagram illustrating a mechanical or physical process with labeled component '1' and directional arrow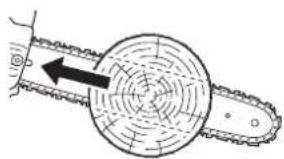
natural_image
Diagram of a chain saw cutting through a circular cutterhead with visible teeth and a black arrow indicating direction (no text or symbols)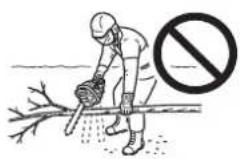

natural_image
Illustration of a worker using a tool to cut a slope, with a no-smoking symbol nearby (no text or labels)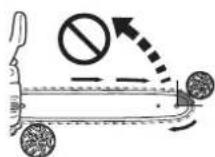
natural_image
Illustration of five different tree planting techniques showing manual, manual, tree root, manual with prohibition signs, and manual with a tool (no text or symbols present)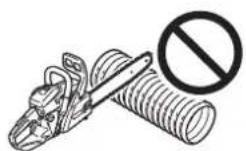

VORSICHT
text_image
Technical diagram showing 12 labeled mechanical components with arrows indicating motion or assembly stepsnatural_image
Illustration of two manual methods for using a chainsaw, showing tool and foot positioning (no text or symbols)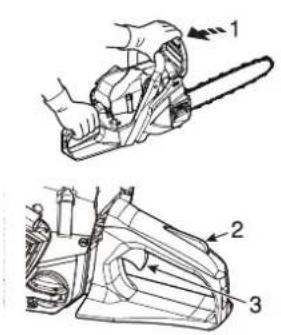
text_image
Technical diagram showing two views of a chain saw with numbered parts labeled 1, 2, and 3.Warmstart
natural_image
Diagram of a chain-linking device with a diagonal bar and a prohibition symbol (no text or labels)text_image
Illustration showing a person using a tool to interact with a bear and child, with directional arrows indicating interaction.natural_image
Illustration of a person using a chain-linking power tool with a coin nearby (no text or symbols)text_image
Illustration showing three different methods of a manual tool: cutting a saw, using a tool with no restrictions, and using a chain.text_image
Diagram illustrating mechanical components with numbered parts and directional arrows, likely from an engineering or manufacturing context.Fällen eines Baums
natural_image
Illustration of a person using a tool on a slope with a prohibition symbol (no text or labels)text_image
Illustration showing nine steps of a wooden rolling operation, labeled 1 through 9 with arrows indicating movement and cutting.text_image
Technical diagram showing mechanical assembly steps with numbered components and directional arrows indicating motion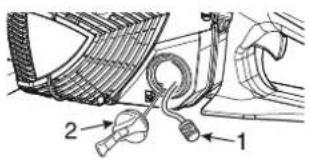
text_image
Technical diagram showing mechanical assembly with labeled parts 1 and 2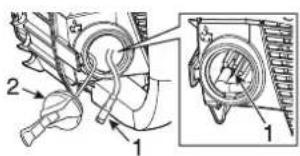
text_image
Technical diagram showing mechanical assembly with labeled parts 1 and 2, including a magnified inset view of a circular component.Wartung
natural_image
Technical line drawing of a spark plug (no text or symbols)Zündkerze
text_image
Technical diagram of a mechanical assembly with numbered components and directional arrows indicating motion or flow.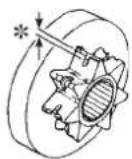
natural_image
Technical line drawing of mechanical components with no visible text or symbolsnatural_image
Technical line drawing of an engine compartment with hoses and levers (no text or labels)Schalldämpfer
HINWEIS
text_image
Technical diagram of a vehicle's internal components with numbered parts labeled 1, 2, and 3.natural_image
Technical line drawing of a chain drive with labeled part 8 (no text or symbols beyond label)
Entsorgungshinweise
natural_image
Line drawing of a chainsaw with visible blades and handle (no text or symbols)natural_image
Technical line drawing of a chain-linking machine (no text or symbols)text_image
Illustration showing two scenes: one of a person using a cart with a 3-meter scale, the other of a person handling a long object with a no-smoking symbol.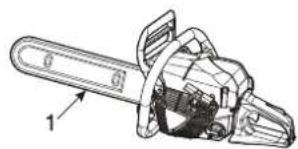
natural_image
Technical line drawing of a chain drive with labeled parts (no text or symbols present)text_image
Diagram showing a circular object with a labeled arrow indicating direction, possibly illustrating a physical or engineering concept.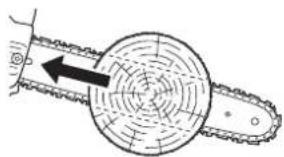
natural_image
Diagram of a chain drive with gear teeth and a circular blade, showing internal gear teeth pattern (no text or symbols)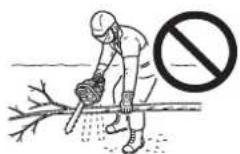
natural_image
Illustration showing four different manual tree clearing techniques: climbing, cutting, tree crushing, and falling (no text or symbols present)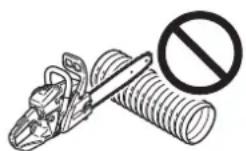

ATTENZIONE
text_image
Technical diagram showing 12 numbered mechanical assembly steps with labeled components and directional arrows indicating motion or movement.natural_image
Illustration of two manual methods for using a chainsaw, showing tool and foot positioning (no text or symbols)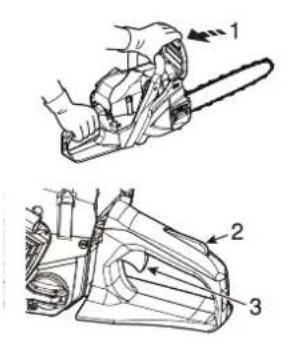
text_image
Technical diagram showing a chain saw cutting process with labeled parts 1, 2, and 3natural_image
Diagram of a chain-linking device with a diagonal bar and a prohibition symbol (no text or labels)NOTA
text_image
Diagram showing a person using a machine to interact with two children, one carrying a bear and the other running away.natural_image
Illustration of a person using a chain-linking power tool with a coin nearby (no text or symbols)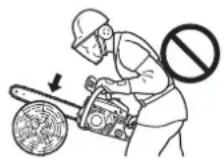
text_image
Illustration showing three different methods of using a power tool: moving wheels, cutting a saw, and using a chainsaw with no warning symbols.natural_image
Illustration of a person using a tool on a slope with a prohibition symbol (no text or labels)text_image
Technical diagram showing mechanical assembly steps with numbered components and directional arrows indicating motion- Carter cilindro
- Fermo carter cilindro
- Filtro aria
- Linguetta
text_image
Technical diagram showing labeled parts of a mechanical or electrical component with numbered annotations
PERICOLO
text_image
Technical diagram showing mechanical assembly with labeled parts 1 and 2, including a magnified inset view of the component.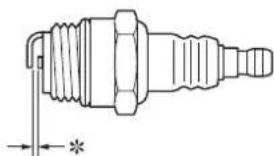
natural_image
Technical line drawing of a spark plug (no text or symbols)Candela
text_image
Technical diagram of a mechanical assembly with numbered components and directional arrows indicating motion or flow.
text_image
Technical diagram showing mechanical assembly with labeled component T and directional arrow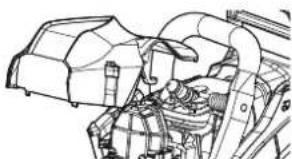
natural_image
Technical line drawing of a mechanical assembly with no visible text or symbols
ATTENZIONE
text_image
Technical diagram of a vehicle's internal components with numbered parts and labeled partsnatural_image
Technical line drawing of a chainsaw with labeled parts (no text or symbols beyond numbers)
natural_image
Line drawing of a chainsaw with visible blades and handle (no text or symbols)natural_image
Technical line drawing of a chain-linking machine (no text or symbols)MANUAL DEL PROPRIETARIO / USARIO DE SHINDAIWA
MOTOSIERRA
410EC
Introducción
text_image
Illustration showing two scenes: one of a person using a cart with a 3-meter scale, the other of a person handling a large object with a no-smoking symbol.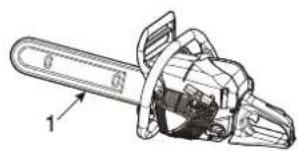
natural_image
Technical line drawing of a chain saw with labeled component (no text or symbols)Arranque del motor
text_image
Diagram illustrating a mechanical or physical process with labeled component '1' and directional arrow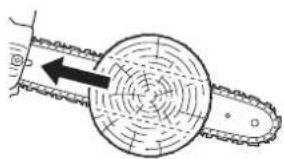
natural_image
Diagram of a chain saw cutting through a circular cutterhead, showing gear teeth and blade geometry (no text or labels)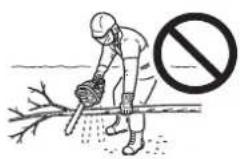
natural_image
Illustration of a worker using a tool on a slope with a prohibition symbol (no text or labels)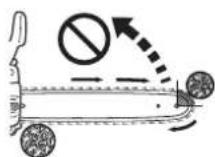
natural_image
Illustration showing five different tree clearing methods: climbing, using a saw, cutting the tree trunk, cutting down the tree trunk with a prohibition symbol (no text or labels present)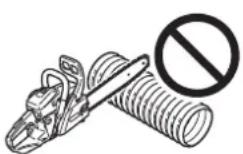

PRECAUCIÓN
text_image
Technical diagram showing 12 labeled mechanical components with arrows indicating motion or assembly stepsnatural_image
Illustration of a chain saw being cut with hands, showing blade and foot positioning (no text or symbols)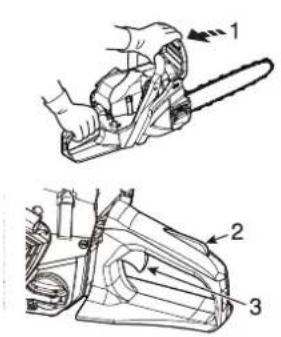
text_image
Technical diagram showing a chain saw cutting process with labeled parts 1, 2, and 3natural_image
Line drawing of a chain-linking device with a prohibition symbol (no text or labels)text_image
Illustration showing a person using a bench to interact with a child, with an arrow indicating the opposite direction.natural_image
Illustration of a person using a chain-linking power tool to cut a coin (no text or symbols present)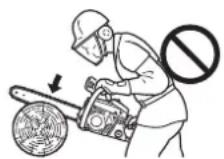
text_image
Illustration showing three different manual methods for using a chain-linking tool, with no text or symbols present.natural_image
Illustration of a person using a tool on a slope with a no-smoking symbol (no text or labels)text_image
Technical diagram showing mechanical assembly steps with numbered components and directional arrows indicating motion or movement.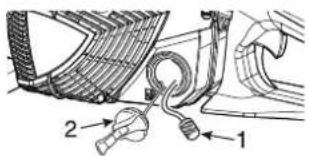
text_image
Technical diagram showing mechanical assembly with labeled parts 1 and 2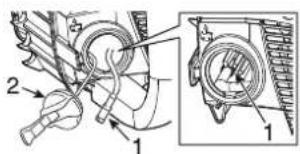
text_image
Technical diagram showing mechanical assembly with labeled parts 1 and 2, including a magnified inset view of a component.Asistencia
natural_image
Technical line drawing of a spark plug with threaded end and shaft (no text or symbols)Bujía
text_image
Technical diagram of a mechanical assembly with numbered components and directional arrows indicating motion or flow.
text_image
Technical diagram showing mechanical assembly with labeled component T and directional arrow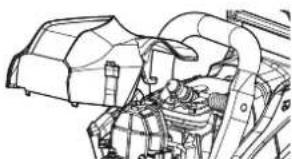
natural_image
Technical line drawing of an engine compartment with hoses and levers (no text or labels)
PRECAUCIÓN
text_image
Technical diagram of a vehicle's internal components with numbered parts labeled 1, 2, and 3.natural_image
Technical line drawing of a chain-linking device with labeled parts (no text or symbols beyond numbers)
natural_image
Line drawing of a chainsaw with visible blades and handle (no text or symbols)cumple con: