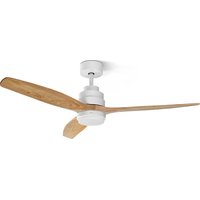
Nepal - Fan UFESA - Free user manual and instructions
Find the device manual for free Nepal UFESA in PDF.


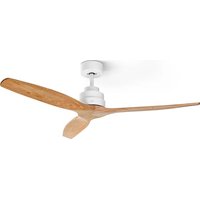
| Product type | Ceiling fan |
| Brand | Ufesa |
| Model | Nepal |
| Weight | 4,2 kg |
| Number of blades | 3 hardwood blades |
| Power supply | 220-240 V ~ 50 Hz |
| Power consumption | 33,04 W |
| Maximum airflow | 208,05 m³/min |
| Service value | 6,30 (m³/min)/W |
| Standby consumption | 0,45 W |
| Sound level | 50,40 dB(A) |
| Maximum air speed | 2,86 m/s |
| Seasonal electricity consumption | 13,08 kWh/year |
| Number of speeds | 6 speeds |
| Remote control | Yes, with LED indicator |
| Integrated LED lighting | Yes, 3 colors (natural, cool, warm) |
| Timer | 1h, 4h, 8h |
| Special modes | Natural wind, anti-theft, winter/summer, silent, delayed stop |
| Minimum mounting height | 2.3 m above the floor |
| Minimum distance to obstacles | 76 cm |
| Maximum operating altitude | 2000 m |
| Installation | Flat ceiling only, by a certified electrician |
| Maintenance | Soft damp cloth, without abrasive products |
| Warranty | According to applicable legislation, contact authorized after-sales service |
Frequently Asked Questions - Nepal UFESA
User questions about Nepal UFESA
0 question about this device. Answer the ones you know or ask your own.
Ask a new question about this device
Download the instructions for your Fan in PDF format for free! Find your manual Nepal - UFESA and take your electronic device back in hand. On this page are published all the documents necessary for the use of your device. Nepal by UFESA.
USER MANUAL Nepal UFESA
natural_image
Modern white and gray multi-compete ceiling fan with three blades, no text or symbols visiblenatural_image
Technical line drawing of a mechanical assembly with no visible text or symbolsFigura 1.*
Figure
Abbildung
Фигура
الشكل

natural_image
Technical diagram of a mechanical assembly with four screws and a hatched top section, labeled 'figura 2.*' (no text or symbols on the diagram itself)Figura 2.*
Figure
Abbildung
Фигура
الشكل
الشكل
Figura 3.
Figure Abbildung Фигура
natural_image
Mechanical assembly diagram showing a cylindrical component being inserted into a housing, with an inset close-up of the component (no text or symbols present)Figura 4.
Figure
Abbildung
Фигура
natural_image
Technical diagram of a mechanical assembly with a close-up inset showing internal components (no text or labels)Figura 5.
Figure
Abbildung
Фигура
Figura 6.
Figure
Abbildung
Фигура
الشكل
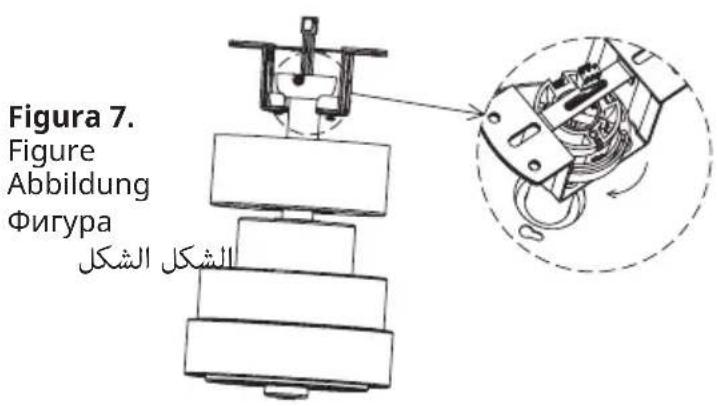
Figura 8.
Figure
Abbildung
Фигура
natural_image
Technical line drawing of a mechanical assembly with concentric rings and a central component (no text or symbols)natural_image
Technical line drawing of a mechanical component with no visible text or symbolsFigura 11.
Figure
Abbildung
Фигура
WE WOULD LIKE TO THANK YOU FOR CHOOSING UFESA. WE WISH THE PRODUCT PERFORMS TO YOUR SATISFACTION AND PLEASURE.
WARNING
PLEASE READ THE INSTRUCTIONS FOR USE CAREFULLY PRIOR TO USING THE PRODUCT. STORE THESE IN A SAFE PLACE FOR FUTURE REFERENCE.
DESCRIPTION
- Mounting bracket
- Ceiling drop rod (15cm and 25 cm)
- Yoke cover
- Canopy
- Lamp shade
- Motor
- Controller set
- Sleeve anchors
- Mounting screws
- Fan blade screws (6 pcs)
- Hard wood fan blades (3 pcs)
REMOTE CONTROL
- LED indicator light
- Appliance power off button
- Light on/off button (Include change the light models)
- Fan speed buttons (1 min. - 6 max.)
- Fan on/off button
- Timer (1h, 4h, 8h)
- Natural air mode
- Anti-theft mode
- Winter/summer mode
- Silent mode
- Delayed shutdown
SAFETY INSTRUCTIONS
- This appliance can be used by children aged from 8 years and above and persons with reduced physical, sensory or mental capabilities or lack of experience and knowledge if they have been given supervision or instruction concerning use of the appliance in a safe way and un-
derstand the hazards involved. Children should not play with the appliance. Cleaning and user maintenance shall not be made by children without supervision.
- This device is designed for use at a maximum altitude up to 2000m above sea level.
- WARNING: If unusual oscillating movement is observed, immediately stop using the ceiling fan and contact the manufacturer, its service agent or suitably qualified persons
- Proceed with the maintenance cycle and method of maintenance according to its section of this instruction manual.
- The weight of the appliance is 4.2 Kilograms
- The replacement of parts of the safety suspension system device shall be performed by the manufacturer, its service agent or suitably qualified persons.
- The mounting of the suspension system shall be performed by the manufacturer, its service agent or suitably qualified persons.
- Ensure the blades will be at least 76 centimeters from any obstruction and at least 2.3 meters above the floor.
-
The fixing means for attachment to the ceiling such as hooks or other devices shall be fixed with a sufficient strength to withstand 4 times the weight of the ceiling fan.
-
This product contains a light source of energy efficiency class E - (EU) 2019/2015 (Only for models with include light) XGD-QY-24W-56SMD
- Means for disconnection must be incorporated in the fixed wiring in accordance with the wiring rules
- Follow the installation section of this manual for fixing the appliance.
IMPORTANT INFORMATION
Read this instruction manual thoroughly before using the appliance and save it for future reference and if necessary, pass the instruction manual on to a third party.
- This appliance is intended exclusively for domestic use for the ventilation of rooms: Do not use it for other purposes. Any other use should be considered improper and dangerous. The manufacturer shall not be held responsible for any damage resulting from improper, incorrect and irresponsible use and/or for repairs made by unqualified technicians.
- Check if the electrical specifications of the appliance are compatible with your installation.
- This appliance is for indoor use only except moist or wet room.
- Before pushing the reversible slide switch, it is necessary to stop the action of the blades by turning off the fan.
- The supplier disclaims all liability for personal injury or property damage arising from incorrect use or installation of the fan. In doubt, call upon an electrician.
- Be careful when working near the rotating blades.
- Warning: only to be installed outside arms reach.
- The product should be installed by an authorized electrician in accordance to national wiring rules.
- An all-pole disconnector with isolating distance of 3mm must be incorporated in the fixed wiring in accordance with the national wiring rules.
- The inner wires can't touch the white metal enclosure after assembling by the client.
TURN POWER OFF
Begin installation by removing fuses or turning off circuit breakers to the wiring you will be using.
WARNING: Failure to disconnect the power supply prior to installation may result in serious injury or death.
Install the appliance ONLY for flat ceilings DO NOT use with sloped or vaulted ceilings.
In locations without a ceiling joist, a hanger support bar may be required. Do not install in damp locations.
B&B TRENDS, S.L. will not be held liable for any harm or damage which may occur to people, animals or objects as a result of failure to observe the aforementioned warnings.
PRE-INSTALLATION INSTRUCTIONS
Before installing this product, read the package list in previous pages and ensure all parts are present and display no defects. DO NOT attempt to install the product if any part is missing or damaged. Read the safety information before installation or use.
Additional tools required for assembly:
• Cross-head Screwdriver
- Flat Head Screwdriver
- Adjustable Pliers or Wrench
- Step Ladder
- Wire Stripper
- Impact Drill (For Cement Floors)
- Electrical Tape
- Safety Glasses
Additional helpful tools:
AC/DC tester light, tape measure, wiring handbook, and wire cutters, hammer.
WARNING: NEVER bend the blade brackets/flanges during assembly or after installation.
DESCRIPTION
Unpack your fan and check the contents. Do not discard the carton. If replacement or repair is ever necessary the fan should be returned in original packaging. Remove all parts and hardware. Do not lay motor housing on its side: the decorative casting may shift.
Examine all parts. You should have the following:
- Mounting bracket
- Yoke cover
- Canopy
- Lamp shade
- Motor
- Controller set (1 set)
- Sleeve anchors (2 pcs)
- Mounting screws (4 pcs)
- Fan blade screws (6 pcs)
-
Hard wood fan blades (3 pcs)
-
Ceiling drop rod (15cm and 25 cm). Use the rod that suits you best to fix the fan closer to or further away from the ceiling.
MOUNTING BRACKET INSTALLATION
- Select the installation method according to the structure of the ceiling (as shown in Figure 1 or 2), and use appropriate fasteners.
- Install the mounting bracket on the building structure as shown in the figure. The fan base mounting bracket must support a load of 25 kg.
- If you want to hang the fan on a ceiling without joists, you may need a hanger support bar.
HANGING PARTS ASSEMBLY
- Loose the ball joint by removing the connecting pin and loosening the screws (Figure 3).
-
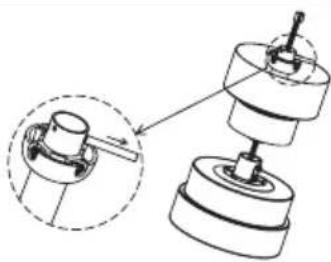
Insert the down rod through the canopy and joint cover and insert the motor wires through down rod, and then secure ball joint back to down rod (Figure 4).
-
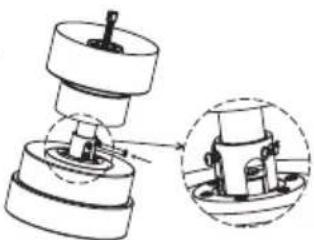
Insert down rod to hanger (Figure 5), line up hanger holes with down rod holes and insert bolt. Then insert pin to end of bolt.
- Finally secure down rod and hanger by tightening two screws (Figure 6).
HANGING THE FAN
- Lift fan assembly onto mounting bracket (Figure 7).
- Rotate the fan down rod by hand and ensure the notch of the ball joint is positioned on the stopper of mounting bracket to prevent fan from rotating when in operation (Figure 8).
CONTROLLER KIT INSTALLATION AND POWER WIRING
WARNING: Disconnect the power by turning off the circuit breakers to the outlet box and associated wall switch location before wiring power cables.
- Install the receiver in the mounting bracket (Figure 9)
- Connect the power input wires to the electrical power supply wires (Please contact a qualified electrician if you don't know how to do it).
Insert the Motor Input Connector, LED Light Power Connector and Power Input Connector into corresponding sockets on the Receiver (Figure 10)
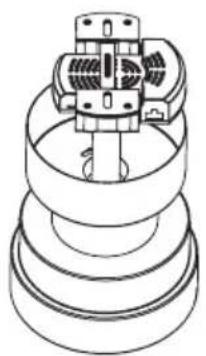
- Tuck all wires and the antenna into the canopy. Push the canopy upwards, lining up the keyholes on the bottom with the screws on the hanger bracket. Twist the Canopy to lock it in place and then tighten the screws to secure it. (Figure 11)
FAN BLADES INSTALLATION
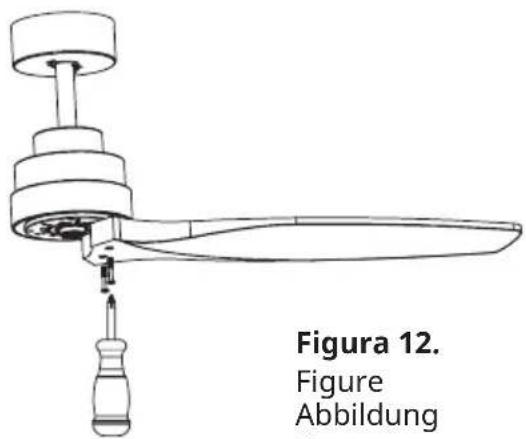
- Install the blade onto the motor with the provided screws (Figure 12).
- Repeat with the remaining blades.
INSTALLING THE LED LIGHT KIT AND LAMP SHADE
CAUTION: To reduce the risk of electric shock, disconnect the power supply circuit to the fan before installing the Light Kit.
- Loosen the three mounting screws on the mounting ring.
- While holding the LED Light Kit under the fan motor, pass the light power wire through the hole in the center of the light kit and plug the light power wire connector into the socket on the lighting kit (Figure 13).
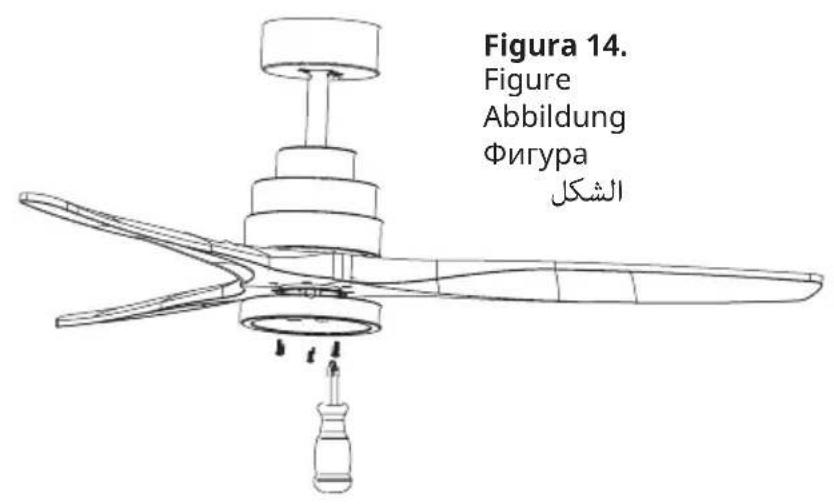
- Carefully position the 3 screw holes on the Light Kit to match the 3 screw holes on the mounting ring. Secure it by placing and tightening the three mounting screws (Figure 14).
- Lift the Lamp Shade against the Light Kit and turn it clockwise until tight, DO NOT OVERTIGHTEN (Figure 15)
REMOTE CONTROLLER INSTRUCTIONS
- LED indicator light
- Appliance power off button
- Light on/off button (Include change the light models)
- Fan speed buttons (1 min. - 6 max.)
- Fan on/off button
- Timer (1h, 4h, 8h)
- Natural air mode
-
Anti-theft mode
-
Winter/summer mode
-
Silent mode
-
Delayed shutdown
Notes:
- LED indicator light:
The LED light comes in 3 different colors settings: natural, cold and warm. To change the color, turn off the light and then turn on.
- Natural Wind Mode:
Press this key and fan speed cycles automatically between 1st to 4th speed every 22 seconds to simulate natural wind.
- Anti-theft Mode:
Press the anti-theft button before going out, and it will automatically turn on for about 10 minutes every 4 hours simulating people inside the house.
9: The fan rotates counterclockwise in summer mode and clockwise in winter mode.
Press the button to switch from one mode to the other. This reverse function allows the blades to rotate in two directions and makes the ceiling fan move the air to give a cool or warm sensation.
10.Silent Mode:
After pressing this key, the remote control is silenced and no beep is heard. Press again to exit this mode.
- Delayed shutdown:
Press this key to turn off the fan and lights after 5 minutes.
CLEANING AND MAINTENANCE
Warning: before carrying out regular cleaning operations, disconnect the plug from the mains socket.
- To clean the appliance, use a soft, slightly damp cloth; do not use abrasive or corrosive products.
- Do not immerse any part of the fan in water or any other liquid: if this should happen, under no circumstances should hands be put into the liquid. First disconnect the plug from the mains socket.
Then dry the appliance carefully and check that all the electrical parts are dry. If in doubt, check with professional qualified technician.
- It is essential that the motor ventilation holes are free of dust and fibres.
- In case of long periods of non-use store the fan, protecting it from dust and moisture.
We recommend using the original packaging.
PRODUCT DISPOSAL
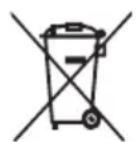
This product complies with European Directive 2012/19/EU on Waste Electrical and Electronic Equipment, known as WEEE, which establishes the legal framework applicable in the European Union for the disposal and recycling of electrical and electronic appliances. Do not throw this product into the bin. Take it to the nearest electrical and electronic waste treatment plant. The product may contain batteries. Remove them before disposing of the product and dispose in special containers approved for this purpose.
We hope you are satisfied with this product.
The product may contain batteries. Remove them before disposing of the product and dispose in special containers approved for this purpose.
| Description Symbol Value Unit | |||
| Maximum fan flow rate F 208.05 m3/min | |||
| Fan power input P 33.04 W | |||
| Service value SV 6.30 (m3/min)/W | |||
| Standby power consumption | PSB 0.45 W | ||
| Fan sound power level LWA 50.40 dB(A) | |||
| Maximum air velocity | C 2.86 meters/s | ||
| Seasonal electricity consumption | Q | 13.08 kWh/a | |
| Measurement standard for service value | IEC 60879:2019 – Comfort fans and regulators for household and similar purposes – Methods for measuring performance |
FRANÇAIS
NOUS VOUS REMERCIONS D'AVOIR CHOISI UFESA. NOUS ESPÉRONS QUE CE PRODUIT RÉPOND À VOS BESOINS ET À VOS GOÛTS.
AVERTISSEMENT
VEUILLEZ LIRE ATTENTIVEMENT LE MODE D'EMPLOI AVANT D'UTILISER LE PRODUIT. CONSERVEZ-LE DANS UN ENDROIT SÛR POUR POUVOIR LE CONSULTER ULTÉRIEUREMENT.
DESCRIPTION
B&B TRENDS, SL. guarantees compliance of this product, for the use for which it is, during the period established by the legislation in force in the country of sale. In the case of breakdown during the term of this warranty, users are entitled to repair or else the replacement of the product at no charge if the former is unavailable, unless one of these options proves impossible to fulfil or is disproportionate. In this case, you can then opt for a reduction in price or cancellation of the sale, which must be dealt with directly with the sales vendor. This also covers replacement of spare parts provided that the product has been used according to the recommendations specified in this manual for both cases, and has not been tampered with by any third party that is not authorised by B & B TRENDS, SL. The warranty will not cover any parts subject to wear and tear. This warranty does not affect your rights as a consumer in accordance with the provisions in Directive 1999/44/EC for member states of the European Union.
USE OF WARRANTY
Customers must contact a B&B TRENDS, SL., authorised Technical Service for repair of the product. Since any tampering of the same by anyone not authorised by B&B TRENDS, SL., or the careless or improper use of the same shall render this warranty null and void. You must keep the purchase invoice, receipt or delivery docket in order to exercise your warranty rights. For technical service and after-sales care outside the Spanish territory, please submit your query to the point of sale where you purchased the item.
BON DE GARANTIE
- WARNING
- DESCRIPTION
- REMOTE CONTROL
- SAFETY INSTRUCTIONS
- IMPORTANT INFORMATION
- TURN POWER OFF
- PRE-INSTALLATION INSTRUCTIONS
- MOUNTING BRACKET INSTALLATION
- HANGING PARTS ASSEMBLY
- HANGING THE FAN
- CONTROLLER KIT INSTALLATION AND POWER WIRING
- WARNING: Disconnect the power by turning off the circuit breakers to the outlet box and associated wall switch location before wiring power cables.
- FAN BLADES INSTALLATION
- INSTALLING THE LED LIGHT KIT AND LAMP SHADE
- REMOTE CONTROLLER INSTRUCTIONS
- Notes:
- CLEANING AND MAINTENANCE
- PRODUCT DISPOSAL
- FRANÇAIS
- AVERTISSEMENT
- USE OF WARRANTY
- BON DE GARANTIE
Brand : UFESA
Model : Nepal
Category : Fan