Kreta - Barbecue EINHELL - Free user manual and instructions
Find the device manual for free Kreta EINHELL in PDF.

| Product type | Gas barbecue cart |
| Brand | Einhell |
| Model | Kreta |
| Fuel type | Propane/butane gas |
| Power | 6.5 kW |
| Gas consumption | 470 g/h |
| Service pressure | 30-37-50 mbar |
| Required pressure regulator | 50 mbar, 1.5 kg/h |
| Ignition | Piezo |
| Number of burners | 1 (adjustable) |
| Frame material | Steel |
| Coating | Heat-resistant paint |
| Use | Outdoor only |
| Safety distance | 1 m (sides and rear) |
| Recommended bottle capacity | 5 to 11 kg |
| Warranty | 2 years |
| Maintenance | Clean after use; clean the grid with vinegar water |
| Safety | Do not use charcoal; check tightness regularly |
Frequently Asked Questions - Kreta EINHELL
User questions about Kreta EINHELL
0 question about this device. Answer the ones you know or ask your own.
Ask a new question about this device
Download the instructions for your Barbecue in PDF format for free! Find your manual Kreta - EINHELL and take your electronic device back in hand. On this page are published all the documents necessary for the use of your device. Kreta by EINHELL.
USER MANUAL Kreta EINHELL
natural_image
Technical line drawing of a mechanical support structure with no visible text or symbols

natural_image
Technical line drawing of a wheeled cart with wheels and handle (no text or symbols)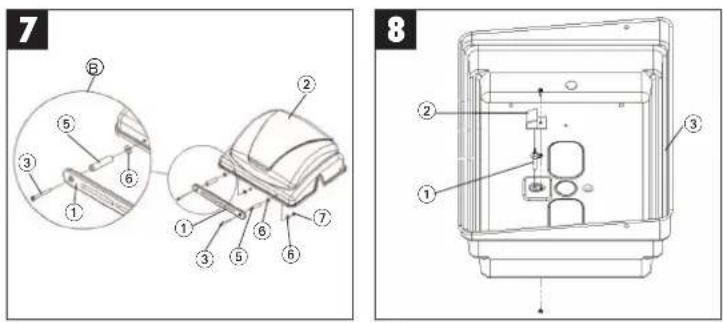
3
natural_image
Technical line drawing of a medical cart with wheels and a lid, labeled with parts ① and ② (no text or symbols beyond labels)RHODOS
natural_image
Technical line drawing of a wheeled cart with wheels and handle (no text or symbols)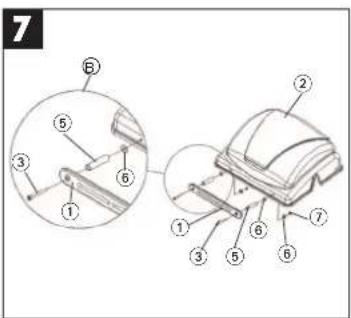

natural_image
Technical line drawing of a portable grill with wheels and a labeled component (no text or symbols)D
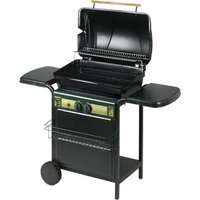
Achtung!
Important: Be sure to read these operating instructions before you assemble the barbecue and use it for the first time.
Technical data:
| Barbecue kitchen Kreta Rhodos | ||
| Power: 6.5 KW 10 KW | ||
| Gas consumption: 470 g/h 730 g/h | ||
| Operating pressure: 30-37-50 mbar | 30-37-50 mbar | |
| Propane/butane | I_3+/I_3 B/P | I_3+/I_3 B/P |
Safety regulations:
● This barbecue is intended for outdoor use only!
● Never move or transport the barbecue equipment when hot.
● Caution: Some parts of the barbecue may be very hot! Keep away from children!
● Turn off the valve on the gas bottle when you have finished barbecuing.
- It is dangerous and prohibited to modify the barbecue or tamper with its equipment in any way. All rights under the warranty shall be forfeited if the barbecue is modified in any way or if non-original replacement parts are used.
● Make sure that the barbecue is set up on a firm, level substructure where it is unable to topple.
● The substructure is not to consist of any flammable materials.
● Fit the gas pipe between the gas bottle and the barbecue so it is safe from kinking, stretching and pinching.
● After you have fitted the gas pipe, check all connections for leaks (use leak spray or soapy water). If you see any bubbles, turn off the valve on the gas bottle at once, check the leaky connection and seal it.
● Make sure that the gas bottle is not exposed to direct sunshine. Never store the gas bottle under ground level or in non-ventilated rooms. Replace porous or damaged pipes immediately. Have the gas equipment of your barbecue repaired and serviced only by specially authorized persons.
- If the flame goes out, wait at least 20 - 30 seconds for the burner to cool before re-igniting.
- Position your barbecue where there are no combustible objects in the direct vicinity. If at all possible you should use the barbecue where it is shielded from the wind. Do not apply any grease to the couplings and valves.
● Stand the gas bottle in a firm position alongside or behind the barbecue (do not place under the barbecue while you are barbecuing).
- Keep a safe distance of 1.0 meter from
combustible objects at the sides and rear.
- Use only pressure reducing valves for 50 mbar and 1.5 kg/h throughput (30 + 37 mbar for export only).
- Use the barbecue only with the lid open. Close the lid only to retain the heat when the gas is turned off at the bottle.
- Use only tested gas pipes and pressure reducing valves.
- Do not store the gas bottle in overheated or non-ventilated rooms (max. 50°C).
● Never lay the gas bottle on the floor.
● Never use a flame to check for leaks.
- It is prohibited to tamper with the connecting elements while the barbecue is being used.
● Children are not allowed to operate or install any equipment, couplings or valves on the barbecue.
● Never use the barbecue without a pressure reducing valve.
● Never leave the barbecue unattended for more than a moment when in use.
- Do not use any charcoal or briquettes on your barbecue.
- Do not smoke while the barbecue is in use.
- Do not place the barbecue within the operating area of any fire or smoke detectors.
Assembly
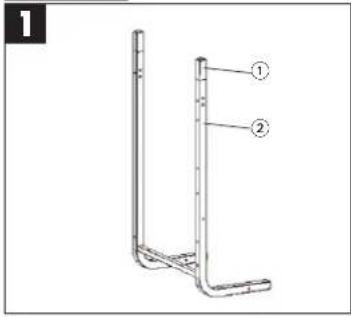
(Fig. 1) Insert the plastic caps (1) into the stand (2).
CAUTION: The wheel frame has 2 additional holes for mounting the axles.
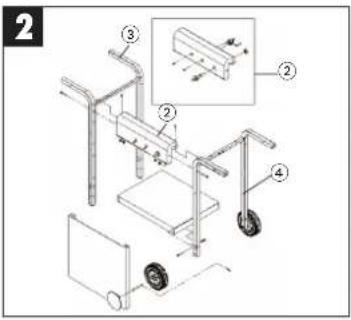
(Fig. 2). Attach the pre-assembled fittings holder (2)
to the top of the lateral cross struts using two
4 x 10 mm self-tapping screws and additionally fasten to the side of the stand (3) and chassis (4) using two M6 x 35 lock bolts, washers and hexagonal nuts.
(Fig. 3) Applies to Kreta only: Place the preassembled frame unit on the ground upside down and simultaneously pull the front cover (1) on both tubular legs up to the height of the fittings holder.
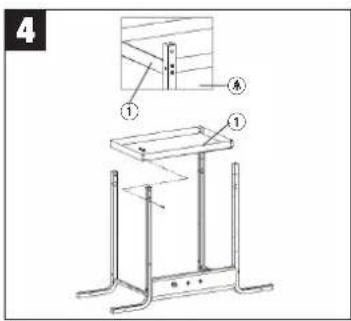
(Fig. 4) Fasten the tray plate (1) to the tubular frame using 8 M6 x 35 lock bolts, washers and hexagonal nuts. Refer to detail A.
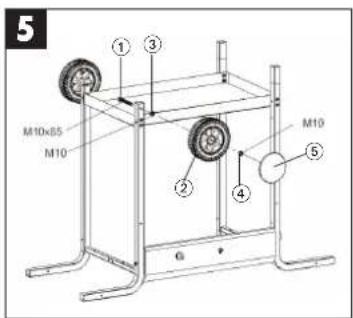
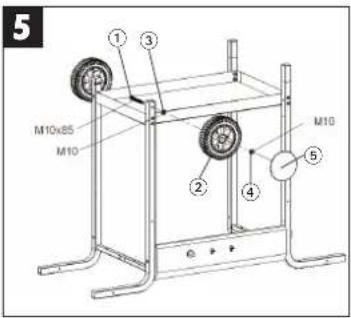
(Fig. 5) Insert a size 10x85 screw through the tubular leg from the inside and screw on a size M10 nut from the outside and tighten. Then slide the wheel on the screw and screw on a size M10 self-locking nut with plastic insert. Then mount the wheel cover (5).
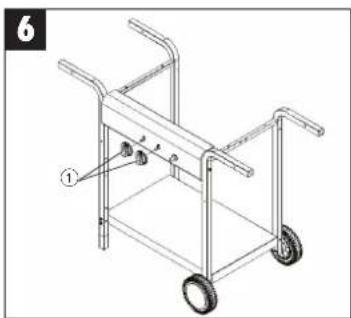
(Fig. 6) Connect the control knob (1) to the control axle.
(Fig. 7) Fasten the handle (1) to the grill hood (2) by inserting the M6 x 70 screw (3) through the handle (1) and the spacer (5). Place a grommet (6) between the spacer (5) and the grill hood (2) and a second grommet (6) between the grill hood (2) and the hexagonal nut (7). Refer to detail B.
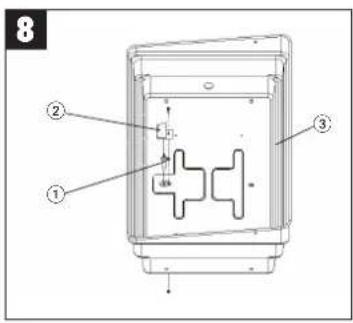
(Fig. 8) Insert the ignition electrode (1) into the bottom of the ignition panel (2) and mount it in the grill bottom (3) using the M4 x 10 bolt and hexagonal nut.
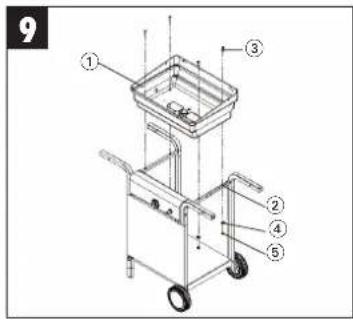
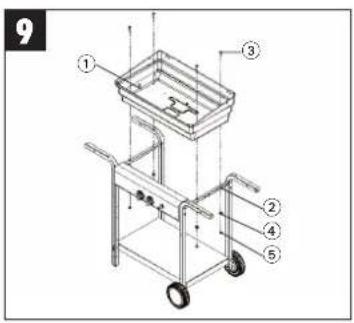
(Fig. 9) Fasten the grill bottom (1) to the back of the lateral cross struts (2) with the hinges using M6 x 45 lock bolts (3), grommets (4) and hexagonal nuts (5). Do not tighten the bolts too much so as to avoid damaging the paint on the grill bottom. IMPORTANT: The grommets must be positioned between cross strut/grill bottom and hexagonal nut/grill bottom.
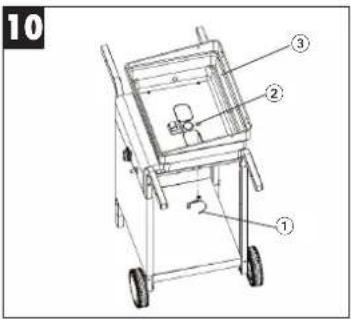
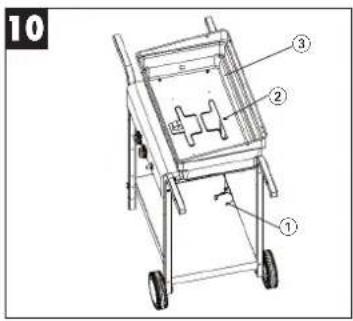
(Fig. 10) Connect the bracket (1) on the grease collecting pan by inserting it into the respective hole (2) on the inside of the grill bottom (3).
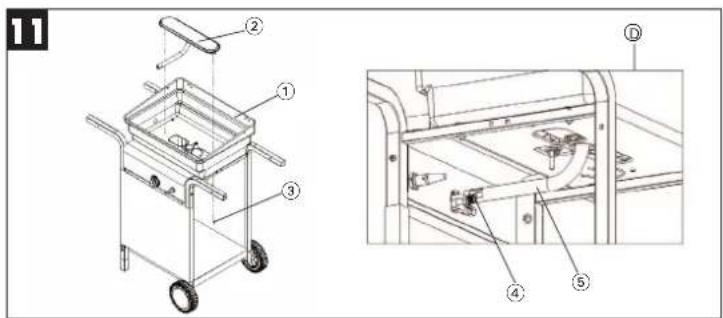
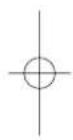
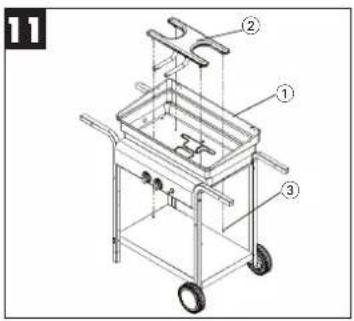
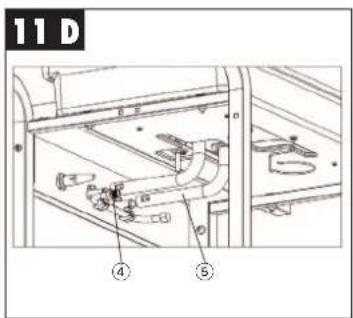
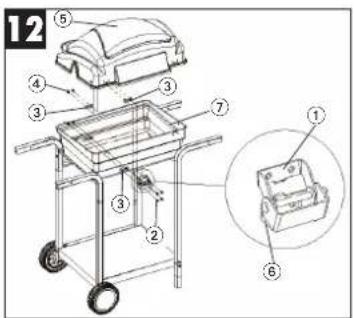
(Fig. 11) Install the burner (2) by lowering in into the grill bottom (1) and fastening it at the bottom with two 4 × 10 screws (3). Ensure that the gas nozzle (4) attached to the control fitting is seated at the center of the burner tube (5) as shown in detail D. (Fig. 12) Fasten the hinge bracket (1) to the grill hood (5) using M6 x 15 lock bolts (2), grommels (3) and hexagonal nuts (4). Do not tighten the bolts too
much so as to avoid damaging the paint on the grill hood.
IMPORTANT: The grommets must be positioned between hinge/grill hood and hexagonal nut/grill hood.
Fasten the hinges (6) to the grill bottom (7) using the M6 x 15 lock bolts (2), grommets (3) and hexagonal nuts (4). Do not tighten the bolts too much so as to avoid damaging the paint on the grill bottom. IMPORTANT: The grommets must be positioned between hinge/grill bottom and hexagonal nut/grill bottom. Refer to detail C.
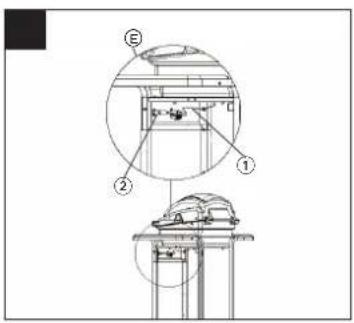
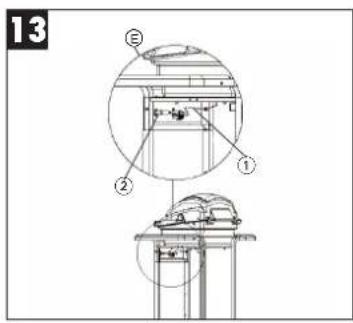
(Fig. 13) Connect the ignition cable (1) to the ignition button (2). Ensure that the ignition cable is kept away from the hot areas of the grill.
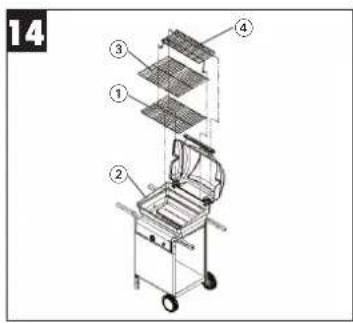
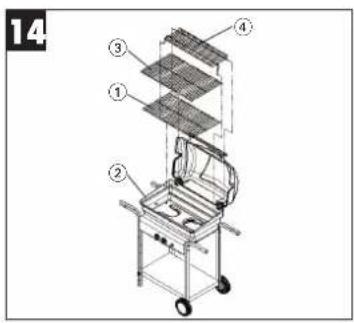
(Fig. 14) Place the lava rock grate (1) in the grill bottom (2) and evenly distribute the lava rocks over the top. Place the griddle (3) on the grill bottom (2). Attach the warming rack (4) by separately inserting the wire brace and the wire angle into the holes on the right side of the grill hood and the grill bottom. Now attach the left side of the warming rack in the same way.
Important! Carefully mount the warming rack so as to avoid damaging the surface of the grill. Important! Wash the griddle and the warming rack with a lukewarm soap solution prior to starting up the unit. Thoroughly rinse with water and dry.
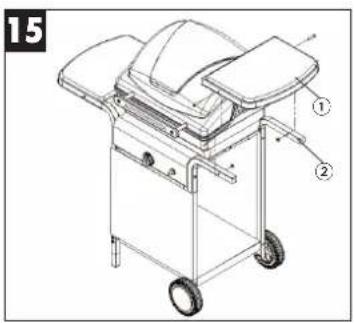
(Fig. 15) Fasten the side trays (1) to the tubular frame (2) using 2 M6 x 35 mm bolts and hexagonal nuts each.
(Fig. 16) Applies to Rhodos only: Fasten bottom, front cover (1) to the tubular frame using 4 x 10 screws (2).
(Fig. 17) Applies to Rhodos only: Fasten top, front cover (1) to the tubular frame using 4 x 10 screws (2).
(Fig. 18) Applies to Rhodos only: Attach wire basket to the tubular frame.
Connecting the gas bottle
The following parts are needed to connect up the barbecue:
● A standard camping gas bottle of 5 - 11 kg filling
GB
GB
weight, e.g. a gray propane camping gas bottle. These can be purchased from your liquid gas dealer. When empty, simply exchange for a full bottle.
● A non-adjustable, DVGW-approved pressure reducing valve, max. 1.5 kg/h, operating pressure 50 mbar (30 - 37 mbar for export only), to match the gas bottle used. Pressure reducing valves of this type are also available from your specialist dealer.
- A DVGW-approved pipe of sufficient length to enable kink-free fitting. The pipe is part of the barbecue's equipment. A porous or damaged pipe has to be replaced immediately.
● Leak detecting agent, e.g. leak detecting spray or soapy water.
Before you can use your barbecue you still have to screw the gas pipe to the fitting and make the connection to the pressure reducing valve and the gas bottle.
Caution!
The pipe has a left-hand thread at both ends.
Please note:
Once you have connected the gas pipe to the fitting and started up the barbecue, it is imperative to check all gas-carrying parts for leaks.
Ideally you should check for leaks with a gas leak spray (available from specialist dealers) or soapy water. Any leaky parts (couplings) may cause the barbecue kitchen to catch fire and could lead to injuries for which the manufacture cannot be held liable.
A) Igniting the adjustable burner (Kreta)
- Open the grill hood.
- Open the valve on the gas bottle (place bottle next to or behind grill in a sturdy position).
- Press the gas tap and put to the maximum setting (large flame). After about 3 - 4 seconds, press the ignition button until the gas ignites at the burner.
● The flames must burn properly around the burner cup. - Open the hood to begin grilling. Close the hood only to retain heat.
B) Igniting the two separately adjustable burners (Rhodos)
- Open the grill lid.
- Open the gas bottle valve (place the bottle along side or behind the barbecue where it cannot topple).
● Always ignite the right-hand burner section first. Press the right-hand gas valve and set to „max.“ (symbol of a large flame). Wait for approx. 3-4 seconds and press the ignition button until the gas ignites at the burner.
● Flames should burn cleanly around half the burner cup (the right-hand half). - To ignite the left-hand burner, press only the left-hand gas valve and set to the symbol of the large flame. The escaping gas will be ignited automatically by the right-hand burner. Ignite the burner only when set to "max." (symbol of a large flame).
- Open the lid for grilling. Close the lid only to keep cooked food hot when the gas has been turned off at the gas bottle.
Caution!
If ever the flames go out, it is imperative to set the gas valves to 'Off' (symbol O). Wait for approx. 20 to 30 sec. before re-igniting the burner.
N.B.:
Food containing a great deal of fat should not be cooked on the barbecue. Dripping fat causes spitting and contaminates the lava rocks. It is advisable, therefore, to place aluminium cooking foil on the griddle and to cook the food on top of the foil.
Important!
The fully assembled grill top is to be used only in conjunction with the barbecue trolley, otherwise the warranty will be rendered null and void. You are to use only gas bottles of 5 kg or 11 kg capacity.
Cleaning and maintenance
Important!
After long periods of non-use and each time before starting the barbecue, check the gas-carrying parts for leaks.
Allow the barbecue kitchen to cool before cleaning it with washing-up liquid and storing in a dry place. Never apply any grease to the couplings and valves. You will find it easy to clean the griddle with a mixture of vinegar and water and a brush.
Storing the gas bottle
It is prohibited to store gas bottles in basements, stairways, hallways and passageways through buildings or in their direct vicinity. Gas bottle valves have to be fitted with valve guard caps and cap nuts. Gas bottles - full or empty - have to be stored in upright position. Before cooking with your barbecue, particularly after long periods of non-use, check the gas-carrying parts for blockages due to insects, etc. Clogged gas pipes can result in dangerous flashback.
Important information for our customers
Your grill is finished with high-quality heat-resistant paint. Nevertheless it is inevitable that the color will change slightly. Before cooking food with the grill for the first time, allow the grill to heat up for 15 minutes until the slight fuming dies down. Do not start to cook any food until then.
F
Attention!
m = 311
32
34
The undersigned declares in the name of the company that the product is in compliance with the following guidelines and standards.
The undersigned declares in the name of the company that the product is in compliance with the following guidelines and standards.
The guarantee period begins on the sales date and is valid for 2 years.
Responsibility is assumed for faulty construction or material or functional defects.
Any necessary replacement parts an necessary repair work are free of charge.
We do not assume responsibility for consequential damage.
Your customer service partner
© CERTIFICADO DE GARANTIA
©PL CERTYFIKAT GWARANCJI
Eschenstraße 6 D-94405 Landau/Isar (Germany)
Info-Tel. 0180-5 120 509 • Telefax 09951-26 10 und 52 50
Technical changes subject to change
P Finell Podunal Lds
Technical & Commercial Company
- Panastratou & Asklinicu Str
GB 18545 Piräus
Tel 0210 4136155, Fax 0210 4137692
Bermas
Halai Trading Co. LLC
POB 9282, Nakheel Rd, Deira, Shop No. 15
UAE Dubai
Tel/Fax 04 2279554
(in) Alborz Abzar Co. Ltd.
No. 111, Bastan Passage Imam Khomeini Ave.
IR 11146 Teheran
Tel 021 6716072, Fax 021 6727177
(1) I.B.G.
Beinskij-str. 102
KZ 486008 Chimkent
Tel 03252 518461, Fax 03252 570743
BH FIS d.o.o
Poslovni Centar 96
BIH 87000 Vitez
Tel 030 715 267, Fax 030 715 320
© MANIMEX d.o.o
Uzicke republike 93
CS 31000 Uzice
Tel 031 551 393, Fax 031 601 539
EH 11/2003