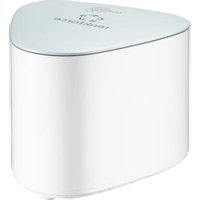
RF-WMH-310 - Router Renkforce - Free user manual and instructions
Find the device manual for free RF-WMH-310 Renkforce in PDF.


| Product type | WiFi mesh router/repeater |
| Brand | Renkforce |
| Model | RF-WMH-310 |
| Dimensions (L x H x D) | Approx. 134 x 116 x 125 mm |
| Weight | Approx. 829 g per device |
| Power supply | 12 V/DC, 1.5 A (power adapter 100-240 V, 50/60 Hz) |
| Power consumption | Max. 1.5 A (18 W) |
| Connectors | 1x WAN (Internet/Backhaul), 2x LAN (10/100/1000 Mbit/s), 1x USB 2.0 |
| WiFi standards | IEEE 802.11b/g/n (2.4 GHz), IEEE 802.11a/n/ac (5 GHz) |
| Frequency bands | 2.4 GHz: 2.412 – 2.472 GHz; 5 GHz: 5.150 – 5.825 GHz |
| Transmission power | ≤ 13 dBm (2.4 GHz); ≤ 23 dBm (5 GHz, estimated) |
| Max data rate | 2.4 GHz: 300 Mbit/s; 5 GHz: 1733 Mbit/s |
| Number of antennas | 6 (4x 5 GHz, 2x 2.4 GHz) |
| Main functions | Mesh router, repeater, TouchLink, browser-based configuration, Pair button coupling |
| WiFi security | WPA2-PSK, WPA/WPA2 mixed |
| Reset | Recessed Reset button (hold 6 s) |
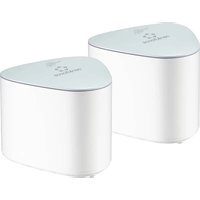
| Package contents (single set) | 1 router/repeater, 1 power adapter, 1 RJ45 cable, user manual |
| Package contents (double set) | 2 routers/repeaters, 2 power adapters, 1 RJ45 cable, user manual |
| Operating conditions | 0 to +40 °C, 10-90% RH (non-condensing) |
| Maintenance and cleaning | Dry, lint-free cloth; disconnect before cleaning |
| Protection rating | Indoor use only |
| Order number | 2300579 (double set), 2300580 (single set) |
Frequently Asked Questions - RF-WMH-310 Renkforce
User questions about RF-WMH-310 Renkforce
0 question about this device. Answer the ones you know or ask your own.
Ask a new question about this device
Download the instructions for your Router in PDF format for free! Find your manual RF-WMH-310 - Renkforce and take your electronic device back in hand. On this page are published all the documents necessary for the use of your device. RF-WMH-310 by Renkforce.
USER MANUAL RF-WMH-310 Renkforce
WLAN-SSID TouchLink: MeshGo_XXXX_Touch
www.conrad.com/downloads
GB Operating Instructions
Mesh WiFi Set
Order No. 2300579 (RF-WMH-320, 2 adapters)
Order No. 2300580 (RF-WMH-310, one adapter)
Intended use
The product is used to create a Mesh-Network. Any device can be used as a Mesh-Router and also as a Mesh-Repeater.
The Mesh-Router can operate up to 10 Mesh-Repeaters. The connection between router and repeaters can be either wireless or wired.
The Mesh-Router establishes a connection to the internet via your existing modem or similar. The Mesh-Repeater(s) will boost the router's WLAN network or extend the WLAN network's coverage range.
If you have purchased the 2-pack set (Order No. 2300579), the two devices are already factory-paired.
You can configure the wired or wireless devices either via a web browser on a computer, Mac or mobile device.
You can connect your devices to the product via WLAN or LAN.
Power is supplied via the included power adapter.
For safety and compliance reasons, you may not convert or modify the product in any way. If you use the product for other purposes than those described above, the product may be damaged. Moreover, the improper use involves risks such as short-circuits, fire, electric shocks, etc. Please read the operating instructions carefully and keep them. Please include these operating instructions, if you pass the product on to a third party.
This product complies with the applicable national and European regulations. All names of companies and products are the trademarks of the respective owners. All rights reserved.
Package contents
Order No. 2300579 Order No. 2300580
• 2 Mesh-Router/Mesh-Repeater
• 1 Mesh-Router/Mesh-Repeater
• 2 Power adapters
• 1 Power adapter
• 1 RJ45 cable
• 1 RJ45 cable
- Operating instructions
- Operating instructions
Latest operating instructions
Download the latest operating instructions using this link
www.conrad.com/downloads or scan the QR-Code shown. Follow the instructions on the website.
Symbols explained

The lightning bolt inside a triangle is used to alert you of potential risk of personal injury, such as electric shock.

An exclamation mark in a triangle indicates important instructions in these operating instructions which absolutely have to be observed.

The arrow symbol indicates specific tips and advice on operation.
Safety Instructions

Please read the operating instructions carefully and pay particular attention to the safety instructions. We do not assume liability for any injuries/material damages resulting from failure to observe the safety instructions and the information in these operating instructions regarding the proper use of the product. Furthermore, in such cases, the warranty/guarantee will be null and void.

a) AC adapter
- The design of the plug-in power adapter complies with IEC Protection Class II (double insulated electrical appliances). As for the voltage source for the power adapter, only a proper power socket connected to the public grid may be used.
- Never touch a power adapter that shows signs of damage, as this could cause a fatal electric shock!
Switch off the mains voltage to the mains socket to which the power adapter is connected (e.g., switch off at the corresponding circuit breaker or remove the safety fuse and then switch off the corresponding RCD). Only then unplug the power adapter from the mains socket and take the product to a specialised workshop.
- If you have any questions that are not answered in this manual, please contact our technical service or another specialist.
- Check the product for damage before each use!

- DO NOT connect the product to the mains supply, if you detect any damage! Danger to life!
- The product is only suitable for dry, enclosed indoor areas. The product may not become damp or wet; never touch it with wet hands!
Danger of electric shock!
b) General Information
- Do not expose the product to extreme temperatures, direct sunlight, strong vibrations, high humidity, moisture, combustible gases, vapours and solvents.
• The product is not a toy. Keep out of the reach of children and pets. - Do not leave packaging material unattended. It may become a dangerous plaything for children.
- Handle the product with care; impacts, blows or a fall even from a low height will damage it.
- If you have any questions that are not answered in these operating instructions, please contact our technical service or another specialist.
Product overview
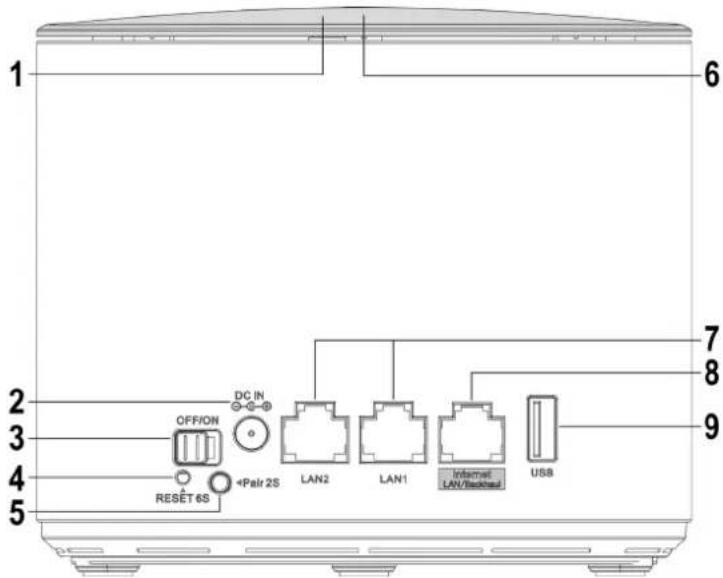
1 LED Status indicator illuminated label on the top of the device
Purple lit during the boot-up process
Blue Router the device is connected to the internet
Repeater connection between Mesh-Devices is good
Blue Router new device is being connected;
(fashing) TouchLink is active, connection can be established without password via TouchLink-SSID
Repeater "TouchLink" or "Mesh-Pairing" is active
Red Repeater connection between Mesh-Devices is bad, choose a location closer to the device
Red (flashing) the device is not connected (router and repeater)
2 DC IN connector socket for the power adapter
3 OFF/ON slide switch to turn the device on/off
4 "Reset" button recessed, hold down for at least 6 seconds to reset the device
5 "Pair" button Hold down the button for 1 or 2 seconds to start the pairing process
6 "TouchLink" button Touch key to activate connection sharing
7 LAN1/LAN2 2 network interfaces; the corresponding LED is lit when connected; flashes during data transfer
8 "Internet LAN/Backhaul" Port for modem/Internet (router mode) or wired connection to the router (repeater mode); LED is lit when connected; flashes during data transfer
9 USB USB 2.0 port data storage, as network sharing
Default settings:
Configuration URL: http://ap.setup
Default IP address: 192.168.10.1
User name/password: admin
WLAN-SSID 2.4 and 5 GHz: MeshGo_XXXX (XXXX = unique for each device)
WLAN-SSID TouchLink: MeshGo_XXXX_Touch
Connection and Start-Up
You always have to first configure the device as Mesh-Router, regardless of whether you have purchased the 2-pack set or the single device. However, if you purchased a 2-pack set or single device as extenders, you can skip the Mesh-Router setup step.
If you configure a 2-pack for the first time, you need to configure one of the two devices as the primary router. It doesn't matter which one. Once the router is configured, continue with the repeater.
Basic installation of the devices
- Plug the power adapter output into the "DC IN" socket (2) on the respective product.
- Plug the power adapter into a mains socket.
Connecting the Mesh-Router
- If you intend setting up the product as a Mesh-Router, connect port "Internet LAN/Backhaul" (8) to the appropriate port on your modem, router, etc. with a network patch cord. If necessary, turn your modem on.
Switching on
- Use the slide switch (3) to turn the product on and wait until the boot process has finished. This will take approx. 2 minutes.
Mesh-Router first time setup
- Connect a computer, Mac or mobile device to WLAN or to one of the two LAN ports of the Mesh-Router described above.
The default WLAN-SSID is printed on the label at the bottom of the device; it is predefined and unique for each device. By default, the WLAN is not encrypted.
- Open the router's configuration page. To do this, enter either the website URL http://ap.setup or the default IP address 192.168.10.1.
→ Check that you are connected to the correct WLAN network, if the page is not properly displayed or does not load at all. If necessary, restart your device or alternatively, try a different browser.
- As soon as the login page appears, select your language and wait for the page to reload.
- Then enter your password "admin" (without the quotation marks) to log in.
- The setup wizard will start automatically, if you are configuring theMesh-Router for the first time.
Select your country in the In the top field. If it is not listed, select "GLOBAL".
Then, in the second field, set the appropriate time zone location for the Mesh-Router.
In the menu below, you can choose whether the Mesh-Router should restart regularly on a given day/time or on a day/time that you have defined. Select the last item in the list, if you don't need this option.
Finally, enter a new login password for the web interface.
Click the blue button below to save.
- On the next page, you need to configure Internet access and the WLAN network of the Mesh-Router.
Under the first item, select the connection type. If the router works behind a modem that requires dial-in, select "PPPoE". If you intend to use the router behind a device that does not require dial-in, (for example, another router, cable modem, etc.) select "DHCP".
For "PPPoE" enter in the appropriate fields your full user name and the password of your DSL connection.
Under the next item you have the option to change the name of the WLAN network.
Finally select an encryption option for WLAN. We recommend selecting the "WPA2-PSK" protocol, which offers the highest security standard. If you have devices that only support "WPA", select both protocols.
Enter a WLAN password. It should consist of 8 characters and should include numbers as well as upper and lower case letters.
Finally click on the blue button below to save your selection. Once the changes have been applied, the setup is complete.
If the save button is greyed-out and you cannot click it, check the network cable between the "Internet LAN/Backhaul" port (8) and your modem. Refresh the configuration page and try again. Remember that the login password has already been saved.
If you have made the configuration via WLAN, you will now need to connect your device to the new WLAN network.
- Click the blue button to reload the page.
Adding a Mesh-Repeater
Place the Mesh-Repeater close to the Mesh-Router during setup, when you connect the Mesh-Repeater for the first time. Once configured, you can place it at your preferred location.
Adding the Mesh-Repeater from the 2-pack set
- If you have the 2-pack set, and one of the two devices is already working as Mesh-Router, the second device will automatically establish a connection as soon as you turn on the second device, because the two have been factory-paired.
Here, it also does not matter whether you will connect the Mesh-Repeater later wirelessly or via network cable.
- Turn on the repeater as described in Chapter "Connection and startup". The connection is established the moment the boot process finishes.
Adding a single Mesh-Repeater with the "Pair" button
- Turn on the new Mesh-Repeater and wait until the boot process has finished.
- Hold down the "Pair" button on the Mesh-Router for approx. 1 to 2 seconds and then release the button. The blue LED indicator begins to flash.
- Within the next 2 minutes, you have to press the "Pair" button on the new Mesh-Repeater and then release the button after approx. 1 to 2 seconds.
- Once the LED indicators are lit blue on both devices, the pairing process is complete.
Adding a single Mesh-Repeater to the Mesh-Router's web interface
- Turn on the new Mesh-Repeater and wait until the boot process has finished. The LED indicator should flash red.
- Open the router's configuration page and log in.
- Open the Mesh device list. To do this, click either in the Status page under List of devices on "More..." or at the bottom on "WiFi" and then in the list on the second item from the top.
- At the very bottom, enter a device name and then the MAC address of the new Mesh-Repeater. You find the address on the label attached to the underside of the device.
The MAC address is a unique 12-digit identifier made up of numbers and letters. Always enter a colon ":" as separator between every 2 digits (for example, 11:22:33:AA:BB:CC). It does not matter whether letters are in upper or lower case.
- When done, click the button to the right of the MAC address. As soon as the settings have been applied, the LED indicator is lit blue.
Connecting a Mesh-Repeater using a network cable
- If you are installing a Mesh-Repeater using a network cable, you first have to pair it with the Mesh-Router.
- Then connect the Mesh-Repeater "Internet LAN/Backhaul" port (8) with one of the LAN ports (7) of the Mesh-Router or any other already connected Mesh-Repeater.
→ The Mesh-Router automatically detects whether the repeater connection is wireless or wired.
You can easily change the connection type at any time, once the Mesh-Repeater (or possibly more) is paired with the Mesh-Router. If your devices are not using a wired connection, WLAN is used automatically. If a cable is used, the wired connection will be used automatically.
You can connect a new repeater to an existing and already connected repeater (to one of the two LAN ports) at any time.
"TouchLink" function
The Mesh-Router has a separate "MeshGo_XXXX_Touch" WLAN network. This is not encrypted, but inaccessible by default. It acts as a guest WLAN network for friends or acquaintances with only limited privileges.
- To temporarily enable network sharing, tap the "TouchLink" touch button (6) located on the top of the Mesh-Router.
The Mesh-Router LED starts flashing blue for 120 seconds. During that time, the device can now connect to the open WLAN network. - Connect the device of your choice to the WLAN network "MeshGo_XXXX_Touch".
- A new connection is no longer possible after 120 seconds have passed. Devices already connected can reconnect to this WLAN network at any time.
"TouchLink" configuration
- Click "WiFi" at the bottom of the Mesh-Router's web interface and then open the item "TouchLink" to configure the function on the configuration page.
- Here you can turn the function on or off using the slide button, you can configure the sharing time for the connection that will become active after you have clicked the button and you can change the WLAN SSID.
- You can also view a list with devices that are already connected and whether the connection is active.
- Mark the box next to a device to delete it.
- Click the blue button to save changes or to delete a device.
Positioning the Mesh-Repeaters
- You need to find an appropriate location for the repeater(s) after the connection is working.
- Try different locations and select the final location with the best connection to the Mesh-Router or an already installed Mesh-Repeater.
- Test the connection quality with your smartphone, for example, to make sure that the Mesh-Repeater is not located too far away from the next device. The WLAN icon should have at least 3 active bars.
→ Important! Once the repositioned WLAN repeater starts and the LED indicator is steady blue, the connection is good. If the indicator is lit red, then the connection is bad and insufficient. If that is the case, reposition the Mesh-Repeater.
If a Mesh-Repeater uses a wired connection, then the distance to the next device is not a major issue, of course.
Resetting to Factory Settings
Proceed as follows to reset the product to factory settings.
- Plug the power adapter output into the "DC IN" socket (2) of the product.
- Plug the power adapter into a mains socket.
- Use the slide switch (3) to turn the product on and wait until the boot process has finished.
- Hold down the "Reset" button (4) for more than 6 seconds. Then release the button.
- The product will restart with the factory settings. This takes about 1 to 2 minutes.
Care and Cleaning

Do not use abrasive cleaning agents, cleaning alcohol or other chemical solutions since these could damage the housing or even impair operation.
- Before cleaning, pull the power adapter out of the power socket and remove any connection cables.
- Use a dry, lint-free cloth to clean the product.
Disposal

Electrical and electronic equipment does not belong in the regular household waste.
the product becomes unusable, dispose of it in accordance with the relevant statutory regulations.
Declaration of Conformity (DOC)
We, Conrad Electronic SE, Klaus-Conrad-Straße 1, D-92240 Hirschau, hereby declare that this product conforms to the 2014/53/EU directive.
→ The full text of the EU conformity declaration is available at the following Internet address:
www.conrad.com/downloads
Select a language by clicking a flag symbol and enter the order number of the product in the search field; then you will be able to download the EU declaration of conformity in PDF format.
Technical data
a) Product
Operating voltage 12 V/DC 1.5 A
Power consumption ....max. 1.5 A
Ports 3x RJ45 10/100/1000 MBit/s, 1x WAN, 2x LAN; 1x USB
Number of antennas 6; 4x 5 GHz, 2x 2.4 GHz
WLAN ...... EEE802.11b/g/n, 2.4 GHz, max. 300 MBit/s; IEEE802.11a/n/ac, 5 GHz, max. 1733 Mbit/s;
Frequency range/ 2.412 - 2.472 GHz, ≤ 13 dBm;
transmitting capacity 5.150 – 5.250 GHz, ≤ 21 dBm 5.725 – 5.850 GHz, ≤ 14 dBm
Encryption protocols ....WPA2; WPA
Modes of operation ......Mesh-Router/Mesh-Repeater
Dimensions (W x H x D) .... approx. 134 x 116 x 125 mm
Weight .... approx. 829 g per device
Operating conditions .... 0 to +40 °C / 10 - 90% rel. humidity (noncondensing)
Storage conditions ....-10 to +70 °C / 10 - 90% rel. humidity (noncondensing)
b) AC adapter
Operating voltage 100 - 240 V/AC, 50/60 Hz, max. 0.5 A
Output 12 V/DC, 1.5 A, 18 W
Output jack .... coaxial connector 5.5 x 2.5 mm
F Mode d'emploi
www.conrad.com/downloads
Puissance de transmission....5,150 – 5,250 GHz, ≤ 21 dBm
5,725 - 5,850 GHz, ≤ 14 dBm
Protocole de cryptage ....WPA2; WPA
Repeater "TouchLink" of "Meshpairing" is actief
WLAN-SSID TouchLink: MeshGo_XXXX_Touch
www.conrad.com/downloads


- GB Operating Instructions
- Mesh WiFi Set
- Intended use
- Package contents
- Latest operating instructions
- Symbols explained
- Safety Instructions
- a) AC adapter
- b) General Information
- Product overview
- Default settings:
- Connection and Start-Up
- Basic installation of the devices
- Connecting the Mesh-Router
- Switching on
- Mesh-Router first time setup
- Adding a Mesh-Repeater
- Adding the Mesh-Repeater from the 2-pack set
- Adding a single Mesh-Repeater with the "Pair" button
- Adding a single Mesh-Repeater to the Mesh-Router's web interface
- Connecting a Mesh-Repeater using a network cable
- "TouchLink" function
- "TouchLink" configuration
- Positioning the Mesh-Repeaters
- Resetting to Factory Settings
- Care and Cleaning
- Disposal
- Declaration of Conformity (DOC)
- Technical data
- a) Product
- b) AC adapter
- F Mode d'emploi
Brand : Renkforce
Model : RF-WMH-310
Category : Router