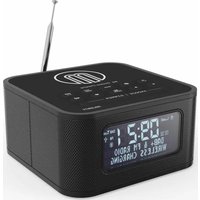
Knapton - Radio Majority - Free user manual and instructions
Find the device manual for free Knapton Majority in PDF.


| Product Type | DAB+/FM Clock Radio with Bluetooth and Wireless Charging |
| Brand | Majority |
| Model | Knapton |
| Dimensions (W x D x H) | 13.8 x 13.8 x 6.9 cm |
| Weight | 750 g |
| Power Supply | DC 9V 2A (adapter included) |
| Frequency Ranges | FM: 87.5 – 108 MHz; DAB/DAB+: Band III |
| Bluetooth | Version 5.2, range 10 meters |
| Wireless Charging | Qi compatible, up to 1.66 A, disabled in DAB/FM modes |
| USB Port | Playback and charging (DC 5V 1A) |
| Speaker | 40 mm, 3 W, 2 inches |
| Frequency Response | 40 Hz – 20 kHz |
| Main Functions | DAB/FM radio, Bluetooth, dual alarm, snooze, sleep timer, brightness adjustment, station presets |
| Maintenance and Cleaning | Unplug before cleaning; use a soft dry cloth; do not use water or liquid cleaners |
| Safety | Do not open the casing; do not expose to water or heat sources; unplug during storms or prolonged non-use |
| Spare Parts and Repairability | Contact support via www.majority.co.uk; no user-serviceable parts |
| Warranty | 12 months standard, extendable to 3 years after registration at www.majority.co.uk |
| Box Contents | Knapton radio, DC 9V power adapter, rod antenna, instruction guide |
Frequently Asked Questions - Knapton Majority
User questions about Knapton Majority
0 question about this device. Answer the ones you know or ask your own.
Ask a new question about this device
Download the instructions for your Radio in PDF format for free! Find your manual Knapton - Majority and take your electronic device back in hand. On this page are published all the documents necessary for the use of your device. Knapton by Majority.
USER MANUAL Knapton Majority
Knapton DAB Bedside Radio
User Manual
MAJORITY
What's In the Box? 3
Controls And Functions 4
Instructions Guide. 7
Basic Operation. 7
Listening to Audio. 8
USB Functions.. 9
Bluetooth 10
DAB Radio. 11
FM Radio. 12
FM and DAB Radio Presets. 13
Wireless Charging. 14
Alarm Functions. 15
Other Functions. 18
Troubleshooting 20
Specification 21
Warranty. 21
Safety Information 22
3 year Warranty
Register your product online for a FREE 3 year extended warranty at: www.majority.co.uk
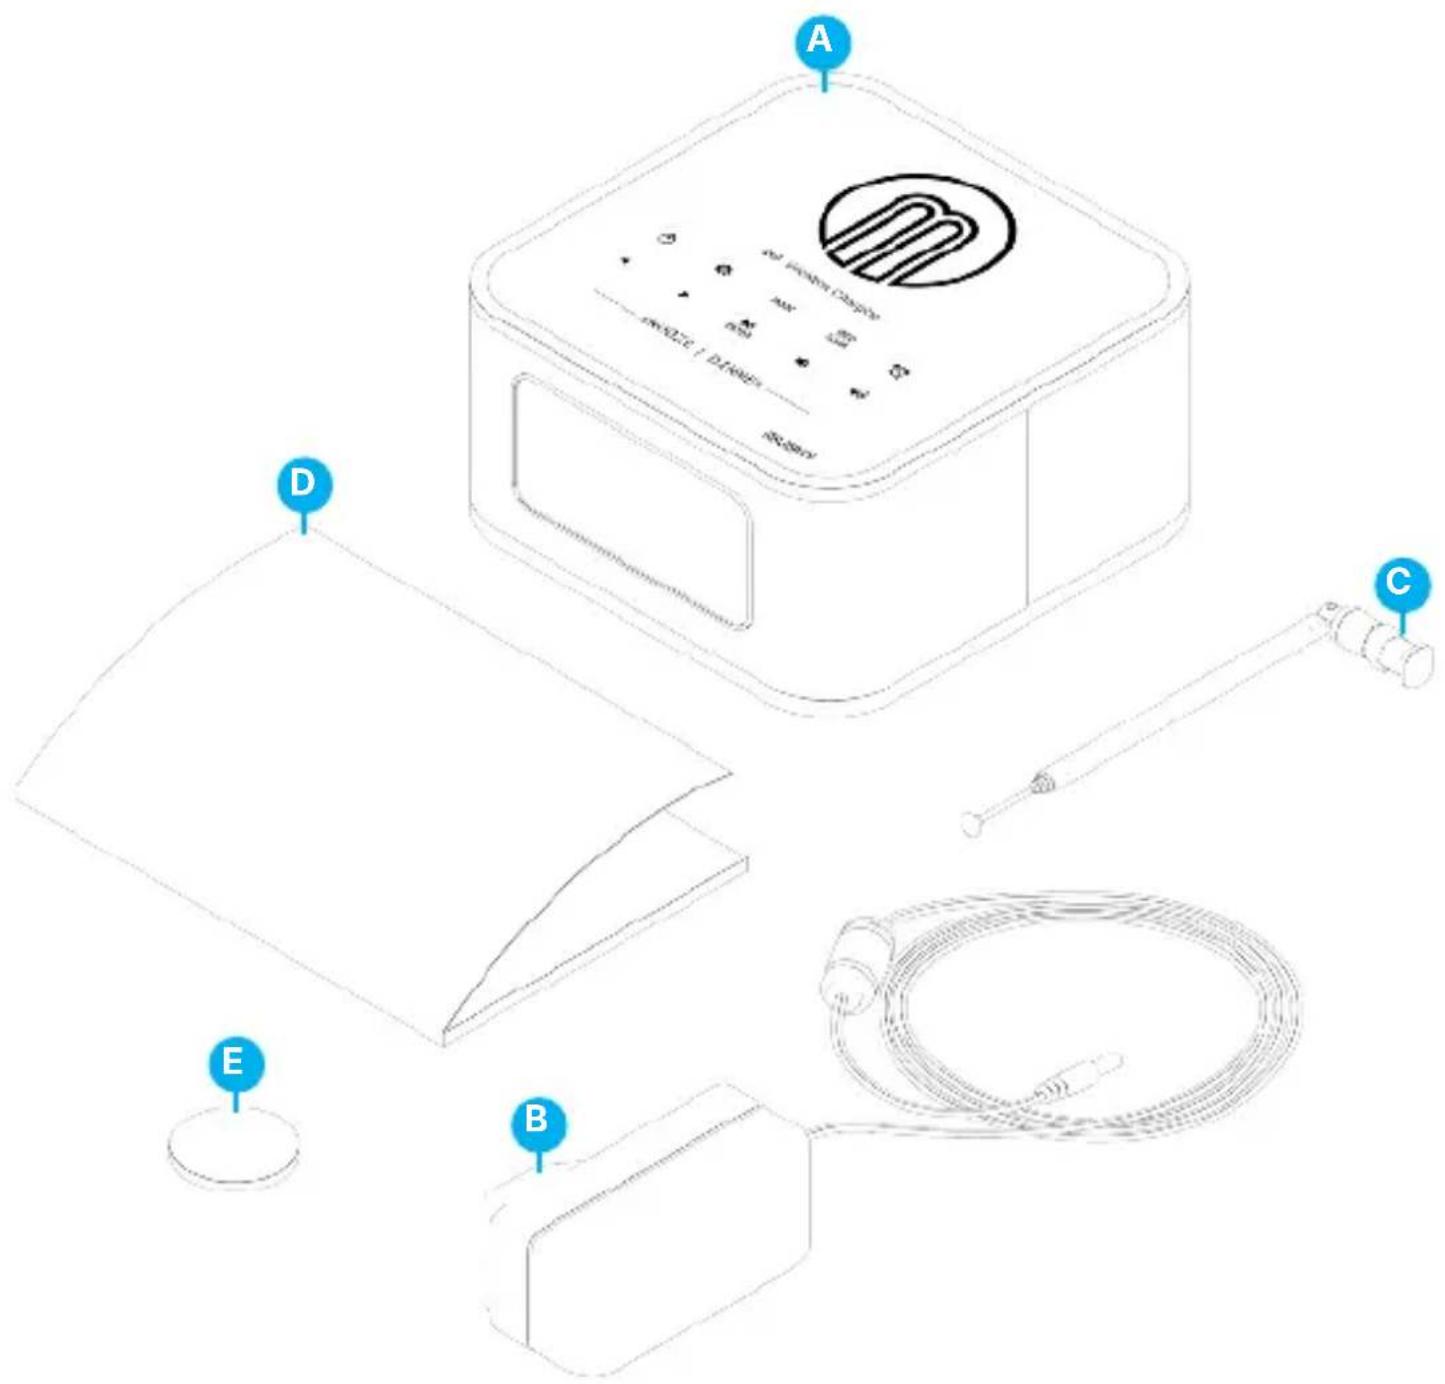
What's in the Box?
A. Knapton DAB Bedside Radio
B. UK Standard Plug DC 9V Power Supply
C. Rod-Antenna
D. Instructions Guide
E. Back-up Button Battery
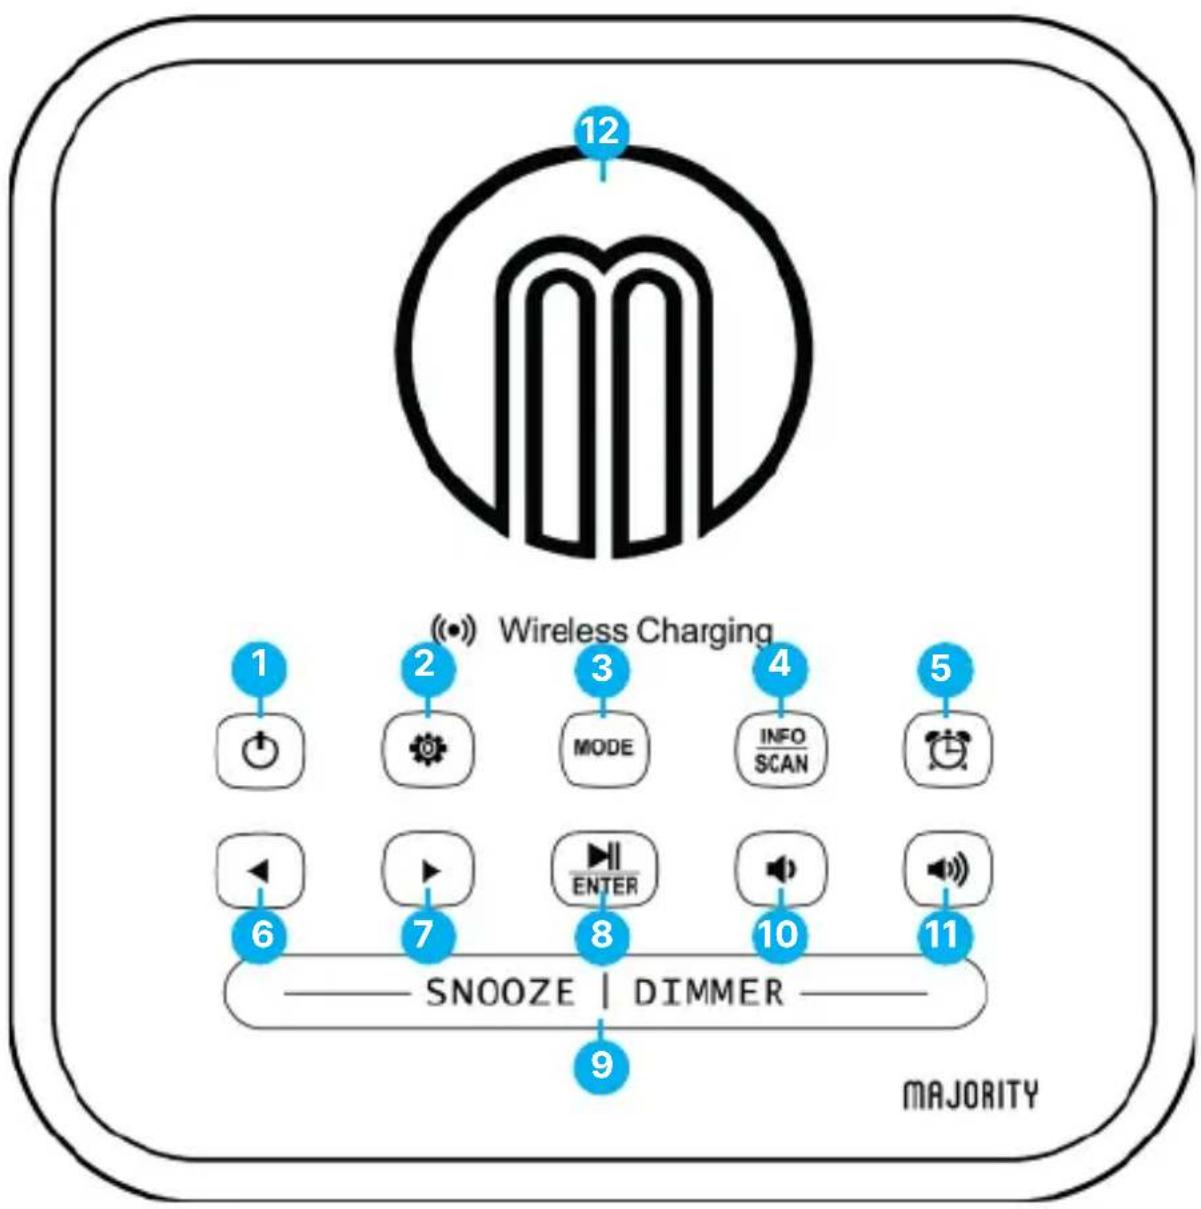
Top View
- Power/Standby button
- Settings/Menu button
3.Mode button - Info/Scan button
- Alarm
-
'Previous' button
-
Next' button
- Play/Resume/Enter button
- Snooze/Dimmer button
- Volume - button
- Volume + button
- Wireless Charging Dock
Display View
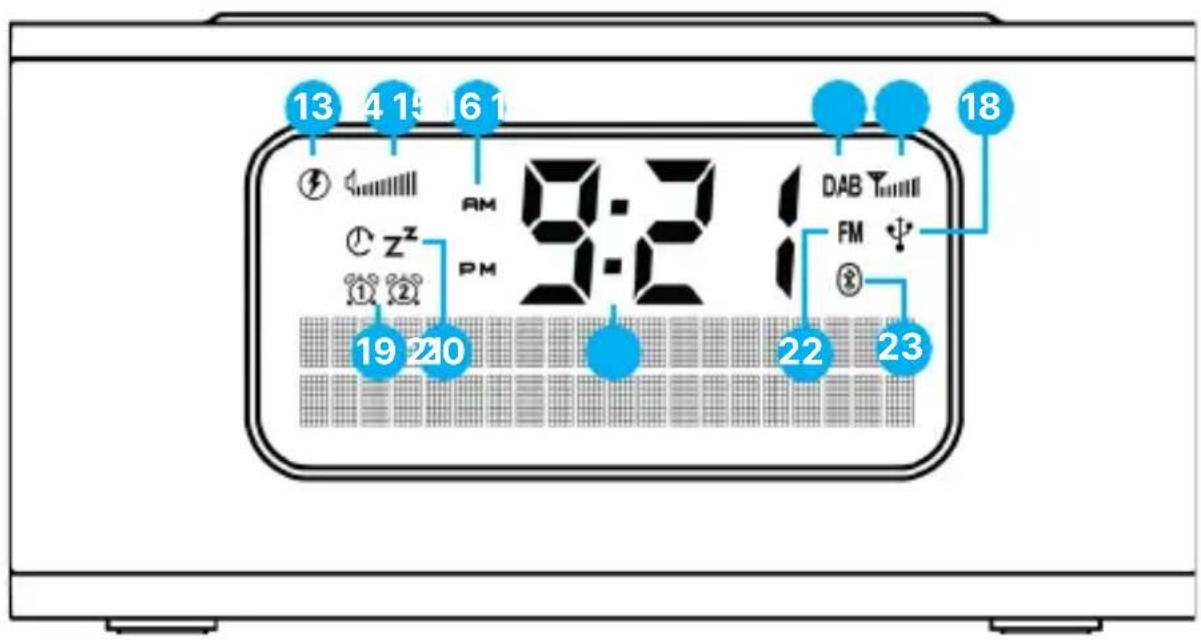
- Wireless Charging
- Volume
- AM/PM
- DAB Mode
- DAB Radio Signal
-
USB Play/Charge
-
Alarm 1/Alarm 2
- Snooze
- Content Display Area
- FM Mode
- Bluetooth Mode
Back View
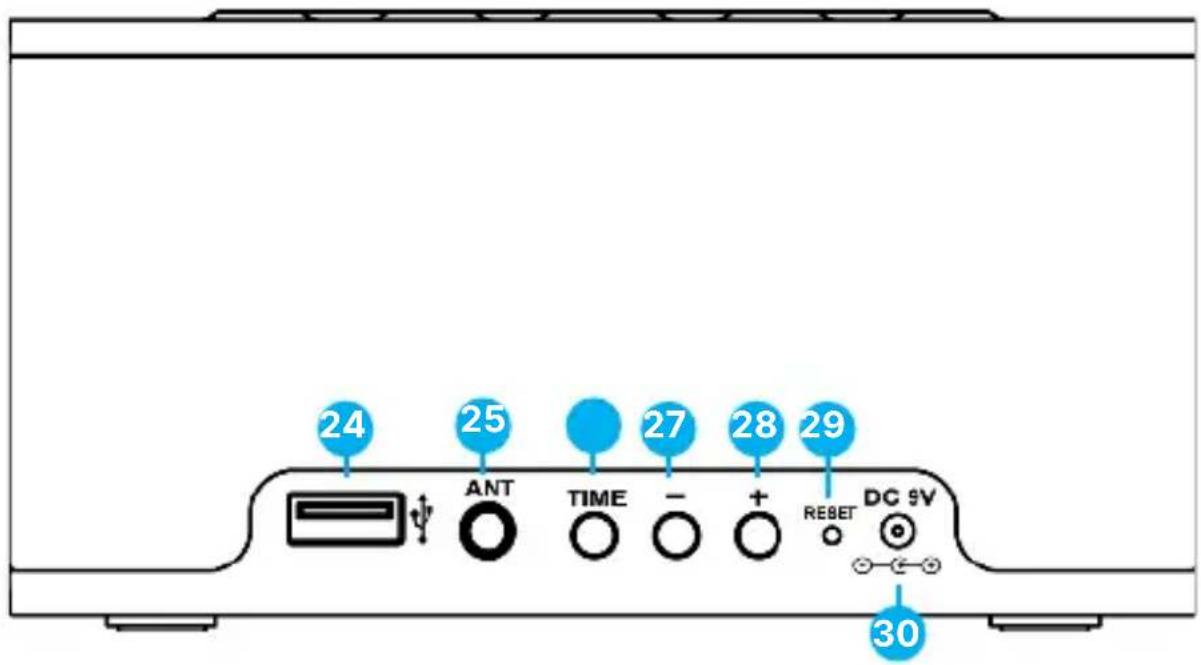
- USB Play/ Charge Port
- ^ +^ button
- Antenna
- Reset
- Time Setting
- Power Input
- button
Basic Operation
Please note all (Ref.) refer to Page 4-6 Controls and Functions mapping guide.
Plug the DC 9V power supply into the back of the system via the DC 9V input (Ref.30).
Connect the supplied rod-antenna to the antenna port at the rear of the device, screw together by hand.
Note: do not tighten with a tool, tighten only by hand.
Once connected, the radio will pick up signal from DAB and the time should now set itself automatically.
Press the 'Power/Standby' button (Ref.1) to turn off standby. When taken out of standby mode, the screen will display the current mode.
Listening to Audio
Select Mode
Ensure that the Knapton is switched ON and not on standby (Ref.1).
To select a mode, press the 'MODE' button (Ref.3), multiple times until your required option is selected. The actual 'Mode' selected will be indicated by an icon visible on the top of the display screen e.g. (Ref.16).
There are four options:
DAB Radio
FM Radio
USB Playing Mode
Bluetooth
Standby
To place the Knapton on standby, press the Power/Standby button (Ref.1).
The radio will stop playing any audio but will continue showing on the time on the display screen. While in Standby, the radio will still hold the alarm or sleep settings.
To switch off fully, switch off at the mains.
USB Functions
USB Playing Mode
Insert a USB stick into the USB port (Ref.24) at the back of the docking station.
Ensure that the unit is switched 'ON' and not on standby.
Press the 'Mode' button (Ref.3) repeatedly to scroll through mode choices.
When the icon appears, USB Mode will be selected for USB playing mode.
Audio from the USB stick should begin playing automatically when in USB mode.
Use the and buttons (Ref.6/7) to select previous or next tracks. You can also use the ENTER button (Ref.8) to play or pause a track.
USB Charging
Insert the USB cable into the USB port (Ref.24) at the back of the unit. Connect the USB cable to your device to begin charging.
The USB charging port can be used to charge smart phones, tablets, or other devices.
Bluetooth
Connect to Bluetooth
To select Bluetooth Mode, ensure that the unit is switched ON and not on standby.
Press the 'Mode' button (Ref.3) repeatedly to scroll through mode choices.
When the 8 icon appears, Bluetooth Mode will be selected and begin searching for Bluetooth enabled devices.
Go to your device settings and choose to connect to the 'Majority Knapton'.
Playing audio via Bluetooth
Begin playing audio, streaming services or video services from your device.
Use the and buttons (Ref.6/7) to select previous or next tracks. Use the ENTER (Ref.8) to play or pause a track.
Tip: Ensure the volume is switched up on your device to ensure you have sound. Ensure any other users have disconnected from the device before trying to connect.
DAB Radio
Before scanning, please extend the radio antenna in full, to ensure that the best DAB+ radio signal can be received.
On first use, the radio will automatically scan all stations and store them. The time and date will automatically synchronise with the radio station. If the unit hasn't automatically scanned or if you would like to look for the available stations again, press, and hold the 'Scan' button (Ref.24) and then release. While on DAB Mode, if you are having issues playing a specific station, repeat manual scan as many times as you need.
By pressing the 'Scan' button (Ref.24), the radio will scan for all radio stations available on the frequency band, and store all with good signal. Once the full scan has been completed, the radio will automatically start playing the first stored radio station.
To select a different station, use the or buttons (Ref.6/7) to find your desired station. Select the station by clicking the Enter button (Ref.8).
When you are listening to a DAB/DAB+ radio station with good signal, you can press the 'Info' button (Ref.4) repeatedly to view different program information.
FM Radio
Selecting FM Mode
To select FM Radio Mode, ensure that the unit is switched ON and not on standby.
Press the 'Mode' button (Ref.3) repeatedly to scroll through mode choices.
When the 'FM' icon appears, FM Radio Mode will be selected and 88.4MHz will be displayed at the top of the screen.
Playing FM Radio
Before scanning, please extend the radio antenna in full, to ensure that the best FM radio signal can be received.
Press the 'SCAN' button (Ref.4) to scan forward or press and hold the 'SCAN' button to scan backward for available stations. This will save the stations that have a good signal in your area.
To listen to the saved stations after scanning, press the ' ' button (Ref.2) to check the stations, press the or buttons (Ref.6/7) to select the station. Press the 'ENTER' button (Ref.8) to play the station.
In FM Mode, press the 'ENTER' button (Ref.8) to enter Audio Mode settings. You can then select STEREO or MONO Mode.
FM and DAB Radio Presets
You can store up to 40 DAB & FM radio stations for easy navigation.
To store a station that you are currently playing:
Press and hold the 'Menu' (Ref.2) button for 2-3 seconds until the menu settings open and scroll to 'Preset Store'. Press the 'Enter' (Ref.8) button to access all presets.
Press the or button (Ref.6/7) to change the <1' to the number you want to store the station as. Then press 'Enter' (Ref.8) button to save the station to that preset number. The display will then show 'Preset x stored'.
Note: If there is an existing station stored under a preset, it will be over written when you store the new station.
Recalling a stored station
In DAB or FM playing mode, short press the 'Menu' (Ref.2) button to open Preset Recall settings. Do not hold down the button as this will open Menu Settings.
Press the or button (Ref.6/7) to scroll through your preset stations. Follow by pressing the Enter' (Ref.8) button to select your choice and the station will begin playing.
Wireless Charging
The wireless charger is compatible with Wireless Certified Devices (WPC) only.
Wireless charging is disabled on DAB & FM Modes due to signal interference, so use Wireless Charging on Bluetooth, USB and standby modes only.
Place your WPC certified device on the Majority logo (Ref.12) on the top of the Knapton radio for charging.
When the mobile device is fully charged, remove it from the wireless charger.
Caution A
Do not place foreign materials such as metal objects, magnets, and magnetic stripe cards between the mobile device and wireless charger. The mobile device may not charge properly or may be damaged due to overheating.
Wireless charging may not work effectively if you have attached a thick case to your mobile device, as a case will be a barrier to the quickest charge time.
If you use the wireless charger in areas with weak network signals, you may also lose network reception.
Alarm Functions
Alarm 1 Settings/Alarm 2 Settings
Press the 'Alarm' button (Ref.5) once to activate Alarm 1 settings or press the 'Alarm' button twice to activate Alarm 2 settings.
The screen will display 'Alarm 1 Setup' or 'Alarm 2 Setup', then press the 'ENTER' button (Ref.8) to enter settings. Press the or buttons (Ref.6/7) to select 'Alarm ON' or 'Alarm OFF' Mode.
When the 'Alarm OFF' is selected, press 'ENTER' button (Ref.8) to confirm the option and exit the alarm settings.
When 'Alarm ON' is selected, press 'ENTER' button (Ref.8) to set the alarm time. The display screen will show '00:00'. To change the hour, use the arrow buttons to scroll forward and backwards. Once the hour has been selected, press the 'ENTER' button (Ref.8) to confirm. You will now be able to change the minutes. Repeat the same process and press the 'ENTER' button (Ref.8) to confirm.
It will then enter the 'Alarm Working Mode' settings. The display screen will show 'Once-Daily-Weekdays-Weekends'. Press the or buttons to select the alarm working mode and press the 'ENTER' button to confirm.
You will enter the 'Alarm Ringtone Mode' settings. The display screen will show 'DAB-FM-BUZZER-WONDERFUL'. Press the or buttons to select the mode, then Press the 'ENTER' button to confirm.
Alarm Functions
Note: In DAB & FM Mode the last FM station listened to, will be sound of the alarm ring tone. In 'Wonderful' Mode it plays built-in music.
Upon entering the alarm volume settings, the display screen will show 'VOLUME 00'. Use the arrow buttons to set the volume as per your preferences, then press the 'ENTER' button to confirm.
The Alarm 1/Alarm 2 icon will now show on the display screen to confirm fully setup.
To cancel your alarm, press the 'Alarm' button to enter Alarm 1 Set-up or Alarm 2 Set-up and press the 'ENTER' button. The display screen will show 'Alarm ON' or 'Alarm OFF'. Press the or buttons to select 'Alarm OFF' and press the 'ENTER' button to confirm.
The alarm will sound from low to high volume. While sounding the Alarm 1 or Alarm 2 icon will flash on the display screen.
Turn off the alarm when sounding
To turn the Alarm Off when sounding, press the Power/Standby button (Ref.1) or press the 'Alarm' button (Ref.5).
If the 'ONCE' alarm is turned off, the icon will now disappear from the display screen. If the 'Everyday' alarm is turned off, the icon will remain on the display screen to sound the next day.
Alarm Functions
Snoopze
When the alarm is sounding, press the Snooze/Dimmer button (Ref.9) to snooze your alarm. An icon of a clock will now appear on the top right of the display screen.
After 9 minutes, Snooze will sound the alarm again for up to 30 minutes. To cancel the Snooze sound, press the 'Power/Standby' button (Ref.1).
Other Functions
Sleep Mode
This will set the radio on Standby Mode after the selected sleep time.
In Playback Mode, press and hold the (Ref.2) button to enter Menu Mode. Press the or buttons (Ref.6/7) to select 'System and press the 'Enter' button (Ref.8) to confirm.
The display screen will show 'Set Sleep Time'. Press the or buttons (Ref.6/7) to select the sleep time as either 90, 60, 45, 30, 15 minutes or OFF. Press the Enter button (Ref.8) to confirm, then press the 'Menu/Preset button' (Ref.2) to exit the settings.
Once the 'Sleep' Mode has been set, z^z and a countdown timer will appear on the display screen.
Dimmer
To change the display screen brightness, use the 'Dimmer/ Snooze' button (Ref.9) and select repeatedly - there are four brightness levels to choose from.
Note: If put on the lowest dimmer setting, you will need to press the Dimmer button, to light up the screen again.
Other Functions
Setting the time manually
Press the 'Time' button (Ref.26) at the back of the unit and '24H' will display and flash. To change the clock format between 12 hour or 24 hours use the +' or - buttons (Ref.27/28). Press the 'Time' button to confirm (Ref.26).
The time will now begin to flash. To change the time, use the +' or - buttons (Ref.27/28) to adjust the hour. Press 'Time' to confirm your selection. Complete the same process for the minutes and confirm the settings by pressing the 'Time' (Ref.26) button.
Complete the same process to set the date, month, and year. Once the date has been set, save your selection by pressing the 'Time' (Ref.26) button.
Note: If there are no operations on the radio, after 5 seconds of no actions the radio will automatically exit these settings.
| Observation Potential Cause/Solution | |
| No power/function | Check whether the power is switched on or off at the wall. Check that the power adaptor is properly connected to the power outlet. |
| No sound | Check whether unit is set to MUTE. Check whether MODE is correctly selected. Turn up the volume on the speakers or on your external device. Check that cables are properly installed. |
| Function disturbance | Switch off and unplug the unit. Leave it for 2 minutes and switch it on again. |
| Bluetooth not connecting | Ensure that you are on Bluetooth mode on the speaker and the Bluetooth on your device is switched on. Select the Bluetooth device 'Majority Knapton' and you should now be able to play audio. |
Support
If you require further assistance with your Majority product, please contact our support team on the Majority website: www.majority.co.uk/support
Specification
| Power Supply DC 9V 2A | |
| Bluetooth Specification Bluetooth 5.2 | |
| Bluetooth Frequency Range 2.402 GHz - 2 | 480 Hz |
| Bluetooth Operating Distance 10 Metres C | class II |
| Driver Unit 40 hm 3w 2in | |
| Frequency Range 40Hz - 20KHz | |
| FM Frequency Range | 87.5 - 108 MHz |
| USB Port DC 5V 1A | |
| Wireless Charging Current 1.66A Max | |
| Weight 750g | |
| Dimensions 13.8cm x 13.8cm x 6.9cm (LxWxH) |
Warranty
All products come with a standard 12 month warranty. All items must be registered on www.majority.co.uk for the warranty to be valid. Once on the web page, use the menu to find 'Register Your Product'. You will also be given the chance to extend your warranty for an additional 24 months, free of charge.
- Read these instructions.
- Keep these instructions. Instructions are also available for download at www.majority.co.uk.
- Heed all warnings.
- Follow all instructions.
- Do no clean the apparatus near or with water.
- Do not block any ventilation openings. Install in accordance with the manufacturer's instructions.
- Do not block any ventilation openings. Install in accordance with the manufacturer's instructions.
- Do not install near any heat sources such as radiators, heat registers, stoves, or other apparatus that produce heat.
- Protect the power from being walked on or pinched particularly at plugs, convenience receptacles, and the point where they exit from the apparatus.
- Only use accessories specified by the manufacturer.
- Unplug this apparatus during light storms or when unused for long periods of time.
- Refer all servicing to qualified service personnel.
- No naked flame sources, such as a lit candle should be placed on the apparatus.
- Dispos of used electrical products and batteries safely according to your local authority and regulations.
ADDITIONAL WARNINGS
The apparatus shall not be exposed to dripping, splashing or objects filled with water.
The main plug is used to disconnect the device. In order to disconnect the apparatus from the main mains completely, the mains plug should be disconnected from the main socket outlet completely.
Battery shall not be exposed to excessive heat.
RECYCLING ELECTRICAL PRODUCTS
You should now recycle your waste electrical goods and in doing so help the environment.

electrical product should not be disposed of with normal household waste. Please ensure it is taken to a suitable facility for disposal when finished.
IMPORTANT: Please read all instructions carefully before use and keep for future reference.
Risk of electric shock. Do not open.
Read all instructions carefully

before use and keep for future reference.
When servicing, use only identical replacement parts.
ATTENTION
RISK OF ELECTRIC SHOCK DO NOT OPEN


CAUTION
RISQUE D'ELECTROCUTION NE PAS OUVIR


IMPORTANT: Please read all instructions carefully before use and keep for future reference

Knapton DAB Radio am Bett
Benutzerhandbuch
MAJORITY
WasistinderSchachtel? 3
www.majority.co.uk/support
Spezifikation
RISQUE D'ELECTROCUTION NE PAS OUVRIR


I hereby declare that the product:
Product Name: Majority Knapton DAB Radio EU - Black
Model: 1000002923
Brand Name: Majority
Satisfies all the technical regulations applicable to the product within the scope of Council Directives 2014/35/EU and 2014/30/EU, 2009/125/EC, 2012/19/EU, 2014/53/EU, 2011/65/EU, 1907/2006.
2014/35/EU (LVD Directive)
EN62368-1:2014+A11:2017
2014/30/EU (EMC Directive)
EN55032:2015+A11:2020, Class B, EN IEC 61000-3-2: 2019, EN61000-3-3: 2013+A1:2019, EN55035: 2017, EN 301 489-1 V2.2.3 (2019-11), EN 301 489-17 V3.2.2 (2019-12), EN 303417:2017
2009/125/EC (ERP Directive)
EN50564:2011,EN62311:2008
2012/19/EU (WEEE Directive)
2014/53/EU (RED Directive)
EN55032:2015+A11:2020, Class B, EN IEC 61000-3-2: 2019, EN61000-3-3: 2013+A1:2019, EN55035: 2017, EN 301 489-1 V2.2.3 (2019-11), EN 301 489-17 V3.2.2 (2019-12), EN 303 345-1 V1.1.1 (2019-06), EN 303 345-V1.1.0 (2019-11), EN 303 345-4 V1.1.0 (2019-11), ETSI 300 328 V2.2.2 (2019-07), EN62368-1:2014+A11:2017, 62479: 2010, EN 50663:2017
2011/65/EU & 2015/863/EU (RoHS Directive)
1907/2006 (REACH Directive)
All essential test suites have been carried out.
This declaration is issued under the sole responsibility of iZilla Ltd.
Point of Contact: Eddie Latham | Founder
Signed: E.Latham
Date: July 2023
UK: iZilla Ltd, Newton House, 2 Pioneer Court, Histon, Cambridge, CB24 9PT
EU RP: AR Experts, P.O. Box 5047, 3620 AA Breukelen, The Netherlands
US: Izilla Ltd, C/O A.N. Deringer, Inc., 19520 Wilmington Ave, Rancho Dominguez, CA, 90220
Majority is owned and operated by iZilla Ltd. Registered in England with Company No: 08520738
MAJORITY
www.majority.co.uk

A DEPOSER AMEL MAGASIN EN D

A DEPOSITOR IN DECHETERIES

- Knapton DAB Bedside Radio
- What's in the Box?
- Display View
- Back View
- Basic Operation
- Listening to Audio
- Select Mode
- There are four options:
- Standby
- USB Functions
- USB Playing Mode
- USB Charging
- Bluetooth
- Connect to Bluetooth
- Playing audio via Bluetooth
- DAB Radio
- FM Radio
- Selecting FM Mode
- Playing FM Radio
- FM and DAB Radio Presets
- Recalling a stored station
- Wireless Charging
- Caution A
- Alarm Functions
- Alarm 1 Settings/Alarm 2 Settings
- Turn off the alarm when sounding
- Snoopze
- Other Functions
- Sleep Mode
- Dimmer
- Setting the time manually
- Support
- Warranty
- ADDITIONAL WARNINGS
- RECYCLING ELECTRICAL PRODUCTS
- ATTENTION
- CAUTION
- Knapton DAB Radio am Bett
- MAJORITY
Brand : Majority
Model : Knapton
Category : Radio