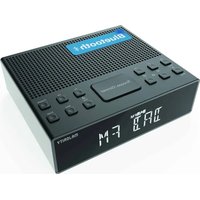
Knapwell - Radio Majority - Free user manual and instructions
Find the device manual for free Knapwell Majority in PDF.


| Product Type | DAB/DAB+ and FM Digital Radio with Bluetooth |
| Brand | Majority |
| Model | Knapwell |
| Dimensions (W x H x D) | 14 x 12 x 4 cm |
| Net Weight | 286 g |
| Power Supply | DC 5 V / 1 A (mains adapter included, 100-240 V~) |
| Standby Power Consumption | 0.07 W |
| Radio Bands | DAB/DAB+ (Band III 174-240 MHz) and FM (87.5-108 MHz) |
| Bluetooth | Version 5.2, range up to 10 m |
| Presets | Up to 40 stations in DAB and FM |
| Alarms | Dual alarm with source selection (buzzer, DAB, FM) |
| Sleep Timer | 10 to 90 minutes or off |
| Snooze Function | 5-minute repetition |
| Display | Backlit display with 3 brightness levels |
| Connectors | 3.5 mm headphone jack, USB charging port (output), DC input |
| Antenna | Pigtail antenna |
| Equalizer | Presets: Normal, Classical, Jazz, Pop, Rock, Speech |
| Menu Languages | English, German, French |
| Care and Cleaning | Unplug before cleaning; use a dry cloth only |
| Safety | Do not expose to water or heat sources; keep ventilation unobstructed |
| Spare Parts / Repairability | Repairs by qualified personnel only; contact support via www.majority.co.uk/support |
| Warranty | 12 months standard (extendable to 3 years after registration at www.majority.co.uk) |
| Box Contents | Radio, mains adapter, user guide |
Frequently Asked Questions - Knapwell Majority
User questions about Knapwell Majority
0 question about this device. Answer the ones you know or ask your own.
Ask a new question about this device
Download the instructions for your Radio in PDF format for free! Find your manual Knapwell - Majority and take your electronic device back in hand. On this page are published all the documents necessary for the use of your device. Knapwell by Majority.
USER MANUAL Knapwell Majority
Knapwell Digital Radio
User Manual
What's In the Box? 3
Controls And Functions 4
Instructions Guide. 6
Basic Operation 6
DAB/DAB+ Radio. 7
DAB/DAB+ Radio Presets. 8
DAB/DAB+ Radio Station Information. 9
FM Radio. 10
FM Radio Presets. 11
FM Radio Station Information. 12
Bluetooth Mode. 13
Settings:Clock and Date. 14
Setting the Alarm. 15
Other Alarm Functions. 16
Radio Settings : System Menu 18
Additional Features. 19
Troubleshooting 20
Specification and Warranty. 21
Safety Information 22
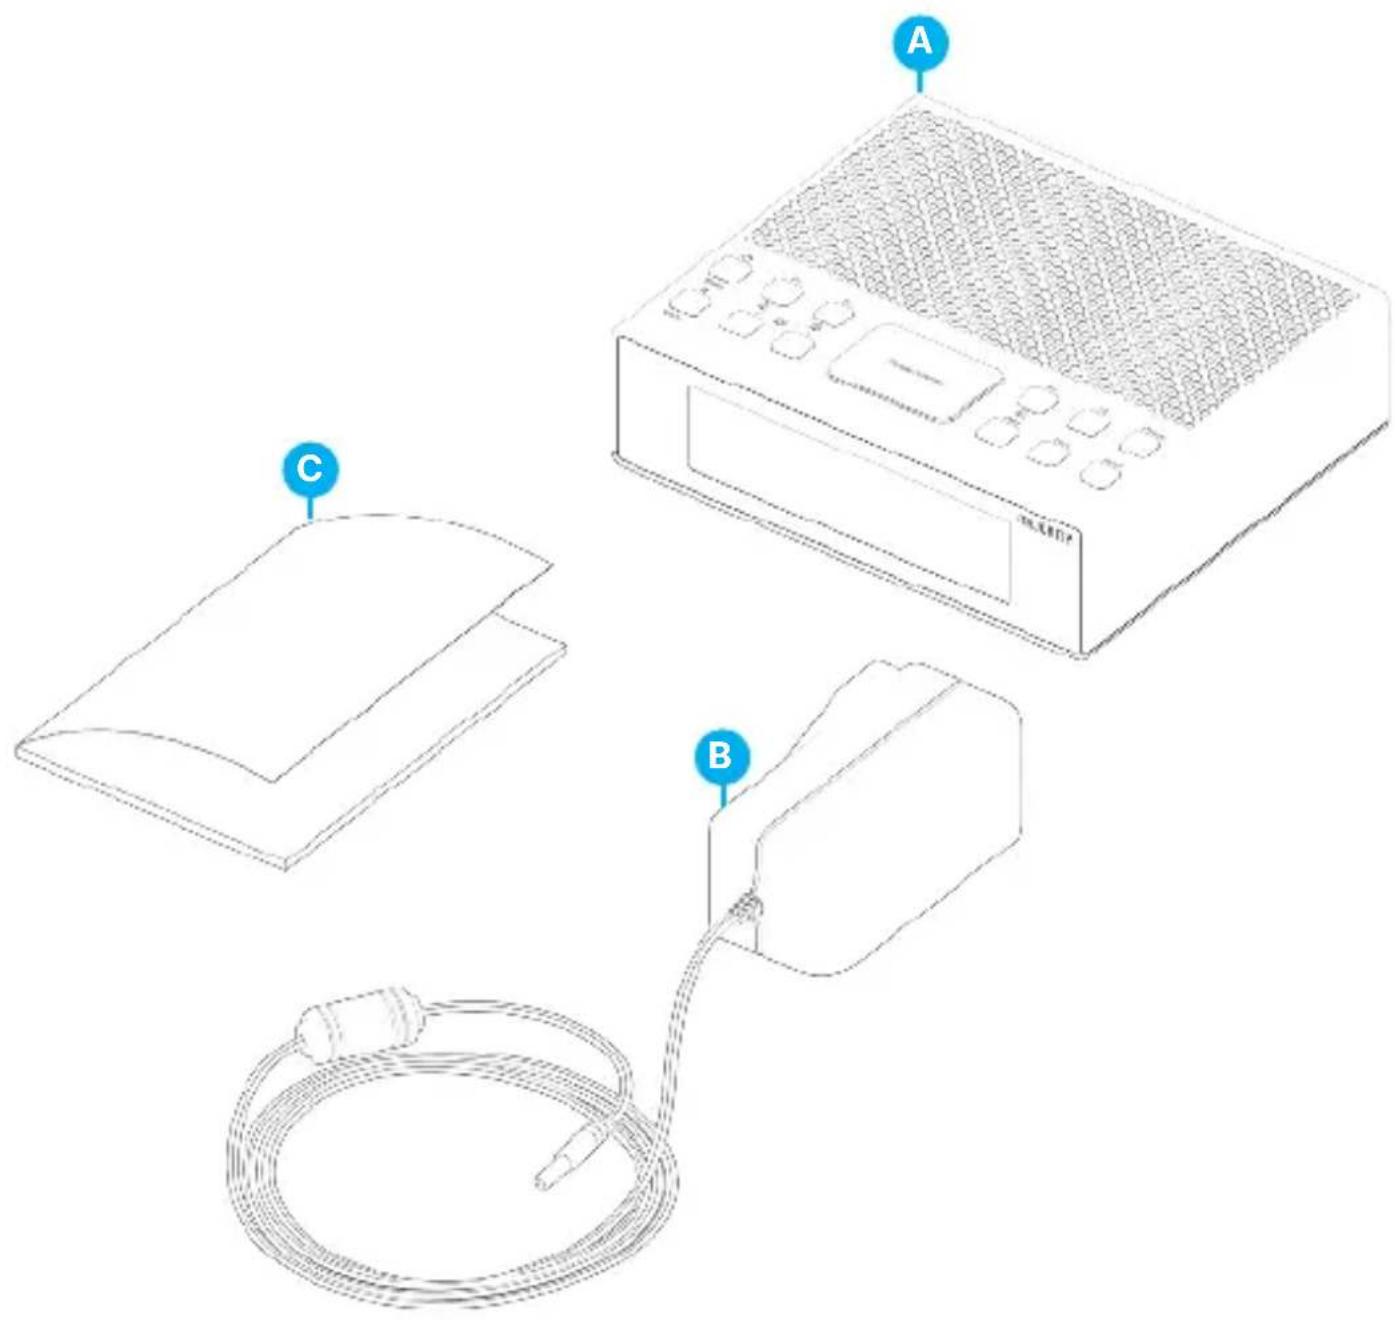
What's in the Box?
A. Majority Knapwell Radio
B. Power Adapter
C. User Guide
Top View
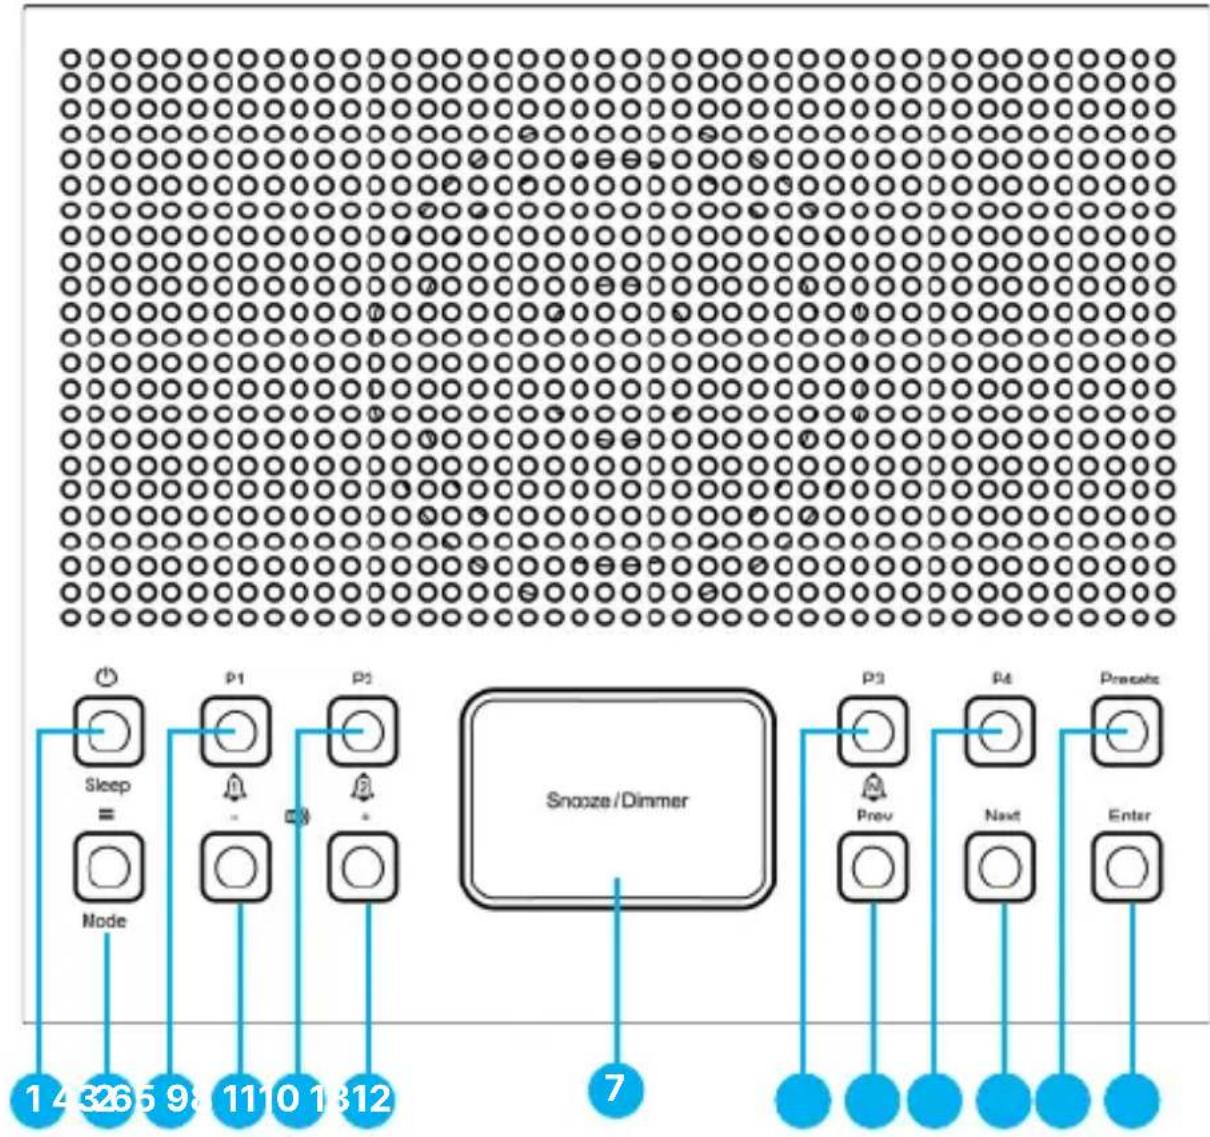
- Power/Sleep
- Menu/Mode
- Preset 1/Alarm 1
- Vol-
- Preset 2/Alarm 2
-
Vol+
-
Snooze/Dimmer
- Preset 3
- Prev
- Preset 4
- Next
- Presets
- Enter
Back View
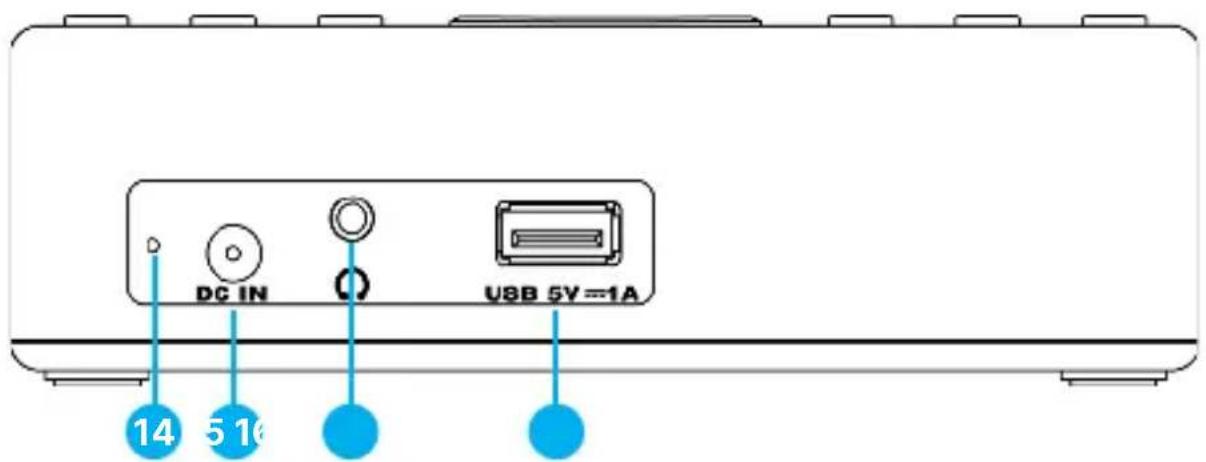
- Pigtail Antenna
- DC IN
- Headphones Jack Port
- USB Charging Port
Basic Operation
Please note all (Ref.) refer to Page 4-5 Controls and Functions mapping guide.
Getting Started
Plug the power cable into the mains and the other end into the DC port (Ref.15) which can be found at the back of the radio labelled 'DC IN'. Once plugged in with the cable, the radio will switch ON, and show 'WELCOME' on the screen.
Make sure the radio's pigtail antenna is fully extended so you can get the best possible radio signal.
At first use, the radio will automatically start scanning and store all available DAB radio stations at your location. Once the scan has been completed, the radio will then start playing the first stored DAB radio station.
Press and hold the 'Menu/Mode' button (Ref.2) for 2-3 seconds and then release to switch the radio mode in between DAB, FM and Bluetooth.
Standby
To set the radio to Standby, press the 'Power/Sleep' (Ref.1) button.
DAB/DAB+ Radio
Fully extend the pigtail antenna (Ref.14) to ensure that the best signal can be received before scanning.
From the 'Welcome' screen, your radio will automatically scan for DAB stations.
If the unit has not automatically scanned or if you would like to rescan the available stations, press the 'Menu/Mode' button (Ref.2) to enter radio 'Menu' option. Press either the 'Prev' or the 'Next' (Ref.9/11) buttons to find and select 'SCAN'. Press the 'Enter' button (Ref.13) to confirm and start scanning.
Note: The date and time displayed on the DAB radio stations is also synchronised with the radio stations found.
If you find your favourite radio stations with bad reception/signal, we recommend repeating this procedure. By selecting 'Scan' option, the radio will automatically search for available radio stations with best reception on the radio frequency band up and store all with good reception.
As soon as the full scan has been completed, the radio will automatically start playing at the first stored radio station.
To select a different radio station, use the 'Prev' or the 'Next' buttons (Ref.9/11) to find your desired station. Select the station by clicking the 'Enter' (Ref.13) button.
Note: DAB mode is not indicated by displaying 'DAB' on the radio screen. The first available station will be displayed with rolling information text.
DAB/DAB+ Radio Settings
In DAB Mode, press the MENU button (Ref.2) to enter the radio settings. Use the 'Prev/Next' buttons to scroll through the following options:
Scan: Select this option to initiate a scan for available stations. Whilst scanning, the screen will show 'Scanning' along with the number of stations that have been found.
Manual Tune: Select this option to browse through available stations by multiplex and frequency.
DRC (Dynamic Range Compression): Select this option to reduce the volume of louder sounds and boost the volume of quieter sounds. Select 'High', 'Low' or 'Off'. Confirm your selection by pressing the 'Enter' button (Ref.13).
Prune: 'PRUNE' is a DAB feature which can help to remove found stations that are listed, but no longer available. Using the 'Prev/Next' buttons, highlight 'Prune Yes' ('Y') to activate this feature or 'Prune No' ('N') to deactivate. Press the 'Enter' button (Ref.13) to confirm.
System: Enter to access the radio system settings described on page 18.
DAB/DAB+ Presets Storing DAB Stations
You can store up to 40 DAB radio stations for easy navigation.
To store a station that you are currently playing:
Press and hold the 'Preset 1-4' (Ref.3/5/8/10) button for 2 seconds. Once saved, you will see a message on display saying 'Stored'. To save preset on position 5 or further, press and hold 'Presets' (Ref.12) button to save the station. The Preset Store settings will open, and the display will show 'EMPTY X'. Release the 'Preset' button.
Press the 'Prev' or 'Next' button (Ref.9/11) to change the <1' to the number you want to store the station as. Press the 'Enter' (Ref.13) button to save the station to that preset number. The display will then show 'STORED'.
Note: If there is an existing DAB station already stored under a preset number you wish to save, the new station will overwrite the existing one.
Recalling a stored DAB radio station
Press the "Preset 1-4' (Ref.3/5/8/10) button or 'Presets' (Ref.12) to open Preset Recall settings.
Press the 'Prev' or 'Next' button (Ref.9/11) to scroll through your preset stations. Once found, press the 'Enter' (Ref.13) button to confirm your selection and the radio station will automatically start playing.
Radio station information for DAB/DAB+ Radio
While playing a DAB/DAB+ radio station with good signal, press the 'Enter' button (Ref.13) repeatedly to view different program information such as:
Signal Strength: Displays a signal bar with the strength of the current station.
Bit Error Rate: Provides details of the signal error rate.
Channel and Frequency: Displays the station's transmission channel number and frequency.
PTY (Program Type): Shows the type and description of the program me provided by the DAB station.
Time and Date: Displays the time and date information provided by the broadcaster.
Bit Rate: The data rate at which the signal is being transmitted.
Dynamic Label Segment (DLS): Displays scrolling text information supplied by the broadcaster.
FM Radio
Press and hold the 'Menu/Mode' button (Ref.2) multiple times to switch between DAB, FM, and Bluetooth. The first time you switch to FM mode, the FM frequency '87.5 MHz' will be displayed on the screen.
Fully extend the pig-tail antenna (Ref.14), before scanning.
To scan for the available stations with good signal up the bandwidth, press 'Menu/Mode' button (Ref.2) to step into 'Menu' option, using the 'Next' or the 'Prev' button, to find and select 'SCAN'. Press the 'Enter' button to confirm.
A full scan will automatically start up the frequency band. Once completed the next available station with good signal will begin to play.
To scan through the frequency band, press and hold down the 'Prev' button (Ref.9) for 2-3 seconds to search for the radio stations with good signal available.
How to tune a specific frequency manually
To listen to a specific frequency, press and hold down the 'Next' button (Ref.11) to search up the bandwidth quickly. To search down the frequency band quickly, press and hold down 'Prev' button (Ref.9). It will stop searching when the button is released.
To search slowly, press the 'Prev' or 'Next' (Ref.9/11) multiple times to search the band. Each button press will search with 00.50 MHz up or down, the frequency band.
FM Radio Settings
In FM Mode, press the 'MENU' button on the unit (Ref.2) to open FM settings. Use the 'Prev' or 'Next' (Ref.9/11) buttons to navigate through the following options:
Scan: Select to process a full scan of FM radio stations. Press the 'Enter' button to confirm (Ref.13).
Setting: Enter this section to select 'Distant' or 'Local'. The 'Distant' option will allow the radio to find stations with weaker signals when scanning. The 'Local' option will allow you to receive stations with stronger radio signal.
Audio: All stereo stations are reproduced in stereo; which may lead to poor audio quality for the ones with weak stations. To improve sound quality in FM Radio Mode, choose 'Mono'. Press the 'Enter' button (Ref.13) to confirm your selection.
System: Select this option to open the radio system settings described on page 18.
FM Radio Presets
Storing FM Stations
You can store up to 40 FM radio stations for easy navigation.
To store a station that you are currently playing:
Press and hold the 'Preset 1-4' (Ref.3/5/8/10) button for 2-3 seconds. Once saved, you will see a message on display saying 'Stored'. To save preset on position 5 or further, press and hold the 'Presets' (Ref.12) button to save the station. The Preset Store settings will open, and the display will show 'EMPTY X'. Release the 'Preset' button.
Press the 'Prev' or 'Next' button (Ref.9/11) to change the <1' to the number you want to store the station as. Press the 'Enter' (Ref.13) button to save the station to your chosen preset number. The display will then show 'STORED'.
Note: If there is an existing FM station already stored under a preset number you wish to save, the new station will overwrite the existing one.
Recalling a FM stored station
Press the 'Preset 1-4' (Ref.3/5/8/10) button or 'Presets' (Ref.12) button to open Preset Recall settings. Do not hold down the button as this will open Preset Store settings.
Press the 'Prev' or 'Next' button (Ref.9/11) to scroll through your preset stations. Once found, press the 'Enter' (Ref.13) button to confirm your selection, and the radio station will automatically start playing.
Radio station Information for FM Radio
When you are listening to an FM radio station with good signal, you can press the 'Enter' button (Ref.13) repeatedly to view different program information, such as:
PTY (Program Type): Shows the type and description of the program provided by the FM station, if available.
Signal Strength: Displays a signal bar with the strength of the current station.
Time and Date: Displays the time and the date.
Frequency: Displays the station's transmission frequency.
Audio Type: Displays the audio type of the station you are listening to. It will either be Stereo or Mono.
Radio Text: Displays scrolling text information supplied by the broadcaster, if available.
Bluetooth Mode
Setting Up Bluetooth
Pair your radio with a phone, a tablet or similar device to play audio via the Knapwell's speaker.
To choose Bluetooth mode, press and hold the 'Menu/Mode' button (Ref.2) repeatedly until Bluetooth mode is selected.
Go into Bluetooth settings on your Bluetooth-enabled device and ensure that it is switched on. On your list of devices available, the 'Majority Knapwell' will appear. Select this option to connect. Once paired with your device, you will hear a beeping sound, and the radio screen will display 'Connected'. You can now start playing audio from your device.
The volume level, next or previous track can be changed from your device or from the Knapwell Radio using the 'Prev' and 'Next' buttons (Ref.9/11) on the radio.
The operational range between the unit and a Bluetooth device is approximately 10 metres without any obstructions.
Note: Bluetooth earphones and earbuds are not compatible with this device.
Setting the Clock and the date
Manually Setting the Time
Ensure the unit is in working mode (i.e. listening to DAB/FM Radio). Press the 'Menu/Mode' button (Ref.2) to enter the radio menu. Press 'Prev' or 'Next' (Ref.9/11) multiple times until you see 'SYSTEM'. Press the 'Enter' (Ref.13) button to confirm your selection.
Once entered, press 'Prev' or 'Next' button (Ref.9/11) again to select 'TIME'. Press the 'Enter' (Ref.13) button to confirm.
Use the 'Prev' or 'Next' (Ref.9/11) button to choose your option and select Time/Date by pressing 'Enter' button (Ref.13).
The hour digital will now flash. Press the 'Prev' or 'Next' button (Ref.9/11) to select the correct hour. Press the 'Enter' button (Ref.13) to confirm.
Once this is confirmed, you will be able to press the 'Press' or 'Next' button (Ref.9/11) to select the correct minutes. Press the 'Enter@' button (Ref.13) to confirm.
Manually Setting the Date
After setting the time, the year digits will now flash. Press the 'Prev' or the 'Next' button (Ref.9/11) to select to the correct year. Press 'Enter' button (Ref.13) to confirm.
Once this confirmed, you will be directed to the month. To change the month, use the 'Prev' or the 'Next buttons (Ref.9/11). Press the 'Enter' button to confirm (Ref.13).
After setting the year and the month, you will then be able to press the 'Prev' or the 'Next' button (Ref.9/11) to select the day. Press the 'Enter' button (Ref.13) to confirm.
Setting: Dual Alarm Clock
Setting the Alarm
Ensure the unit is in Standby Mode. Press the 'Preset 1/Alarm1' button (Ref.3) or 'Preset2/Alarm2' button (Ref.5) to open the 'Alarm' settings.
Press the 'Prev' or 'Next' button (Ref.9/11) to find 'Alarm 1' or 'Alarm 2' and select your choice by pressing the 'Enter' button (Ref.13) to confirm.
To switch the alarm ON or OFF, press the 'Prev' or the 'Next' button until 'ON' or 'OFF' is flashing on the screen. Press the 'Enter' (Ref.13). button to confirm your selection.
The hour digits of the alarm will flash. Press the 'Prev' or the 'Next' button until you see 'ON' or 'OFF' flashing. Press the 'Enter' (Ref.13). button to confirm your selection.
Once the hour has been set, the minutes will start flashing. Follow the same steps as per the hour settings to set the minute digits.. You can then choose the type of alarm sound you would like to have such as: Buzzer, DAB, or FM. Press the 'Enter' button to confirm.
Note: If you choose DAB or FM mode as played sound, you have the option to choose either last played radio station or any other radio stations you have on the radio. You can use 'Press' and 'Next' buttons to navigate through these, select your desired station, then press the 'Enter' button to confirm.
The last option for setting your alarm is to select 'Alarm Mode'. Choose one of the following to select the frequency: Once, Daily, Weekends or Weekdays only. Press the 'Enter' (Ref.13). button to confirm your selection. The alarm is then SAVED, as displayed on the screen.
Note: You can press the 'Menu/Mode' button (Ref.2) to go back to the previous step when programming the alarm. When Alarm sounds, if no operations have been detected; it can last for one hour.
Settings: Alarm Functions and Snooze
Turn OFF the alarm when sounding.
To turn OFF the Alarm 1 or Alarm 2 when sounding, press the 'Power/Mode' button (Ref.1). This action will cancel the alarm set.
If the alarm is set to be ON for 'Weekdays', 'Weekends' or 'Daily', the alarm icon will be displayed on the radio screen on Standby Mode.
If the Alarm mode is set for 'Once' then the alarm icon will disappear from the radio display screen after sounding.
How to cancel/deactivate an alarm already set.
While the radio is in Standby Mode, press Preset 1- for Alarm 1, or Preset 2 for Alarm 2, press then Enter (Ref.13) to access the alarm settings.
Press the Next' or the 'Prev' (Ref.9/11) buttons to scroll through the options until OFF' is flashing on the radio display. Press the Enter' (Ref.13) button to confirm.
Snoopze Function
When the alarm sounds, press the 'Snoopze/Dimmer' button (Ref.7) to delay the alarm for another 5 minutes and the radio will go into Standby Mode.
To cancel the Snooze or stop the sounding alarm, press the Snooze/Dimmer button (Ref.7).
Sleep Timer
Ensure the unit is in Standby Mode.
Press and hold the 'Power/Sleep' button (Ref.8) for 1-2 seconds to open the 'Sleep Timer' option. n. Press the 'Enter' button to confirm (Ref.13).
The screen will now display 'OFF' by showing a bed icon. While flashing, use the 'Prev' and 'Next' buttons (Ref.9/11) to browse through a range of sleep timer lengths: 10/20/30/40/50/60/70/80/90 minutes or OFF.
When your choice is displayed, press the 'Enter' button to (Ref.13). The unit will then automatically start the timer.
To turn the sleep timer off, follow the above instructions and select 'OFF' from the choices.
Once the timer has been set, an icon with a bed will be visible on the radio screen display.
Radio Settings- 'SYSTEM' menu
When the radio is turned ON (not in Standby Mode), press the 'Menu/Mode' (Ref.2) button. Using the 'Prev' and the 'Next (Ref.9/11) buttons, find 'SYSTEM' and select this option by pressing the 'Enter' button (Ref.13) to confirm.
Once in 'SYSTEM' menu, navigate through the sub-menus options listed below using the buttons 'Prev' and 'Next', (Ref.9/11). To access any of these sub-menus, press the Enter button (Ref.13) to confirm.
The 'SYSTEM' has the following sub-menus:
EQ: The radio has a few audio presets that you can use as per your preferences, such as: Normal, Classic, Jazz, Pop, Rock, and Speech. Press the 'Enter' button (Ref.13) to confirm your choice.
Time: In this section you will find: 'Set Time' and 'Update'. Choose 'Set Time' to manually set the time and date or choose 'UPDATE' to choose how you would you like the time/date on your radio to be updated such as: using DAB radio, FM radio, or None. Press the 'Enter' button (Ref.13) to confirm your choice.
Dimmer: There are two options you can choose from such as 'Timeout' and 'Level'. Select 'Level' to set the radio display backlight level to high, medium, or low light. Press the 'Enter' button (Ref.13) to confirm your choice.
Select 'Timeout' and set this as per your preferences to 10,20, 30,45,60,90,120,180 seconds or choose 'ON'. Press the 'Enter' button (Ref.13) to confirm.
Please Note: In case you would like to have the display brightness set at all time at a specific level you should set 'Timeout' to ON.
Language: Access this section if you would like to change the language.
There are 3 options: English, German and French. Press the 'Enter' button (Ref.13) to select your chosen language.
Reset: Choose this option to set your radio to factory default settings.
Press the 'Enter' button (Ref.13) and the display will show 'Factory Reset?'. Press the 'Prev' or 'Next' button (Ref.9/11) to select 'Yes' or 'No'. Select one of these and press the 'Enter' button again (Ref.13) to confirm.
Note: Once you process a reset of the radio to default, all stored radio stations and presets you have set on the radio will be deleted.
System Version:
Press the 'Prev' or 'Next' button (Ref.9/11) in the 'Set Menu' screen to select to the sub-option of 'SW VER'. Press the 'Enter' button (Ref.13) to check the system version information.
Additional Features
Headphone Jack:
Plug in your earphones via the 3.5mm headphone jack (Ref.16) to listen to audio from your radio.
Display dim backlight:
The radio display backlight can be changed with a short press on the 'Snoopze/Dimmer' button (Ref.7). There are 3 levels you can choose from: Low, High, and Medium.
Power Supply:
The unit is powered and charged by power adapter DC 5V 1A.
| Observation Potential Cause/Solution | |
| No sound | The station is not tuned properly. Please perform a full scan and search again for available stations or manually scroll through available stations. |
| Cannot preset stations | Ensure that you are pressing and holding down the 'Preset' button for 2-3 seconds to open Preset Store Settings. Only press, do not hold to open Preset Recall. |
| FM: Static sound DAB: Burbling/intermittent cut-out | Signal reception is low. Adjust the aerial and move the unit to a stronger signal location. Re-scan stations and or process a factory reset. |
| Desired station not found | Weak signal. Use the manual tune function and try rescanning in a different area. |
| Display shows 'No Service' | There is no DAB coverage in your area, or poor reception. Adjust the position of the aerial or move the unit to a stronger signal location. |
| Display is blank | This may occur if the broadcaster changes the label of a service or removes a label while tuned. The radio will try to retune or perform a scan. |
| Time and Date not setting automatically | Go to DAB mode and this will automatically set once a scan is performed. Alternatively, set in your 'Settings'. |
| Sound is distorted | The volume is too high. Adjust the volume control. |
Support
If you require further assistance with your Majority product, please contact our support team on the Majority website: www.majority.co.uk/support
Specification
| Power Supply DC 5.0V 1.0A (100-240V) | |
| Modes | DAB/DAB+ Band III 5A-13F 174-240MHz FM (87.5MHz - 108MHz) Bluetooth |
| Output Connector 3.5mm Earphone Jack | |
| Dimension (WxHxD) 14 x 12 x 4 cm | |
| Net Weight 286 g | |
| Input | 100-240V~, 50-60Hz, 0.2A Max |
| Output | 5.0V = 1.0A 5.0W |
| Average active efficiency 75.26% | |
| No-load power consumption 0.07W | |
| Bluetooth version 5.2 |
Warranty
All products come with a standard 12-month warranty. All items must be registered within 30 days of purchase on www.majority.co.uk for the warranty to be valid. Once on the web page, use the menu to find 'Register Your Product'. You will also be given the chance to extend your warranty for an additional 24 months, free of charge.

Knapwell Digitales Radio
Benutzerhandbuch
MAJORITY
WasistinderSchachtel? 3
Knapwell Radio Digital
Manual del Nombre
MAJORITY
EN Safety and Usage Guidelines (All where applicable)
General Safety Information - Read and Retain: Review all safety and operating instructions before use; keep them for future reference. Follow Instructions: Adhere strictly to all safety and operational guidelines. Water Exposure: Keep the device away from water; avoid placing liquids near it. Ventilation: Ensure ventilation openings are unobstructed to prevent overheating. Heat Sources: Keep the device away from heat-emitting appliances. Wall Mounting - Installation Safety: Follow the manufacturer's instructions and use approved mounting kits only. Avoid drilling into areas with cables, gas, or water lines. Use proper tools and safety apparatus. Regular Maintenance: Inspect regularly for wear or damage, especially if wall-mounted. Relocation: Detach from the wall mount before moving. Child Safety: Keep out of children's reach and ensure heavy items are securely mounted. Seismic Precautions: Use specialized mounts in earthquake-prone areas. Electrical Safety - Power Source: Use the specified power source; consult an electrician if unsure. Cable Management: Protect the power cord from damage. Power Disconnection: Keep the main plug accessible; unplug during storms or long periods of non-use. Battery Safety - Charging: Use the manufacturer's charger; avoid extreme conditions. Heat Exposure: Keep batteries away from heat to prevent explosion or leakage. Battery Condition: Discontinue use if the battery is damaged; dispose of it properly. Replacement: Only use recommended batteries; incorrect types can cause hazards. External Batteries: Use only specified types, observing correct polarity. Battery Removal: Remove batteries if not used for an extended period. Disposal: Follow local regulations for battery disposal; do not incinerate. Connectivity Safety - Cable Connections: Power off devices before connecting or disconnecting cables. Bluetooth Pairing: Ensure a secure connection; avoid interference from other devices. Volume Control: Keep volume moderate to prevent hearing damage. Connectivity and Data Security - Wireless Security: Review privacy policies and secure your network. Software Updates: Keep software updated for security and performance. Children's Safety Warnings - Product Use: Intended for adults; keep away from children. Battery Warning: Keep batteries and items containing batteries out of children's reach. Volume Control: Maintain a safe volume level to protect children's hearing. Fire Hazard - Flammable Materials: Do not place open flames near the product. Overheating: Avoid covering the product to prevent overheating and fire risks. Disposal and Recycling - Product Disposal: Dispose of at a recycling centre according to local laws. Environmental Compliance: Follow regulations for battery and electronic waste disposal. User Maintenance - Cleaning: Unplug before cleaning; use a dry cloth only. Servicing: Only qualified personnel should perform repairs. Data Protection: Reset to factory settings before returning or disposing of the product. Disclaimer: Failure to follow these instructions may result in injury, death, or property damage. The manufacturer is not liable for damage caused by improper use.
Declaration of Conformity:
We, Izilla Ltd, Newton House, 2 Pioneer Court, Histon, Cambridge, CB24 9PT declare under our sole responsibility that the product:
Product Name: Knapwell DAB Radio Model: 1000002920/1000002921
Brand Name: Majority
To which this declaration referred is in conformity to the following harmonized standards or normative documents (CE & Rohs 2.0);
EN 55035:2017, EN 55032:2015, EN61000-3-2:2014, EN61000-3-3:2013, EEN62368-1:2004+A11:2017, ETSI EN 301 489-1 V2.2.3(2019-11), ETSI EN 301 489-17, V3.2.2(2019-12), ETSI EN 300 328 V2.2.2 (2019-07), EN 62479: 2010, IEC 62321-3-1:2013, IEC 62321-4:2013, IEC 62321-5:2013, IEC 62321-6:2015, IEC 62321-7-1:2015, IEC 62321-7-2:2017, IEC 62321-8:2017, (EC)NO 1275/2008,EN50564:2011, (EC)NO 801/2013.
Complying with the requirements or provisions of Council Directives which relate to:
EMC Directive 2014/30/EU, RED Directive 2014/53/EU, LVD Directive 2014/35/EU, Directive (2011/65/EU) and its amendment directives 2015/863/EU (RoHS 2.0) of the, European parliament, ERP Directive 2009/125/EC.
All essential test suites have been carried out.
Point of Contact: Eddie Latham | Founder
Signed: E. Latham
Date of Issue: January 2024 Place of Issue: Cambridge, UK
Importer's Addresses:
UK: iZilla Ltd, Newton House, 2 Pioneer Court, Histon, Cambridge, CB24 9PT
Email: techsupport@majority.co.uk
EU RP: AR Experts, Po Box 5047, 3620 AA Breukelen, The Netherlands
Email: info@ar-experts.eu
US: iZilla Ltd C/O A.N.Deringer Inc, 19520 Wilmington Ave, Rancho
Dominguez, CA, 90220
Email: techsupport@majority.co.uk

ATTENTION
RISK OF ELECTRIC SHOCK DO NOT OPEN


CAUTION
RISQUE D'ELECTROCUTION NE PAS OUVRIR


IMPORTANT: Please read all instructions carefully before use and keep for future reference
MAJORITY
www.majority.co.uk

- Knapwell Digital Radio
- What's in the Box?
- Top View
- Back View
- Basic Operation
- Getting Started
- Standby
- DAB/DAB+ Radio
- DAB/DAB+ Radio Settings
- DAB/DAB+ Presets Storing DAB Stations
- Recalling a stored DAB radio station
- Radio station information for DAB/DAB+ Radio
- FM Radio
- How to tune a specific frequency manually
- FM Radio Settings
- FM Radio Presets
- Storing FM Stations
- Recalling a FM stored station
- Radio station Information for FM Radio
- Bluetooth Mode
- Setting Up Bluetooth
- Setting the Clock and the date
- Manually Setting the Time
- Manually Setting the Date
- Setting: Dual Alarm Clock
- Setting the Alarm
- Settings: Alarm Functions and Snooze
- Turn OFF the alarm when sounding.
- How to cancel/deactivate an alarm already set.
- Snoopze Function
- Sleep Timer
- Ensure the unit is in Standby Mode.
- Radio Settings- 'SYSTEM' menu
- System Version:
- Additional Features
- Display dim backlight:
- Power Supply:
- Support
- Warranty
- Knapwell Digitales Radio
- Knapwell Radio Digital
- EN Safety and Usage Guidelines (All where applicable)
- MAJORITY
Brand : Majority
Model : Knapwell
Category : Radio