City line reach & clean FC8412 - Vacuum Cleaner PHILIPS - Free user manual and instructions
Find the device manual for free City line reach & clean FC8412 PHILIPS in PDF.

User questions about City line reach & clean FC8412 PHILIPS
0 question about this device. Answer the ones you know or ask your own.
Ask a new question about this device
Download the instructions for your Vacuum Cleaner in PDF format for free! Find your manual City line reach & clean FC8412 - PHILIPS and take your electronic device back in hand. On this page are published all the documents necessary for the use of your device. City line reach & clean FC8412 by PHILIPS.
USER MANUAL City line reach & clean FC8412 PHILIPS
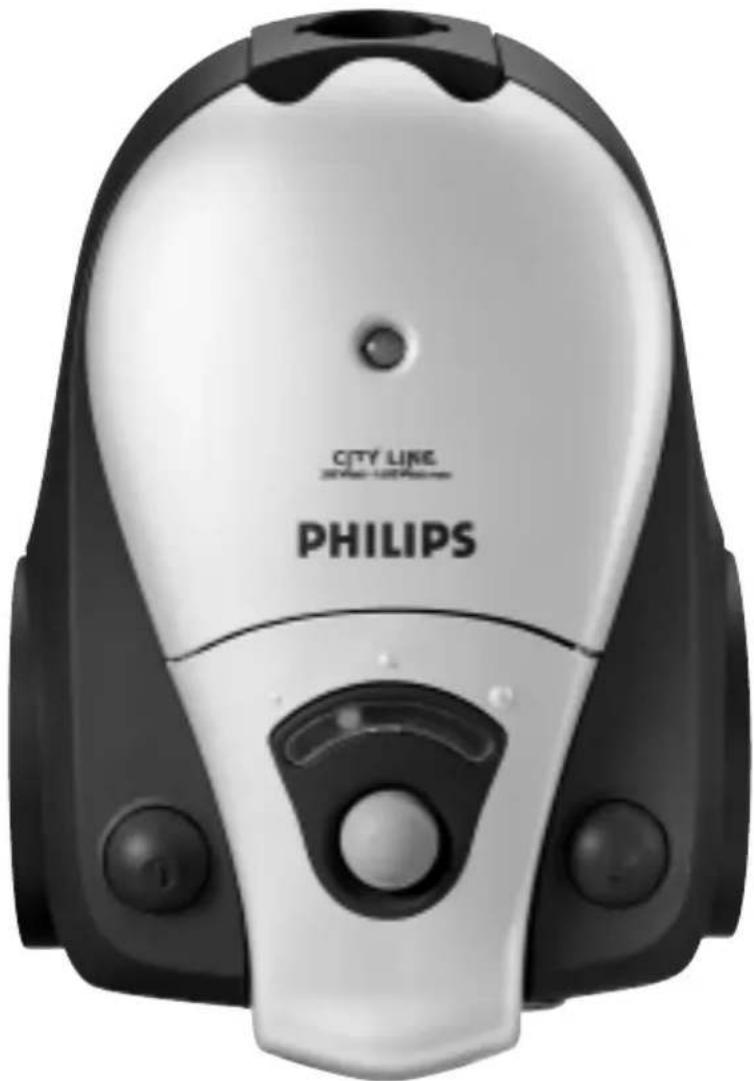
City line reach & clean
natural_image
Black and white photo of a Philips air purifier device (no visible text or symbols on body)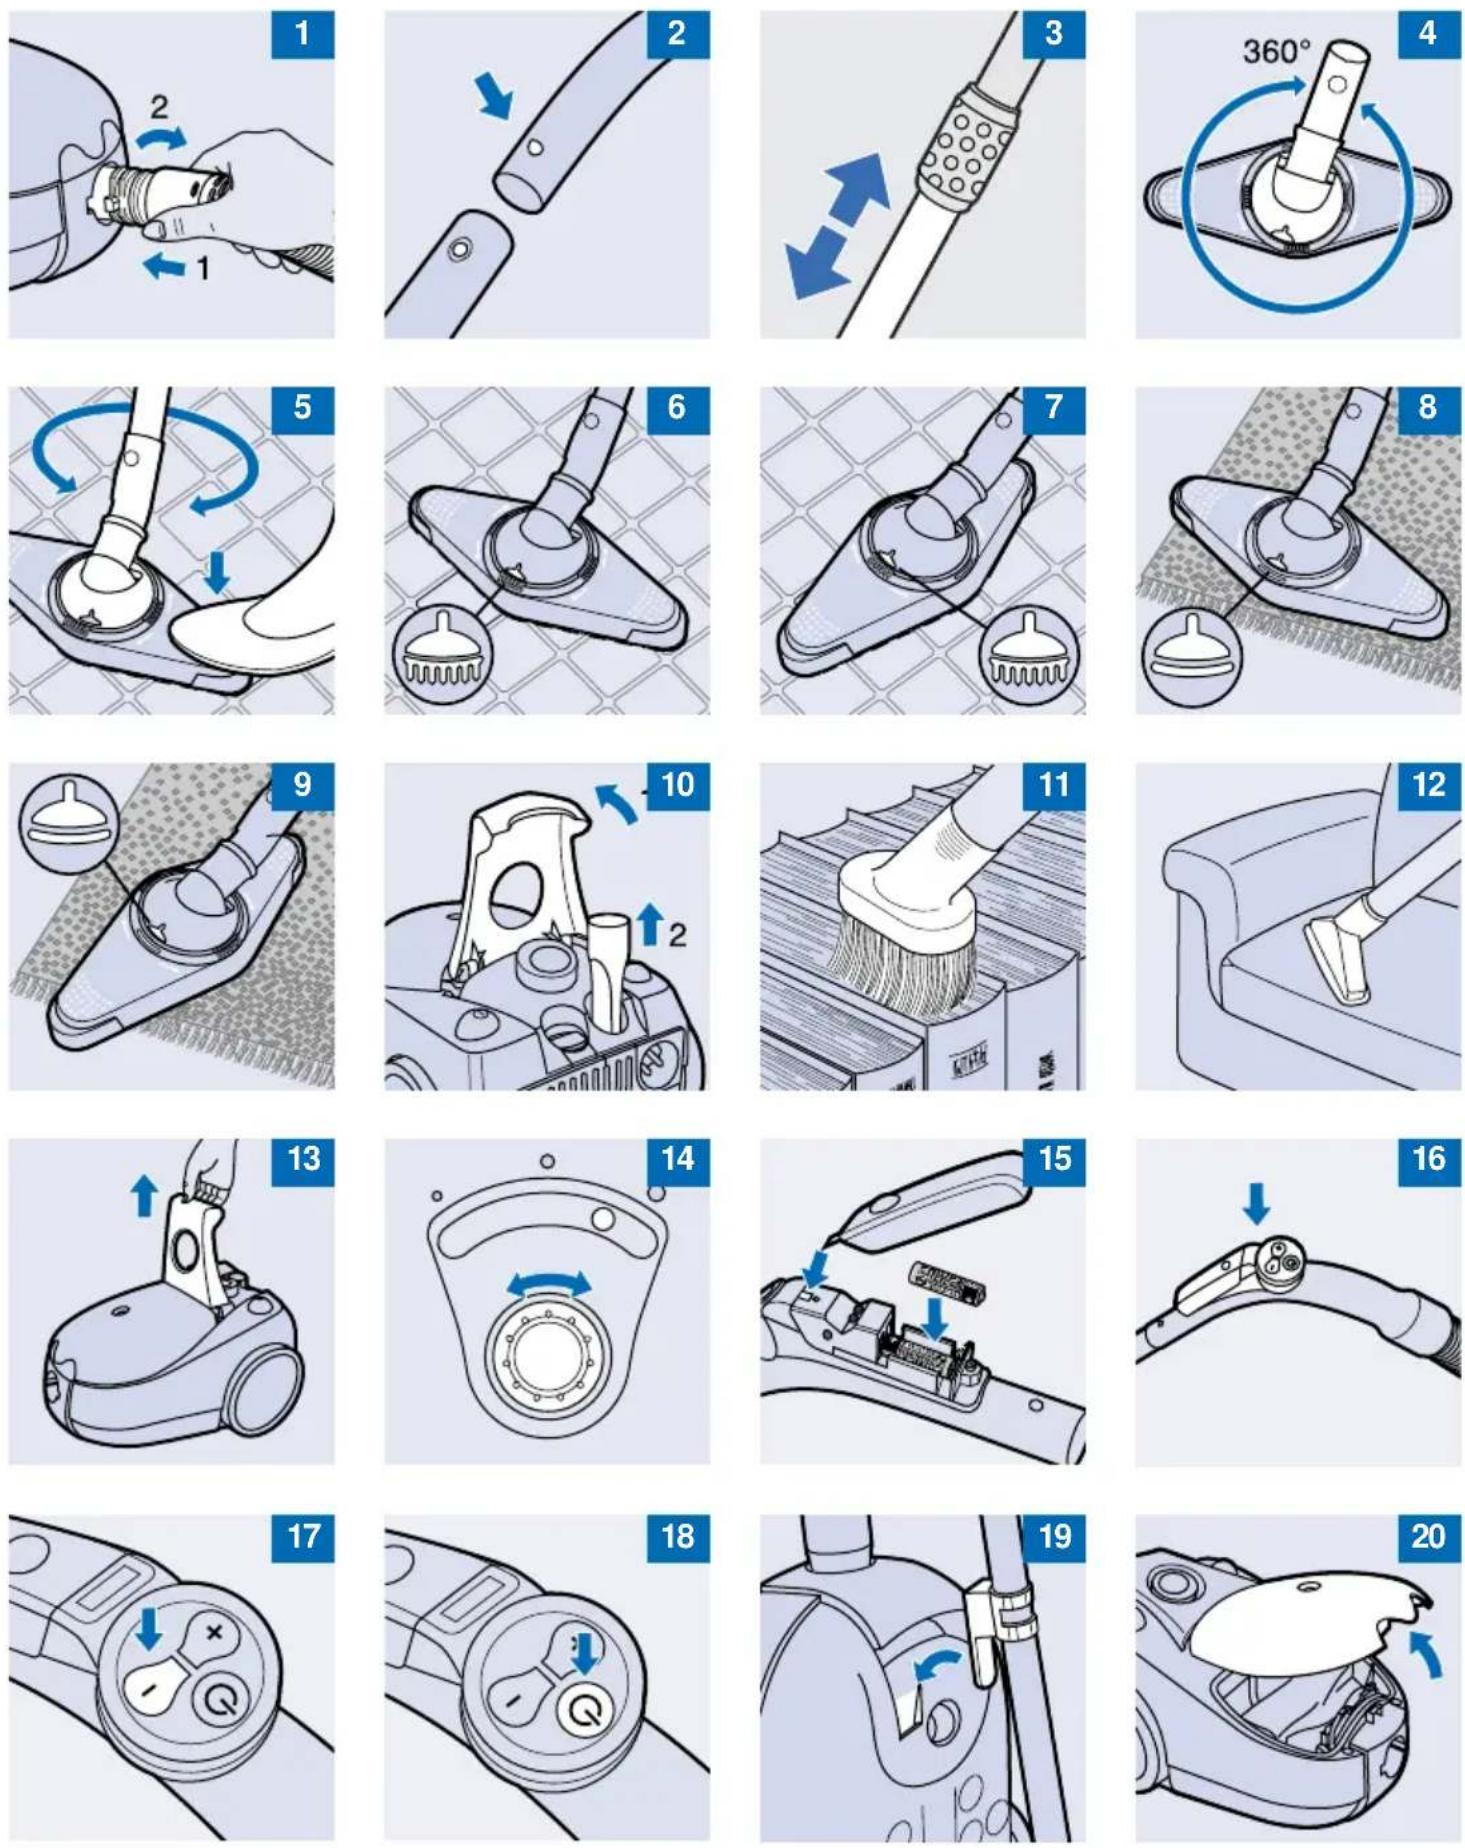
ENGLISH 6 DEUTSCH 10 FRANÇAIS 14 NEDERLANDS 18 ESPAÑOL 22 ITALIANO 26 PORTUGUÉS 30 NORSK 34 SVENSKA 38 SUOMI 42 DANSK 46 ΕΛΛΗΝΙΚΑ 50 TÜRKÇE 55
Important
▶ Only use Philips s-bag™ double-layer paper dustbags (FC8021).
▶ Never use the vacuum cleaner to suck up water or any other liquid. Never suck up ashes until they are cold.
When the vacuum cleaner is used to suck up fine dust, the pores of the dustbag may become clogged, causing the passage of air through the dustbag to become obstructed. As a result, the dustbag-full indicator will indicate that the dustbag needs to be replaced, even though the dustbag is not full at all.
Never use the appliance without the Motor Protection Filter. This could damage the motor and shorten the life of the appliance.
▶ Never clean the appliance with water.
Connecting accessories
To connect the hose to the appliance, push it into the appliance and turn it clockwise (fig. 1). To disconnect the hose from the appliance, turn it anticlockwise and pull it out of the appliance.
Button coupling (specific types only)
1 Connect the tube to the handgrip by pressing the spring-loaded lock button on the handgrip and inserting the handgrip into the tube. Fit the spring-loaded lock button into the opening in the tube ("click") (fig. 2).
To disconnect the tube from the handgrip, press the spring-loaded lock button and pull the handgrip out of the tube.
▶ Use the same method to connect and disconnect the other accessories.
Telescopic tube
Adjust the tube to the length you find most comfortable during vacuum cleaning (fig.3).
Reach & Clean nozzle
The Reach & Clean nozzle can be used on either carpets or hard floors. The nozzle can be turned 360 degrees to 4 different positions, allowing you to also vacuum clean hard-to-reach places in an easy way. When the nozzle is positioned lengthwise, the suction power is concentrated at the front side of the nozzle (fig.4).
To adjust the nozzle to the type of floor and the area to be cleaned, put your foot on the indicated spot and then turn the tube until the nozzle is in the required position (fig. 5).
1 With the nozzle positioned breadthwise and the brush strip folded out, you can clean large hard floor areas. Turn the tube until the brush strip pops out of the nozzle housing and the nozzle is positioned breadthwise (fig.6).
2 With the nozzle positioned lengthwise and the brush strip folded out, you can vacuum clean small hard floor areas. Turn the tube 90 degrees anti-clockwise until it is positioned lengthwise with the brush strip still folded out of the nozzle housing (fig.7).
3 With the nozzle positioned breadthwise and the brush strip folded in, you can vacuum clean large soft floor areas. Turn the tube 90 degrees anti-clockwise again to position the nozzle breadthwise and to make the brush strip disappear into the nozzle housing (fig.8).
4 With the nozzle positioned lengthwise and the brush strip folded in, you can vacuum clean small soft floor areas. Turn the tube 90 degrees anti-clockwise again until it is positioned lengthwise with the brush strip still folded in (fig.9).
Crevice nozzle, brush nozzle and small nozzle
1 Lift the handle on the vacuum cleaner to gain access to the accessory storage compartment (fig. 10).
2 Connect the crevice nozzle to the tube or directly to the handgrip.
3 The brush nozzle can be used for cleaning computers, bookshelves etc. (fig. 11). The small nozzle can be used for vacuum cleaning small areas, e.g. the seats of chairs and sofas (fig. 12).
Vacuum cleaning
1 To carry the appliance, put the handle in upright position and lift the appliance by the handle (fig. 13).
Adjusting suction power
You can adjust the suction power during vacuum cleaning:
1 Adjust the suction power by means of the electronic suction power control (specific types only) (fig.14).
Infrared remote control (specific types only)
1 Place the batteries in the battery compartment (fig. 15).
Make sure the - and + poles are pointing in the right direction.
2 With the infrared remote control you can set the suction power to one of 5 different suction power settings. When you switch the appliance on, it will always start running at the highest suction power setting (fig. 16).
3 By pushing the - button, you will reduce the suction power by one setting. By pushing the + button, you will increase the suction power by one setting (fig.17).
4 Push the standby button to temporarily switch the vacuum cleaner off, for instance when you have to move some furniture. To continue vacuum cleaning, simply press the - button or the + button. The appliance will start operating at the previously selected suction power setting again (fig. 18).
Storage
1 Put the appliance in upright position and attach the lower tube to the appliance by means of the clip (fig. 19).
The height of the clip can be adjusted by sliding it along the tube.
Replacing the dustbag
- Replace the dustbag as soon as the "dustbag-full indicator" changes colour (when the nozzle is not placed on the floor).
1 Switch the appliance off.
2 Open the cover (fig. 20).
3 Push the dustbag holder backwards (fig.21).
4 Remove the full dustbag from the holder by pulling the cardboard tag (fig.22).
When you do this, the dustbag will be automatically sealed.
5 Slide the cardboard front of the new dustbag into the two grooves of the dustbag holder. Press it down as far as possible (fig. 23).
6 Pull the dustbag holder forwards (you will hear a click) (fig.24).
You cannot close the cover if no dustbag has been inserted.
Replacing filters
Motor Protection Filter
1 Replace the Motor Protection Filter when you insert the first of a new set of dustbags or once a year.
2 Insert the filter into the appliance with the white side facing upwards (fig. 25).
AFS Micro Filter
The AFS Micro Filter in this appliance will remove a large part of the smallest particles from the exhaust air by means of its electrostatically charged fibres.
1 Replace the AFS Micro Filter when you insert the first of a new set of dustbags or once a year (fig.26).
2 Place the sides and the bottom edge of the new filter properly behind the ridges of the holder (fig. 27).
3 Make sure the filter has been properly inserted into the holder before you close the filter holder.
HEPA Filter (specific types only)
Some appliances are equipped with a HEPA Filter. This filter not only removes household dust, but also harmful microscopic vermin.
1 Replace the HEPA Filter at least once a year.
2 Open the filter grill (fig. 28).
3 Push both catches sidewards and remove the filter (fig. 29).
4 Place the new filter with its white side pointing towards the appliance. Make sure that the Philips logo on the filter is visible and in the upper right-hand corner (fig.30).
5 Secure the filter by pushing the catches home and close the filter grill (fig. 31).
Ordering dustbags and filters
Philips s-bag™ paper dustbags are available under type number FC8021 (482248010113).
The recommended dustbags fit a variety of Philips vacuum cleaners. For compact vacuum cleaners like the City Line or the Impact, this means that the dustbags will not be filled to their maximum capacity, as the capacity of the dust compartment is smaller than that of the dustbag. However, this does not prevent your vacuum cleaner from functioning optimally.
Two AFS Micro Filters and one Motor Protection Filter are available under type number FC8032 (482201570056). HEPA Filters are available under type number HR6992 (482248010084).
If you have any difficulties obtaining dustbags, filters or other accessories for this appliance, please contact the Philips Customer Care Centre in your country.
See the worldwide guarantee leaflet for telephone numbers of the Philips Customer Care Centre.
Environment
To make recycling possible, the plastics used for this appliance have been coded.
The cardboard packaging has been made of recycled material and is fully recyclable.
Remove the batteries when you discard the appliance. Do not throw the batteries away with the normal household waste, but hand them in at an official collection point. You can also take the batteries to a Philips service centre, which will dispose of them in an environmentally safe way.
Replacing the mains cord
If the mains cord of this appliance is damaged, it must always be replaced by Philips or a service centre authorised by Philips, as special tools and/or parts are required.
Solving problems
▶ The suction power is insufficient:
1 Adjust the suction power by pushing the + button of the remote control (specific types only) (fig. 32).
2 Set the electronic suction power control to a higher setting (specific types only) (fig. 33).
3 Check if the dustbag needs to be replaced.
4 Check if the filters need to be replaced.
5 Check if the nozzle, tube or hose is blocked up.
6 To remove the obstruction, disconnect the blocked-up item and connect it (as far as possible) in reverse position. Switch the vacuum cleaner on to make the airflow suck the obstructing material out of the blocked-up item (fig. 34).
▶ The infrared remote control does not function:
7 It is possible that the batteries are not making proper contact.
8 Remove the lid of the battery compartment and push the batteries back into place (fig. 35).
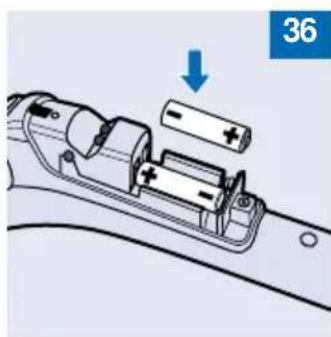
9 The batteries are empty.
10 Replace the batteries (make sure the - and the + poles of the new batteries are pointing in the right direction). Use LR03 batteries, preferably alkaline batteries (fig. 36).
Information & service
If you need information or if you have a problem, please visit the Philips Web site at www.philips.com or contact the Philips Customer Care Centre in your country (you will find its phone number in the worldwide guarantee leaflet). If there is no Customer Care Centre in your country, turn to your local Philips dealer or contact the Service Department of Philips Domestic Appliances and Personal Care BV.
Wichtig
natural_image
Mechanical component diagram showing internal parts with blue arrows indicating direction (no text or symbols)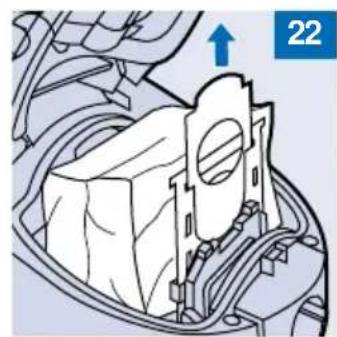
natural_image
Technical diagram of a mechanical assembly with no visible text or symbols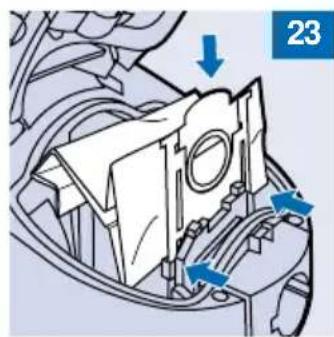
natural_image
Mechanical assembly diagram showing a component with blue arrows indicating parts of motion (no text or symbols present)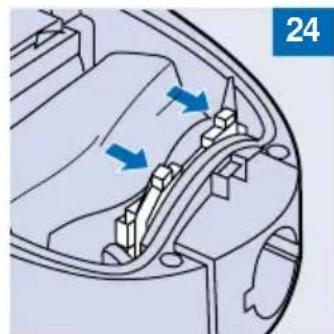
natural_image
Diagram of a car interior showing structural components with blue arrows indicating movement or flow (no text or labels)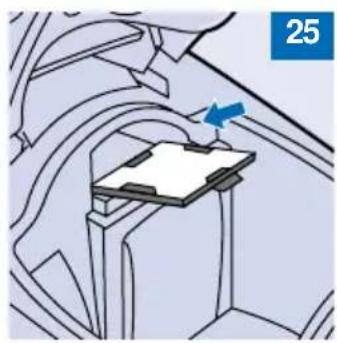
natural_image
Technical diagram of a mechanical component with a blue arrow indicating a specific feature (no text or symbols present)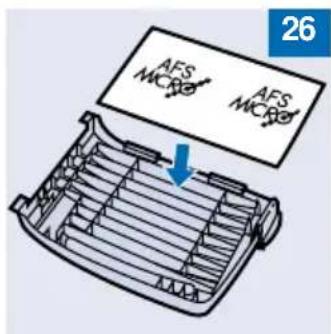
text_image
AFS MICRO AFS MICRO 26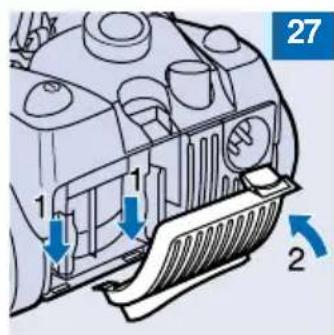
text_image
27 1 1 2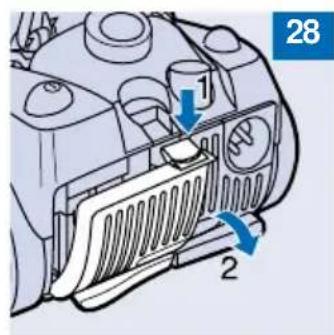
text_image
28 1 2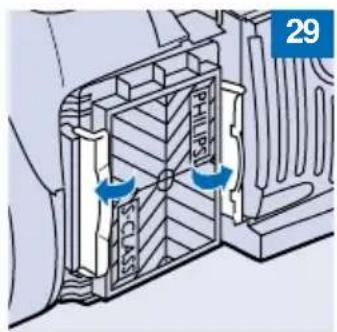
natural_image
Technical diagram of a mechanical component with directional arrows indicating flow or movement (no text or symbols)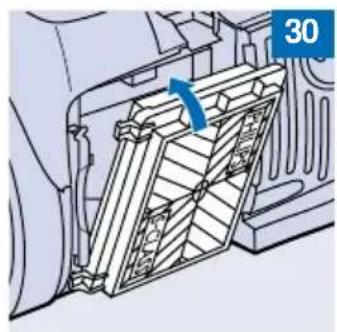
natural_image
Diagram of a vehicle air vent assembly with a blue arrow indicating direction (no text or symbols)
natural_image
Diagram of a vehicle door with internal compartments and directional arrows indicating movement (no text or symbols)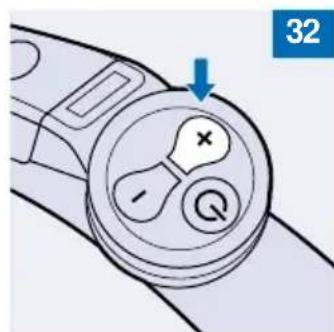
text_image
32
natural_image
Diagram of a mechanical component with a blue arrow indicating rotational motion (no text or symbols)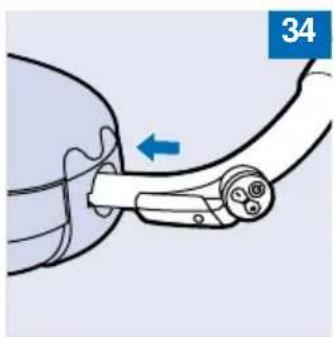
natural_image
Diagram of a mechanical joint or connector with a blue arrow indicating direction (no text or symbols present)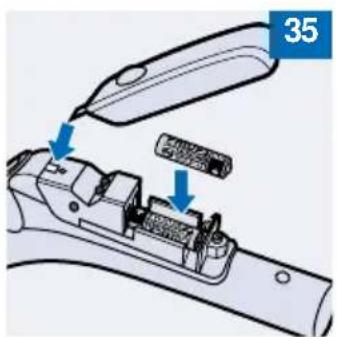
text_image
35