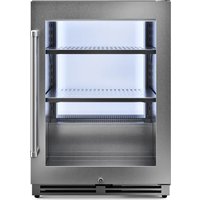
TBR24U-LH - Refrigerator Thor - Free user manual and instructions
Find the device manual for free TBR24U-LH Thor in PDF.


| Product Type | Beverage Refrigerator |
| Brand | Thor |
| Model | TBR24U-LH |
| Dimensions (W x D x H) | 23 7/16 x 23 7/16 x 34 1/4 in (59.6 x 59.5 x 87 cm) |
| Net Weight | 124 lb (56.25 kg) |
| Power Supply | 115 V AC, 60 Hz, 2.8 A |
| Rated Power | 100 W |
| Capacity | 5.3 cu ft (150 L) / 154 standard cans |
| Temperature Range | 34 °F to 46 °F (1 °C to 7 °C) |
| Refrigerant Type | R-600a (isobutane), 1.2 oz (33 g) |
| Refrigeration System | Compressor, automatic defrost |
| Protection Class | I |
| Protection Rating | IPX4 |
| Climate Type | SN |
| Interior Lighting | LED (not user-replaceable) |
| Alarms | Open door, abnormal temperature |
| Panel Lock | Automatic after 1 min, manual possible |
| Demo Mode | Yes (display only) |
| Installation | Built-in or freestanding |
| Cleaning | Stainless steel surfaces, glass panel, interior |
| Safety | Anti-tip brackets, mandatory grounding |
| Repairability | Power cords replaceable by professional; LED lamp non-replaceable |
| Warranty | See website www.thorkitchen.com/warranty-registration |
Frequently Asked Questions - TBR24U-LH Thor
User questions about TBR24U-LH Thor
0 question about this device. Answer the ones you know or ask your own.
Ask a new question about this device
Download the instructions for your Refrigerator in PDF format for free! Find your manual TBR24U-LH - Thor and take your electronic device back in hand. On this page are published all the documents necessary for the use of your device. TBR24U-LH by Thor.
USER MANUAL TBR24U-LH Thor
Thank you for choosing THOR KITCHEN. This appliance has been manufactured by Thor International, 4651 E Airport Drive, Ontario, CA 91761. This manual contains all the information you will need to install / use the appliance correctly and safely. Please read all the instructions prior using the appliance, and keep this manual in a secure place for future reference. Do not remove the attached adhesive identification label containing code, model number, manufacturer and other information from the appliance. This label will be used by the THOR KITCHEN authorized service representative in the event that your appliance needs servicing.
TABLE OF CONTENTS
IMPORTANT SAFETY INFORMATION....5
1.1 Appliance safety 5
1.2 Information for proper disposal....6
1.3 Explanation of symbols 7
1.4 Signal symbol/word definitions 7
INTENDED USE 7
APPLIANCE DESCRIPTION 8
3.1 Overview 8
3.2 Control panel description....8
3.3 Display indicators 9
BEFORE FIRST USE 9
4.1 Tools needed 10
4.2 Location requirements....10
4.3 Leveling the appliance 10
4.4 Cleaning....11
INSTALLATION....11
5.1 Installing the door handle 11
5.2 Built-in installation....11
5.3 Installing the floor mounted anti-tip brackets....12
USE 13
6.1 Switching on and off 13
6.2 Arranging and placing beverages 13
6.3 Adjusting controls and settings....14
6.4 Alarms and error codes 15
6.5 Beverage storage tips....16
CLEANING....16
MAINTENANCE 17
TRANSPORTATION 18
DISPOSAL 18
FREQUENTLY ASKED QUESTIONS....19
PRODUCT SPECIFICATIONS 20
WARRANTY 20
IMPORTANT SAFETY INFORMATION
1.1 Appliance safety
When using electrical appliances, basic safety precautions should always be followed to reduce the risk of fire, electric shock, injury and/or death including the following:
WARNING
Keep ventilation openings, in the appliance enclosure or in the built-in structure, clear of obstruction.
WARNING
Do not use mechanical devices or other means to accelerate the defrosting process, other than those recommended by the manufacturer.
WARNING
When positioning the appliance, ensure the supply cord is not trapped or damaged.
WARNING
Do not locate multiple portable socket outlets or portable power supplies at the rear of the appliance.
WARNING
Do not use electrical appliances inside the food storage compartments of the appliance, unless they are of the type recommended by the manufacturer.
WARNING: Cancer and Reproductive Harm - www.p65warnings.ca.gov
- This appliance is not intended for use by persons (including children) with reduced physical, sensory or mental capabilities, or lack of experience and knowledge, unless they have been given supervision or instruction concerning use of the appliance by a person responsible for their safety.
● Children should be supervised to ensure that they do not play with the appliance. - If the supply cord is damaged, it must be replaced by the manufacturer, its service agent or similarly qualified persons in order to avoid a hazard.
- The appliance must be plugged into its own dedicated 115 Volt, 60 Hz, 15 Amp, AC only electrical socket outlet. The supply cord of the appliance is equipped with a three prong grounding plug for your protection against electrical shock hazards. It must be plugged directly into a properly grounded three prong socket outlet. The socket outlet must be installed in accordance with local codes and ordinances. Consult a qualified electrician. Avoid connecting the appliance to a Ground Fault Interrupter (GFI) circuit. Do not use an extension cord or adapter plug.
- Allow disconnection of the appliance from the supply after installation. The disconnection may be achieved by having the plug accessible or by incorporating a switch in the fixed wiring in accordance with the wiring rules.
- Never unplug the appliance by pulling on the power cord. Always grip the plug firmly, and pull straight out from the socket outlet to prevent damaging the power cord.
● Unplug the appliance before cleaning to avoid electrical shock.
● Performance may be affected if the voltage varies by 10% or more. Operating the appliance with insufficient power can damage the compressor. Such damage is not covered under your warranty. - Do not plug the appliance into an electrical socket outlet controlled by a wall switch or pull cord to prevent the appliance from being turned off accidentally.
IMPORTANT SAFETY INFORMATION
- Do not store explosive substances such as aerosol cans with a flammable propellant in the appliance. The fumes can create a fire hazard or explosion.
-
Use two or more people to move and install the appliance. Failure to do so can result in back or other injury.
● This appliance is intended to be used in household and similar applications such as -
staff kitchen areas in shops, offices and other working environments;
- farm houses and by clients in hotels, motels and other residential type environments;
- bed and breakfast type environments;
- catering and similar non-retail applications.
● The maximum weight capacity for each shelf is 55 lbs (25 kg). - The built-in LED of this appliance is not replaceable by the user. When the LED reaches its end of life, continue to use the appliance as normal.
- Never clean refrigerator parts with flammable fluids. The fumes can create a fire hazard.
- Do not store fresh milk or other fresh dairy products in this appliance.
- The flammable refrigerant isobutene (R600a) is contained within the refrigerant circuit of the appliance, a natural gas with a high level of environmental compatibility, which is nevertheless flammable. During transportation and installation of the appliance, ensure that none of the components of the refrigerant circuit becomes damaged.
1.2 Information for proper disposal
WARNING
Risk of child entrapment. Before you throw away your old appliance:
● Take off the doors.
- Leave the shelves in place so that children may not easily climb inside.


WARNING
Risk of fire! Flammable materials. This appliance uses refrigerant R-600a and must be disposed of by a qualified service technician with knowledge of appropriate gas reclamation methods.
IMPORTANT SAFETY INFORMATION
1.3 Explanation of symbols
The following symbols are used in this user manual, on the appliance, or on the packaging.
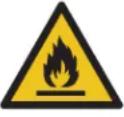
 | WARNING! Risk of fire/flammable materials. |
 | |
 Intertek Intertek | The ETL Listed Mark is proof that the appliance has been independently tested and meets the applicable published standard. |
1.4 Signal symbol/word definitions
The following symbols are used in this user manual.
 | DANGER | Indicates a potentially hazardous situation which, if not avoided, will result in death or serious injury. |
 | WARNING | Indicates a potentially hazardous situation which, if not avoided, could result in death or serious injury. |
 | CAUTION | Indicates a potentially hazardous situation which, if not avoided, may result in minor or moderate injury. |
| NOTICE | Indicates installation, operation or maintenance information which is important but not hazard-related. |
INTENDED USE
- This appliance is intended for storing and chilling up to 154 shelf-stable beverage cans and bottles inside a kitchen, pantry, basement, garage and similar spaces.
- This appliance is designed for built-in or freestanding installation.
● This appliance is not intended for storing food or biological substances.
● For household and residential use only.
APPLIANCE DESCRIPTION
3.1 Overview
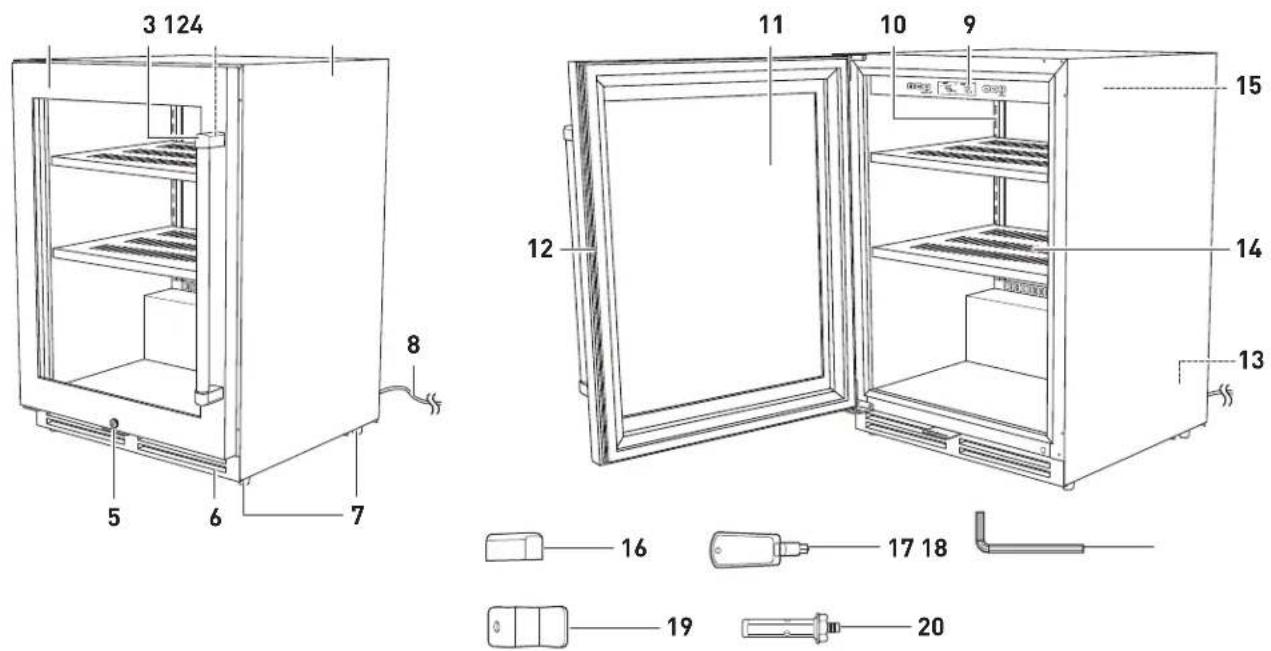
| 1 | Housing | 11 | Glass panel |
| 2 | Door pins | 12 | Door gasket |
| 3 | Door handle | 13 | Anti-tip bracket slots |
| 4 | Door | 14 | Shelves |
| 5 | Lock | 15 | Interior light |
| 6 | Ventilation opening | 16 | End caps x 2 |
| 7 | Leveling feet | 17 | Door keys x 2 |
| 8 | Supply cord with plug | 18 | Hex key |
| 9 | Control panel | 19 | Anti-tip brackets x 2 |
| 10 | Shelf brackets | 20 | Stud anchors x 2 |
3.2 Control panel description

APPLIANCE DESCRIPTION
| Button/Part Description | ||
| A |  | Lock/unlock control panel buttons |
| B |  | Mute/unmute door and temperature alarms and button sounds |
| C | [∅GDX] | Switch light on/offChange temperature unit (°F/°C) |
| D | Display | |
| E |  | Increase temperature |
| F |  | Decrease temperature |
| G | [Z8DH] | Switch appliance on/off |
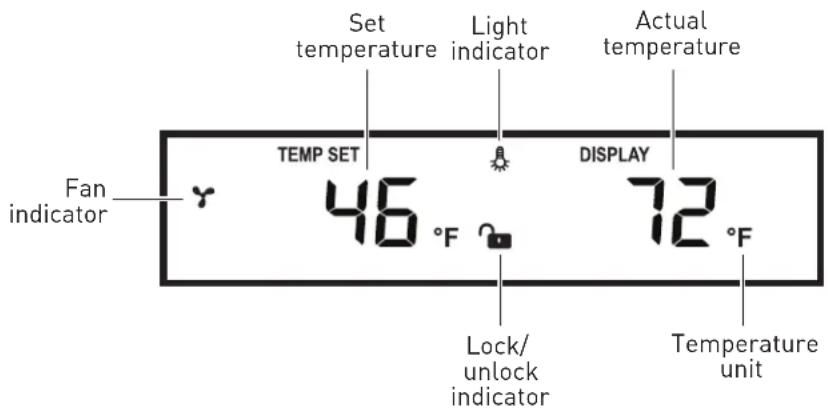
3.3 Display indicators
BEFORE FIRST USE
⚠️ DANGER Risk of suffocation! Keep all packaging materials away from children and pets. These materials pose a threat of suffocation.
- Remove and dispose of all packaging materials.
- Check the appliance for any damage or broken parts.
- Check that all components are included.
- Let the appliance stand upright for at least 24 hours to allow the refrigerant to settle after transport.
- Let the appliance reach the set temperature before placing any beverages inside.
BEFORE FIRST USE
4.1 Tools needed
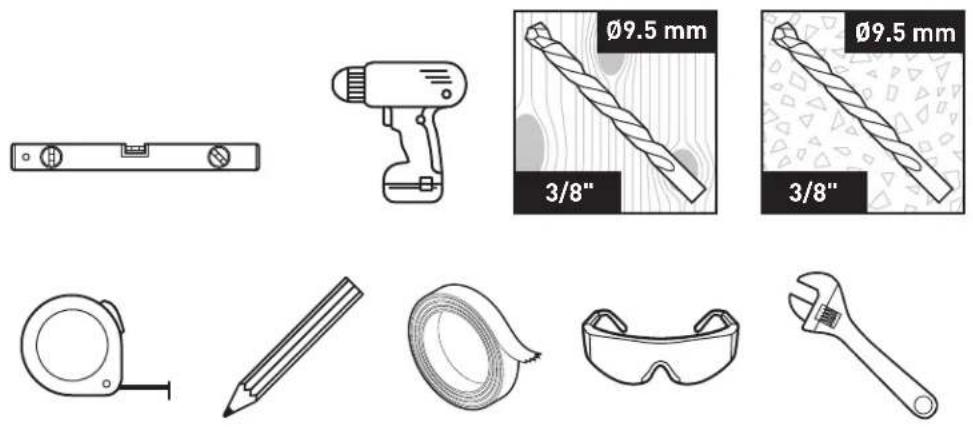
4.2 Location requirements
WARNING Risk of fire!
- Do not block the ventilation opening (6). Insufficient ventilation could cause the appliance to overheat and cause fire. Leaked refrigerant may cause fire and ex
-
Accumulated dust on the plug may cause fire. Choose a location that prevents dust accumulation or allows access for cleaning the plug.
-
The appliance should be installed near a grounded, non-GFCI, electrical socket outlet. Do not use an extension cord or an adapter plug.
- Place the appliance on a level, strong enough floor that can support a fully loaded appliance. On carpet or vinyl flooring, it is recommended to place a plastic mat underneath.
- Place the appliance out of direct sunlight and away from heat sources such as the dishwasher or range.
- Do not install the appliance in a poorly insulated or heated area to avoid affecting cooling performance or creating external condensation on the appliance.
- Leave at least 2 in (5 cm) of space behind the appliance and at least 0.8 in (2 cm) from the sides and top of the appliance for adequate air flow. Make sure there is enough space at the front to allow the door to fully open.
- Keep the appliance away from hazardous or combustible substances.
4.3 Leveling the appliance
The appliance must rest firmly on a level surface in order to function properly. If the appliance is not leveled, the door (4) may be misaligned when installed. This can lead to cooling and moisture issues if the door (4) does not completely close.
- Place a carpenter's level on top of the appliance to check if it needs leveling.
- Turn the leveling feet (7) clockwise to lower the appliance or counter-clockwise to raise the appliance until the carpenter's level shows the appliance is level.
BEFORE FIRST USE
4.4 Cleaning
- Wipe the interior surfaces and shelves (14) with lukewarm water and a soft, clean cloth.
- Wipe dry with a soft, clean cloth.
INSTALLATION
5.1 Installing the door handle
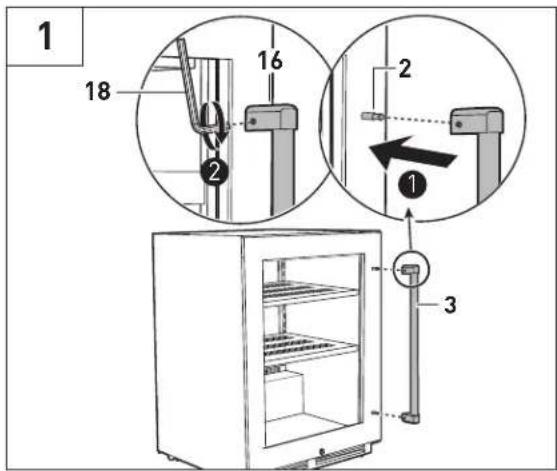
- Attach the end caps (16) to both ends of the door handle (3).
- Place the assembled door handle (3) onto the door pins (2) (Fig. 1).
- Tighten the pre-installed screws inside the end caps (16) with the hex key (18) (Fig. 1). Do not overtighten the screws.
5.2 Built-in installation
⚠️ CAUTION Risk of injury! Keep fingers out of the "pinch point" areas. Clearances between the door (4) and housing (1) are necessarily small. Be careful closing door (4) when children are in the area.
NOTICE Adjust the leveling feet (7) as needed before placing the appliance in a recessed location (see chapter "Leveling the appliance"). The leveling feet adjustment range is 0 - 0.4" (0 - 1 cm).
Make sure the installation area has adequate space for the appliance (Fig. 2).
![2 23 7/16 in [59.6 cm] 21 7/16 in [54.5 cm] 23 9/16 in [59.6 cm] 25 15/16 in [65.8 cm] 34 1/4 in [87 cm] 24 in [61 cm] 34 5/8 in [88 cm] 24 7/16 in [62 cm]](/content/2026/04/704760/images/a0a8e324601959815fcede62950324ff1f93d5964ee50da1174449375999b2a1.jpg)
INSTALLATION
5.3 Installing the floor mounted anti-tip brackets
CAUTION Risk of injury! Wear appropriate protective gear to avoid injury.
⚠️ CAUTION Risk of property damage! Make sure there are no gas pipes, water pipes, or electrical wires underneath the floor.
NOTICE
- For installation on tiled floors: for porcelain tiles, use a carbide-tipped drill bit; for natural stone, use a diamond-tipped drill bit.
- To prevent natural stone surfaces from overheating during drilling, drip some water on top of the mounting hole location.
- Place masking tape around the surrounding surface to prevent scratching the area if the drill bit slips.
● Drill at a slow speed to avoid cracking the tile. - For wood and concrete flooring, use a standard drill bit.
-
If in doubt about floor installation, contact a qualified professional.
-
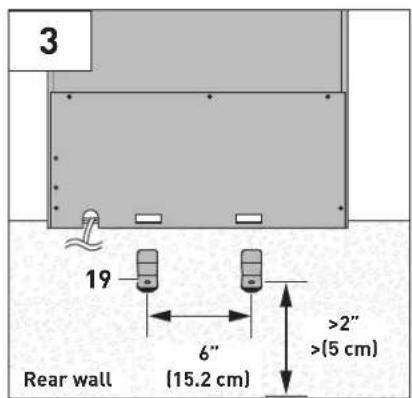
Position the anti-tip brackets (19) 6" (15.2 cm) apart on the floor. Mark the location of the mounting holes on the floor (Fig. 3). Make sure there is at least 2 in (5 cm) of space behind the appliance.
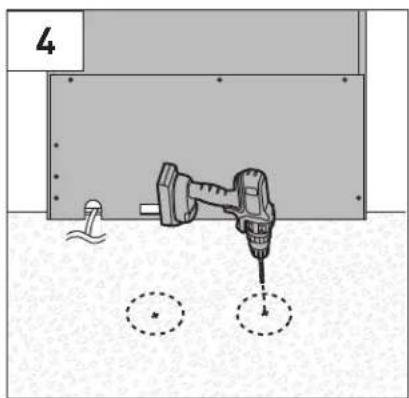
- Drill two mounting holes over the marked locations 1 7/16" (3.7 cm) deep using a 3/8" (9.5 mm) drill bit (Fig. 4).
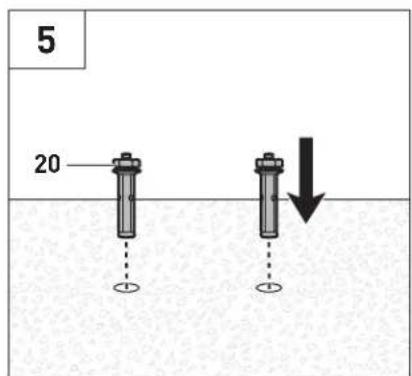
- Insert the stud anchors (20) inside the holes (Fig. 5).
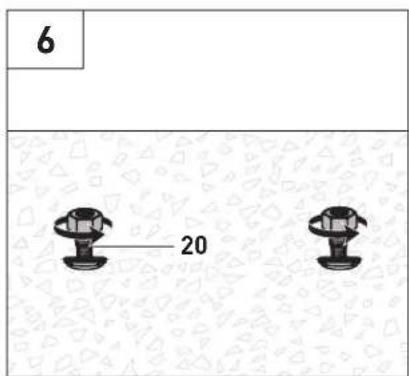
- Remove the nuts from the stud anchors (20) (Fig. 6).
INSTALLATION
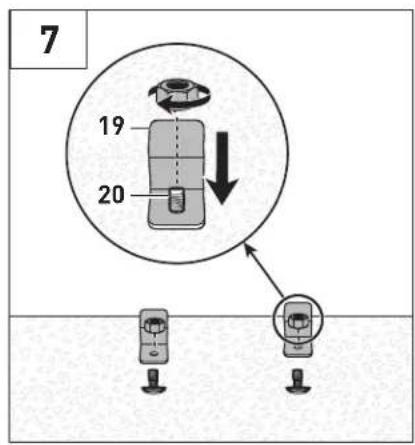
- Place the anti-tip brackets (19) on the stud anchors (20), then refit and tighten the nuts onto the stud anchors (20) (Fig. 7).
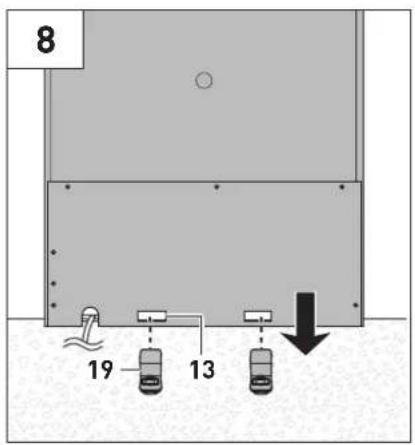
- Slide the appliance toward the anti-tip brackets (19) so that the brackets insert and lock completely into the anti-tip bracket slots (13) (Fig. 8).
USE
6.1 Switching on and off
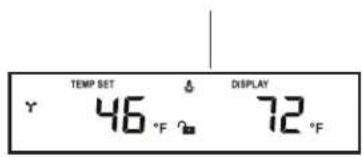
- Connect the plug (8) to a suitable socket outlet. The appliance switches on automatically and the display (D) lights up.
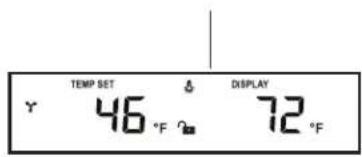
- The display (D) shows the default temperature setting, +34 °F (+7 °C).
6.2 Arranging and placing beverages
⚠️ CAUTION Risk of damage or injury! Remove beverages from the shelves (14) before rearranging the shelf layout.
- Place beverages evenly across and throughout the top and bottom of the housing (1). Do not overload the shelves (14).
- Do not let the beverages touch the back of the housing (1) to allow adequate air circulation.
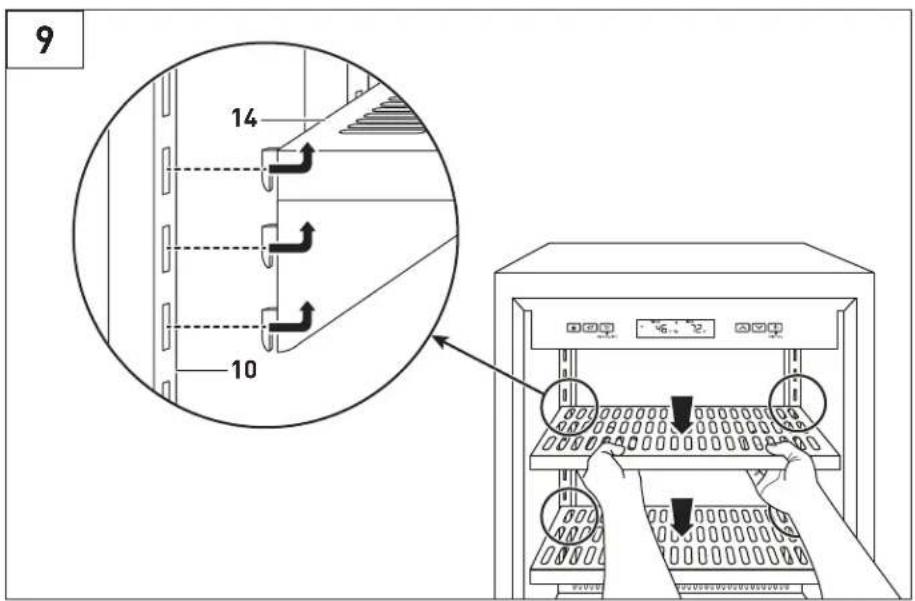
- Remove a shelf (14) to create extra space for oversized or oddly shaped cans or bottles, or for vertical storage (Fig. 9). To refit a shelf (14), align it inside the holes of the shelf brackets (10), then push down until the shelf (14) fits securely.
● The actual capacity depends on the size, shape and layout of the cans or bottles.
USE
6.3 Adjusting controls and settings
NOTICE The appliance's internal memory stores the last used settings. If the appliance is switched off or loses power, the previous settings appear on the display (D) when the appliance is switched back on.
Temperature
NOTICE The temperature setting ranges from +34 °F (+1 °C) to +46 °F (+7 °C).
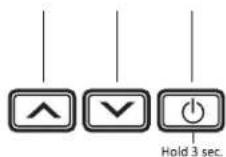
- Press the ▲ button (E) to increase the temperature by +1 °F/+1 °C. The set value blinks for 5 seconds.
- Press the √ button (F) to decrease the temperature by +1 °F/+1 °C. The set value blinks for 5 seconds.
Interior light
NOTICE If the interior light (15) is switched on, it stays on until it is manually switched off.
- Press the button (C) once to switch the interior light (15) on or off.
- Press and hold the "button (C) for 3 seconds to toggle the temperature unit between Fahrenheit and Celsius.
Mute and unmute alarms and sounds
- Press the button (B) once to mute the door alarm and temperature alarm.
- Press and hold the button (B) for 3 seconds to mute the control panel buttons' sound.
Lock/unlock
NOTICE The control panel buttons (except for the button (A)) lock automatically after 1 minute if no buttons are pressed on the control panel (9).
Press and hold the 🔒 button (A) for 3 seconds to lock or unlock the control panel buttons.
Power
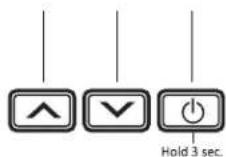
- Press and hold the button (G) for 1 second to switch the appliance on.
- Press and hold the button (G) for 3 seconds to switch the appliance off.
Demo mode
NOTICE ● Demo mode is for display purposes only. The compressor, fan and door alarm do not work in demo mode.
● The LED light remains on while the door (4) is closed.
Press and hold the button (E) and button (F) at the same time for 3 seconds to turn on demo mode.
6.4 Alarms and error codes
Door alarm
NOTICE ● The compressor and fan stop running if the door (4) is open for more than 1 minute. They resume once the door (4) is closed.
- If the door alarm is muted, the display (D) keeps flashing to signal that the door (4) is open.
- An alarm sounds when the door (4) is open for more than 1 minute. The display (D) flashes.
- Close the door (4) to silence the alarm. The display (D) stops flashing.
Temperature alarms
NOTICE If the temperature alarm is muted, the display (D) keeps flashing to signal that the temperature has changed beyond the set temperature.
- If the temperature inside the housing (1) is +39 °F (+4 °C) lower than the set temperature for over 1 hour, an alarm sounds. The display (D) shows L and flashes.
- If the temperature inside the housing (1) is +39 °F (+4 °C) higher than the set temperature for over 24 hours, an alarm sounds. The display (D) shows hand flashes.
Error code guide
- When the display (D) shows for, the compressor, fan and defrosting system shut down.
- When the display (D) shows for, the compressor and fans shut down for 5 minutes, then resume immediately after.
USE
| Code Error | |
| E1 | Internal temperature sensor has a broken circuit |
| E2 | Internal temperature sensor short-circuited |
| E3 | Defrosting sensor has a broken circuit |
| E4 | Defrosting sensor short-circuited |
| HH | High temperature alarm |
| LL | Low temperature alarm |
| Display flashes Door open alarm | |
6.5 Beverage storage tips
- Set the appropriate temperature if only one type of beverage is stored.
- For storing a variety of beverages, the recommended temperature is +40 °F (+5 °C).
| Beverage Storage temperature range | |
| Soft drinks, shelf-stable juices, sports drinks | +38 °F to +42 °F (+3 °C to +6 °C) |
| Beer | +38 °F to +46 °F (+3 °C to +7 °C) |
CLEANING
- Switch the appliance off and disconnect the plug (8) from the socket outlet.
- Wipe away any dust from the exterior of the appliance with a soft, dry cloth.
- Remove all items and the shelves (14) from the appliance.
● Wipe away any condensation with a soft, absorbent cloth. - Never use corrosive detergents, wire brushes, abrasive scourers, or metal/sharp utensils to clean the appliance.
Stainless steel surfaces
-
Use a cleaner intended for stainless steel as needed to keep the stainless steel surfaces free from dust, fingerprints and other residue. Follow the manufacturer's instructions for best results.
● Alternatively, use undiluted white vinegar to clean stainless steel surfaces. -
Spray the vinegar onto the surface
- Wipe with a soft microfiber cloth, following the grain of the stainless steel surface. Do not wipe in a circular motion.
- Dampen a clean microfiber cloth with distilled or filtered water. Wipe away any vinegar residue from the surface.
- Wipe the surfaces dry with a soft, clean microfiber cloth.
Glass panel
- Use a cleaner intended for glass as needed to keep the glass panel (11) free from dust, fingerprints and other residue. Follow the manufacturer's instructions for best results.
- Avoid applying the glass cleaner on the surrounding stainless steel surface.
Interior surfaces
- Prepare a cleaning solution of 2 tablespoons of baking soda and 1 quart (0.95 l) of water.
- Wipe the interior surfaces with the prepared cleaning solution and a soft, clean cloth.
- Wipe remaining residue with a soft cloth and clean water. Wipe dry with a soft, clean cloth.
- Wipe the control panel (9) with a soft cloth and clean water. Wipe dry with a soft, clean cloth.
Shelves
- Remove all items and the shelves (14) from the appliance.
- Use a cleaner intended for stainless steel as needed to keep the shelves (14) free from dust, fingerprints and other residue. Follow the manufacturer's instructions for best results.
-
Alternatively, use undiluted white vinegar to clean the shelves (14).
-
Spray the vinegar onto the surface
- Wipe with a soft microfiber cloth, following the grain of the stainless steel surface. Do not wipe in a circular motion.
- Dampen a clean microfiber cloth with distilled or filtered water.
- Wipe away any vinegar residue from the shelves.
- Wipe the shelves (14) dry with a soft, clean microfiber cloth before refitting them onto the shelf brackets (10).
Door gasket
Wipe the door gasket (12) when visibly dusty or dirty with a soft, damp cloth.
MAINTENANCE
For any servicing other than mentioned in this user manual, contact a qualified service technician for repairs and maintenance.
Defrosting
● The appliance defrosts automatically.
● The compressor stops temporarily while the fans circulate air around the coils to melt the ice.
MAINTENANCE
Power failure
- In case of power failure, avoid opening the door (4) to maintain a consistent temperature until the power is restored.
- If the plug (8) is disconnected or if the appliance is switched off, wait at least 5 minutes before switching the appliance on again. This avoids damaging the compressor.
Vacation and periods of absence
⚠ WARNING Risk of child entrapment. If leaving the door (4) open, make sure children cannot climb inside the appliance and become entrapped.
If leaving the appliance unused for several months:
- Switch the appliance off and disconnect the plug (8) from the socket outlet.
- Remove all items and the shelves (14) from the appliance.
- Clean the appliance (see chapter "CLEANING").
- Prop the door (4) slightly open to prevent odor and mold.
TRANSPORTATION
If moving or transporting the appliance:
- Switch the appliance off and disconnect the plug (8) from the socket outlet.
- Remove beverages and clean the appliance (see chapter "CLEANING").
- Tape the shelves (14) securely in place inside the appliance to prevent damage.
- Tape the door (4) closed.
- Wrap the appliance with a protective cover, such as a blanket or bubble wrap.
● During transport, secure the appliance in an upright position so it does not slide or tip over.
DISPOSAL

- Dispose of the appliance according to local regulations.
- This appliance contains refrigerants and gases in the insulation. These must be removed and recycled by a qualified service technician.
● Make sure that the refrigerant tubing is not damaged prior to disposal.
FREQUENTLY ASKED QUESTIONS
| Problem Solution | |
| The appliance does not switch on. | Check if the plug (8) is properly connected to the socket outlet.Check if the socket outlet is operational. |
| The appliance is not cold enough. | Adjust the set temperature lower.Reduce the amount of beverages inside the appliance.Open the door (4) only when necessary.Make sure the door (4) closes completely.Clean the door gasket (12). |
| Interior light (15) does not work. | Check if the plug (8) is properly connected to the socket outlet.Press the button (C) to switch the interior light (15) on.The circuit breaker may be tripped or there is a blown fuse. |
| The compressor and fan switch on and off frequently. | The ambient temperature may be higher than normal. If possible, adjust the ambient temperature.Reduce the amount of beverages inside the appliance.Open the door (4) only when necessary.Make sure the door (4) closes completely.Clean the door gasket (12). |
| The appliance makes unusual noise. | Make sure the appliance is on stable and level ground. Adjust the leveling feet (7) if necessary.Move the appliance to make sure it does not touch surrounding objects or walls.Gurgling noises are a result of refrigerant flowing through the refrigerant system. This is normal. |
| Condensation builds up inside and outside the appliance and door (4). | The ambient temperature may be higher than normal. If possible, adjust the ambient temperature.Open the door (4) only when necessary.Make sure the door (4) closes completely. |
PRODUCT SPECIFICATIONS
| Rated voltage 115 V AC, 60 Hz | |
| Rated power 100 W, 2.8 A | |
| Protection class I | |
| Cooling temperature range +34 °F to +46 °F (+1 °C to +7°C) | |
| Maximum capacity 5.3 ft | ^3 (150 L), 154 standard beverage cans |
| Refrigerant type R-600a, 1.2 oz (33 g) | |
| Foaming agent Cyclopentane (C | _5H_10 |
| Cooling system Compressor cooling | |
| Climate type SN | |
| IP rating IPX4 | |
| Net weight 124 lbs (56.25 kg) | |
| Dimensions (W x D x H) 23 7/16 x 23 7/16 x 34 1/4" (59.6 x 59.5 x 87 cm) | |
WARRANTY

Warranty&Service
This appliance has been manufactured by Thor International, 4651 E Airport Drive, California 91761
For Customer Service, please call (877) 288 - 8099
For the most up to date warranty and service policy, please refer to our website WWW.THORKITCHEN.COM/WARRANTY-REGISTRATION
For in-warranty service requests, please visit our website at WWW.THORKITCHEN.COM/SERVICE
Please Note: You must provide proof of purchase or installation date for any in-warranty service requests
TABLE DES MATIÈRES
REMARQUE IMPORTANTE CONCERNANT LA SÉCURITÉ 22
CARACTÉRISTIQUES DU PRODUIT
Garantie et service
Garantía y servicio
You chose THOR Kitchen to enhance your culinary journey and we're stoked to have you in the club. Think of it as a secret society of really savvy people, such as yourself, choosing professional power and performance at an affordable price.

Register your product by following the steps below.
WARRANTY REGISTRATION

Scan the QR code or visit thorkitchen.com/warranty
Input your product info and select register

You're done. Let's get cookin'.
WARRANTY NEED PARTS?


- TABLE OF CONTENTS
- IMPORTANT SAFETY INFORMATION....5
- INTENDED USE 7
- APPLIANCE DESCRIPTION 8
- BEFORE FIRST USE 9
- INSTALLATION....11
- USE 13
- CLEANING....16
- MAINTENANCE 17
- TRANSPORTATION 18
- DISPOSAL 18
- FREQUENTLY ASKED QUESTIONS....19
- PRODUCT SPECIFICATIONS 20
- WARRANTY 20
- IMPORTANT SAFETY INFORMATION
- Appliance safety
- WARNING
- Information for proper disposal
- Explanation of symbols
- Signal symbol/word definitions
- INTENDED USE
- APPLIANCE DESCRIPTION
- Display indicators
- BEFORE FIRST USE
- Tools needed
- Location requirements
- WARNING Risk of fire!
- Leveling the appliance
- Cleaning
- INSTALLATION
- Installing the door handle
- Built-in installation
- Installing the floor mounted anti-tip brackets
- NOTICE
- USE
- Switching on and off
- Arranging and placing beverages
- Adjusting controls and settings
- Temperature
- Interior light
- Mute and unmute alarms and sounds
- Lock/unlock
- Power
- Demo mode
- Alarms and error codes
- Door alarm
- Temperature alarms
- Error code guide
- Beverage storage tips
- CLEANING
- Stainless steel surfaces
- Glass panel
- Interior surfaces
- Shelves
- Door gasket
- MAINTENANCE
- Defrosting
- Power failure
- Vacation and periods of absence
- TRANSPORTATION
- DISPOSAL
- FREQUENTLY ASKED QUESTIONS
- PRODUCT SPECIFICATIONS
- WARRANTY
- Warranty&Service
- TABLE DES MATIÈRES
- REMARQUE IMPORTANTE CONCERNANT LA SÉCURITÉ 22
- CARACTÉRISTIQUES DU PRODUIT
- Garantie et service
- Garantía y servicio
- WARRANTY REGISTRATION
Brand : Thor
Model : TBR24U-LH
Category : Refrigerator