
KCO128 - Oven KITCHENAID - Free user manual and instructions
Find the device manual for free KCO128 KITCHENAID in PDF.

| Product Type | Multifunction Toaster Oven |
| Brand | KitchenAid |
| Model | KCO128 |
| Power Supply | 120 V ~ 60 Hz, 1800 W |
| Power | 1800 W |
| Viewing Window | Tempered Glass |
| Included Accessories | Removable Crumb Tray, Broil Rack, Enameled Baking Pan, Chrome Steel Rack, Air Fry Basket, Pizza Stone, Cooling Rack |
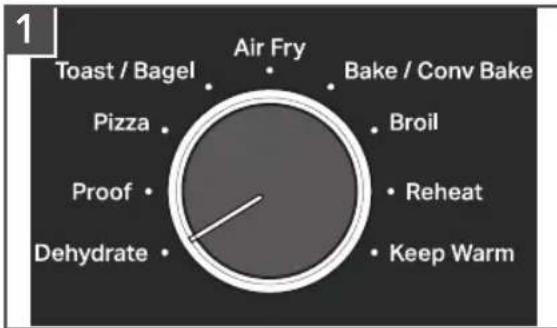
| Cooking Functions | Air Fry, Bake, Broil, Toast, Bagel, Pizza (frozen/fresh), Dehydrate, Proof, Keep Warm, Reheat |
| Temperature Range | 80 °F – 450 °F (27 °C – 232 °C) depending on mode |
| Timer | Yes, adjustable up to 6 hours (Dehydrate mode) |
| Convection | Convection fan on/off |
| Auto Preheat | Yes for most modes; can be skipped |
| Display | LCD screen with icons (preheat, browning level, etc.) |
| Rack Positions | High (upper) and Low (lower) |
| Browning Function | Adjustable 1 to 8 for Toast and Bagel modes |
| Temperature Units | Fahrenheit or Celsius (toggle by Options button 3s) |
| Cleaning | Removable crumb tray; rack and pan dishwasher-safe (hand wash recommended); non-stick interior |
| Safety | Auto shut-off at end of cooking; do not cover crumb tray; use oven mitts |
| Warranty | 1-year limited warranty with hassle-free replacement (USA/Canada) |
Frequently Asked Questions - KCO128 KITCHENAID
User questions about KCO128 KITCHENAID
0 question about this device. Answer the ones you know or ask your own.
Ask a new question about this device
Download the instructions for your Oven in PDF format for free! Find your manual KCO128 - KITCHENAID and take your electronic device back in hand. On this page are published all the documents necessary for the use of your device. KCO128 by KITCHENAID.
USER MANUAL KCO128 KITCHENAID
natural_image
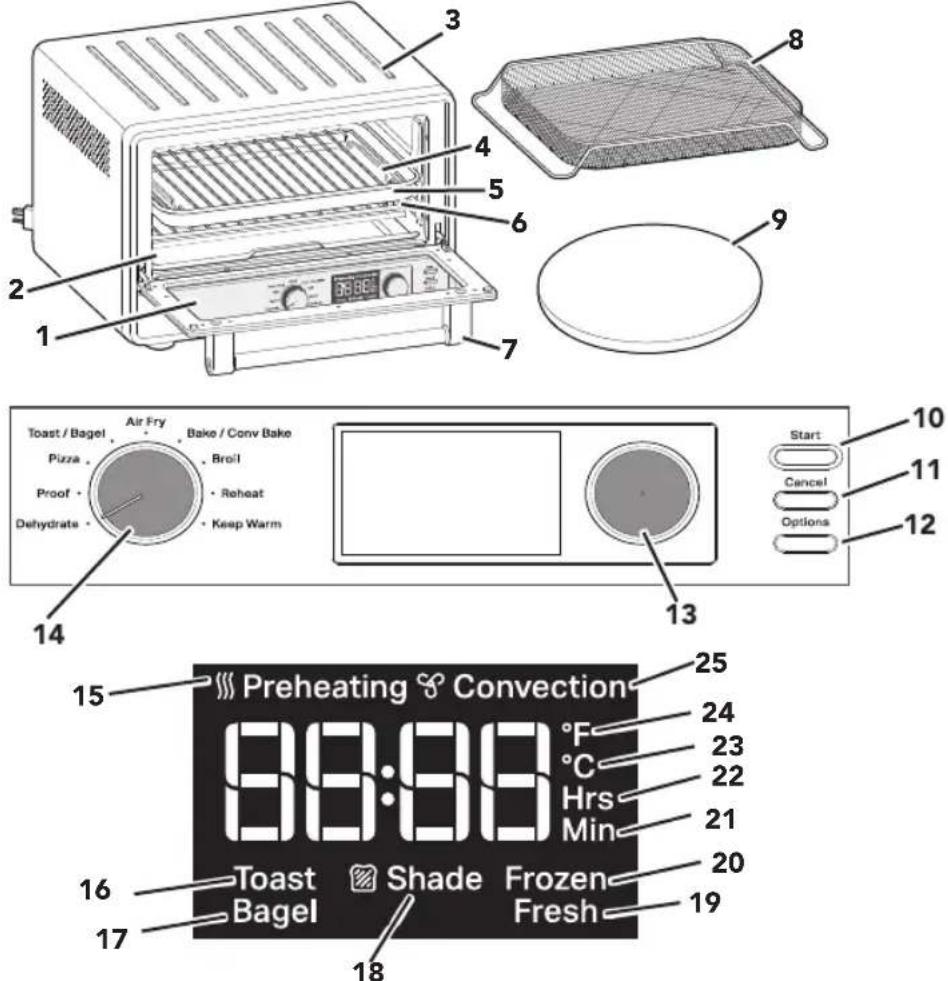
KitchenAid appliance with digital display, a circular baking pan, and a mesh grater (no visible text or symbols)PARTS AND FEATURES
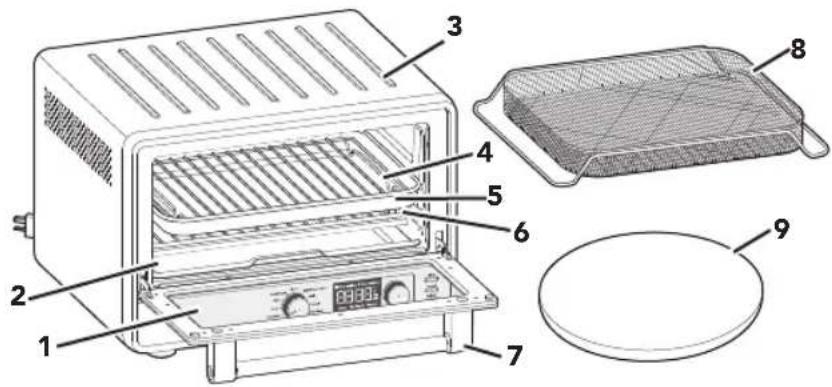
1 Toughened Glass Window
2 Removable Crumb Tray
3 Cool Down Surface for Removable Oven Rack
4 Chrome-plated Steel Broiling Rack
5 Enamel-coated Pan
6 Chrome-plated Steel Oven Rack
7 Door Handle
8 Air Fry Basket
9 Pizza Stone
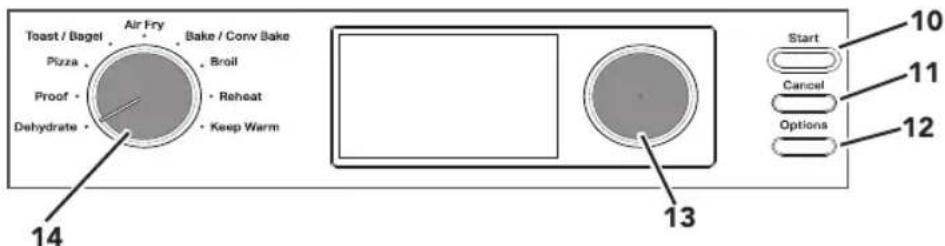
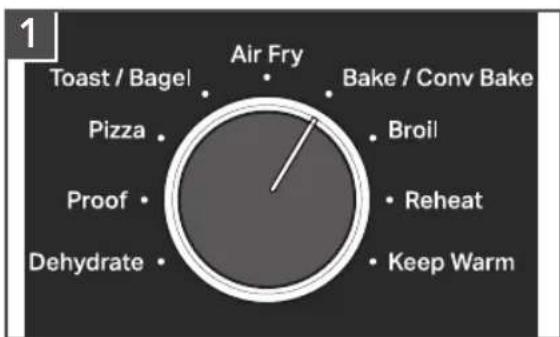
10 Start: Start Selected Cooking Mode
11 Cancel: Stops Selected Cooking Mode
12 Options
13 Temperature/Timer Knob
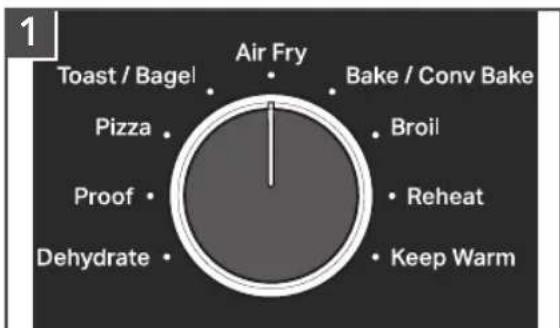
14 Mode Knob: Cooking Mode Selector
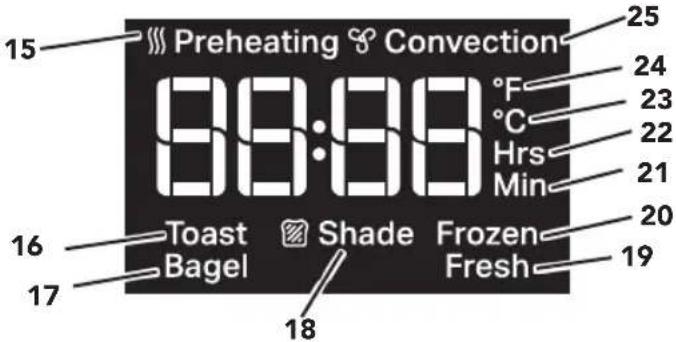
15 Preheating Icon
16 Toast Icon
17 Bagel Icon
18 Shade Icon
19 Fresh Icon
20 Frozen Icon
21 Minutes Icon
22 Hours Icon
23 Celsius Icon
24 Fahrenheit Icon
25 Convection Icon
NOTE: Press and hold the Options button for 3 seconds to switch between the temperature units Fahrenheit (°F) and Celsius (°C).
2
PRODUCT SAFETY
Your safety and the safety of others are very important.
We have provided many important safety messages in this manual and on your appliance. Always read and obey all safety messages.

This is the safety alert symbol.
This symbol alerts you to potential hazards that can kill or hurt you and others.
All safety messages will follow the safety alert symbol and either the word "DANGER" or "WARNING." These words mean:

You can be killed or seriously injured if you don't immediately follow instructions.

You can be killed or seriously injured if you don't follow instructions.
All safety messages will tell you what the potential hazard is, tell you how to reduce the chance of injury, and tell you what can happen if the instructions are not followed.
IMPORTANT SAFEGUARDS
When using electrical appliances, basic safety precautions should always be followed, including the following:
- Read all instructions. Misuse of appliance may result in personal injury.
- Do not touch hot surfaces. Use handles or knobs.
- To protect against risk of electrical shock, do not put cord, plugs, or any parts of the Countertop Oven in water or other liquid.
-
This appliance is not intended for use by children or by persons with reduced physical, sensory, or mental capabilities, or lack of experience and knowledge. Close supervision is necessary when any appliance is used near children. Children should be supervised to ensure that they do not play with the appliance.
-
Do not operate any appliance with a damaged cord or plug, or after the appliance malfunctions, or is dropped or damaged in any manner. Return appliance to the nearest Authorized Service Facility for examination, repair, or electrical or mechanical adjustment.
-
The use of accessories/attachments not recommended or sold by KitchenAid may cause fire, electrical shock, or injury to persons.
-
Do not let cord hang over edge of table or counter, or touch hot surfaces.
-
Do not place on or near a hot gas or electric burner, or in a heated oven.
-
Extreme caution must be used when moving an appliance containing hot oil or other hot liquids.
-
Use extreme caution when removing Multipurpose Pan, Oven Rack, or disposing of hot grease.
-
Oversize foods or metal utensils must not be inserted in a Countertop Oven as they may create a fire or risk of electric shock.
-
A fire may occur if Countertop Oven is covered or touching flammable material, including curtains, draperies, walls, and the like, when in operation. Do not store any item on top of the appliance when in operation.
PRODUCT SAFETY
- Do not clean with metal scouring pads. Pieces can break off the pad and touch electrical parts, creating a risk of electric shock.
- Extreme caution should be exercised when using containers constructed of materials other than metal or glass.
- Do not store any materials, other than KitchenAid recommended accessories, in this Countertop Oven when not in use.
- Do not place any of the following materials in the Countertop Oven: paper, cardboard, plastic, or anything similar.
- Do not cover crumb drawer or any part of the Countertop Oven with metal foil. This will cause overheating of the oven.
- To disconnect, turn the Countertop Oven "off" by pressing Cancel button, then remove plug from wall outlet.
- Do not use the appliance outdoors.
- Do not use appliance for other than intended use.
- Unplug from outlet when not in use and before cleaning. Allow to cool before putting on or taking off parts.
SAVE THESE INSTRUCTIONS
This product is designed for household use only.
ELECTRICAL REQUIREMENTS
WARNING
Electrical Shock Hazard
Plug into a grounded 3 prong outlet.
Do not remove ground prong.
Do not use an adapter.
Do not use an extension cord.
Failure to follow these instructions can result in death, fire, or electrical shock.
Voltage: 120 V\~
Frequency: 60 Hz
Power: 1800 W
NOTE: If the plug does not fit in the outlet, contact a qualified electrician.
Do not modify the plug in any way.
Do not use an adapter.
Do not use an extension cord. If the power supply cord is too short, have a qualified electrician or service technician to install an outlet near the appliance.
The cord should be arranged so that it will not drape over the countertop or tabletop where it can be pulled on by children or tripped over unintentionally.
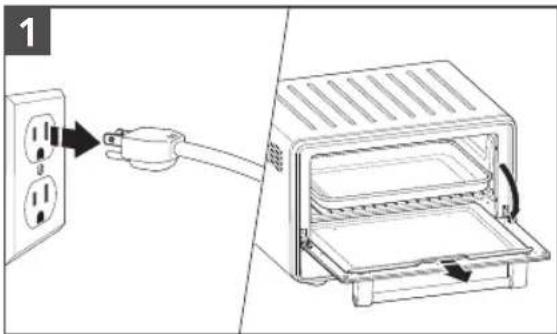
GETTING STARTED
Before first use, clean all parts and accessories (see "Care and Cleaning" section). Place the Countertop Oven on a dry and flat level surface. Remove all packaging materials and labels, if present.
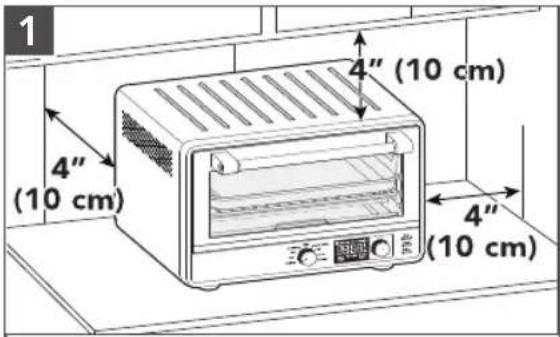
Make sure all sides are positioned with at least 4" (10 cm) distance.
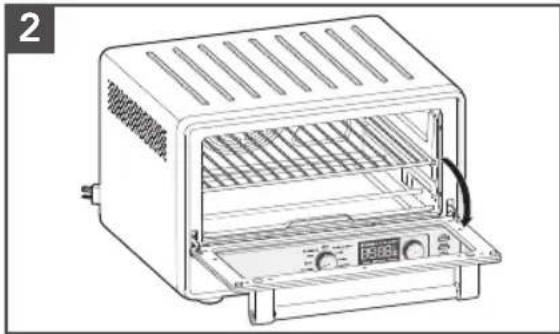
natural_image
Line drawing of a portable toaster oven with ventilation grilles and control panel (no text or symbols)Open the door and align the rack with the grooves for desired positions (see "Countertop Oven Rack Position" section).
WARNING

Electrical Shock Hazard
Plug into a grounded 3 prong outlet.
Do not remove ground prong.
Do not use an adapter.
Do not use an extension cord.
Failure to follow these instructions can result in death, fire, or electrical shock.
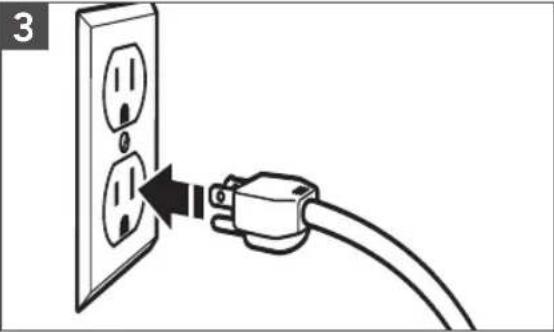
natural_image
Line drawing of a cable inserted into an electrical outlet with two outlets, showing a black arrow indicating the cable's direction (no text or symbols present)Plug into a grounded 3 prong outlet. Your Countertop Oven is now ready to use.
NOTE: Upon first use, the Air Fryer may produce light smoke. This is normal.
GETTING STARTED
TIME RECOMMENDATION - AIR FRY FUNCTION
| FOOD PORTION | TEMPERATURE°F(°C) | TIME | |
| Chicken Nuggets 1 | Layer 425°F (218°C) 8-10 minutes | ||
| Chicken Tenders 1 | Layer 425°F (218°C) 13-15 minutes | ||
| Chicken Wings 1 | Layer 425°F (218°C) 18-20 minutes | ||
| Fish Fillets 1 | Layer 450°F (232°C) 12-14 minutes | ||
| Fish Sticks 1 | Layer 450°F (232°C) 10-12 minutes | ||
| French Fries 1 | Layer 425°F (218°C) 22-24 minutes | ||
| Mozarella Sticks 1 | Layer 450°F (232°C) 5-7 minutes | ||
| Taquitos 1 | Layer 400°F (204°C) 5-7 minutes | ||
NOTE: Gently spray the basket with oil before each batch of food. No more oil is needed. Results may vary with different food brands and sizes. Follow Toaster Oven instructions from the back of the food package and reduce time.
TIP: When cooking fatty foods, such as non breaded poultry with skin, use the baking pan instead of the Air Fry Basket to catch excess oil that may drip from the food.
COOKING FUNCTIONS
PREHEATING
Preheating your Countertop Oven is important for consistent and even results. Once you select your desired cooking mode or any other settings, and press "Start".
The light ring around the Start button will be on, and the Preheat indicator will show on the LCD. Once the oven has reached the set temperature, a tone will sound to let you know that you can insert food and begin cooking. Preheating is NOT necessary in all cooking modes.
To skip the Preheat and Start the timer directly, push the Start button a second time.
NOTE: Automatic Preheat is not programmed for Dehydrate, Keep Warm, Reheat, Toast, and Bagel functions.
CONVECTION
The convection fan is controlled by the Options button. Pushing the Options button will toggle the fan ON or OFF for Bake. A "Convection" label and fan icon will appear on the display when the convection fan is on. The Air Fry function uses a high speed convection fan that cannot be turned off. The Dehydrate function uses the high speed convection fan as preset, but it may be turned off by pushing the Options button.
COOKING FUNCTIONS
| COOKING FUNCTION | RECOMMEND RACK POSITION | PRESET TEMP. °F (°C) | TEMPERATURE RANGE °F (°C) | PRESET TIME | PREHEAT |
| Dehydrate Upper/Lower 150°F (66°C) | 80–180°F (27–82°C) | 6 hours - | |||
| Proof Lower 90°F (32°C) | 80–100°F (27–38°C) | 30 minutes - | |||
| Air Fry Lower 400°F (205 °C) | 150–450°F (66–232°C) | 17 minutes Auto | |||
| Bake Lower 350°F (176°C) | 150–450°F (66–232°C) | 30 minutes Auto | |||
| Broil Upper 450°F (232°C) | 350°F (17 C) 450°F (232°C) | 8 minutes Auto | |||
| Reheat Lower 300°F (149°C) | 150–450°F (66–232°C) | 15 minutes - | |||
| Keep Warm Lower 170°F (77°C) | 150–450°F (66–232°C) | 1 hours - | |||
| Frozen Pizza Lower 400°F (204°C) | 150–450°F (66–232°C) | 17 minutes Auto | |||
| Fresh Pizza Lower 450°F (232°C) | 150–450°F (66–232°C) | 15 minutes | Auto w/ stone | ||
Note: Preheat can be skipped by pressing "Start" button twice - not recommended for Fresh Pizza function.
Cook all foods to minimum safe internal temperatures. Consuming raw or undercooked meats, poultry, seafood, shellfish, or eggs may increase your risk of food borne illness.
| TOASTING FUNCTIONS | RECOMMEND RACK POSITION | PRESET SHADE | SHADE RANGE (LIGHT TO DARK) | ELEMENTS RUN |
| Toast | Lower | 4 | 1-8 | Runs 4 elements |
| Bagel | Lower | 4 | 1-8 | Runs 4 elements |
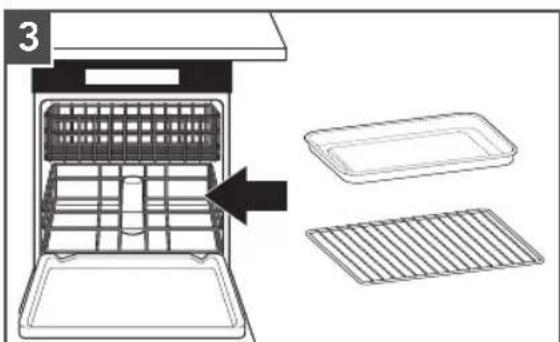
COUNTERTOP OVEN RACK POSITION
| Bottom rack position for Air Fry, Bake, Dehydrate, Keep Warm, Pizza, Proof, Reheat |  | |
| Top rack position for Broil, Dehydrate | 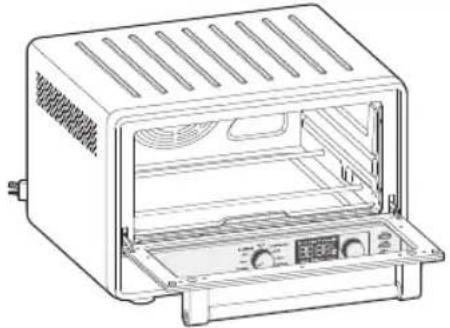 |
USING THE DEHYDRATE FUNCTION
Dehydrate option is to remove moisture content from veggies or fruits to dry and preserve them.
Set the Mode knob to Dehydrate.
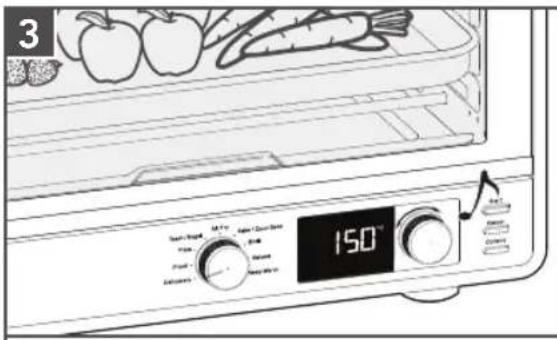
The preset temperature 150^ F will be shown. If desired, rotate knob to adjust.
Press the knob to show preset time. The preset time is 6 hours. If desired, rotate knob to adjust.
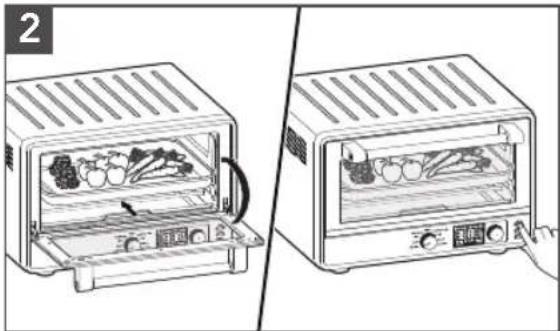
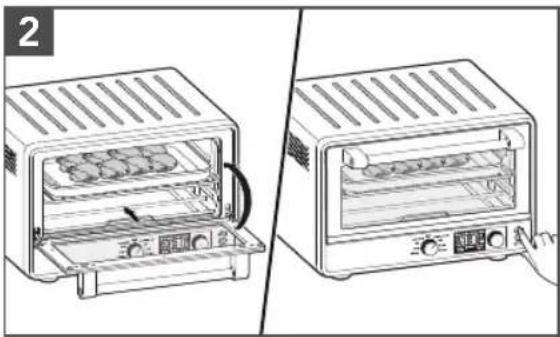
Open the door and place the food on the center of the rack. Close the door. Press Start to start the cycle.
USING THE DEHYDRATE FUNCTION
When the time has elapsed, the end signal will sound and the Air Fryer will shut off automatically.
IMPORTANT: Always use oven mitts when removing pans or racks.
USING THE PROOF FUNCTION
The Proof function maintains a warm environment useful for rising yeast.
Use for dough. To speed up bread proofing. With a range of 80–100°F temperature and lower heating elements, this setting can be used to accelerate bread proofing (rising).
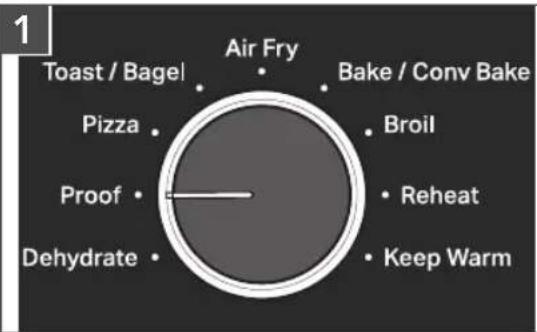
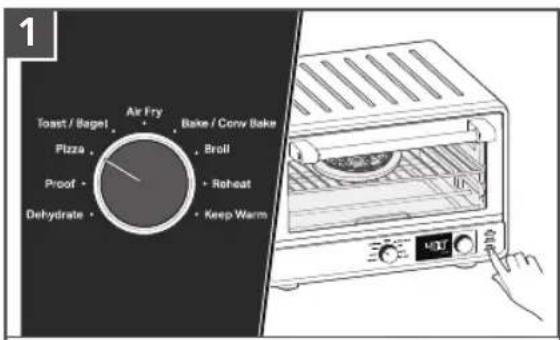
Set the Mode knob to Proof.
The preset temperature 90^ F will be shown. If desired, rotate knob to adjust.
Press the knob to show preset time. The preset time is 30 minutes. If desired, rotate knob to adjust.
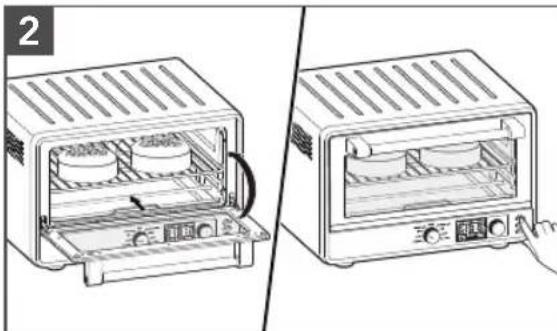
natural_image
Two-step diagram showing a toaster oven with two dish units being placed, one open and one closed, with a hand pressing the lid (no text or symbols present)Open the door and place the food on the center of the rack. Close the door. Press Start to start the cycle.
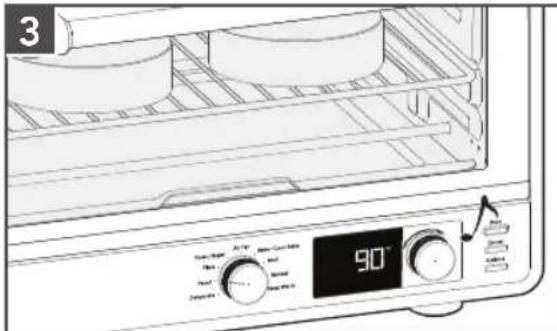
When the time has elapsed, the end signal will sound and the Countertop Oven will shut off automatically.
USING THE PIZZA (FROZEN/FRESH) FUNCTION
The Pizza Function distributes power to the top and bottom heating elements to maintain the desired Oven temperature to cook homemade or Frozen Pizza.
Set the Mode knob to Pizza.
The default mode is Frozen. To cook Fresh pizza, select the Options button to toggle to Fresh.
natural_image
Illustration of two kitchen ovens with control knobs, one open and one closed, showing food inside (no text or symbols)The preset temperatures are
400°F (204°C) for Frozen and
450°F (232°C) for Fresh pizza. If desired, rotate the knob to adjust.
Press the knob to show preset time. The preset times are 17 minutes for Frozen and 15 minutes for Fresh pizza. If desired, rotate knob to adjust.
Place the Pizza Stone in the Oven while the oven is preheating. Once the oven is preheated, take out the Pizza Stone and place pizza on the stone. Insert back into the oven. Close the door.
Press Start to start the cycle.
natural_image
Line drawing of a microwave oven with a digital display showing temperature reading (no text or symbols on the device itself)When the time has elapsed, the end signal will sound and the Countertop oven will shut off automatically. If cooking another Pizza, please make sure to preheat the Pizza Stone again.
Tips when using Pizza Function:
- When using Fresh Pizza mode, recommend to preheat the oven (with Pizza Stone inside) for full time. If cooking multiple pizzas, recommend to always preheat the oven and stone again for optimal results.
- Results may vary with different doughs, ingredients, and brands. For frozen pizzas, it is recommended to follow time and temperature directions included on the food packaging.
- Thick crust, self-rising, or deep-dish pizzas may require longer cooking times.
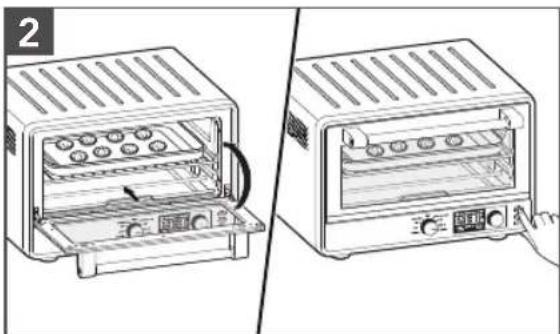
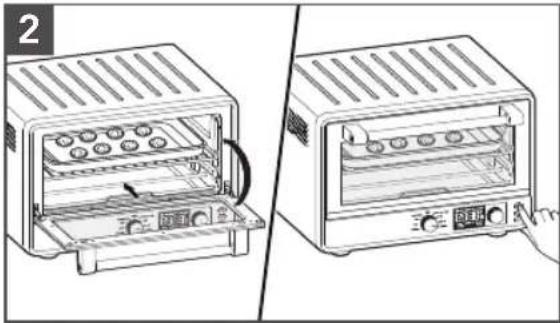
USING THE TOAST OR BAGEL FUNCTION
In Toast mode, your oven distributes power to the top and bottom heating elements to maintain the desired oven temperature.
In Bagel mode, the oven distributes power between the top and bottom heating elements to nicely brown the top of cut bagels while gently warming the outside.
pie
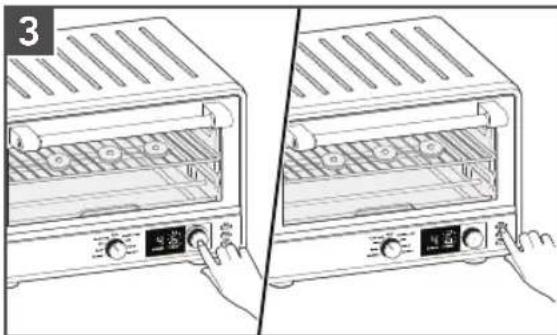
| Category | Value | |---|---| | Air Fry | 1 | | Toast / Bagel | 0 | | Bake / Conv Bake | 0 | | Broil | 0 | | Reheat | 0 | | Keep Warm | 0 | | Dehydrate | 0 | | Proof | 0 | | Pizza | 0 |Set the Mode knob to Toast/Bagel. Mode and Shade will be shown on right screen.
natural_image
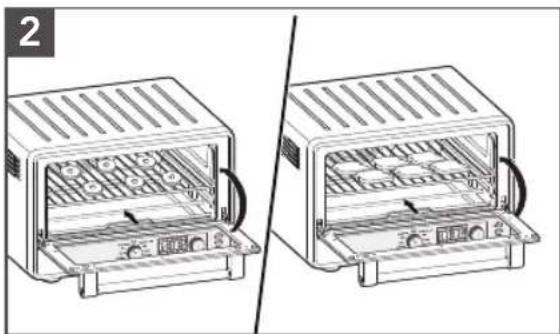
Two technical line drawings of a toaster oven with internal compartments and heat sinks (no text or symbols)Open the door and place the food on the center of the rack. Close the door.
natural_image
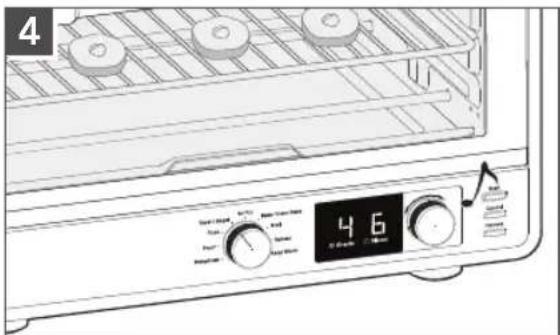
Illustration of a two-step kitchen appliance setup showing front and side views with control buttons (no text or symbols)Toast option will be default. Press Options button to switch to Bagel option. The Shade Icon will be flashing. Rotate the knob to adjust shade 1 (lowest) to 8 (highest). Press Start to start the cycle.
When the time has elapsed, the end signal will sound and the Countertop Oven will shut off automatically.
USING THE AIR FRY FUNCTION
The Air Fry function uses a combination of hot air and heating elements to prepare crispy foods.
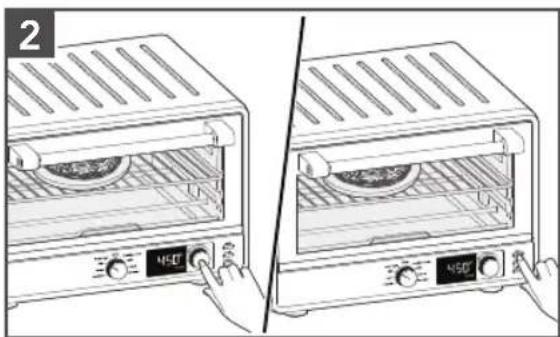
Set the Mode knob to Air Fry.
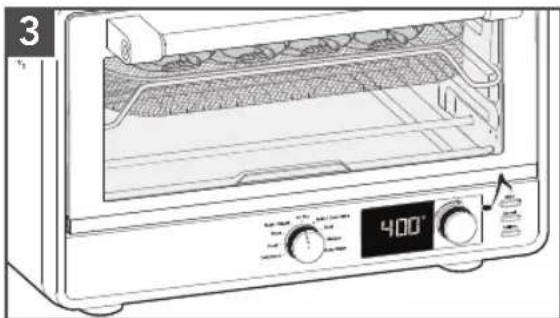
The preset temperature 400^ F will be shown. If desired, rotate knob to adjust.
Press the knob to show preset time. The preset time is 17 minutes. If desired, rotate knob to adjust.
USING THE AIR FRY FUNCTION
natural_image
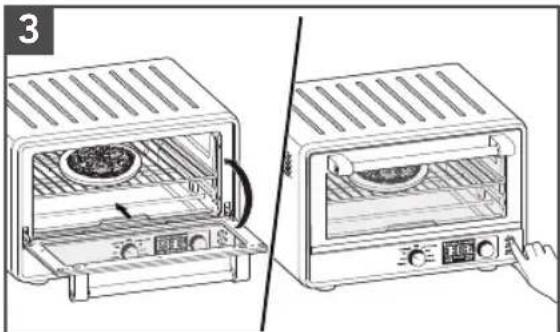
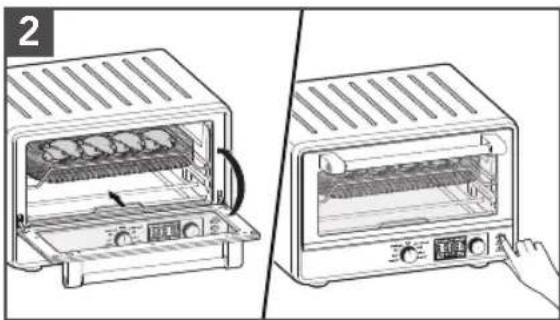
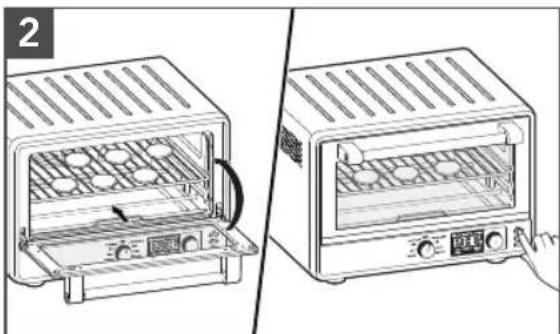
Two-step illustration of a toaster oven setup, showing front and side views with no text or symbolsOpen the door and place the food on the center of the rack. Close the door. Press Start to start the cycle.
natural_image
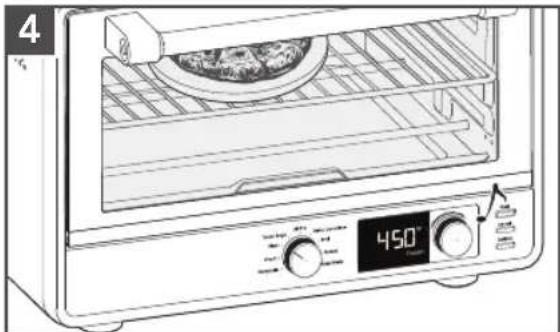
Line drawing of a microwave oven with digital display showing 400°F temperature (no text or symbols on main body)When the time has elapsed, the end signal will sound and the Countertop Oven will shut off automatically.
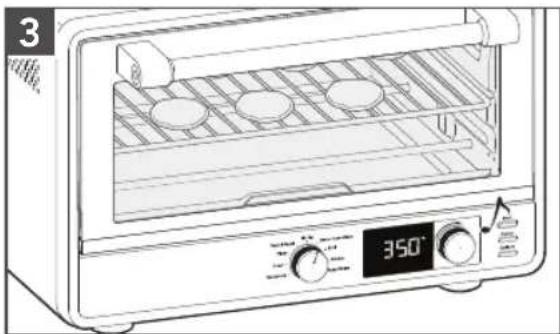
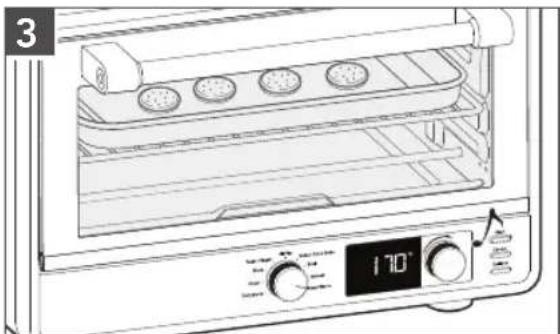
USING THE BAKE FUNCTION
In Bake mode, food will prepare in dry heat like bread, cake, toast etc. Both the top and bottom cooking elements cycle on and off while baking. Recipes will vary and cooking time should be monitored for desired results. For better cooking results, select the correct cooking pan to allow for proper air circulation.
The convection fan can be turned ON or OFF by pressing the convection button.
pie
| Category | Value | |---|---| | Air Fry | 1 | | Toast / Bagel | 0 | | Bake / Conv Bake | 0 | | Broil | 0 | | Reheat | 0 | | Keep Warm | 0 | | Dehydrate | 0 | | Proof | 0 | | Pizza | 0 |Set the Mode knob to Bake/Conv Bake.
The preset temperature 350^ F will be shown. If desired, rotate knob to adjust.
Press the knob to show preset time. The preset time is 30 minutes. If desired, rotate knob to adjust.
natural_image
Two-step illustration of a toaster oven setup, showing front and side views with no text or symbolsOpen the door and place the food on the center of the rack. Close the door. Press Start to start the cycle.
natural_image
Line drawing of a microwave oven with cooling fans and digital display (no text or symbols)When the time has elapsed, the end signal will sound and the Countertop Oven will shut off automatically.
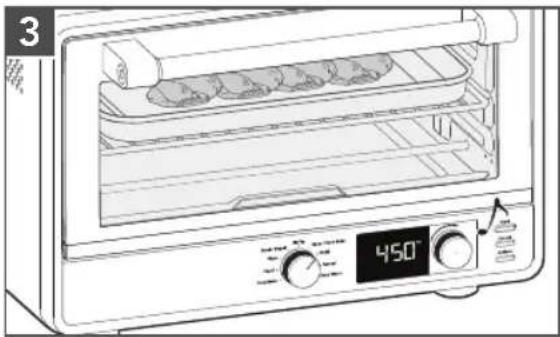
USING THE BROIL FUNCTION
Only the top cooking elements heat when the Broil function is selected. Use the included broil pan directly on the oven rack for even browning and easy cleanup. The broil pan may also be used for the Bake and Warm settings.
The convection fan can be turned ON or OFF by pressing the convection button.
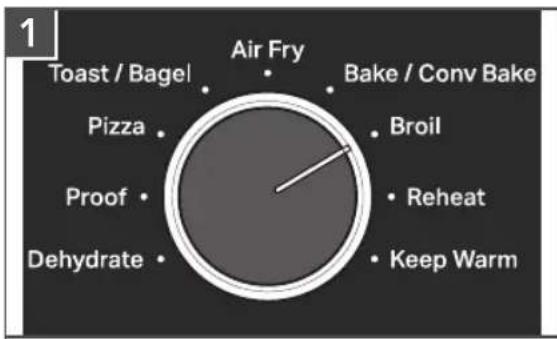
Set the Mode knob to Broil.
The preset temperature 450^ F will be shown. If desired, rotate knob to adjust.
Press the knob to show preset time. The preset time is 8 minutes. If desired, rotate knob to adjust.
natural_image
Two-step illustration of a toaster oven setup, showing front and side views with no text or symbolsOpen the door and place the food on the center of the rack. Close the door. Press Start to start the cycle.
natural_image
Line drawing of a microwave oven with a digital display showing temperature reading (no text or symbols on the oven itself)When the time has elapsed, the end signal will sound and the Countertop Oven will shut off automatically.
USING THE REHEAT FUNCTION
In Reheat function oven distributes power to the top and bottom elements to bring food to serving temperature.
The convection fan can be turned ON or OFF by pressing the convection button.
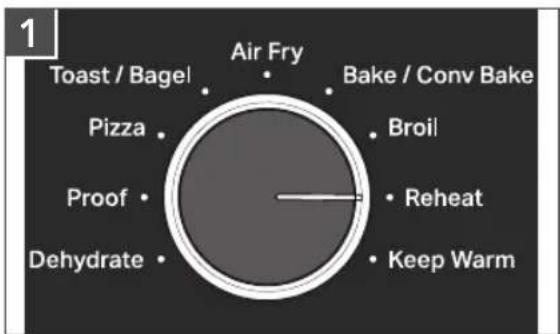
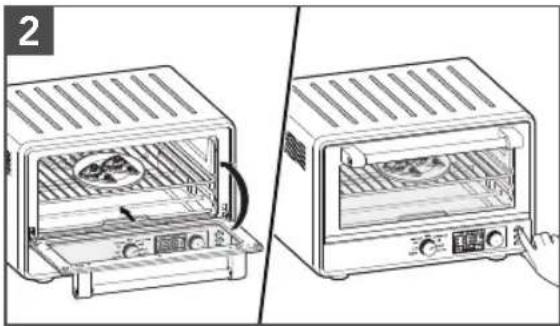
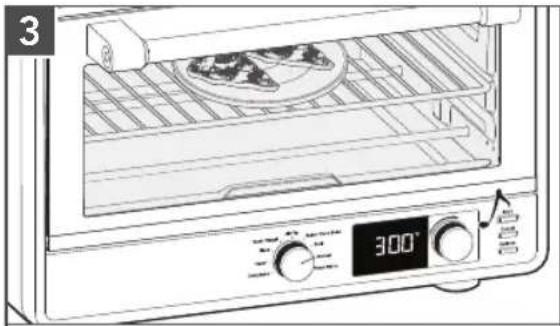
Set the Mode knob to Reheat.
The preset temperature 300^ F will be shown. If desired, rotate knob to adjust.
Press the knob to show preset time. The preset time is 15 minutes. If desired, rotate knob to adjust.
USING THE REHEAT FUNCTION
natural_image
Two-step illustration of a toaster oven with open lid and side panel, showing internal components (no text or symbols)Open the door and place the food on the center of the rack. Close the door. Press Start to start the cycle.
natural_image
Line drawing of an open oven with a plate and digital temperature display (no text or symbols)When the time has elapsed, the end signal will sound and the Countertop Oven will shut off automatically.
USING THE KEEP WARM FUNCTION
WARNING
Food Poisoning Hazard
Do not let food sit in oven more than one hour before or after cooking.
Doing so can result in food poisoning or sickness.

In Keep Warm mode, your oven distributes power to the bottom elements to keep food warm after cooking, so it may be served hot.
The convection fan can be turned ON by pressing the convection button.
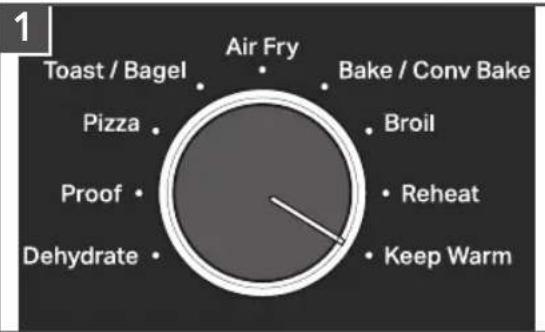
Set the Mode knob Keep Warm.
The preset temperature 170^ F will be shown. If desired, rotate knob to adjust.
Press the knob to show preset time. The preset time is 1 hours. If desired, rotate knob to adjust.
USING THE KEEP WARM FUNCTION
natural_image
Two-step diagram showing a toaster oven with tray, cooling fan, and control panel (no text or symbols)Open the door and place the food on the center of the rack. Close the door. Press Start to start the cycle.
natural_image
Line drawing of an oven with a digital control panel and tray, no text or symbols presentWhen the time has elapsed, the end signal will sound and the Countertop Oven will shut off automatically.
ENGLISH
CARE AND CLEANING
NOTE: Allow the Countertop Oven and accessories to cool completely before cleaning.
IMPORTANT: Allow the appliance to cool completely before putting on or taking off parts, and before cleaning the appliance.
IMPORTANT: Caring for a Pizza Stone only requires brushing off the surface of dried crumbs or food particles after baking. There is no water, soap or scrubbing required. Wait until the Pizza Stone has completely cooled, then brush off excess food particles and return to storage. Keep in mind over time the Pizza Stone will likely develop some discoloration or staining – this is a result of normal usage.
natural_image
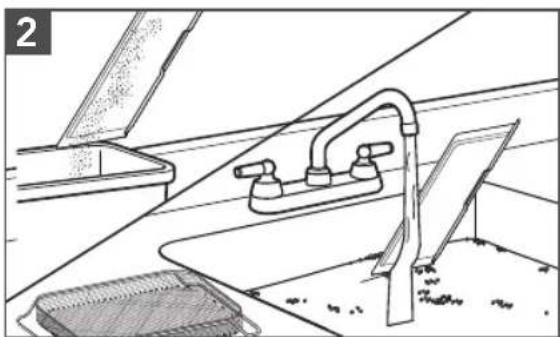
Diagram showing a power outlet connected to an open toaster oven with a plug, no text or symbols presentUnplug the Countertop Oven from the outlet.
To remove the Crumb Tray, Air Fry Basket, open the door, grasp the crumb tray handle, and slide straight out.
natural_image
Line drawing of a kitchen sink with faucet and drain, no text or symbols presentEmpty and wash in warm, sudsy water, if needed. Dry with a soft cloth. Open the door and slide it back into place. A soft bristle brush can be used to clean the mesh on the Air Fry Basket.
The following parts are dish-washer safe, but hand washing is recommended: Oven rack and Multipurpose pan.
IMPORTANT: Do not use cleaning agents, abrasive cleansers, or metal scouring pads on the inner or outer surfaces of the Air Fryer. They could scratch the surface.
INTERIOR: The inside walls of the oven feature a nonstick coating. Remove heavy spatter with a nylon or polyester mesh pad, sponge, or cloth dampened with warm water. Dry thoroughly.
EXTERIOR: Wipe the outside of the Air Fryer with a clean, damp cloth and dry thoroughly.
IMPORTANT: Ensure all parts and surfaces are completely dry before re-use.
TROUBLESHOOTING GUIDE

natural_image
Black-and-white illustration of a hand with a lightning bolt symbol and a curved line above it (no text or symbols)WARNING
Electrical Shock Hazard
Plug into a grounded 3 prong outlet.
Do not remove ground prong.
Do not use an adapter.
Do not use an extension cord.
Failure to follow these instructions can result in death, fire, or electrical shock.
| PROBLEM SOLUTION | |
| If the oven fails to start | Check to see if the oven is plugged into a grounded 3 prong outlet. |
| Check to see if the fuse in the circuit breaker box to the oven is in working order. | |
| If the problem cannot be corrected | See the “Warranty and Service” sections.Do not return the Countertop Oven to the retailer – retailers do not provide service. |
| If the wrong temperature unit is displayed | Press and hold the Options button for 3 seconds to switch between Fahrenheit (°F) and Celsius (°C) temperature units. |
| Upper cooking elements visibly glow, but bottom cooking elements do not | The upper cooking elements use higher power for better browning performance. The lower cooking elements are on, but may not visibly glow like the upper cooking elements. This is normal and your Countertop Oven is working properly. |
| If “E1 or E2” flashes on the display and a chime sounds | The NTC Sensor may not be working. This issue can not be corrected. Please see the “Warranty and Service” sections. |
| If “PF” is shown on the display | The oven will display “PF” when it is powered up for the first time, or has experienced a power failure. If a cooking function was in process, dispose of food; it might not be thoroughly cooked. |
LIMITED WARRANTY AND SERVICE
KITCHENAID® PRODUCT WARRANTY FOR THE 50 UNITED STATES, THE DISTRICT OF COLUMBIA, PUERTO RICO, AND CANADA
This limited warranty extends to the original purchaser and any succeeding owner for product operated in the 50 United States, the District of Columbia, Puerto Rico, and Canada.
| Length of Warranty: One Year Limited Warranty from date of delivery. | |
KitchenAid Will Pay for Your Choice of: | Hassle-Free Replacement of your product. See the next page for details on how to arrange for service, or call the Customer eXperience Center toll-free at 1-800-541-6390.ORThe replacement parts and repair labor costs to correct defects in materials and workmanship that existed at the time this product. was purchased. Service be provided by an Authorized KitchenAid Service Center. |
| KitchenAid Will Not Pay for (What is Not Covered By This Limited Warranty) : | A. Commercial, non-residential, or multiple family use or use inconsistent with product instructions and manuals.B. Defects or damage resulting from accident, alteration, misuse, abuse, fire flood, or acts of God.C. Any shipping or handling costs to deliver your product to an Authorized Service Center.D. Replacement parts or repair labor costs for the product operated outside the 50 United States, District of Columbia, Puerto Rico, and Canada.E. Damages, defects, or repairs caused by unauthorized servicers or use of non-genuine or third-party parts; however, use of unauthorized service providers or non-genuine or third-party parts will not void this warranty.F. Cosmetic damage (e.g., scratches, dents, chips, and other damage to finishes), unless damage results from defects in materials and workmanship and is reported to KitchenAid within 30 days from date of delivery.G. Discoloration, rust or oxidation of surfaces resulting from caustic or corrosive environments (e.g., high salt concentrations, high moisture or humidity or exposure to chemicals).H. Products with original, factory-installed model/serial numbers removed, altered or not easily determined.I. Incidental or consequential damages resulting from product failure.J. Consumable parts or accessories. |
| DISCLAIMER OF IMPLIED WARRANTIESImplied warranties, including any implied warranty of merchantability or implied warranty of fitness for a particular purpose, are limited to ten years or the shortest period allowed by law. Some states and provinces do not allow limitations on the duration of implied warranties of merchantability or fitness, so this limitation may not apply to you. | |
| HOW STATE LAW APPLIESThis warranty gives you specific legal rights, and you may also have other rights that vary from state to state or province to province. Some states and provinces, such as California, do not allow for limitations on the date your warranty coverage begins, so this limitation may not apply to you. | |
LIMITED WARRANTY AND SERVICE
HASSLE-FREE REPLACEMENT WARRANTY—50 UNITED STATES, DISTRICT OF COLUMBIA, AND PUERTO RICO
We're so confident the quality of our products meets the exacting standards of KitchenAid that, if your product should fail within the first year of ownership, KitchenAid will arrange to deliver an identical or comparable replacement to your door free of charge and arrange to have your original Countertop Oven returned to us. Your replacement unit will also be covered by our one year limited warranty.
If your Countertop Oven should fail within the first year of ownership, simply call our toll-free Customer eXperience Center at
1-800-541-6390 Monday through Friday. Please have your original sales receipt available when you call. Proof of purchase will be required to initiate the claim. Give the consultant your complete shipping address (no P.O. Box numbers, please).
When you receive your replacement Countertop Oven, use the carton, packing materials, and prepaid shipping label to pack up your original Countertop Oven and send it back to KitchenAid.
HASSLE-FREE REPLACEMENT WARRANTY—CANADA
We're so confident the quality of our products meets the exacting standards of the KitchenAid brand that, if your product should fail within the first year of ownership due to defects in materials or workmanship, we will replace your product with an identical or comparable replacement. Your replacement unit will also be covered by our one year limited warranty.
I If your product should fail within the first year of ownership, simply call our toll-free
Customer eXperience Center at
1-800-807-6777 Monday through Friday. Please have your original sales receipt available when you call. Proof of purchase will be required to initiate the claim. Give the consultant your complete shipping address.
When you receive your replacement product, use the carton, packing materials, and prepaid shipping label to pack up your original product and send it back to KitchenAid.
ARRANGING FOR SERVICE AFTER THE WARRANTY EXPIRES, OR ORDERING ACCESSORIES AND REPLACEMENT PARTS
In the United States and Puerto Rico:
For service information, or to order accessories or replacement parts, call toll-free at 1-800-541-6390 or write to:
Customer eXperience Center, KitchenAid Small Appliances, P.O. Box 218, St. Joseph, MI 49085-0218
Outside the United States and Puerto Rico:
Consult your local KitchenAid dealer or the store where you purchased the product for information on how to obtain service.
For service information in Canada:
Call toll-free 1-800-807-6777.
For service information in Mexico:
Call toll-free 01-800-0022-767.
PIÈCES ET CARACTÉRISTIQUES
natural_image
Line drawing of a toaster oven with ventilation grilles and control panel (no text or symbols)natural_image
Line drawing of a cable inserted into an electrical outlet with two outlets, no text or symbols presentnatural_image
Two-step illustration of a food oven setup with vegetables inside and a hand pressing the lid (no text or symbols)natural_image
Line drawing showing two different kitchen appliances: a front-mounted oven with a side panel and a right-mounted toaster with a side panel, both without any text or symbols.natural_image
Illustration of two kitchen ovens with control knobs, one open showing interior dish, the other closed (no text or symbols)natural_image
Line drawing of a microwave oven with a digital display showing temperature reading (no text or symbols on the device itself)pie
| Category | Value | |---|---| | Toast / Bagel | 1 | | Pizza | 1 | | Proof | 1 | | Dehydrate | 1 | | Air Fry | 1 | | Bake / Conv Bake | 1 | | Broil | 1 | | Reheat | 1 | | Keep Warm | 1 |natural_image
Two technical line drawings of a portable oven or stove unit, showing internal compartments and venting (no text or symbols)natural_image
Two-step illustration of a toaster oven setup, showing front and side views with no text or symbolsnatural_image
Line drawing of a microwave oven with digital display and control knobs (no text or symbols)pie
| Category | Value | |---|---| | Air Fry | 1 | | Toast / Bagel | 0 | | Pizza | 0 | | Proof | 0 | | Dehydrate | 0 | | Bake / Conv Bake | 0 | | Broil | 0 | | Reheat | 0 | | Keep Warm | 0 |natural_image
Two-step illustration of a toaster oven setup, showing front and side views with no text or symbolsnatural_image
Line drawing of a microwave oven with a digital display showing 350° temperature (no text or symbols on the device itself)pie
| Category | Value | |---|---| | Air Fry | 1 | | Bake / Conv Bake | 1 | | Broil | 1 | | Reheat | 1 | | Keep Warm | 1 | | Dehydrate | 1 | | Proof | 1 | | Pizza | 1 | | Toast / Bagel | 1 |natural_image
Two-step illustration of a toaster oven setup, showing front and side views with no text or symbolsnatural_image
Line drawing of an open oven with a digital temperature display showing 450°F (no text or symbols on the oven itself)natural_image
Two-step illustration of a toaster oven with lid and side panel, showing open and closed views (no text or symbols)natural_image
Line drawing of a toaster oven with a digital display showing 300° temperature (no text or symbols on the device itself)UTILISER LA FONCTION KEEP WARM (MAINTIEN AU CHAUD)
AVERTISSEMENT
UTILISER LA FONCTION KEEP WARM (MAINTIEN AU CHAUD)
natural_image
Two line drawings of a toaster oven with a hand pointing to the interior (no text or symbols present)natural_image
Line drawing of a microwave oven with tray, control panel, and digital display (no text or symbols)natural_image
Line drawing of a kitchen sink with faucet and grater (no text or symbols)natural_image
Black and white illustration of a hand with a lightning bolt symbol (no text or labels)AVERTISSEMENT
Customer eXperience Center, KitchenAid Small Appliances, P.O. Box 218, St. Joseph, MI 49085-0218
natural_image
Line drawing of a toaster oven with ventilation grilles and control panel (no text or symbols)natural_image
Line drawing of a cable inserted into an electrical outlet with two outlets, no text or symbols presentnatural_image
Two-step illustration of a food oven setup: one open with vegetables inside, the other closed with a hand pressing it (no text or symbols)natural_image
Two-step diagram showing a toaster oven with two panes and a side view of the front oven (no text or symbols present)natural_image
Illustration of two kitchen ovens with control knobs, one open and one closed, showing interior design (no text or symbols)natural_image
Line drawing of a microwave oven with a digital display showing 450°F temperature (no text or symbols on the device itself)pie
| Category | Value | |---|---| | Air Fry | 1 | | Toast / Bagel | 0 | | Bake / Conv Bake | 0 | | Broil | 0 | | Reheat | 0 | | Keep Warm | 0 | | Dehydrate | 0 | | Proof | 0 | | Pizza | 0 |natural_image
Two technical line drawings of a toaster oven with internal compartments and heat sinks (no text or symbols)natural_image
Two-step illustration of a toaster oven setup, showing open and closed views with control buttons (no text or symbols)natural_image
Line drawing of a microwave oven with digital display and control knobs (no text or symbols)pie
| Category | Value | |---|---| | Air Fry | 1 | | Bake / Conv Bake | 0 | | Broil | 0 | | Reheat | 0 | | Keep Warm | 0 | | Dehydrate | 0 | | Proof | 0 | | Pizza | 0 | | Toast / Bagel | 0 |natural_image
Two line drawings of a toaster oven with internal compartments and control knobs, showing no text or symbols.natural_image
Line drawing of a microwave oven with a digital display showing 350°F temperature (no text or symbols on the device itself)natural_image
Two-step illustration of a toaster oven setup, showing front and side views with no text or symbolsnatural_image
Line drawing of a microwave oven with a digital display showing 450° angle (no text or symbols on the oven itself)natural_image
Two-step illustration of a toaster oven with a side view showing internal components (no text or symbols)natural_image
Line drawing of a toaster oven with a dish inside, showing control panel and digital display (no text or symbols)natural_image
Line drawing of a two-section kitchen appliance showing the oven and tray (no text or symbols)natural_image
Line drawing of an oven with a digital display showing temperature reading (no text or symbols on the main subject)natural_image
Line drawing of a kitchen sink with faucet and plate, no text or symbols presentCustomer eXperience Center, KitchenAid Small Appliances, P.O. Box 218, St. Joseph, MI 49085-0218
natural_image
Color palette bar with grayscale shades and a small crosshair symbol (no text or labels)


natural_image
Color palette bar with grayscale shades and a small crosshair symbol (no text or labels)


natural_image
Color palette bar with grayscale shades and a small crosshair symbol (no text or labels)

DISCOVER MORE. DÉCOUVREZ PLUS. DESCUBRA MÁS. KITCHENAID.COM/QUICKSTART

natural_image
White silhouette of a telephone handset on black background (no text or symbols)PRODUCT QUESTIONS OR RETURNS
QUESTIONS SUR LE PRODUIT OU LES RETOURS
PREGUNTAS SOBRE EL PRODUCTO O
DEVOLUCIÓNES USA: 1.800.541.6390 | KitchenAid.com
CANADA: 1.800.807.6777 | KitchenAid.ca
MEXICO: KitchenAid.com.mx
LATIN AMERICA: KitchenAid-Latam.com
KitchenAid®
®/TM ©2023 KitchenAid. All rights reserved. Used under license in Canada.
W11670365B
07/23
- PARTS AND FEATURES
- PRODUCT SAFETY
- Your safety and the safety of others are very important.
- IMPORTANT SAFEGUARDS
- SAVE THESE INSTRUCTIONS
- WARNING
- GETTING STARTED
- COOKING FUNCTIONS
- PREHEATING
- CONVECTION
- COUNTERTOP OVEN RACK POSITION
- USING THE DEHYDRATE FUNCTION
- USING THE PROOF FUNCTION
- USING THE PIZZA (FROZEN/FRESH) FUNCTION
- Tips when using Pizza Function:
- USING THE TOAST OR BAGEL FUNCTION
- USING THE AIR FRY FUNCTION
- USING THE BAKE FUNCTION
- USING THE BROIL FUNCTION
- USING THE REHEAT FUNCTION
- USING THE KEEP WARM FUNCTION
- CARE AND CLEANING
- TROUBLESHOOTING GUIDE
- Electrical Shock Hazard
- LIMITED WARRANTY AND SERVICE
- HASSLE-FREE REPLACEMENT WARRANTY—CANADA
- In the United States and Puerto Rico:
- Outside the United States and Puerto Rico:
- UTILISER LA FONCTION KEEP WARM (MAINTIEN AU CHAUD)
- AVERTISSEMENT
- DISCOVER MORE. DÉCOUVREZ PLUS. DESCUBRA MÁS. KITCHENAID.COM/QUICKSTART
- KitchenAid®
Brand : KITCHENAID
Model : KCO128
Category : Oven