NorFrost ICE 82 BI - Fridge NODOR - Free user manual and instructions
Find the device manual for free NorFrost ICE 82 BI NODOR in PDF.

User questions about NorFrost ICE 82 BI NODOR
0 question about this device. Answer the ones you know or ask your own.
Ask a new question about this device
Download the instructions for your Fridge in PDF format for free! Find your manual NorFrost ICE 82 BI - NODOR and take your electronic device back in hand. On this page are published all the documents necessary for the use of your device. NorFrost ICE 82 BI by NODOR.
USER MANUAL NorFrost ICE 82 BI NODOR
natural_image
Interior view of a fully open refrigerator with open doors and internal compartments (no visible text or symbols)
NODOR
always innovating
ES
MANUAL DE INSTRUÇÕES
DE
GEBRAUCHSANWEISUNG
Índice
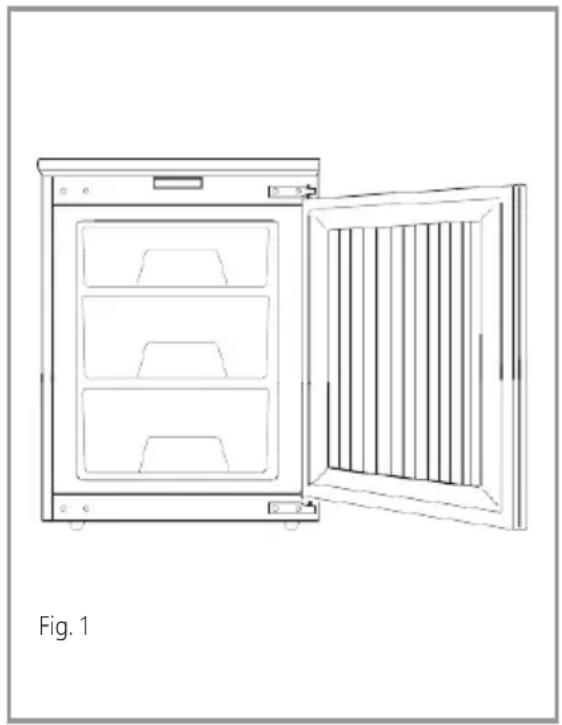
natural_image
Line drawing of an open refrigerator with internal compartments and ventilation slots (no text or symbols)natural_image
Black snowflake-like symbol with six symmetrical arms, labeled 'Figura 3' at bottom (no other text or symbols)Cuidado y limpieza
natural_image
Technical line drawing of a front panel and side view of a refrigerator (no text or symbols)text_image
Technical diagram showing assembly of a rectangular panel with mounting holes and a cross-sectional view labeled A-A.natural_image
Line drawing of a rectangular enclosure with internal curved and straight lines, labeled 'Figura 10' (no text or symbols on the diagram itself)1 Important information
2 Important safety and usage instructions
3 Before first use
4 General use of the Freezer
5 Storage and use
6 Controls
7 Super freeze function
8 Care and cleaning
9 Defrosting the freezer Troubleshooting
10 Installation and ventilation
11 Mounting the fascia doors
12 Reversing the fridge door
13 Changing the light bulb
14 Climate range
IMPORTANT: Please read the user instructions carefully before using the appliance for the first time and before installing it. Failure to install the line, or to have it installed, as per the user manual could invalidate the warranty. Any service calls relating to misuse or incorrect installation could incur a service charge.
Important information
The Manufacturer cannot be held responsible for injuries or losses caused by incorrect use or installation of this product. Please note that the Manufacturer reserves the right to invalidate the guarantee supplied with this product following incorrect installation or misuse of the appliance or use in a commercial environment.
This appliance is not designed to be used by people (including children) with reduced physical, sensorial or mental capacity, or who lack experience or knowledge about it, unless they have had supervision or instructions on how to use the appliance by someone who is responsible for their safety.
Under no circumstances should any external covers be removed for servicing or maintenance except by suitably qualified personnel.
Appliance information:
Please enter the details on the appliance rating plate below for reference, to assist Customer Care in the event of a fault with your appliance and to register your appliance for guarantee purposes.
| Appliance Model | NorFrost ICE 82 BI |
| Serial Number |
EU Declarations of Conformity
This appliance has been manufactured to the strictest standards and complies with all applicable legislation, including Electrical safety (LVD) 2014/35/EU and Electromagnetic interference (EMC) 2014/30/EU. Parts intended to come into contact with food conform to 1935/2004/EC.
IMPORTANT INFORMATION FOR CORRECT DISPOSAL OF THE PRODUCT IN ACCORDANCE WITH EU DIRECTIVE 2012/19/EU.
At the end of its working life, the product must not be disposed of as urban waste. The refrigeration system contains insulating gases and refrigerants, which require specialised waste disposal. The valuable materials contained in this appliance can be recycled. It must be taken to a special local authority differentiated waste collection centre or to a dealer providing this service.
Before disposing of an old appliance, remove the door seals, latch or bolt lock to avoid the risk of child entrapment.
Disposing of a household appliance separately avoids possible negative consequences for the environment and health. It also enables the constituent materials to be recovered, saving both energy and resources. As a reminder of the need to dispose of household appliances separately, the product is marked with a
crossed-out wheeled dustbin.
Important saftey and usage instructions
Never store inflammable or explosive items and strong corrosive acids or alkalis in the appliance.
This is a household appliance, which is produced in accordance with the national standard. It is intended for food storage only, not for storage of blood, medicine and biological products.
To prevent risk of fire, keep the appliance away from petrol or any other inflammables.
To prevent risk of electromagnetic interference or other accidents, do not place a microwave oven on top of the refrigerator or use any electric appliance inside the refrigerator.
Do not allow children to play with or near the appliance.
The internal surfaces of the fridge compartment may be very cold when the appliance is running. Avoid touching, if possible, the surfaces especially when hands are wet.
Do not splash water onto the appliance. Keep it away from places of high humidity that may have adverse effect on the electric insulation performance.
This appliance is designed to be used in ambient temperatures between 18°C and 38°C. Use outside of this range may cause the appliance to fail.
This refrigeration appliance is intended for use as a built-in appliance.
Before first use
You must allow the freezer to settle for at least twenty four hours prior to switching the power on.
It is recommended that you clean the interior of the appliance prior to first use, using a solution of bicarbonate of soda and warm water and then thoroughly drying the interior.
The freezer may have an odour to it at first use. This will disappear as the appliance cools.
When first switching the appliance on it is advisable to set the freezer to setting 3 and leave the freezer to settle for 24 hours before adjusting the temperature to the preferred setting.
Please note:
The appliance will work continuously until it comes down to the correct temperature.
If the appliance is switched off, you should allow five minutes before switching it on again to prevent unnecessary damage to the compressor.
Never store inflammable or explosive items and strong corrosive acids or alkalis in the appliance.
The presence of some frosting within the appliance is not a malfunction of the freezer.
Note: If the appliance does not have a freezer compartment ( ^ ^** ) it is not suitable for freezing foodstuffs.
General use of the Freezer
- The freezer compartments are designed to store only frozen food
- Never put hot foods in the freezer, allow food to cool fully before storing them in the freezer
- Follow the instructions on the food packaging for storage of frozen food. If no information is provided, foods should not be stored for more than three months after the purchase date
- Make sure food is clean and any extra water is wiped away before putting into the fridge
- Store food in small packages (ideally less than 2.5kg). This reduces the freezing time and improves the quality of the food after thawing
- Wrap food before putting into the freezer. To stop the wrapping sticking together, ensure it is dry
- Label the food before freezing with information including type of food and dates of storage and expiry
- Once food is thawed, it must not be refrozen unless it has been completely cooked. Only defrost as much food as is required, to prevent wastage
- Bottled or canned drinks should not be stored in the freezer compartments as they could explode
- Check the rating plate to confirm the maximum amount of fresh food that can be frozen within a 24 hour period
- Do not attempt to freeze more than the maximum amount
- To freeze fresh food more quickly, set the temperature control to setting 5 a few hours prior to placing food in the freezer remembering to return the setting back to your preferred setting once the food is frozen
Storage and use
This freezer is suitable for storing deep frozen food (food which has already been frozen before being added to the freezer), for storing fresh food for a short period (2-3 weeks) by freezing it and for making ice and ice cream.
Always remember to observe and adhere to the recommended expiration date of food.
Fresh food, and food which needs to be stored for a long period, should be kept at a temperature of -18^ cor below.
For this, we recommend using setting 3 or 4
If food only needs to be stored for a short period then a setting of 2 or 3 will suffice.
natural_image
Line drawing of an open refrigerator with internal compartments and ventilation slots (no text or symbols)Please remember: Ice cream or ice for drinks should be allowed to sit at room temperature for several minutes before being used as they can still be cold enough to cause damage to skin and lips.
Please note: The freezer should be defrosted regularly. If you are unsure of when then it is advisable to do so when, and if, the ice layer reaches 5mm thickness.
Controls
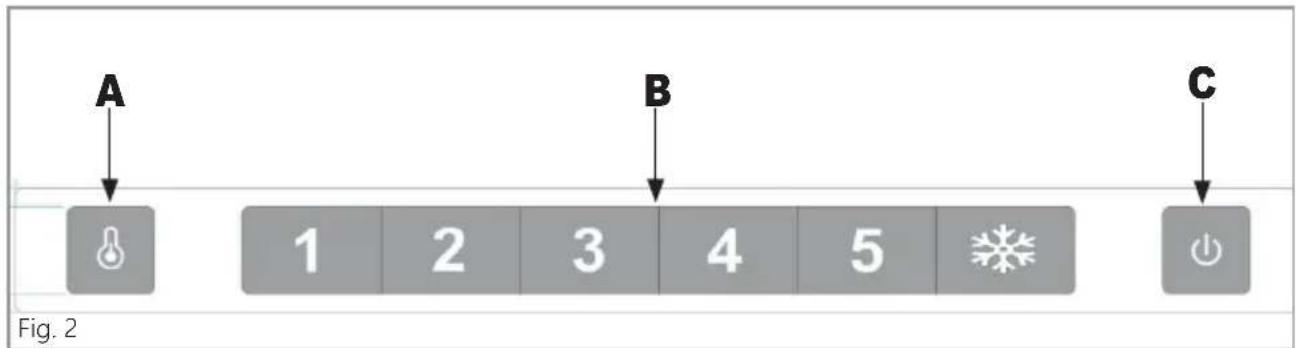
text_image
A B C 1 2 3 4 5 Fig. 2A. Freezer temperature adjustment sensor
This button is used to adjust the temperature within the freezer. Press this sensor(A)once to activate adjustment, and then as many times as necessary until the desired level is selected. The settings range from 1 to super freeze (❄️) with 1 being the warmest and super freeze being the coldest.
Please note: Where possible, avoid having the temperature setting on 5 or the super freeze all of the time. This well help to alleviate strain on the compressor and system.
B. Freezer temperature setting display
This display will illuminate the current temperature setting. Adjusting the temperature will cycle through this display.
Please note: You do not use numbers 1 to 5 or the snowflake to change the temperature. Instead, use the freezer temperature adjustment sensor (A).
C. Power button
Use this sensor( )to switch the appliance on and off (standby mode). The sensor will be illuminated when the appliance is off.
Super freeze function
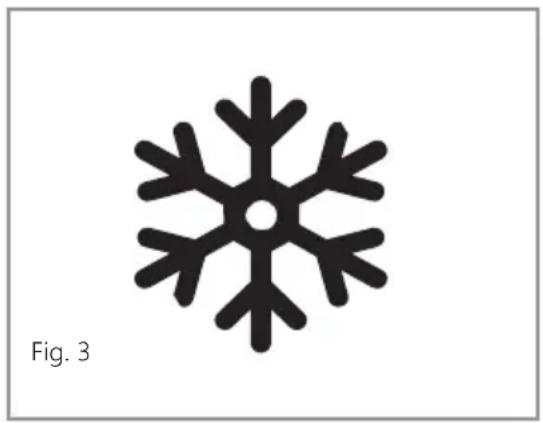
The 6th setting on the control panel, represented by the snowflake (Fig. 3), is a super freeze function. This should be used when freezing large quantities of food all at once. Activate this function 2 or 3 hours before introducing the food and do not leave it to run for more than necessary. Leaving it to run for longer will place unnecessary strain on the cooling system. The function will automatically deactivate after approximately 24 hours.
natural_image
Black snowflake-like symbol with six symmetrical arms and a central dot, labeled 'Fig. 3' (no text or symbols on the snow itself)Care and cleaning
Always disconnect the appliance from the power supply before any cleaning or maintenance.
The freezer should be cleaned using a solution of bicarbonate of soda and lukewarm water. Do not use abrasive products or detergents. After washing, rinse and dry thoroughly.
Clean the drawers separately by hand with a mild solution of washing up liquid and water. Do not put them in the dishwasher.
If the appliance is not to be used for prolonged periods of time, unplug and clean the appliance. The doors should be left slightly ajar to prevent the formation of mildew and unpleasant odours. It is important however that you ensure that no child or person could become trapped in the appliance.
Defrosting the freezer
Do not use heaters or defrosting sprays in this appliance.
Never use any metallic or sharp objects such as knives or forks to remove the ice as this could damage the lining.
The freezer compartment should be defrosted regularly to ensure the most efficient running of the freezer.
Once the ice is more than 5mm thick, the freezer should be defrosted.
- 24 hours before defrosting the freezer, switch the temperature control to setting 5 or switch on the super freeze function to ensure food is fully frozen
- Before switching the freezer off, wrap the frozen food in sheets of paper and store it in a cool dry place
- Switch the appliance off at the temperature control panel and the mains and remove the freezer drawers
- To speed up the defrosting process, place a bowl of warm water in the base of the freezer compartment
- The freezer should be cleaned using a solution of bicarbonate of soda and lukewarm water. Do not use abrasive products or detergents. After washing, rinse and dry thoroughly
- Clean the drawers separately by hand with a mild solution of washing up liquid and water. Do not put them in the dishwasher
• Once cleaning is complete, reconnect the power
Troubleshooting
If you have any problems with your appliance, you should check the troubleshooting guide prior to calling the Customer Care to prevent unnecessary service calls and potential cost. Contact details are on the back cover of this manual
If the appliance is not working, check the following:
• There is power to the appliance
- The house fuses are intact and the fuse in the plug has not blown
- The on/off switch is not set to off
- The plug socket is functioning correctly. To check this, plug another electrical appliance in to see if the socket is faulty
If the appliance is working, but not very well, check the following:
• The appliance is not overloaded
- The thermostat is set to an appropriate temperature
• The doors are closing properly
- The cooling system at the rear of the appliance is clean and free of dust, and not touching the rearwall
- There is enough ventilation at the side, rear walls and underneath
- The lower vents are neither blocked nordirty
If the appliance is noisy, check the following:
• The appliance is level and stable
- The side and rear walls are clear, and there is nothing resting on the appliance
- Note: The cooling gas in the refrigerator may make a slight bubbling or gurgling noise, even when the compressor is not running
If there is water in the freezer, check the following:
- The appliance has power and the temperature control light is on. Check the door seal for any kinks, debris or damage. If you notice any, and are unable to resolve the issue yourself, contact the Customer Care so that the seal can be replaced
If excessive ice has formed in the freezer:
- Ensure that the temperature control is at the position you intend for it to be and hasn't been accidentally set to the highest setting. If the freezer is set to maximum, try lowering the setting
- Check that there is some resistance when opening the door of the appliance. If it opens at the slightest touch it may mean that the door seal needs to be replaced or the appliance is not fitted correctly and the door is not closing fully
- Check the door seal for any kinks, debris or damage. If you notice any, and are unable to resolve the issue yourself, contact the Customer Care so that the seal can be replaced
Installation and ventilation
This appliance must never be installed close to heat sources, e.g. heating elements, cookers or in damp places.
- To ensure the appliance is level, you should use the height adjustable feet at the front and rear of the appliance
- The ventilation system at the bottom of the appliance must not be blocked
- Fig. 4 shows the installation requirements for your appliance. All measurements are in millimetres. Failure to install the appliance correctly can lead to increased running costs, premature failure and may invalidate the warranty provided with the appliance

text_image
820-870mm 550mm 75-125mm 600mm 162mm 596mm 600mm 600mm max 822-872mmMounting the fascia doors
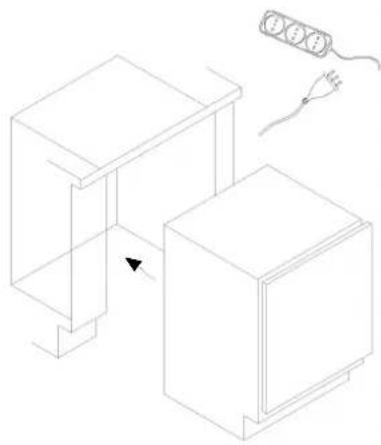
- Push the appliance into the wooden furniture, the appliance should be better approach furniture left side.
| Tools&parts | |
| Cross head screw3.9×12, T20 | |
| Connection Pin | |
| Flange Screw | |
| Hinge cover | |
natural_image
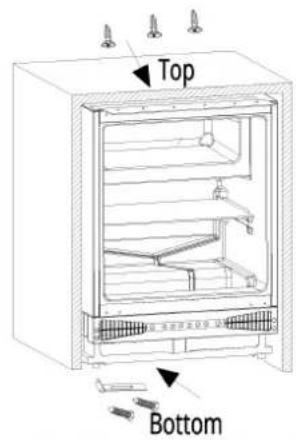
Isometric line drawing of two rectangular cabinets with a plug and cable, no text or symbols present- Adjust the position of appliance, screw product top and bottom part on the furniture
text_image
Top BottomFixing hinge to furniture

natural_image
Simple line drawing of a boat navigating near water channels (no text or symbols)PS: Install the spacer on the hinge
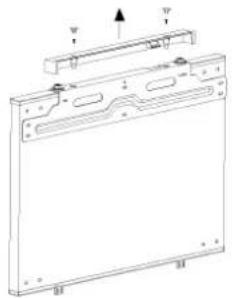
- Measure the dimension of A
Remove the trim cover before measuring
natural_image
Technical line drawing of a rectangular electronic component with mounting holes and internal slots (no text or symbols)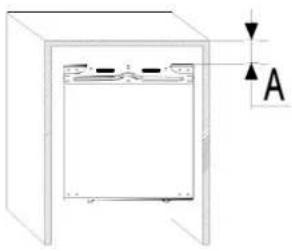
natural_image
Simple line drawing of a cabinet or enclosure with labeled component 'A' (no text or symbols beyond label)- Remove the connecting metal plate and install the connecting metal plate on the wooden door
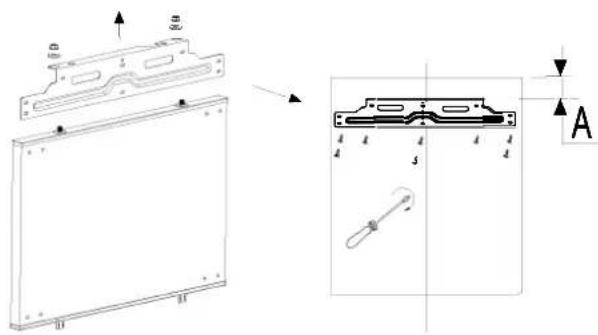
text_image
Technical diagram showing assembly of a panel with labeled components and directional arrows, including section A-A.- Please follow the steps below to connect the wooden door and the refrigerator door
Use T20 screwdriver to tighten the bolt and adjust the upper and lower clearance between the wooden door and the cabinet
Use the # 13 wrench to adjust the nut, adjust the left and right and front and back clearance between the wooden door and the cabinet
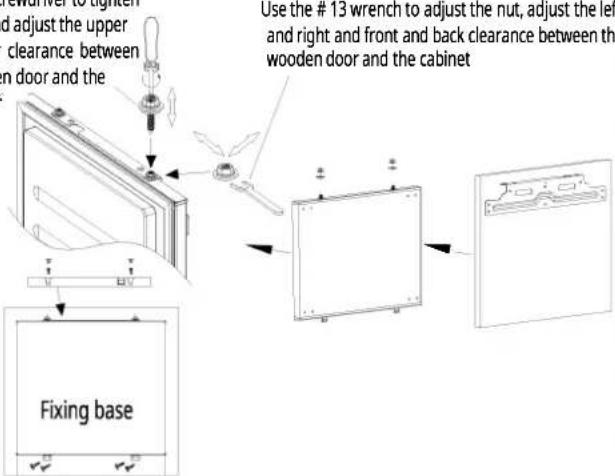
text_image
Use the # 13 wrench to adjust the nut, adjust the left and right and front and back clearance between the wooden door and the cabinet Fixing baseReversing the freezer door
We recommend you seek the help of another individual to support the doors whilst performing this operation.
- Open the door
- Carefully prise off the white cover caps for the side that you wish to switch the hinges to
- Loosen the screws that hold the hinges to the fridge cabinet and remove the door
- Remove the screws that secure the hinge to the door
- Place the door somewhere safe where it will not cause or receive damage
-
Relocate the hinges to their opposing corners as shown in Fig. 10
-
Refit the door to the hinges. Do not turn the door upside down
8 Insert the.cover caps (3) on the opposite side in the exposed holes
- Ensure that the door seal is correct, as per page 19
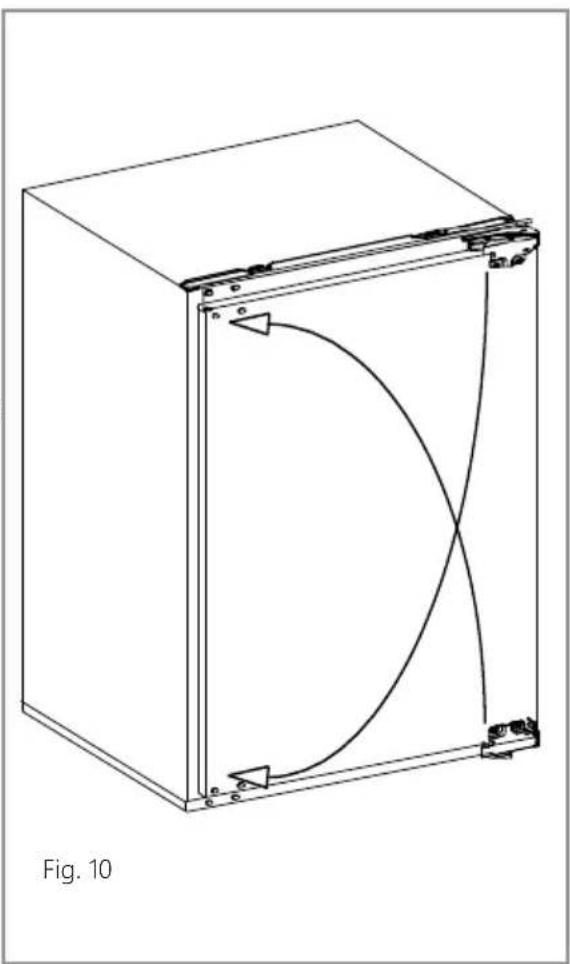
natural_image
Technical line drawing of a rectangular enclosure with internal curved and straight lines, labeled Fig. 10 (no text or symbols on the diagram itself)Ensuring the door seals correctly:
It is normal for the seal to be compressed after the door has been reversed.
With the door closed, use a hair dryer to expand the seal and fill the gap between the door and the body of the appliance.
Take care not to use the hair dryer too close to the appliance, which could damage the seal. A distance of approximately 10cm should be adequate.
When completed, allow the seal and door to cool before touching them.
Once done, the seal will remain in position.
Changing the light bulb
If the LED lighting(if applicable) fails in any way, it should only be replaced by an authorised service agent. In the event of light failure within your fridge please contact the Customer Care to arrange a service visit.
Climate range
The information about the climate range of the appliance is provided on the rating plate. It indicates at which ambient temperature (that is room temperature in which the appliance is working) is optimal for the operation of the appliance.
| Climate class | Allowable ambient temperature |
| SN Extended Temperate | This refrigeration appliance is intended for use at an ambient temperature ranging between 10°C and 32°C |
| N Temperate | This refrigeration appliance is intended for use at an ambient temperature ranging between 16°C and 32°C |
| ST Sub Tropical | This refrigeration appliance is intended for use at an ambient temperature ranging between 18°C and 38°C |
| T Tropical | This refrigeration appliance is intended for use at an ambient temperature ranging between 18°C and 43°C |
Table des matières
natural_image
Line drawing of an open refrigerator with internal compartments and ventilation slots (no text or symbols)natural_image
Black snowflake-like symbol with six symmetrical arms and a central dot, labeled 'Fig. 3' (no text or symbols on the snow itself)natural_image
Isometric line drawing of two 3D rectangular blocks with a cable and plug attached (no text or symbols)natural_image
Technical line drawing of a front panel and side view of a refrigerator (no text or symbols)text_image
Technical diagram showing assembly of a rectangular panel with mounting holes and a cross-sectional view labeled Anatural_image
Technical line drawing of a rectangular frame with internal curved arrows indicating flow or movement, labeled 'Fig. 10' (no text or symbols on the diagram itself)natural_image
Line drawing of an open refrigerator with internal compartments (no text or symbols)Fig. 3
natural_image
Black snowflake-like symbol with six symmetrical arms, labeled Fig. 3 (no text or symbols on the snow itself)Cuidados e limpeza
natural_image
Isometric line drawing of two 3D rectangular blocks with a curved arrow indicating rotation or movement (no text or symbols)natural_image
Technical line drawing of a front panel and side view of a refrigerator (no text or symbols)text_image
Technical diagram showing assembly of a rectangular panel with mounting holes and a cross-sectional view labeled Anatural_image
Technical line drawing of a rectangular frame with internal curved arrows indicating flow or movement, labeled 'Fig. 10' (no text or symbols on the diagram itself)natural_image
Line drawing of an open refrigerator with internal compartments and ventilation slots (no text or symbols)Abb. 3
natural_image
Black snowflake-like shape with six symmetrical arms and a central dot, labeled 'Abb. 3' (no other text or symbols)natural_image
Isometric line drawing of two connected 3D cubes with a cable and plug attached (no text or symbols)natural_image
Technical line drawing of a front panel and side view of a refrigerator (no text or symbols)text_image
Technical diagram showing assembly of a rectangular panel with mounting holes and a cross-sectional view labeled Anatural_image
Technical line drawing of a rectangular enclosure with internal curved arrows indicating flow or movement (no text or symbols)| Product Information Sheet EN COMMISSION DELEGATED REGULATION (EU) 2019/2016 | ||||||
| Supplier's name or trademark: Nodor | ||||||
| Supplier's address: CNA Group, Carrer del Ter, 2 08570 Torelló (SPAIN) | ||||||
| Model identifier: NorFrost ICE 82 BI | ||||||
| Type of refrigerating appliance: | ||||||
| Low-noise appliance: —Design type: Built-in v | ||||||
| Free standing | ||||||
| Wine storage appliance: —Other refrigerating appliance: v | ||||||
| General product parameters: | ||||||
| Parameter Value Parameter Value | ||||||
| Overall dimensions (millimetre) | Height 820 | Total volume (dm3 or l) 95 | ||||
| Width | 596 | |||||
| Depth | 550 | |||||
| EEI | 99.8 | Energy efficiency class | E | |||
| Airborne acoustical noise emissions (dB(A) re 1 pW) | 40 | Airborne acoustical noise emission class | C | |||
| Annual energy consumption (kWh/a) | 176.01 | Climate class: | Extended Temperate | |||
| Temperate | ||||||
| Subtropical | v | |||||
| Tropical | ||||||
| Minimum ambient temperature (oC), for which the refrigerating appliance is suitable | 16 | Maximum ambient temperature (oC), for which the refrigerating appliance is suitable | 38 | |||
| Winter setting | No | |||||
| Compartment Parameters: | ||||||
| Compartment type | Compartment parameters and values | |||||
| Compartment volume (dm3 or l) | Recommended temperature setting for optimised food storage (oC) These settings shall not contradict the storage conditions set out in Annex IV, Table 3 | Freezing capacity (kg/24h) | Defrosting type (auto-defrost=A, manual defrost=M) | |||
| Pantry | No | — | — | — | — | |
| Wine storage | No | — | — | — | — | |
| Cellar | No | — | — | — | — | |
| Fresh food | No | — | — | — | — | |
| Chill | No | — | — | — | — | |
| 0-star or icemaking | No | — | — | — | — | |
| 1 -star | No | — | — | — | — | |
| 2 -star | No | — | — | — | — | |
| 3 -star | No | — | — | — | — | |
| 4 -star | Yes | 95 | 3-4 | 4.5 | M | |
| 2-star section | No | — | — | — | — | |
| Variable temperature compartment | No | — | — | — | — | |
| For 4-star compartments | ||||||
| Fast freeze facility | Yes | |||||
| Light source parameters: | ||||||
| Type of light source | No | |||||
| Energy efficiency class | N/A | |||||
| Minimum duration of the guarantee offered by the manufacturer (months): | 36 | |||||
| Additional information: | ||||||
| Weblink to the manufacturer's website, where the information in point4(a) Annex of Commission Regulation (EU) 2019/2019 is found: | ||||||