
LAC-7750R - Car stereo LG - Free user manual and instructions
Find the device manual for free LAC-7750R LG in PDF.

User questions about LAC-7750R LG
0 question about this device. Answer the ones you know or ask your own.
Ask a new question about this device
Download the instructions for your Car stereo in PDF format for free! Find your manual LAC-7750R - LG and take your electronic device back in hand. On this page are published all the documents necessary for the use of your device. LAC-7750R by LG.
USER MANUAL LAC-7750R LG
CAR CD/MP3/WMA Receiver
OWNER'S MANUAL
MODEL:LAC7750R
Please read this instruction booklet carefully and completely before installing, operating or adjusting this product.
GERMAN
Auto-CD-/MP3-/WMA-Receiver
CAR CD/MP3/WMA Receiver
The lightning flash with the arrowhead symbol, within an equilateral triangle is intended to alert the user about the presence of uninsulated dangerous voltage within the product's enclosure that may be of sufficient magnitude to constitute a risk of electric shock.

The exclamation point within an equilateral triangle is intended to alert the user to the presence of important operating and maintenance (servicing) instructions in the literature accompanying the appliance.

Always operate the vehicle in a safe manner.
Do not become distracted by the vehicle while driving, and always be fully aware of all driving condition. Do not change settings, or any functions. Pull over in a safe and legal manner before attempting such operations.

Do not use for many hours at extremely low or high temperature. (-10 60^)

To reduce the risk of electric shock, do not remove the cover or back of this product. There are no user-serviceable parts inside. Refer servicing to qualified service personnel.

To reduce the risk of fire or electric shock, do not expose this product to dripping or splashing water, rain, or moisture.

The temperature of unit's outside can be extremely high, please use the unit after proper installation in your vehicle.
CAUTION : This product uses a Laser System.
To ensure proper use of this product, please read this owner's manual carefully and retain it for future reference.
Should the unit require maintenance, contact an authorized service center.
Performing controls, adjustments, or carrying out procedures other than those specified herein may result in hazardous radiation exposure.
To prevent direct exposure to laser beam, do not try to open the enclosure. Visible laser radiation when open. DO NOT STARE INTO BEAM.

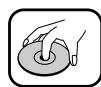
- A defective or soiled disc inserted into unit can cause sound to drop out during playback.
- Handle the disc by holding its inner and outer edges.
- Do not touch the surface of the unlabeled side of the disc.
Do not stick paper or tape etc. on the surface.

Do not expose the disc to direct sunlight or excessive heat.

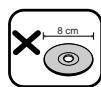
This unit cannot play 8cm disc (use 12cm disc only).
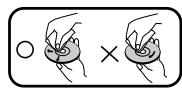
- Clean the disc before playback. Wipe the disc from the center outward with a cleaning cloth.
- Never use solvents such as benzine or alcohol to clean the disc.
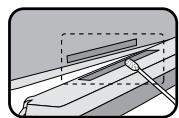
Periodically wipe the contacts on the back of the control panel with a cotton swap moistened with alcohol.
Bluetooth®
Bluetooth® wireless technology is a system which allows radio contact between electronic devices within a max. range of 10 meters.
Connecting individual devices under Bluetooth® wireless technology does not incur any charges. A mobile phone with Bluetooth® wireless technology can be operated via the Cascade if the connection was made via Bluetooth® wireless technology.
"The Bluetooth® word mark and logos are owned by the Bluetooth® SIG, Inc. and any use of such marks by LG Electronics is under license.
Other trademarks and trade names are those of their respective owners."
Operating condition for using a Bluetooth function
- Close windscreen.
- Turn off the air conditioner/ heater.
- Stop the vehicle or drive at low speed.
- Make the call in a quiet location.
- There may be differences in call quality depending on phone type, road conditions weather, etc.
- Using the phone while driving may cause unexpected accidents.
- The Bluetooth function may not operate properly with certain types of Bluetooth phones.
A section whose title has one of the following symbols is applicable only to the disc represented by the symbol.
CD Audio CDs MP3 MP3 files WMA WMA files
MP3/WMA Disc compatibility with this unit is limited as follows:
- Sampling Frequency / 8 - 48kHz (MP3) 22.05 - 48kHz (WMA)
- Bit rate / within 8 - 320kbps (include VBR) (MP3) 32 -320kbps (WMA)
- CD-R/CD-RW file system should be "ISO 9660"
- If you record MP3/WMA files using software which cannot create a FILE SYSTEM, for example "Direct-CD" etc., it will not be possible to playback MP3/WMA files. We recommend that you use "Easy-CD Creator" which creates an ISO9660 file system.
Customers should also note that permission is required in order to download MP3/WMA files and music from the Internet.
Our company has no right to grant such permission.
Permission should always be sought from the copyright owner.

Disposal of your old appliance
- When this crossed-out wheeled bin symbol is attached to a product, it means the product is covered by the European Directive 2002/96/EC.
- All electrical and electronic products should be disposed of separately from the municipal waste stream via designated collection facilities appointed by the government or the local authorities.
- The correct disposal of your old appliance will help prevent potential negative consequences for the environment and human health.
- For more detailed information about disposal of your old appliance, please contact your city office, waste disposal service or the shop where you purchased the product.

This product is manufactured to comply with Directive 2005/83/EEC(ANNEX I, 3.2.9), 72/245/EEC and 2006/95/EC.
Table of contents
Safety note 2-3
Table of contents 4
Before use 5
Control panel 6
Remote control 6
Installation 7
Connection diagram 8-9
Basic operation 10-13
Bluetooth operation 13-19
Radio operation 19
RDS operation 20
CD/MP3/WMA operation 20-22
Aux operation 22
Troubleshooting 23
Specifications 23
Bluetooth phone compatibility list 24
Before use
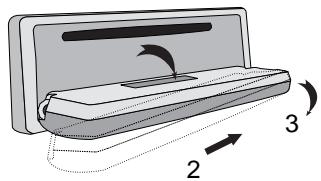
Detaching the control panel
You can detach the control panel when leaving the car.
When detaching or attaching the control panel, be careful not to damage the connectors on the back of the control panel and on the panel holder.
- Press the "▶" button to unlock the control panel.
- Push the control panel to right.
- Pull the control panel out of the unit.
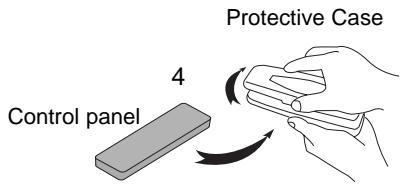
- Put the detached control panel into the protective case.
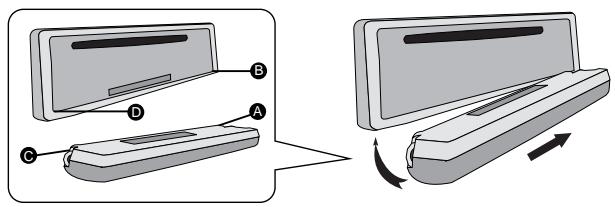
Attachable control panel
1 Attach part A of the control panel to part B of the unit.
2 Attach part of the control panel to part D of the unit while pushing the control panel to right.
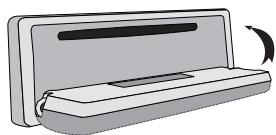
3 Close the control panel.
Caution
- When detaching or attaching the control panel, do not press the display or control buttons.
- The control buttons may not work properly if the control panel is not attached properly. If this occurs, gently press the control panel.
- Do not leave the control panel in any area exposed to high temperatures or direct sunlight.
- Do not drop the control panel or otherwise subject it to strong impact.
- Do not allow such volatile agents as benzine, thinner, or insecticides to come into contact with the surface of the control panel.
- Do not try to disassemble the control panel.
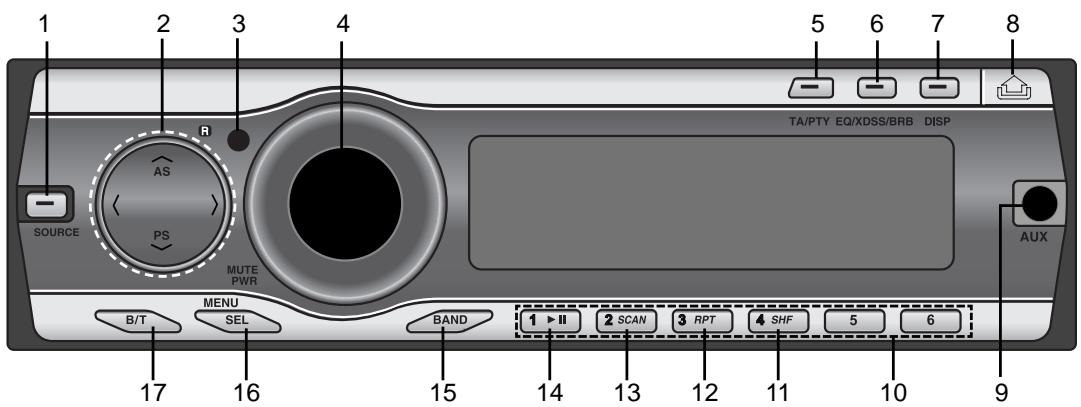
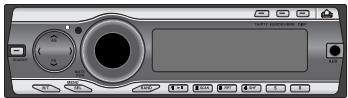
Control panel
1 [SOURCE]
2·Skip/Search<
- Seek/Tune
- Auto Store [AAS]
- Preset Scan [VPS]
- MP3 Track +10/-10 N/V
MP3 WMA
- Folder Up/Down A/V
MP3 WMA
3 Remote Sensor
4 Volume [VOL.]
[MUTE]
- Power [PWR]
5 •Traffic Announcement
[TA]
Programme Type [PTY]
6 - Equalizer [EQ] - Extreme Dynamic Sound
System
[XDSS] - Bass Reverb Blaster
[BRB]
7 Display [DISP]
8 Release/Eject
9 AUX In [AUX]
10 Preset Station [1~6]
11 Shuffle [SHF]
12 Repeat [RPT]
13 Intro Scan [SCAN]
14 Play/Pause [▶/III]
15 [BAND]
16·[MENU]
- Select [SEL]
17 Bluetooth [B/T]
![LG LAC-7750R - [SOURCE] - 1](/content/2025/01/70221/images/11823460eeb6affe44938473cb21117f666460d502956ee3c336d809506a2aed.jpg)
Remote control
1 Power [POWER] / Mute
2 Select [MENU/SEL]
3 Source [SRC]
4 Play/Pause▶/
5 Intro Scan [SCAN]
6 Shuffle [SHF]
7 MP3 Track +10
MP3
- Folder Up ∧ MP3 WMA
8 CD Skip / Search
- Seek / Tune I
9 [BAND]
10 Volume Up / Down
11 Number[#]
12 Repeat [RPT]
13 Number [0-9]
14 CD Skip / Search
![LG LAC-7750R - [BAND] - 1](/content/2025/01/70221/images/e3467aed0e9acc586edfe6922dda625fcdffe0d4ee6b8e7c796e10ab81965b26.jpg)
- Seek / Tune ▷ ▷ ▷ I
15 Display [DISP.]
16·MP3 Track -10
MP3
WMA
- Folder Down V
MP3
WMA
Battery Installation
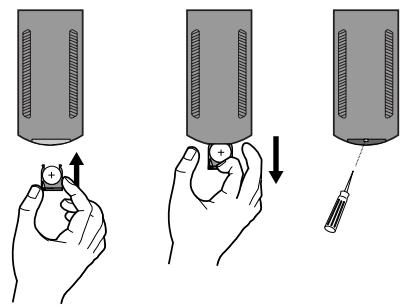
1 Remove the battery holder with a sharp product like a ball point pen.
2 Install the battery on the battery holder.
3 Install the battery holder back into its original position.
Note
- Use only one CR2025 (3V) lithium battery.
- Remove the battery if the remote control is not used for a long period of time.
- Do not leave the product in a hot or humid place.
- Do not handle the battery with metallic tools.
- Do not store the battery with metallic materials.
Installation
Basic Installation
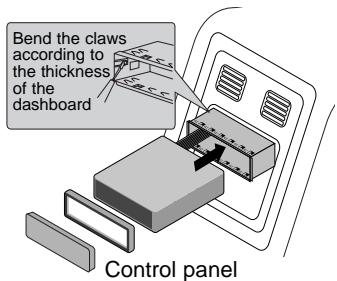
Before installing, make sure that the ignition-switch is set to OFF and remove the terminal of the car battery to avoid short-circuiting.
1 Remove the existing receiver unit.
2 Make the necessary connections.
3 Install the installation sleeve.
4 Install the unit into the installation sleeve.
Removing the existing receiver unit
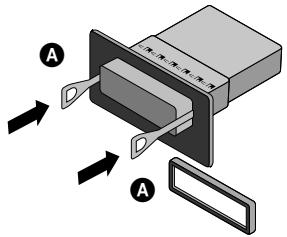
If there is already an installation sleeve for the receiver unit in the dashboard, it must be removed.
1 Remove the rear support from the unit.
2 Remove the control panel and trim ring from the unit.
3 Insert the lever A into the hole on one side of the unit. Perform the same operation on the other side and pull the unit out from the mounting sleeve.
ISO-DIN Installation
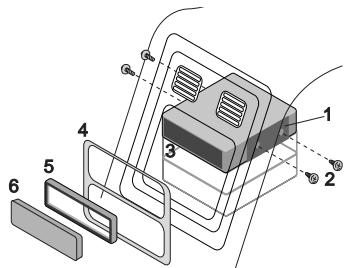
1 Slide the unit into the ISO-DIN frame.
2 Fit screws removed from the old unit.
3 Slide the unit and frame into the dash opening.
4 Install the dash panel or adapter plate.
5 Install the trim ring to the unit.
6 Install the control panel to the unit.
Control panel
Connection diagram
Before connecting, make sure that the ignition switch is set to OFF, and remove the battery terminal to avoid short circuits.
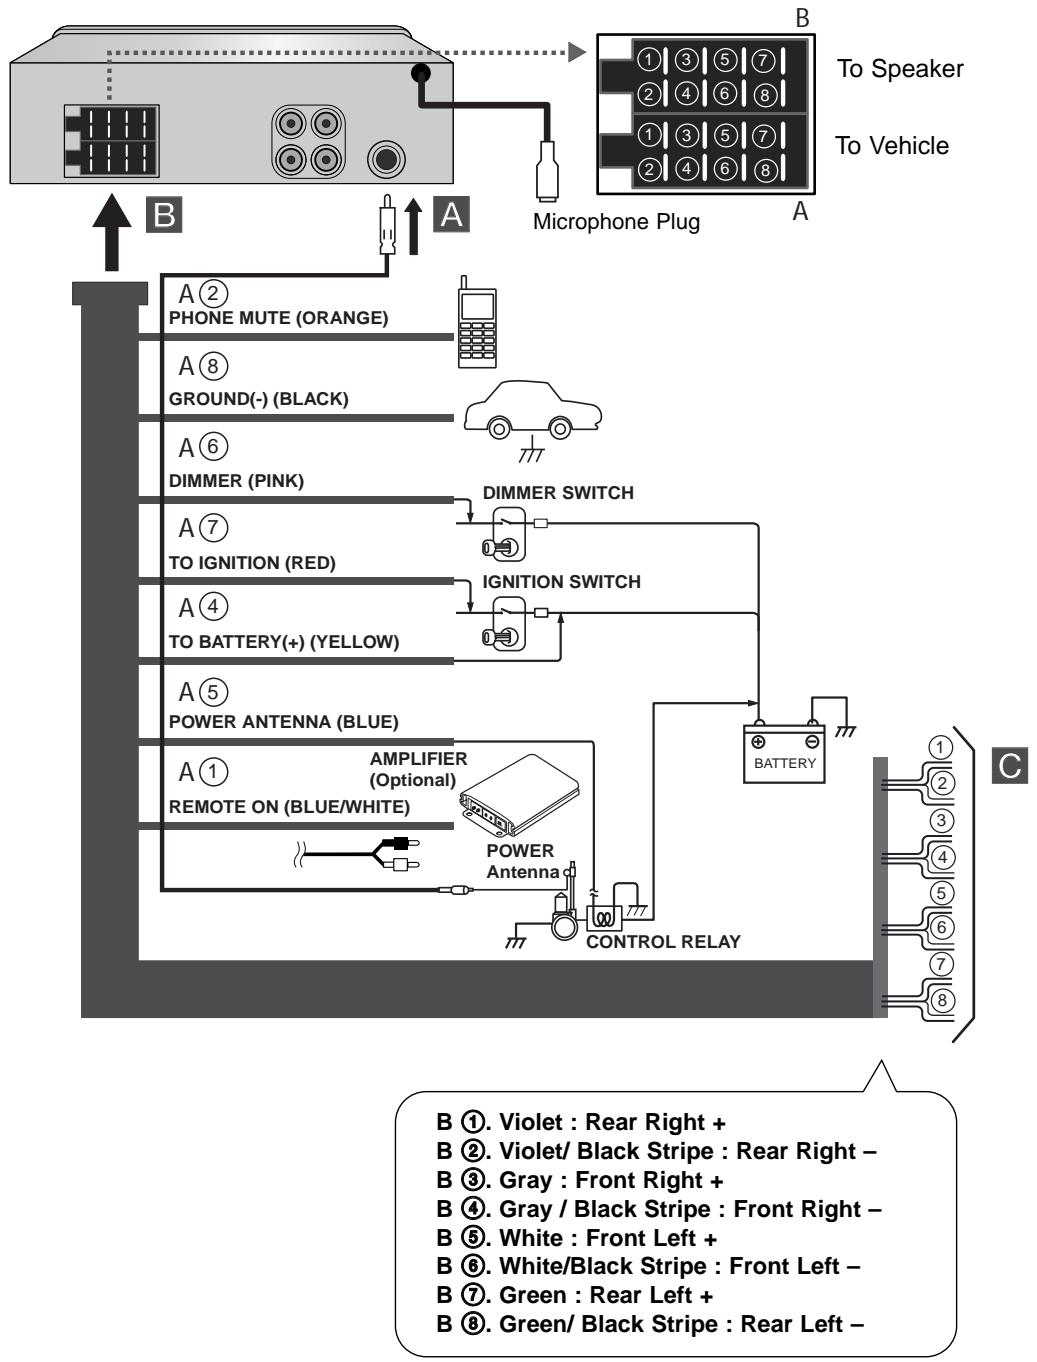
A From antenna
B To the wiring of the vehicle colors of leads.
- BLACK: This lead is for the ground connection.
ORANGE: This lead is for the phone line connection. - PINK: This lead is for the dimmer line connection.
- RED: This lead is for connection to the power supply terminal when the ignition switch is set to ACC.
- YELLOW: This lead is for connection to the battery (back-up) terminal from which power is always supplied.
- BLUE: This lead is for the power antenna connection.
- BLUE/WHITE: This lead is for the remote amplifier on connection.
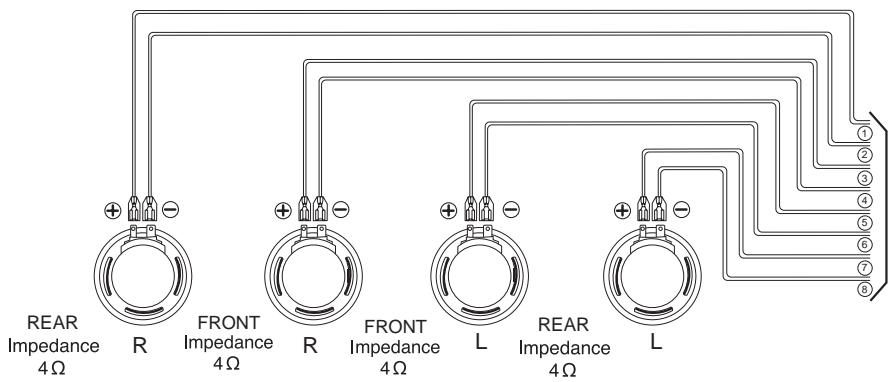
C Speaker Connections
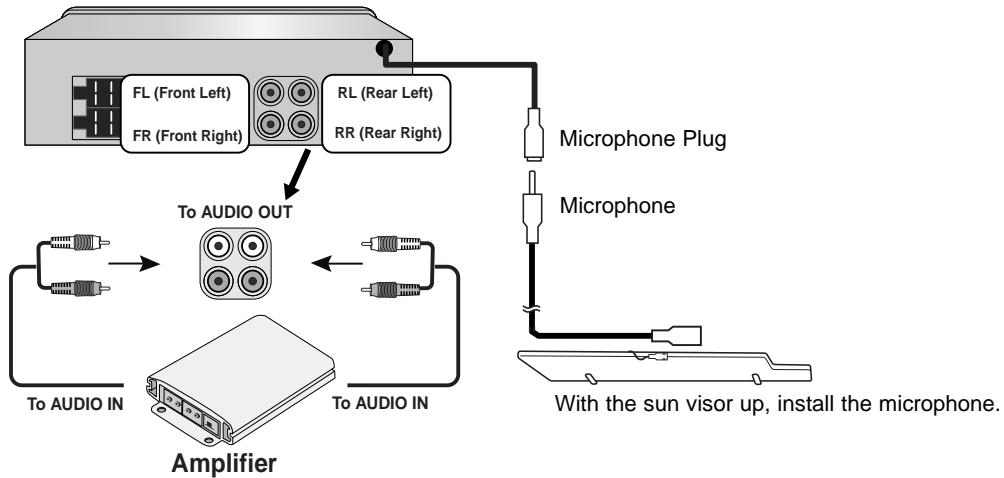
Connecting to Auxiliary Equipment (Optional)
Connect the AUDIO OUTPUT jack of this unit to the AUDIO INPUT jack of the Auxiliary Equipment.
Basic operation
Turning the unit on
Press MUTE/PWR (POWER/ on the remote control) or any other button.
Note
When you insert the CD in the CD slot, the unit turns on.
Turning the unit off
Press and hold MUTE/PWR and then press and hold MUTE/PWR one more time(POWER/ on the remote control).
Note
When the demo function is "off", press and hold MUTE/PWR.
Insert a disc
1 Press to open the control panel.
2 Draws the disc, and starts playback automatically.
Eject a disc
Press to open the control panel. The disc automatically ejects from the loading slot.
When the disc is ejected by pressing during playback, it will be loaded automatically after 10 seconds unless you pull out disc from the unit.
Selecting a source
Press SOURCE repeatedly to select a source.
The indicator lights up in the following order.
TUNER AUX TUNER..
TUNER CD AUX TUNER...(Insert CD in unit)
TUNER CD AUX BT Music TUNER...(When Insert CD in unit, Linked BT A2DP Profile)
Note
You cannot select a source if it is not ready.
Adjusting the volume
Rotate MUTE/PWR (Press VOLUME on the remote control) to adjust the sound level.(0 - 35)
Note
When you turn the unit off, the current volume level is automatically memorized. Whenever you turn the unit back on, it will operate at the memorized volume level.
Mute
1 Press MUTE/PWR (POWER/ on the remote control) to cut the sound.
2 To cancel it, press again or any other buttons.
Checking the clock
You can see the clock pressing DISP (DISP. on the remote control).
Changing the general settings
1 Press and hold MENU/SEL (MENU/SEL on remote control) to enter the menus.
2 Press N/AS or V/PS (N/V on remote control) to scroll between menus.
RDS Display Bluetooth Setup
3 Press < or > (I I on remote control) and Press N/AS or V/PS (N/V on remote control) to select one of the settings specified belows.
4 Press MENU/SEL (MENU/SEL on remote control) to finish the setting.
RDS
AF(Alternative frequency)
When the reception quality drops, the tuner automatically changes to another station in the network, broadcasting a better reception quality, using the PI and AF codes.
ON : wherever you drive, you can continue to listen to the same program without interruptions.
OFF: Only station name will be displayed. In case of poor reception no alternative station can be used.
REG (Region)
ON : The unit switches to another station, within the same network, broadcasting the same programme when the receiving signals from the current station become weak.
OFF : The unit switches to another station, within the same network when the receiving signals from the current station become weak.(In this mode, the programme may differ from the one currently received.)
TA (Traffic Announcement Identification)
Seek : When the newly tuned station does not receive TP information for 5 seconds, the receiver retunes to the next station which has the same PI as the last station, but has the TP information.
Alarm : When a newly tuned station has no TP information for 5 seconds, a double beep sound is output.
TA VOLUME
Control the volume of TA (Traffic Announcement Identification)
DPI (Programme Identification)
Sound : If the sound of a station with different PI is heard intermittently, the receiver mutes the sound after 1 second.
Mute : If the situation described above is repeated, the receiver instantly mutes the sound.
Display
You can select various display modes. It displays the change of sound output during play.
ALL Pinball Dance Space Racing OFF
Image
ON : Animation or Graphic EQ are displayed on screen.
OFF : Animation or Graphic EQ are not displayed on screen.
Graphic EQ
OFF Graphic EQ 1 Graphic EQ 2
- Setup
Sets the beep sound every time a button is pressed.
BEEP 2nd
The beep is generated when a key is long pressed. (1 sec)
BEEP ALL
The beep is generated when any key is pressed.
DEMO ON / OFF
You can change the initial indication on the display to information name. (function name, EQ name, etc...)
DEMO ON
When the unit is "Power on", press and hold MUTE/PWR (POWER/ on the remote control), Demo is displayed on screen.
DEMO OFF
Demo is not displayed on screen.
AUX In
It is possible to use auxiliary equipment with this unit. Activate the auxiliary setting when using auxiliary equipment connected to this unit.
- Enable : When using a auxiliary equipment.
- Disable : When not using a auxiliary equipment.
AUX In Att. (Auxiliary In Attenuate)
You can adjust the volume level of each source to prevent radical changes in volume when switching between sources.
Setting range: 0 dB / +6 dB
If the input level of the connected component is not high enough, increase the input level properly. Without adjusting the line input level, you may be surprised at a loud sound when you change the source from the external component to another source.
Contrast
You can adjust the display for easier viewing when lighting conditions change.
Dark: -15.....+15 : Light
- Bluetooth
Auto Connection(Auto CONN.) On / Off
ON : Bluetooth phone with a previous record showing that it has successfully connected will automatically start the connection process when starting the car.
OFF: Cancels the function.
Auto Answer(Auto ANS.) On / Off
ON : If you set the automatic answering function on, hands-free answering call is possible.
OFF: Cancelsthefunction.
HF Volume (Setting range: 0 - 35)
After connected, it is necessary to adjust the volume of Bluetooth's voice.
It is possible to adjust the volume using the MUTE/PWR button when talking on the phone.
Last Call
Your unit keeps records of your recently received and dialed calls.
To make a call from the last call, press MENU/SEL to place a call to the entered number. 1 Time / 2 Times
It may be that sending is done by pressing MENU/SEL twice depending on type of bluetooth phone. ( Please see page 15 for details.)
Using the EQ (Equalizer)
Press EQ/XDSS/BRB repeatedly. The indicator lights up in the following order.
$$ \operatorname {P o p} (\mathrm {P}) \rightarrow \operatorname {C l a s s i c} (\mathrm {C}) \rightarrow \operatorname {R o c k} (\mathrm {R}) \rightarrow \operatorname {J a z z} (\mathrm {J}) \rightarrow \operatorname {V o c a l} (\mathrm {V}) \rightarrow \operatorname {S a l s a} (\mathrm {S S}) \rightarrow \operatorname {S a m b a} (\mathrm {S B}) \rightarrow $$
$$ \text {U s e r 1} (\mathrm {U} 1) \rightarrow \text {U s e r 2} (\mathrm {U} 2) \rightarrow \text {O f f} $$
- Pop : Optimized for R&B, Soul and Country music.
- Classic : Optimized for orchestral music.
- Rock : Optimized for Hard Rock and Heavy Metal music.
- Jazz : Sweet sound with soft feeling.
Vocal : Powerful realism with strong sound quality. - Salsa : Reproduces salsa music acoustics.
- Samba : Reproduces samba music acoustics.
- User1 : Use the menu to set the sound level you want.
- User2 : Use the menu to set the sound level you want.
You can adjust each sound level to your preference. Once you select a USER mode and then make an adjustment, it automatically stored for the currently selected USER mode.
Refer to the "Adjusting the sound level" on the page 13.
Adjusting the sound level
1 Press SEL (SEL on the remote control) repeatedly to select the mode you want to adjust from volume, bass, middle, treble, balance and fader.
The indicator lights up in the following order.
VOLUME(VOL) EQ - USER(BAS, MID, TRB) BALANCE(BAL) FADER(FAD)
2 Rotate the MUTE/PWR. (Press VOLUME on the remote control) to adjust the sound quality.
| Indication | Turn right | Turn left |
| VOL | Increase the volume level. | Decrease the volume level. |
| BAS | Increase the bass level. | Decrease the bass level. |
| MID | Increase the middle level. | Decrease the middle level. |
| TRB | Increase the treble level. | Decrease the treble level. |
| BAL | Decrease the level of the left speaker(s). | Decrease the level of the right speaker(s). |
| FAD | Decrease the level of the front speaker(s). | Decrease the level of the rear speaker(s). |

Note
When EQ, BRB or XDSS+ is set to "Off", you can adjust the sound level (BAS, MID, TRB) settings.
XDSS+ (Extreme Dynamic Sound System), BRB (Bass Reverb Blaster)
1 Press and hold EQ/XDSS/BRB.
"XDSS+" is appear on screen.
XDSS+ : Improve the treble, bass sound.
2 Press and hold EQ/XDSS/BRB.
Each time you press the button, the modes change
XDSS+→BRB (TBB → 3D-TB → SBB)
- TBB (Turbo-Bass Blaster) : Improve the bass sound to make it spectacular.
- 3D-TB (3D-TremD Blaster) : Positions audio effects real time in 3D space.
- SBB (Sound field Boost Blaster): Extremely wide stereo imaging and improved low frequency bass.
3 Press and hold EQ/XDSS/BRB.
XDSS/BRB function is "off".
Bluetooth operation
Using a Bluetooth wireless connection
Your unit supports Bluetooth wireless connections. You can set up a wireless link with Bluetooth phone.
Starting Bluetooth on your phone
Your phone's Bluetooth feature may be set to off by default.
To use your car Bluetooth feature, Bluetooth must be turned on in your phone.


Pairing your unit and Bluetooth phone
Pairing links your unit and Bluetooth phone, and is required only once for the initial setup. Before you start the pairing procedure, make sure the Bluetooth feature is turned on in to your Bluetooth phone. Refer to your Bluetooth phone's user guide.
1 Press B/T to connect your Bluetooth phone.
The "Connect" is displayed.
If connecting through a Bluetooth phone, the handsfree connection or headset connection may operate depending on the type of phone.
With connection via Bluetooth technology, HFP (Hands Free Profile) is prioritized over HSP (Head Set Profile).
2 Press to enter the "Pairing" menu.
3 Press B/T again
4 The unit displays the PIN code enter screen. PIN : 1234
5 The unit may request permission to bond with your phone.
The indicator flashes.
To cancel, press and hold B/T again.
6 You can set up a wireless link with Bluetooth phone.
Refer to your phone's user guide.
7 The Bluetooth phone displays the device name, select the device.
8 The Bluetooth phone displays the PIN code enter screen, enter the PIN code 1234.
9 If the connection is successful, the Bluetooth phone is registered (Device 1-5).
10 When your unit successfully paired with your Bluetooth phone, the flashing of indicator stops.
Note
- Your unit keeps lists of pairing you recently connected. A maximum of 5 pairing numbers can be saved.
- Unlike the Hands-free functionality, Headset connection will allow only two functions "answering calls" and "making a call from the latest call".
Changing the Bluetooth settings
1 Press B/T so that one of menu items appears.
2 Press N/AS or V/PS to scroll between menus.
Call Disconnect Preset Phone Book
3 Press (▶▶▶I on remote control) to enter the sub menus.
4 Press N/AS or V/PS up or down to scroll between sub menus.
5 Press < or > left or right (I / I on remote control) to select the settings of your choose.
Answering and Ending a call
Your unit, Bluetooth phone, or both may ring when you receive a call, press B/T to answer a call. To end a call, press and hold B/T.
Note
If the Call-ID service is available, the caller's phone number is displayed.
Rejecting a call
When your unit rings, press and hold B/T.
Note
If "REJECT" function is unusable, then the phone connected to the device does not support the reject call function.
Missed call notification
When an incoming call is not answered, the missed call message is displayed on the your screen.
1 The "??" appears on the screen.
2 Press B/T to place a call.
3 Press (▶▶▶I on remote control) to enter the "Received Call".
4 To end the call and hang up the phone, press B/T button.
This function is adjust only on hands free mode.
Audio transfer
It is possible to select the automatic connection between your Bluetooth phone and this unit.
1 Press B/T to answer the call.
2 Press B/T again.
The "Private" is displayed.
If the private mode is selected on the unit, press B/T to return to the call to hands-free mode. (This feature is only available on phones with Hands-free profile.)
Or press and hold B/T to return to the call to hands-free mode. (This feature is only available on phones with Headset profile.)
Connecting a Another Bluetooth phone
After being registered, it is necessary to connect another Bluetooth phone from this unit.
Refer to step 2 - 4 of page 14.
Note
Your unit keeps lists of pairing you recently connected. A maximum of 5 pairing numbers can be saved.
Making a call from the latest call : Last call
Your phone keeps a lists of your recently received and dialed even if the calls did not connected. Your unit keeps recorded of your recently received and dialed on phone.
Last call
1 Press B/T to select the "Call".
2 Press > (▶▶▶ on remote control) to select the "Last Call".
3 Press B/T.
Received or dialed call
1 Press B/T to select the "Call".
2 Press > and then press N/AS or V/PS to select the "Dialed Call" or "Received Call".
3 Press > and then press N/AS or V/PS to select desire phone number.
4 Press B/T.
Note
- When you want to make an international call, press > to add "+" press < to delete "+"
- “+” can only be added when the detail list of Missed call, Dialed call or Received call is selected.
Dial using a number from the unit
You can making a call to desire number.
1 Press B/T to select the "Call".
2 Press > and then press / AS or V/PS to select the "Dial Number"
3 Press > and then press N/AS or V/PS up or down, press < or > left or right to input the desire number.
4 Press B/T.
Disconnecting a Bluetooth phone
It is possible to disconnect your Bluetooth phone from this unit.
1 Press B/T and then press N/AS or V/PS to select the "Disconnect".
2 Press >. The "YES" and "NO" appears on the screen.
3 Press B/T to disconnect a Bluetooth phone from the unit. The "DISCONNECTED" appears on the screen.
Making a call from the preset list
It is possible to make a call from the preset phone number list.
1 Press B/T and then press N/AS or V/PS to select the "Preset".
2 Press and hold the preset button 1~6 or press > and then press N/AS or V/PS the phone number is recalled from memory
3 Press B/T to making a call.
Search stored a call number
It is possible to search edit and call from the stored phone number list.
1 Press B/T and then press A/AS or V/PS to select the "Phone Book".
2 Press to select the "Search".
3 Press > and then press N/AS or V/PS to select the desire name.
4 Press > and then press N/AS or V/PS to select the desire number(Mobile/Home/Office Number).
5 Press N/AS or V/PS select desire phone number and then press B/T to call. The phone number appears on the screen.
Editing stored a call number
It is possible to edit from the stored phone number list.
Name
1 Refer to the step 1 - 4 of "Search stored a call number" on page 16.
2 Press > and then press N/AS or V/PS to select the "Edit".
3 Press and then press A/AS or V/PS to select the "Name".
4 Press > and then press N/AS or V/PS up or down, press < or > left or right to edit the Name.(Press and hold > : Change to minuscule, number, etc. Press and hold < : Delete)
5 To save, press B/T and then press < to select "End" and then press B/T.
Number
1 Refer to the step 1 - 2(Name).
2 Press and then press A/AS or V/PS to select the "Number".
3 Press > and then press NAS or V/PS to select the desire number(Mobile/Home/Office Number).
4 Press > and then press N/AS or V/PS up or down, press < or > left or right to edit the desire number(Mobile/Home/Office Number).
5 To save, press B/T and then press < to select "END" and then press B/T.
Deleting stored a call number
It is possible to delete from the stored phone number list.
1 Refer to the step 1 - 4 of "Search stored a call number" on page 16.
2 Press > and then press N/AS or V/PS to select the "Delete".
3 Press >
The "YES" and "NO" appears on the screen.
4 Press / AS or V/PS ( / V on remote control) to select "YES" and then press B/T. The "DELETED" appears on the screen.
Search(as preset) stored a call number
It is possible to store in preset number from the stored phone number list.
1 Refer to the step 1 - 4 of "Search stored a call number" on page 16.
2 Press > and then press / AS or V/PS to select the "To preset".
3 Press to storing in preset number.
4 Press N/AS or V/PS up or down to store in desire preset number(1 - 6).
5 After select desire preset number, press B/T.
The "SAVED" appears on the screen.
Add new Mobile/Home/Office number
It is possible to add new phone number in phone number list.
1 Press B/T to enter the "Phone Book" menu.
2 Press > and then press N/AS or V/PS to select the "Add New".
3 Press > and then press / AS or V/PS up or down, press < or > left or right to input the new name.
4 Press B/T to add new phone number(Mobile/Home/Office Number).
5 Refer to the step 4 of "Number"
6 Press B/T to select "End", press > and then press N/AS or V/PS to select the desire "DEFAULT NUMBER"(Mobile/Home/Office) and then press B/T. The "SAVED" appears on the screen.
Deleting(All) stored a call number
It is possible to all delete from the stored phone number list.
1 Press B/T to enter the "Phone Book".
2 Press > and then press N/AS or V/PS to select the "Delete All".
3 Press >.
The "YES" and "NO" appears on the screen.
4 After press N/AS or V/PS to select the "YES" and then press B/T.
The "DELETED" appears on the screen
Storing a call number in last answered.
You can easily store desire phone numbers and laster recall with the press the button.
Preset
1 Press B/T to enter the "Call".
2 Press > and then press N/AS or V/PS to select the "Dialed call or Received Call".
3 Press right to select the desire number and then press right button. The "SAVE TO PHONE BOOK" or "SAVE TO PRESET" appears on the scre
4 After select the "SAVE TO PRESET", press to store a call number.
5 Press N/AS or V/PS up or down to select the preset number(1 - 6)
6 Press B/T
The "SAVED" appears on the screen
Phone Book
1 Refer to the step 1 - 3(preset).
2 After select the "SAVE TO PHONE BOOK", press right to store a call number.
3 Press right to select the insert name.(Refer to the step 4 of "Name" on page 16)
4 Press B/T.
The "SAVE TO (MOBILE, HOME, OFFICE)" appears on the screen.
5 After select one of the "SAVE TO", press B/T.
The "SAVED" appears on the screen.

Note
- When you want to make an international call, press to add "+" press < to delete "+"
- "+" can only be added when the detail list of Missed call, Dialed call or Received call is selected.
Pairing your unit and Bluetooth device (MP3 Player, MP3 Phone...)
When you activate your Bluetooth device's linked unit, you can listen to MP3 with wireless connections. The method of use for a Bluetooth device is the same as when using a Bluetooth phone. (Refer to the page 14 for details.)
Playing MP3 files
When you turn Bluetooth on, your Bluetooth device displays "Bluetooth" on the home screen.
The Bluetooth remains on until you turn the device off.
Press SOURCE repeatedly to select Bluetooth.
The indicator lights up in the following order.
TUNER MP3(CD) AUX BT Music TUNER...
To play an MP3 file stored on your Bluetooth device, refer to your Bluetooth device's user guide.
Bluetooth Profiles
In order to use Bluetooth technology, devices must be able to interpret certain profiles.
This unit is compatible with following profiles.
GAP (Generic Access Profile)
HSP (Hands Set Profile)
HFP (Hands Free Profile)
GAVDP (Generic Audio/Video Distribution Profile)
A2DP (Advanced Audio Distribution Profile)
AVDTP (Audio/Video Distribution Transport Profile)
AVRCP (Audio/Video Distribution Remote Control Profile)
GAP
GAP is short for Generic Access Profile. This is a basic profile of Bluetooth wireless technology.
HFP
HFP is short for Hands-Free Profile. This profile is used for hands-free phoning with the devices featuring Bluetooth wireless technology.
HSP
HSP is short for Head Set Profile. This profile is used for connecting a headset and for communicating terminal wireless technology.
GAVDP
This profile uses an Initiator (INT), a device (such as a portable player) that initiates a signalling procedure to send a request to an Acceptor (ACP), - such as headphones etc. Although this profile specifies signalling transaction procedures between two devices to up, terminate and reconfigure streaming channels, using GAVDP alone, it is required to GAVDP in combination with profiles that depend on this profile - the AVRCP and the VDI
A2DP
Mobile phones and devices with A2DP high quality stereo bluetooth profile.
This profile is based on the GAVDP, and allows advanced audio to be transmitted (audio streaming) from a Source (SRK) - such as a CD player, to a Sink (SNK), such as headphones.
AVRCP
Based on the GAP Profile, this uses a Controller (CT) - PDA, computer mobile phone etc., which sends a command to a Target (TG) - TV, discman, headphone etc. The command can be to Play, record, colour control, volume control etc., depending on the nature of the devices involved and the scenario. The commands are transported by a new additional protocol, called the Audio/Video Control Transport Protocol (AVCTP). Some scenarios defined are Remote Control from a Separate Controller, Remote Control and Audio Stream Between Two Devices, and Remote Controller with LCD.
Radio operation
Listening to radio stations
1 Press SOURCE to select the tuner.
2 Press the BAND repeatedly to select a band.
The indicator lights up in the following order. FM1 FM2 FM3 MW(AM)
3 Auto Search: Press < / > (I on the remote control).
When a station is received, searching stops.
Manual Search : Press and hold < / > (I-1 on the remote control) until "MANUAL" appears, and then press it repeatedly.
The frequencies move up or down step by step.
Storing and recalling broadcast frequencies
You can easily store up to 6 broadcast frequencies for later recall at the touch of a button.
1 Press BAND to select desired band you want to store.
2 Select the desired frequency.
3 Press one of preset buttons 1~6 and hold until the beep sound.
The number you have pressed will appears the preset number on screen and then remain lit. The selected radio station frequency has been stored in memory.
4 Repeat steps 1 ~ 3 to preset other stations.
The next time, you press the same preset button, the radio station frequency is recalled from the memory.
Note
- Up to 18 FM stations, 6 for each of three FM bands and 6 MW(AM) stations can be stored in the memory.
- When a station is stored on the preset numbers on which another station of the same band has already been preset, the previously preset station is automatically erased.
Auto search memory
This function lets you automatically store the 6 strongest broadcast frequencies.
1 Press NAS until "AUTO STORE" appears.
The six strongest broadcast frequencies will be stored under preset button 1~6 in the order of their signal strength.
2 To cancel, press N/AS or V/PS.
To scan the preset stations
Press V/PS. Each preset station appears. To cancel, press A/AS or V/PS.
To tune in the preset stations
Press BAND to select the desired band and press the desired preset button 1~6.
The preset station of the preset button 1~6 is displayed and the preset station is received.
RDS operation
RDS Display options
In normal RDS operation the display will indicate the station name. Pressing DISP enables you to cycle through the various data types in the following sequence:
CT FREQUENCY PTY RT PS
- CT (Time controlled by the channel)
- PTY (Programme type recognition)
- RT (Radio text recognition)
- PS (Programme Service name)
PI (Programme Identification) - AF (Alternative Frequencies for the actual programme)
- TP (Traffic programme Identification)
- TA (Traffic Announcement Identification)
PTY (Programme Type) function
To select a certain program type out of the reception band, the following procedure can be used.
1 Press and hold TA/PTY to select a programme types.
2 After, press / and TA/PTY to select PTY type of "Music" or "Speech". Music Speech
3 Press TA/PTY
4 Press < / > , AS or VPS to move selection cursor of PTY of selected PTY group.
5 Press TA/PTY to select PTY
| Music group | Speech group |
| Pop M, Rock M | News, Affairs, Info |
| Easy M, Light M. | Sports, Education, Drama |
| Classics, Other M | Culture, Science, Varied |
| Jazz, Country | Weather, Finance, Children |
| Nation M, Oldies | Social, Religion, Phone In |
| Folk M | Travel, Leisure, Document |
Note
RDS is only available for FM reception.
TA (Traffic Announcement) function
TA reception allows the unit to switch temporarily to a Traffic Announcement from the current source (another FM station, CD, or other connected components).
To switch the TA (Traffic Announcement) function on or off, press TA/PTY.
- TA ON
Traffic programs and announcements can be automatically received using TP/TA features.
TA OFF
Traffic programs and announcements can not be received using TP/TA features.
CD/MP3/WMA operation
Playing an Audio CD and MP3/WMA Disc
The unit can play MP3/WMA formatted recordings on CD-ROM, CD-R or CD-RW discs. Before playing MP3/WMA recordings, read the notes on MP3/WMA Recordings on page 4. If you change the source, CD play also stops (without ejecting the CD). Next time you select "CD" as the source, CD play starts from where playback has been stopped previously.
- To directly play a file, press NUMBER (#) on remote control and then press the track number with 0-9 number.
Pause CD MP3 WMA
1 Press during playback.
2 To return to playback, press again.
Skip to next track/file CD MP3 WMA
Press briefly > (▶▶▶ on the remote control) to select the next track or file.
Skip to previous track/file CD MP3 WMA
Press briefly < (1 on the remote control) within 3 seconds of playing time.
Return to the beginning of the current track/file CD MP3 WMA
Press briefly < (1 on the remote control) after 4 seconds of playing time.
Search CD MP3 WMA
Press and hold / (I on remote control) for about 1 second during playback and then release at the point you want.
Intro scan
The first 10 seconds of each tracks/files (SCAN) or each files in the current selected folder
(SCAN) on the disc are played.
1 Press SCAN.
- FIII appears on the display window. MP3 WMA (or All CD)
2 Press and hold SCAN for about 2 seconds during playback.
- AI appears on the display window. MP3 WMA
3 Press SCAN again.
- Fill or All disappear from the display window and The intro scan is cacelled.
Repeat
The current selected tracks/files (RPT) or folder ( RPT) on the disc is played repeatedly.
1 Press RPT during playback.
- 1 appears on the display window. CD MP3 WMA
2 Press and hold RPT for about 2 seconds during playback.
- F appears on the display window. MP3 WMA
3 Press RPT again.
- 1 or F disappear from the display window and the repeat mode is cancelled.
Shuffle
All of the tracks/files (SHF) or the current selected folder (■ SHF) on the disc is played randomly.
1 Press SHF during playback.
-FX appears on the display window. MP3 WMA (or AX CD)
2 Press and hold SHF for about 2 seconds during playback.
-AX appears on the display window. MP3 WMA
3 Press SHF again.
- F × or A × disappear from the display window and the random playback is cancelled.
Note
During random playback, if you press < (I on remote control), you won't go back to the previous track.
CD TEXT / ID3 TAG


When playing a disc containing information, you can see the CD TEXT/ID3 TAG information. In CD TEXT, information about the disc (disc title, performer and track title) is recorded. In a ID3 TAG, information about the file (album title, Performer name, song title) is recorded. In a WMA Content, information about the file (song title, Performer name) is recorded. If there is no information, "NO TEXT" will be shown in the display window.
Press DISP repeatedly during MP3/WMA/CD TEXT file playback.
To go to a particular quickly (+10/-10 buttons) MP3 WMA
(If there is no folder or one folder.)
Press NAS (A on remote control) to skip to the next 10 track, and press V/PS (V on remote control) to skip to the previous 10 track.
To skip to the next or previous folder MP3 WMA
(If there are more than two folders.)
Press NAS (A on remote control) to skip to the next folder, and press V/PS (V on remote control) to skip to the previous folder.
Note
Time display appearing on the display part when playing VBR file may vary and there may be some difference from actual time (both progress time and VBR are displayed at the same time when playing file).
AUX operation
Playing an Auxiliary Equipment
You can connect Auxiliary Equipment to this unit. Connect one to the external device jack using the line input cable (not supplied), and the other to the AUX input jack on the control panel.
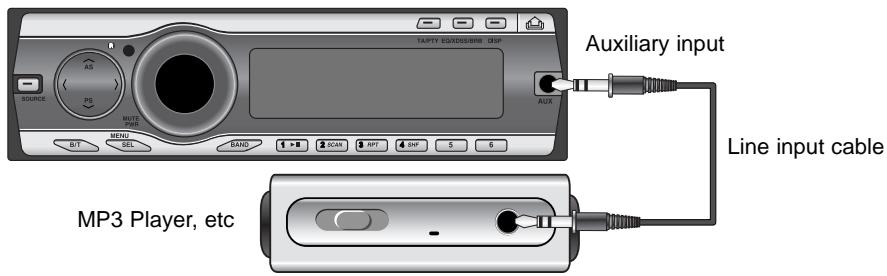
1 Press SOURCE to select the AUX as source.
AUX appears on the display window.
2 Turn on the connected Auxiliary Equipment and start playing the source.
3 Adjust the volume.
Note
- Before operating the Auxiliary Equipment using the following procedure, select the external input correctly. (Refer to the page 12 for details.)
- If the input level of the Auxiliary Equipment connected to the AUX input jack is not high enough, adjust the input level properly. (Refer to the page 12 for details.)
Troubleshooting
Power doesn't turn on. / The unit doesn't operate.
Ca Leads and connectors are not properly connected.
Co Confirm once more that all connections are correct.
Ca The fuse is blown.
Co Rectify the problem that caused the fuse to blow, and then replace it. Be very sure to install the correct fuse with the same rate.
Ca Noise and other factors are causing the built-in microprocessor to operate incorrectly.
Co Turn the unit off and then on.
Playback is not possible.
Ca The disc is dirty.
Co Clean disc.
Ca The loaded disc is of a type this unit cannot play.
Co Check what type the disc.
No sound is heard. / The volume level will not rise.
Ca Cables are not connected correctly.
Co Connect the cables correctly.
Sy There's no sound.
Ca The volume level is low.
Co Adjust the volume.
There's audio skipping.
Ca This unit is not firmly secured.
Co Secure this unit firmly.
The unit does not operate correctly even when the appropriate remote control buttons are pressed.
Ca Battery power is low.
Co Load new battery.
Specifications
GENERAL
Output Power .50W x 4CH (Max.)
Power Source .DC 12V
Speaker impedance 4
Ground System Negative
Dimensions (W x H x D) 180 x 51 x 171 mm (Without Control Panel)
Net Weight 1.5 kg
CD SECTION
Frequency Response .20 Hz-20 kHz
S/N Ratio .85 dB
Distortion .0.05%
Channel Separation (1kHz) 60 dB
RADIO SECTION
FM
Frequency Range .87.5-107.9 or 87.5-108 MHz
S/N Ratio .53 dB
Distortion 0.7%
Useable Sensitivity 12 dBμV
AM (MW)
Frequency Range .520-1720 or 522-1620 kHz
S/N Ratio 45 dB
Distortion 1.0%
Useable Sensitivity 28 dBuV
AUX SECTION
Frequency Response 20 Hz-20 kHz
S/N Ratio .80 dB
Distortion 0.05 %
Channel Separation (1kHz) 45 dB
Max Input Level (1kHz) 1.2 V (35 KΩ)
BLUETOOTH SECTION
TX POWER .4 dBm
Frequency Range 2400-2483.5 MHz
Version .Bluetooth 2.0 certified
Bluetooth phone compatibility list
Bluetooth list and manufacturing company applicable NR : Not Recommended
NC : Not Compatible
| Company | List | Company | List | Company | List |
| Nokia | 3230 | Motorola | 6060 | Sony- | K750i (NR) |
| 3250 | A1000 | Ericsson | K800i (NR) | ||
| 3650 | A760 (NR) | P990i (NR) | |||
| 5300 | A780i (NR) | S700i | |||
| 5500 | E1000 | T610 | |||
| 6021 | E1070 (NR) | T628 | |||
| 6103 | E680 (NR) | V600i | |||
| 6131 | E680i (NR) | V800 | |||
| 6230 | KRZR K1 (NR) | W550i | |||
| 6230i | L6 | W710i (NR) | |||
| 6233 | L7 | W810i | |||
| 6270 | RAZA V3i | W850i (NR) | |||
| 6280 | ROKR E2 (NR) | Z600 | |||
| 6600 | U6 | Z608 | |||
| 6630 | V360 | Siemens | EF81 | ||
| 6650 | V3ROHS (NR) | S65 | |||
| 6670 | V3X (NR) | SK65 | |||
| 6680 | V500 | SL75 | |||
| 6681 | V525 | SX1 | |||
| 6820a | V600i | SXG75 | |||
| 7370 | Samsung | SGH-D500 | Panasonic | X800 | |
| 7600 | SGH-D600 | Sazem | myX6-2 | ||
| 7610 | SGH-D820 | Pantech | PG8000 (NR) | ||
| 8800 | SGH-D900 | PG6200 | |||
| 8910i | SGH-E788 | NEC | N850 | ||
| 9500 | SGH-E900 | N930 | |||
| E50 | SGH-X820 | N730 (NR) | |||
| E61 | SGH-Z540V | Blackberry | 7130v (NC) | ||
| E62 | LG | KG245 | 8070v | ||
| E70 | KG800 | SHARP | GX15 | ||
| N71 | M4410 (NR) | ||||
| N73 | U890 | ||||
| N80 | |||||
| N90 | |||||
| N93 | |||||
| N-Gage | |||||
| N-Gage QD |