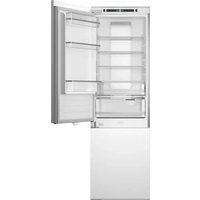
REF24BMBPNB - Refrigerator BERTAZZONI - Free user manual and instructions
Find the device manual for free REF24BMBPNB BERTAZZONI in PDF.


| Brand | Bertazzoni |
| Model | REF24BMBPNB |
| Product Type | Refrigerator with freezer compartment |
| Dimensions (H x W x D) | 177 x 54 x 55 cm (estimate) |
| Power Supply | 110-120 V ~ 60 Hz, 10 A |
| Freezing Capacity | 2.6 kg per 24 hours |
| Defrost System | No Frost (automatic) |
| Cooling Zone | Yes, adjustable from -3°C to 3°C |
| Temperature Setting | Refrigerator: 1°C to 6°C; Freezer: -15°C to -22°C |
| Special Functions | Rapid Cooling, Holiday, Smart, Quick Freeze, Forced Defrost |
| Error Display | Codes F1-F5, 2E, EC |
| Interior Lighting | LED (replacement by technician) |
| Door Reversal | Possible (instructions provided) |
| Built-in Installation | Yes, with ventilation kit |
| Door Gasket | Compressible, can be expanded with a hair dryer |
| Vegetable Drawer | With humidity control (high/low) |
| Maintenance | Cleaning with baking soda and warm water |
| Warranty | 2 years (parts and labor) |
| Customer Service (US) | 866 905 0010 |
| Customer Service (Canada) | 800 561 7265 |
Frequently Asked Questions - REF24BMBPNB BERTAZZONI
User questions about REF24BMBPNB BERTAZZONI
0 question about this device. Answer the ones you know or ask your own.
Ask a new question about this device
Download the instructions for your Refrigerator in PDF format for free! Find your manual REF24BMBPNB - BERTAZZONI and take your electronic device back in hand. On this page are published all the documents necessary for the use of your device. REF24BMBPNB by BERTAZZONI.
USER MANUAL REF24BMBPNB BERTAZZONI
INSTALLATION AND USE MANUAL
RÉFRIGÉRATEUR
MANUEL D'INSTALLATION ET D'UTILISATION
REFRIGERADOR
natural_image
Interior view of a white refrigerator with open doors and shelves (no visible text or symbols)1. IMPORTANT INFORMATION 5
1.1 Important Information....5
2. APPLIANCE ACCESSORIES 6
2.1 Appliance Accessories....6
3. APPLIANCE INSTALLATION AND OPERATING CONDITIONS 7
3.1 Installation and Preparing to Use the Appliance for the First Time....7
3.2 Minimum distances from heat sources....7
3.3 Connecting to the power supply....7
3.4 Disconnecting from the power supply....7
4. INSTALLATION INSTRUCTIONS 8
4.1 Installation Instructions....8
4.2 Ensuring the door seals correctly....8
4.3 Installation into a cabinet....11
4.4 Mounting the cabinet door(s)....11
5. BEFORE USE 13
5.1 Before use....13
6. STORAGE INSTRUCTIONS 14
6.1 Fridge use....14
6.2 Freezer use....14
6.3 Fresh Zone 15
6.4 Crisper Drawer Humidity Adjustment....15
7. CONTROLS 16
7.1 Fridge use....16
8. DEFROSTING 17
8.1 Defrosting....17
9. MAINTENANCE AND CLEANING 18
9.1 Maintenance and cleaning....18
10. TROUBLESHOOTING 19
10.1 Troubleshooting....19
11. WARRANTY 20
1.1 Important Information
-
This manual is general in nature and may reference several refrigerator models. The Manufacturer shall not be held liable for damage arising from failure to comply with the instructions contained in this manual.
-
Keep this manual for future reference and pass it along to the next user.
-
The appliance operates properly at room temperature (see product's climate class). Do not use it in a basement or in an unheated vacation home, cabin, etc. during autumn or winter.
-
When positioning, moving or lifting the appliance, do not hold it by the door handles, do not pull the condenser at the rear part of the refrigerator and do not touch the compressor unit.
-
When transporting, moving or positioning the fridge-freezer, do not tilt it by more than 40^ from the vertical position. Should such a situation occur, the appliance should not be switched on for a minimum of 2 hours following its being returned to the correct upright position.
-
Disconnect the plug from the power supply socket before performing any maintenance activity. Do not pull on the power cord to disconnect the power; grip the body of the plug instead.
-
The appliance may emit a "cracking" sound, which is caused by the expansion and contraction of parts as a result of temperature variations.
-
For safety reasons, do not repair the appliance yourself. Repairs carried out by people without the requisite qualifications may result in serious hazards for the appliance user.
-
Air out the room in which the appliance is placed for a few minutes (the size of the room for a product containing isobutane/R600a must be at least 4 m^3 ) to avoid damage to the cooling system.
-
Do not refreeze partially thawed products.
-
Do not store beverages in bottles and cans, especially carbonated beverages, in the freezer chamber. The cans and the bottles may explode.
-
Do not put frozen products (Popsicles, ice cubes, etc.) directly into your mouth after taking them out of the freezer; their low temperature may cause severe ice burns.
-
Make sure you do not damage the cooling
system by puncturing the refrigerant tubing in the evaporator or breaking it. The refrigerant is flammable. If the refrigerant comes into contact with the eyes, rinse them with clean water and call for medical assistance immediately.
-
This appliance is intended for food storage; do not use it for other purposes.
-
When performing activities such as cleaning, maintenance or moving, the appliance must be completely disconnected from the power supply (by pulling the plug out of the socket).
-
This appliance can be used by children aged 8 years and older, by people with physical, mental or sensory disabilities or by those who are inexperienced or unfamiliar with the appliance, provided that they are supervised or have been instructed on how to safely use the appliance and are familiar with the risks associated with its use. Make sure that children do not play with the appliance. Cleaning and maintenance of the appliance should not be performed by children unless they are aged 8 years or older and are supervised by a competent person.
-
The Anti-Bacteria System (varies depending on the model; its presence is indicated by the label inside the appliance) protects foods and products inside the refrigerator from bacteria and mold, which may cause unpleasant odors and shorten the life of stored foods. The Anti-Bacteria System prolongs the freshness of food. The special material used to construct the fridge liner inhibits the growth of bacteria, microorganisms and mold.
2.1 Appliance Accessories
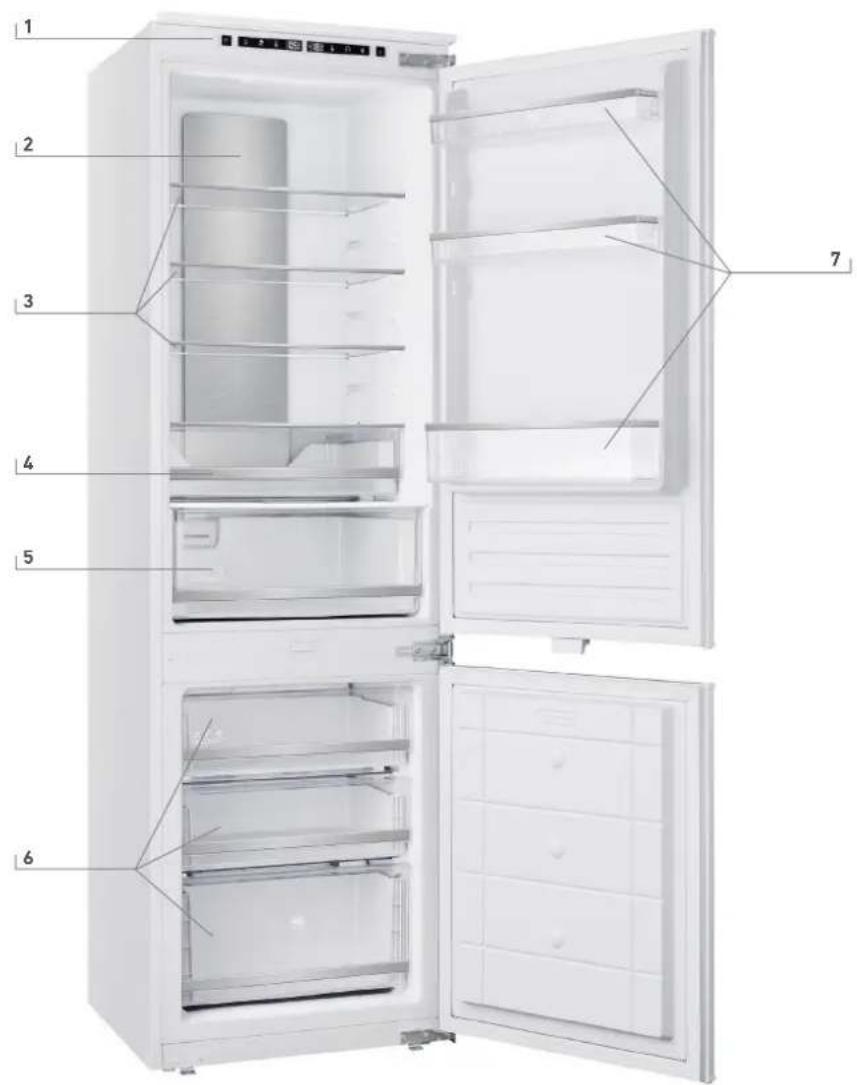
- Control panel
- Air duct panel
- Glass shelves
- Crispers
- Fresh Zone
- Drawers
- Door bins
3.1 Installation and Preparing to Use the Appliance for the First Time
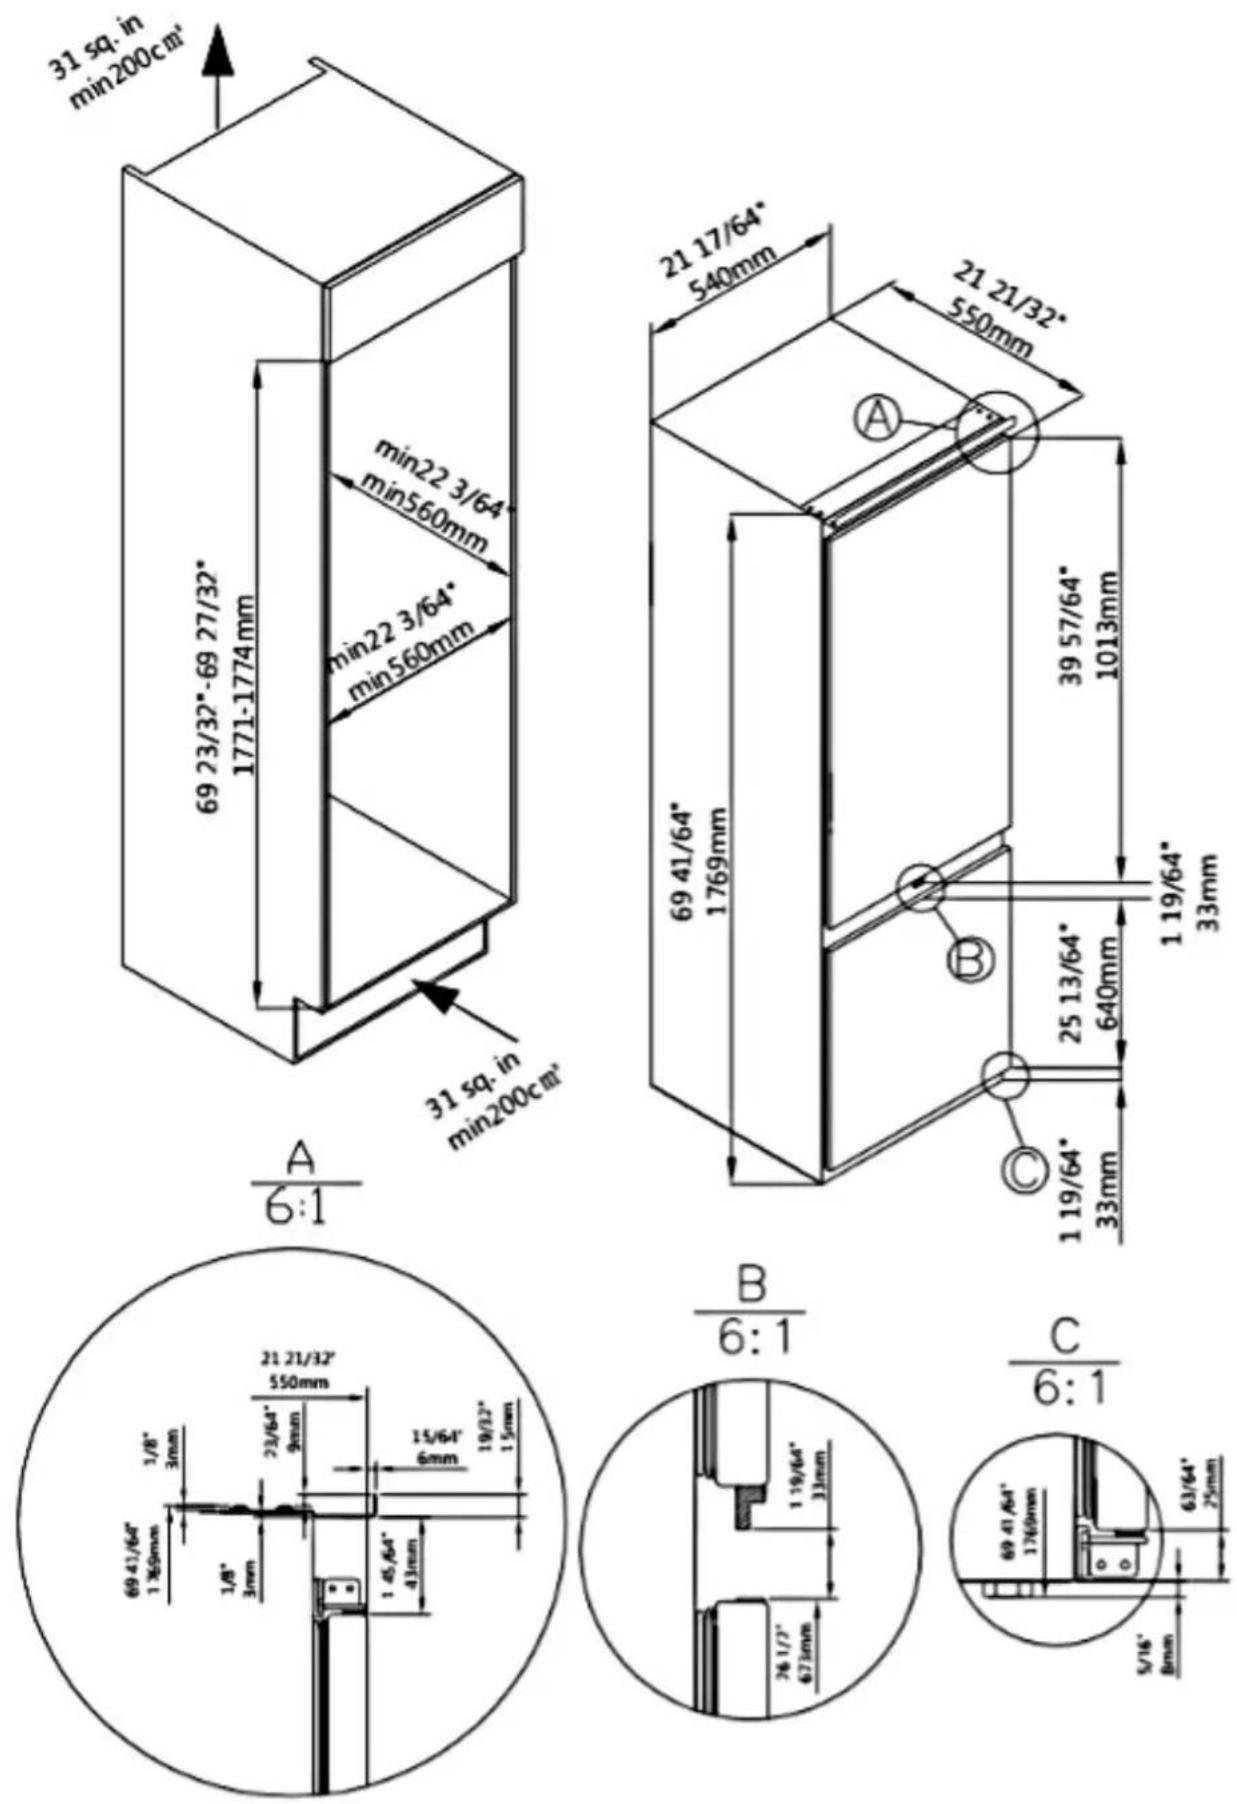
Make sure there is enough space around the refrigerator for it to operate properly. A free space of 25/64" (10 mm) is required behind the appliance so that air can circulate and cool the compressor. Space above the refrigerator should be at least 1 3/16" (30 mm).
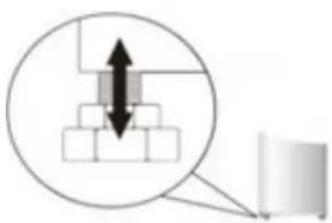
Make sure that the appliance is placed in a level position by screwing in the 2 adjustable front legs.
natural_image
Diagram showing a 3D object with stacked cubes and an arrow, enclosed in a circle (no text or symbols)3.2 Minimum distances from heat sources
from electric and gas ovens: 1 3/16" (30 mm);
from oil- or coal-fired ovens:11 13/16" (300 mm);
from built-in ovens: 1 31/32" (50 mm).
Installation must be performed carefully and exactly as specified, with nothing left to interpretation.
3.3 Connecting to the power supply
Prior to connection, it is recommended to set the temperature control knob to "OFF" or to another position that shuts the appliance off from the power supply (see page with description of controls).
This appliance should be connected to an AC 110-120V 60HZ power outlet. The socket must be properly fitted and equipped with a grounding conduit and a 10A fuse.
It is a legal requirement that the appliance be properly grounded. The manufacturer will not be held liable for any damage or injury which may result from failure to meet this requirement.
Do not use adapters, multiple sockets or two-wire extension leads. If it is necessary to use an extension lead, it must be equipped with a protection ring and a single socket and must have a VDE/GS safety certificate.
If an extension lead is used (with a protection ring
and safety certificate), its socket must be located at a safe distance, away from sinks, and must not be in a place where it could be exposed to water or wastewater.
See the information plate on the lower section of the appliance's interior wall for detailed specifications.
3.4 Disconnecting from the power supply
Make sure the appliance can be easily disconnected from the power supply, either by pulling the plug out of the socket or by switching the circuit breaker off.
4.1 Installation Instructions
CHANGING THE SIDE ON WHICH THE DOORS OPEN
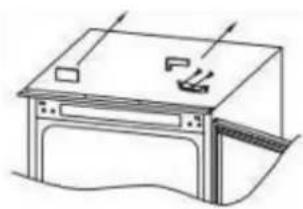
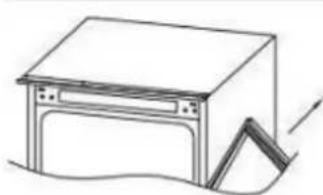
- Using a screw driver, remove the right upper hinge cover and hinge.
natural_image
Line drawing of a kitchen appliance with a door, drawer, and handle (no text or symbols)- Remove the upper door.
natural_image
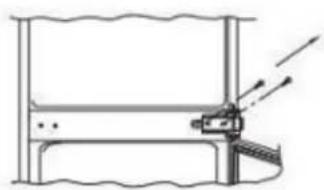
Simple line drawing of a garage with a door and adjacent wall (no text or symbols)- Remove the middle hinge and its connecting pin underneath.
natural_image
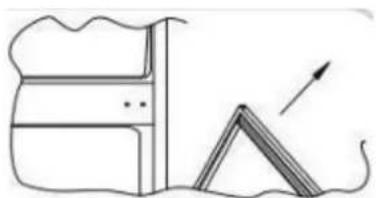
Pure technical line drawing of a mechanical assembly without any text, numbers, or symbols- Remove the bottom door.
natural_image
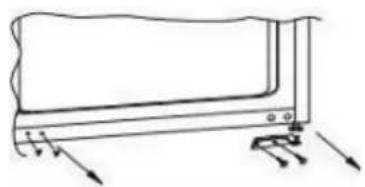
Simple line drawing of a cabinet and a triangular structure with an arrow (no text or symbols)- Remove the right bottom hinge and left plastic plugs, and refit them on the opposite sides.
natural_image
Diagram of a mechanical component with directional arrows indicating force or movement (no text or symbols)- Mount the right upper hinge on the left bottom corner and install the cover.
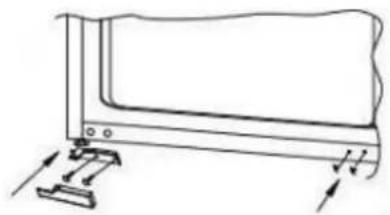
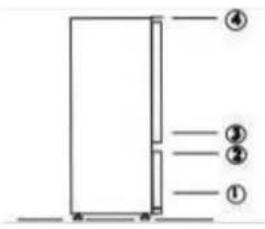
natural_image
Line drawing of a mechanical component with mounting base and directional arrows indicating motion (no text or symbols)- Remount the doors and hinges, working from bottom to top (from 1-4).
4.2 Ensuring the door seals correctly
It is normal for the seal to be compressed after the door has been reversed. With the door closed, use a hair dryer to expand the seal and fill the gap between the door and the body of the
appliance. Take care not to hold the hair dryer too close to the appliance, which could damage the seal.
A distance of approximately 4" (10cm) should be suitable. When completed, allow the seal and door to cool before touching them. Once done, the seal should remain in position.
The main consideration when installing any refrigeration unit into a fitted kitchen is ventilation. The heat removed from the cooling compartment needs to be dissipated into the air around the appliance. Incorrect ventilation can lead to premature compressor failure, excessive power consumption and total system failure and may invalidate the warranty provided with the appliance.
For products intended to be installed inside a tall housing cabinet, the following requirements must be met:
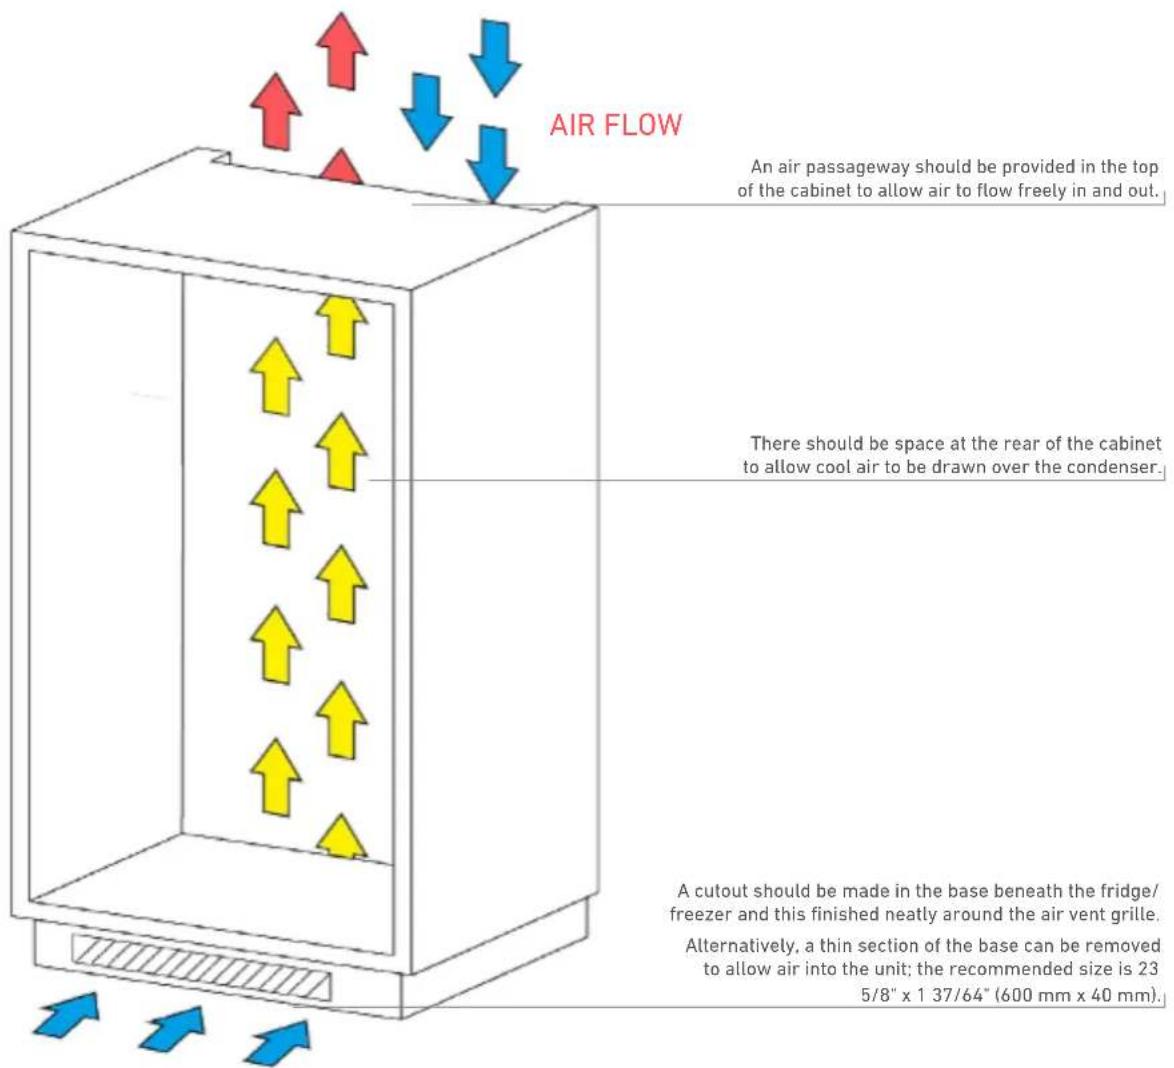
AIR FLOW
4.3 Installation into a cabinet
With the help of one or two other people, move the appliance into the cabinet. There are two metal plates at the base of the appliance. Fit the supplied white spacers to these plates.
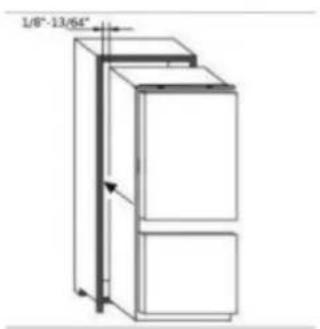
- Insert the appliance into the column cabinet, placing it on the opposite side of with respect to the hinges, and make sure there is a gap of 1/8"-13/64".
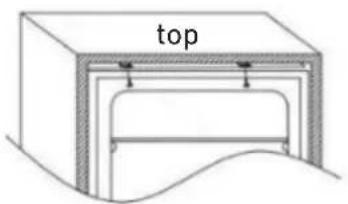
- After checking the alignment of appliance door and cabinet door, mount the plastic covers from the accessories bag.
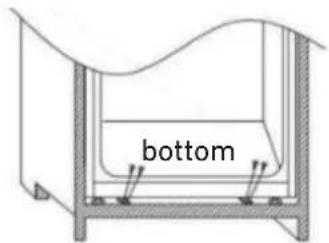
- Tighten the screws for the appliance's lower part.
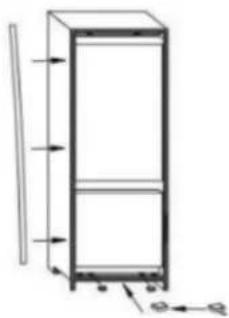
- Fit the seal onto the appliance, cutting off any excess as necessary. Mount the plastic covers on the bottom parts.
natural_image
Technical line drawing of a vertical cabinet with internal components and directional arrows (no text or symbols)- Use a Phillips-head screwdriver to loosen the connecting pin underneath the right middle hinge, and adjust it to screw onto the right cabinet wall.
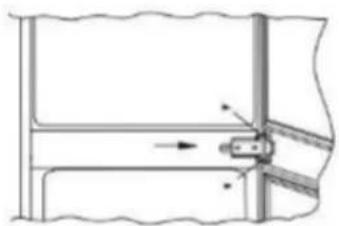
natural_image
Pure mechanical diagram showing a lever mechanism without any text or symbols4.4 Mounting the cabinet door(s)
Ensure that there is a gap of 1/8" to 5/32" (3 to 4mm) between the non-hinged side of the fridge and the cabinet wall.
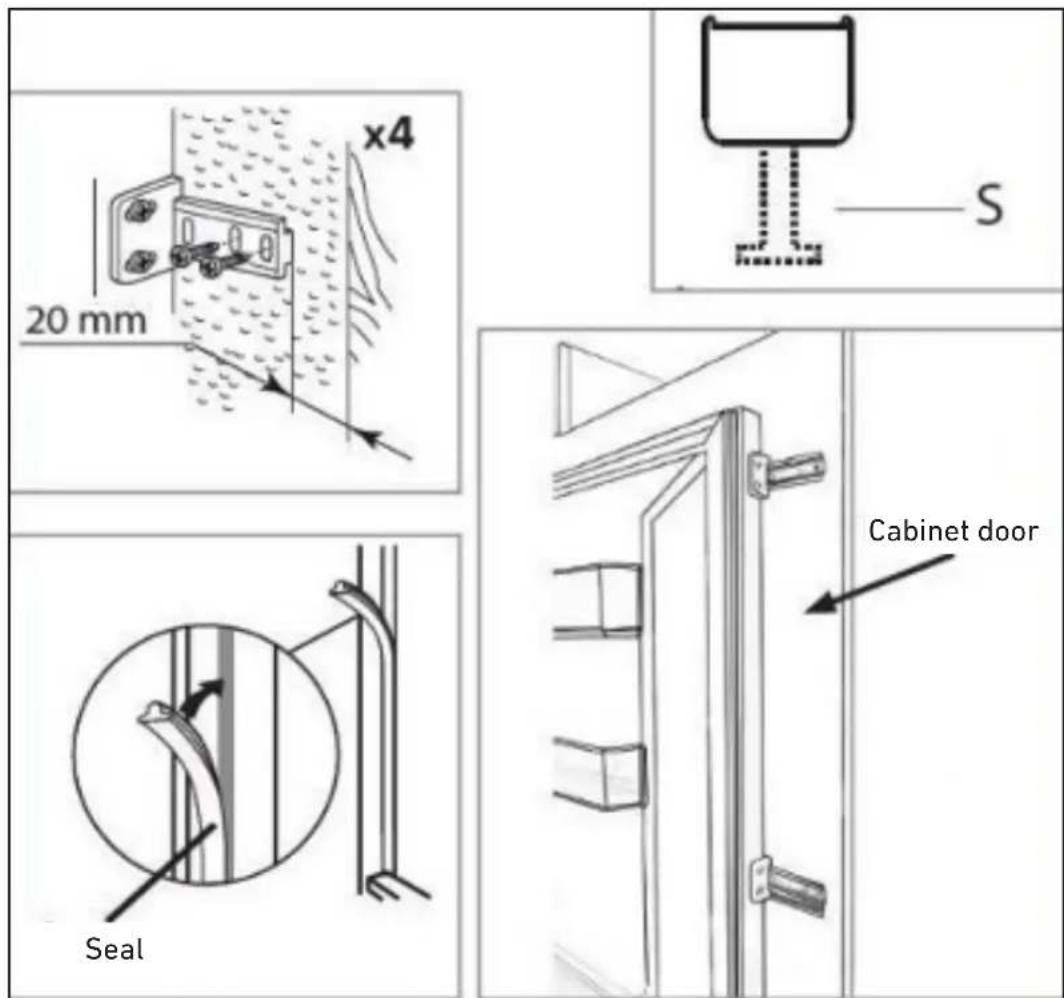
Locate the slider in the bracket and mount the slider on the cabinet door, 51/64" to 7/8" (20 to 22mm) from the door's long edge, as shown in the following image, ensuring that the slider is positioned centrally and horizontally within the bracket. Tighten securely by hand.
Fill the gap on the non-hinged side with the gasket/sealing strip provided.
The finished look for the door sliders should be similar to those shown in the following image which shows 2 sliders in place.
Ensure the appliance doors open, close and seal properly.
Once complete, and if you are happy with the fit of the appliance in the cabinet, bend and snap off the parts of the white spacers marked 'S', as shown by the dotted outline.
Leave the remaining portions of the spacer covers in place over the metal plates.

Important
After completing the installation, check that the appliance is secure within the cabinet and that the door(s) close and open properly. If there is no resistance from the door seals when opening the door(s), then it is probable that the appliance and/or cabinet door(s) are not fitted properly.
5.1 Before use
Before first use, you must allow the fridge to settle for at least twenty-four hours prior to switching the power on.
It is recommended that you clean the interior of the appliance prior to first use using a solution of baking soda and warm water, then thoroughly dry the interior. The fridge may have an odor at its first use. This will disappear as the appliance cools.

NOTE:
The appliance will start at 41 °F (5°C) for the fridge and 0 °F (-18 °C) for the freezer and work continuously until it comes down to the correct temperature. If the appliance is switched off, you should allow five minutes before switching it on again in order to prevent unnecessary damage to the compressor. Never store flammable or explosive items or strong corrosive acids or alkalis in the appliance. This fridge cools your food by making the inside back of the cavity cold. It is normal for frost to build up on this surface; it then dissipates and drains through a small drain at the bottom, where it evaporates harmlessly. The presence of frost at the back does not mean that the fridge is malfunctioning.
6.1 Fridge use
- Never put liquids into the refrigerator uncovered.
- Never put hot foods into the refrigerator. Warm food should be allowed to cool to room temperature before being put into the refrigerator.
- Nothing should rest against the rear wall of the refrigerator, as this will cause frost which will be difficult to remove and possible condensation problems.
- Make sure food is clean and that any excess water is wiped off before putting it into the fridge.
- Wrap or cover food before putting it into the fridge. This will help prevent the loss of moisture, keep food fresh and avoid unpleasant odors.
- Any foods to be used soon should be stored at the front of the shelf, in order to prevent deterioration, which could be caused when the door is kept open for long periods of time.
- Do not overfill the fridge. There should be sufficient space between foods to allow cool air to circulate.
- Thawing frozen foods in the fridge compartment will help to keep the temperature low and save energy.
- Never store raw meats on shelves above cooked meats or other produce. This will help to prevent juices from raw meat from contaminating other foodstuffs.

NOTE
The fridge shelves can be moved within the refrigerator compartment depending on storage requirements. To move a shelf, lift up the rear section and then pull it outwards.
To replace, slide the shelf back into the slot and then lower the rear section.
6.2 Freezer use
- The freezer compartments are designed to store only frozen food.
- Never put hot or warm foods into the freezer; allow them to cool fully before putting them into the freezer.
- When storing frozen food, follow the instructions on the food packaging. If no information is
provided, foods should not be stored for longer than three months after the purchase date.
- Store food in small packages (ideally less than 1 kg). This reduces freezing time and improves the quality of the food after thawing.
- Wrap food before putting it into the freezer. To stop the wrapping from sticking together, ensure it is dry.
- Label food before freezing, with information including type of food and dates of storage and expiration.
- Once food is thawed, it must not be refrozen. In order to prevent wastage, only defrost as much food as is required.
- Bottled or canned drinks should not be stored in the freezer compartments, as they could explode.
- The maximum amount of fresh food that can be frozen within a 24-hour period is 5.7 lb (2.6 kg).
- Do not attempt to freeze more than the maximum amount.
The fridge section is for short-term food storage. Although low temperatures can be maintained, it is not recommended to store food for extended periods.
The temperature can vary between the different sections as the cold air circulates within the fridge. For this reason, foods should be stored in different sections according to type.
- Butter, cheeses, etc.
- Food in jars and bottles
- Beverages, e.g. milk
- Cooked food
- Yogurts, preserves, etc.
- 75cl bottles, ready-made meals, etc.
- Fresh meat and fish
- Fruits and vegetables
natural_image
Front view of a double refrigerator with open doors and shelves (no visible text or symbols)The fridge shelves can be moved within the refrigerator compartment depending on storage requirements.
To move a shelf, lift up the rear section and then pull it outwards.
To replace, slide the shelf back into the slot and then lower the rear section.
6.3 Fresh Zone
You can control the temperature inside the fresh zone independently.
The temperature range for the fresh zone is from 37^ F ( 3^ C) to 27^ F (- 3^ C).
Zero-degree biological preservation technology allows the refrigerator to maintain a relatively stable independent temperature very close to 37°F (3°C), but not lower than the 27°F (-3°C) of the Fresh Zone compartment. The temperature of the Fresh Zone ensures that food will not be frozen but will nonetheless be kept fresh for a longer period of time.
Suggestions for use: It is recommended to store fresh fish and meat at temperatures between 28°F (-2°C) and 32°F (0°C). Put frozen ingredients into the Fresh Zone 4-5 hours before use; you can cut or cook frozen foods effortlessly and enjoy a more modern, faster and healthier cooking experience.
It is recommended to store vegetables and fruits at temperatures between 32°F (0°C) and 37°F (3°C).

NOTE
If you want to put ingredients that dry out easily, such as meat, into the Fresh Zone for more than 4 hours, you should wrap them in plastic wrap in order to prevent excessive moisture loss, which would affect the taste.
6.4 Crisper Drawer Humidity Adjustment
The crisper drawer within this appliance features a humidity level adjustment slider. Vegetables and similar foods that are subject to wilting (e.g. arugula, spinach leaves, herbs such as basil, etc.) should be kept in the crisper drawer and the adjustment slider kept closed (fully to the left: high). By keeping the adjustment slider closed, water vapor is held in the drawer and subsequently greens are kept crisper and fresher for longer.
By contrast, fruits that are susceptible to rotting should be stored in the crisper drawer with the humidity adjustment slider fully open (to the right: low). This will allow the gases that accelerate spoilage, emitted by certain foods, to exit the crisper drawer.
The drawer is marked high and low, with vegetable and fruit symbols to aid you.

7.1 Fridge use
- When the appliance is switched on for the first time or power is restored after a power failure, it will be operating at the following settings: 41 °F (5°C) for the fridge, 37°F (3°C) for the Fresh Zone and 0 °F (-18°C) for the freezer. If you wish to adjust the temperature or functions manually, press any button to wake up the control panel, then you will be able to make your changes.
- Fridge temperature adjustment: Press button D on the left-hand side of the control panel to adjust the temperature within a range of between 34°F (1°C) and 43°F (6°C).
- Freezer temperature adjustment: Press button E on right-hand side of the control panel to adjust the temperature within a range of between 5°F (-15)°C and -9°F (-22°C).
- Fast Cooling function: Press button B; the button lights up and the Fast Cooling function is activated. The fridge starts to operate automatically at a temperature setting of 34^ F ( 1^ C) and continues to do so for 2.5 hours, after which the function will quit and the light will turn off.
- Holiday function: Press button C; the button lights up. Holiday function is enabled and the entire appliance automatically starts to operate at the following settings: fridge at 63°F (17°C) and freezer at 0°F (-18°C). The Fresh Zone operates at 63°F (17°C).
- Smart function: Press button F on the control panel; the Smart function is enabled and the button lights up. The fridge compartment operates at 41°F (5°C) and the freezer compartment operates at 0°F (-18°C). The Fresh Zone operates at 37°F (3°C).
- Fast Freezing function: Press button G; the button lights up and the freezer starts to run the Fast Freezing function, with a temperature setting of -9^ (-22°C). After 6 hours, the Fast Freezing function quits automatically.
- Press and hold button H for 3 seconds to switch off your appliance; the button lights up and the power is shut off. The interior lighting and the
compressor stop operating. Press and hold button H for 3 seconds to switch your appliance on; the symbol lights up and power is restored.
9. Press button A to temporarily show the Fresh Zone settings on the display;, press button A again to adjust the temperature. The temperature range for the Fresh Zone is between 27°F (-3°C) and 37°F (3°C).
10. No Frost models feature a function called Forced Defrosting. Press and hold buttons D + H or E + H for 5 seconds to switch on the Forced Defrosting function and clean the freezer evaporator; the freezer temperature will be displayed. Press and hold buttons D + H or E + H for 3 seconds to switch off the Forced Defrosting function; the freezer temperature will be displayed.
11. Fault Display – This appliance has a "Fault Display & Alarm" function. Once the sensors detect a fault, alerts are shown on the temperature display; the appliance still cools, but a professional service engineer should be called in to check it.
F1 - Fridge evaporator sensor
F2 - Fresh Zone sensor
F3 – Fridge compartment sensor
F4 - Freezer compartment sensor
F5 - Freezer evaporator sensor
2E - Freezer fan/motor fault
EC – Communication fault between main board and display panel

NOTE
The main board is located in the compressor compartment
8.1 Defrosting
The product has a No Frost system, which is designed to prevent heavy buildup of ice. Under normal conditions of use, there should be no need to regularly defrost the freezer system.

NOTE
If you are regularly finding heavy ice buildup or pools of water in the freezer section, then it is likely that the door is not sealing properly. This could be due to a faulty door seal, incorrect assembly or overloading. For more information, see the troubleshooting section on ice.
9.1 Maintenance and cleaning
Always disconnect the appliance from the power supply before performing any cleaning or maintenance.
The fridge and freezer sections should be cleaned using a solution of bicarbonate of soda and lukewarm water. Do not use abrasive products or detergents. After washing, rinse and dry thoroughly.
Clean the shelves and door bins separately, by hand, with a mild solution of dish soap and water. Do not put them in the dishwasher.
If the appliance is not going to be used for an extended period of time, unplug and clean the appliance. The doors should be left slightly ajar to prevent the formation of mildew and unpleasant odors.
10.1 Troubleshooting
If you have any problems with your appliance, you should check this troubleshooting section prior to calling Customer Care.
If the appliance is not working, check that:
There is power being supplied to the appliance.
The fuses in your house are intact and the fuse in the plug has not blown. The fridge has not been turned off.
The electrical socket is working. To check this, plug another electrical appliance into it to see if the socket is faulty.
If the appliance is working, but not very well, check that:
The appliance is not overloaded.
The thermostat is set to an appropriate temperature.
The doors are closing properly.
The cooling system on the back of the appliance is clean and free of dust and is not touching the rear wall.
There is enough ventilation around the side and rear walls.
If the appliance is noisy, check that:
The appliance is level and stable.
The side and rear walls are clear and there is nothing resting against the appliance.

Note
The coolant gas in the refrigerator may make a slight bubbling or gurgling noise, even when the compressor is not running.
If the appliance is beeping, check that:
The doors are closed. An alarm will sound after a door has been open for 60 seconds.
If ice has formed on the back wall of the fridge:
It is normal for some ice droplets to form on the back wall of the fridge. This does not constitute a fault with the appliance.
Ensure that no items inside the fridge are in contact with the back wall.
Check that there is some resistance when opening the door of the appliance. If it opens at the slightest touch, it may mean that the door seal needs to be replaced.
Check the door seal for any kinks, debris or damage. If you notice any, and are unable to resolve the issue yourself, contact Customer Care so that
the seal can be replaced.
This can be due to the cabinet door(s) not being properly fitted. If you are at all unsure, ask your installer to check the cabinet doors.
If excessive ice has formed in the freezer:
Check that there is some resistance when opening the door of the appliance. If it opens at the slightest touch, it may mean that the door seal needs to be replaced.
Check the door seal for any kinks, debris or damage. If you notice any, and are unable to resolve the issue yourself, contact Customer Care so that the seal can be replaced.
This can be due to the door panel(s) not being properly fitted. If you are at all unsure, ask your fitter to check the door panel(s).
If one or more of the LED units within the appliance is not working:
Contact Customer Care to arrange a service visit.
11. Warranty
What this limited warranty covers:
The Warranty coverage provided by Bertazzoni SpA ("Bertazzoni") in this statement applies exclusively to the original Bertazzoni appliance ("Product") sold to the consumer ("Purchaser") by an authorized Bertazzoni dealer/distributor/retailer, purchased and installed in the United States, District of Columbia or Canada, and which has always remained within the original country of purchase (the United States, District of Columbia or Canada). Warranty coverage is activated on the date of the Product's original retail purchase and has a duration of two (2) years.
Warranty coverage is non-transferable.
In the event of replacement of parts or of the entire product, the replacement Product (or parts) shall assume the remaining original Warranty activated with the original retail purchase document. This Warranty shall not be extended with respect to such replacement.
Bertazzoni SpA will repair or replace any component/part which fails or proves defective due to materials and/or workmanship within 2 years of the date of the original retail purchase and under conditions of ordinary residential, non-commercial use.
Repair or replacement will be free of charge, including labor at standard rates and shipping expenses. Purchaser is responsible for making the Product reasonably accessible for service. Repair service must be performed by a Bertazzoni Authorized Service company during normal working hours. Labor performed at overtime or premium rates shall not be covered by Warranty.

IMPORTANT
Retain proof of original purchase to establish warranty period.
Bertazzoni's liability on any claim of any kind, with respect to the goods and/or services provided, shall in no event exceed the value of the goods or service or part thereof which has given rise to the claim.
30-Day Cosmetic warranty
The Purchaser must inspect the product at the time of delivery.
Bertazzoni warrants that the Product is free from manufacturing defects in materials and workmanship for a period of thirty (30) days from date of original retail purchase of the Product.
This coverage includes:
- Paint blemishes
- Chips
- Macroscopic finish defects
Cosmetic warranty does NOT cover:
issues resulting from incorrect transport, handling and/or installation (e.g.: dents, broken, warped or deformed structures or components, cracked or otherwise damaged glass components);
slight color variations on painted/enameled components;
differences caused by natural or artificial lighting, location or other analogous factors;
stains/corrosion/discoloration caused by external substances and/or environmental factors;
labor costs, display, floor, B-stock, out-of-box, "as is" appliances and demo units.
How to receive service
To receive warranty services, the Purchaser must contact the Bertazzoni Service department in order to determine the problem and the required service procedures.
Model number, serial number and date of original retail purchase will be requested.

IMPORTANT
Retain proof of original purchase to establish warranty period.
If located in the USA
866-905-0010
https://us.bertazzoni.com/more/support
If located in CANADA
800-561-7265
https://ca.bertazzoni.com/more/support
Warranty Exclusions: What Is Not Covered
Use of the Product in any non-residential, commercial application.
Use of the Product for anything other than its intended purpose.
Repair services provided by anyone other than a Bertazzoni Authorized Service agency.
Damages or repair services to correct services provided by unauthorized parties or the use of unauthorized parts.
Installation not in accordance with local/state/city/county fire codes, electrical codes, gas codes, plumbing codes, building codes, laws or regulations.
Defects or damage due to improper storage of the Product.
Defects, damage or missing parts on products sold out of the original factory packaging or from displays.
Service calls or repairs to correct an incorrect
installation of the Product and/or related accessories.
Replacement of parts/service calls to connect, convert or otherwise repair the electrical wiring and/or gas line to properly use the product.
Replacement of parts/service calls to provide instructions and information on the use of the Product.
Replacement of parts/service calls to correct issues arising from the product being used in a manner other than what is normal and customary for residential use.
Replacement of parts/service calls due to wear and tear of components such as seals, knobs, pan supports, shelving, cutlery baskets, buttons, touch displays, scratched or broken ceramic-glass tops.
Replacement of parts/service calls for lack of/improper maintenance, including but not limited to: build up of residues, stains, scratches, discoloration, corrosion.
Replacement of glass components and light bulbs, if claim arises later than 30 days from the original retail purchase date.
Defects and damage arising from accidents, alterations, misuse, abuse or improper installation.
Defects and damages arising from Product transport, logistics and handling. Inspection of the product must be made at time of delivery. Following receipt and inspection, the selling dealer/delivery company must be notified of any issues arising from handling, transport and logistics.
Defects and damage arising from external forces beyond the control of Bertazzoni SpA, including but not limited to wind, rain, sand, fires, floods, mud slides, freezing temperatures, excessive moisture or extended exposure to humidity, power surges, lightning, structural failures surrounding the appliance and other acts of God.
Products whose serial number has been altered/ damaged/tampered with.
In no case shall Bertazzoni be held liable or responsible for damage to surrounding property, including furniture, cabinetry, flooring, panels, and other structures surrounding the Product.
Bertazzoni is neither liable nor responsible for the Product if it is located in a remote area or an area where certified trained technicians are not reasonably available. Purchaser must bear any transportation and delivery costs of the Product to the nearest Authorized Service Center or the additional travel expenses of a certified trained technician.
THERE ARE NO EXPRESS WARRANTIES OTHER THAN THOSE LISTED AND DESCRIBED ABOVE, AND NO WARRANTIES EITHER EXPRESS OR IMPLIED, INCLUDING, BUT NOT LIMITED TO, ANY IMPLIED WARRANTIES OF MERCHANTABILITY OR FITNESS FOR A PARTICULAR PURPOSE THAT SHALL APPLY AFTER THE EXPRESS WARRANTY PERIODS STATED ABOVE, AND NO OTHER EXPRESS WARRANTY OR GUARANTEE GIVEN BY ANY PERSON, FIRM OR CORPORATION WITH RESPECT TO THIS PRODUCT SHALL BE BINDING ON BERTAZZONI. BERTAZZONI SHALL NOT BE LIABLE FOR LOSS OF REVENUE OR PROFITS, FAILURE TO REALIZE SAVINGS OR OTHER BENEFITS, TIME AWAY FROM WORK, MEALS, LOSS OF FOOD OR BEVERAGES, TRAVELING OR HOTEL EXPENSES, EXPENSES TO RENT OR PURCHASE APPLIANCES, REMODELLING/CONSTRUCTION EXPENSES IN EXCESS OF DIRECT DAMAGES WHICH ARE UNDENIABLY CAUSED EXCLUSIVELY BY BERTAZZONI, OR ANY OTHER SPECIAL, INCIDENTAL OR CONSEQUENTIAL DAMAGES CAUSED BY THE USE, MISUSE OR INABILITY TO USE THIS PRODUCT, REGARDLESS OF THE LEGAL THEORY ON WHICH THE CLAIM IS BASED, AND EVEN IF BERTAZZONI HAS BEEN ADVISED OF THE POSSIBILITY OF SUCH DAMAGES. NOR SHALL RECOVERY OF ANY KIND AGAINST BERTAZZONI BE GREATER IN AMOUNT THAN THE PURCHASE PRICE OF THE PRODUCT SOLD BY BERTAZZONI AND CAUSING THE ALLEGED DAMAGE. WITHOUT PREJUDICE TO THE FOREGOING, PURCHASER ASSUMES ALL RISK AND LIABILITY FOR LOSS, DAMAGE OR INJURY TO PURCHASER AND PURCHASER'S PROPERTY AND TO OTHERS AND THEIR PROPERTY ARISING FROM THE USE, MISUSE, OR INABILITY TO USE THIS PRODUCT SOLD BY BERTAZZONI THAT IS NOT A DIRECT RESULT OF NEGLIGENCE ON THE PART OF BERTAZZONI. THIS LIMITED WARRANTY SHALL NOT EXTEND TO ANYONE OTHER THAN THE ORIGINAL PURCHASER OF THIS PRODUCT, IS NON-TRANSFERABLE AND STATES YOUR EXCLUSIVE REMEDY.
Bertazzoni does not assume any responsibility for incidental or consequential damages. Some states do not allow the exclusion or limitation of incidental or consequential damages, so the above limitation or exclusion may not apply to you. This warranty gives you specific legal rights and you may also have other rights which may vary from state to state or province to province.
Any questions about this Limited Warranty may be directed to Bertazzoni Customer Care.
If located in the USA
866-905-0010
https://us.bertazzoni.com/more/support
If located in CANADA
800-561-7265
https://ca.bertazzoni.com/more/support
1. AVIS IMPORTANTS 23
1.1 Avis importants....23
2. ACCESSOIRES DE L'APPAREIL 24
natural_image
Diagram showing a 3D object with a magnified inset, no text or symbols presentnatural_image
Line drawing of a kitchen appliance with a door, drawer, and handle (no text or symbols)natural_image
Simple line drawing of a two-story building with a curved roof and a triangular support (no text or symbols)natural_image
Pure technical line drawing of a mechanical assembly without any text, numbers, or symbolsnatural_image
Simple line drawing of a roof structure with a triangular roof and an arrow indicating upward motion (no text or symbols)natural_image
Diagram of a mechanical component with directional arrows indicating force or movement (no text or symbols)natural_image
Line drawing of a monitor with scroll and base mount (no text or symbols)natural_image
Technical line drawing of a vertical rectangular frame with internal structure and dimension arrows (no text or symbols)natural_image
Pure mechanical diagram showing a lever mechanism without any text, numbers, or symbolsnatural_image
Front view of a refrigerator with open doors and shelves (no visible text or symbols)https://us.bertazzoni.com/more/support
https://ca.bertazzoni.com/more/support
https://us.bertazzoni.com/more/support
https://ca.bertazzoni.com/more/support
REMARQUES
FR
1. AVISOS IMPORTANTES 43
1.1 Avisos importantes....43
2. ACCESORIOS DEL ELECTRODOMÉSTICO 44
natural_image
Diagram showing a mechanical assembly with a magnified inset view of a stepped block (no text or symbols)natural_image
Line drawing of a refrigerator with doors and a door, showing airflow or ventilation (no text or symbols)natural_image
Simple line drawing of a roof structure with a sloped corner and curved base (no text or symbols)natural_image
Pure technical line drawing of a mechanical assembly without any text, numbers, or symbolsnatural_image
Simple line drawing of a roof structure with an arrow indicating upward motion (no text or symbols)natural_image
Simple line drawing of a rectangular device with directional arrows indicating motion or force (no text or symbols)natural_image
Line drawing of a monitor mounted on a stand with directional arrows indicating motion (no text or symbols)natural_image
Technical line drawing of a vertical rectangular frame with internal structure and dimension arrows (no text or symbols)natural_image
Pure mechanical diagram showing a lever mechanism without any text, numbers, or symbolsnatural_image
Front view of a double refrigerator with open doors and shelves (no visible text or symbols)https://us.bertazzoni.com/more/support
https://ca.bertazzoni.com/more/support
https://us.bertazzoni.com/more/support
https://ca.bertazzoni.com/more/support
NOTAS
ES
NOTAS
NOTAS
ES
- IMPORTANT INFORMATION 5
- APPLIANCE ACCESSORIES 6
- APPLIANCE INSTALLATION AND OPERATING CONDITIONS 7
- INSTALLATION INSTRUCTIONS 8
- BEFORE USE 13
- STORAGE INSTRUCTIONS 14
- CONTROLS 16
- DEFROSTING 17
- MAINTENANCE AND CLEANING 18
- TROUBLESHOOTING 19
- WARRANTY 20
- Important Information
- Appliance Accessories
- Installation and Preparing to Use the Appliance for the First Time
- Minimum distances from heat sources
- Connecting to the power supply
- Disconnecting from the power supply
- Installation Instructions
- Ensuring the door seals correctly
- Installation into a cabinet
- Mounting the cabinet door(s)
- Ensure the appliance doors open, close and seal properly.
- Important
- Before use
- NOTE:
- Fridge use
- NOTE
- Freezer use
- Fresh Zone
- Crisper Drawer Humidity Adjustment
- Fridge use
- Defrosting
- Maintenance and cleaning
- Troubleshooting
- If the appliance is not working, check that:
- If the appliance is working, but not very well, check that:
- If the appliance is noisy, check that:
- If the appliance is beeping, check that:
- If ice has formed on the back wall of the fridge:
- If excessive ice has formed in the freezer:
- If one or more of the LED units within the appliance is not working:
- Warranty
- What this limited warranty covers:
- 30-Day Cosmetic warranty
- How to receive service
- Warranty Exclusions: What Is Not Covered
- AVIS IMPORTANTS 23
- ACCESSOIRES DE L'APPAREIL 24
- REMARQUES
- AVISOS IMPORTANTES 43
- ACCESORIOS DEL ELECTRODOMÉSTICO 44
- NOTAS
Brand : BERTAZZONI
Model : REF24BMBPNB
Category : Refrigerator