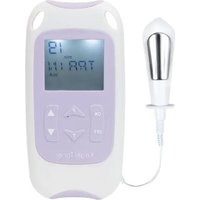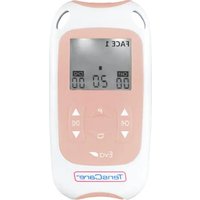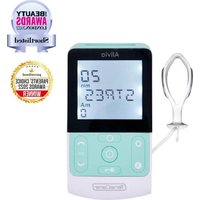
Alivia - Pelvic fitness device TensCare - Free user manual and instructions
Find the device manual for free Alivia TensCare in PDF.


| Product Type | Pelvic fitness device (perineal electrical stimulation) |
| Brand | TensCare |
| Model | Alivia |
| Dimensions | 120 x 63 x 26 mm |
| Weight | 100 g (without batteries) |
| Power source | 2 AA alkaline batteries or 2 AA NiMH batteries |
| Battery life | Approximately 15 hours at 50 mA, 300 µs, 50 Hz |
| Channels | 1 channel (mono) |
| Preset programs | 5 programs: STRES (stress), URGE (urgency), MIXED (mixed), TONE (toning), PAIN (menstrual pain) |
| Maximum intensity | 99 mA (in 1 mA steps) |
| Pulse width | 200 to 300 µs (depending on program) |
| Frequency | 10 to 110 Hz (depending on program) |
| Treatment duration | Programmable: continuous, 10, 20, 30, 45, 60 or 90 minutes (20 min default) |
| Waveform | Asymmetric rectangular |
| Display | Large LCD screen with backlight |
| Key lock | Automatic after 30 seconds of inactivity |
| Open circuit detection | Yes, with LEADS alarm and intensity reset |
| Protection rating | IP22 (protected against fingers and dripping water when tilted) |
| Safety classification | Type BF applied part, internal power source |
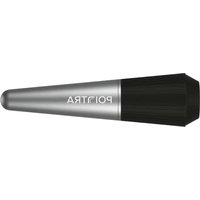
| Box contents | Device, cable, Liberty Loop vaginal probe with pointer, 2 electrodes 50x90 mm, 2 AA batteries, belt clip, storage pouch, manual |
| Cleaning and maintenance | Probe: alcohol-free antibacterial wipe or warm soapy water. Unit: damp cloth. Do not immerse. |
| Lifespan / Warranty | Device: 2 year warranty. Probe: replace every 6 months. Cable: approximately 6 months. |
| Manufacturer | TensCare Ltd, PainAway House, 9 Blenheim Road, KT19 9BE, United Kingdom |
Frequently Asked Questions - Alivia TensCare
User questions about Alivia TensCare
0 question about this device. Answer the ones you know or ask your own.
Ask a new question about this device
Download the instructions for your Pelvic fitness device in PDF format for free! Find your manual Alivia - TensCare and take your electronic device back in hand. On this page are published all the documents necessary for the use of your device. Alivia by TensCare.
USER MANUAL Alivia TensCare
Pelvic Floor Exerciser
QUICKSTART GUIDE
natural_image
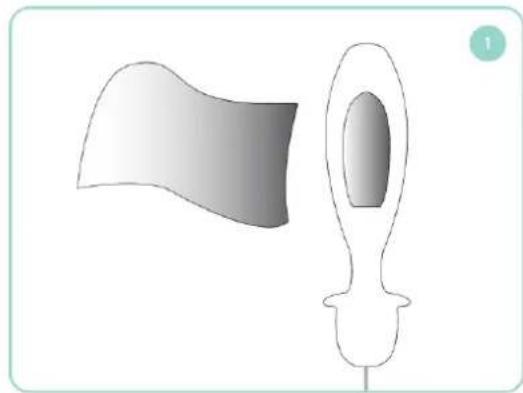
Simple line drawing of a flag and a stylized object with a handle, no text or symbols present.Clean the probe with an alcohol-free anti-bacterial wipe or with warm soapy water
Regulate the output intensity with ▲ and ▼
natural_image
Illustration of a medical device labeled 'Allvia' with a catheter above it, no text or symbols on the device itself.Connect the unit with the vaginal probe and insert the probe
natural_image
Close-up of a TensCare device control panel with buttons and display (no readable text or symbols beyond branding)Press and hold the OFF button to switch the device off Presionar el botón de OFF para apagar el dispositivo Appuyez sur le bouton OFF pour éteindre l'appareil Halten Sie die OFF-Taste gedrückt, um auszuschalten
Dear Customer,
Thank you for choosing Alivia. TensCare stands for high-quality, thoroughly tested products for the applications in the areas of gentle electrotherapy, muscle toning, continence management and pain relief during labour.
Please read these instructions for use carefully and keep them for later use and observe the information they contain.
Best regards,
Your TensCare Team
CONTENTS
- INTRODUCTION 5
- INTENDED USE 5
- ALIVIA FEATURES....6
- PELVIC FLOOR EXERCISES......6
4.1. PELVIC FLOOR MUSCLES....6
4.2. PERFORMING PELVIC FLOOR EXERCISES....7
- TYPES OF INCONTINENCE 8
- PERIOD PAIN....9
- HOW 'EMS' WORKS 10
- HOW 'TENS' WORKS....11
- CONTRAINDICATIONS, WARNINGS & CAUTIONS.... 12
- INFORMATION ABOUT THE PROGRAMME SETTINGS.... 15
- PROGRAMMES....16
11.1. PROGRAMME SETTINGS.... 16
11.2. PRESET PROGRAMMES.... 16
11.3. PAIN PROGRAMME.... 17
- CONTENT....18
- UNIT INFORMATION.... 19
13.1. CONTROLS & DISPLAY 19
13.1. CONTROLS & DISPLAY 19
13.2. OPERATING INSTRUCTIONS.... 20
13.1. CONTROLS & DISPLAY....19 13.2. OPERATING INSTRUCTIONS....20
- SETTING UP AND USING THE ALIVIA 22
14.1. INSTALLATION OF BATTERIES 22
14.2. CONNECTING LEAD WIRE....23
14.3. PREPARING FOR SESSION....23
14.4. TRAINING SESSION 24
14.5. AFTER YOUR TRAINING SESSION....26
- ANAL PROBE 26
15.1. CONDITIONS THAT MAY BE TREATED....26
15.2. HOW TO INSERT THE ANAL PROBE 27
- CLEANING....28
- EMC 28
- DISPOSAL OF WASTE ELECTRICAL AND ELECTRONIC PRODUCTS (WEEE)... 28
- ACCESSORIES 29
- WARRANTY.... 29
- TROUBLESHOOTING 31
- GENERAL SPECIFICATION....33
SYMBOLS USED
| TYPE BF APPLIED PART: Equipment providing a degree of protection against electric shock, with isolated applied part. Indicates that this device has conductive contact with the end user. | |
| This symbol on the unit means “Refer to instructions for use”. | |
| Temperature Limitation: indicates the temperature limits to which the medica device can be safely exposed. | |
| Lot Number: indicates the manufacturer's batch code so that the batch or lot can be identified. | |
| Humidity Limitation: indicates the humidity limits to which the medical device can be safely exposed. | |
| Serial Number: indicates the manufacturer's serial number so that a specific medical device can be identified. | |
| Do not dispose in household waste. | |
| Catalogue Number: indicates the manufacturer's catalogue number so that the device can be identified. | |
| Atmospheric Pressure: indicates the atmospheric limits to which the medical device can be safely exposed. | |
| Manufacturer Symbol | |
| Date of Manufacture: indicates the date which the medical device was manufactured. This is included within the serial number found on the device (usually on the back of the device), either as “E/Year/Number” (YY/123456) or “E/Month/Year/Number” (MM/YY/123456). | |
| CE Mark | |
| Medical Device | |
| This medical device is indicated for home use. | |
| Importer Symbol | |
| IP22 | This medical device is not water resistant and should be protected from liquids.The first number 2: Protected against access to hazardous parts with a finger, and the jointed test finger of 12 mm ø, 80 mm length, shall have adequate clearance from hazardous parts, and protected against solid foreign objects of 12.5 mm ø and greater.The second number 2: Protected against vertically falling water drops whe enclosure is tilted up to 15°. Vertically falling drops shall have no harmful effects when the enclosure is tilted at any angle up to 15° on either side of the vertical. |
1. INTRODUCTION
Device Description & Principles of Design
Bladder leakage and incontinence are common problems for both women and men, affecting their long-term health. Exercising the pelvic floor muscles is recognised as the way of preventing and treating symptoms of incontinence and pelvic floor weakness.
The Alivia is a powered muscle stimulator used for strengthening the pelvic floor muscles.
It sends a gentle stimulation (similar to your natural nerve impulses) direct to your pelvic floor muscles through a vaginal probe with stainless steel electrodes. These signals make your pelvic floor muscles contract. If you have forgotten how to contract them, are having trouble getting muscle response, or simply want to bring back the condition of your pelvic floor muscles, the Alivia can work them for you to build up their strength and help you to develop your own muscle control. It perfectly complements pelvic floor exercises. The Alivia is very easy to use, with four clearly labelled preset training programmes, a fifth programme for period pain and a simple push button control.
The Alivia provides relief from conditions such as:
- Urinary and faecal incontinence: including stress, urge and mixed types as well as post prostatectomy urinary incontinence in men. Additionally, it may help improve
sexual intimacy by toning the pelvic floor muscles.
- Anal stimulation may also help men who are otherwise unable to execute Kegel exercises to strengthen their pelvic floor. Pelvic floor muscle training is recommended for recovery from some causes of Erectile Dysfunction. However it is not intended to treat any medical issues and your first step in deciding appropriate therapy should be to consult your professional medical advisor.
- Period pain: primary menstrual pain (dysmenorrhoea) and secondary menstrual pain due to conditions such as endometriosis, fibroids or pelvic inflammatory disease.
2. INTENDED USE
Alivia is a medical device designed to be used in the home healthcare environment to treat symptoms of urinary and/or faecal incontinence and is suitable for use by all who can control the device and understand the instructions.
Alivia may also help to relieve the pain of secondary menstrual pain due to conditions such as endometriosis, fibroids or pelvic inflammatory disease.
Do not use the device for any purpose other than this intended use.

Warning: Not suitable for use in children without medical supervision.
3. ALIVIA FEATURES
- Single Channel
Single channel unit to treat symptoms of urinary incontinence via a probe with biofeedback pointer.
• Comfortable Stimulation
Gentle stimulation with fine tune adjustment settings for different levels of intensity, 1 mA per step.
- 5 Preset Programmes
EMS programmes including STRES, URGE, MIXED and TONE aftercare; and additional TENS programme providing relief from period pain.
- Memory
Features 3 functions: programme retention (automatically starts in the last programme used), number of uses and time of usage.
- Treatment Timer
Unit defaults to 20 minutes' treatment to ensure the pelvic floor muscles are not over-worked. The user can manually reset this (Continuous, 10, 20, 30, 45, 60 or 90 mins).
- Open Circuit Detection
Automatically resets the strength to zero and flashes 'LEADS' if the connection comes loose.
• Automatic Keypad Lock
Automatic keypad lock prevents any accidental changes in settings.
- Large LCD Screen
Clearly shows the operation of the unit and the programme and intensity being used.
4. PELVIC FLOOR EXERCISES
4.1. PELVIC FLOOR MUSCLES
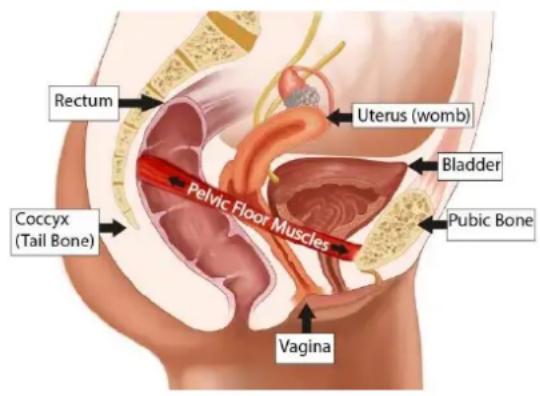
The “FLOOR” of your pelvis is made up of layers of muscles that support the bowel, bladder, urethra and uterus. These muscles are like a hammock, or the bottom and sides of a bowl, in shape. They run from the pubic bone in the front to the end of the spinal column (or tail bone) in the back.
text_image
Rectum Uterus (womb) Coccyx (Tail Bone) Pelvic Floor Muscles Bladder Pubic Bone VaginaThe pelvic floor muscles:
- Assist in supporting the abdominal and pelvic organs.
- Work with the abdominal and back muscles to stabilise and support the spine.
- In women, also
- provide support for the baby during pregnancy and
- assist in the birthing process
Pelvic floor muscles are also important for sexual function.
- In women, voluntary contractions (squeezing) of the pelvic floor contribute to sexual sensation and arousal.
However pelvic floor muscles may become weak. If your pelvic floor muscles become stretched or weakened, your pelvic organs may no longer be fully supported and you may lose control of your bladder or bowel movements.
For some women, the pelvic floor muscles can also become too tight. This condition is less common, but it can lead to pelvic pain and make it difficult for you to empty your bladder or bowel completely.
Common signs that can indicate a pelvic floor problem include:
- Accidentally leaking urine when you exercise, laugh, cough or sneeze
- Needing to get to the toilet in a hurry or not making it there in time
- Constantly needing to go to the toilet
• Finding it difficult to empty the bladder or bowel - Accidentally losing control of the bladder or bowel
• Accidentally passing wind - Pain in your pelvic area
- Painful sex, or
- A prolapse
In women, this may be felt as a bulge in the vagina or a feeling of heaviness, discomfort, pulling, dragging or dropping. This occurs when one or more of the pelvic organs (bladder, bowel or uterus) become displaced and sag down into the vagina. It is very common in the United Kingdom and occurs in about 40% of women. Symptoms tend to become exacerbated towards the end of each day and if left untreated, they will generally worsen over time.
In men, this may be felt as a bulge in the rectum or a feeling of needing to use the bowel but not actually needing to go.
Like other muscles in your body, the pelvic floor can be strengthened with regular exercise. Building pelvic floor strength enables the muscles to better support your pelvic organs, improves your bladder and bowel control and can stop accidental urine, faeces or wind leakage.
It can also reduce your risk of prolapse, improve your recovery from childbirth and gynaecological surgery, and increase your sexual pleasure. A continence therapist can help you learn how to exercise your pelvic floor.
Doing just a few pelvic floor exercises every day will help to treat bladder weakness or prolapse symptoms, and will help to prevent problems later on.
4.2. PERFORMING PELVIC FLOOR EXERCISES
It is recommended to make Pelvic Floor Exercises (sometimes called Kegel Exercises) part of your daily life.
1) Kegel exercises can be done at any time and are very discreet so you can do them almost anywhere; lying in bed, sitting at the computer or waiting for a bus. It is a good idea to try and develop a routine which you can repeat each day.
2) First, it is important to find your pelvic floor muscles and feel them working. So here are a couple of techniques which might help:
Try inserting one or two clean fingers into your vagina and then squeezing
the surrounding muscles, lifting up and towards your belly button – a squeezing and lifting sensation.
Another way is to try and stop the flow of urine during urination. If you are successful, then you know you are exercising the correct muscles.

Note: These techniques are just to help you confirm that you are using the correct muscles.
It is important to have an empty bladder before starting the exercises.
3) Try to remember the lifting and squeezing sensation and when you are ready try to recreate it just using the muscles you identified earlier; don't tense the muscles in your legs, stomach or buttocks and remember to breathe normally.
4) Aim to hold each squeeze or 'contraction' for three to five seconds, then release and relax. You should feel a 'letting go' of the muscles. Rest for five seconds and then repeat.
5) Try and do about ten squeezes in this way.
6) Repeat the whole process three or four times a day.
7) Over a period of time try to increase the muscle contractions up to about ten seconds, but remember to rest in between each squeeze for longer periods.

Note: It is important to aim for quality contractions, not quantity, so a few good hard squeezes are better than a series of weak ones.
Do not worry if you find holding for 3 seconds difficult at first. Just squeeze for as long as you feel comfortable to do so. The more exercise you do, the stronger the muscles will become and the longer you will be able to squeeze.
8) Using your Alivia pelvic floor stimulator in conjunction with Kegel exercises will give you a better understanding of how they work and how to get the greatest benefit from them.
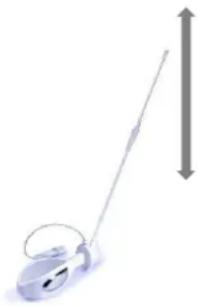
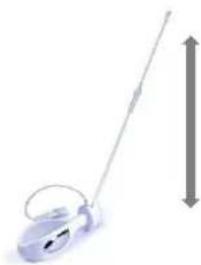
Use the pointer as an indication of how well you are performing the Kegel exercises.
- When performed correctly, the pointer will move downwards.
- When performed incorrectly, the pointer will move upwards.
natural_image
Illustration of a handheld electronic device with a vertical arrow indicating direction (no text or symbols)5. TYPES OF INCONTINENCE
There are three types of incontinence: Stress, Urge, and Mixed.
Stress Incontinence
If you leak urine when you cough, sneeze, laugh, strain or make sudden movements, this is called Stress Incontinence.
It is particularly common in women who have had a natural childbirth and occurs when the bladder neck and the other mechanisms that act to hold urine in the
bladder are not working properly. The most common cause is a weak pelvic floor.
Urge Incontinence
Describes an overactive bladder. A person may experience a strong and sudden urge to go to the toilet but are not always able to hold on, or must go so frequently that it becomes inconvenient.
Mixed Incontinence
Is a combination of both Stress and Urge Incontinence.
6. PERIOD PAIN
Painful periods are common in teenagers and young adults.
Most women have some pain during periods. The pain is often mild but, in about 5 in 10 women, the pain is severe enough to affect day-to-day activities. The pain can be so severe that they are unable to go to school or work.
Period pain generally falls into two categories: primary dysmenorrhea and secondary dysmenorrhea.
Primary dysmenorrhoea has no specific cause yet is the most common type of painful periods affecting 9 out of 10 women. It occurs where there is no underlying problem of the womb (uterus) or pelvis. The main symptom is a cramping type of pain in the lower tummy (abdomen); it may in some cases spread to the lower back, or to the top of the legs. Pains are generally worst in the first few years after starting your period, with symptoms tending to improve with age or after childbirth.
Secondary dysmenorrhoea is less common and is more likely to occur in women in their 30s and 40s. It is caused by a specific underlying condition such as endometriosis (when cells that normally line the uterus are found at other sites in the body – usually the ovaries and fallopian tubes). Again, the main symptom is cramping pain in the lower tummy during your periods. In some women with secondary dysmenorrhoea the pain starts several days before the period begins and lasts all the way through the period. (This is uncommon with primary dysmenorrhoea).
With secondary dysmenorrhoea it is likely to have other symptoms - for example:
- Irregular periods.
- Bleeding between periods.
- Pains between periods.
- The bleeding becomes heavier than previously.
- Vaginal discharge.
- Pain during sex.
- Pain in your back passage (rectum).
Secondary dysmenorrhoea may occur as a result of:
• Endometriosis/adenomyosis.
- Pelvic inflammatory disease.
- Fibroids when it is often associated with heavy menstrual bleeding.
- Adhesions.
• Developmental abnormalities.
Consult your healthcare professional if you are experiencing any of the above symptoms.
7. HOW 'EMS' WORKS
E.M.S. stands for Electrical Muscle Stimulation and has successfully been used in medical rehabilitation and training in competitive sports. EMS produces intensive and effective muscular contraction.
In rehabilitation, EMS is a well-established method for treatment of a broad field of musculoskeletal diagnoses as well as pelvic floor weakness. Electrical stimulation of an intact peripheral nervous system may create motor responses in patients with impaired or lost ability for voluntary muscle activity.
EMS is a complement to other physical therapy and should always be combined with active training such as Kegel exercises (see section 4.2.).
Advantages of EMS
Use of EMS may lead to faster progress in the patient's treatment programme. The method is simple and appropriate for treatment in the clinical setting as well as for self-treatment at home.
How EMS Works
Electrical Muscle Stimulators can play a vital role in educating women and men about their pelvic floor and the sensation they should feel when doing pelvic floor exercises. Electrical Pelvic Floor Exercisers (PFE) offer a noninvasive method of producing contraction of muscles via a gentle stimulation to the pelvic floor through a discreet probe or electrode pads when they are placed close to the nerve that controls the pelvic floor muscles. This current then passes into the nerve fibres controlling that part of the muscle stimulating it to contract. So, electrical stimulation (EMS) artificially activates a muscle for you enabling you to develop your own muscle control. These contractions exercise the muscles and, as with any kind of exercise if performed regularly, build strength and tone.
In urge incontinence, pelvic floor exercisers work in a slightly different way. The electrical stimulation is designed to soothe your bladder muscles rather than exercise your pelvic floor. Alivia uses a gentler, low frequency setting which promotes release of endorphins and reduces involuntary contractions of the bladder (detrusor) muscle.
Different frequencies have different effects; low frequencies (1-10 Hz) coupled with long impulse times, for example, have a purifying and relaxing effect through individual contractions, whereby the circulation in the treated muscle is simultaneously improved and removal of metabolic end products is supported (lymphatic drainage).
In contrast, by means of a rapid succession of contractions (fibrillation), medium frequencies (20-50 Hz) can put a high level of strain on the muscle, thus promoting the muscular structure.
Each preset programme has a specific frequency and pulse width that will offer
the best results for the type of incontinence treated.
8. HOW 'TENS' WORKS
T.E.N.S. stands for Transcutaneous Electrical Nerve Stimulation. T.E.N.S. stimulates your body's own natural defences against pain, namely the release of endorphins. TENS is totally safe and has been used successfully by thousands of pain sufferers.
TENS sends a gentle stimulation through the skin which works in TWO ways:
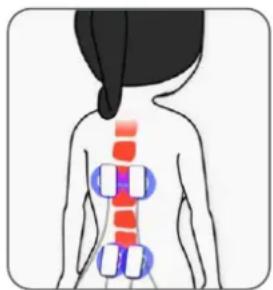
Pain Gate
It stimulates the sensory nerves, which carry touch and temperature signals. These nerves go to the same connections in the spine as the nerves carrying pain. A strong sensory signal will block the pain signal travelling up the spine to the brain. This is known as closing the "Pain Gate" and takes effect quite quickly after the unit is switched on. When the gate is open, pain messages get through to the brain and we feel pain. When the gate is closed, these pain messages are blocked and we do not feel pain.
natural_image
Illustration of a human back with colored anatomical markers (no text or symbols)Evidence suggests that TENS produce pain relief in a similar way to ‘rubbing the pain better’. The pain gate can be closed by activation of mechanoreceptors through ‘rubbing the skin’.
Scientifically, the pain gate works by release of chemical in the synapse at spinal level that inhibits transmission of pain signal.
Endorphin Release
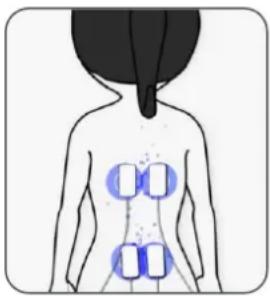
At low frequency settings, and slightly stronger outputs, TENS drives the motor nerves to produce a small repetitive muscle
natural_image
Human back with four blue rectangular markers on the back, indicating areas of interest or emphasis (no text or symbols present)contraction. This is seen by the brain as exercise, and this promotes the release of endorphins - your body's own natural pain killer. The relief builds up and normally takes about 40 minutes to reach a maximum level which can last for hours after the machine is switched off.
By using TENS, you can expect to achieve a significant reduction in pain - if not complete relief from pain.
- TENS is effective for pain from a very wide range of causes.
- TENS machines can be used to help reduce pain from problems in muscles, joints and nerves.
- It can be also used for people with musculoskeletal pain such as long-term (chronic) back pain or knee joint arthritis. They are also often used for pain relief in the early stages of labour (see perfect mamaTENS), particularly whilst a pregnant woman remains at home.
- TENS may also be used to treat many types of pain, such as period pain and endometriosis (see Ova+), cystitis, sports injuries, fibromyalgia
and neuralgia, plantar fasciitis, post-operative pain, TMJ disorder, diabetic neuropathy, osteo-arthritis and sometimes non-painful conditions such as travel sickness.
- You can use low frequency (<10 Hz) programmes on acupuncture points, to achieve similar effects to acupuncture.
- With neurogenic pain (caused by inflamed nerves) such as neuralgia, TENS may start by increasing the pain. We recommend that you only use TENS for these conditions under medical supervision.
- You can safely use TENS as long as it gives you pain relief. The effect may wear off after a few hours (this is called “accommodation”). If this happens, take a break of an hour or so before trying again. If you use settings that cause muscle movement for more than 40 minutes, you may experience aching muscles a few hours later.
9. CONTRAINDICATIONS, WARNINGS & CAUTIONS
In this manual:
A Contraindication is used when a device should not be used because the

risk of use clearly outweighs any foreseeable benefits and may result in serious injury or
death.

A Warning is used when failure to follow the instructions may result in serious injury or
death.
A Caution is used when failure to follow the instructions may result in a minor or moderate injury, or damage to the device or other property.

Notes are used to provide clarification or recommendation.

CONTRAINDICATIONS:
Do NOT use if you are or may be pregnant. It is not known whether TENS may affect foetal development.
Do NOT use with optional electrode pads if you have a pacemaker (or if you have a heart rhythm problem) or with any electronic medical devices. Using this unit with electronic medical devices may cause erroneous operation of the device. Stimulation in the direct vicinity of an implanted device may affect some models.
Do NOT use in the first 6 weeks following a pelvic surgery or vaginal childbirth. Stimulation may disrupt the healing process.
Do NOT use if you have symptoms of active urinary tract infection, vaginal infections, or localized lesions. Introducing the probe may irritate sensitive tissue.
Do NOT use if you have poor sensation in the pelvic region. You may not be able to control the intensity of stimulation safely.

WARNINGS:
Do NOT use if you are unable to properly insert the vaginal or anal probe. If you have a severe prolapse, or if any discomfort occurs when inserting the probe, consult your healthcare professional before use.
Do NOT use when driving, operating machinery, or similar actions needing muscular control. Loose electrode pads, damaged leads, or sudden changes in contact may cause brief involuntary muscle movements.
Do NOT use to mask or relieve undiagnosed pain. This may delay diagnosis of a progressive condition.
Do NOT use if you have, in the area being treated: active or suspected cancer or undiagnosed pain with a history of cancer. Stimulation directly through a confirmed or suspected malignancy should be avoided as it may stimulate growth and promote spread of cancer cells.
Do NOT use optional electrodes on the front of the neck. Stimulation on the front of the neck can affect your heart rate or cause contraction of the throat.
Do NOT use optional electrodes across the chest. Very strong stimulation across the chest may cause an extra heartbeat and/or rhythm disturbances to your heart, which could be lethal.
Do NOT use Alivia while simultaneously connected to high frequency surgical equipment as it may result in burns at the site of stimulator electrodes and possible damage to the stimulator.
Do NOT use Alivia in close proximity (e.g. 1 m) to a shortwave or microwave
as this may produce instability in the stimulator output.
Do NOT use electrodes near the thorax as this may increase the risk of cardiac fibrillation.

CAUTIONS:
Caution should be used if you have a bleeding disorder as stimulation may increase blood flow to the stimulated region.
Caution should be used if you have suspected or diagnosed epilepsy as electrical stimulation may affect seizure threshold.
Caution should be observed when using the device at the same time as being connected to monitoring equipment with body worn electrode pads. It may interfere with the signals being monitored.
Caution Do not permit use by persons unable to understand the instructions or persons with cognitive disabilities, i.e.; Alzheimer's disease or dementia.
Caution: Insertion of the vaginal or anal electrode makes it unsuitable for use in children without clinical supervision
Caution: Keep away from children under 5 years of age. Long cables - risk of strangulation in infants.
Caution: Strong electromagnetic fields (electro-surgery/ microwave cookers/ mobile phones) may affect the correct operation of this unit. If it appears to behave unusually, move it away from these devices.
Caution should be observed when using the Alivia at high strength settings. Prolonged use at high settings
may cause muscle injury or tissue inflammation.
Caution Not intended for use in an oxygen rich environment.
Caution Not intended for use in conjunction with flammable anaesthetics or flammable agents.
Caution The patient is an intended operator.
Caution Do not service and maintain the device while in use.
Caution Maintenance and all repairs should only be carried out by an authorized agency. The manufacturer will not be held responsible for the results of maintenance or repairs by unauthorized persons.
If necessary, we will provide circuit diagrams, component part lists or other information that will assist authorized service personnel to repair the device.
Caution The operator should not touch the patient at the same time when touching the battery output.
Caution Keep away from pets and pests
Caution: should be observed when using the Alivia at high strength settings. Alivia has a Yellow LED light on output socket which means the output will exceed 10 mA (R.M.S) or 10 V (R.M.S) averaged over any period of 1 sec. Prolonged use at high settings may cause muscle injury or tissue inflammation.

Note: No serious or long-term adverse effects have been reported. Mild adverse reactions are very rarely reported, but these have included muscular pain and cramps, vaginal tenderness, irritation
and bleeding, mild or short-term urge or faecal incontinence, and tingling sensation in legs. If you experience any of these, stop use. When symptoms have gone, try resuming at a lower intensity setting.
PROBE CAUTIONS:
Caution: The Alivia vaginal probe is intended for single patient use only. Do not share your Alivia probe with anyone else. Improper treatment or cross-infection may occur.
Caution: It is important that the vaginal probe is cleaned after each use. Ineffective cleaning may lead to irritation or infection.
Caution: Never insert or remove vaginal probe unless the control unit is powered OFF as insertion or removal when stimulation is active may cause discomfort or tissue irritation.
Caution: If tissue irritation occurs, discontinue treatment immediately. Ask your healthcare professional for advice before continuing further treatment to prevent injury.
Caution: Do not use a silicone based lubricant on the metal plates of the probe as it may decrease the effectiveness of Alivia's muscle stimulation.
Caution: Do not use this device with vaginal probe or anal probe other than those recommended by the manufacturer in section 18. Electrodes with smaller surface area may cause tissue irritation.
DO NOT PLACE OPTIONAL ELECTRODE PADS:
- On skin, which does not have normal sensation. If the skin is numb too
great a strength may be used, which could result in skin inflammation.
- On broken skin. The electrode pads could encourage infection.
ELECTRODE PADS CAUTION:
Caution: Do not ignore any allergic reaction to the electrode pads: If a skin irritation develops, stop using TENS, as this type of electrodes may not be suitable for you. Alternative electrode pads specially made for sensitive skin are available (see E-696-SS).
Caution: Do not use this device with leads or electrode pads other than those recommended by the manufacturer. Performance may vary from specification. Electrodes with smaller surface area may cause tissue irritation.
Caution: Do not use high intensity settings if electrodes are smaller than 50x50mm.
The electrode pads supplied are reusable but for single patient use. The adhesive is a peelable hydrogel (water based).
TO KEEP YOUR DEVICE IN GOOD WORKING ORDER, OBSERVE THE FOLLOWING ADDITIONAL CAUTIONS:
Caution: Do not immerse your device in water or place it close to excessive heat such as a fireplace or radiant heater or sources of high humidity such as a nebulizer or kettle as this may cause it to cease to operate correctly.
Caution: Keep the device away from sunlight, as long-term exposure to
sunlight may affect the rubber causing it to become less elastic and crack.
Caution: Keep the device away from lint and dust, as long-term exposure to lint or dust may affect the sockets or cause the battery connector to develop a bad contact.
Caution: Temperature & Relative Humidity of storage: -25°C–+70°C, 0%–93% R.H. Temperature & Relative Humidity of transportation: -25°C–+70°C, 0%–93% R.H.
Caution: There are no user serviceable parts. Do not attempt to open or modify the unit. This may affect the safe operation of the unit and will invalidate the warranty.
10. INFORMATION ABOUT THE PROGRAMME SETTINGS
Each programme has its own combination of Frequency and Pulse Width settings which allow for different sensations through the probe or optional electrode pads and help treating the different types of incontinence.
- Frequency (measured in Hz - pulses per second)
Low frequencies (1-10 Hz) have a purifying and relaxing effect through individual contractions.
Medium frequencies (20-50 Hz) can put a high level of strain on the muscle, thus promoting the muscular structure
Endorphin release (programme PAIN only): A low frequency of 4 or 10 Hz allows for the release of endorphins, the
body's natural morphine-like substances.
- Pulse Width (measured in s - millionths of a second)
The Alivia unit has pulse widths of 200 to 300 s. Generally speaking, the higher the pulse width, the more "aggressive" the stimulation feels, if the pulse width is set high enough, it will usually elicit a muscle contraction, which is required for an effective toning of the pelvic floor muscles.
11. PROGRAMMES
11.1. PROGRAMME SETTINGS
| Prog | STRES | URGE | MIXED | TONE | PAIN |
| Freq. (Hz) | 50 | 10 | 10/50 | 35 | 110 |
| Pulse width (μs) | 300 | 200 | 200/30 0 | 250 | 100 |
| Ramp Up & Down (s) | 1 | Constant | Con/1 | 2 | Constant |
| Plateau (s) | 5 | Con/5 | 3 | ||
| Rest (s) | 10 | Con/ 10 | 6 | ||
| Default duration (min) | 20 | Continuous | 20 | 20 | Continuous |
11.2. PRESET PROGRAMMES
The Alivia has five preset programmes. One for each type of incontinence (stress, urge and mixed), one for toning the pelvic floor muscles (TONE), and one for period pain (PAIN).
STRESS INCONTINENCE:
Shown on the screen as: STRES
The STRES incontinence programme strengthens the muscles of the pelvic floor using gentle stimulation. Once these muscles are stronger they are better able to resist urinary leakage caused by external pressure being applied to the bladder such as with a cough, sneeze or physical exertion.
The stimulation causes the muscles to contract and work. This builds their strength. Like other fitness training, successful treatment requires stimulation once a day for one to three months. Improvement starts becoming apparent after about four weeks.
The sensation is like a strong drawing in of the muscles of the vagina, pulling up the pelvic floor. Your natural reaction will be to pull your muscles in and up, and this exercises and strengthens them.
URGE INCONTINENCE:
Shown on the screen as: URGE
The URGE programme works in a different way to the STRES programme. The gentle continuous stimulation soothes the bladder (detrusor) muscle, reducing its involuntary contractions. This prevents the unwanted and unexpected emptying of the bladder.
Successful treatment requires stimulation once a day and improvements can sometimes be seen in as little as two weeks.
The sensation is a softer, vibrating, stimulation. Nevertheless, when the programme finishes, and your pelvic floor relaxes, it will become apparent how much your pelvic floor has been exercised.
MIXED INCONTINENCE:
Shown on the screen as: MIXED
This programme is perfect if you are suffering from both Stress and Urge incontinence. It is a combination of the STRES and URGE programmes.
The first 10 minutes uses the URGE programme to reduce sensitivity, then in the second 10 minutes, the STRES programme exercises the pelvic floor muscles. You may need to increase the strength to feel the muscle contraction when the STRES programme starts.
TONE:
Shown on the screen as: TONE
Once the pelvic floor muscles have been strengthened with Alivia, continue to exercise them.
Regular use of this programme, about twice a week, will ensure that your muscles remain fit and toned.
The TONE programme may also be used as an alternative treatment for stress incontinence.
The sensation when using the TONE programme is a mixture of a strong drawing in of the muscles and then releasing.
A strong and fit pelvic floor may increase sexual health and enjoyment.
PAIN:
Shown on the screen as: PAIN
The PAIN programme can be used to alleviate period pain. It has a constant output that produces a tingling sensation, activating the Pain Gate. It is the programme that is likely to result in the greatest pain relief.
11.3. PAIN PROGRAMME
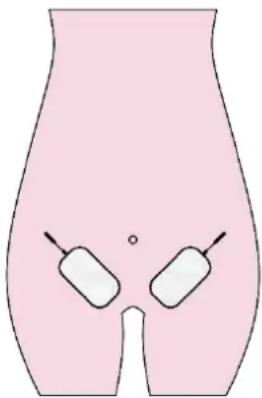
In order to obtain the best relief, the pads need to be placed over the dermatomes T10, T11 and T12, which are the nerve roots that supply the sensory fibres to the uterus. These dermatomes wrap around the body, but do not quite meet up at the front. They run from around waist height at the back down to the groin area at the front.
As each person's body is different, the Aliviais supplied with pads which are large enough to be effective even if not located exactly over all three dermatomes. When the pads are placed correctly the Alivia will work very well.
Therefore, if after thirty minutes considerable relief has not been achieved, either move the pads slightly or try one of the other pad positioning areas.
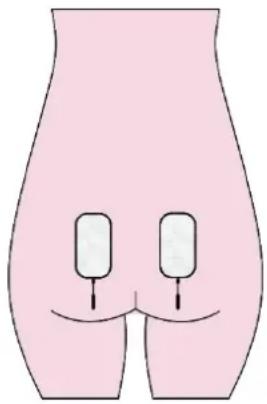
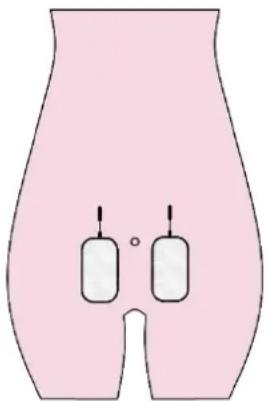
There are THREE positions where the pads can be placed for maximum benefit. It is recommended that the positions are tried in the following order until maximum relief is obtained:
- On the lower back
- On the front, in a vertical format
- On the front, in a diagonal format
Please refer to the diagrams below:
On the lower back:
Place the pads vertically either side of the spine, approximately 10cms (4 inches) apart, with the bottom of the electrodes no higher than the top of your buttocks. The “pigtails” should hang down from the pads.
natural_image
Illustration of a human abdomen with two white oval markers on the lower abdomen (no text or symbols)On the front, in a vertical format:
In the vicinity of your groin, place the pads vertically, about 10cms (4 inches) apart. The "pigtails" should be uppermost.
natural_image
Illustration of a human abdomen with two hanging objects (no text or symbols)On the front, in a diagonal format:
In the vicinity of your groin, place the pads in a V-shape, narrowing to about 10cms (4 inches) apart at the lower end of the pads. The “pigtails” should be uppermost.
natural_image
Illustration of a human pelvis with two white anatomical structures inside, no text or symbols present.The strength should be comfortable, but always remain noticeable. You may need to increase it over the course of
the treatment. There is no need to have a contraction.

Caution: The self-adhesive pads supplied are intended for multi-use by one person only.
Do not lend used pads to others, nor use someone else's used pads yourself.
12. CONTENT
The pack contains:
• 1 x Alivia continence stimulator unit
- 1 x Lead wire (L-CPT)
- 1 x Liberty Loop vaginal probe with detachable pointer (X-VPL)
- 2 x 50x90mm electrode pads (E-CM5090)
• 2 x AA 1.5V alkaline batteries
- 1 x Detachable belt clip
- 1 x Storage pouch
• 1 x Manual instruction
13. UNIT INFORMATION
13.1. CONTROLS & DISPLAY

text_image
Alivia 20 min STRES mA 0 1 2 3 4 5 6 7 8 9 10 CH 11 12 TensCare®| 1 | Low Battery | 7 | Programme Control |
| 2 | Programme Duration | 8 | Strength Increase |
| 3 | Programme Selected | 9 | Power Button |
| 4 | Keypad Lock Indicator | 10 | Treatment Timer |
| 5 | Strength Selected (mA) | 11 | Strength Decrease |
| 6 | Memory Button | 12 | Keypad Lock Button |
13.2. OPERATING INSTRUCTIONS
ON/OFF
To turn the unit on, press the POWER button and hold for 3 to 5 seconds until the display shows. To turn the unit off, press ▼ button to remove keypad lock and press the POWER button and hold for 3 to 5 seconds until the display stops.
At first use, or after changing batteries, the display shows that the unit is automatically set in programme STRES at zero strength.
When switched on the unit will automatically start in the programme which was being used when it was last switched off.
The unit will turn off automatically:
- When the Timer reaches zero,
- If it is left at zero strength for more than 5 minutes.

Note: Always check unit is OFF before applying or removing probe or pads.
The backlight will turn off 10 seconds after the last button press.
STRENGTH CONTROLS
The buttons marked ▲ and ▼ are the strength controls.
To increase strength, press and hold down the button ▲ until required strength is achieved.
To decrease the strength, press and release the button ▼.
To increase strength in steps of 1 mA, press and release the button ▲.
The unit will remain in the WORK part of the cycle for 5 seconds while intensity is being adjusted.
The strength levels are shown on the LCD.
The strength control buttons will not operate until the unit is properly connected to you (probe inserted correctly). Alivia detects a disconnection and automatically returns the strength to zero.
The unit has 99 levels of strength. If you hold down the button ▲ for 3 to 5 seconds, the strength will start scrolling.
You may feel nothing over the first few presses. Continue pressing until the sensation is strong but comfortable. Further increases during use may be necessary if your body becomes used to the sensation.
The yellow LED on the output socket indicates that there is an active output. The display will remain on for 5 seconds after the plug is removed.
PROGRAMME CONTROL

The button illustrated is the programme control. The Alivia has five preset programmes. At first use, the unit automatically goes to programme STRES. Next time it is switched on, it will default to the programme used last.
Each time you press and release the PROGRAMME CONTROL button, the programme changes and is shown on the LCD.
Each time you change the programme, the strength level reverts back to zero. This is a safety feature to alleviate any sudden feeling of a surge, as each programme gives a different sensation.
TREATMENT TIMER

The button illustrated can be used to set the session duration. When you switch the unit on, it is automatically set at 20 min or Continuous, (displayed as C) depending on the programme chosen.
To set a different time, set the strength to zero and press the TREATMENT TIMER button. The min display will flash.
You can set session times of C (Continuous) or 10, 20, 30, 45, 60 or 90 minutes with the buttons ▲ and ▼.
Press the button again to save your selection.
The LCD shows the session duration next to the clock symbol. The unit automatically counts down the minutes set and switches off when it reaches 0.
KEYPAD LOCK

The Alivia keypad can be locked by pressing the
KEYPAD LOCK button. If you do not press any keys for 30 seconds, the keypad will auto-lock. This is to avoid accidental changes in setting. To unlock, press keypad lock button.
LEADS ALARM
The Alivia monitors the connection and the contact between you and the probe, or the pads. This is to prevent sudden changes if a broken connection is re-
made. If either of these goes outside of a standard range while the strength is above 20, the unit will flash LEADS, bleep three times, and return the strength to 0.
Check the lead and if necessary, lubricate the probe with a water based lubricant such as TensCare Go Gel (see K-GO). Please see section 20 for more troubleshooting tips.
LOW BATTERY

An empty battery symbol will show when you need to change the batteries. The unit will shut down about 2 minutes after this.
MEMORY
The Alivia has a Memory with three functions:
1) Programme Retention. When you switch the unit on, it will automatically start in the programme which was being used when it was switched off.

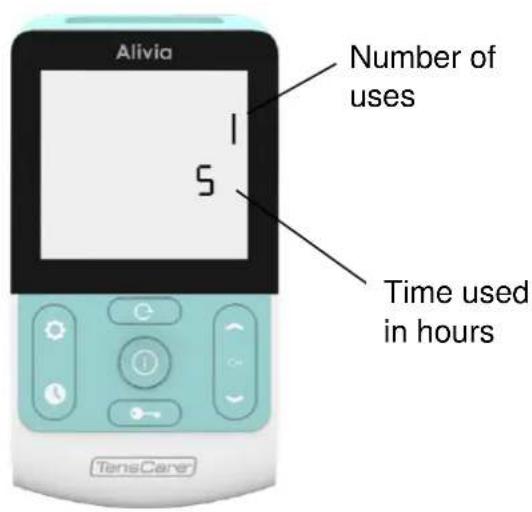
2) Usage. Press the MEMORY button. The display will show the number of times the unit has been used and the duration of use in hours.
Press the button again to return to normal controls.
3) Memory Reset. To reset memory to zero, hold down the MEMORY and CH▼ buttons together for 3 to 5 seconds.
text_image
Alivia Number of uses 5 Time used in hours TensCarer14. SETTING UP AND USING THE ALIVIA
14.1. INSTALLATION OF BATTERIES
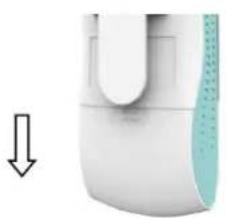
1) Remove battery cover.
natural_image
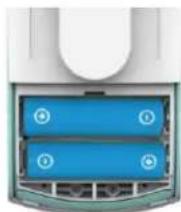
Close-up of a white electronic device with a blue textured surface and a downward arrow indicator (no text or symbols)2) Insert batteries.
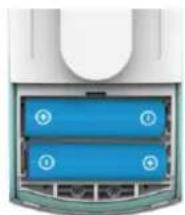
natural_image
Interior view of a computer drive bay showing two blue drive bays with circular indicators (no text or symbols visible)Ensure that the batteries are inserted the right way as shown in battery compartment and that the ribbon is behind them.
3) Replace battery cover and belt clip.

When the batteries are running low, a low battery indicator will show on the screen and it is important to change the batteries as soon as possible.
Rechargeable batteries
The unit will work with rechargeable batteries, but the display may appear dim.

Caution: Remove batteries from your Alivia if the unit is unlikely to be used for a long period. Some types of batteries may leak corrosive fluid.
Battery Life
Batteries should last at least 15 hours at 50 mA, 300 s, 50 Hz.
Unused batteries have a nominal shelf life of 3 years, but will usually last longer than this.

Battery Warnings
Do NOT pierce, open, disassemble, or use in a humid and/or corrosive environment.
Do NOT expose to temperatures over 60°C(140F).
Do NOT put, store or leave near sources of heat, in direct strong sunlight, in a high temperature location, in a pressurized container or in a microwave oven.
Do NOT immerse in water or sea water, or get wet.
Do NOT short-circuit.
Do NOT connect the device unless the battery cover is in place.
If battery leakage occurs and comes in contact with the skin or eyes, wash thoroughly with lots of water and immediately seek medical attention.

Warning: Keep batteries out of the reach of children to prevent them from swallowing them by mistake. If swallowed by child, contact doctor immediately.

Caution NEVER attempt to recharge an alkaline battery. Risk of explosion.

Caution Do not mix old, new or different types of batteries as this may lead to battery leakage or low battery indication.
Disposal: Always dispose of batteries and device responsibly according to local government guidelines. Do not throw batteries onto a fire. Risk of explosion.
14.2. CONNECTING LEAD WIRE
Insert the lead wire plug into the top of the unit.
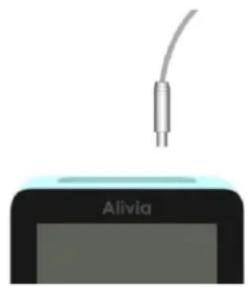
natural_image
Illustration of a device with a curved cable above an Alivia screen (no text or symbols on the device itself)Connect the lead from the top of the unit to the lead in the probe.
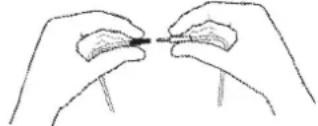
natural_image
Line drawing of two hands holding a small object, possibly a tool or component (no text or symbols present)Push the pin ends firmly into the pigtail ends of the probe lead.
The lead wires may be damaged by rough handling, and should be treated with care.
Lead wire colour coding.
The ends of the lead wire are coloured black or red. This coding is provided for some professional uses. For most purposes, the orientation makes no difference, and you can ignore this colour coding.
14.3. PREPARING SESSION
FOR
1) Before using Alivia you will need to urinate.
2) Lubricate the metal electrode surfaces and probe tip with a water-based lubricant, such as TensCare Go Gel or water.

Caution: Do not use a silicone based lubricant on the stimulation contacts as it may decrease the effectiveness of the Alivia's muscle stimulation.
3) Choose a comfortable position, such as lying down on your bed on your side with your knees raised.

Warning: Ensure the Alivia is switched OFF before inserting the probe.
4) After the wire is securely connected, insert the probe into your vagina, in the same way as you would a tampon, until only the plastic rim at the base of the probe is visible.
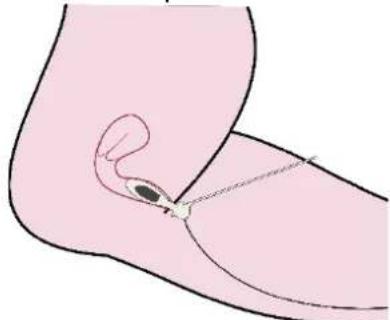
natural_image
Anatomical illustration of a human abdomen with a catheter or needle inserted, showing internal structures without any text or labels.5) The metal parts conduct the electrical pulse and should be in contact with the main part of the muscle at all times. The tissues close to the entrance are more sensitive, so you should avoid stimulating them.
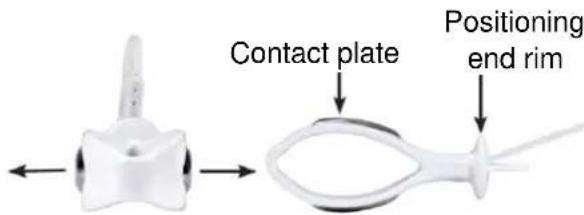
Ensure that the probe is aligned so that the contact plates are to the sides and the longer sides of the positioning end rim are vertical.
text_image
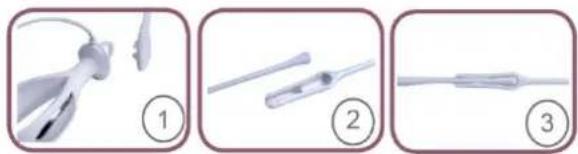
Contact plate Positioning end rim6) The Liberty Loop probe has a pointer attachment which enables you to visually monitor the successfulness of your pelvic floor contractions (the probe can be used without the pointer).
The pointer demonstrates the strength and duration of each contraction, whether caused by stimulation or performed manually. For example, weak contractions are defined by little or no movement in the pointer.
Assemble the pointer and attach to the probe as follows:
natural_image
Three-step medical procedure images showing a tool with a probe, two probes, and a final rod (no text or symbols)- When performed correctly, the pointer will move downwards.
- When performed incorrectly, the pointer will move upwards.
natural_image
Illustration of a handheld electronic device with a curved arm and a vertical arrow indicating upward motion (no text or symbols)14.4. TRAINING SESSION
1) Press and hold the POWER button on the control unit for 3 to 5 seconds to switch the control unit on.
2) You can select from the five preset programmes. Details in section 11 will help you identify the best programme to suit you.
To change between the programmes, press the programme selector.
3) With the required programme selected, you can adjust the intensity of the muscle stimulation until you reach a comfortable level. Once you have reached a comfortable level, 5 seconds after you stop pressing the button, the intermittent work/rest phase will start. The machine will take itself to 0 ~mA for a rest period and then take itself back up to the level of intensity you chose, to work the muscle. This cycle will continue for the 20 minutes of the programme.

Note: The strength required varies widely between users - some will use the Alivia at full power - 99 mA. The Alivia strength will go up at 1 mA increments.
Initially the sensation through the probe may be limited but will improve during treatment. Take care not to use too much strength and thereby over stimulate the muscles until normal sensation is restored. The sensation may not be even as it may vary depending on the sensitivity of the nerves.
The LCD display shows the strength of intensity used. The aim is to increase this over a few days. But remember there is no hurry, so only increase the strength of the stimulation as and when you are comfortable and ready to progress.

Note: If the sensation becomes uncomfortable, reduce the intensity using the button ▼.
When switched on, in STRES and TONE programmes the unit will go through an exercise programme for 4-5 seconds, followed by a rest period of 8-10 seconds. The Alivia causes a sensation which feels like a strong drawing in of the vagina and pulling up of the pelvic floor. The natural reaction will be to pull in and up with the muscles.
At lower strength settings, you may not feel any sensation at all, this depends very much on the individual and any pre-existing physical conditions, so slowly increase the intensity by repeatedly pressing the ▲ button until you begin to feel the muscles around your vagina contract.
For best results in these programmes try to contract the pelvic floor muscles along with the Alivia, and to sustain the contraction into the rest interval. If possible, link the contraction to your breathing to get into a gentle rhythm.
Increase the strength as high as it is comfortable, and then take it back down one step.
The strength display on the control unit will reduce to 0 and flash during the rest period.
The URGE programme works differently. There is no need to have a contraction. The strength should be comfortable, but always remain noticeable. You may need to increase it over the course of the treatment.
The length of each session is automatically set to 20 minutes. The length of each session for muscle strengthening will also depend on your ability to contract and your resistance to fatigue. Be careful not to overuse early on, as the resulting aches may not be felt until the next day.

Note: If you experience cramping, switch the unit off until the symptoms go away
then continue the session with the intensity set at a lower level.
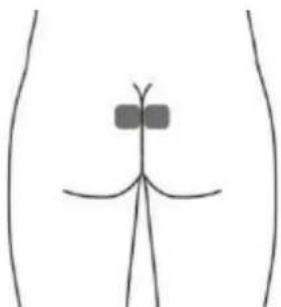
Optional skin surface electrode placement for URGE (this may not be as effective as the stimulation with the vaginal probe).
An alternative method to a vaginal probe is to stimulate areas of the skin that are close to the nerves that go to the bladder and urethra. These come from the parts of the spinal cord segment called S2-S3.
The electrodes are placed on the skin between the anus and the genitals, or at the very bottom of the spine near your coccyx or "tail". See electrode placement pictures below.
natural_image
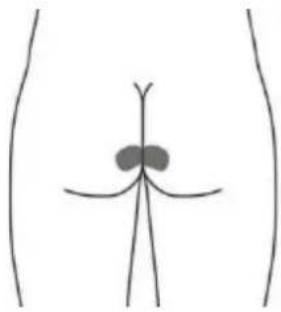
Simple line drawing of a human torso with a rectangular object on the chest (no text or symbols)Optional skin surface electrode placement for STRESS (this may not be as effective as the stimulation with the vaginal probe)
The electrodes are placed on the skin between the anus and the genitals. See electrode placement picture below.
The stimulation should be strong enough to make your anus contract slightly.
natural_image
Simple line drawing of a human torso with a small dark object on the left side (no text or symbols)14.5. AFTER YOUR TRAINING SESSION
When the timer reaches zero, your session is complete and the unit turns off.
1) Check that the control unit is off. If it is not, hold down the POWER button to switch off then remove the probe from your vagina by holding the
positioning end rim and gently pulling outwards.
If you are using the pointer, detach this first before removing the probe.
2) Wash and thoroughly dry the probe and return it to the storage pouch.
3) The Alivia will not only improve your pelvic floor muscles but also help you to recognise the correct sensation you need to feel when doing your Kegel exercises (explained in section 4.2.).

Note: When removing the probe, DO NOT PULL ON THE LEAD WIRE.
15. ANAL PROBE
15.1. CONDITIONS THAT MAY BE TREATED
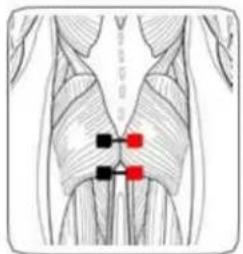
An anal probe such as TensCare X-PR13 can be purchased. This probe can be used for urinary and faecal incontinence in both males and females.
natural_image
Anatomical illustration of human torso with black and red markers indicating specific muscle or neural pathways (no text or labels present)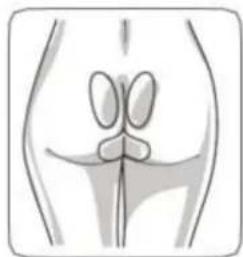
natural_image
Anatomical illustration of pelvic bones (no labels or text)This anal probe may be used to treat Urinary and Faecal Incontinence in a similar way to the vaginal probe. Because the stimulation cannot be restricted to one muscle group, and the mucosal tissue has different electrical characteristics, anal stimulation is less comfortable than vaginal.
You should consult your healthcare professional before starting treatment.
Faecal Incontinence
Faecal incontinence can be the result of weakened or poorly functioning anal sphincter muscles or damage to the nerves controlling them. The purpose is to re-educate the anal sphincter and other muscles of the pelvic floor to contract. The treatments aim to progress towards graduated active exercises, in order to improve pelvic floor muscles' strength and endurance and to regain function.
You may benefit from the Alivia if you either have no active anal sphincter contraction, or a weak or poorly sustained contraction. Use the STRES or TONE programmes. Intensity should be as strong as possible without being painful. When possible, try to contract the muscles at the same time as the Alivia.
Post Prostatectomy Urinary Incontinence
Electrical stimulation has been found to help urinary incontinence in men after radical prostatectomy in some trials. Use the same programmes as for vaginal stimulation. Increase intensity in STRES, MIXED, or TONE programmes to the highest tolerable.
15.2. HOW TO INSERT THE ANAL PROBE
1) Before using Alivia you will need to visit the toilet.
2) Lubricate the metal electrode surfaces and probe tip with a water-based lubricant, such as TensCare Go Gel or water.

Caution: Do not use a silicone-based lubricant on the stimulation contacts as it may decrease the effectiveness of the Alivia's muscle stimulation.
3) Choose a comfortable position, such as lying down on your bed on your side with your knees raised.

Warning: Ensure the Alivia is switched OFF before inserting the probe.
4) After wires are securely connected, insert the probe into the anus whilst 'bearing down' (as in the action of passing stool) to a comfortable limit until the base of the flange on the probe touches the anus. The metal parts conduct the electrical pulse and should be in contact with the main part of the muscle at all times. The tissues close to the entrance are more sensitive, so you should avoid stimulating them. It is recommended that the probe is inserted past the sphincter muscles of the anus, unless directed otherwise by a healthcare professional.
5) Anal probes with long electrodes (the metal part) that run up and down the length of the attachment should always be inserted with the metal parts facing hip-to-hip. Anal probes with circular electrodes (the metal part) should be inserted simply to the desired depth.

Note: Sometimes the wearing of tight-fitting undergarments or a tight pair of jeans will help to keep the probe in place and maintain correct contact during the programme.
For Faecal incontinence, the aim is to stimulate the external sphincter and/or pubo-rectal muscle, so circular electrodes should be placed so that the external ring is just inside the sphincter.
For Urinary Stress incontinence the aim is to stimulate the levator muscles and the probe should be inserted deeper.
16. CLEANING
It is important that the probe is cleaned before using for the first time and after each use. Clean with either an alcohol-free antibacterial wipe such as TensCare Wipes (see X-WIPES) or by washing with warm soapy water. Rinse in clean water and dry thoroughly and return the unit to the storage pouch. Do not immerse the probe in a liquid.
Clean the case of the unit and lead wire at least once a week using the same method.
- Do not immerse your Alivia unit in water.
- Do not use any other cleaning solution.
17. EMC
Wireless communications equipment such as wireless home network devices, mobile phones, cordless telephones and their base stations, walkie-talkies can affect this equipment and should be kept at least a distance d = 3,3 m away from the equipment.
(Note. As indicated in Table 6 of IEC 60601-1-2:2007 for ME EQUIPMENT, a typical cell phone with a maximum output power of 2 W yields d = 3,3 m at an IMMUNITY LEVEL of 3 V/m).

Note: For hospital use, full EMC advice tables are available on request.
18. DISPOSAL OF WASTE ELECTRICAL AND ELECTRONIC PRODUCTS (WEEE)
One of the provisions of the European Directive 2002/96/CE is that anything electrical or electronic should not be treated as domestic waste and simply thrown away. To remind you of this Directive all affected products are now being marked with a crossed-out wheelie bin symbol, as depicted below.
To comply with the Directive, you can return your old electro-therapy unit to us for disposal. Simply print a postage-paid PACKETPOST RETURNS label from our website www.tenscare.co.uk, attach this to an envelope or padded bag with the unit enclosed, and post it back to us. Upon receipt, we will process your old device for components recovery and recycling to help conserve the world's resources and minimise adverse effects on the environment.
19. ACCESSORIES
Expected Service Life
- The machine will often last for more than 5 years, but is warranted for 2 years. Accessories (lead wire, probe, and batteries) are not covered by the warranty.
- Lead life depends greatly on use. Always handle the leads with care. We recommend to replace the lead wires regularly (about every 6 months).
- Replace the probe every 6 months to ensure hygiene.
- Optional electrode pads should last 12-20 applications, depending on skin condition and humidity.
- AA alkaline batteries should last at least 15 hours at 50 mA, 300 μs, 50 Hz.
Replacement electrode pads, new batteries and lead wires are available from your supplier or distributor (see back cover for contact details), by mail order from TensCare, by telephone using a credit or debit card, or through the TensCare website.
The following replacement parts may be ordered from TensCare at www.tenscare.co.uk or +44(0) 1372 723434.
| X-VPL | Liberty Loop Vaginal Probe (32 mm dia.) |
| X-VP | Liberty Vaginal Probe (28 mm dia.) |
| X-VPM | Liberty Plus Vaginal Probe (32 mm dia.) |
| L-CPT | Replacement lead wire, 1.25 m length |
| X-PR13 | Anal probe (19.6 mm dia.) |
| E-CM5050 | Pack of 4 electrode pads (50x50 mm) |
| E-CM5090 | Pack of 2 electrode pads (50x90 mm) |
| K-GO | Go Gel Personal Water-based Lubricant |
| B-AA | 1.5V AA batteries |
| X- BC-PT | Replacement belt clip |
| X- BL-PTT | Replacement battery cover |
| X-WIPES | Pack of 30 wipes |

Caution: You should only use the probe supplied with the unit or the replacements above as performance may vary with other electrodes.

Warning: Do NOT use silicone based or hybrid (mixed water and silicone) lubricants.
20. WARRANTY
This warranty refers to the unit only. It does not cover the probe, electrode pads, battery, or the lead wires.
PRODUCT WARRANTY INFORMATION
This product is warranted to be free from manufacturing defects for 2 years from date of purchase.
This warranty is void if the product is modified or altered, is subject to misuse or abuse; damaged in transit; lack of responsible care; is dropped; if incorrect battery has been fitted; if the unit has been immersed in water; if
damage occurs by reason of failure to follow the written instruction booklet enclosed; or if product repairs are carried out without authority from TensCare Ltd.
We will repair, or at our option replace free of charge, any parts necessary to correct material or workmanship, or replace the entire unit and return to you during the period of the warranty. Otherwise, we will quote for any repair which will be carried out on acceptance of our quotation. The benefits conferred by this warranty are in addition to all other rights and remedies in respect of the product, which the consumer has under the Consumer Protection Act 1987.
If necessary, we will provide circuit diagrams, component part lists or other information that will assist authorized service personnel to repair the device.
Our goods come with guarantees that cannot be excluded under the UK consumer Law. You are entitled to have the goods repaired or replaced if the goods fail to be of acceptable quality.
Before you send your unit for service
Before sending in your unit for service, please take a few minutes to do the following:
Read your manual and make sure you follow all the instructions.
Should repair be needed within the warranty period, enclose the tear off section of the warranty card and your proof of purchase receipt. Please ensure all relevant details are completed before sending your unit in for service. Please ensure your contact details are still current and include a brief description of the problem you are experiencing together with your purchase receipt.
For hygiene reasons, please do not include used probe or electrode pads. Send only the unit and the lead wire.
Please return the unit and warranty card (see page 34):
TensCare Ltd
PainAway House,
9 Blenheim Road,
Longmead Business Park,
Epsom, Surrey
KT19 9BE, UK
Should you require any further information please do not hesitate to contact us by calling our number:
+44 (0) 1372 723 434.
Returning your unit for service
If your Alivia is not working properly, please check the following:
| Problem | Possible causes | Solution |
| No display | Flat batteries. | Replace batteries. |
| Batteries inserted incorrectly. | Remove plastic wrapCheck + / - . | |
| Damaged springs in battery compartment. | Contact supplier. | |
| Low battery display | Low batteries. | Replace batteries. |
| Controls won't work | Keypad is locked. | If LOCK is shown on display, press and hold the▼button.If no LOCK is showing, remove and replace the batteries. |
| No sensation and LEADS alarm showing | TheAliviahas a safety feature which will not allow the intensity to pass 20 mA if the machine detects a connection error. If a connection error is detected the intensity will return to 0 mA and the screen will flashLEADS. This safety feature will prevent the machine from giving any uncomfortable stimulation should the contact break between the machine and your skin. This will also prevent anyone from increasing the intensity to a high level without firm contact between the machine and the skin.A connection error can occur if: | |
| 1. A break has developed within one of the two lead wires. | If this happens, you can try to test the unit by holding the probe in your hand:i) Dampen your hand with water and a little table sal Squeeze the probe firmly and make sure your skir is covering the metal parts of the probe and carefully increase strength until you can feel something. Most people will start to feel the stimulation in their hand at around 25 mA.ii) If theLEADSalarm shows and the unit will not allow you to pass 20 mA. The lead wires need to be replaced. | |
| If you have tried the test above and DO have sensation when the probe is in your hand, then it may be that:2. The skin is dry, meaning poor conductivity between the metal plates on the probe and your skin. | If this happens, you can try the below solutions:i) Using a water-based lubricant such as TensCare Go Gel (seeK-GO), which will improve conduction.ii) Crossing your legs and squeezing to increase pressure on the probe, which should improve the connection. If this enables you to use the unit, you should find that in a few weeks of stimulation the contact improves. If it does not, this unit may not be suitable for you. You may need to contact your healthcare professional to discuss other suitable options.iii) The probe supplied with the unit has a 28 mm diameter. An optional 32 mm probe, part no. X-VPM, is available. | |
| No sensation and no LEADS alarm showing | Intensity level is not high enough and/or reduced sensitivity in the area being treated. | i) Please make sure you are increasing the intensity high enough. Most people will start to feel the stimulation in their hand at around 25 mA and with the probe inserted you will need to increase the intensity higher to around 40 mA – 60 mA. Max power is 99 mA. Everyone is different so just keep increasing the intensity until you can feel it. The intensity increases in very small steps of 1 mA. ii) You may have reduced sensitivity due to previously damaged or desensitised pudendal nerves (this can happen in childbirth or some surgical procedures). Please consult your healthcare professional. |
| No sensation on one side of the probe (or electrode) | Position is not optimal – needs adjusting. | The current flows from one side of the probe to the other, so it is not possible to have one side “no working”. However, the strength of the sensation depends on how close to the nerve the current flows and also in which direction it flows relative to the nerve. You can try slightly adjusting the position on the probe, or exchanging the connection of the wires in the probe. |
| Sudden change in sensation | If you disconnect and re-connect a few minutes later, the signal wi feel quite a lot stronger. | Always return strength to zero after disconnecting the lead or the probe. |
The patient is an intended operator. There are no user-serviceable parts inside the unit, and no calibration is required.
If the above review has failed to resolve your problem, to report unexpected operation or events, or to provide feedback call TensCare or your local dealer (address on back cover) for advice.
Contact TensCare customer service on +44 (0) 1372 723 434. Our staff are trained to assist you with most issues you may have experienced, without the need to send your product in for service.
European Medical Device Regulation requires that any serious incident that has occurred in relation to this device should be reported to the manufacturer and the competent authority in your country. This can be found at:
https://ec.europa.eu/docsroom/documents/36683/attachments/1/translations/en/renditions/pdf
22. GENERAL SPECIFICATION
| Waveform | Asymmetrical rectangular |
| Amplitude(over 500 Ohm load) | 99.0 mA+/- 10% |
| Max intensity | 50V zero to peak across 500ΩConstant voltage over 470-1500 OhmConstant current over 160-470 Ohm |
| Output plug | Fully shielded |
| Channels | Single channel |
| Batteries | 2 x AA alkaline (two AA batteries) or 2 x AA NiMH |
| Weight | 100g without batteries |
| Dimensions | 120 x 63 x 26 mm |
| Safety Classification | Internal power source. |
| Environmental Specifications: | |
| Operating: | Temperature range: 5 to 40°CHumidity: 15 to 93% RH non-condensingAtmospheric pressure: 700hPa to 1060hPa |
| Storage: | Temperature range: -25-+70°CHumidity: Up to 93% RH non-condensingAtmospheric pressure: 700hPa to 1060hPa |
| TYPE BFAPPLIED PART | Equipment providing a degree of protection against electric shock, with isolated applied part.Designed for continuous use. |
| This symbol on the unit means “Refer to Instructions for Use” | |
| IP22 | The unit is not water resistant, and should be protected from liquids. |
| Complies with EU WEEE regulations | |
| Applied Part | Vaginal and anal electrodes. Optional skin surface electrode pads. See section 18. |
Contact duration: At least 10 minutes.

Note: The electrical specifications are nominal and subject to variation from the listed values due to normal production tolerances of at least 5%.
PLEASE RETAIN THIS WARRANTY CARD.
RETURN THIS PORTION ONLY WHEN YOU RETURN YOUR PRODUCT FOR REPAIR UNDER WARRANTY.
NAME:
ADDRESS:
POSTCODE:
DAYTIME TELEPHONE: ____
E-MAIL:
MODEL:
DATE OF PURCHASE: ____
ATTACH PROOF OF PURCHASE
DO NOT SEND IN PROBE, LEADS OR ELECTRODE PADS
RETAILERS NAME: ____
RETAILERS ADDRESS: ____
RETAILERS POSTCODE:
BRIEF DESCRIPTION OF PROBLEM YOU ARE EXPERIENCING: ____
WARRANTY IS VOID UNLESS THE ABOVE INFORMATION IS COMPLETED AND CORRECT.

Estimado cliente
natural_image
Illustration of a handheld device with a vertical arrow indicating measurement or direction (no text or symbols)5. TIPOS DE INCONTINENCIA
natural_image
Illustration of a human back with colored spinal cord segments (no text or labels)natural_image
Human back with four blue rectangular markers on the lower side, indicating areas of interest or emphasis (no text or symbols present)natural_image
Illustration of a human abdomen with two white oval objects on the lower abdomen, no text or symbols present.natural_image
Illustration of a human abdomen with two hanging objects (no text or symbols)natural_image
Illustration of a human pelvis with two medical device pins (no text or symbols)natural_image
Close-up of a white electronic device with a blue handle and a downward arrow indicator (no text or symbols)natural_image
Interior view of a computer drive bay showing two blue drive bays with indicator lights (no text or symbols visible)natural_image
Illustration of a device with a curved cable above it, labeled 'Alivia' (no other text or symbols)natural_image
Line drawing of two hands holding a small object, possibly a tool or component (no text or symbols present)natural_image
Anatomical illustration of a human abdomen with a marked catheter or device, showing no text or symbols.natural_image
Illustration of a handheld device with a vertical arrow indicating measurement or direction (no text or symbols)natural_image
Simple line drawing of a human torso with a rectangular object on the chest (no text or symbols)natural_image
Simple line drawing of a human torso with a small dark object on the chest (no text or symbols)natural_image
Anatomical illustration of human torso with black and red markers indicating specific muscle or neural pathways (no text or labels present)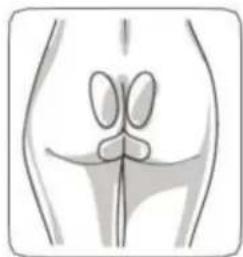
natural_image
Anatomical illustration of a human pelvic region (no labels or text)Longmead Business Park,
Epsom, Surrey
KT19 9BE, UK
https://ec.europa.eu/docsroom/documents/36683/attachments/1/translations/en/renditions/pdf
22. ESPECIFICACIONES GENERALES
natural_image
Illustration of a human back with colored anatomical markers (no text or symbols)natural_image
Human back with four purple rectangular markers on the spine (no text or symbols)natural_image
Illustration of a human abdomen with two oval-shaped markers on the lower abdomen (no text or symbols)natural_image
Illustration of a human abdomen with two white oval shapes and a small circle on the lower side (no text or symbols)natural_image
Illustration of a human pelvis with two medical catheters (no text or symbols)
natural_image
Close-up of a white electronic device with a blue handle and a downward arrow indicator (no text or symbols)2) Insérer les piles.
natural_image
Illustration of a device with a curved cable above an Alivia screen (no text or symbols on the device itself)natural_image
Line drawing of two hands holding a small object, possibly a tool or component (no text or symbols present)natural_image
Anatomical illustration of a human abdomen with a highlighted internal structure (no text or labels)natural_image
Illustration of a handheld device with a curved handle and vertical arrow indicating upward motion (no text or symbols)14.4. SESSION D'EXERCICES
natural_image
Simple line drawing of a human torso with a rectangular object on the chest (no text or symbols)natural_image
Simple line drawing of a human torso with a small dark oval object on the chest (no text or symbols)natural_image
Anatomical illustration of human torso with black and red markers indicating specific regions (no text or labels present)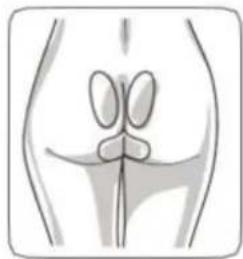
natural_image
Anatomical illustration of pelvic bones (no labels or text)INFORMATIONS SUR LA GARANTIE PRODUIT
Longmead Business Park,
Epsom, Surrey
https://ec.europa.eu/docsroom/documents/36683/attachments/1/translations/en/renditions/pdf
22. CARACTERISTIQUES TECHNIQUES
natural_image
Illustration of a human back with colored anatomical markers (no text or symbols)natural_image
Human back with four blue rectangular markers on the back, indicating areas of interest or emphasis (no text or symbols present)natural_image
Illustration of a human abdomen with two white oval objects on the lower abdomen (no text or symbols)Pigtails sollten
natural_image
Illustration of a human abdomen with two hanging objects inside, no text or symbols presentnatural_image
Illustration of a human pelvis with two white anatomical markers on the abdomen (no text or symbols)
natural_image
Close-up of a white electronic device with a blue handle and a downward arrow indicator (no text or symbols)natural_image
Illustration of a device with a curved cable above an Alivia screen (no text or symbols on the device itself)natural_image
Line drawing of two hands holding a pen, no text or symbols presentnatural_image
Anatomical illustration of a human abdomen with a marked point and measurement lines (no text or labels)natural_image
Simple line drawing of a human torso with a small dark object on the chest (no text or symbols)natural_image
Simple line drawing of a human figure with no text or symbolsnatural_image
Anatomical diagram of human torso highlighting specific muscle regions (no text or labels)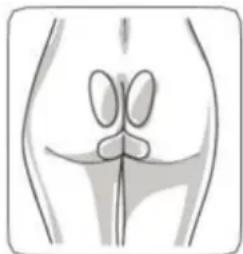
natural_image
Anatomical illustration of pelvic bones (no labels or text)INFORMATIONEN ZUR PRODUKTGARANTIE
Longmead Business Park,
Epsom, Surrey
KT19 9BE, UK
https://ec.europa.eu/docsroom/documents/36683/attachments/1/translations/en/renditions/pdf
TensCare aim to give you the best possible product and service. We listen to your suggestions and are constantly trying to improve our products. We also want to learn about the way our products are used, and the benefits they give. If you have anything you would like to share with us, please get in touch.
www.tenscare.co.uk
Follow us:

TensCare Ltd

@TensCareLtd

TensCare Limited

@tenscareltd
CE
2797
EC Declaration of Conformity
Tenscare Ltd herewith declare that the product meets the provisions of REGULATION (EU) 2017/745 which apply to it. The medical device has been assigned to class IIa according to Annex IV of the REGULATION (EU) 2017/745. The product concerned has been designed and manufactured under a quality management system according to Annex IX, of REGULATION (EU) 2017/745. This EU declaration of conformity is issued under the sole responsibility of the manufacturer. No “Common Specification” is applicable.

TensCare Ltd. 9 Blenheim Rd, Epsom, Surrey, KT19 9BE, UK, +44 (0)1372 723 434

TensCare Europe BV. Juliana van Stolbergstraat 52, 1723LD Noord-Scharwoude, Netherlands
I-ALIVIA-ML [UK,ES,FR,DE] Rev. 1.1 06/22
Advena Ltd. Tower Business Centre, 2nd Flr, Tower Street, Swatar, BKR 4013, Malta

Complies with Medical Device Regulation (EU) 2017/745.
TensCare™