Nouri Duo - Breast pump TensCare - Free user manual and instructions
Find the device manual for free Nouri Duo TensCare in PDF.


User questions about Nouri Duo TensCare
0 question about this device. Answer the ones you know or ask your own.
Ask a new question about this device
Download the instructions for your Breast pump in PDF format for free! Find your manual Nouri Duo - TensCare and take your electronic device back in hand. On this page are published all the documents necessary for the use of your device. Nouri Duo by TensCare.
USER MANUAL Nouri Duo TensCare
Cleaning and Sterilising 4
Installation Guide 5
Pump Controls and Display 6
Mode Settings 7
Pumping with Nouri Duo 8
Storing Breast Milk 10
Preparing Breast Milk 10
Feeding Breast Milk 11
Charging your Nouri Duo 11
When to start using Nouri 11
Troubleshooting 12
Warnings 12
Technical Information 13
Warranty 14
Introduction
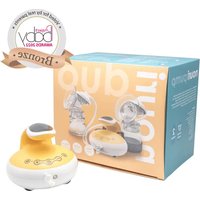
Nouri Duo is an automatic breast pump, designed to provide optimal comfort and performance whilst you express milk. The dual-pump allows you to express milk from both breasts simultaneously whilst the soft massage cushions gently stimulate milk flow. Eight suction levels ensure comfortable and quick pumping, so that mothers can enjoy every expression. The integrated LCD screen clearly displays suction level, working mode and battery level. Nouri Duo has a built-in rechargeable battery and integrated lights, allowing you to pump day and night in complete comfort.
Kit Contents
1 x Duo electric pump 2 x Bottle cap
2 x Bottle (150ml) 2 x Diaphragm
2 x Feeding teat and cap 4 x Bottle valve
2 x Diaphragm cap 2 x Tube
2 x Shield connector 1 x Bottle dock
2 x Breast shield 1 x USB cable
2 x Shield cover
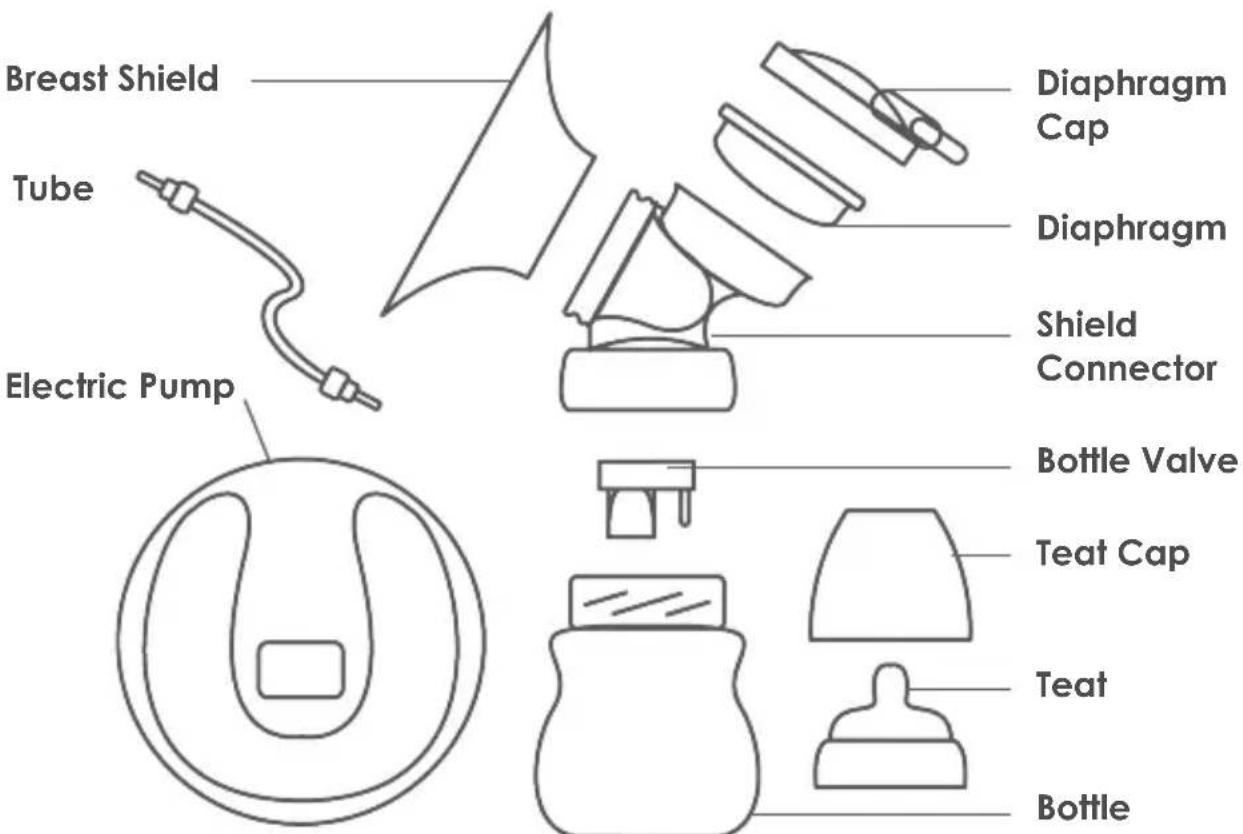
Pump Parts
text_image
Breast Shield Tube Electric Pump Diaphragm Cap Diaphragm Shield Connector Bottle Valve Teat Cap Teat BottleCleaning and Sterilising
Before using for the first time
Clean and sanitise the below parts before using your Nouri Duo for the first time. Use the following cleaning and sanitising instructions.
- Breast shield
- Shield connector
- Bottle valve
- Bottle
After each use
Clean all parts that come in contact with your breast and breast milk.
- Separate all parts, remembering to remove the bottle valve from the shield connector.
- Rinse the parts in cool water to remove breast milk residue.
Washing in sink
- Soak all parts in warm soapy water for 5 minutes and then clean with a clean dish-cloth or soft brush.
- Rinse all parts that come in contact with your breast and breast milk with clear water.
- Allow parts to dry.
Washing in dishwasher
- Wash all separated parts on the top rack of the dishwasher.
- Allow all parts to dry.
Sanitise daily
- Wash hands thoroughly.
- Separate all parts that come in contact with your breast and breast milk, remembering to remove the bottle valve from the shield connector.
- Immerse parts in boiling water for 10 minutes using a household pot.
- Allow water to cool before removing parts from the water.
- Place parts on a clean surface and/or towel and allow to dry.
Tubing and Electric Pump Unit
• Turn off the breast pump.
- Unplug the pump from any power source.
- Separate the tube from the pump and bottle.
- Wipe the electric pump unit and tube with a clean, damp cloth.
Caution:
Only use drinking tap water or bottled water for cleaning.
Separate and wash all parts that come in contact with the breast and milk immediately after use to avoid milk residue drying and to prevent bacteria growth.
Do not store wet or damp parts.
During sanitising with boiling water, prevent the parts from touching the side of the pot. This can cause the parts to deform or be damaged.
Nouri is for single person use. To avoid contamination, please do not share the pump.
Note:
Wash the Nouri Duo parts that come in contact with the breast and breast milk after every use.
Sanitise the Nouri Duo parts that come in contact with the breast and breast milk once a day.
Be careful not to damage parts during cleaning.
Installation Guide
natural_image
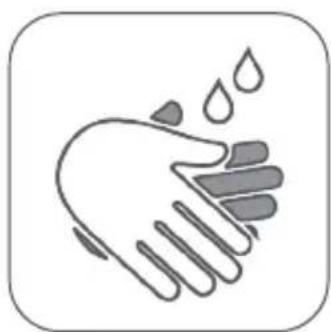
Illustration of a hand washing with water droplets (no text or symbols)- Wash your hands thoroughly with soap and water.
natural_image
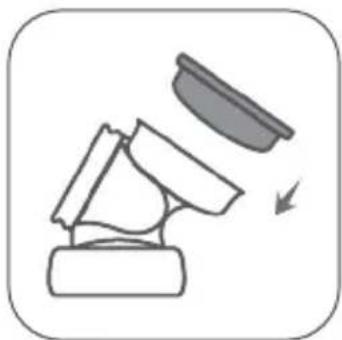
Diagram showing a mechanical component with an arrow indicating motion or force (no text or symbols)- Insert diaphragm into the connector and make sure the edge is engaged.
natural_image
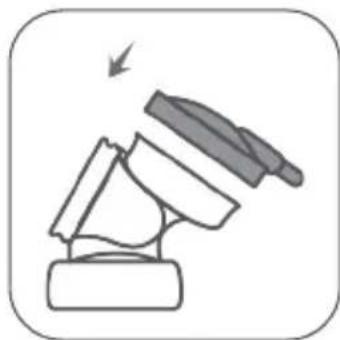
Simple line drawing of a mechanical component with an arrow indicating force or motion (no text or symbols)- Put diaphragm cap on the connector and align the triangle marks on both components. The angle should be roughly 35 degrees.
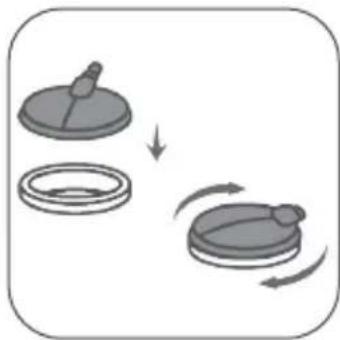
natural_image
Diagram showing three circular components with arrows indicating rotation or movement (no text or symbols)- Screw the diaphragm cap clockwise.

natural_image
Illustration of a mechanical device with a flag and lever mechanism (no text or symbols)- Engage the breast shield with the spout of the connector and make sure they are fixed securely.
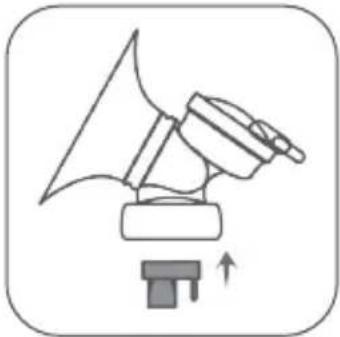
natural_image
Simple line drawing of a mechanical device with an arrow indicating upward motion (no text or symbols)- Insert the valve into the connector and make sure they are fixed securely.
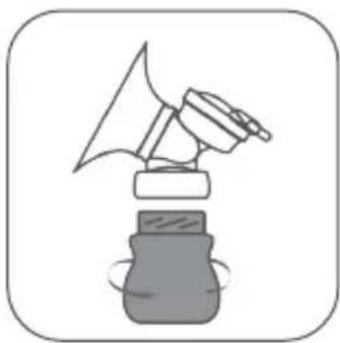
natural_image
Illustration of a spray gun pouring liquid into a bottle (no text or symbols)- Screw the bottle into the shield connector assembly.
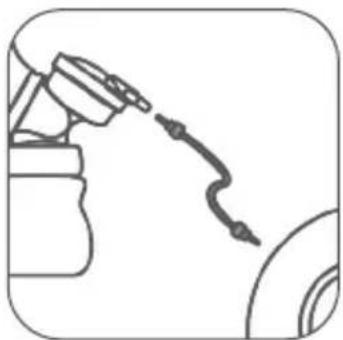
natural_image
Simple line drawing of a mechanical component with a curved cable or wire attached to a cylindrical body (no text or symbols)- Plug one side of the tubing into the diaphragm cap. Connect the other side of the tubing with the airhole plug on the pump unit.
Pump Controls and Display
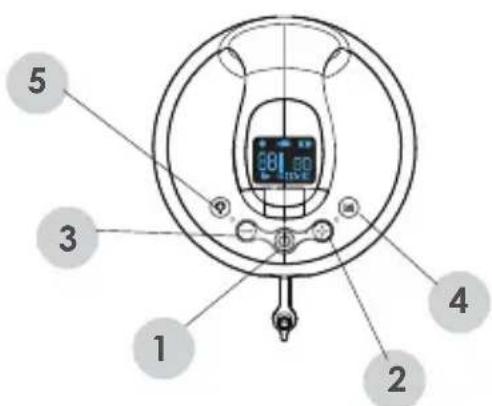
text_image
5 3 1 2 4 4 30.00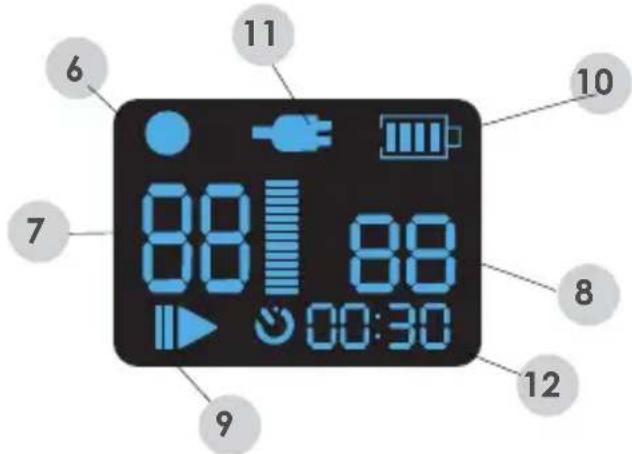
text_image
6 7 8 9 10 11 12 88 88 00:30- ON/OFF
-
Suction Increase: Increase suction force
-
Suction Decrease: Reduce suction force
- Mode Switch: Switch between massage mode and expression mode.
- Night Lamp: Press to turn on/off the lamp. Press once for low brightness, twice for high brightness.
- Massage mode indicator: Indicates the mode
- Frequency: Shows pumping frequency. Frequency is adjusted by pressing and holding the mode switch button until the frequency indicator flashes. Use increase and decrease to select pumping frequency.
- Suction level: Shows suction levels. Use increase and decrease to select suction level.
- Pause/work indicator
- Battery level indicator: Flashing icon means battery is low.
- Power indicator: indicates the power adapter is connected and the pump is being charged.
- Time of working: shows how long the pump has been used since turning on (default expression time is 30 minutes).
Mode Settings
| Mode Suction Level Frequency (cycles/min) | ||||
| Massage 1-5 45 50 | ||||
| Expression 1-12 20 24 28 32 | ||||
Pumping with Nouri Duo
natural_image
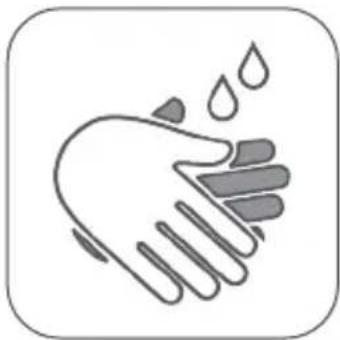
Illustration of a hand washing with water droplets (no text or symbols)- Wash your hands thoroughly with soap and water and make sure that your breast is clean.
natural_image
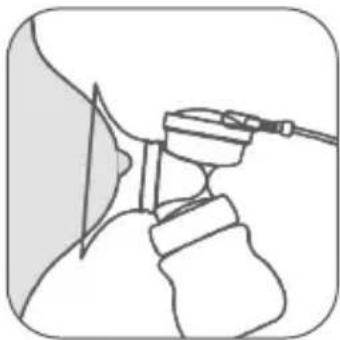
Line drawing of a person using a handheld device to interact with another person (no text or symbols present)- Place the breast pumps onto your breasts. Make sure that you centre your nipples. If only pumping one breast, make sure to insert the tube plug on the electric pump.
natural_image
Icon of a power button inside a rounded square frame (no text or symbols)- Turn on the Nouri Duo by holding the power button. Note pumping will start automatically so make sure the breast is positioned correctly before switching on the pump.
natural_image
Two gray circular icons with white minus and plus signs, no text or symbols present- When turning on, massage mode will begin. Use the increase and decrease buttons to find a comfortable suction level.

natural_image
Simple icon with a large letter 'M' inside a dark circle, enclosed in a rounded square border (no text or symbols)- To adjust pumping frequency, press and hold mode switch button until the frequency indicator flashes. Then use increase and decrease to select pumping frequency.
natural_image
Simple icon of a bottle with a droplet, no text or symbols present- After 2 minutes, expression mode will automatically begin. Again, select a comfortable suction level and frequency.
natural_image
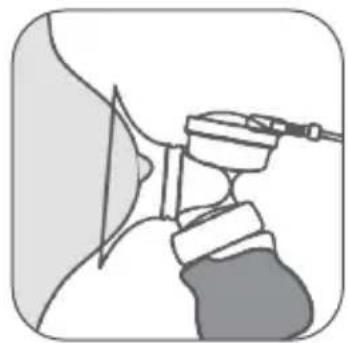
Illustration of a medical device inserted into a patient's neck area (no text or symbols)- Stop pumping when the milk stops flowing or when the bottle is full. To turn off, hold the power button.
natural_image
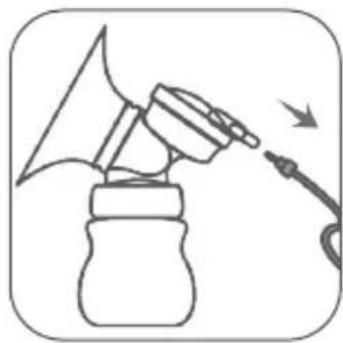
Line drawing of a spray gun pouring liquid into a bottle (no text or symbols)- Remove the tube from the bottle assembly.
natural_image
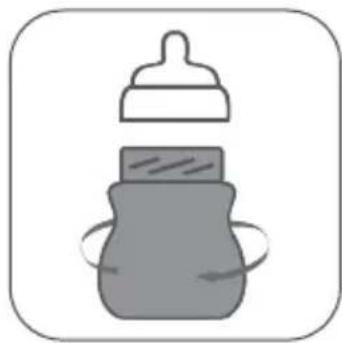
Simple illustration of a baby bottle with a lid and wrapped side by side (no text or symbols)- Unscrew the bottle from the shield connector. Use the bottle cap to seal the bottle for storage or the feeding teat for feeding.
Note:
- The pump will run for 30 minutes before automatically turning off. A single expression should not last longer than 20 minutes.
- User can pause the expression by tapping the power button. To begin pumping again, tap the power button again.
- Both breasts must use the same pumping settings.
- Night light has 2 brightness settings. Press the light button to cycle between OFF, low brightness and high brightness.
Advice
- Hot compress your breast before pumping. Pumping after a bath can be useful as the body is warm.
- Whilst you are breastfeeding, pump milk on the other breast, or pump surplus milk after feeding.
• Change the placement position on the breast to stimulate milk secretion
• Practice using Nouri until you find the approach that works best for you. If discomfort occurs during use, please consult a doctor.
Storing Breast Milk
| Storage location Temperature Max. storage duration | |
| Room 16-29 °C (60-85 °F) 4 hours | |
| Refrigerator 4 °C (39 °F) 4 days | |
| Freezer <-4 °C (25 °F) 0-6 months |
The above only applies for infants one month of older. Please consult a doctor for more details.
Warning:
- Do not refreeze thawed milk.
- Do not mix fresh breast milk with thawed milk.
Note:
- Fresh breast milk should be stored in refrigerator or freezer.
- Be sure to date the milk for storage. Mild should be stored in a refrigerator for no longer than 48 hours and the freezer for no longer than 3 months.
- When freezing, maximum milk volume should be 34 of storage bottle. Milk can expand during freezing.
Preparing Breast Milk
- If the milk is refrigerated, put the milk container in warm water to heat the milk. Shake the container to warm the milk through.
- If the milk is frozen, defrost in the refrigerator 24 hours prior to using. Once defrosted, warm it as refrigerated milk.
Using milk heater:
Turn on milk heater and set it to 40^ C. Put milk container into heater. Layers of liquid may for when using frozen milk. This is normal. Please shake bottle well before feeding.
Warning:
- Do not heat thawed milk again.
- Do not use microwave oven to defrost breast milk.
- Do not heat milk with boiling water.
- If hot water is used to heat milk, please try milk temperature before feeding.
Feeding Breast Milk
It is recommended that breastfeeding is well established prior to bottle feeding your baby.
- Always inspect the bottle, teat and other parts before and after each use. If the teat appears cracked or torn, stop using immediately.
- To prevent possible choking hazard, test the strength of teat by pulling on bulb portion of the teat.
- Do not attempt to enlarge the teat hole.
- Infants must not be bottle fed without adult supervision.
- The teat should not be used as a pacifier.
- Clean and disinfect the bottle before first use and after every use.
Charging your Nouri Duo
To charge the Nouri Duo, connect the USB charging cable to the pump and a power socket. The charging indicator and battery level will show on the display.
When fully charged, the battery indicator will stop flashing and show a full battery.
The Nouri Duo can be used during charging if needed.
The battery has a charge time of 3 hours and will last for 90 minutes before needing to be recharged.
When to start using Nouri
-
If you start breastfeeding successfully, we suggest to start using Nouri after regular milk secretion and feeding is formed. (Breast pumps are usually used 2-4 weeks after the baby is born)
-
Nouri Pump should be used in the following circumstances
-
If you cannot start breastfeeding, regular pumping helps establish and sustain milk secretion.
- When you feed your baby in hospital.
- When you feel your breast is swelling or painful, you can pump milk between feeding to release discomfort.
- If your nipple is painful or cracked and therefore unable to feed your baby, you can pump milk until the nipple recovers.
- If you have to leave your baby for a period of time and therefore not breastfeed regularly, you can pump milk to keep functional milk secretion.
Troubleshooting
| Problem Possible causes Solution | ||
| Pump does not work | Empty battery • Recharge battery | |
| Low suction force | Air leakage at connection positions (Valve, diaphragm, silicone breast shield, tubing)The output air path of breast pump is blocked, e.g. the suction pipe is pressed or bent, or there are sundries in the pipeNo cause found | Check all connecting parts to make sure they are installed properlyStraighten or clean air tubingPlease contact supplier |
| No suction | Valve is not installed or damaged due to deformationNo case found | Reinstall or replace valvePlease contact supplier |
Warnings
- This product is a precision electronic appliance. Please do not use it during bathing. Please keep it in a cool, dry and ventilated place, avoid direct sunlight, and keep it out of the reach of children.
- Unplug the power adapter after use.
- This product is for personal use only. Do not use it between more than one person to avoid cross infection.
- Do not use a breast pump during pregnancy, because early breastmilk expression will stimulate uterine contraction which may lead to abortion.
- Do not forcibly remove breast shield from breast. Please power off and gently release the seal between the breast and the breast shield, and then remove breast shield from the breast.
- When disassembling or assembling the pump, make sure to assemble each part according to the Installation Guide. When disassembling and cleaning, please be careful not to misplace/lose the small parts.
- Set the suction level according to individual physique to ensure comfortable milk expression.
- Please clean with water and disinfect before use.
Technical Information
| Technical Information | |
| Model Number K-NRIDUO | |
| Power Input AC100-240V, 50-60Hz, 0.3A | |
| Power Output 5V-1A | |
| Rated Power 3.6W | |
| Battery Capacity 3.7V/800mAh | |
| Net Weight 367g | |
| Executive Standard GB 4806.7-2016 GB 4806.11-2016 GB 4806.2-2015 | |
Warranty
This product is warranted to be free from manufacturing defects for one year from the date of purchase. This warranty is void if the product is modified or altered, is subject to misuse or abuse; damaged in transit; lack of responsible care; is dropped; if damage occurs by reason of failure to follow the written instruction booklet enclosed; or if product repairs are carried out without authority from TensCare Ltd.
We will repair, or at our option replace free of charge, any parts necessary to correct material or workmanship, or replace the entire unit and return to you during the period of the warranty. Otherwise, we will quote for any repair which will be carried out on acceptance of our quotation. The benefits conferred by this warranty are in addition to all other rights and remedies in respect of the product, which the consumer has under the Consumer Protection Act 1987.
Our goods come with guarantees that cannot be excluded under the UK consumer Law. You are entitled to have the goods repaired or replaced if the goods fail to be of acceptable quality.
Before you send your unit for service please be sure to read the user manual and follow all the instructions.
Should repair be needed within the warranty period, please return the device with the following details:
- Name:
- Address:
- Telephone:
- E-mail:
- Date of Purchase:
- Proof of Purchase:
Returns should be sent to the following address:
TensCare Ltd
PainAway House,
9 Blenheim Road,
Longmead Business Park,
Epsom, Surrey
KT19 9BE, UK
For more information, please call +44 (0) 1372 723 434.
Contenido
Introducción 16
Contenido 16
Partes de la Bomba 16
natural_image
Illustration of a hand washing with water droplets (no text or symbols)natural_image
Diagram of a mechanical component with a downward arrow indicating motion or force (no text or symbols)natural_image
Simple line drawing of a mechanical component with an arrow indicating motion (no text or symbols)natural_image
Diagram showing three circular components with arrows indicating rotation or movement (no text or symbols)natural_image
Illustration of a flag being launched into a mechanical device (no text or symbols)natural_image
Simple line drawing of a mechanical device with a lever and base, no text or symbols presentnatural_image
Simple line drawing of a spray gun with a bottle and nozzle (no text or symbols)natural_image
Simple line drawing of a car's wheel connected to a fuel nozzle (no text or symbols)natural_image
Illustration of a hand washing with water droplets (no text or symbols)natural_image
Line drawing of a medical procedure with surgical instrument (no text or symbols)natural_image
Icon of a power button inside a rounded square frame (no text or symbols)natural_image
Two gray circular icons with white minus and plus signs inside a rounded square (no text or symbols)natural_image
Simple gray square icon with a white letter 'M' in the center, no text or symbols present.natural_image
Simple icon of a bottle with liquid droplet, no text or symbols presentnatural_image
Illustration of a person using a handheld device to interact with another person (no text or symbols visible)natural_image
Line drawing of a spray bottle with a hand holding a hose, emitting a droplet (no text or symbols)natural_image
Simple illustration of a baby bottle with a lid and wrapped side by side (no text or symbols)Longmead Business Park,
Epsom, Surrey
KT19 9BE, UK
natural_image
Illustration of a hand washing with water droplets (no text or symbols)natural_image
Diagram of a mechanical device with a lid and base, showing motion or assembly (no text or symbols)natural_image
Simple line drawing of a mechanical component with an arrow indicating force or motion (no text or symbols)natural_image
Diagram showing three circular components with arrows indicating rotation or movement (no text or symbols)natural_image
Simple line drawing of a flag on a mechanical device with an arrow indicating motion (no text or symbols)natural_image
Simple line drawing of a mechanical device with a lever and base, no text or symbols presentnatural_image
Illustration of a spray gun pouring liquid into a jar (no text or symbols)natural_image
Simple line drawing of a mechanical component with a curved cable or wire attached to a base (no text or symbols)natural_image
Illustration of a hand washing with water droplets (no text or symbols)natural_image
Line drawing of a person using a handheld device to interact with another person (no text or symbols present)natural_image
Gray button with white power symbol inside a rounded square (no text or numbers)natural_image
Two gray circular icons with minus and plus signs, no text or symbols presentnatural_image
Simple gray square icon with a white letter 'M' inside a dark circle (no text or symbols beyond the letter)natural_image
Simple icon of a bottle with a droplet, no text or symbols presentnatural_image
Illustration of a medical or surgical procedure with a tool inserted into a device (no text or symbols visible)natural_image
Line drawing of a spray gun pouring liquid into a bottle (no text or symbols)natural_image
Simple illustration of a baby bottle with a lid and wrapped rings (no text or symbols)Longmead Business Park,
Epsom, Surrey
KT19 9BE, UK
natural_image
Illustration of a hand washing with water droplets (no text or symbols)natural_image
Diagram showing a mechanical component with an arrow indicating motion or force (no text or symbols)natural_image
Simple line drawing of a mechanical component with an arrow indicating force or motion (no text or symbols)natural_image
Diagram showing three circular objects with arrows indicating rotation or movement (no text or symbols)natural_image
Illustration of a mechanical device with a flag and arrow, no text or symbols presentnatural_image
Simple line drawing of a mechanical device with a lever and base, no text or symbols presentnatural_image
Simple line drawing of a spray gun pouring liquid into a jar (no text or symbols)natural_image
Simple line drawing of a mechanical component with a curved cable or wire attached to a cylindrical body (no text or symbols)natural_image
Illustration of a hand washing with water droplets (no text or symbols)natural_image
Line drawing of a medical procedure with surgical instrument (no text or symbols)natural_image
Two gray circular icons with white minus and plus signs inside a rounded square (no text or symbols)natural_image
Simple icon with a white letter 'M' inside a dark circle, enclosed in a rounded square border (no text or symbols)natural_image
Simple icon of a bottle with a droplet, no text or symbols presentnatural_image
Illustration of a medical procedure in progress, showing a hand holding a tool near a patient's head (no text or symbols present)natural_image
Line drawing of a spray gun pouring liquid into a bottle (no text or symbols)natural_image
Simple line drawing of a baby bottle with a lid, no text or symbols presentLongmead Business Park,
Epsom, Surrey
KT19 9BE, UK
2 x seno in silicone
2 x tappo diaframma
2 x diaframma
natural_image
Illustration of a hand washing with water droplets (no text or symbols)natural_image
Diagram of a mechanical component with an arrow indicating motion or force (no text or symbols)natural_image
Simple line drawing of a mechanical component with an arrow indicating motion (no text or symbols)natural_image
Diagram showing a lid being placed on a ring, with arrows indicating rotation (no text or symbols)natural_image
Illustration of a mechanical device with a flag and arrow, no text or symbols presentnatural_image
Simple line drawing of a hand gripping a device with an arrow indicating motion (no text or symbols)natural_image
Simple line drawing of a spray gun with a bottle and handle (no text or symbols)natural_image
Simple line drawing of a mechanical component with a curved cable or wire attached to a cylindrical body (no text or symbols)natural_image
Illustration of a hand washing with water droplets (no text or symbols)natural_image
Line drawing of a medical or surgical procedure with no visible text or symbolsnatural_image
Icon of a power button inside a rounded square frame (no text or symbols)natural_image
Two gray circular icons with minus and plus signs, no text or symbols presentnatural_image
Simple gray square icon with a white letter 'M' in the center, no text or symbols present.natural_image
Simple icon of a bottle with a droplet, no text or symbols presentnatural_image
Illustration of a medical or surgical procedure with no visible text or symbolsnatural_image
Line drawing of a spray gun with a hose and bottle, no text or symbols presentnatural_image
Simple line drawing of a baby bottle with a lid and wrapped around it, no text or symbols present.Longmead Business Park,
Epsom, Surrey
KT19 9BE, UK
TensCare aim to give you the best possible product and service. We listen to your suggestions and are constantly trying to improve our products. We also want to learn about the way our products are used, and the benefits they give. If you have anything you would like to share with us, please get in touch.

TensCare Ltd

@TensCareLtd

TensCare Limited

@tenscareltd
nouri

TensCare Ltd. 9 Blenheim Rd, Epsom, Surrey, KT19 9BE, U.K. +44 (0) 1372 723 434
I-NRIDUO-ML [UK,ES,FR,DE,IT] Rev 1.0 08/21
TensCare™