
EIR-6331 B - Cooker EDESA - Free user manual and instructions
Find the device manual for free EIR-6331 B EDESA in PDF.

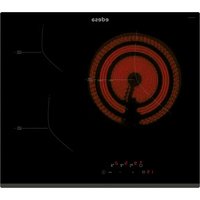
| Product type | Induction hob |
| Brand | Edesa |
| Model | EIR-6331 B |
| Number of cooking zones | 4 |
| Control type | Touch |
| Booster function | Yes (maximum power for 5 minutes) |
| Timer | Yes (up to 99 minutes) |
| Pause function | Yes |
| Child lock | Yes |
| Residual heat indicator | Yes (displays "H") |
| Automatic shut-off | Yes (depending on power level) |
| Small object detection | Yes |
| Overheat protection | Yes |
| Power supply | Fixed electrical connection (230 V ~ 50 Hz) |
| Total power | Approximately 7.2 kW |
| Surface material | Ceramic glass |
| Cleaning | Soft cloth, non-abrasive products |
| Safety | Compliant with directives 2014/35/EU and 2014/30/EU |
Frequently Asked Questions - EIR-6331 B EDESA
User questions about EIR-6331 B EDESA
0 question about this device. Answer the ones you know or ask your own.
Ask a new question about this device
Download the instructions for your Cooker in PDF format for free! Find your manual EIR-6331 B - EDESA and take your electronic device back in hand. On this page are published all the documents necessary for the use of your device. EIR-6331 B by EDESA.
USER MANUAL EIR-6331 B EDESA
natural_image
Abstract graphic with waveforms above a stylized monitor icon (no text or symbols)ES Manual de instrucciones
EN Instruction manual
PT Manual de instruções
FR Manuel d'instructions
EIR-6331 B /A
(F4)
natural_image
Three identical cooking pots with crossed-out X marks, shown in side-by-side positions (no text or symbols)(F5)
| Modelo L (mm) W (mm) H (mm) D (mm) A (mm) B (mm) X (min) | |||||||
| EIR-6331 B /A | 590 520 | 58 54 565 | 495 50 | min. | |||
(F6)
(F7)
natural_image
Pure technical diagram showing a corner joint with no text, numbers, or symbols(F8)
(F9)
ESTE APARATO ESTÁ DISEÑADO EXCLUSIVAMENTE PARA USO DOMESTICO. EL FABRICANTE NO SE HARA RESPONSABLE DE LOS DAÑOS O LESIONES OCASIONADOS POR UNA INSTALACIÓN INCORRECTA O POR UN USO INADECUADO, INCORRECTO O ABSURDO.
THIS APPLIANCE IS CONCEIVED FOR DOMESTIC USE ONLY. THE MANUFACTURER SHALL NOT IN ANY WAY BE HELD RESPONSIBLE FOR WHATEVER INJURIES OR DAMAGES ARE CAUSED BY INCORRECT INSTALLATION OR BY UNSUITABLE, WRONG OR ABSURD USE.
The manufacturer declares that this product meets all the essential requirements for low voltage electrical material set out in European directive 2014/35/EU and for electromagnetic compatibility as required by European directive 2014/30/EU.
PRECAUTIONS
When the hob is in use keep all magnetizable objects away (credit cards, floppy disks, calculators and so on).
Do not use any aluminium foil or place any foodstuffs wrapped in aluminium foil directly on the hob
Do not place any metal objects such as knives, forks, spoons and lids on the hob surface as they will heat up.
When cooking in a non-stick pan without seasoning, do not exceed 1-2 minutes' pre-heating time.
When cooking food that may easily stick, start at a low power output level and then slowly increase while regularly stirring.
After cooking is finished, switch off using the key provided (turn down to "0"), and do not rely on the pan sensor.
If the surface of the hob is cracked, immediately disconnect the appliance from the mains to prevent the possibility of electric shock.
Never use a steam cleaner to clean the hob.
The appliance and accessible parts may be hot during operation.
Take care to avoid touching the heating elements.
Children less than 8 years of age should be kept at a safe distance unless continuously supervised.
This appliance may be used by children aged 8 or over and by persons with reduced physical, sensory or mental capabilities or lack of experience and knowledge, if they are supervised and have received suitable instructions on safe use of the appliance and understand the dangers involved. Children must not play with the appliance. User maintenance and cleaning should not be carried out
by children except under constant supervision.
Cooking with grease or oil may be dangerous and cause a fire if left unattended. NEVER try to extinguish a fire with water. Rather, disconnect the appliance and then cover the flames with a cover or sheet, for example.
The cooking process has to be supervised. A short term cooking process has to be supervised continuously.
Unattended cooking on a hob with fat or oil can be dangerous and may result in a fire.
Fire hazard: do not store elements on cooking surfaces.
Only counter top protectors designed for use with the cooking appliance and listed in the manufacturer's instructions should be used as suitable protection for the counter top incorporated in the appliance. Use of unsuitable protectors may cause accidents.
Do not place or drop heavy objects on your hob.
Do not use cookware with jagged edges. Do not drag cookware across the induction glass surface as this can scratch the glass.
Persons with cardiac pacemakers or other electrical implants (such insulin pumps) must consult with their doctor or implant manufacturer before using this appliance to make sure that their implants will not be affected by the electromagnetic field.
WARNING: Accessible parts will become hot when in use. To avoid burns and scalds children should be kept away.
Insert in the fixed wiring a mean for disconnection from the supply mains having a contact separation in all poles that provide full disconnection under overvoltage category III conditions, in accordance with the wiring rules. The plug or omnipolar switch must be easily reached on the installed equipment.
This appliance is not intended to be used via an external timer or a remote control system.
The manufacturers decline any responsibility in the event of non-compliance with what is described above and the accident prevention norms not being respected and followed.
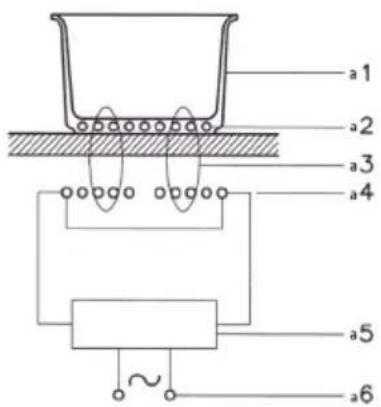
A Word on Induction Cooking(F1)
- a1 Cookware
• a2 Induced current - a3 Magnetic field
- a4 Inductor
• a5 Electronic circuit
• a6 Electric power supply
Induction cooking is a safe, advanced, efficient, and economical cooking technology. It works by electromagnetic vibrations generating heat directly in the cookware, rather than indirectly through heating the glass surface. The glass becomes hot only because the cookware eventually warms it up.
Induction cooking has the following characteristics.
- Minimal dispersion (high performance)
- Removing (or lifting) the cookware from the hob automatically stops the cooking zone.
- The electronic system permits flexibility and precision control.
Product Overview
Using your Induction Hob (F2)
- Keylock
- ON/OFF
- Power level slider
- Booster
- Timer
- Zone selector
- Cooking functions
- Stop&Go
To start cooking
- Touch ON/OFF (2). After power on, the buzzer beeps once, all displays show “-”, indicating that the induction hob has entered the state of standby mode.
- Place a suitable cookware on the cooking zone that you wish to use. Make sure the bottom of the cookware and the surface of the cooking zone are clean and dry.
- According to the cooking zone where the cookware is placed, press the desired zone selector (6). The symbol "0." selected will flash.
- Set a power level between 1 and 9 by sliding along the "slider" (3) key, or just touch any point of the "slider" (3).
- If you don't choose a power setting within 1 minute, the induction hob will automatically switch off. You will need to start again at step 1.
- You can modify the power setting at any time during cooking.
If the display flashes alternately with the power setting

This means that:
- The cookware is not placed on the correct cooking zone or,
- The cookware is not suitable for induction cooking or,
- The cookware is too small or not properly centred on the cooking zone.
No heating takes place unless there is a suitable cookware on the cooking zone.
The display will automatically turn off after 1 minute if no suitable cookware is placed on it.
When you have finished cooking
- Touch the key (6) for the zone that you want to turn off.
- Press the "-" of power level slider (3) will decrease the power to "0" level or press the "+" and "-" at the same time, the power level will decrease to 0 straight away.
- Beware of hot surfaces.
Residual heat indicator
After switching off the cooking zone, the corresponding power display will indicate "H" until the temperature in the zone has dropped below the critical level. It will disappear when the surface has cooled down to a safe temperature.
Using the Booster (F2)
Boost function provides higher power for a maximum of 5 minutes. Thus you can get a more powerful and faster cooking. The function can work in any cooking zone.
Using the Booster to get higher power
- Touch the zone selector (6) that you wish to boost.
- Touch the key "B" (4) of the slider. The related power display will show "P" and the zone will reach the maximum power.
- The Booster power will last for 5 minutes and then the zone will go back to the 9 power level.
Cancel the Boost function
- Touch the zone selector (6) that you wish to cancel.
- Touch the power level slider (3) to cancel the Boost function, then the cooking zone will revert to the power level that you wish.
Restrictions when using (F3)
The three or four zones were divided into two groups.
If you want to use Booster function, when you press the Booster key (4) the selected zone will be able to reach power level "P". In the case where the power level of the other zone within the same group is also "P", then the power of this zone will be automatically reduced to level 9.
Using Cooking Functions (F3)
You can choose 3 handy cooking functions by pressing "Cooking functions" (7) each time moves from one function to the other.

-Melt or defrost about 45-55 °C
-Heating or keeping warm about 65-70 °C
-Simmering, temperature close to boiling, useful for slow cooking (about 85-95 °C)
Using the Pause function - Stop&Go (F2)
Pause function can be used at any time during cooking. It allows to stop the induction hob and come back to it keeping all the settings.
- Make sure that the cooking zone is working.
- Touch the Stop&Go (8). All the cooking zone displays will show "=" . The operation of the induction hob will be deactivate except the Stop&Go (8), ON/OFF (2) and Keylock (1).
- To cancel the pause status, touch Stop&Go (8), then the cooking zones will go back to the power level which you set before.
Keylock (child safety feature)
- You can lock the keys to prevent unintended use (for example children accidentally turning the cooking zones on).
To lock the keys
Touch the Keylock (1). The timer display will show "Lo".
To unlock the keys
- Make sure the induction hob is turned on.
- Touch and hold the Keylock (1) for a while.
- You can now start using your induction hob.

When the hob is in the lock mode, all the keys are disabled except the ON/OFF (2) and Keylock (1). You can always turn the induction hob off with the ON/OFF (2) in an emergency, but you shall unlock the hob first in the next operation.
Over-Temperature Protection
A temperature sensor is monitoring the temperature inside the induction hob. When an excessive temperature is detected, the induction hob will stop operation automatically.
Detection of Small Articles
When undersized or non-magnetic cookware (e.g. aluminium), or some other small items (e.g. knife, fork, key) has been left on the hob, the hob will automatically go to standby mode in 1 minute. The fan will keep cooking down the induction hob for a further 1 minute.
Auto Shutdown Protection
Auto shut down is a safety protection function. It shuts down the cooking zone automatically if you ever forget to turn it off. The default maximum working time for each power level is shown in the table below:
| Power level | 1~3 4~6 7~8 9 | ||
| Default working timer (hour) 360 1 | 80 120 90 |
When the cookware is removed, the display shows the power level during 5s and then displays -for 1 minute. After that it will display "H", which means the surface of cook zone is hot. Please do not touch it. When the surface has cooled down to a safe temperature, it will display "-" for 1 minute, then the zone will automatically switch off.
Using the Timer
Timer function can be used in two different ways:
- You can use it as a minute minder. In this case, the timer will not turn any cooking zone off when the set time is up.
- You can set it to turn one cooking zone off after the set time is up.
You can set the timer up to 99 minutes.
Using the Timer as a Minute Minder
- At least one cooking zone must be on (although it must not be selected).
- Touch the Timer (5). The minder indicator will start flashing and "10" will show in the timer display.
- Set the time by touching the "-" or "+" of the power level slider (3).
Hint: Touch the "-" or "+" of the slider (3) once to decrease or increase by 1 minute. Touch and hold the "-" or "+" of the slider (3) to decrease or increase by 10 minutes.
- When the time is set, it will begin to count down immediately. The display will show the remaining time.
- When the set time is finished, the buzzer will beep for 30 seconds and the timer indicator shows "00".
Setting the timer to turn one cooking zone off
- Select the relevant cooking zone which is working by touching the zone selector (6).
- Press the Timer (5). The minder indicator will start flashing and "10" will be shown on the Timer display.
- Using the "+" and "-" buttons (3), you can realize the setting of timing from 1 to 99 minutes.
- When the time is set, the timer indicator will flash for 5 seconds and the countdown will begin immediately. The display will show the remaining time.
- When cooking timer expires, the corresponding cooking zone will be automatically switched off and the display will show "H". Other cooking zone will keep operating if they were turned on previously.
- To cancel the timer, touch the "-" and "+" together, the timer is cancelled, and the "00" will be shown in the minute display.
Setting the timer to turn more than one cooking zone off
- When using the timer function in more than one cooking zone, then the timer display will show the shortest time (e.g. zone 3# setting time of 3 minutes, zone 2# setting time of 6 minutes, the timer indicator shows "3"). The flashing red dot next to power level indicates of which cooking zone is the time shown on the timer display.
- When cooking timer expires, the corresponding cooking zone will be automatically switched off and the display will show "H".
Hints and Tips
| Problem Possible causes | What to do | |
| The induction hob cannot be turned on. | No power. Make sure the induction hob is connected to the power supply and that it is switched on.Check whether there is a power outage in your home or area. If you've checked everything and the problem persists, call a qualified technician. | |
| The touch keys are unresponsive. | The keys are locked. Unlock the keys. See section 'Using your induction hob for instructions. | |
| The touch keys are difficult to operate. | There may be a slight film of water over the keys or you may be using the tip of your finger when touching the keys. | Make sure the touch key area is dry and use the ball of your finger when touching the keys. |
| The glass is being scratched. | Rough-edged cookware.Unsuitable, abrasive scourer or cleaning products being used. | Use cookware with flat and smooth bases. See 'Choosing the right cookware'. |
| Some cookware make crackling or clicking noises. | This may be caused by the construction of your cookware (layers of different metals vibrating differently). | This is normal for cookware and does not indicate a failure. |
| The induction hob makes a low humming noise when used on a high power level. | This is caused by the technology of induction cooking. | This is normal, but the noise should quieten down or disappear completely when you decrease the power level. |
| Fan noise coming from the induction hob. | A cooling fan built into your induction hob has switched on to prevent the electronics from overheating. It may continue to run even after you have turned the induction hob off. | This is normal and needs no action. Do not switch off the power supply of the induction hob while the fan is running. |
| Cookware do not become hot and the symbol appears in the display. | The induction hob cannot detect the cookware because it is not suitable for induction cooking.The induction hob cannot detect the cookware because it is too small for the cooking zone or not properly centred on it. | Use cookware suitable for induction cooking. See section 'Choosing the right cookware'.Centre the cookware and make sure that its base matches the size of the cooking zone. |
Failure Display and Inspection
If an abnormality comes up, the induction hob will enter the protective state automatically and display corresponding protective codes. These are the most common failures:
| Error Message | Possible causes What to do | |
| No cookware or cookware not suitable. Replace the cookware. | ||
| ER03 | Water or cookware on the glass over the control area. | Clean the control area. |
| F1E | Connection between the display board and the left mainboard fails (the cooking zone which indicator shows “E”). | 1.Connection cable not correctly plugged or defective.2.Replace the mainboard. |
| F3E | Coil temperature sensor failure. (in the cooking zone which indicator shows “E”). | Replace the coil sensor. |
| F4E | Mainboard temperature sensor failure. (in the cooking zone which indicator shows “E”). | Replace the mainboard. |
| E1E | Temperature measured by the sensor of the ceramic glass is too high. | Please restart after the hob has been cooled down. |
| E2 E | Temperature sensor of the IGBT is too high. | Please restart after the hob has been cooled down. |
| E3 E Abnormal supply voltage (too high). | Please inspect whether power supply is normal. Switch on after the power supply is normal. | |
| E4 E Abnormal supply voltage (too low). | Please inspect whether power supply is normal. Switch on after the power supply is normal. | |
| E5 E | Temperature sensor failure (in the cooking zone which indicator shows E”). | Connection cable not correctly plugged or the assembly is defective. |
Please do not disassemble the unit by yourself to avoid any dangers and damages to the induction hob.
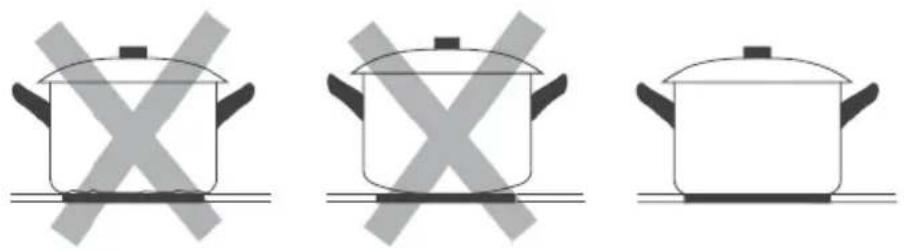
Choosing the right cookware (F5)
- Preferably use cookware indicated as being suitable for induction cooking.
- A magnet-attracting cookware may be suitable for induction cooking.
- Stainless steel cookware with multi-layer or ferritic stainless-steel bases if the base indicates: for induction cooking.
- If cast iron cookware is used, it should preferably have an enamel bottom to avoid scratching the ceramic hob surface.
- The following types of cookware are not suitable: glass, ceramic, earthenware, aluminium, copper or non-magnetic (austenitic) stainless steel.
- Flat and thick-bottomed cookware.
- A cookware with the same diameter as the cooking zone ensures the maximum power is used.
- A smaller cookware reduces the power but will not lead to energy loss. In any case,
EN
we do not recommend the use of cookware with a diameter of less than 10 cm.
- To obtain the best efficiency of your hob, please place the cookware in the centre of the cooking zone.
Maintenance
Pieces of aluminium foil or food, fat splashes, spilt sugar or highly sugared foodstuffs should be removed immediately from the cooking surface using a spatula to avoid scratching the hob subsequently clean the surface with a suitable product and kitchen roll, rinse with wa-ter and dry with a clean cloth. Never use abrasive sponges or scourers and avoid the use of aggressive chemical detergents or stain removers.
Installation
Instructions for the fitter
All operations relating to installation must be carried out by qualified personnel in line with current regulations.
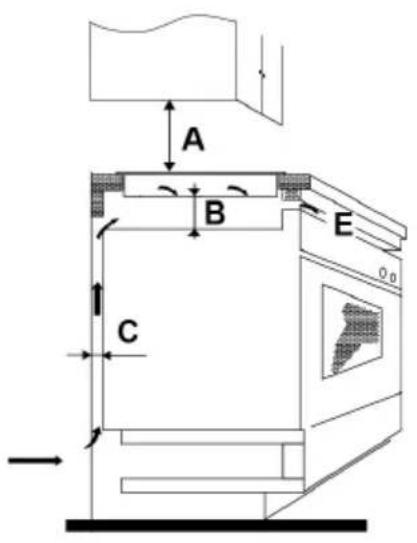
The appliance is designed for fitting into a worktop, as shown in the figure. Place the supplied sealant around the perimeter of the hob. The hob should not be installed over an oven, although if this is the case, check that:
- The oven is equipped with an appropriate cooling system
- There is no warm-air leakage from the oven towards the hob.
- Suitable air inlets are provided as shown in the figure.
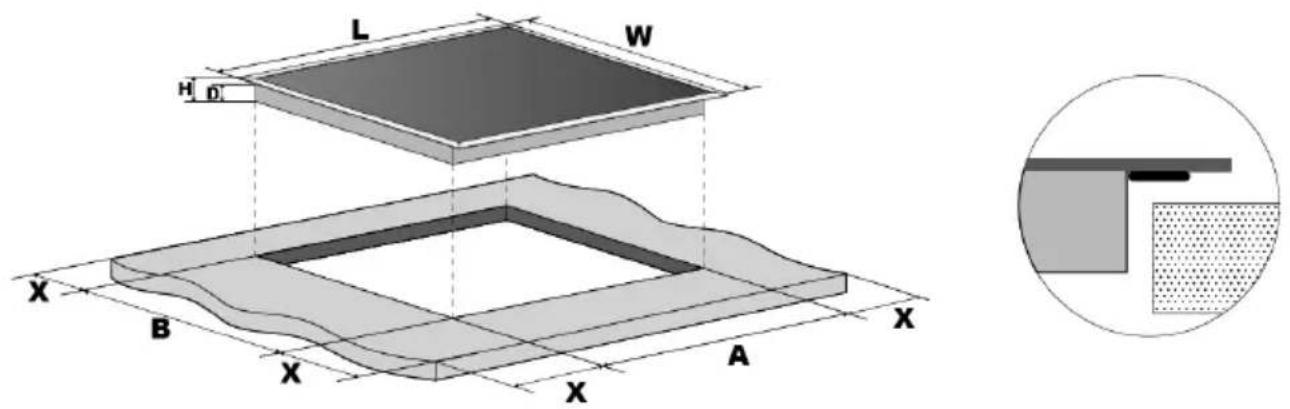
Selection of installation equipment
Cut out the work surface according to the sizes shown in the drawing. (F6)
For the purpose of installation and use, a minimum of 5 cm space shall be preserved around the hole.
Be sure the thickness of the work surface is at least 30mm.
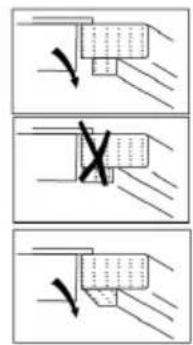
Under any circumstances, make sure the induction hob is well ventilated and the air inlet and outlet are not blocked. (F7)
Stretch out the supplied installation joint along the underside edge of the hob, ensuring the ends overlap.
Do not use adhesive to fix the hob into the worktop.
Place the hob into the cutout in the worktop (F8). Apply gentle pressure downwards onto the hob until it is fitted, ensuring a good seal around the outer edge.
Before you install the hob, make sure that
- The work surface is level and made of a heat-resistant material. Also the walls near the hob must be heat-resistant.
- The hob will not be installed directly above a dishwasher, fridge, freezer, washing machine or clothes dryer, as the humidity may damage the hob electronics.
- The installation will comply with all clearance requirements and applicable standards and regulations.
When you have installed the hob, make sure that
- The power supply cable is not accessible through cupboard doors or drawers.
- If the hob is installed above a drawer or cupboard space, a thermal protection barrier is installed below the base of the hob.
- Disconnect the appliance from the mains electricity supply before carrying out any
work or maintenance on it.
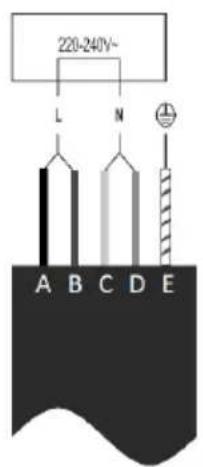
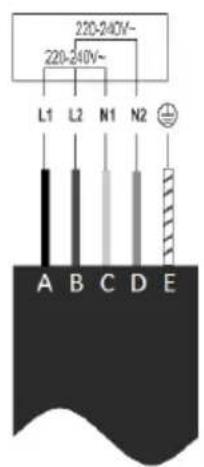
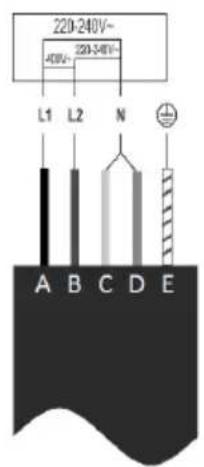
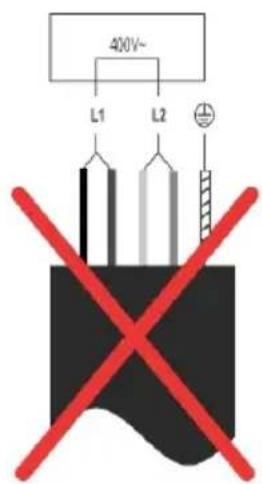
Connecting the hob to the mains power supply (F9)
Wire colour code:
Before connecting the hob to the mains power supply, check that:
- The domestic wiring system is suitable for the power drawn by the hob.
- The voltage corresponds to the value given in the rating plate.
- The power supply cable sections can withstand the load specified on the rating plate.
-
The installation is fitted with an efficient earthing connection in line with current regulations and law. The earth connection is a legal requirement.
-
To connect the hob to the mains power supply, do not use adapters, reducers, or branching devices, as they can cause overheating and fire.
- Where the appliance is not supplied with a cable or plug, use suitable material for the current indicated on the rating plate and for the operating temperature. The cable must never reach a temperature of more than 50 °C above the ambient temperature.
- The power supply should be connected in compliance with the relevant standard, or a single-pole circuit breaker.
- The installer must ensure that the correct electrical connection has been made and that it is compliant with safety regulations.
- The cable must not be bent or compressed.
ESTE APARELHO DESTINA- -SE UNICAMENTE A USO DO- MÉSTICO, O FABRICANTE NÃO SERA EM CASO ALGUM RESPONSAVEL PELOS FERI- MENTOS OU DANOS RESUL- TANTES DE UMA INSTALA- CAO INCORRETA OU DE UMA UTILIZAÇÃO INDEVIDA, IN- CORRETA OU INSENSATA.
Para bloquear as teclas
Para desbloquear as teclas
natural_image
Abstract graphic with waveforms above a stylized monitor icon (no text or symbols)CNA group
This page will not be printed
版本号:20220707 V1.1

- ESTE APARATO ESTÁ DISEÑADO EXCLUSIVAMENTE PARA USO DOMESTICO. EL FABRICANTE NO SE HARA RESPONSABLE DE LOS DAÑOS O LESIONES OCASIONADOS POR UNA INSTALACIÓN INCORRECTA O POR UN USO INADECUADO, INCORRECTO O ABSURDO.
- PRECAUTIONS
- A Word on Induction Cooking(F1)
- Product Overview
- Using your Induction Hob (F2)
- To start cooking
- If the display flashes alternately with the power setting
- When you have finished cooking
- Residual heat indicator
- Using the Booster (F2)
- Using the Booster to get higher power
- Cancel the Boost function
- Restrictions when using (F3)
- Using Cooking Functions (F3)
- Using the Pause function - Stop&Go (F2)
- Keylock (child safety feature)
- To lock the keys
- To unlock the keys
- Over-Temperature Protection
- Detection of Small Articles
- Auto Shutdown Protection
- Using the Timer
- Using the Timer as a Minute Minder
- Setting the timer to turn one cooking zone off
- Setting the timer to turn more than one cooking zone off
- Failure Display and Inspection
- Choosing the right cookware (F5)
- EN
- Maintenance
- Installation
- Instructions for the fitter
- Selection of installation equipment
- Before you install the hob, make sure that
- When you have installed the hob, make sure that
- Connecting the hob to the mains power supply (F9)
- Before connecting the hob to the mains power supply, check that:
- ESTE APARELHO DESTINA- -SE UNICAMENTE A USO DO- MÉSTICO, O FABRICANTE NÃO SERA EM CASO ALGUM RESPONSAVEL PELOS FERI- MENTOS OU DANOS RESUL- TANTES DE UMA INSTALA- CAO INCORRETA OU DE UMA UTILIZAÇÃO INDEVIDA, IN- CORRETA OU INSENSATA.
- Para bloquear as teclas
- Para desbloquear as teclas
- CNA group
- This page will not be printed
Brand : EDESA
Model : EIR-6331 B
Category : Cooker