GT45 - Firearm Pardini - Free user manual and instructions
Find the device manual for free GT45 Pardini in PDF.


User questions about GT45 Pardini
0 question about this device. Answer the ones you know or ask your own.
Ask a new question about this device
Download the instructions for your Firearm in PDF format for free! Find your manual GT45 - Pardini and take your electronic device back in hand. On this page are published all the documents necessary for the use of your device. GT45 by Pardini.
USER MANUAL GT45 Pardini
text_image
CAL.9 MOD. GT9 CAT. 10678 MADE IN ITALY CAL.9 MOD. GT45 CAT. 10682 MADE IN ITALY PARDINIMANUALE DI ISTRUZIONI - USER MANUAL - MANUEL D'INSTRUCTIONS BEDIENUNGSANLEITUNG - MANUAL D'INSTRUCIÓNES
Fig. 5
text_image
Technical line drawing of a handgun with numbered parts for identification
natural_image
Illustration of hands holding a mechanical tool with arrows indicating motion or movement (no text or symbols)Fig.1
natural_image
Line drawing of two hands holding a handgun, no text or symbols presentFig.2
natural_image
Line drawing of hands holding a cylindrical object with a pointed tip, showing mechanical assembly (no text or symbols)Fig.3
natural_image
Line drawing of two hands holding a tool, no text or symbols presentFig.4
DATI TECNICI - TECHNICAL DATA - FICHE TECHNIQUE - DATOS TÈCNICOS
MODELLO
| model - modele - modell - modelo | GT9 - PC9 | PC40 | GT45 | GT9 1 - GT9 1 TITAN | GT45 II | GT9 1 INOX | GT40 | GT9 INOX |
| CALIBROcaliber - calibre - kaliber - calibre | 9 | 40 S&W | 45 ACP | 9 INI | 45 ACP | 9 | 40 S&W | 9 |
| CARICATORE BIFILAREChargeur - Doppelreihises magazin - Cargador | 17 | 13 | 13 | 17 | 13 | 17 | 18 | 17 |
| ALTEZZAheight - hauter - höhe - alto | 135mm. | 135mm. | 135mm. | 135mm. | 135mm. | 135mm. | 135mm. | 135mm. |
| LARGHEZZAwidth - largeur - breite - ancho | 44mm. | 44mm. | 44mm. | 44mm. | 44mm. | 44mm. | 44mm. | 44mm. |
| LUNGHEZZAoveral lenght - longueur - gesamtlänge - largo | 225mm. | 225mm. | 228mm. | 250mm. | 250mm. | 250mm. | 223mm. | 225mm. |
| PESO TOTALEtotal weight - poids - gesamtgewicht - peso total | 1.070 gr. | 1.050 gr. | 1.020 gr. | 1.145 gr. | 1.095 gr. | 1.550 gr. | 1.380 gr. INOX1.100 gr. ERGAL | 1.510gr. |
| LUNGHEZZA CANNabarrel lenght - longueur du canonlauflänge - longitud del cañon | 127mm. | 127mm. | 127mm. | 152,5mm. | 152,5mm. | 152,5mm. | 127mm. | 127mm. |
| LUNGHEZZA LINEA DI MIRAsight radius - longueur de ligne de mirevisierlänge - distancia entre miras | 176mm. | 176mm. | 179mm. | 201mm. | 204mm. | 201mm. | 170mm. | 176mm. |
| CHIUSURAClosing System - Obturation - Verschluss - Anchura | GEOMETRICA A CORTO RINCULO DI CANNA - GEOMETRICAL SHORT RECOILGÉOMÉTRIQUE À COURT RECUL DU CANON - VERRIEGELTER MASSEVERSHLUB - GEOMETRICO A CORTA DISTANCIA DEL CANÓ | |||||||
| SCATTOrigger Mechanism - Détente - Auslösung Abzug - Altura | SINGOLA AZIONE - SINGLE ACTION - SIMPLE ACTIONEINZELAUSLŐSUNG / EINSTELLBARER SINGLE - ACTION - ABZUG - ACCION ÚNICA | |||||||
| SICURASafety Catch - Sureté - Sicherung - Peso | BLOCCO DEL MECCANISMO DI SCATTO - TRIGGER MECHANISM - BLOCAGE DU MÉCANISME DE DÉCLENCHEMENTBLOCKIERUNG DES AUSLŐSEMECHANISMUS - BLOQUEO DEL MECANISMO DEL RESORTE | |||||||
Con riserva di modifiche tecniche - technical changes reserved - modifications techniques réservées - Technische Änderungen vorbehalten - Se reservan modificaciones técnicas

ATTENTION! Safety procedures for handling firearms
ALWAYS Handle firearms as if loaded.
ALWAYS engage the safety catch after loading.
ALWAYS wear eye and ear protection.
ALWAYS keep your firearm clean.
ALWAYS check that the chamber is clear when unloading.
ALWAYS store your firearm and ammunition safely away from children.
NEVER point your firearm at anything other than the target.
NEVER handle a firearm if you drink alcohol or take drugs.
READ this manual and be SURE you are fully competent in the handling of your firearm.

Technical data
LOCKING SYSTEM: Modified Browning. Short action recoiling barrel, steel frame insert with barrel locking ramp. Frame: CNC milled one piece construction. Ergonomic characteristics: 115 degree grip angle, high grip (6,2 mm below slide rails) for straight back recolling.
SLIDE: CNC milled with large ejection port for improved case clearing.
SIGHTS: Interchangeable front sights and micrometer adjustable rear sight sitting flush with the slide.
TRIGGER: Single action trigger with adjustable sear engagement, trigger pull weight and take-up and overtravel adjustments.
SAFETY: Ambidextrous thumb safety that locks both sear and slide.
To shot: ATTENTION!
Never place your finger on the trigger until ready to shoot!
- Lock the slide to the rear with the slide catch lever.
- Insert a full magazine and verify it is locked in place.
- Grasp the slide between the thumb and forefinger and pull back slightly, disengaging the slide catch lever. Release so that it will go forward, chambering the first round.
- The pistol is now ready to fire. If you do not intend to fire immediately, engage the thumb safety by pushing it up.

Trigger adjustments
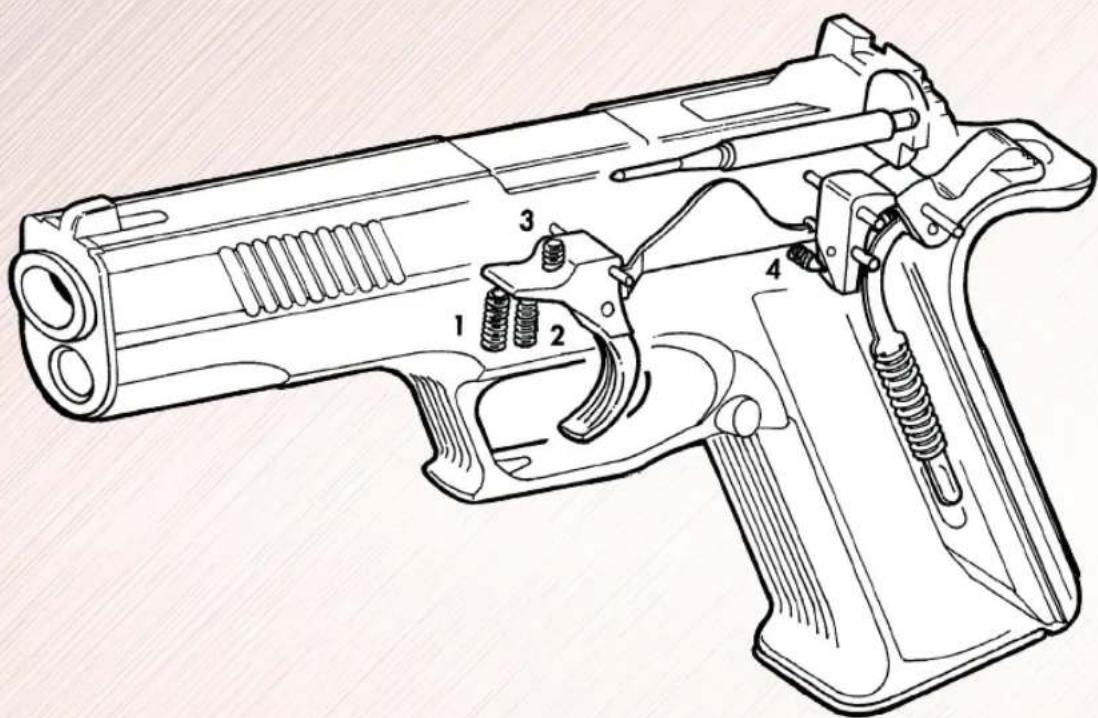
- Duplex screw "1" controls the 2nd stage of the trigger pull. Turning the outer body clockwise increases the LENGTH of the 2nd stage. (If turned counterclockwise far enough, the 2nd stage disappears.) Turning the inner screw clockwise increases the WEIGHT of the 2nd stage.
- Screw "2" acts as a trigger stop or overtravel adjustment. Turning it clockwise reduces the over travel. Too far in, and the sear cannot be released.
- Screw "3" and "4" should only be adjusted by qualified technicians to avoid damage to the pistol or unsafe operation! Screw 3 adjusts the trigger pull length and screw 4 regulates the sear engagement.
UNLOADING THE PISTOL
- Depress the magazine release catch and remove the magazine.
- Pull back the slide to eject any chambered cartridge.
- Visually verify that there are no rounds left in the chamber or the magazine well before closing the slide.
Dismantling
- Make sure the pistol is unloaded (see above).
- Take off the magazine
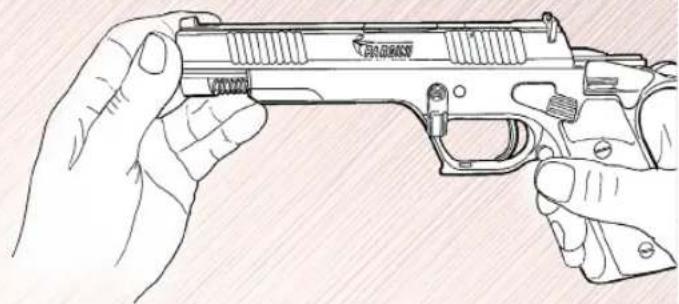
- Hold the pistol as shown in Figure 1. Use your left index finger to push in the end of the take-down lever until it slightly moves away from the frame. Then, with your left thumb, rotate the take-down lever down 90 degrees.
- Slide off the whole top assembly from the frame as shown in figure 2.
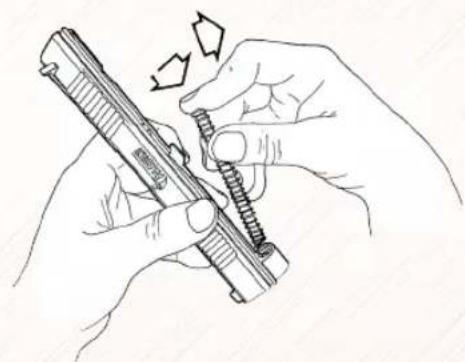
- Caution! The recoil spring is compressed! Holding the slide in your left hand, push in the recoil spring guide rod/spring assembly toward the muzzle. Lift up and slowly release the spring tension as shown in Figure 3.
- For models fitted with a compensator, loosen the locking screws, remove the securing pin and work it off the barrel.
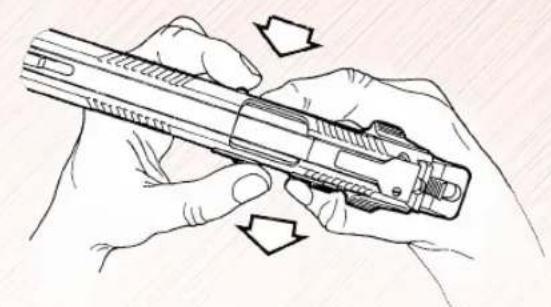
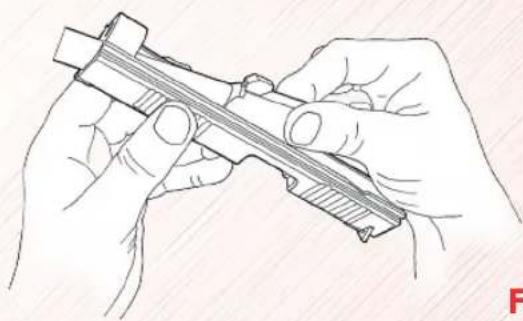
- Remove the barrel from the slide as shown in Figure 4.
- Reassemble in reverse order. Before returning the take-down lever to its locked position, push the top assembly slightly to the rear of its normal closed position.
CLEANING AND LUBRICATION
Use first a properly sized brass brush on the chamber and bore and then clean the bore with a patch - insure that all lead is removed to insure top accuracy and function. Lubricate the slide/frame guides with a simple lubricant with no additive. Do NOT use solvent or oils on the trigger mechanism. At least every 2.500 rounds disassemble and thoroughly clean the magazines.

text_image
Exploded view diagram of a firearm with numbered parts for identification