RG-CG 10 8 Li - Grass trimmer EINHELL - Free user manual and instructions
Find the device manual for free RG-CG 10 8 Li EINHELL in PDF.

User questions about RG-CG 10 8 Li EINHELL
0 question about this device. Answer the ones you know or ask your own.
Ask a new question about this device
Download the instructions for your Grass trimmer in PDF format for free! Find your manual RG-CG 10 8 Li - EINHELL and take your electronic device back in hand. On this page are published all the documents necessary for the use of your device. RG-CG 10 8 Li by EINHELL.
USER MANUAL RG-CG 10 8 Li EINHELL
GB Original operating instructions Cordless grass and shrub shears
natural_image
Close-up of a mechanical component with a wire and circular connector attached (no visible text or symbols)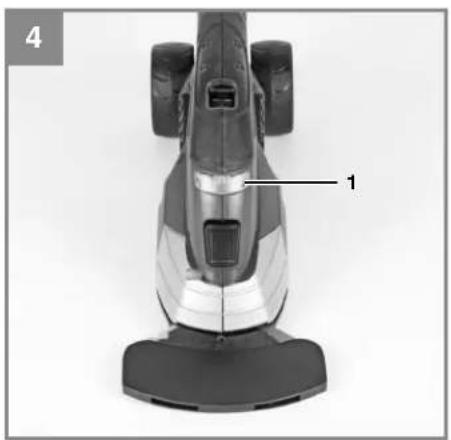
natural_image
Top-down view of a vacuum cleaner with labeled component '1' (no text or symbols beyond label)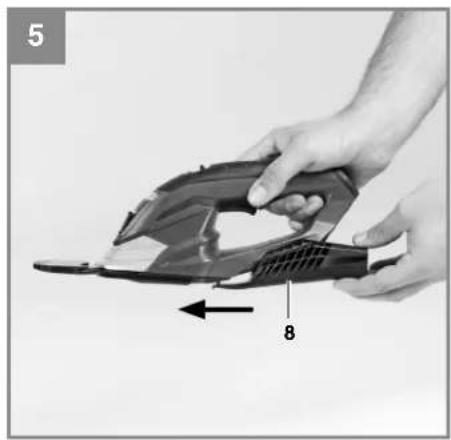
natural_image
Close-up of hands holding a black electric fan device with a label indicating '8' (no text or symbols on the device itself)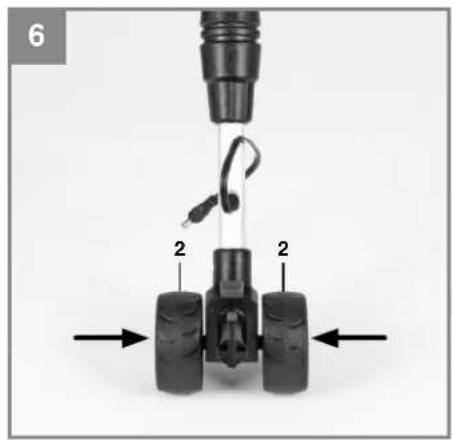
natural_image
Mechanical device with two labeled parts and directional arrows indicating movement (no text or symbols present)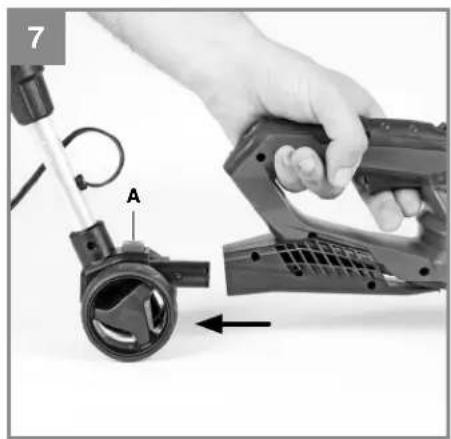
natural_image
Close-up of a hand using a tool to adjust a small mechanical component, with no visible text or symbols.
natural_image
Side view of a black electric scooter with wheels and mounting bracket (no visible text or symbols)

natural_image
Close-up of a handheld electric shock absorber with labeled component A, no visible text or symbols on the device itself.
natural_image
Close-up of a hand holding a handheld electronic device with cable and connector, showing a mechanical assembly (no text or symbols visible)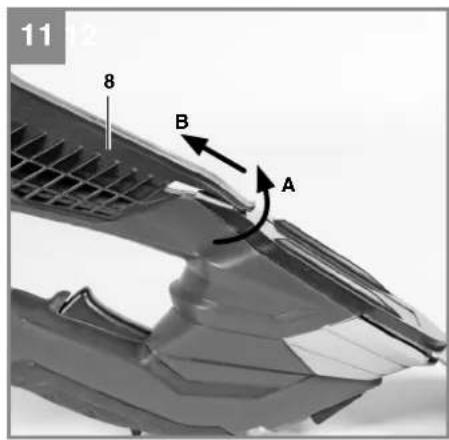
text_image
11 12 8 B A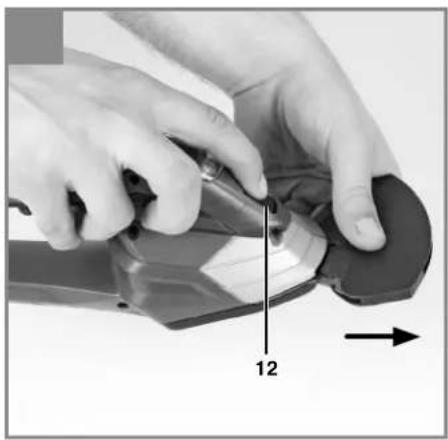
natural_image
Close-up of hands operating a mechanical device with a numbered component (12) and an arrow indicating direction (no text or symbols on the device itself)
text_image
13 2 2 1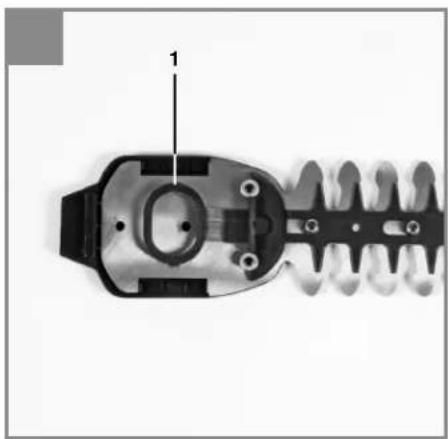
natural_image
Mechanical component diagram showing a worm-like structure with no visible text or symbols

15
natural_image
Cross-sectional diagram of a mechanical device with fins and internal components (no text or symbols)16
text_image
1 ! 1 5 2 2 4 Li-Ion 3 4 67


D
Inhaltsverzeichnis
- Safety regulations
- Layout and items supplied
- Proper use
- Technical data
- Before starting the equipment
- Operation
- Cleaning, maintenance and ordering of spare parts
- Disposal and recycling
GB
⚠️ Important!
When using the equipment, a few safety precautions must be observed to avoid injuries and damage. Please read the complete operating instructions and safety regulations with due care. Keep this manual in a safe place, so that the information is available at all times. If you give the equipment to any other person, hand over these operating instructions and safety regulations as well. We cannot accept any liability for damage or accidents which arise due to a failure to follow these instructions and the safety instructions.
1. Safety regulations
The corresponding safety information can be found in the enclosed booklet.
Caution!
Read all safety regulations and instructions.
Any errors made in following the safety regulations and instructions may result in an electric shock, fire and/or serious injury.
Keep all safety regulations and instructions in a safe place for future use.
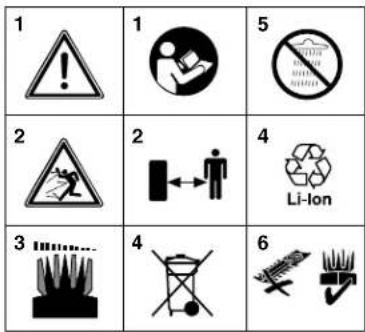
Explanation of the warning signs on the machine (Figure 16)
- Important! Read the operating instructions and follow the warnings and safety instructions
- Keep all other persons away from the danger zone.
- Caution! The cutter blades continue to run after the motor is switched off. Wait for the blades to come to a standstill.
- Dispose of batteries correctly!
- Protect the tool from the damp and never expose it to rain.
- Extension only with grass cutter blade! It is prohibited to use the extension with the hedge cutter blade!
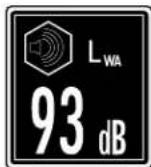
- Guaranteed sound power level: 93 dB
Risk of injury!
2. Layout and items supplied
2.1 Layout (Fig. 1a/1b)
1 Grass cutter blade
2 Wheels
3 Safety lock-off
4 ON button
5 Telescopic long handle
6 Clamp coupling for telescopic long handle
7 Handle grip
8 Mount
9 Blade guard
10 Battery charger
11 Shrub cutter blade
12 Blade release mechanism
2.2 Items supplied
- Open the packaging and take out the equipment with care.
- Remove the packaging material and any packaging and/or transportation braces (if available).
• Check to see if all items are supplied. - Inspect the equipment and accessories for transport damage.
- If possible, please keep the packaging until the end of the guarantee period.
Important!
The equipment and packaging material are not toys. Do not let children play with plastic bags, foils or small parts. There is a danger of swallowing or suff ocating!
• Original operating instructions
- Safetyinstructions
3. Proper use
The equipment is designed for cutting the edges of lawns and small areas of grass in private and hobby gardens.
Tools for private and hobby gardens are not suitable for use in public facilities, parks and sport centers, along roadways, on farms or in the forestry sector. For the tool to be used properly it is imperative to follow the instructions set out in the manufacturer's directions for use.
Important! It is prohibited to use the tool to chop material for composting because of the potential danger to persons and property.
GB
The machine is to be used only for its prescribed purpose. Any other use is deemed to be a case of misuse. The user / operator and not the manufacturer will be liable for any damage or injuries of any kind caused as a result of this.
Please note that our equipment has not been designed for use in commercial, trade or industrial applications. Our warranty will be voided if the machine is used in commercial, trade or industrial businesses or for equivalent purposes.
4. Technical data
Speedn 0: 1200 rpm
Cutting width of the grass cutter: 100 mm
Cutting width of the shrub shears ..... 190 mm
Cutting thickness of the shrub shears ..... 8 mm
Running time max.: 100 min
Battery pack: ..... Li-lon / 10,8 V d. c. / 1.3 Ah
Charging time: 2 h
Protection class: ....III
L_pA sound pressure level: ....69 dB
L_WA sound power level: .....89 dB
K uncertainty ....3 dB
Vibration a_bv : 5.5 m/s ^2
K uncertainty 1,5 m/s
Weight: 1.4 kg
Battery charger
Mains voltage.....100-240 V \~ 50-60 Hz
Output
Rated voltage 13 V DC
Rated current: 900 mA
- The vibration emission level has been measured in accordance with a set of standardized criteria and can be used to compare one power tool with another.
- The specified emission level can also be used to make an initial assessment of the exposure to vibrations.
- The vibration emission level may vary from the level specified during actual use, depending on the way in which the power tool is used.
- Try to keep the impact from vibrations as low as possible. Exposure to vibrations can be reduced by wearing gloves when using the tool,
for example, and by limiting the amount of operating time. This includes the full cycle of operation (e.g. times when the power tool is switched off and times when the tool is switched on but no working load is applied).
5. Before starting the equipment
5.1 Charging the battery pack (Figure 3, 4)
- Connect the charger to the charging station (Figure 3).
- Check that your mains voltage is the same as that marked on the rating plate of the battery charger. Plug the battery charger in a socket-outlet. The red LED (Figure 4 / Item 1) comes on to indicate that charging voltage is available.
- The battery pack is being charged. An empty battery pack requires a maximum charging period of 2 hours. The temperature of the battery pack may rise slightly during the charging operation. This is normal.
- As soon as battery pack is fully charged, the red LED (Fig. 4/Item 1) extinguishes
If the rechargeable battery fails to charge, check whether there is voltage at the socket outlet.
Timely recharging of the battery pack will help it serve you well for a long time. Recharging is always necessary when you notice a drop in the tool's performance.
Never allow the battery pack to become fully discharged. This will cause it to develop a defect.
5.2 Fitting the long handle
Using the telescopic long handle (Fig. 1/Item 5) you can push the cordless shears on wheels over the lawn.
The long handle is only for use with the grass cutter blade and must not be used with the hedge cutter blade!
To attach the long handle, push the fi tting (Fig. 5/Item 8) onto the tool in the direction of the arrow until the catch clicks into position.
Now mount the wheels (Fig. 6/Item 2) on the axle and push inwards.
GB
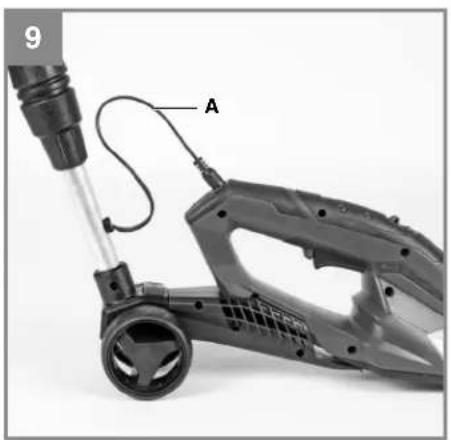
Unscrew the fi tting (Fig. 1/Item 6), adjust the telescopic handle to the required length and then tighten the fi tting again. Press the catch in and push the tool onto the telescopic handle as shown by the direction of the arrow in Fig. 7. After letting go of the catch, make sure that the fi tting is correctly engaged (Fig. 1/Item 8). Then connect the power plug (Fig. 9/Item A) to the tool as shown in Fig. 9. Press the catch (Fig. 10/Item A) to rotate the tool to the left or right and to use it as an edge trimmer. Make sure that it clicks into place!
To take apart, proceed in the reverse order. To remove the fi tting (Fig. 11/Item 8), release it in the direction of the arrow (Fig. 11/Item A) and then push it in the direction of the arrow (Fig. 11/Item B).
Important!
It is prohibited to remove or bridge any of the switching elements installed on the tool by the manufacturer (e.g. by securing a button to the handle) as this would prevent the tool from switching off automatically and result in high risk of injury.
Under no circumstances are you to use the shrub cutter with the telescopic long handle fitted.
6. Operation
The area to be cut must first be cleared of stones and other solid objects. The safety lock-off (Fig. 1/Item 3) prevents the tool being started unintentionally. Activate the safety lock-off (Figure 1 / Item 3) by pushing it forward and pressing the ON/OFF switch (Figure 1 Item 4) at the same time. To switch off the tool, let go of the ON/OFF switch (Figure 1 / Item 4).
6.1 Cutting grass
Allow the grass cutter to glide above the ground. The best results are achieved when the lawn is dry.
When you notice a drop in cutting performance, re-charge the tool immediately so that the battery does not become fully discharged.
6.2 Trimming hedges
The tool can be used to trim small hedges and shrubs.
Hold the tool slightly tilted in relation to the hedge you want to cut.
First cut the sides from the bottom up, then cut the top.
Watch out for foreign objects in or on the hedge which could damage the blades.
When is the best time to trim hedges?
- As a general rule, hedges which lose their leaves in the autumn should be trimmed in June and October.
- Hedges which do not lose their leaves should be cut in April and August.
6.3 Changing the blades
Caution! Risk of Injury!
To remove the blade, press the release mechanism (Fig. 1/Item 12) and take out the blade as shown in Fig. 12/Item 12.
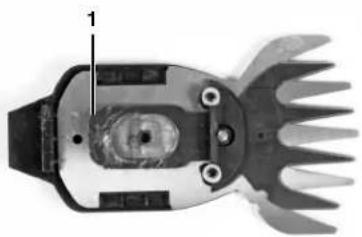
Once you have removed the blade you will be able to see the toothed wheels of the gear unit (Fig. 13). Make sure that no dirt gets into the gear unit when you change the blade.
To assemble, proceed in the reverse order.
Caution! The blade will fall out when the release mechanism is pressed (Fig. 1/Item 12)!
When you fit the hedge cutter blade
check the position of the pin for the eccentric connector (Fig. 13/Item 1). Take the hedge cutter blade and slide the eccentric mount (Fig. 14/Item 1) into position so that the pin for the eccentric connector and the eccentric mount fi t together precisely when assembled. Slot the hedge cutter blade onto the guide pins (Fig. 13/Item 2).
When you fit the grass cutter blade
check the position of the pin for the eccentric connector (Fig. 13/Item 1) again. Shift the eccentric mount (Fig. 15/Item 1) on the grass cutter blade to the left or the right to find the position at which the pin for the eccentric connector (Fig. 13/Item 1) and the eccentric mount (Fig. 15/Item 1) match up.
GB
7. Cleaning, maintenance and ordering of spare parts
7.1 Cleaning
- Keep all safety devices, air vents and the motor housing free of dirt and dust as far as possible. Wipe the equipment with a clean cloth or blow it with compressed air at low pressure.
• We recommend that you clean the device immediately each time you have finished using it. - Clean the equipment regularly with a moist cloth and some soft soap. Do not use cleaning agents or solvents; these could attack the plastic parts of the equipment. Ensure that no water can seep into the device.
- A few drops of oil (e.g. sewing machine oil) will improve the cutting performance of the blades, but never apply any grease to the blades.
- To ensure constant exact cutting it is also important to remove grass remnants and dirt from between the upper and lower blade.
Important!
Never clean the tool under running water - and particularly never with high pressure - because of the potential danger to persons and property. Keep your cordless grass cutter and hedge trimmer in a dry and frost-proof place. Choose a place that children are unable to enter.
7.2 Maintenance
- To achieve good results you should keep the blades sharp at all times. In particular we recommend that you immediately level off any jags or ridges caused by stones or the like. The tool should be thoroughly cleaned both before and after use.
- There are no parts inside the equipment which require additional maintenance.
7.3 Ordering replacement parts:
Please quote the following data when ordering replacement parts:
• Type of machine
• Article number of the machine
• Identification number of the machine
- Replacement part number of the part required For our latest prices and information please go to www.isc-gmbh.info
8. Disposal and recycling
The unit is supplied in packaging to prevent its being damaged in transit. This packaging is raw material and can therefore be reused or can be returned to the raw material system.
The unit and its accessories are made of various types of material, such as metal and plastic. Defective components must be disposed of as special waste. Ask your dealer or your local council.
GB

For EU countries only
Never place any electric power tools in your household refuse.
To comply with European Directive 2002/96/EC concerning old electric and electronic equipment and its implementation in national laws, old electric power tools have to be separated from other waste and disposed of in an environment-friendly fashion, e.g. by taking to a recycling depot.
Recycling alternative to the return request:
As an alternative to returning the equipment to the manufacturer, the owner of the electrical equipment must make sure that the equipment is properly disposed of if he no longer wants to keep the equipment. The old equipment can be returned to a suitable collection point that will dispose of the equipment in accordance with the national recycling and waste disposal regulations. This does not apply to any accessories or aids without electrical components supplied with the old equipment.
The reprinting or reproduction by any other means, in whole or in part, of documentation and papers accompanying products is permitted only with the express consent of the iSC GmbH.
Subject to technical changes
GB
Warranty certifi cate
Dear Customer,
All of our products undergo strict quality checks to ensure that they reach you in perfect condition. In the unlikely event that your device develops a fault, please contact our service department at the address shown on this guarantee card. Of course, if you would prefer to call us then we are also happy to offer our assistance under the service number printed below. Please note the following terms under which guarantee claims can be made:
- These guarantee terms cover additional guarantee rights and do not affect your statutory warranty rights. We do not charge you for this guarantee.
- Our guarantee only covers problems caused by material or manufacturing defects, and it is restricted to the rectification of these defects or replacement of the device. Please note that our devices have not been designed for use in commercial, trade or industrial applications. Consequently, the guarantee is invalidated if the equipment is used in commercial, trade or industrial applications or for other equivalent activities. The following are also excluded from our guarantee: compensation for transport damage, damage caused by failure to comply with the installation/assembly instructions or damage caused by unprofessional installation, failure to comply with the operating instructions (e.g. connection to the wrong mains voltage or current type), misuse or inappropriate use (such as overloading of the device or use of non-approved tools or accessories), failure to comply with the maintenance and safety regulations, ingress of foreign bodies into the device (e.g. sand, stones or dust), effects of force or external influences (e.g. damage caused by the device being dropped) and normal wear resulting from proper operation of the device. This applies in particular to rechargeable batteries for which we nevertheless issue a guarantee period of 12 months. The guarantee is rendered null and void if any attempt is made to tamper with the device.
- The guarantee is valid for a period of 2 years starting from the purchase date of the device. Guarantee claims should be submitted before the end of the guarantee period within two weeks of the defect being noticed. No guarantee claims will be accepted after the end of the guarantee period. The original guarantee period remains applicable to the device even if repairs are carried out or parts are replaced. In such cases, the work performed or parts fitted will not result in an extension of the guarantee period, and no new guarantee will become active for the work performed or parts fitted. This also applies when an on-site service is used.
- In order to assert your guarantee claim, please send your defective device postage-free to the address shown below. Please enclose either the original or a copy of your sales receipt or another dated proof of purchase. Please keep your sales receipt in a safe place, as it is your proof of purchase. It would help us if you could describe the nature of the problem in as much detail as possible. If the defect is covered by our guarantee then your device will either be repaired immediately and returned to you, or we will send you a new device.
Of course, we are also happy offer a chargeable repair service for any defects which are not covered by the scope of this guarantee or for units which are no longer covered. To take advantage of this service, please send the device to our service address.
Also refer to the restrictions of this warranty concerning wear parts/consumables and missing parts as set forth in the warranty conditions in these operating instructions.


F
Sommaire
x 2006/42/EC
Annex IV
Notified Body:
Notified Body No.:
Reg. No.
x 2000/14/EC_2005/88/EC
x Annex V
Annex VI
P = KW; L/∅ = cm
Notified Body:
2006/28/EC
Emission No.:
Noise: measured L_WA = 82 dB (A); guaranteed L_VA = 93 dB (A)
Standard references: EN 60335-1; IEC 60335-2-94; EN 60745-1; EN 60745-2-15; EN 62233; EN 55014-1; EN 55014-2; EN 61000-3-2; EN 61000-3-3; EN 60335-2-29
Subject to change without notice
Archive-File/Record: NAPR006875
Documents registrar: Alexander Scheifl
Wiesenweg 22, D-94405 Landau/Isar

text_image
Blank lined notebook page with a pencil icon and a color palette at the top
text_image
Blank lined notebook page with a pencil icon and a color palette at the top

EH 10/2012 (01)