
HBG5100W - Blender BEKO - Free user manual and instructions
Find the device manual for free HBG5100W BEKO in PDF.

| Brand | BEKO |
| Model | HBG5100W |
| Product type | Blender / Multi-function chopper |
| Power supply | 220-240 V~, 50/60 Hz |
| Power | 700 - 1000 W |
| Insulation class | II |
| Maximum capacity (meat) | 400 g |
| Maximum capacity (fruits) | 700 g |
| Maximum capacity (onions) | 500 g |
| Measuring cup capacity | Approximately 1.5 L |
| Main bowl material | Plastic and measuring cup |
| Blade material | Stainless steel |
| Functions | Blending, beating, chopping, grating |
| Included accessories | Blending stem, whisk, grating blade, grating disc, pushers (2x), measuring cup |
| Turbo mode | Yes |
| Maximum continuous use time | 10 seconds |
| Recommended cooling time | 1 minute between each cycle |
| Safety | Automatic shut-off, do not immerse, sharp blades |
| Maintenance | Clean with a damp cloth, do not immerse the motor unit |
| Repairability | Original parts recommended, authorized service |
| Use | Household use only |
| Color | White |
Frequently Asked Questions - HBG5100W BEKO
User questions about HBG5100W BEKO
0 question about this device. Answer the ones you know or ask your own.
Ask a new question about this device
Download the instructions for your Blender in PDF format for free! Find your manual HBG5100W - BEKO and take your electronic device back in hand. On this page are published all the documents necessary for the use of your device. HBG5100W by BEKO.
USER MANUAL HBG5100W BEKO
Hand Blender Set with Grater Attachment
User Manual

natural_image
White and blue electric toothbrush with a beaker, no visible text or symbols on the device itself.HBG5100W
EN MK SQ FR SR DE IT PL RO
01M-8835043200-2217-07
Please read this manual first!
Dear Valued Customer,
Thank you for preferring this Beko appliance. We hope that you get the best results from your appliance which has been manufactured with high quality and state-of-the-art technology. For this reason, please read this user manual and all other provided documents carefully before using the appliance and keep it as a reference for future use. If you hand over the appliance to someone else, give the user manual as well. Follow the instructions by paying attention to all the information and warnings in the user manual.
Meanings of the symbols
Following symbols are used in various sections of this manual:

Important information and useful hints about usage.

WARNING:Warnings for dangerous situations concerning the safety of life and property.

Suitable for contact with food.

Do not immerse the appliance in water

Protection class for electric shock.

This product has been produced in environmentally-friendly, state-of-the-art facilities.
CONTENTS
| ENGLISH | 4-17 |
| MACEDONIAN | 18-35 |
| ALBANIAN | 36-50 |
| FRANÇAIS | 51-66 |
| SERBIAN 67-82 | |
| DEUTSCH | 83-99 |
| ITALIANO | 100-116 |
| POLSKI | 117-136 |
| ROMANIAN | 137-154 |
1
Important safety and environmental instructions
This section contains safety instructions that will help protect from risk of personal injury or material damage. Failure to follow these instructions voids any granted warranty.
1.1 General safety
- This appliance complies with international safety standards.
- This appliance can be used by people who have limited physical, sensory or mental capacity or who do not have knowledge and experience, provided that they are supervised or they understand the instructions with regard to safe use of the product and potential dangers.
- Children should not play with the appliance. Cleaning and maintenance works should not be performed by children.
- This appliance cannot be used by children.
- Keep the appliance and the power cable out of the reach of children.
1
Important safety and environmental instructions
- Do not use it if the power cable, blades or the appliance itself is damaged. Contact an authorised service.
- Only use the original parts or parts recommended by the manufacturer.
- Do not attempt to dismantle the appliance.
- Your mains power supply should comply with the information supplied on the rating plate of the appliance.
- Do not use the appliance with an extension cable.
- Do not pull the power cable when unplugging the appliance.
- Unplug the appliance when left unattended and wait for it to stop completely while installing/removing accessories or before cleaning.
- Do not touch the plug of the appliance with damp or wet hands.
- Do not use the device for hot food.
- To prevent overheating, do not use the appliance continuously for more than 10 seconds. Leave to cool for 1 minute in between each 10 seconds of operation.
1
Important safety and environmental instructions
- Use the appliance only with the supplied base and container.
- Do not operate the appliance without the ingredients in the bowl.
- Remove bones and stones from food to prevent the blades and the appliance from getting damaged.
- This appliance is not suitable for dry or hard foods as this will quickly cause the blades to become dull.
- Follow all warnings to prevent injuries due to incorrect use.
- When emptying the container, during cleaning and grabbing chopping blades with bare hands serious injuries could result due to incorrect use. Use the plastic section trying to hold the chopping blade.
• After cleaning, dry the appliance and all parts before connecting it to mains supply and before attaching the parts. - Do not immerse the appliance, power cable, or power plug in water or any other liquids.
- Do not operate or place any part of this appliance or its parts on or near hot surfaces.
1
Important safety and environmental instructions
- If you keep the packaging materials, store them out of the reach of children.
1.2 Compliance with the WEEE Directive and Disposing of the Waste Product:
This product complies with EU WEEE Directive (2012/19/EU). This product bears a classification symbol for waste electrical and electronic equipment (WEEE).
natural_image
Symbol of a trash bin crossed out by a diagonal line, with no text or numbers present.This product has been manufactured with high quality parts and materials which can be reused and are suitable for recycling. Do not dispose of the waste product with normal domestic and other wastes at the end of its service life. Take it to the collection center for the recycling of electrical and electronic equipment. Please consult your local authorities to learn about these collection centers.
1.3 Compliance with RoHS Directive
The product you have purchased complies with EU RoHS Directive (2011/65/EU). It does not contain harmful and prohibited materials specified in the Directive.
1
Important safety and environmental instructions
1.4Package information

Packaging materials of the product are manufactured from recyclable materials in accordance with our National Environment Regulations. Do not dispose of the packaging materials together with the domestic or other wastes. Take them to the packaging material collection points designated by the local authorities.
1.5 Things to do for energy saving
Follow the times recommended in the manual during use. Unplug the appliance after use.
2 Your chopper
2.1 Overview
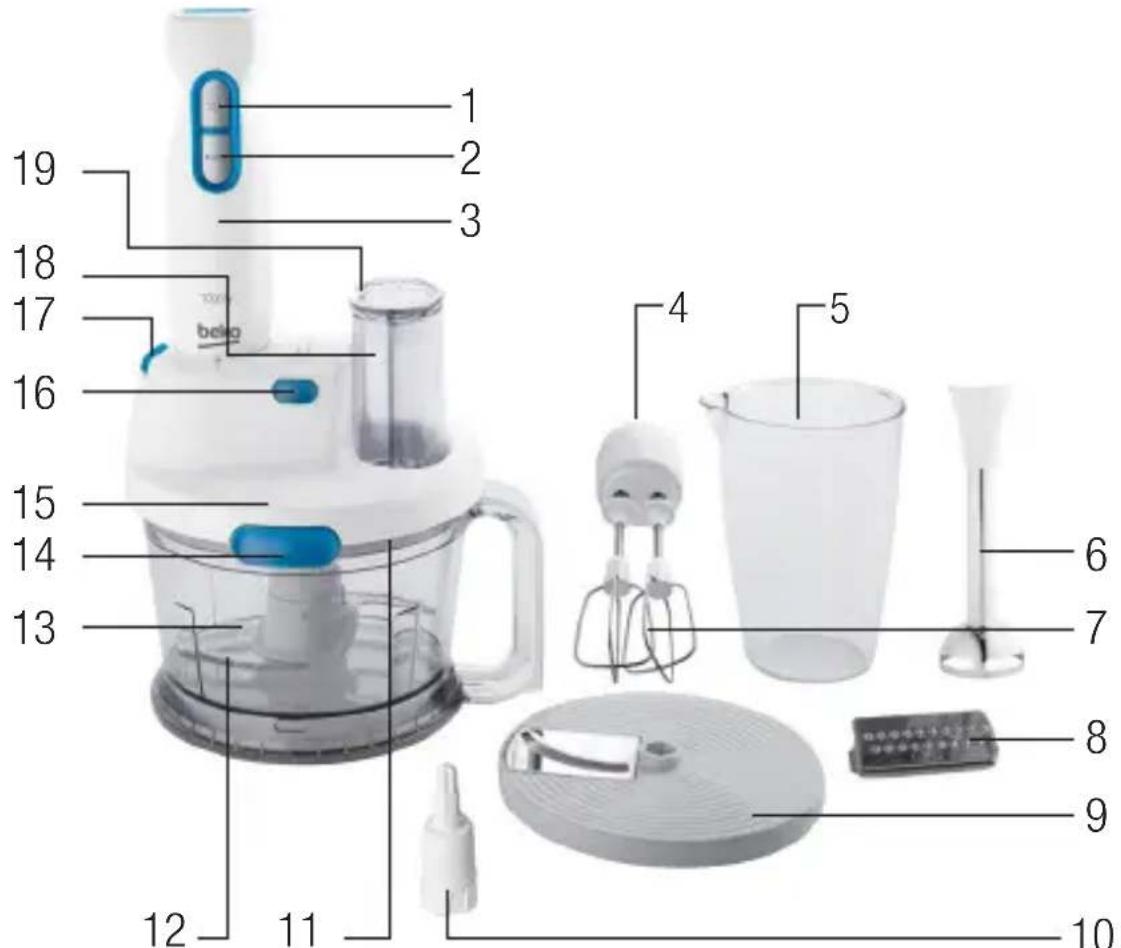
- Operation button
- Turbo operation button
- Body
- Whisker holder
- Measuring beaker
- Blending shaft
- Whisker
- Grating blade
- Grater disc
-
Accessory carrier pin
-
Transparent middle cover
-
Blending blade
-
Processor container
-
Locking tabs
-
Lockable cover
-
Locking tab release button
-
Motor body locking button
-
Feeding chute
-
Pusher (2x)
The values which are declared in the markings affixed on your appliance or the other printed documents supplied with it represent the values which were obtained in the laboratories pursuant to the pertinent standards. These values may vary according to the usage of the appliance and ambient conditions.
2 Your chopper
2.2 Technical data
Power supply: 220-240 V\~,
50/60 Hz
Power: 700-1000 W
Insulation class : ||
3 Operation
3.1 Initial use
- Take out all packaging and label materials and dispose of them in accordance with the applicable local regulations.
- Clean the appliance before initial use (Refer to "Cleaning and care" section).
- Use the appliance upright on a balanced, flat, clean, dry and non-skid surface.
- Do not use the appliance for more than 10 seconds. Switch off the appliance after using it for 10 seconds. If you want to use it for another 10 seconds, wait for it to cool down for 1 minute.
3.2 Maximum quantities and durations
| Ingredients | Maximum amount | Processing type |
| Meat 400 g Turbo | ||
| Onions (cut into pieces) | 500 g | On-Turbo(for short processes) |
| Fruits (cut into pieces) | 700 g Turbo | |
| Parsley 100 g On-Turbo | ||
| Almond / Hazelnut / Walnut | 300 g On-Turbo | |
| Cheese 300 g Turbo | ||
| Biscuits 300 g On-Turbo | ||
| Cucumber 800 g On | ||
| Carrots 400 g On | ||
| Potato 400 g On | ||
| Courgette 800 g On | ||
| Radish 400 g On |
3 Operation
3.3 Intended use
- This appliance is intended for household use only. It should not be used commercial purposes.
- Do not use the appliance for anything other than its intended use.
- It has been designed only for chopping and blending foods.

Unplug the appliance when not in use.
3.4 Mixing

Warning: Do not touch the blades with your bare hands.
- Put the food you want to purée or blend into the measuring beaker (5).
- Turn the blending shaft (6) anti-clockwise until it is locked and attach it to the motor body (3). Make sure that the blending shaft is fully seated into the motor unit.
-
Plug in the appliance.
-
Put the blending shaft (6) into the measuring beaker (5) that contains the ingredients.
- Press and hold the operation button (1).
- The appliance will start to operate.
- Press the turbo operation button (2) found on the motor body to change the speed level.
- Move the appliance upwards and downwards slowly and circularly to blend the ingredients.

Warning: Do not operate the appliance for more than 10 seconds continuously.

If the ingredients stick on the sides of the plastic container, remove them with a spatula and continue blending.
- When your work is done, release the operation button (1) or turbo operation button (2) and unplug the appliance.
3 Operation
- Take the mixture out of the measuring beaker (5).
3.5 Whisking
- Attach the whisker (7) to the whisker holder making sure that it is fully seated. Turn the whisker holder anti-clockwise to fit it to the motor body and make sure that it is correctly fitted.
- Put the ingredients you want to process into the measuring beaker (5).
- Plug in the appliance.
- Put the whisker (7) into the measuring beaker (5) that contains the ingredients.
- Press and hold the operation button (1).
- The appliance will start to operate.
- You can press the turbo operation button (2) to increase the speed.
- When your work is done, release the operation button (1) and turbo operation button (2) and unplug the appliance.
- Take the mixture out of the measuring beaker.
3.6 Blending

Warning: Do not use the appliance to chop extremely hard ingredients such as coffee beans, ice, coconut, grains or bones. Remove the stalks of plants, shells of walnuts, and bones, sinews and gristles of meats.
- Place the appliance on a flat surface.
- Attach the blending blade (12) to the accessory carrier pin (10) and then place it onto the fixed shaft in the processor container respectively.

Warning: Do not touch the blades with your bare hands. Blades are extremely sharp.
- Put the ingredients into the processor container (13) and place the transparent middle cover (11).
3 Operation
- Place the lockable cover (15) onto the transparent middle cover (11). Make sure that the tabs on the lockable cover are fully seated on the container.
- Place the motor body (3) onto the cover (15). Turn clockwise until it is fully seated into its place. Make sure that the motor body is fully fitted to the cover.
- Plug in the appliance.
- Press and hold the operation button (1).
- Press and hold the turbo operation button (2) for accelerating.
- When your work is done, release the operation button (1) or turbo operation button (2) and unplug the appliance.
- To remove the motor body (3), press the motor body locking button (17) and take the motor body out by turning it anticlockwise.
-
To remove the lockable cover (15), take out the cover by pressing the locking tabs release button (16) at first and then remove the transparent middle cover.
-
Before taking out the blended food, remove the blending blade (12) carefully.
3.7 Using the grater disc
- Hold the grating blade while it is facing upwards and attach it to the grater disc (9). (To remove the grating blade from the disc, push it slightly from the bottom).
- Place the accessory carrier pin (10) onto the fixed shaft in the processor container and fit the grater disc (9) on it. Then close the transparent middle cover (11) and place the lockable cover (15) on it. You will hear a "click" sound when the cover (15) is fully seated.
- Place the motor body (3) onto the cover (15). Turn clockwise until it is fully seated into its place. Make sure that the motor body is fully fitted to the cover.
- Plug in the appliance.
- Put your food into the feeding chute (18) and grate it with the help of the pusher (19). Never use your fingers, forks, knives etc. to push the food.
3 Operation
- When the process is over, wait for the disc to stop and unplug the appliance.
- Remove the motor. (see 3.6).
- Remove the lockable cover. (see 3.6).
- Hold the accessory carrier pin (10) and remove it together with the grater disc (9) and then take out your food from the container.

Warning: Do not attach the blades to the accessory carrier pin while grating.
4 Cleaning and care
4.1 Cleaning

Warning: Never use gasoline, solvents or abrasive cleaning agents, metal objects or hard brushes to clean the appliance.

Warning: Do not touch the chopping blades with your bare hands. Blades are sharp. Use a brush for cleaning!
- Switch off and unplug the appliance.
- Wait for the appliance to cool down completely.
- Clean the exterior of the motor unit (3) with a moist and soft cloth and wipe it dry.
- Wash and dry the upper and lower blades before storing the appliance.
Warning: Do not immerse the body or the power cord in water or other liquids and do not wash them under water.

Dry all parts with a soft towel before starting to use the appliance after cleaning it.

It is easier to clean the appliance right after using it.
4.2 Storage
- If you do not intend to use the appliance for a long time, store it carefully.
- Unplug the appliance before lifting the appliance and its cable.
- Store the appliance in a cool and dry place.
- Keep the appliance out of the reach of children.
4 Cleaning and care
4.3 Handling and transportation
- During handling and transportation, carry the appliance in its original packaging. The packaging of the appliance protects it against physical damages.
- Do not place heavy loads on the appliance or on the packaging. The appliance may get damaged.
- Dropping the appliance may render it non-operational or cause permanent damage.
natural_image
Symbol of a trash bin crossed with a diagonal line, no text or numbers presentnatural_image
Symbol of a trash bin crossed with a diagonal line, no text or numbers presentOvaj proizvod je proizveden korišćenjem visokokvalitetnih de- lova i materijala koji se mogu ponovo iskoristiti i koji su pogodni za reciklažu. Ne odlăžite ovaj otpad zajedno sa normalnim kućnim i drugim otpadom na kraju radnog veka. Odnesite ga u centar za prikupljanje za reciklažu električne i elektronske opreme. Konsultujte se sa svojim lokalnim vlastima da biste saznali o ovim centrima za sakupljanje otpada.
1.3 Usaglašenost sa RoHS direktivom
- Dugme za pokretanje
- Turbo dugme za pokretanje
- Telo
- Držač za mutilicu
- Merna posuda
- Osovina za blendiranje
- Mutilica
-
Nož za rendanje
-
Disk za rendanje
- Igla nosača za dodatke
- Providni središnji poklopac
- Osovina za blendiranje
- Posuda za obradu
- Jezičci za zaključavanje
- Poklopac sa mogućnošću zaključavanja
Vrednosti koje su date na oznakama postavljenim na vaš aparat ili drugim štampanim materijalima koje ste dobili sa aparatom, predstavljaju vrednosti koje su dobijene u laboratorijama, u skladu sa važećim standardima. Ove vrednosti mogu da variraju prema upotrebi aparata i uslovima sredine.
2 Vaša seckalica
- Dugme za otpuštanje jezičaka za zaključavanje
- Dugme za zaključavanje mot- orne jedinice
- Levak za ubacivanje
- Dodatak za guranje (2x)
2.2 Tehnički podaci
Napajanje:
220-240 V\~, 50/60 Hz
Snaga: 700-1000 W
Klasa izolacije:
3 Upotreba
3.1 Prva upotreba
- Izvadite sav materijal za pakovanje i označavanje i uklonite ga u saglasnosti sa primenjivim lokalnim propisima.
- Očistite aparat pre prve upotrebe (pogledajte odeljak „Čišćenje i održavanje“).
- Koristite aparat u uspravnom položaju na uravnoteženoj, ravnoj, čistoj, suvoj i površini koja se ne kliza.
- Nemojte koristiti aparat duže od 10 sekundi. Isključite aparat nakon upotrebe od 10 sekundi. Ako želite da ga koristite još 10 sekundi, sačekajte 1 minut da se aparat ohladi.
3 Upotreba
3.2 Maksimalni kapacitet i trajanje
| Sastojci | Maksimalna količina | Tip obrade |
| Meso 400 g Turbo | ||
| Crni luk (iseckan na komadiće) | 500 g | Turbo - uključeno (za kratke obrade) |
| Voće (iseckano na komadiće) | 700 g Turbo | |
| Peršun 100 g | Turbo - uključeno | |
| Badem / lešnik / orah | 300 g | Turbo - uključeno |
| Sir 300 g Turbo | ||
| Biskviti 300 g | Turbo - uključeno | |
| Krastavac 800 g Uključeno | ||
| Šargarepe 400 g Uključeno | ||
| Krompir 400 g Uključeno | ||
| Tikvice 800 g Uključeno | ||
| Rotkvica 400 g Uključeno |
3 Upotreba
3.3 Namena
4.3 Prenos i transport
- Tokom prenosa i transporta, nosite aparat u njegovom originalnom pakovanju. Pakovanje aparata ga štiti od fizičkih oštećenja.
- Nemojte stavljati teške predmete na aparat ili njegovo pakovanje. Aparat se može oštetiti.
- Ako vam aparat ispadne, to može izazvati trajno oštećenje, odnosno aparat može postati nefunkcionalan.
natural_image
Symbol of a trash bin crossed out by a diagonal line, with no text or numbers present.natural_image
White and blue electric toothbrush with a digital brush, no visible text or symbols on the device itself.HBG5100W
AR
beko
01M-8835043200-2217-07

- Hand Blender Set with Grater Attachment
- Please read this manual first!
- Meanings of the symbols
- 1
- Important safety and environmental instructions
- General safety
- Compliance with the WEEE Directive and Disposing of the Waste Product:
- Compliance with RoHS Directive
- 1.4Package information
- Things to do for energy saving
- Your chopper
- Overview
- Technical data
- Operation
- Initial use
- Maximum quantities and durations
- Intended use
- Mixing
- Whisking
- Blending
- Using the grater disc
- Cleaning and care
- Cleaning
- Storage
- Handling and transportation
- Usaglašenost sa RoHS direktivom
- Vaša seckalica
- Tehnički podaci
- Napajanje:
- Upotreba
- Prva upotreba
- Namena
- Prenos i transport
Brand : BEKO
Model : HBG5100W
Category : Blender