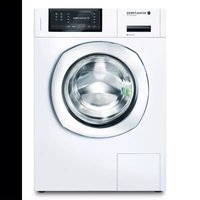
Superforte 740 - Washing machine Schulthess - Free user manual and instructions
Find the device manual for free Superforte 740 Schulthess in PDF.


User questions about Superforte 740 Schulthess
0 question about this device. Answer the ones you know or ask your own.
Ask a new question about this device
Download the instructions for your Washing machine in PDF format for free! Find your manual Superforte 740 - Schulthess and take your electronic device back in hand. On this page are published all the documents necessary for the use of your device. Superforte 740 by Schulthess.
USER MANUAL Superforte 740 Schulthess
Washing machine | Private households and apartment buildings
Aufstellanleitung
Installation instructions
WA14 CH
400V
natural_image
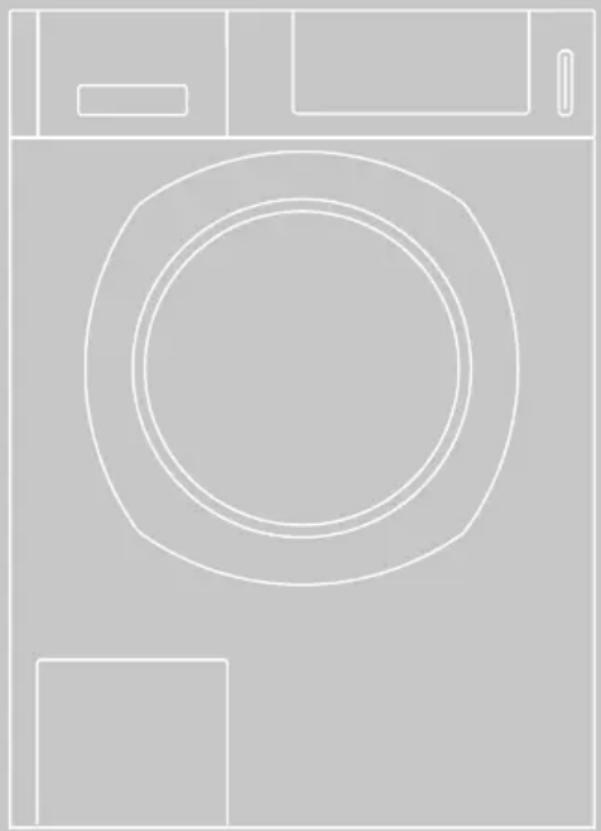
Line drawing of a washing machine with concentric circles and rectangular buttons (no text or symbols)Inhalt / Sommaire / Indice / Content
DEUTSCH
Safety and safety measures 47
Removing the transport securing device 48
Installing the appliance....49
Washer-Dryer tower 51
Water inlet. 52
Water outlet 54
Electrical connection.... 55
Private household....56
Apartment building 58
Symbole

natural_image
Three mechanical tool icons showing different types of fasteners or fasteners (no text or symbols)natural_image
Line drawing of a single washing machine with front panel and door (no text or symbols)natural_image
Mechanical diagram showing a wrench turning a key with an arrow indicating rotational motion (no text or symbols)natural_image
Mechanical diagram showing a bolt and nut assembly with rotational arrow (no text or symbols)natural_image
Diagram of a wrench tool with a rotating knob and hexagonal base (no text or symbols)natural_image
Illustration of a faucet with a valve and handle (no text or symbols)natural_image
Diagram of a faucet with tubing and a magnified inset showing three connected pipe fittings (no text or labels)natural_image
Diagram of a pipe system with a drain valve and tubing, showing a magnified inset of the component (no text or labels)natural_image
Line drawing of a washing machine interior showing internal components and a magnified view of the door (no text or symbols)▶ Retirer tuyaux et câbles de leurs supports.
text_image
2x Maison individuelle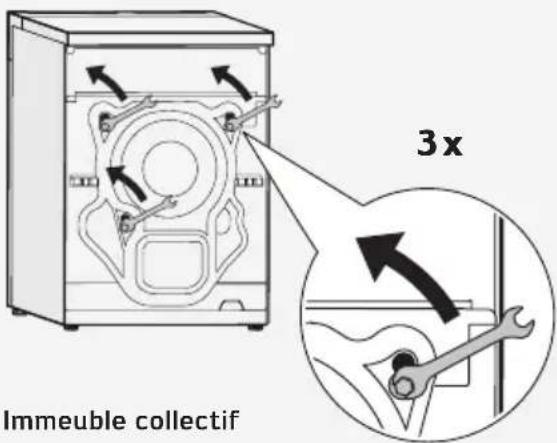
natural_image
Three mechanical tool icons showing different types of fasteners or fasteners (no text or symbols)natural_image
Line drawing of a single washing machine with front panel and door (no text or symbols)natural_image
Mechanical diagram showing a wrench turning a key with an arrow indicating rotational motion (no text or symbols)natural_image
Mechanical diagram showing a bolt and nut assembly with rotational arrow (no text or symbols)natural_image
Diagram of a wrench tool with a rotating knob and hexagonal base (no text or symbols)natural_image
Illustration of a faucet with a valve and handle (no text or symbols)natural_image
Diagram of a faucet with tubing and a magnified inset showing three pipe fittings (no text or labels)natural_image
Diagram of a pipe system with a drain valve and tubing, showing a close-up inset (no text or labels)natural_image
Three mechanical tool icons showing different types of fasteners or fasteners (no text or symbols)natural_image
Line drawing of a single washing machine with front panel and door (no text or symbols)natural_image
Mechanical diagram showing a wrench turning a key with an arrow indicating rotational motion (no text or symbols)natural_image
Mechanical diagram showing a bolt and nut assembly with rotational arrow (no text or symbols)natural_image
Mechanical diagram showing a wrench tool with a rotating arm and base (no text or symbols)natural_image
Illustration of a faucet with a valve and handle (no text or symbols)natural_image
Diagram of a faucet with tubing and a magnified inset showing three connected pipe fittings (no text or labels)natural_image
Diagram of a pipe system with a drain valve and tubing, showing a close-up inset of the component (no text or labels)Please read the instructions.
!
Warnings are marked with a warning triangle.
The text gives information how a dangerous situation can be avoided.
Signal words indicate the severity of the danger, if not avoided.
Warning
means that possible personal injuries, and potentially life-threatening injuries may occur.
⚠️ Important
means property damages may occur.
Safety and safety measures
When installing and connecting the appliance, the following safety instructions, warnings, general instructions and any possible special regulations of the locally responsible water and electricity supply companies must be observed.
▶Have the machine installed according to the mounting instructions by qualified and trained personnel.
▶Check the machine for transport damage. Do not connect an appliance which displays visible damage.

Warning
Risk of injury!
The washing machine is very heavy.
When transporting or installing the machine (unloading, moving etc.), make sure that it does not fall down or tips over.
Components sticking out from the machine (e.g. loading door, cover plate) may break off and cause injuries, when used for lifting.
▶Do not grip the appliance on components sticking out.
Inexpert installation of hoses and power cables may cause trip hazards and danger of injury.
▶Lay hoses and cables in such a way that they do not represent a risk of tripping.
When playing with packaging material / film and packaging parts, children may become entrapped in it or pull these over their head and suffocate.
▶Keep packaging material away from children.

Warning
Danger of electric shock!
There is a risk of short circuits and fire, when operating the washing machine outdoors.
▶The machine must not be operated out doors (e.g. balcony).
▶When operating the washing machine at 2000m above sea level, it is absolutely imperative to activate the temperature limiter to prevent the water from boiling (see service instructions or ask the customer service and/or retailer).
▶Operating temperature of the appliance is 5 to 35 °C.
Removing the transport securing device

Important
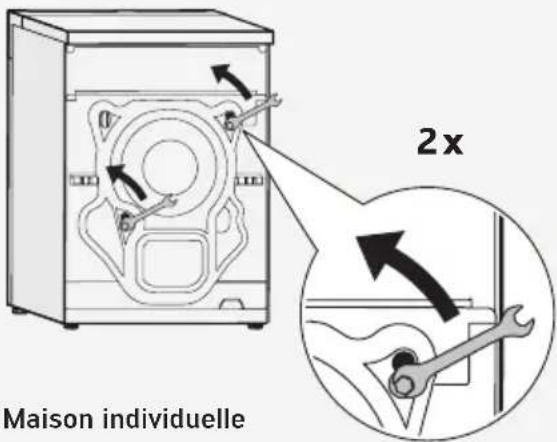
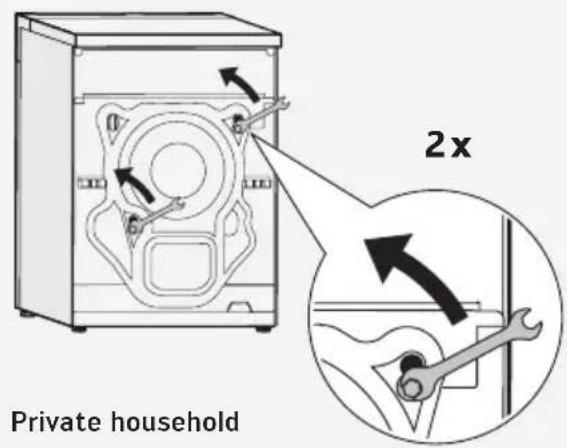
The machine is secured with transport safety devices on the back of the washer.
▶ Before putting the appliance into service for the first time, the transport securing device must be removed.
- Keep the safety devices for further use. - To avoid transport damage, temporarily re-install the safety device when transporting the machine in the future.
text_image
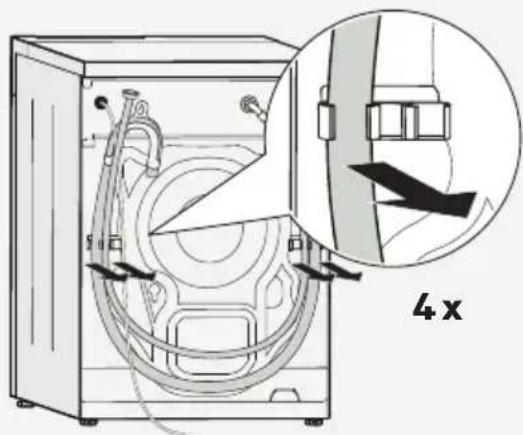
4 x▶ Remove the hoses and cables from their holding straps.
text_image
Private household 2x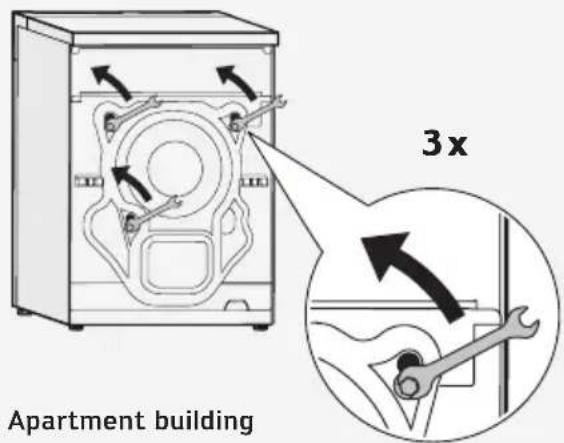
text_image
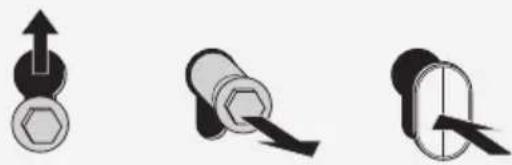
3x Apartment building▶ Loosen hexagonal screws with a spanner (spanner size 13), until the screws can be moved freely.
natural_image
Three mechanical tool icons showing different types of fasteners or fasteners (no text or symbols)▶ Remove the screws with their sleeves.
▶ Close the openings with the enclosed covers.

Warning
In the case of slipping there is a risk of injury.
Installing the appliance
Each appliance is carefully checked under operating conditions before leaving our factory. Any moisture or water residue which you may possibly find in the appliance or outlet hose are attributable to this check..
Installation area
In order to ensure the stability of the appliance during spin drying, the installation area must be firm and level. Soft floor coverings, e.g. fitted carpets or coverings with a foamed material backing are not suitable as an installation area.
Installation on timber joist floors
▶ Place the appliance on an at least 40 mm thick, water-resistant timber board which should be screwed firmly to the floor.
▶ Installation should be made as far as possible in the corner of the room. Fasten the appliance by its feet using the fixing set (this applies particularly in the case of a washer-dryer tower).
Installation on a plinth

Important
During spinning, the washing machine may wander and tip over or fall from the plinth.
The base of the device must be fixed securely to it with a fixing set in order to prevent it from sliding off during its spin cycle. (this applies particularly in the case of a washer-dryer tower).
Installation on a slippery surface
When the machine is installed on a slippery surface (e.g. ceramic tile, polished natural stone, fine concrete), the feet of the machine must be secured with an attachment set (attachment set for glueing) to prevent the machine from moving during spinning.
Fixing sets
You can purchase the following fixing sets at your specialist retailer or through our customer services team:
▶ Steel fixing set – to be drilled Order No: 520 510
- Plastic fixing set – to be glued Order No: 51 215
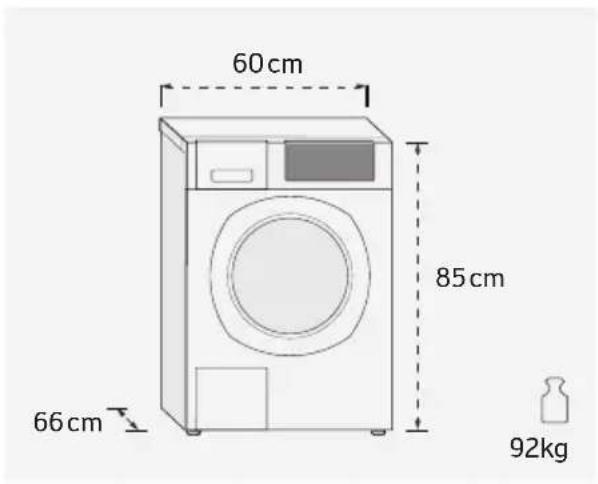
Keep machine dimensions in mind
The minimum distance between the machine and the wall or possibly another machine is 1 cm.
Private home
Aligning the appliance
▶ Align the appliance with the help of a spirit level on all sides.
Notice
The machine must be in a vertical position with all four feet firmly on the floor and it must not wobble. Otherwise the machine might move during operation and cause any damage.
natural_image
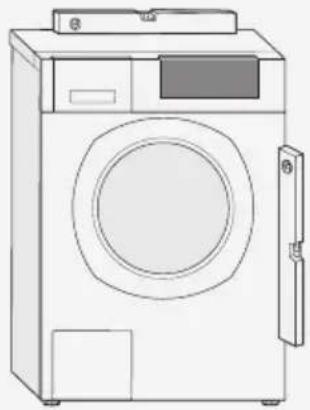
Line drawing of a single washing machine with front panel and door (no text or symbols)▶ Check the orientation of the machine.
natural_image
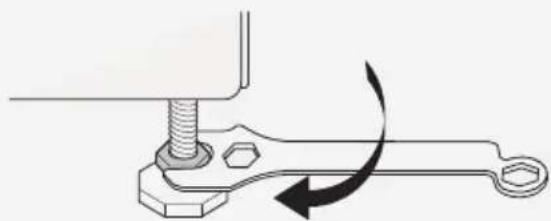
Mechanical diagram showing a wrench turning a key with an arrow indicating rotational motion (no text or symbols)▶ Loosen the counternuts with a spanner.
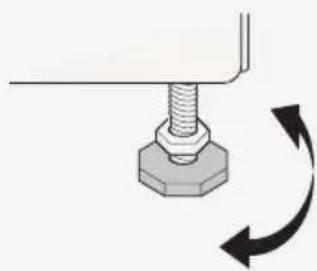
natural_image
Mechanical diagram showing a bolt and nut assembly with rotational arrow (no text or symbols)▶ If necessary, adjust the height of the feet of the machine by turning them.
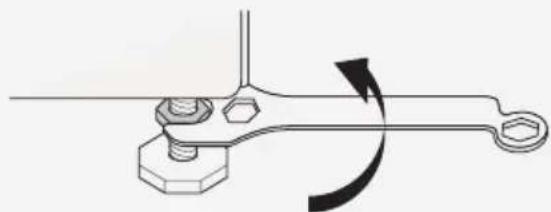
natural_image
Diagram of a wrench tool with a rotating knob and hexagonal base (no text or symbols)▶ Afterwards refasten the lock nut of each machine foot against the housing. While doing so, hold on to the feet to prevent the changing the height.
Washer-Dryer tower
In order to save space (installation space), you can place your dryer on top of a washing machine (washer-dryer tower). It is absolutely imperative not to mount a washing machine on a dryer, risk of falling.
You can obtain the appropriate parts as a construction kit from your specialist dealer or our customer service. The installation must be carried out by a specialised electrician.
Private home
▶ Washer-dryer tower staking kit, white Order No: 51 027
▶ Washer-dryer tower staking kit, grey Order No: 51 028
Apartment building
▶ Washer-dryer tower staking kit, white Order No: 51 044

Important
Risk of tipping!
It is absolutely imperative not to mount a washing machine on a dryer.
Water inlet
For the water connection, a normal cold-water supply with at least 0.1 MPa (1 bar) water pressure is required. When the water tap is turned on, more than 8 litres of water per minute must flow out.
▶ If the water pressure is over 1 MPa (10 bar), a pressure valve should be fitted.

Important
▶ Do not connect to the mixing battery of a pressureless hot-water apparatus.
Hoop up the machine with like new inlet hoses. Do not reuse old hose kits.
▶ Do not kink or protract the hoses.
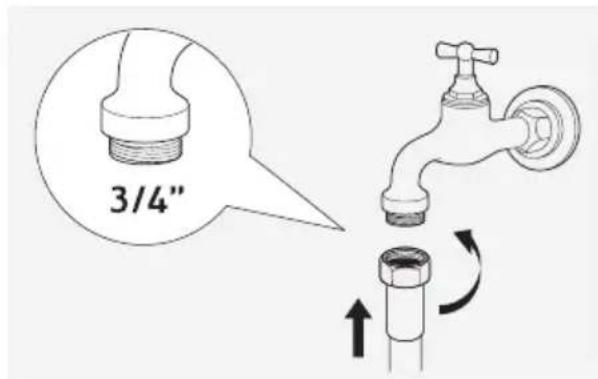
text_image
3/4"▶ Connect the inlet hose to the water tap.
▶ Do not remove the screens in the hose connections, except for cleaning.
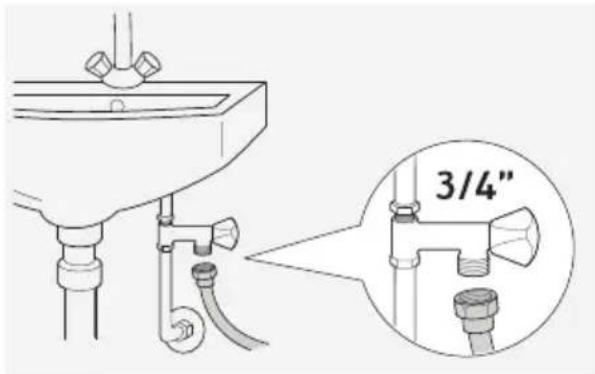
text_image
3/4"▶ Carefully turn on the water tap to make sure that the connections are not leaking.

Important
The connecting points are under full water pressure.
In order to avoid water damage, the water tap and the intermediate valve must be closed after washing..
Soft water/ rainwater connection
Notice
If you wish to use rainwater, this must be filtered or hygienically clean to avoid contamination.
▶ A rainwater utilisation system is required to operate your washing machine with rainwater.
Machines with soft water/ rainwater option provide two water con nections on the rear panel for the soft and hard water connection (cold) respectively.
The supply valve for soft water/ rain-water is marked with a green line at the mouth, the neutral valve is determined for the hard water.
▶ Connect the soft / rain and hard water hose to the respective water tap.
Hot water connection
Machines with hot water option provide two water con nections on the rear panel for the hot and cold water connection. The water supply valve for hot water is marked with a red line at the mouth, the neutral valve is determined for the cold water.
▶ Connect the hot and cold water water hose to the respective water tap.

Important
The hot water temperature must not exceed 70^ C.
▶ Higher water temperatures must be reduced by means of a mixer con nec ted in series.
Aquastop / Aquasafe
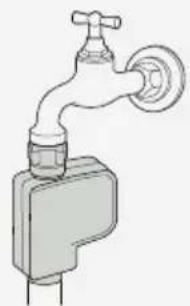
natural_image
Illustration of a faucet with a valve and handle (no text or symbols)In the case of appliances with aquastop / aquasafe, connect the valve to the water tap as shown in the sketch.
▶ Carefully open the water tap to make sure that the connections are not leaking.

Warning
Danger of electric shock!
▶ Do not immerse the aquastop valve in water.
Water outlet

Important
Risk of water damage!
A drainage hose that is insufficiently secured, may slip out of the sink or the connection during draining and cause water damage.
▶ Do not kink or protract the hoses.
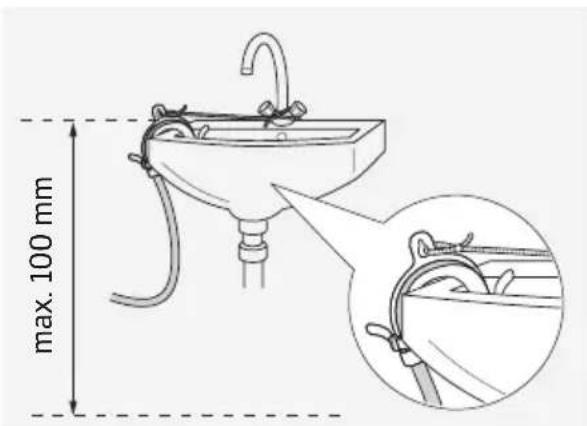
Water drainage into sink
text_image
max. 100 mm▶ Secure the hose against slipping out.
▶ Check, if the water drains away fast enough.
▶ Make sure the plug is not obstructing drainage.
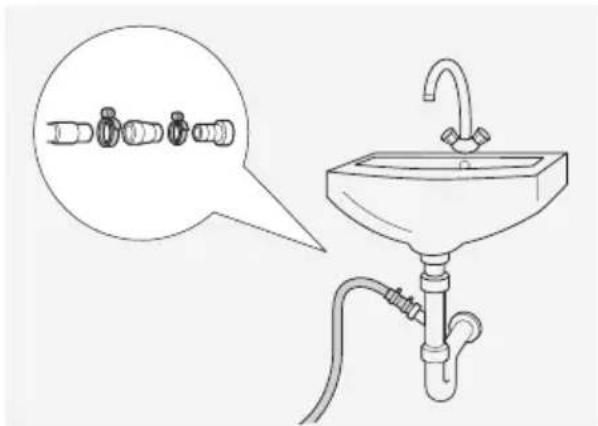
Water drainage into siphon (In-wall or sink siphon)
natural_image
Diagram of a water tap with a funnel and tubing, showing a close-up of small components (no text or labels)- Secure the connection with hose clamps (available at the hardware store).
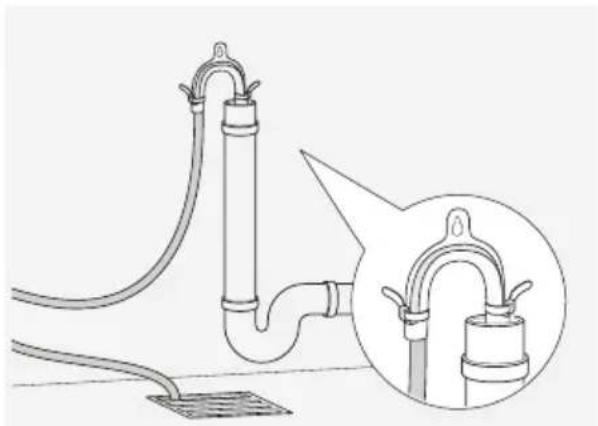
Water drainage into a standpipe or floor drain
natural_image
Diagram of a pipe system with a valve and tubing, showing a close-up inset of the valve assembly (no text or labels)▶ Fasten the hose on both sides with a cable tie.
Electrical connection
Notice
Connection of the appliance to the power supply must be carried out by a specialised electrician.
When the machine is operated for the first time the Data and Time settings are to be checked and if necessary, set correctly (see Settings / Menu Settings in the operating instructions).
Perform the electrical connection according to the regulations or provisions made by the local electricity authority and utility companies.
In rooms in which fault-current protective switches are required or recommended in order to increase safety, the release current must be 30 mA.
▶ Use a fault-current protective switch with the ≈ symbol.
Approval for fixed connection, all-pole disconnectable by a main switch with contact distance of min. 3 mm or plug contact.

Warning
Risk of electric shock and risk of fire! No extension cables, no multi-coupling and no plug-in, mobile time switches may be used.
The dryer may not be connected via an external switching mechanism, which regularly switches the machine on and off (e.g. timer switch).
Reduced mains power
The appliance may be changed-over to a reduced connection rate (see the following electrical installation schemes).
Additional information regarding change-over capabilities are located on the sticker on the power cable of the machine.
Notice
The switchover must be carried out by a specialist elec tri cian.
▶ For lower connected loads, the setting Reduced mains power needs to be adjusted accordingly.
Private household (Type WA14 EFH)
Mains cable
The appliance is supplied with a 4-core mains cable for connection to 2-phase alternating current with a neutral conductor (400 V 2 N \~, connected load 4000 W, fuse 10 AT).
Fuses and switches are not included in the scope of supply.
8 kg washing machine
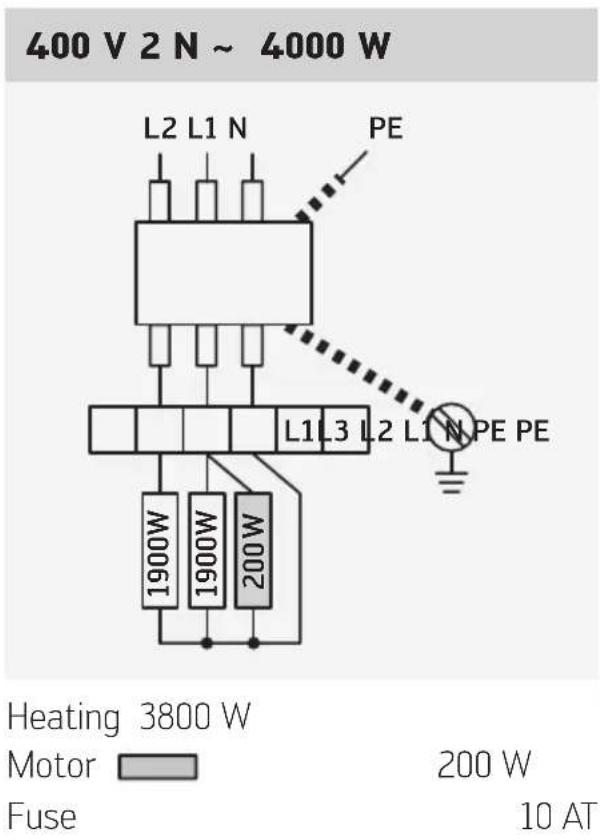
text_image
400 V 2 N ~ 4000 W L2 L1 N PE L1 L3 L2 L1 N PE PE 1900W 1900W 200W Heating 3800 W Motor Fuse 200 W 10 AT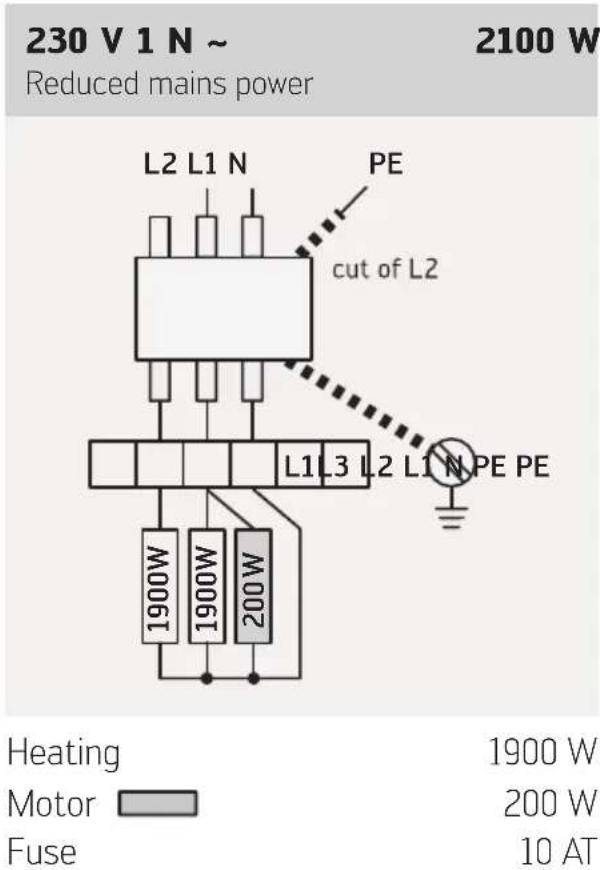
text_image
230 V 1 N ~ Reduced mains power 2100 W L2 L1 N PE cut of L2 L1 L3 L2 L1 N PE PE 1900W 1900W 200W Heating Motor Fuse 1900 W 200 W 10 AT<> model
The appliance is supplied with a 3-core mains lead with a mains plug type 23 (230 V 1 N \~, connection value 3500 W, fuse 16 AT).
Fuses and switches are not included in the scope of supply.
230 V 1 N \~ 3500 W
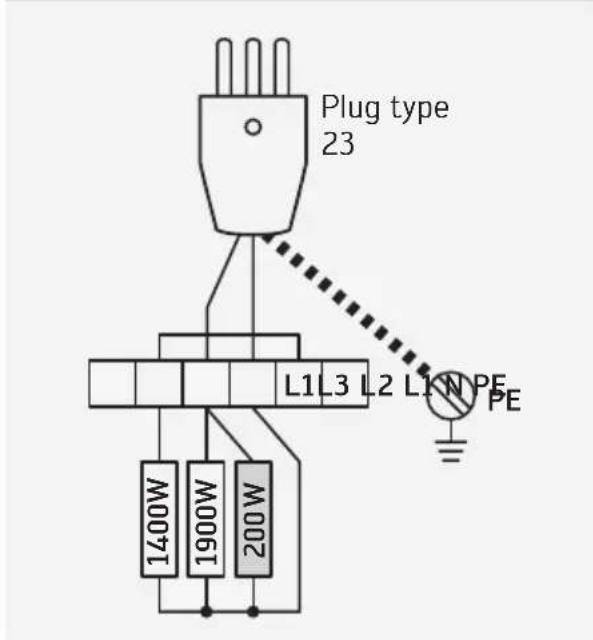
text_image
Plug type 23 L1 L3 L2 L1 N P E PE 1400W 1900W 200WHeating 3300 W Motor 200 W Fuse 16 AT
<> model
The appliance is supplied a mains lead (length: 165 cm) with a mains plug type T 12 to connect to a single phase alternating current with neutral conductor (230 V 1 N \~, connection value 2300 W, fuse 10 AT).
Fuses and switches are not included in the scope of supply.
230 V 1 N \~ 2300 W
Reduced mains power
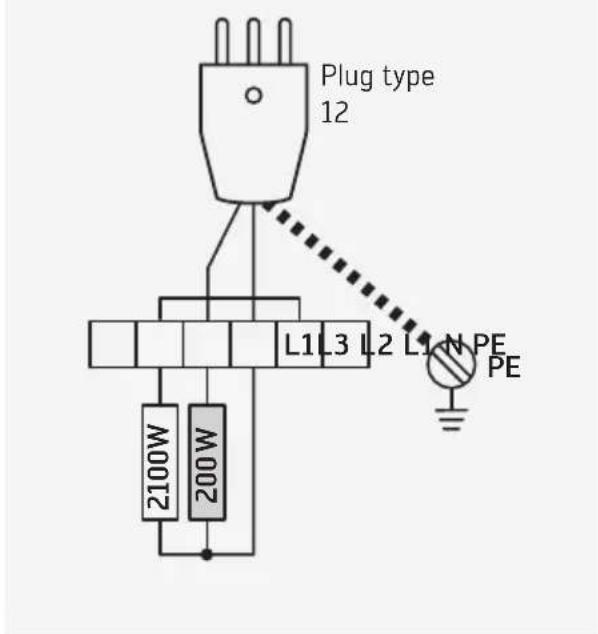
text_image
Plug type 12 L1 L3 L2 L1 N PE PE 2100W 200WHeating 2100 W Motor 200 W Fuse 10 AT
Apartment building (Type WA14 MFH)
Mains cable
9 kg washing machine
The appliance is supplied with a 5-core mains cable for connection to 2-phase alternating current with a neutral conductor (400 V 3 N \~, connected load 4800 W, fuse 10 AT).
8 kg washing machine
The appliance is supplied with a 4-core mains cable for connection to 2-phase alternating current with a neutral conductor (400 V 2 N \~, connected load 4400 W, fuse 10 AT).
Fuses and switches are not included in the scope of supply.
9 kg washing machine
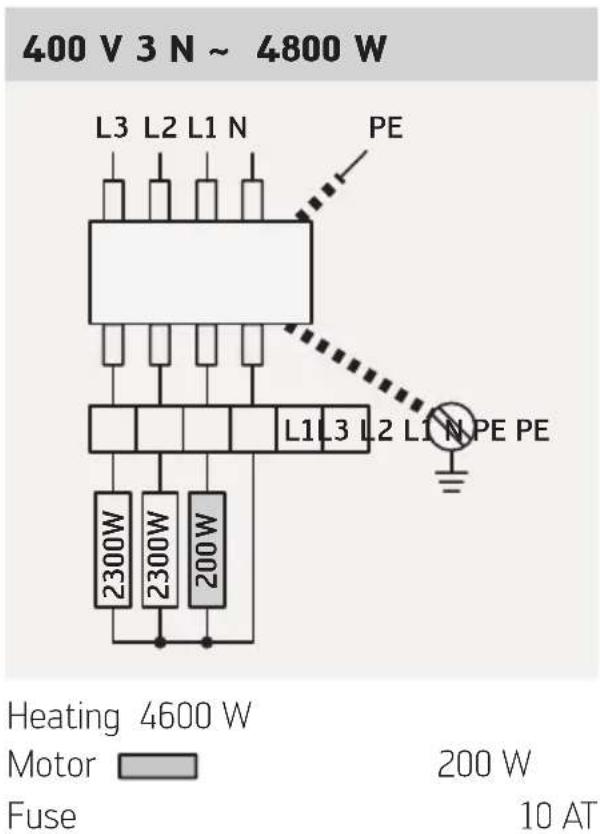
text_image
400 V 3 N ~ 4800 W L3 L2 L1 N PE L1 L3 L2 L1 N PE PE 2300W 2300W 200W Heating 4600 W Motor Fuse 200 W 10 AT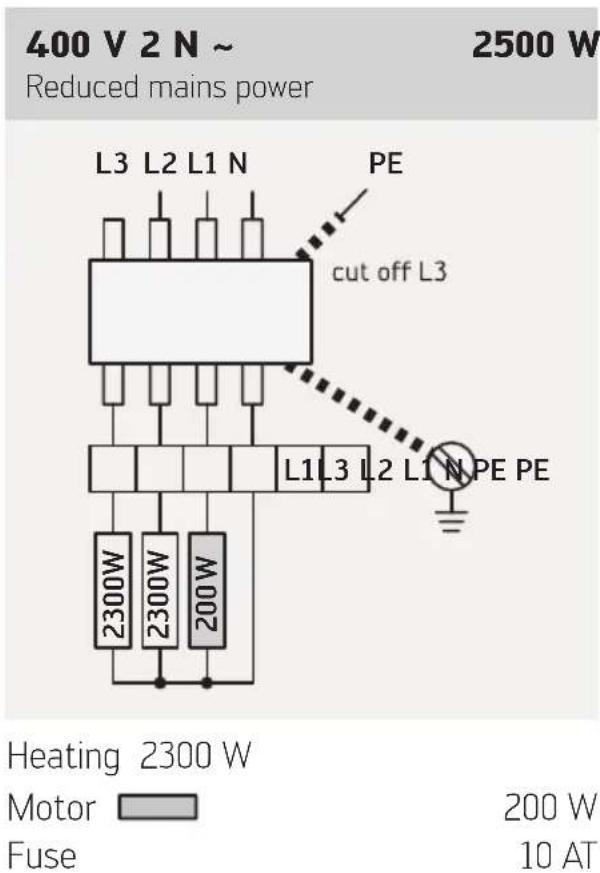
text_image
400 V 2 N ~ Reduced mains power 2500 W L3 L2 L1 N PE cut off L3 L1 L3 L2 L1 N PE PE 2300W 2300W 200W Heating 2300 W Motor Fuse 200 W 10 AT8 kg washing machine
400 V 2 N \~ 4400 W
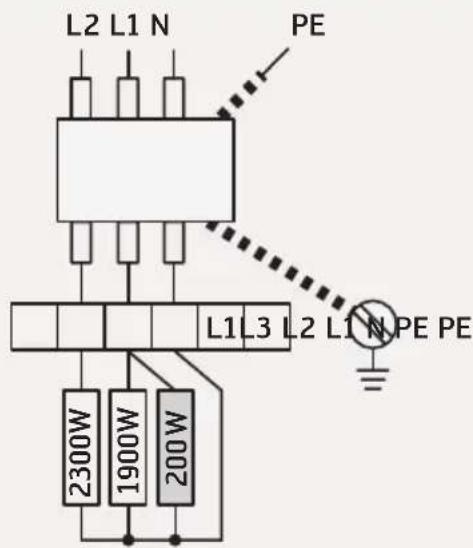
text_image
L2 L1 N PE L1 L3 L2 L1 N PE PE 2300W 1900W 200WHeating 4200 W
Motor 200 W
Fuse 10 AT
230 V 1 N \~ 2100 W
Reduced mains power
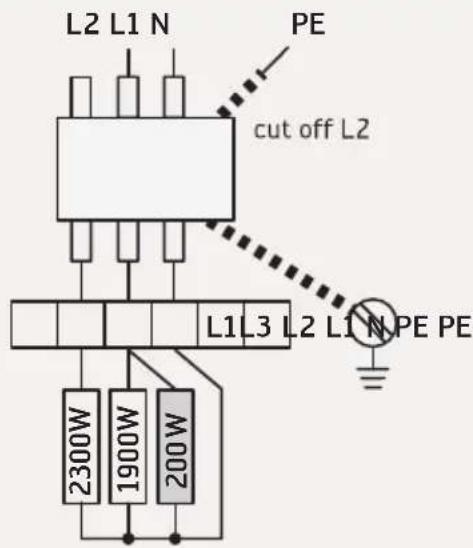
text_image
L2 L1 N PE cut off L2 L1 L3 L2 L1 N PE PE 2300W 1900W 200WHeating
1900 W
Motor

200 W
Fuse 10 AT
L1 brown
N blue
L2 black
PE yellow-green
Translation of the original installation instruction