TO 45356 - Toaster KALORIK - Free user manual and instructions
Find the device manual for free TO 45356 KALORIK in PDF.


User questions about TO 45356 KALORIK
0 question about this device. Answer the ones you know or ask your own.
Ask a new question about this device
Download the instructions for your Toaster in PDF format for free! Find your manual TO 45356 - KALORIK and take your electronic device back in hand. On this page are published all the documents necessary for the use of your device. TO 45356 by KALORIK.
USER MANUAL TO 45356 KALORIK
natural_image
Exterior view of a Kalorik KALORIK stainless steel toaster with control knobs and ventilation slots (no text or symbols on the device itself)EN......3
FR.....16
SP......29
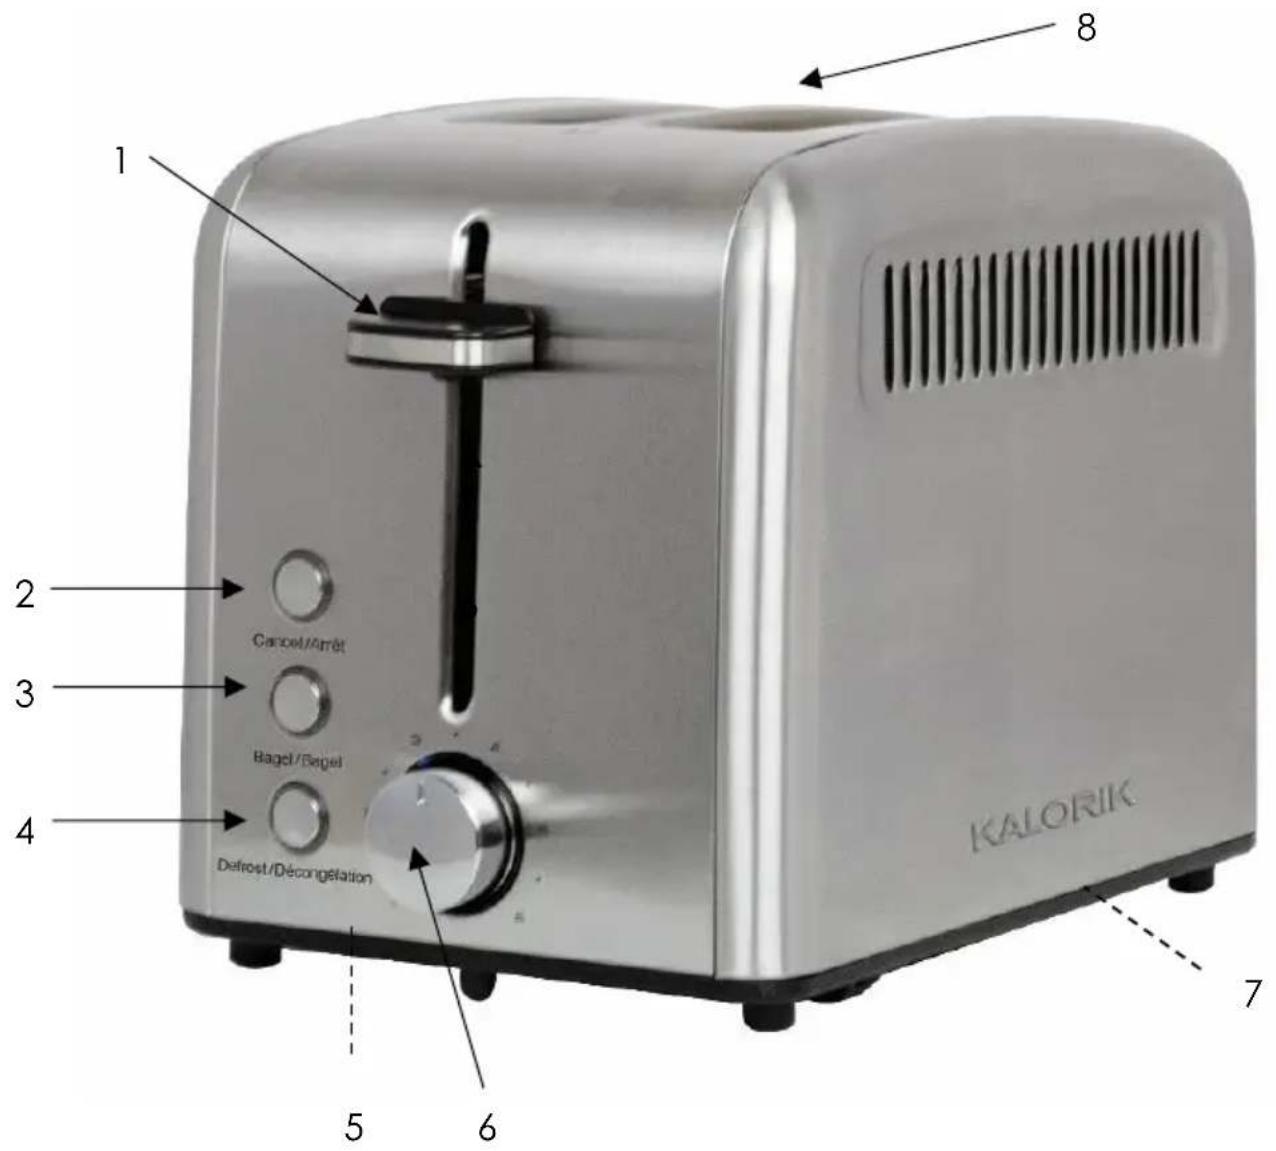
PARTS DESCRIPTION / DESCRIPTION DES ÉLÉMENTS/ DESCRIPCÍON DE PARTES
When using electrical appliances, basic safety precautions should always be followed, including the following:
1. Read all instructions before use.
- Do not touch hot surfaces. Use handles or knobs.
-
Warning - to protect against electric shock, fire and personal injury:
-
do not immerse cord, plug or appliance in water or other liquids.
- do not immerse the appliance or any electrical components in water or any other liquids.
-
always switch off and unplug the appliance before cleaning.
-
Close supervision is necessary when any appliance is used by or near children.
- Unplug from wall outlet when not in use and before cleaning. Allow to cool before putting on or taking off parts, and before cleaning the appliance.
- Do not operate any appliance with a damaged cord or plug, or after the appliance malfunctions or has been damaged in any manner. Call our toll-free customer assistance number for information on examination, repair, or adjustment.
- The use of accessory attachments not recommended by the appliance manufacturer may result in fire, electric shock or injuries to persons.
- Do not use outdoors or in a damp area.
- Do not let power cord hang over edge of table, counter or touch hot surfaces.
- Do not place on or near a hot gas or electric burner or in a heated oven.
- To turn off and disconnect, press the cancel button, then remove plug from wall outlet.
- Do not use appliance for other than intended use.
- Oversized foods, metal foil packages, or metal utensils must not be inserted in the appliance as they may create a fire or risk of electric shock.
- A fire may occur if the appliance is covered or touches flammable material, including curtains, draperies, walls, and the like, when in
operation. Do not store any item on top of the appliance when in operation.
- Do not attempt to dislodge food while the appliance is plugged in.
- Do not clean with metal scouring pads. Pieces can break off the pad and touch electrical parts involving a risk of electric shock.
- Do not place any object made of the following materials in the appliance: paper, cardboard, plastic, metal.
- Do not use metal utensils to remove lodged food, as this may result in personal injuries or damages.
- When heating toaster pastries, always use the lightest toast color setting.
- Never leave the appliance unattended during operation.
-
Warning:
-
do not toast pastries with runny fillings or frosting.
• do not toast torn slices of bread. - do not place buttered bread or wrapped food into the toaster.
- do not toast small-sized bread, mini-baguettes, breadsticks, etc.
SAVE THESE INSTRUCTIONS HOUSEHOLD USE ONLY
WARNING:
DO NOT OPERATE THIS APPLIANCE, IF THE POWER CORD SHOWS DAMAGE OR IF APPLIANCE WORKS INTERMITTENTLY OR STOPS WORKING ENTIRELY.
POLARIZED PLUG INSTRUCTIONS
This appliance is equipped with a polarized plug (one blade is wider than the other). To reduce the risk of electric shock, this plug will fit into the polarized outlet only one way. If the plug does not properly fit into the outlet at first, reverse it. If it still does not fit, contact a competent qualified electrician. Do not attempt to modify the plug in any way.
A short power supply cord is provided to reduce the hazards resulting from becoming entangled in or tripping over a longer cord. Extension cords may be used if care is exercised in their use.
- The electrical rating of the extension cord should be at least that of the appliance. If the electrical rating of the extension cord is too low, it could overheat and burn.
- The resulting extended cord should be arranged so that it will not drape over the countertop or tabletop where it can be pulled on by children or tripped over.
PARTS DESCRIPTION
See page 2-3.
BEFORE THE FIRST USE
- Remove all packaging materials and/or other transportation means.
- Check package content to verify it is complete and undamaged. Do not operate the appliance if the content is incomplete or appears damaged. Return it immediately.
Danger of suffocation!
-- Packaging materials are not toys. Always keep plastic bags, foils and foam parts away from babies and children. Packaging material could block airways and prevent breathing.
NOTE:
-- The appliance may produce an odor and/or emit smoke when switched on for the first time, as residues from the production process are eliminated. This is normal and does not indicate a defect or hazard. -- Always use the appliance with the Crumb Tray.
- When using the appliance for the first time, it is recommended to operate it for at least twice on its highest temperature setting until no odor or smoke is present. During use, ensure ample ventilation.
- Let the appliance cool completely.
- Clean the appliance.
OPERATING INSTRUCTIONS
- This appliance can be used to toast plain fresh or frozen toast/bagels. Do not use for any other foods. Never place any objects in the Toasting Slots.
NOTE:
- The appliance has a rated power of 1350W. Before plugging it into the wall outlet, ensure that the electrical circuit is not overloaded with other appliances. This appliance should always be operated on a separate 120V \~ 60Hz wall outlet.
- Do not connect the appliance to a wall outlet unless it is fully assembled.
- Make sure no food or other objects are inside the Toasting Slots.
- Place the appliance on a clean, flat and heat resistant surface.
- When using the appliance on wooden furniture, use a heat resistant mat to protect the wood from damages. Ensure a minimum distance around the appliance of at least 4 inches to other objects, cupboards and walls
WARNING:
- Only use accessories recommended by the manufacturer. Do not use any other accessories with the appliance.
- Do not cover or insert any objects into the air vents.
- Never let the power cord come in contact with the housing of the appliance during use.
- Do not toast torn or large/thick toasts/bagels, as it may become lodged in the Toasting Slots.
- Make sure the Crumb Tray is free of food residues and inserted properly. Never use the appliance without the Crumb Tray.
-
Insert the plug into a wall outlet.
-
Remove any protective wrappings from toasts/bagels before placing them in the Toasting Slots.
- Rotate the Control Knob to adjust the browning level. Choose between levels 1 to 6, according to your preferences.
- Press the Toasting Lever down, until it locks in place to switch the heating elements on and then select the desired function. The CANCEL Button is illuminated.
NOTE:
- The Toasting Lever will not remain in the downward position, unless the appliance is connected to an energized wall outlet.
- To stop or interrupt any cycle, press the CANCEL Button. The Toasting Lever and contents of the Toasting Slots will pop up and the CANCEL Button will turn off.
- Do not force the Toasting Lever up. Always use the CANCEL Button to switch the appliance off.
Danger of burns!
-- Always pay special attention when placing or removing accessories from the appliance and/or the contents of the Toasting Slots.
-- Toasted food and Toasting Slots get hot, pay attention when removing toasted food. Use suitable non-metal utensils if required.
- Once the toasting cycle is completed, the Toasting Lever and contents of the Toasting Slots will pop up and the CANCEL Button will turn off.
NOTE:
This appliance is equipped with a lift function to assist in removing toasted food from the Toasting Slots. Pull the Toasting Lever upwards to lift the toasted food slightly higher for easier removal.
- Once you have finished using the appliance, remove the plug from the wall outlet.
TOASTING FUNCTION
- Place the bread slices into the Toasting Slots. Select the required browning level with the Control Knob.
- Press the Toasting Lever down, until it locks in place. The toasting cycle begins, and the CANCEL Button is illuminated.
- Once the toasting cycle is completed, the Toasting Lever and contents of the Toasting Slots will pop up and the CANCEL Button will turn off.
BAGEL FUNCTION
Use the bagel function to toast bagels.
NOTE:
- Bagels have to be cut into half. Do not force them into the Toasting Slots.
- When using the bagel function, place the inside of the bagel facing the outer sides of the appliance. Pay attention to the respective position of each bagel half in regard to each toasting slot.
- Place the bagel halves into the Toasting Slots. Select the required browning level with the Control Knob.
- Press the Toasting Lever down and then press the BAGEL Button, until it locks in place. The bagel cycle begins and the BAGEL and CANCEL Buttons are illuminated.
- Once the bagel cycle is completed, the Toasting Lever and contents of the Toasting Slots will pop up and the BAGEL and CANCEL Buttons will turn off.
NOTE:
-- Bagel and defrost functions can be combined by pressing the BAGEL Button before or after the DEFROST Button within 15s. During the defrost cycle, both DEFROST, and BAGEL Buttons are illuminated.
DEFROST FUNCTION
Use the defrost function to defrost plain frozen toasts/bagels. For bagels, please also refer to Bagel function.
- Place the bread slices into the Toasting Slots. Select the required browning level with the Control Knob.
- Press the Toasting Lever down and then press the DEFROST Button, until it locks in place. The defrost cycle begins and the DEFROST and CANCEL Buttons are illuminated.
- Once the defrost cycle is completed, the Toasting Lever and contents of the Toasting Slots will pop up and the DEFROST and CANCEL Buttons will turn off.
NOTE:
-- Bagel and defrost functions can be combined by pressing the BAGEL Button before or after the DEFROST Button within 15s. If the bagel function is used, the BAGEL Button is also illuminated.
GET MORE OUT OF YOUR PRODUCT
Sign up for the Kalorik email mailing list on www.kalorik.com to receive special offers and recipes and connect with us on social media for daily inspiration.
CLEANING AND MAINTENANCE
Proper maintenance will ensure many years of service from your appliance. Clean the appliance after every use. The appliance contains no user serviceable parts and requires little maintenance. Leave any servicing or repairs to qualified personnel.
WARNING:
-- Always ensure the appliance is switched off. Disconnect the plug from the wall outlet before cleaning. Allow all parts of the appliance to cool down completely.
NOTE:
-- Do not immerse the Power Cord with Plug or appliance into water or any other liquids.
-- Do not use abrasive cleaners, steel wool or scouring pads. Dry all parts thoroughly after cleaning, before using or storing the appliance. Ensure that no water enters the appliance housing.
- Clean the surface of the appliance with a damp cloth or sponge and a mild detergent.
- Do not use metal utensils to remove lodged food, as this may result in personal injuries or damages.
- To clean the Crumb Tray, remove it from the appliance completely. Dispose of any crumbs. Rinse the Crumb Tray with water and a little detergent. Dry thoroughly with a soft cloth. Reinsert the Crumb Tray carefully.
NOTE:
Dry all parts and surfaces thoroughly before use. Make sure that all parts and surfaces are completely dry before connecting the appliance to a wall outlet.
STORAGE
- Before storage, always make sure the appliance is completely cool, clean and dry.
- The power cord can be stored in the Cord Storage underneath the appliance.
- It is recommended to store the appliance in a dry place.
- Store the appliance on a stable shelf or in a cupboard. To avoid accidents, ensure that both the appliance and its power cord are beyond reach of children or pets.
| Problem | Cause | Solution |
| The appliance is not working | Appliance not plugged in Wall outlet not energized | Insert the plug into the wall outlet Check fuses and circuit breaker |
| The appliance heats up but the button(s) do not light up | Damaged indicator(s) | Disconnect the appliance from the wall outlet and contact qualified personnel to check and repair the appliance |
| The appliance heats up but the Toasting Lever is not pressed down | Malfunctioning appliance | Disconnect the appliance from the wall outlet and contact qualified personnel to check and repair the appliance |
| The Toasting Lever is pressed down but the appliance does not heat up | Malfunctioning appliance | Disconnect the appliance from the wall outlet and contact qualified personnel to check and repair the appliance |
| Toasts/bagels are ejected very quickly | Toasting Lever not locked in place | Press the Toasting Lever down until it locks in place. Ensure the appliance is connected to an energized wall outlet |
| Toasts/bagels are not ejected once the function cycle is completed | Damaged Toasting Lever Toasts/bagels stuck in the Toasting Slots (torn/too thick/too large) | Disconnect the appliance from the wall outlet and contact qualified personnel to check and repair the appliance Disconnect the appliance from the wall outlet and allow it to cool down. Remove toasts/bagels with non-metal utensils |
| The appliance produces an odor and/or emits smoke | Residues from the production process are eliminated during first useFood type not suitable for toastingBrowning level too highMalfunctioning appliance | Operate the appliance for at least twice on its highest setting, with no food, until no odor or smoke is presentPress the CANCEL Button to stop the cycle and remove the food from the Toasting Slots, using suitable non-metal utensilsPress the CANCEL Button to stop the cycle and remove the toasts/bagels from the ToastingSlots, using suitable non-metal utensils. Reduce the browning level for the next setDisconnect the appliance from the wall outlet and contact qualified personnel to check and repair the appliance |
| Frozen bread/bagels/waffles are not toasted to the desired level | The DEFROST Button was not pressed before the toasting cycle | Place the frozen bread, bagels or waffles into the Toasting Slots. Press the Toasting Lever down and then press the DEFROST Button to start a toasting cycle using the defrost function |
| The heating elements in the middle of the toaster don’t toast very well | Malfunctioning appliance | Disconnect the appliance from the wall outlet and contact qualified personnel to check and repair the appliance |
| Uneven toast: Darker toasting on bottom and then lightens toward the top of the toast. One side is brown and the other is barely toasted. | This may happen when toasting just one slice of bread. The inner side of the bread will face more heat and darker than the outer side. And there will be color difference from top to bottom. | The Rapid toaster is recommended for toasting of two slices of bread at the same time. If toasting one slice of bread, use lower setting. Suggested that once toasting has been done, toast again on the second slot so that the other side of the one toast gets the same inner heating. |
We suggest that you complete and return the enclosed Product Registration Card promptly to facilitate verification of the date of original purchase. However, return of the Product Registration Card is not a condition of these warranties. You can also fill out this warranty card online, at the following address: www.KALORIK.com
This KALORIK product is warranted in the U.S.A. and Canada for 1 year from the date of purchase against defects in material and workmanship. This warranty is not transferable. Keep the original sales receipt. Proof of purchase is required to obtain warranty performance. During this period, if the KALORIK product, upon inspection by KALORIK, is proven defective, it will be repaired or replaced, at Kalorik's option, without charge to the customer. If a replacement product is sent, it will carry the remaining warranty of the original product.
This warranty does not apply to any defect arising from a buyer's or user's misuse of the product, negligence, failure to follow KALORIK instructions noted in the user's manual, use on current or voltage other than that stamped on the product, wear and tear, alteration or repair not authorized by KALORIK, or use for commercial purposes. There is no warranty for glass parts, glass containers, filter basket, blades and agitators, and accessories in general. There is also no warranty for parts lost by the user.
ANY WARRANTY OF MERCHANTABILITY OR FITNESS WITH RESPECT TO THIS PRODUCT IS ALSO LIMITED TO THE ONE YEAR LIMITED WARRANTY PERIOD.
Some states do not allow limitation on how long an implied warranty lasts or do not allow the exclusion of incidental or consequential damages, so the above limitations may not apply to you. This warranty gives you specific legal rights, and you may also have other rights which vary from state to state.
If the appliance should become defective within the warranty period and more than 30 days after date of purchase, do not return the appliance to the store: often, our Customer Service Representatives can help solve the problem without having the product serviced. If servicing is needed, a Representative can confirm whether the product is under warranty and direct you to the nearest service location.
If this is the case, bring the product, or send it, postage prepaid by the user (all Kalorik customers are responsible for the initial shipment back
to the warranty center), along with proof of purchase and a return authorization number indicated on the outer package, given by our Customer Service Representatives. Send to the authorized KALORIK Service Center (please visit our website at www.KALORIK.com or call our Customer Service Department for the address of our authorized KALORIK Service Center).
When sending the product, please include a letter explaining the nature of the claimed defect.
If you have additional questions, please call our Customer Service Department (please see below for complete contact information), Monday through Thursday from 9:00am - 5:00pm (EST) and Friday from 9:00am - 4:00pm (EST). Please note hours are subject to change.
If you would like to write, please send your letter to:
KALORIK Customer Service Department
Team International Group of America Inc.
16175 NW 49 ^th Avenue
Miami Gardens, FL 33014 USA
Or call:
Toll Free: +1 888-521-TEAM / +1 888-KALORIK
Only letters can be accepted at this address above. Shipments and packages that do not have a return authorization number will be refused.
Team International Group of America Inc.
16175 NW 49 ^th Avenue
Miami Gardens, FL 33014 USA
OBTENGA MÁS DE SU PRODUCTO
Team International Group of America Inc.
16175 NW 49th Ave
Miami Gardens, FL 33014 USA
O llame gratuitamente (U.S.A.) al +1 888-521-TEAM / +1 888-KALORIK
For questions please contact:
Team International Group of America Inc.
16175 NW 49th Avenue
Miami Gardens, FL 33014 USA
text_image
1 AÑO GARANTIA • GARANTÍE 1 AÑO • 1 YEAR WARRANTY 1 YEARRef TO 45356 SS
User manual content and recipes courtesy of Team International Group – Do not reproduce without consent of the authors - All rights reserved.