EPCK 45028 BK - Saucepan KALORIK - Free user manual and instructions
Find the device manual for free EPCK 45028 BK KALORIK in PDF.

User questions about EPCK 45028 BK KALORIK
0 question about this device. Answer the ones you know or ask your own.
Ask a new question about this device
Download the instructions for your Saucepan in PDF format for free! Find your manual EPCK 45028 BK - KALORIK and take your electronic device back in hand. On this page are published all the documents necessary for the use of your device. EPCK 45028 BK by KALORIK.
USER MANUAL EPCK 45028 BK KALORIK
natural_image
Exterior view of a modern stainless steel rice cooker with digital display and control buttons (no visible text or symbols on main body)EN......4
ES.....29
FR.....57
PARTS DESCRIPTION / DESCRIPTION DES ÉLÉMENTS
text_image
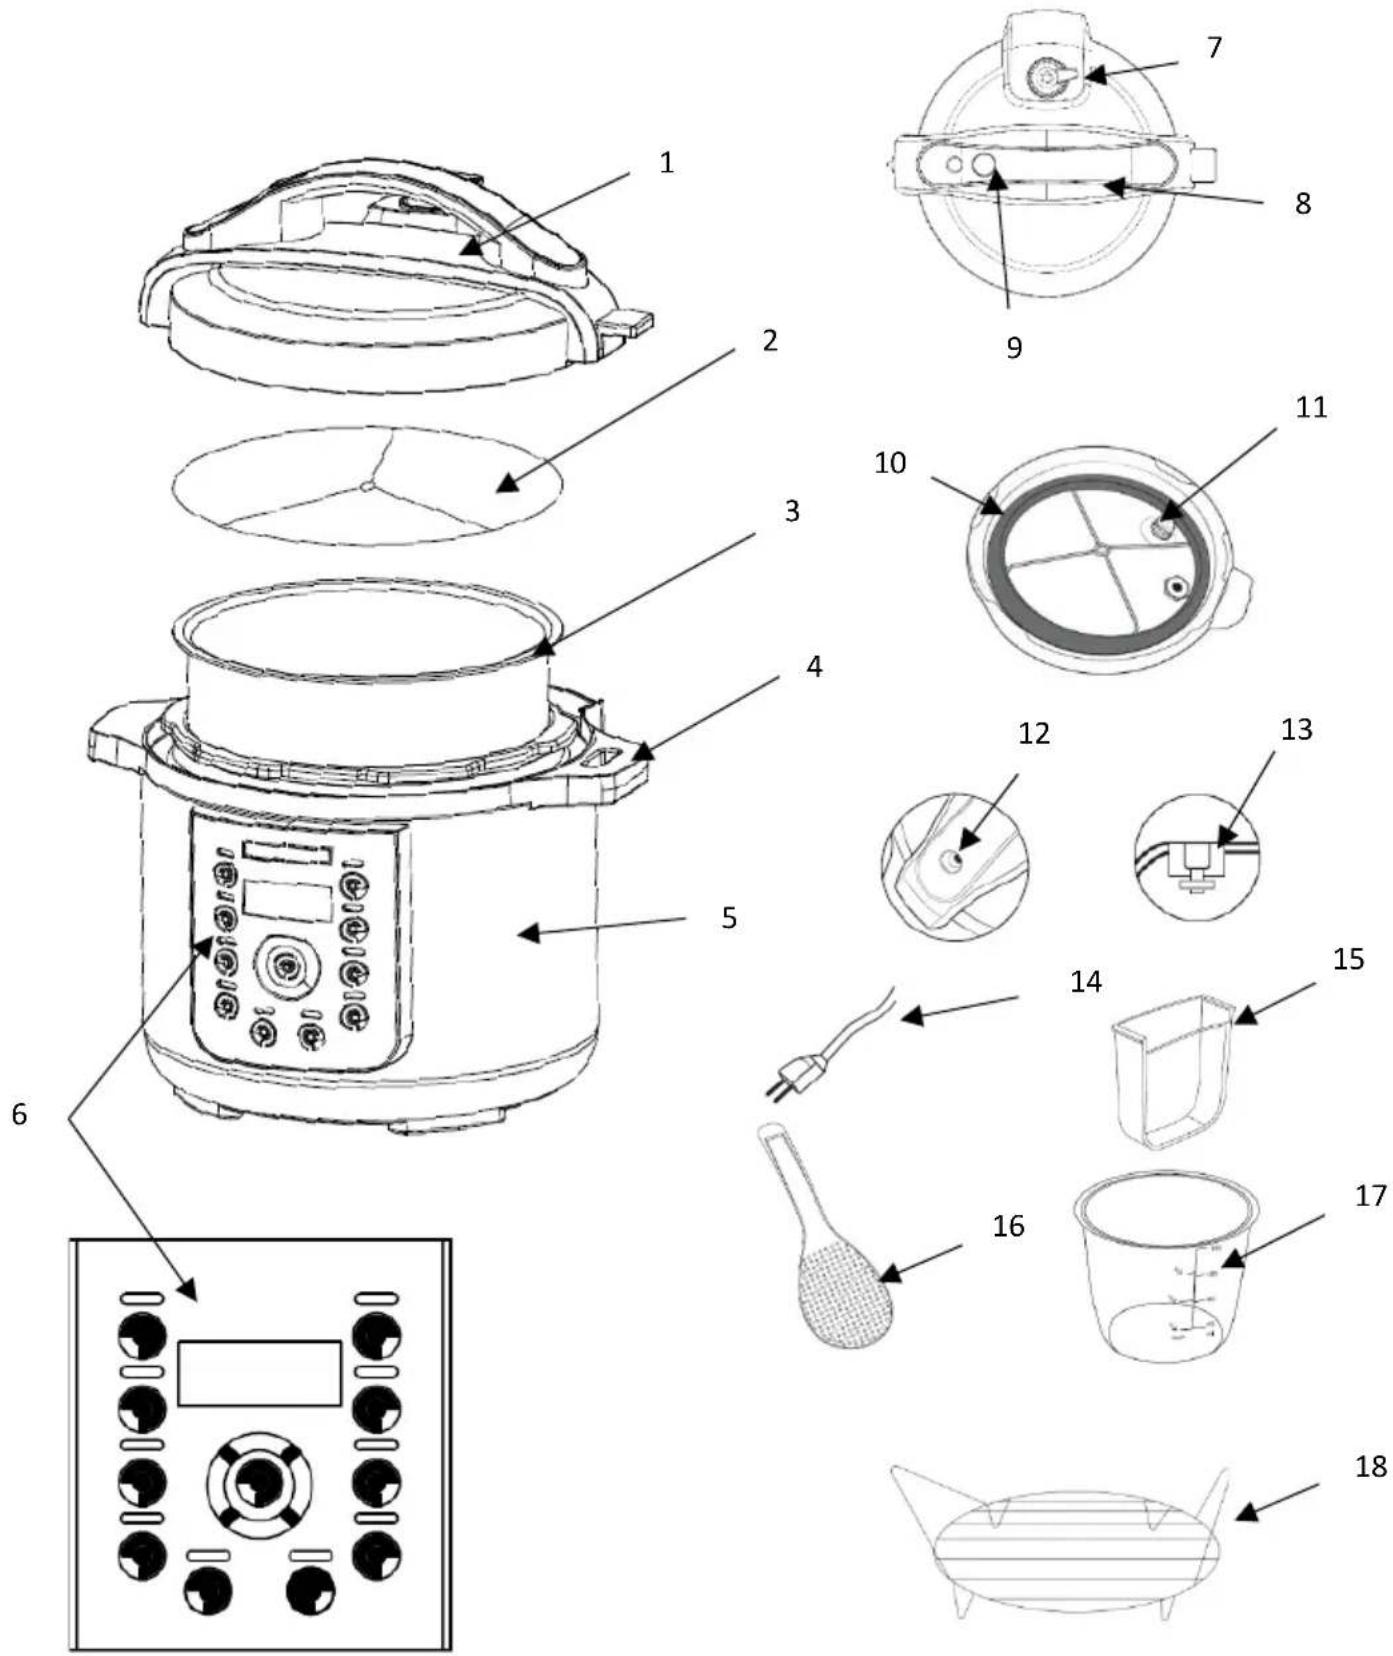
Exploded diagram of a rice cooker with numbered parts for identification and assembly reference.ENGLISH:
- Lid
- Gasket holding ring
- Removable cooking pot
- Cooker handle
- Exterior Housing
- Control panel
- Steam release knob
- Lid Handle
-
Lid release button
-
Silicon gasket
- Anti-block shield
- Float valve hole
- Float valve
- Power cord
- Condensation collector
- Rice paddle
- Measuring cup
- Steaming rack
ESPAÑOL:
When using electrical appliances, basic safety precautions should always be followed, including the following:
1. READ ALL INSTRUCTIONS BEFORE USE.
- DO NOT touch hot surfaces on the appliance. Use handles or knobs.
- To protect against electrical shock, do not immerse the cord, plug, external housing or the appliance in water or other liquids.
- Close supervision is necessary when any appliance is used near children. This appliance should not be used by children.
- Children should be supervised to ensure that they do not play with the appliance.
- Please keep out of reach of children and pets. This product is not intended for use by children, by people with reduced physical, sensory or mental capabilities, or by people lacking product experience or knowledge, unless they have been given supervision or instruction concerning its use by a person responsible for their safety. Extra caution is always necessary when using this product.
- Unplug from outlet when not in use and before cleaning. Allow to cool before putting on or taking off parts and before cleaning the appliance.
- DO NOT operate any appliance with a damaged cord or plug or after the appliance malfunctions or has been damaged in any manner. Return the appliance to the nearest authorized service facility for examination, repair, or adjustment.
- Do NOT cover the pressure valves with anything. An explosion may occur.
- This appliance cooks under pressure. Improper use may result in scalding injury.
- Do not use outdoors or for commercial purposes.
- The use of accessory attachments not recommended by the appliance manufacturer may result in fire, electric shock, or injury.
- DO NOT let the cord hang over the edge of a table or counter or touch hot surfaces.
- DO NOT place on or near a hot gas or electric burner, or in a heated oven.
- DO NOT use the appliance for other than intended use.
- To disconnect, press the 'Keep Warm/Cancel' to stop the device, then remove the plug from wall outlet.
- Do not intend to operate by means of an external timer or separate remote-control system.
-
Extreme caution must be exercised when moving an appliance containing hot oil or other hot liquids. Do not move the appliance when under pressure.
-
Do not use on plastic or synthetic tablecloths or any unstable place or near flammable goods including curtains, draperies, walls, and the like, as fire may occur.
-
Never impact this unit or drop from high place.
-
Do not touch the lid during use. HOT SURFACE! Do not touch hot surfaces, use handles or knobs.
-
To reduce the risk of electric shock, only cook in the supplied removable cooking pot.
-
Do not use metal utensils on the cooking bowl surface, as they will scratch the non-stick coating.
-
Do not fill the pressure cooker more than 12 full with food or 2/3 full with liquids. When cooking foods that may expand when cooking, do not fill the unit over 12 full. Over filling may risk clogging the steam release and developing excess pressure. This may also cause leakage, personal injuries, or damage to the cooker. These level warnings do not apply to non-pressure cooking programs.
-
When cooking food under pressure, at least 2 cups of water (16 Oz) must be added.
-
Foods such as applesauce, cranberries, oatmeal or other cereals, peas, noodles, pasta, or rhubarb should not be cooked under pressure, as these foods tend to foam, froth, and sputter, which may block the floating valve.
-
WARNING! Keep hands and face away from the pressure regulator knob or valve when releasing the pressure.
-
Do not open the cooker until the cooker has cooled and all internal pressure has been released. If the float valve is still up or the lid is difficult to turn, it is an indication that the cooker is still pressured – do not force it open.
-
Make sure the steam release knob is in the sealing position for all the pressure cooking programs.
-
Always check the steam release valve, float valve and anti-block shield for clogging before use.
-
Never remove the lid while this unit is operating under pressure!
-
After cooking, use extreme caution when removing the lid. Serious burns can result from the steam inside the unit.
-
CAUTION! When removing the lid, there could be a suction created between the inner pot and the lid.
-
Do not attempt to dislodge food when the appliance is plugged in.
-
CAUTION: Perishable foods, such as meat or poultry products, fish, cheese or dairy products, cannot be left at room temperature for more than 2 hours (and no longer than 1 hour if the temperature in the room is above 90F). When cooking these foods, do not set the delay timer function for more than 2 hours.
-
DANGER! Never deep fry or pressure fry in a pressure cooker. It is dangerous and may cause fire, injuries, and serious damage.
-
Service or repair should only be performed by a qualified technician. This product contains no user-serviceable parts.
-
DANGER! Do not lift the unit with the lid handle, use side handles only!
SAVE THESE INSTRUCTIONS HOUSEHOLD USE ONLY
3-PRONG PLUG INSTRUCTIONS
For your personal safety, this appliance must be grounded. This appliance is equipped with a power supply cord having a 3-prong grounding plug. To minimize possible shock hazard, the cord must be plugged into a mating 3 prong, grounding type, wall receptacle, grounded in accordance with the National Electrical Code ANSI/NFPA 70 latest edition and all local codes and ordinances. If a mating wall receptacle is not available, it is the personal responsibility and obligation of the customer to have a properly grounded, 3-prong, wall receptacle installed by a qualified electrician.
SHORT CORD INSTRUCTIONS
A short power supply cord is provided to reduce the hazards resulting from becoming entangled in or tripping over a longer cord. Do not use with an extension cord.
PARTS DESCRIPTION
See page 2-3. The Kalorik 10-IN-1 Multi Use Pressure Cooker comes with a measuring cup, a spoon and a rack to cook.
| Steam release knob: | Should be set to the ‘Sealing’ position before using the unit, for the cooker to build pressure. |
| Set to the ‘Venting’ position to release the pressure manually or to cook without pressure. | |
| Removable cooking pot: | 8L/8.4qt capacity stainless steel removable pot, provides even heat distribution. |
| Silicon gasket: | Creates the air-tight seal needed for the pressure cooker. |
| Gasket holding ring: | Holds up the silicon gasket. |
| Condensation collector | Collects any condensation on the lid or the sides of the pressure cooker |
Control panel functions:
There are 16 presets in addition to a Keep Warm and Delay start setting. More details about each preset are presented in the Settings table.
BEFORE THE FIRST USE
- Remove all packing materials and literature.
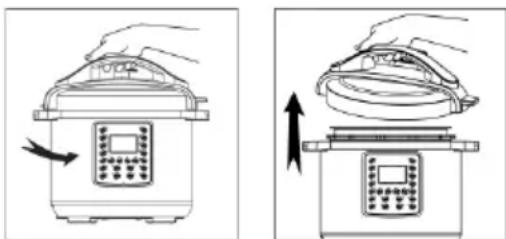
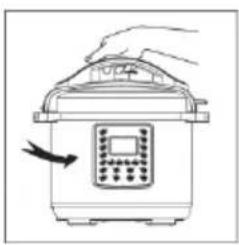
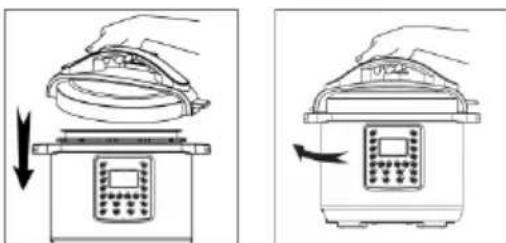
- To remove the lid, press the button on the lid, hold the handle, turn in a counterclockwise direction, and lift off. Make sure not to lift off the pot while lifting the lid
natural_image
Illustration of a rice cooker with hand gestures showing the process (no text or symbols)- Wash all removable parts and accessories in warm, soapy water. Rinse and dry all parts thoroughly.
- Wipe the outer housing with a clean damp cloth.
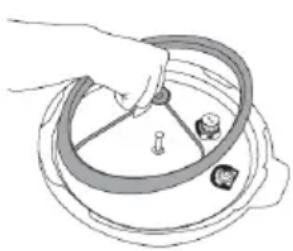
- Make sure the silicon gasket is properly fitted on the gasket holding ring.
- Place the gasket holding ring into the underside of the lid. It will only fit in one way.
- Push the dew collector on the back of the pressure cooker.
OPERATION
Cooking under pressure
- Remove the lid: press the button on the lid, hold the handle, turn in a counterclockwise direction, and lift off.
- The lid can rest in a vertical position when placed on the lid rests located on each of the handles.
natural_image
Line drawing of a rice cooker with a digital display and hand holding the lid (no text or symbols)
natural_image
Illustration of a hand pressing down on a kitchen appliance with a digital display (no text or symbols)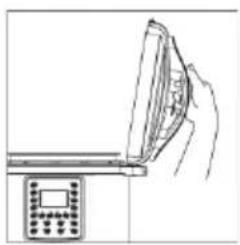
natural_image
Line drawing of a hand inserting a card into a device (no text or symbols)- Check that the silicon gasket is in good shape.
- Make sure that the silicon gasket is present in the gasket holding ring and the gasket holding ring is fitted inside the lid.
- Add food and or liquids to the cooking pot. Do not fill the removable cooking pot to more than 2/3 for liquids and not more than 12 full for solids. Highly-expanding food should not fill the pot
more than 1/2 of its capacity. At minimum, fill at least 2 cups (measuring cup is provided) when using pressurized settings.
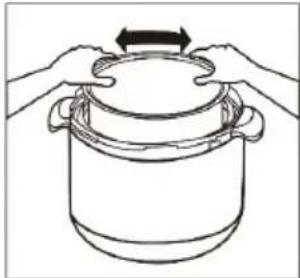
- Place the removable pot inside the appliance. Make sure that the outside of the inner pot, surface of the heater and the inner cavity are clean and dry.
natural_image
Line drawing of hands stirring a cooking pot with an arrow indicating rotation (no text or symbols)- Each time before using the pressure cooker, check to be sure that the silicon gasket and the pressure regulator valve are clean and in the down position properly. Make sure the anti-block shield is clean and free of food debris.
- Close the lid. Hold the handle and turn the lid in a clockwise direction to lock it.
natural_image
Two-step illustration showing a hand holding a lid above a rice cooker, with no text or symbols present.Note: The directions for opening and closing the lid are also present on top of the lid for reference.
CAUTION: SURFACE GETS HOT. DO NOT TOUCH. Failure to follow the directions below may result in serious injury.
A. Be certain that the Steam Release ring is in the Sealing position before turning on the power and selecting a function.
B. The Steam Release ring must be in the Venting position and the Float Valve in the down (open) position prior to opening the lid.
C. When cooking liquids, be certain the Float Valve is in the down (open) position prior to releasing the Exhaust from the Steam Release ring.
D. Keep hands and face away from Steam Release ring when pressure is being vented.
- Place the steam release knob in the 'Sealing' position and check that the float of the floating valve is down.

text_image
Seating Vanting- Plug the cord into a wall outlet and the other end inside the pressure cooker. The display will show 'OFF'.
- When unit is on standby mode, press on a preset. The presets are Rice, Fruit, Soup/Broth, Multi Grain, Cake, Fish, Sterilize, Bean/Chili, Meat/Stew, Poultry, Egg, Steam, Slow Cook, Sauté, Yogurt, Manual, Keep Warm and Delay Start setting. To indicate that the preset has been selected, the LED light above the preset will light up.
- Each preset will be displayed with the corresponding default time and default pressure (Low or High). To change time, press the ‘+’ or ‘-’ buttons. To adjust the pressure level, press ‘Pressure Hi/Lo’
- Each preset has been calibrated with settings allowing variations of the same dish. For each preset, select between 'Less', 'Normal' or 'More' modes by pressing the Adjust button to find your perfect cooking program.
- The cooking process automatically begins 10 seconds after making a selection.
- While the unit is building up pressure, the bars on the screen will go up and down as indicators. The unit will only begin to count down time after the pressure has been reached. It may take several minutes to begin the countdown. This depends on the fullness of the pot. When the desired pressure level is reached, the timer will start counting down.
- When the cooking cycle is complete, the pressure cooker will beep and automatically switch to the Keep Warm function. Turn off the cooking or Keep warm function by pressing the 'Keep Warm/Cancel' button. This button can be pressed at any time during the cooking cycle.
- Once turned off, let the pressure drop on its own (natural release method) or release the pressure immediately by sliding the steam
release knob to the 'Venting' position until the pressure is released (quick release method).
CAUTION! When turning the steam release knob to release the pressure, hot steam/liquid will escape. Risk of scalding! USE KITCHEN GLOVES OR OVEN MITTS! Do not place hands, face or skin over the pressure outlet. When preparing soup or other liquids, make sure that the Floating Valve is in the down(open) position before carefully turning the steam release knob.
WARNING: Hot steam/liquid will be ejected. Keep hands and face away from steam vents, use pot holders when removing the removable pot or touching any hot items. Never force the lid open. The lid will only open once the pressure is released. Remove the lid by lifting it away from you to avoid being burned by the steam.
- To take the inner pot out, use oven mitts or kitchen gloves and lift up to remove. Place on a heat-resistant surface.
- Use the included spoon to remove the food as required
- Let the appliance cool completely before cleaning. See the 'Cleaning' section for more details
'Adjust' button:
The ‘Adjust’ button on the Kalorik pressure cooker allows the user the convenience of a quick selection of different times based on the type of food, quantity and/or the cooking level required. There are three types of modes for each preset- the ‘Less’, ‘Normal’ and ‘More’ which are also visible on the display screen. To operate this, follow the below steps:
- With the pressure cooker on standby mode, press the desired preset required. By default, the selected preset will be set in the 'Normal' mode.
- Press the 'Adjust' button to switch to the 'More' mode. Press the 'Adjust' button again to switch to the 'Less' mode. Selected modes are displayed on the screen.
-
If needed, the times may be further changed by pressing the ‘-’ or’+’ at any time before cooking has begun.
-
The pressure cooker automatically starts operating 10 seconds after the setting and mode have been selected.
Note: Please refer to the settings table below for cooking program options:
Settings table:
| Function | Adjust | Use | Default Pressure |
| Rice | Less | Normal release method* | High |
| Normal | White rice, quick release | ||
| More | Brown rice | ||
| Fruit | Less | Some fresh fruits | High |
| Normal | Most fruits | ||
| More | Dried fruits, sauces | ||
| Soup/Broth | Less | Soup without meat | High |
| Normal | Soup with meat | ||
| More | Bone broth | ||
| Multigrain | Less | Mung beans, farro, bulgur, whole oats | High |
| Normal | Barley, kamut | ||
| More | A mixture of grains and beans | ||
| Cake | Less | Moist cakes | High |
| Normal | Perfect cakes | ||
| More | Cheesecakes | ||
| Fish | Less | Small quantity | Low |
| Normal | Medium quantity | ||
| More | Larger quantity | ||
| Beans/Chili | Less | Black beans, Black-eyed peas | High |
| Normal | Pinto, Great Northern, Navy beans | ||
| More | Chick peas | ||
| Meat/Stew | Less | Soft texture | High |
| Normal | Softer texture | ||
| More | Falling-off-the-bone | ||
| Poultry | Less | Chicken Breast 1lb. | High |
| Normal | Chicken Breast 3lb. | ||
| More | Chicken Breast 5 lb. | ||
| Egg | Less | Soft boiled | High |
| Normal | Medium boiled | ||
| More | Hard boiled | ||
| Steam | Less | Vegetables | High |
| Normal | Seafood | ||
| More | Meat | ||
| Sterilize | Less | Baby bottles | High |
| Normal | Foods, utensils | ||
| More | Canning of fruits and vegetables | ||
| Yogurt | Less | Less tangy yogurt | No pressure |
| Normal | Tangier yogurt | ||
| More | Pasteurizes the milk** | ||
| Slow Cook | Less | Non-pressure cooking | No pressure |
| Normal | |||
| More | |||
| Sauté | Less | Onions | No pressure |
| Normal | Browning of Meat | ||
| More | Large qty of meat and stir frying | ||
| Manual | Less | Covers the whole spectrum | High |
| Normal | |||
| More |
*The actual cooking times for each setting can and will vary depending on the quantity of food and water used.
**See Yogurt section for detailed instructions
'Slow cook' setting
This program enables you to cook food at low temperature, in liquids, for an extended period of time.
- Place the food to be slow cooked in the cooking pot.
- Place the lid on the pressure cooker and lock it in place by turning it clockwise.
- Turn the steam release knob to the Venting position.
- Press the 'Slow Cook' button.
Note: This function will cook food at 190-208°F
- By default, the unit is set to the 'Normal' mode with an 8-hour cooking time indicated in the display.
- Press the ‘+’ or ‘-’ buttons to set the desired cooking time or alternatively press the ‘Adjust’ button to easily adjust between the ‘Normal’, ‘More’ or ‘Less’ modes. The longest cooking time is 12 hours.
- The pressure cooker will automatically start functioning after 10 seconds.
'Sauté' setting
Use the 'Sauté' or browning function to brown meats or caramelize vegetables. Searing or browning ingredients keeps them moist, tender and flavorful.
- Always ensure the lid is removed from the appliance before using the 'Sauté' function
- Add a small amount of oil or butter to the bottom of the removable cooking pot.
- Place the food in the cooking pot.
- Once the pressure cooker is on standby mode, press the 'Sauté' button to select the function.
- Adjust the time up or down, depending on your desired cooking time. The default cooking time is 15 minutes.
Note: For optimal results, meat searing should be done in small batches.
- When finished, use tongs to remove ingredients or select 'Slow Cooking' or one of the preset pressure cooking menus to continue preparing your meal.
'Delay start' setting
This function allows you to begin cooking food up to 24 hours later. You can use the delayed time setting with the slow cook or pressurized settings.
Caution: Perishable foods such as meat and poultry products, fish, cheese and dairy products cannot be left at room temperature for more than 2 hours (no longer than 1 hour when the room temperature is above 90F). When cooking these foods, do not set the delay start function for more than 1-2 hours!
- Select 'Delay start' and keep pressing the 'Delay start' button to adjust the time to your desired starting time (up to 24 hours delay). Time can be delayed in 30 minutes increments up to 24 hours. The delayed start pilot light will turn on.
- Select one of the preset functions to validate the delayed start and select a cooking mode and adjust time or pressure as necessary.
- The appliance automatically starts the delay start countdown 10 seconds after the selection of a preset.
- Once the delayed time is complete, the pressure cooker will automatically start the cooking process.
NOTE: Delay start can also be set after selecting one of the presets.
'Yogurt' setting
The yogurt function in the Kalorik 8 Qt. pressure cooker makes making yogurt at home easy. Simply follow the below steps:
-
Open the pressure cooker and remove the cooking pot.
-
Fill the cooking pot with the desired amount of milk and place the cooking pot back inside the pressure cooker and shut the lid.
-
Turn the steam release knob to the 'Sealing' position.
-
Plug the pressure cooker into an outlet. The pressure cooker will be on Standby mode and will display 'OFF'.
-
Press the 'Yogurt' button once and then immediately press the 'Adjust' button once. The display screen should display 'boiL'.
-
The pressure cooker will automatically begin to pasteurize the milk, which is an important step in the yogurt making process.
-
Once the pasteurization is complete, the pressure cooker will beep indicating that this step is complete.
-
Let the milk cool to a little above room temperature- around 100-105°F (38-40°C). You can let it cool inside the pressure cooker or take the pot out to let it cool faster.
-
Place the live yogurt strains inside the pot and place the pot back inside the pressure cooker. Shut the lid and place the steam release knob to the 'Sealing' position.
-
With the display on 'OFF' position, press the Yogurt button and the display will show 8:00hrs. You can adjust this time by pressing the '+' or '-' buttons respectively for how long you require the yogurt to be fermented for. The time can be adjusted from 4hrs to 24hrs.
-
The pressure cooker will reach the fermentation temperature and will continue functioning until the cooking time has elapsed.
Tip: The longer the yogurt is fermented for, the tangier the yogurt will be.
'Keep warm' setting
This program reheats or keeps cooked food warm for extended periods of time. This mode is automatically selected after the cooking time is elapsed, unless the 'Keep Warm/Cancel' button is pressed to stop the unit. The display starts to count up from the time 'Keep Warm' was selected. 'Keep Warm' can be started directly without any other cooking process. To do this, once the pressure cooker is on standby mode and the display shows 'Off', press the 'Keep Warm/Cancel' button. The 'Keep Warm' function will switch on automatically and will
count up from the time ‘Keep Warm’ was selected. Food can be kept warm up to 24 hours.
This mode can be entered at any time during cooking, by pressing the "Keep Warm/Cancel" button twice.
Note: The unit will turn to keep-warm automatically after it finishes a cycle of pressure cooking, but some residual pressure might still be present in the cooking pot. You can release this pressure manually or simply wait for the pressure to release naturally.
Using the accessories
The provided heat resistant rack can be used for cooking foods that need to be cooked without direct heat from the bottom of the cavity or those that do not need to come into contact with water. The rack can be a great accessory for steaming foods (using the ‘Steam’ preset) and for making cakes (using the ‘Cake’ preset). To use the rack:
- Use the rack handles to lift the rack and place it inside the empty removable pot.
- Add about 1.5 cups (12oz) of water to the pot so that the rack surface is above the liquid.
- Add the food either by placing it directly on the rack or by placing it in a heat-resistant bowl or a baking pan (in the case of cake).
- Make sure that the rack handles are standing upright inside the pot. The rack handles can rest on the removable pot if required.
- Lock the lid and turn the Steam Release knob to the 'Sealing' position.
- Select the ‘Steam’ or ‘Cake’ setting as desired and adjust the time according to your preference.
- After the cooking has elapsed, and the steam has been released by turning the knob to ‘Venting’ position, carefully open up the lid.
- Use oven mitts to grab the rack using the two rack handles and lift up vertically to remove the rack.
Note: Take care while removing the rack and watch out for steam and/or hot food on the racks. Alternatively, you can use tongs to pick out food that has directly been placed on the rack.
- To ensure the best cooking performance when cooking under pressure, always use at least 2 cups of water or liquid in your recipes to enable enough steam to be created to produce pressure.
- When using the pressure settings, the timer will not begin counting down until there is enough pressure.
- When cooking under pressure, if you are unsure of the cooking time, it is better to under cook and use the quick release method and check for doneness. If not done, just continue cooking under pressure.
- Never fill the pressure cooker more than half full with food or 2/3 full with liquid.
- If the electric circuit is overloaded with other appliances, your appliances may not operate. The pressure cooker should be operated on a separate electrical circuit.
- Tougher cuts of meat are better suited for the pressure cooker because cooking under pressure breaks the fibers down for tender results.
- Add a tablespoon of oil to the water to reduce the amount of foaming that beans produce.
- You can use frozen meats and poultry. Rule of thumb is, if it is frozen then add ten minutes for every inch of the thickness of the food.
Cooking rice
For better results, always rinse rice before cooking. Cook rice in liquid such as water or broth.
On the next page is a table of recommended cooking times for different types of rice.
| Rice type | Time in minutes | Uncooked rice (cups) | Liquid (cups) |
| Arborio | 6 to 8 | 1 | 2 |
| Basmati | 4 to 6 | 1 | 1 12 |
| Emperor's Rice | 20 to 25 | 1 | 2 34 |
| Jasmine | 4 to 7 | 1 | 1 12 |
| Long-grain, Brown | 10 to 18 | 1 | 1 12 to 2 |
| Long-grain, White | 4 to 5 | 1 | 1 12 |
| Parboiled | 6 to 8 | 1 | 112 |
| Red rice | 7 to 9 | 1 | 2 12 |
| Short-grain, Brown | 12 to 20 | 1 | 1 12 to 2 |
| Short-grain, White | 6 to 8 | 1 | 1 12 |
| Wild rice | 20 to 25 | 1 | 3 to 4 |
CLEANING AND MAINTENANCE
- Unplug the unit and let it cool before cleaning.
- Wash the inner cooking pot with hot soapy water, using a clean dishcloth. Rinse and dry. Wipe dry with a soft cloth. It can also be placed in a dishwasher
- The accessories including measuring cup and spoon can also be cleaned under warm, soapy water if required.
- Wash the inner surface of the lid thoroughly, including the steam release knob, gasket holding ring, anti-block shield and float valve.
- Wipe the outer housing with a clean damp cloth. DO NOT submerge in water!
- Always clean the pressure cooker thoroughly after every use or if it has not been used for an extended period.
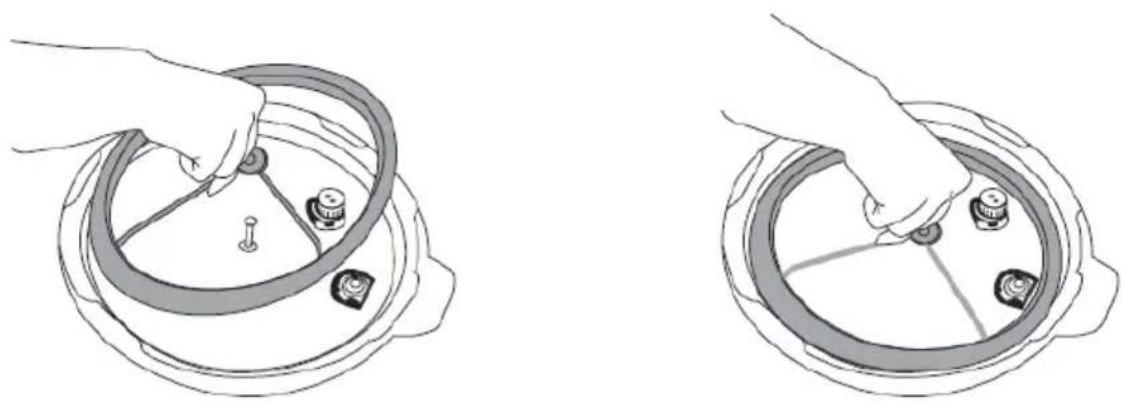
- Always check that the gasket is clean and in good shape. If you need to remove the gasket for cleaning, turn the lid upside down, grasp the gasket holding ring and pull up to remove it out. Pull out the silicon gasket from the gasket holding ring and clean both the ring and the gasket under warm soapy water. Rinse and dry thoroughly. Replace the gasket back on the ring by lining it along the edge of the gasket holding ring. Make sure the inner center of the gasket is wedged into the ring.
- Place the ring back on the lid by pushing the center of the ring onto the center of the lid.
natural_image
Illustration of a hand holding a steering wheel with a small object inside (no text or symbols)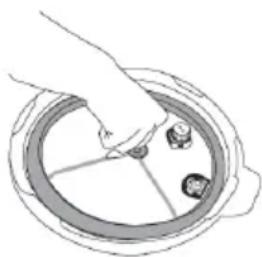
natural_image
Illustration of a hand placing a small object into a circular container with two small items on the side (no text or symbols)- Make sure to empty, clean and replace the dew collector before each use.
Note: If the gasket is not positioned properly, the unit will not build pressure. The silicon gasket must always be properly positioned. Check periodically to make sure that it is clean, flexible, and not cracked or torn.
- If the silicon gasket is damaged, do not use the appliance and contact our Customer Service department (see the 'WARRANTY' section).
- Never use abrasive cleaners or scouring pads to clean any of the parts.
- Make sure that the parts are clean and dry before storing
DO NOT IMMERSE THE HOUSING IN WATER OR ANY OTHER LIQUIDS!
To clean the valves
- Check that the steam release knob and the pressure safety valves are in good working order before each use.
• After the unit has cooled, remove the lid. - Turn the lid upside down and remove the anti-block shield. Simply pull firmly on the anti-block shield to remove. Check the exhaust valve (also referred to as pressure regulator valve) and clean if necessary.
- Using a brush, check for and remove any food or foreign particles that may be lodged in the exhaust valve or floating valve.
- Replace the anti-block shield on the bottom of the exhaust valve. Firmly push the anti-block shield to secure it in position.
Any other servicing should be performed by an authorized service representative!
TROUBLESHOOTING
If you have not added sufficient liquid and you notice that the floating valve has not risen, but the timer is counting down, perform the following steps:
- Stop the pressure cooker by pressing the 'Keep Warm/Cancel' button
- Turn the steam release knob to the 'Venting' position, until the pressure is fully released.
- Carefully remove the lid and add approximately 1 cup of water/stock or any liquid. Stir food to disperse liquid.
- Replace the lid and lock into position.
- Select your desired preset menu and adjust the cooking time and pressure if necessary.
- The cooking process will begin automatically in a couple of seconds
If steam is leaking from under the cover because the cover is not properly closed, the gasket is not positioned properly or is damaged, or the pressure cooker is over-filled, follow these steps:
- Unplug. Release any pressure using the quick release method.
- Remove the gasket and check for tears or cracks.
- Check to be sure that the gasket is positioned properly.
• If the cooker is too full, remove excess liquid and continue cooking.
If you cannot open or remove the cover:
- Be sure all the pressure has been released.
- If you still cannot open it, bring the contents of the cooker up to pressure again.
- Release the pressure completely and try again.
If you cannot hear steam escaping during the cooking:
This is perfectly normal. Unlike a manual pressure cooker that relies on constant heat and constant release of the pressure to maintain optimal pressure conditions, the pressure inside the unit is electronically controlled, and little to no steam will be released in normal working conditions.
Error messages
In some rare instances you could get error messages displayed on the control panel. See below for the error description and solutions when appearing.
E1: Means open circuit of the sensor. When this happens:
- Press 'Keep warm/Cancel'
- Unplug from wall outlet
- Make sure no condensation water stays in the housing cavity or in the socket that could cause a short circuit. Make sure the housing's cavity is dry. If the socket was ever immersed in water, discontinue use and contact Customer service. Let the inner housing cool down before checking for condensation as it could be hot.
- If the inner housing is dry and the unit doesn't seem damaged, plug the cord back after 10 minutes and resume usage.
- If the problem persists or appears on a regular basis, contact Customer Service for maintenance/repair.
E2: Means short-circuit of the sensor. If the case:
- Press 'Cancel' and unplug the device.
- Let the unit cool down completely.
- Make sure there is enough water in the pot. Add a little bit of water in the cooking pot if required
- If the unit is already cool, wait at least 10mins before plugging back the device.
- The function should then be restored. If the problem persists, contact Customer Service
E3: Means ‘Overheating’. When this happens:
- Stop the cooking process by pressing ‘Cancel’. Release the steam and let the unit cool down before opening.
- Check if there is anything burnt inside or at the bottom of the cooking pot
- Add a little bit of water in the cooking pot if the water level is very low.
- Let the unit cool down completely. The function should then be restored.
- If this E3 error message appears again on a regular basis, then it is likely that the cooking pot or the heating plate inside the base are deformed and create an uneven heat. The cooking pot or the heating plate need to be replaced. Please contact Customer service for maintenance/repair.
E4: The signal switch has malfunctioned. Follow the steps:
- Unplug the unit from the wall outlet
- Wait around 15 minutes to plug it back in
- Press the 'Cancel' button on the pressure cooker and select the desired setting to begin cooking
- If the problem persists or appears on a regular basis, contact Customer Service for maintenance/repair.
GET MORE OUT OF YOUR PRODUCT
Browse Chef-created recipes specifically made for your Kalorik product. Visit our website www.kalorik.com to see our extensive recipe library and start cooking. Sign up for the Kalorik email mailing list to receive special offers and recipes, and connect with us on social media for daily inspiration.
RECIPES
MUSHROOM RISOTTO
Ingredients:
- 4 cups chicken or vegetable stock
- 1 ½ lb. mixed mushrooms, trimmed and sliced, remove stem
- 4 tbsp. olive oil
- Kosher salt and ground black pepper
• 4 tbsp. unsalted butter
• 1 medium yellow onion, chopped
• 2 garlic cloves, minced
• 2 cups Arborio rice
2 tsp. soy sauce
- 3 / 4 cup dry white wine
• 1 oz. Parmigiano cheese, grated
- 12 cup fresh herbs, minced
- 14 cup heavy cream
- Place broth in a small pot and heat up until simmering. Alternatively, use microwave-safe container and microwave on high power for about 5 minutes.
-
Using the sauté function of your pressure cooker, heat olive oil until shimmering. Add the mushrooms and season with salt and pepper. Cook, stirring occasionally, until excess moisture is evaporated and mushrooms are well browned, about 8 minutes.
-
Add butter, onion, garlic, and cook, stirring frequently, until onions are softened and aromatic, about 4 minutes. Add rice and cook, stirring, until rice is evenly coated in oil and toasted but not browned, 3-4 minutes. Stir in soy sauce.
- Add wine and cook, stirring, for about 2 minutes.
- Pour stock into the pot. Make sure all the rice, mushrooms, garlic and onions are fully submerged. Close pressure cooker and bring up to low pressure. Cook at low pressure for 7 minutes, then depressurize using the quick release method. Open pressure cooker and stir to combine rice and cooking liquid until it forms a creamy consistency. Stir in cream, cheese, and herbs. If risotto isn't thick enough, cook for a few minutes longer, stirring, until it begins to thicken more. Season to taste with salt and pepper and serve immediately.
POT ROAST
Ingredients:
- 3 lb. boneless beef chuck roast, trimmed
• 1 can (14 oz.) beef broth
• 1 tbsp. Worcestershire sauce
• 1 large onion, in wedges -
4 carrots, peeled and cut in 1 in. pieces
-
4 potatoes, peeled and cut in 1 in. cubes
• 2 tbsps. Vegetable oil -
Salt, black pepper and onion powder, to taste
-
Using the sauté function, heat oil until shimmering. Brown the roast on all sides in the hot oil and season with pepper, salt, and onion powder.
- Pour in beef broth and Worcestershire sauce, add the onion, close the lid, set the cooking time for 30 minutes, the pressure on high and press Start.
- Use the quick-release method to lower the pressure. Open the lid and add the carrots and potatoes. Close the lid again, and cook for an additional 15 minutes.
- At the end of the cooking time, use the quick-release method again and transfer the roast and vegetables to a serving dish.
TURKEY CHILI
Ingredients:
• 1 tbsp. vegetable oil
• 1.25 lb. ground turkey
• 1 medium onion chopped
- 1 medium green bell pepper coarsely chopped
• 1/2 tsp. garlic powder
• 3 tsp. ground cumin
- 1 tsp. salt
• 3 tsp. chili powder
• 1 (29 oz.) can tomato sauce
• 1 (29 oz.) can crushed tomatoes
- 1 1/2 cup water
- 1 cup V-8 Juice spicy hot flavor or bloody Mary mix
• 1 lb. dried kidney beans; washed
- Shredded Cheddar cheese, sour cream
- Using the sauté function, heat the vegetable oil until shimmering.
- Add the ground turkey and begin browning the meat. When meat begins to brown, stir in the chopped onion and pepper along with the seasonings. Stir and cook about 1 minute.
- Stir in the crushed tomatoes, the tomato sauce and the water. Add the spicy V-8 juice or bloody Mary mix and the washed kidney beans.
- Secure the lid and set valve to the closed/seal position. Cook for 35 minutes.
- When cooking time has elapsed, let the pressure release naturally. Open the lid and stir the chili. Taste and adjust seasonings if needed.
- Serve hot with cheddar cheese and some sour cream.
LENTIL SOUP
Ingredients:
• 1 tbsp. vegetable oil
• 1 cup red lentils, rinsed
• 1 cup green/brown lentils, rinsed
• 1 medium onion, chopped
• 3 cloves garlic, minced
- 2 tsp. cumin
- 1½ tsp. smoked paprika
- 1 tsp. salt
- 2 carrots, sliced into 14 inch pieces
- 1 lb. waxy potatoes, such as Yukon Gold
- 1 bunch Rainbow Chard or similar greens, chopped
- 8 cups water
-
Salt and pepper, to taste
-
Using the sauté function, heat the vegetable oil until shimmering.
- Sauté onions, garlic, spices, carrots, and potatoes for 3-5 minutes, or until onions begin to soften.
- Stir in the lentils to combine.
- Add water to cover.
- Lock the lid into place, select High pressure and set the time for 12 minutes.
- Use the quick release method to release the pressure until it is safe to unlock the lid.
- Stir in the chard, season to taste with salt and pepper, and serve.
PRESSURE COOKER CHICKEN
Ingredients:
- 1 whole chicken
- 1 tbsp. olive oil
• 1 tsp. paprika
• 11/2 cups bone broth - 1 tsp. dried thyme
• 1/3 tsp. black pepper
- 2 tbsp. lemon juice
- 12 tsp. sea salt
- 6 garlic cloves, peeled
- In a small bowl, combine paprika, thyme, salt, and pepper. Rub seasoning on the chicken.
- Using the sauté function, heat the vegetable oil until shimmering.
- Add chicken, breast side down and cook on high pressure for 6-7 minutes.
- After the cooking time has elapsed, use the quick release method to release the pressure. Flip the chicken and add broth, lemon juice and garlic cloves.
- Lock pressure cooker lid and set for 25 minutes on high.
- Let the pressure cooker release naturally.
- Remove from pressure cooker and let stand for 5 minutes before carving.
We suggest that you complete and return the enclosed Product Registration Card promptly to facilitate verification of the date of original purchase. However, return of the Product Registration Card is not a condition of these warranties. You can also fill out this warranty card online, at the following address: www.KALORIK.com
This KALORIK product is warranted in the U.S.A. and in Canada for 1 year from the date of purchase against defects in material and workmanship. This warranty is not transferable. Keep the original sales receipt. Proof of purchase is required to obtain warranty performance.
During this period, if the KALORIK product, upon inspection by KALORIK, is proven defective, it will be repaired or replaced, at Kalorik's option, without charge to the customer. If a replacement product is sent, it will carry the remaining warranty of the original product.
This warranty does not apply to any defect arising from a buyer's or user's misuse of the product, negligence, failure to follow KALORIK instructions noted in the user's manual, use on current or voltage other than that stamped on the product, wear and tear, alteration or repair not authorized by KALORIK, or use for commercial purposes. There is no warranty for glass parts, glass containers, filter basket, blades and agitators, and accessories in general. There is also no warranty for parts lost by the user.
ANY WARRANTY OF MERCHANTABILITY OR FITNESS WITH RESPECT TO THIS PRODUCT IS ALSO LIMITED TO THE ONE YEAR LIMITED WARRANTY PERIOD.
Some states do not allow limitation on how long an implied warranty lasts or do not allow the exclusion of incidental or consequential damages, so the above limitations may not apply to you. This warranty gives you specific legal rights, and you may also have other rights which vary from state to state.
If the appliance should become defective within the warranty period and more than 30 days after date of purchase, do not return the appliance to the store: often, our Customer Service Representatives can help solve the problem without having the product serviced. If
servicing is needed, a Representative can confirm whether the product is under warranty and direct you to the nearest service location.
If this is the case, bring the product, or send it, postage prepaid by the user (all Kalorik customers are responsible for the initial shipment back to the warranty center), along with proof of purchase and a return authorization number indicated on the outer package, given by our Customer Service Representatives. Send to the authorized KALORIK Service Center (please visit our website at www.KALORIK.com or call our Customer Service Department for the address of our authorized KALORIK Service Center).
When sending the product, please include a letter explaining the nature of the claimed defect.
If you have additional questions, please call our Customer Service Department (please see below for complete contact information), Monday through Thursday from 9:00am - 5:00pm (EST) and Friday from 9:00am - 4:00pm (EST). Please note hours are subject to change.
If you would like to write, please send your letter to:
KALORIK Customer Service Department
Team International Group of America Inc.
16175 NW 49 ^th Avenue
Miami Gardens, FL 33014 USA
Or call:
Toll Free: +1 888-521-TEAM / +1 888-KALORIK
Only letters can be accepted at this address above. Shipments and packages that do not have a return authorization number will be refused.
natural_image
Illustration of a rice cooker with hand gestures showing the process (no text or symbols)natural_image
Two-step diagram showing hands adjusting a circular component with adjustment knobs and a central knob (no text or symbols)natural_image
Three-step illustration of a rice cooker with control panel, showing hand movement and open lid (no text or symbols)natural_image
Line drawing of hands holding a lid with an arrow indicating rotation (no text or symbols)natural_image
Two-step illustration of a rice cooker with lid and control panel, showing hand movement (no text or symbols)text_image
Seating Ventingnatural_image
Two hand-drawn diagrams showing a mechanical component being inserted into a circular housing, with no visible text or symbols.OBTENGA MÁS DE SU PRODUCTO
Team International Group of America Inc.
16175 NW 49 ^th Avenue
Miami Gardens, FL 33014 USA
O llame gratuitamente (U.S.A.) al +1 888-521-TEAM / +1 888-KALORIK
INSTRUCTIONS POUR LES FICHES AVEC MISE A LA TERRE
natural_image
Line drawing of a rice cooker with a hand operating it, showing the lid and control panel (no text or symbols)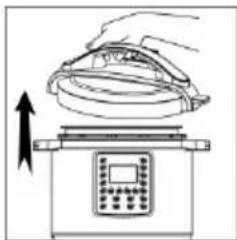
natural_image
Illustration of a hand pressing down on a device with a screen and control panel (no text or symbols)natural_image
Illustration of a hand holding a circular component with a knob, inside a bowl-like container (no text or symbols)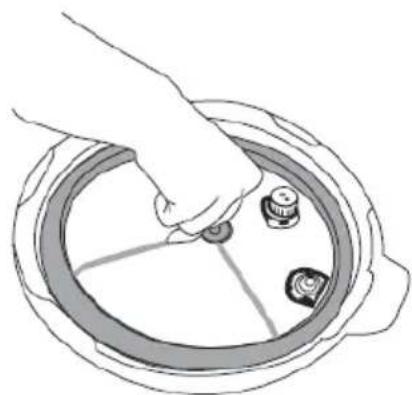
natural_image
Illustration of a hand placing a small component into a circular container with three buttons (no text or symbols)natural_image
Three-step illustration showing a rice cooker with control panel, lid, and open lid (no text or symbols)natural_image
Line drawing of hands holding a cooking pot with a lid and side handles, no text or symbols presentnatural_image
Two-step illustration showing a kitchen appliance being placed on a rice cooker, with no text or symbols present.text_image
Seating Ventingnatural_image
Two hand-drawn diagrams showing a mechanical assembly or cleaning process, with no visible text or symbols.Team International Group of America Inc.
16175 NW 49 ^th Avenue
Miami Gardens, FL 33014 USA
For questions please contact:
Team International Group of America Inc.
16175 NW 49th Avenue
Miami Gardens, FL 33014 USA

text_image
1 AÑO GARANTIA • GARANTIE 7 AÑO • 1 YEAR WARRANTY 1 YEARRef EPCK 45028
User manual content and recipes courtesy of Team International Group – Do not reproduce without consent of the authors - All rights reserved.