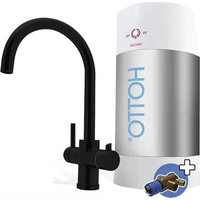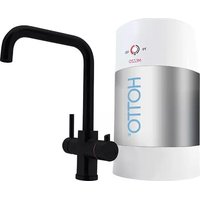
Quadro - Faucet HOTTO - Free user manual and instructions
Find the device manual for free Quadro HOTTO in PDF.


User questions about Quadro HOTTO
0 question about this device. Answer the ones you know or ask your own.
Ask a new question about this device
Download the instructions for your Faucet in PDF format for free! Find your manual Quadro - HOTTO and take your electronic device back in hand. On this page are published all the documents necessary for the use of your device. Quadro by HOTTO.
USER MANUAL Quadro HOTTO
Assembly and operating instructions - Terms and conditions of warranty
natural_image
White HOTTO portable water heater with control knob and rotary dial (no text or symbols on body)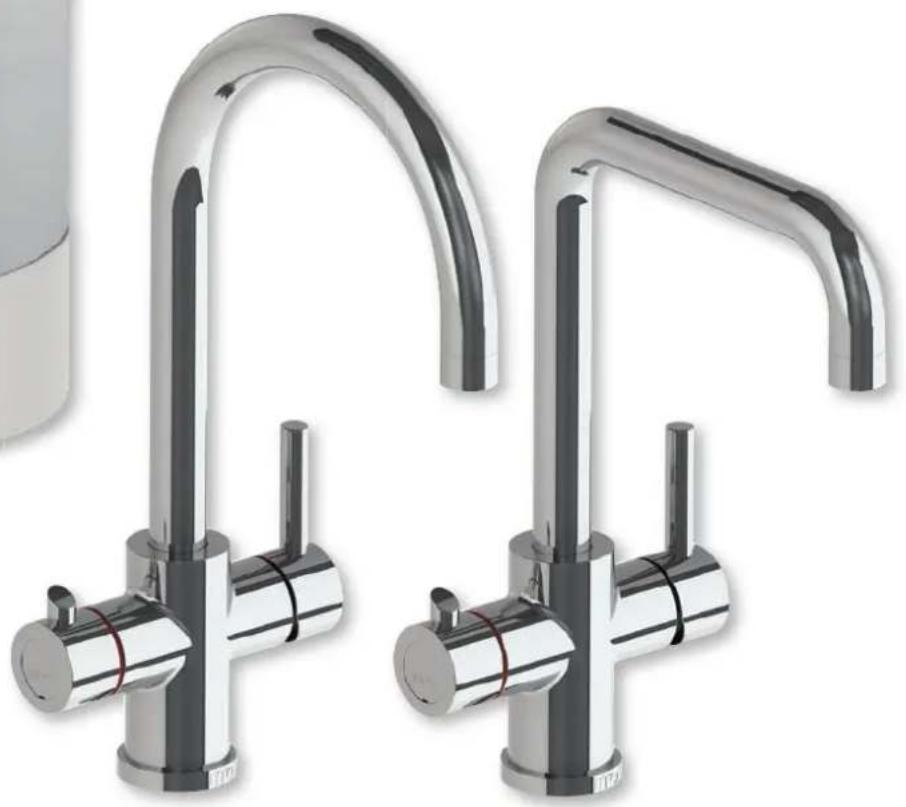
natural_image
Two modern stainless steel kitchen faucet fixtures with curved arms and blue fittings (no text or symbols visible)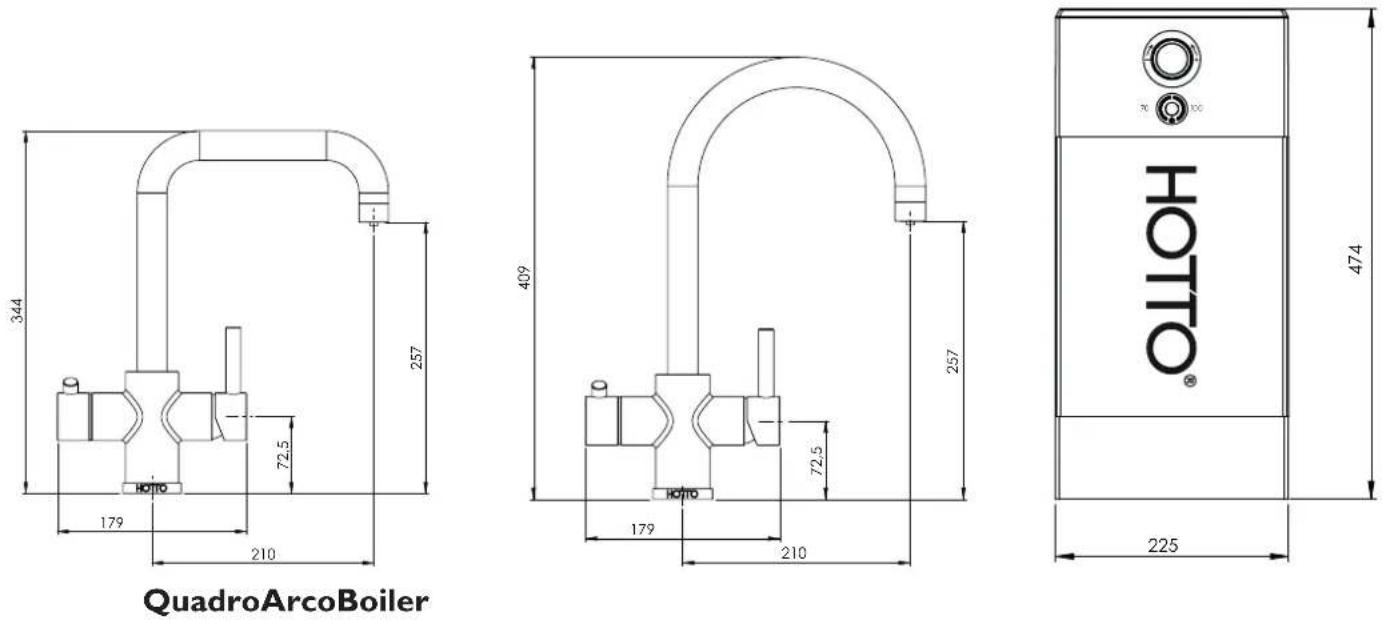
text_image
DE HOTIO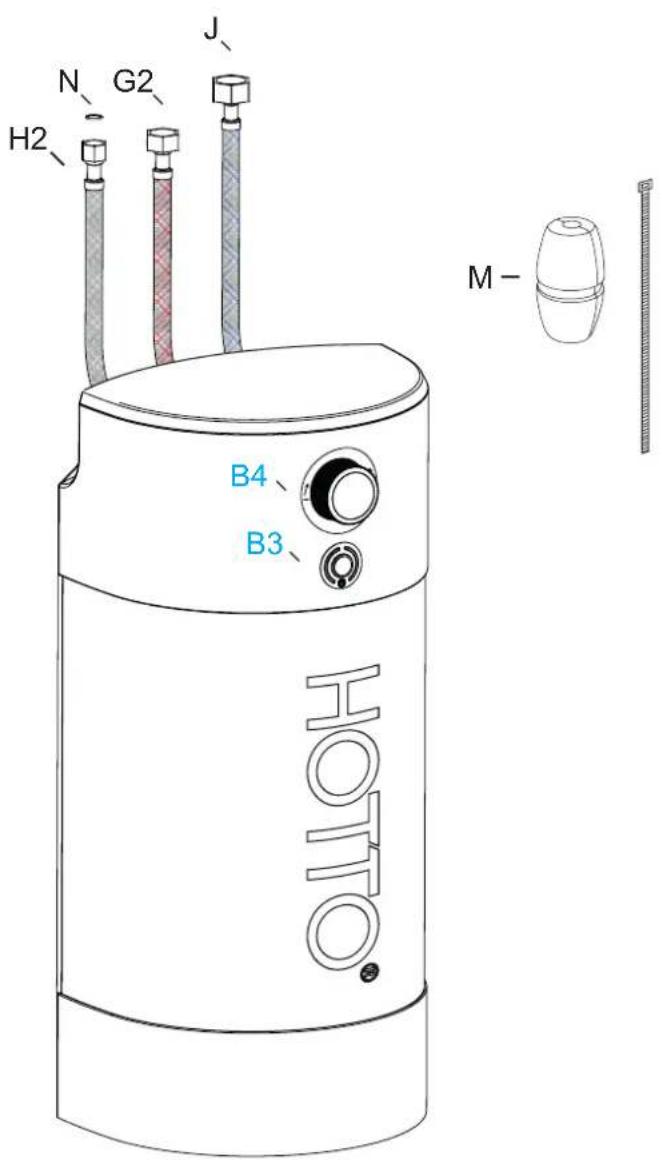
text_image
HOTA B4 B3 N G2 J H2Voor inhoud installatieset zie meegeleverde handleiding. For content installation set see included installation guide. Pour le contenu kit de montage voir le guide d'installation fourni. Für den Inhalt des Montage-Sets, siehe beiliegende Anleitung.
TIP!
Too much distance between boiler and tap? Order the Hotto extension set at hotto.com! Use no more than one set per Hotto setup.
natural_image
Close-up of two metallic industrial hoses with threaded connectors, enclosed in a circular frame (no text or symbols visible)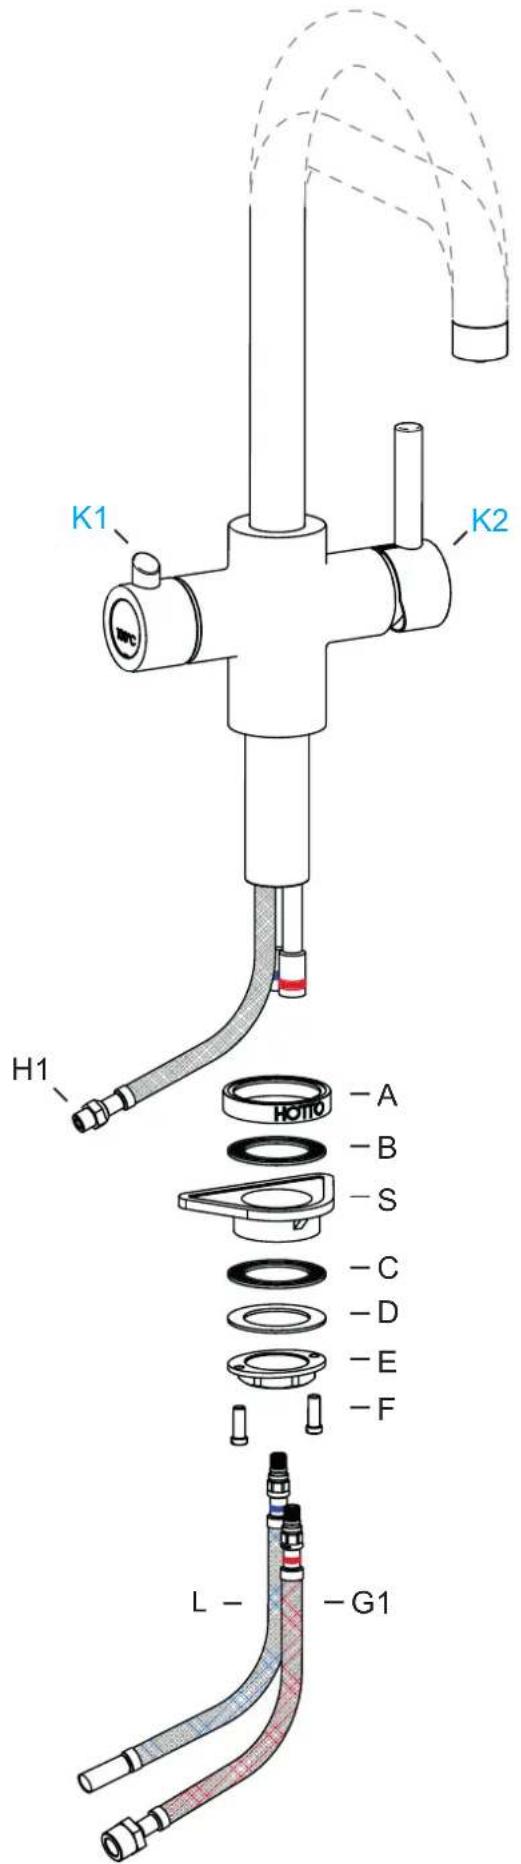
text_image
K1 K2 H1 -A -B -S -C -D -E -F L- -G1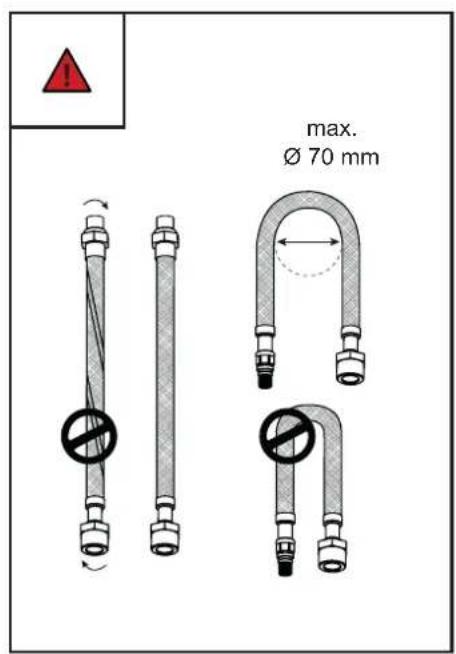
text_image
max. Ø 70 mm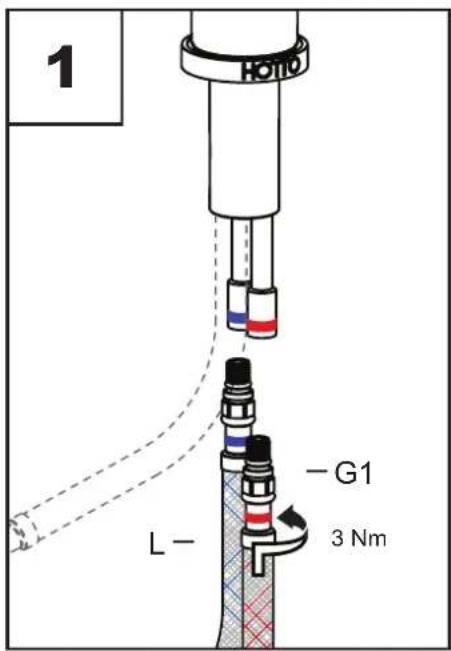
text_image
1 Hono L- -G1 3 Nm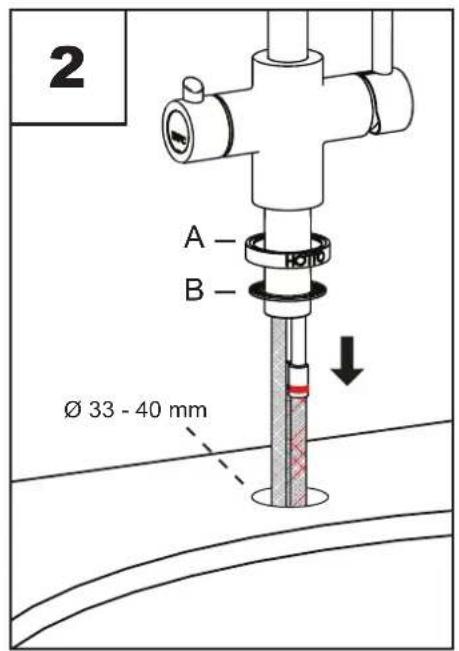
text_image
2 A - B - Ø 33 - 40 mm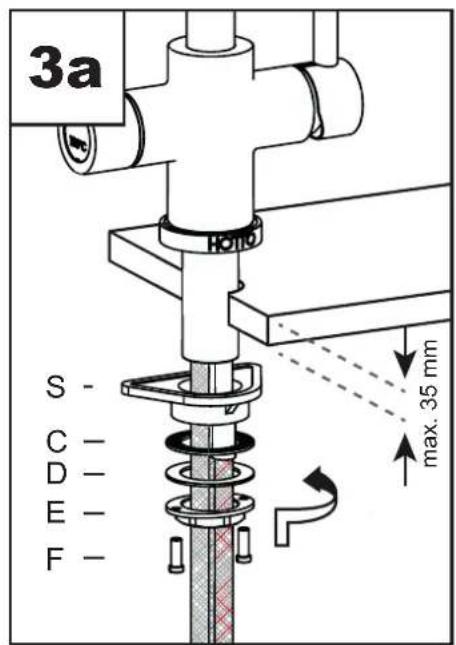
text_image
3a S - C - D - E - F -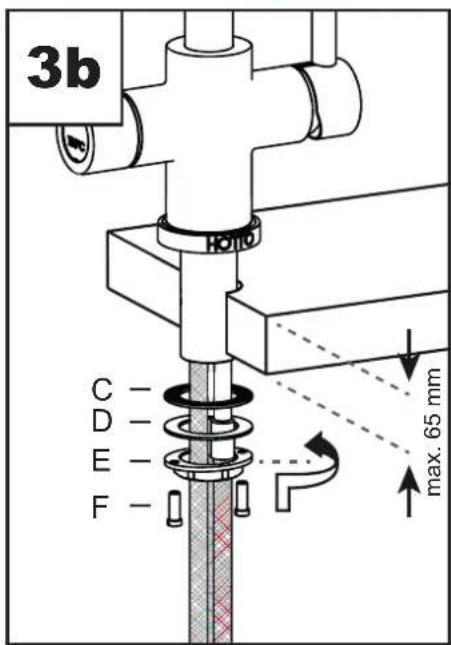
text_image
3b C - D - E - F - Homo max. 65 mm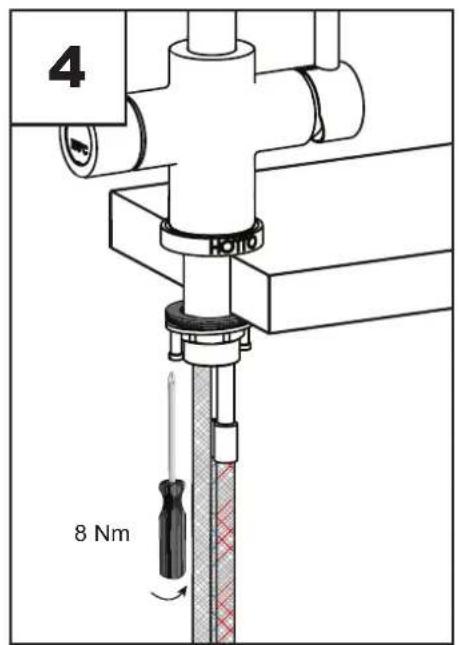
text_image
4 H10 8 Nm| 5 | 6 | 7 |
| 8 | 9 |

Install the installation set according to included instructions.
The following symbols are used in these instructions/appear on the device:

Complies with the basic safety standards set by European Directives.

Failure to observe the instructions identified by this symbol may endanger persons. Failure to observe the instructions identified by this symbol may lead to damage to the device.

Indicates a voltage that is present. Failure to observe the instructions identified by this symbol may lead to damage to the device.

Read the manual.

Faulty and/or electrical or electronic appliances that are to be disposed of must be handed in at the relevant recycling centres set up for this purpose
Introduction
Congratulations on your Hotto!
Your Hotto product consists of a boiling water boiler and a 3-in-1 tap with boiling water function. You must use the Hotto installation set to install the Hotto. In addition to boiling water, the Hotto boiler also provides hot water. You can adjust the maximum hot water temperature on the boiler. You can also set the Hotto boiler to 70^ C, which means that the water will be heated to a maximum of 70^ C.
Safety comes first at Hotto. That is why both the tap and the boiler are provided with child-safe features. However, during use you should always be aware of the general hazard of boiling hot water.
In case of failures, please consult the troubleshooter in this manual. If, in spite of this troubleshooter, you still need some extra help, please do not hesitate to contact our service line. For this you can also visit our website: www.hotto.com.
I. Use of the manual


These instructions contain important information about commissioning, operating the device and maintenance. To ensure your safety and that of others we suggest that you read these installation and operating instructions before using the device for the first time. Please keep the instructions and other documentation close to the device.
This device was manufactured in accordance with current standards and has been tested by competent agencies. The technical characteristics of the product can be found on the rating plate at the rear of the boiler.
The device should be installed by qualified persons. All repair and maintenance work on the device, for example the removal of limestone and water scale deposits, may only be carried out by duly authorised technical staff. The applicable regulations and regional requirements must always be duly observed!
| This device is intended for use in household and similar applications such as: staff kitchen areas in shops, offices and other working environments; farm houses; by clients in hotels, motels and other residential type environments; bed and breakfast type environments. Its modern design and the use of carefully selected materials and an improved manufacturing process ensure high quality. | |
 | This device can be used by children aged from 8 years and above and persons with reduced physical, sensory or mental capabilities or lack of experience and knowledge if they have been given supervision or instruction concerning use of the device in a safe way and understand the hazards involved. |
 | Children shall not play with the device. Cleaning and user maintenance shall not be made by children without supervision. |
 | The device is a pressure boiler! A safety group (0.8 MPa, with Kiwa certificate (Germany 0.6 MPa)) must be applied to the cold water supply. Install according to accompanied instructions. |
 | Statement of conformityQuantex Group B.V. duly declares that the device complies with the following directives:»2006/95/EC Low Voltage Directive»2004/108/EC Electromagnetic Compatibility Directive (EMC)»2011/65/EC RoHS II»2009/125/EC Ecodesign»(EC) No. 814/2013 |
 | |
 | The product also conforms to the following harmonised European standards:»EN 60335-1: 2012 + All:2014»EN 60335-2-15: 2003 + A2:2008 + A11:2012»EN 60335-2-21: 2003 + A1:2005 + A2:2008»EN 55014-1: 2006 + A1:2009 + A2:2011»EN 55014-2: 1997 + A1:2001+ A2:2008»EN 61000-3-2: 2006 + A1:2009 + A2:2009»EN 61000-3-3: 2008»EN 62233: 2008 +CI:2008 |
| ELECTRICAL SAFETY | |
| Quantex Group B.V., De Overmaat 78, 6831 AJ Arnhem, The Netherlands, 01-12-2016 |
2. Mounting instructions
Environment
This device is delivered in sturdy packaging in order to avoid damage during transport.
This packaging is made of recyclable material. Please dispose the packaging in a responsible manner.
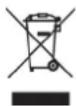
Disposal of the device
Old devices must not be disposed of in your household waste!
Every consumer is legally obliged to dispose of old devices separately from their household waste and to take them, for example, to a collection point in their local community or local district. Old electrical devices will usually be accepted free of charge. This ensures that the old devices are properly recycled and any negative impacts on the environment are avoided. This is why electrical devices are marked with the symbol shown on the left.
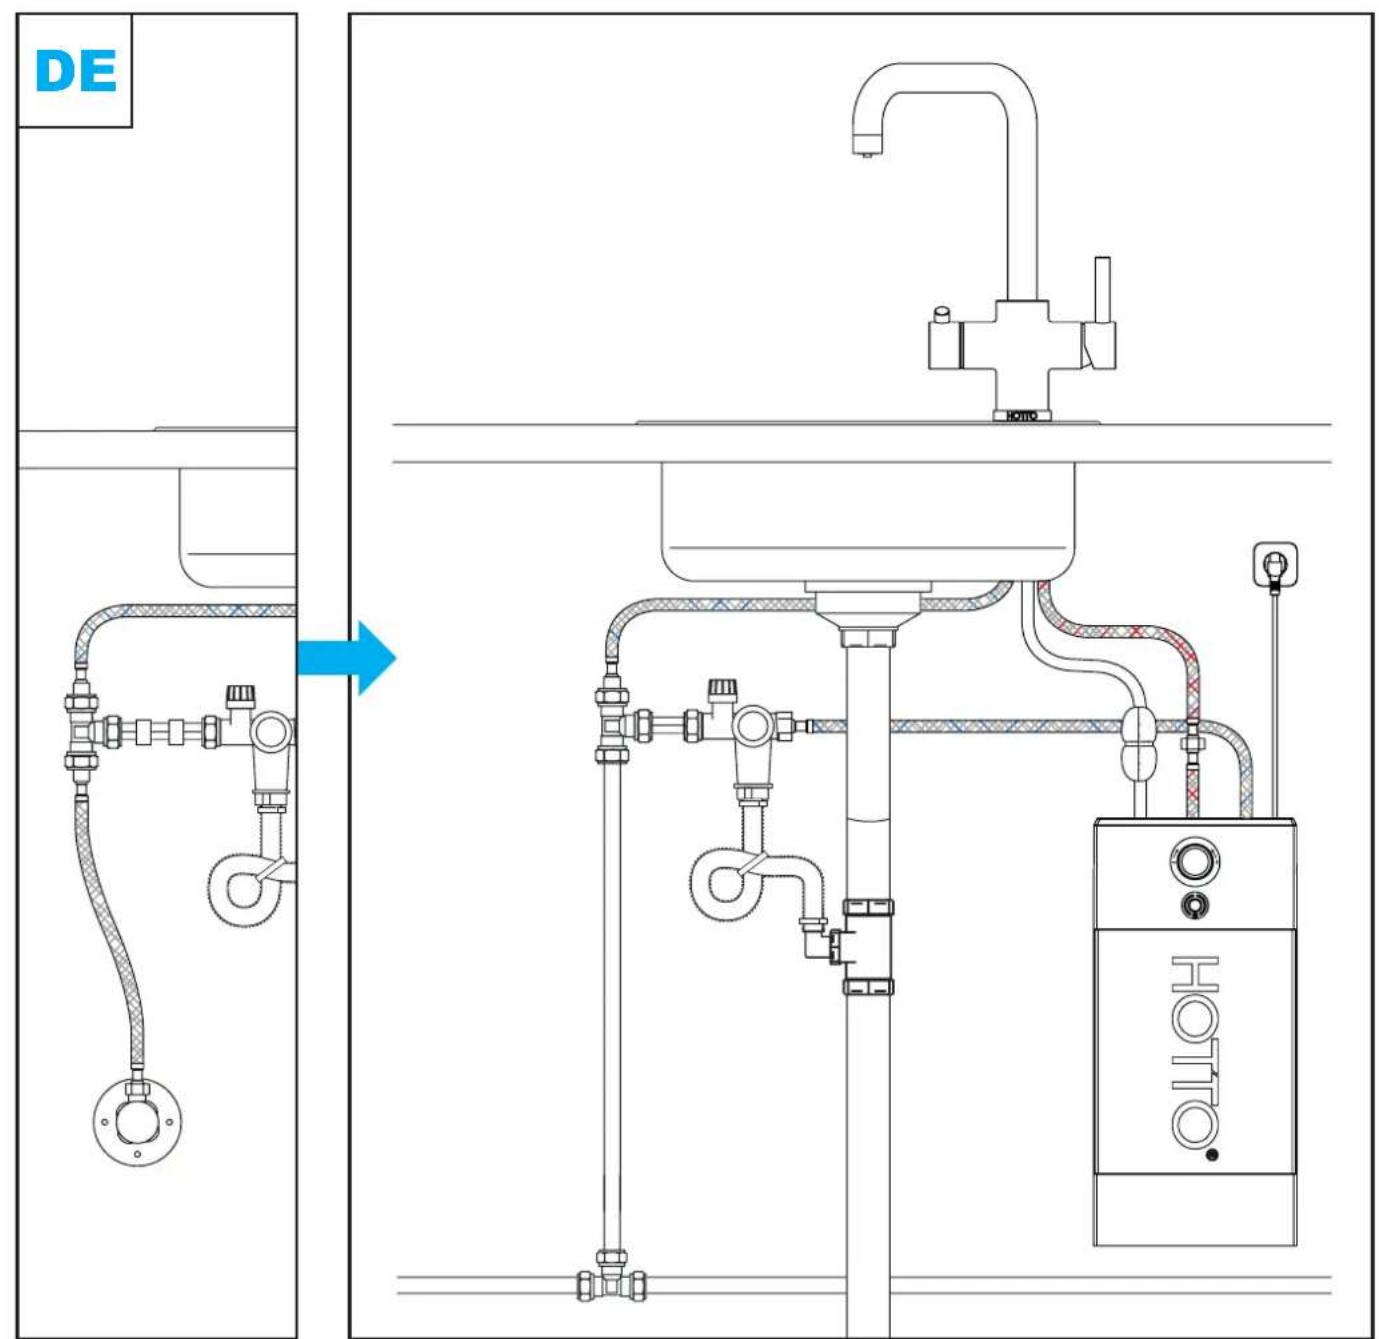
| InstallationThe device should be installed in accordance with the drawing on the first page of the user manual. Any other installation position may result in serious damage to the device.Installation should take place as close as possible to a cold water connection. The product should be protected from the effects of frost (for example in caravans, summer houses, etc.). | ||
| When mounting swivels and compression fittings, always use 2 open-end spanners in order to prevent bending and twisting pipes and accessories. | ||
| ! | FrostIn case of risk of frost in a room, the device should not be installed in this room. If, despite this advice, the device is installed in a room where there is a risk of frost, the device should be emptied before the risk arises. | |
| ! | The Hotto is not suitable for installation on a reverse osmosis installation or a water softening installation with pH reduction. | |
| ! | Always use the Hotto safety group for connecting. Never use the device without a safety group! | |
| ! | Use of a different tap than the supplied Hotto 3-in-1 tap, or a change in the tap/boiler combination, may damage the product. The warranty will always become invalid in case of incorrect installation or modification! | |
| ! | Important: Never insert the plug in the earthed wall socket before the appliance is filled with water! | |
| ! | Never connect the Hotto boiler to a hot water pipe. This might decrease the life expectancy of the boiler due to increased limescale build-up on the heating element and inside the mixing valve. | |
| Water qualityIn areas where the water hardness is above 12 °dH a water filter approved by Hotto must be placed in the supply water line. Failure in doing so will void the warranty. See www.hotto.com for more information and ordering options for water filters. The water quality must meet the following requirements: | ||
| pH scale 7 - 9.5 pH | ||
| Fe (Iron level) < 0.2 mg/l | ||
| CI (Chlorine content) < 150 mg/l | ||
| DH (German Hardness) < 12 °DH | ||
| Minimum flow pressure 0.1 MPa | ||
2A Connecting the tap
Step I: Connect the cold and hot water hoses (G) by screwing them in the tap.
Step 2: Place the tap in the hole ( 33 - 40 mm). The Hotto logo of the rosette (A) with rubber ring (B) should be pointing towards the front.
If the counter top is less than 35 mm thick, go to step 3a. Else, proceed with step 3b.
Step 3a: In case of a counter top less than 35 mm thick, first place the stability triangle (S), then the rubber ring (C) and finally the metal ring (D). Then tighten the nut (E) containing the two screws (F) by hand.
Step 3b: In case of a counter top between 35 and 65 mm thick, place the rubber ring (C) and then the metal ring (D). Then tighten the nut (E) containing the two screws (F) by hand.
Step 4: Tighten the two screws to fixate the nut (E).

Make sure the hoses are not installed with a kink or twist.
2B Connecting the installation set

Step 5: Close the main water tap. Then install the installation set according to the provided instructions, steps 6 to 9.
2C Connecting the boiler
Connection of the device to the power supply network must take place in accordance with electric installation standards and as specified by local laws and regulations. The device must be directly connected to the power supply network (230V) via the electrical cable and plug.
Avoid danger from damaged power supply cables. In the event of damage, the device must be replaced by the manufacturer or its customer service department, or by an equivalently-qualified person.
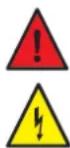
Ensure that the addition of this device will not overload the fuse protection in your mains. Internal modifications to the product may cause problems if this work is not carried out by authorized and qualified technical staff. The warranty only applies if the product has not been modified in any way, i.e. subject to it being in unchanged condition.
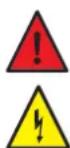
In order to avoid creating an unsafe situation by inappropriate resetting of the maximum temperature safety device, this unit may not be powered via an external switching device (a time switch for example) or connected to a circuit, which is regularly switched on and off by the power supply company.

Never place the Hotto boiler lying down or upside down. The boiler should always be upright, so that the switch (B5) is at the bottom.
Step 10: Connect the boiler's cold water supply hose (J) to the Hotto safety group.
Step II: Connect the tap's hot water hose (G1) to the boiler's hot water hose (G2). Then connect the tap's boiling water hose (H1) to the boiler's boiling water hose (H2) with the ring (N).
Stap 12: Insert the tap's cold water hose (L) in the compression t-piece in front of the safety group. Properly tighten the clamp nut of the t-piece using a suitable open-end wrench.
Stap 13: Place the insulation part (M) around the boiler's boiling water hose connection. Fixate the insulation with the accompanied tie wrap.
Then open the main water tap and the stop valve (O7) of the safety group. Fill the Hotto boiler with cold water by opening the boiling water knob until no more air is coming out of the tap. This may take a few minutes. After the boiler has been filled with water you must fully open the lever for hot water (K2). Allow the water to flow until no more air is coming out of the tap. Then insert the plug in the wall socket.

Important: In the unlikely event that the device is connected to the mains power supply without being filled with water, or if for some reason the device switches off after a short while, please disconnect the plug from the wall socket to allow the device to cool down. It may be necessary to reset the boiler: See the troubleshooter.
3. User instructions

The device must be filled with water before connected to the electrical supply!

The device should always be connected to a safety group!
Implementation (step 16)
The boiler is switched on with the switch (B5) on the rear, after the boiler has been fully filled with water. The boiler is now standby and is not yet heating. You will see that the LED at the front turns orange.
70° C setting (step 17)
Press the standby key (B3) once and the water will be heated to a maximum of 70^ C. The left blue LED will light until the temperature has been reached, after which the LED will turn red.
100° C setting (step 17)
Press the standby key (B3) once more, and the water will be heated to 100^ C. Now the right LED will turn blue and then red once the temperature has been reached.
Setting the temperature for hot water (step 18)
The hot water temperature can be adjusted by turning the round knob (B4) at the front of the boiler to the right (lower temperature) or to the left (higher temperature). The setting range is 35 - 70 °C, if the boiler is set to 100 °C. The setting range when the boiler is set to 70 °C is 35 - 60 °C.
Using the tap (step 14/15)
- Cold and hot water
With the lever (K2) in vertical position, the tap will provide cold water. You will only get hot water if the lever is moved towards the front. In this way no hot water and energy is wasted.
- Boiling water
In order to get boiling water you must first push in the catch (15.1) and then rotate the boiling water knob (K1) away from you (15.2). When you let go of the knob (K1), the built in spring will make sure that it will return to its original position immediately. This feature will prevent curious children from activating the boiling water tap by accident.
 | If the water in the boiler is heated, the volume will increase. This is referred to as expansion water. The expansion water will drip away via the safety group. This is necessary and should not be prevented. |
| If all the boiling water is used, it will take approximately 20 minutes for the water to reach the correct temperature. The LED on the boiler will turn red once all the water in the boiler has reached the set temperature. | |
| 4. Maintenance | |
 | This device does not require any maintenance by the user. Professional maintenance should always be carried out by an expert. |
| The safety group discharges expansion water through its funnel. This funnel must be placed in a continuous downward direction and must always be left open to the atmosphere. A discharge hose is placed between the funnel and sewer. This construction must always be placed in a frost-free environment. | |
| Check the functioning of the safety group by turning the large knob on the safety group once a year, allowing water to flow out, and closing it immediately. This will prevent the valve of the safety group from getting stuck. Also check the drain for blockages. If it is blocked, unblock the drain or instruct a third party to do so. | |
 | If faulty, never try to repair the device yourself. Please contact the nearest service specialist or the party that supplied the device originally. See www.hotto.com |
 | |
| CleaningThe housing of the device can simply be cleaned with a damp cloth. Do not use aggressive cleaners or cleaners with a scouring effect! | |
| Legionella preventionDo not use heated water as drinking water. After prolonged shutdown of the device for example due to holidays, the device should be fully heated up to the maximum temperature before re-using. It is recommended to flush the pipes for one minute. | |
4. Maintenance
5. Troubleshooting

Note: in case of problems, always consult the troubleshooter!
If the water in the device is no longer heated, first check whether the plug is properly connected to the wall socket and whether the fuse of the device group is still working. For all other failures, please consult the troubleshooter.
If the device no longer works because it was connected without being filled with water first, follow the troubleshooter. The device has been overheated and needs to cool down, or possibly repaired.
If the device has been reset several times, but still does not work, please contact the Hotto service line.
6. Disconnect and drain boiler
When the boiler needs to be disconnected follow these steps:
I. Put the boiler in standby mode by pressing the standby button (B3) until the standby LED turns orange.
2. Drain the boiling water with the boiling water knob (K1) until cold water comes out of the tap.
3. Turn off the boiler with the switch on the back side of the boiler (B5) and pull out the plug from the socket.
4. Close the stop valve from the safety group.
5. Relief the pressure from the boiler by opening the boiling water knob (K1) and warm water lever (K2) until no (cold) water comes out of the tap.
6. Now the hoses of the boiler can be disconnected. Please note that some water may come out of the cold water hose (H2).
7. Place the boiler near the sink.
8. Blow on the warm water hose (G2) from the boiler and the remaining water will flow out of the boiler through the cold water hose (H2).
It is likely that a small amount of water will remain in the boiler.
7. Technical specifications
| Description 8L boiler set and 3-in-1 tap | |
| Mounting boiler vertical | |
| Operating pressure 0.8 MPa | |
| Temperature range boiler 70 °C / 100 °C | |
| Temperature range hot water 35 °C - 70 °C | |
| Supply I/N/PE 230V | |
| Frequency 50 Hz | |
| Nominal capacity 2200 W | |
| Boiler volume 8 l | |
| Cable size 3 x 1.5 mm2 | |
| Maximum recommended water volume | 10.0 l / min |
| Protection class | I |
| Type of Protection | IPX4 |
| Dimensions boiler (HxWxD) | 485 x 225 x 225 mm |
| Dimensions Arco tap (HxWxD) | 410 x 225 x 170 mm |
| Dimensions Quadro tap (HxWxD) | 350 x 225 x 170 mm |
| Available water 100 °C * | 6 l |
| Available water 60 °C * | 16 l |
| Available water 40 °C * | 28 l |
| Daily electricity consumption Q_elec | 1.318 kWh |
| Load profile | XXS |
| Sound power level L_WA | 15 dB |
| Energy efficiency _wh3 | 38.32 % |
* At 100 °C setting and with a water inlet temperature of 15 °C
8. Warranty conditions
| Warranty | The rights under this manufacturer's warranty shall apply in addition to the buyer's statutory rights. This warranty shall in no way restrict the buyer's statutory rights in particularly towards the seller. |
| Entitlement | The claiming of rights under this warranty shall be subject to the submission of the respective proof of purchase. |
| Content Hotto Nederland shall guarantee as the manufacturer that this product is free of material and manufacturing errors. Material and manufacturing errors arising during the warranty period shall justify the rights under the warranty. This warranty shall not cover errors due to improper installation or incorrect usage, incorrect operating conditions or defective maintenance or repair work. | |
| Duration The warranty shall be valid for 24 months. The warranty period shall commence on the day on which the product is purchased. Warranty services provided shall neither prolong the warranty period nor initiate a new warranty period. | |
| Claims In case of a defective product you should contact the Hotto service line. For more information, see our website www.hotto.com | |
| Invalidity of warranty | Attempted repairs carried out by a customer or third party that are not authorized by Hotto shall invalidate the warranty. The same shall apply if parts are installed in the product or connected to the product that are not original parts from Hotto. |
| Restriction | This warranty shall be restricted to rectification of the defect and subsequent delivery. This warranty shall not include compensation, withdrawal from the agreement, reduction in price or any reimbursement for consequential loss due to defects. |
| This warranty does not apply to devices purchased outside the Netherlands, Belgium or Germany. The statutory provisions and delivery conditions of the national company or importers must be observed. | |
Installation troubleshooter
| Complaint Cause Solution | ||
| The hoses are too short You are trying to install the boiler too far from the safety group and/or tap | Place the boiler closer to the safety group and/or tap | |
| The safety group provides an unpleasant smell of sewage. | No loop in the black drain hose of the safety group | Make a loop in the hose, as shown on the installation drawing (step 9) of the installation set. |
Water troubleshooter
| Complaint Cause Solution | ||
| Tap is making bubbling noises There is air in the pipes Open both taps wide and de-aerate (stop valve, kitchen tap) | ||
| No water Main valve closed Open main valve | ||
| No hot water Stop valve safety unit closed Open stop valve | ||
| Little water is coming from the tap | Water pressure is too low | Check a different outlet. If the pressure is low here as well, fully open the main tap. If the pressure is still too low you should contact the water supplier. |
| Check whether the main tap and stop valves are fully opened | Fully open the tap concerned | |
| Make sure there is no kink in the hose | Remedy the kink, or replace the hose if it is damaged | |
| Scaling of the outlet | Clean or replace the aerator | |
| Hot water is coming out of the cold water tap | The hoses of the tap have been mixed up | Connect the hoses correctly |
| Hot water is too hot or too cold | Hot water temperature has not been set correctly | Adjust the temperature using the round knob (B4) on the boiler |
| No hot water coming from the hot water tap and no boiling water from the boiling water tap | Boiler is not (yet) heated up, see LED indication on figure 17 and in §3 | Wait for the boiler to heat up, approximately 25 minutes |
| Check whether the boiler is switched on. For this, follow the instructions in §3 | ||
| Boiler is not connected to the power supply | Place the plug in the wall socket | |
| Check whether the power group concerned is switched on | ||
| Boiler is defective | Contact the Hotto service line | |
| When turning open the boiling water knob (1), there is hot water coming from the tap, but no boiling water | Boiler is set to 70°C | Set the boiler to 100° using the standby knob (B3), see §3, and wait for the boiler LED to turn red. |
| Water is not heated to 100°C | Wait until the water is heated. The LED on the boiler will turn red once the water has been heated. | |
| Boiling water is coming out of the tap with more bubbling noises and more steam is created than otherwise | Boiler must be reset | Press the reset switch (B6) at the rear of the boiler |
| Sensor or control unit is defective | Contact the Hotto service line, see www.hotto.com | |
| Boiling water is coming out of the tap with bubbling noises and the tap has a low yield of boiling water. | Scaling of the outlet | Clean or replace the aerator |
| There is a white substance in the hot water | There is too much scaling in the tank | Have the boiler cleaned by an installer |
| The device makes boiling noises | Too much scale deposit in the device | Contact the Hotto service line, see www.hotto.com |
Electricity troubleshooter
| Complaint | Cause | Solution |
| The groups are switched off continuously | Too many devices on one group | Use less devices at the same time or connect devices to a different group, or use an energy divider, www.hotto.com |
| The earth leakage circuit breaker is activated | There is a short circuit in the electrical circuit | Investigate which device causes the short circuit: Remove the plug of the Hotto boiler from the wall socket, reset the earth leakage circuit breaker. If it is activated again, this will mean that your Hotto boiler is not the cause. Check which other device may be the cause. If the earth leakage circuit breaker is activated again as a result of the Hotto boiler, please contact the Hotto service line, see www.hotto.com |
| Standby LED does not light | Boiler is getting no voltage | Place the plug in the wall socket |
| Switch on the boiler using the button (B5) at the rear | ||
| Check whether there is voltage on the wall socket | ||
| Check in the group box whether the group concerned and the accompanying earth leakage circuit breakers are switched on | ||
| No water in the boiler and safety power interrupter is activated | Pull out the plug and allow the device to cool down for 30 minutes. Fill with water. Press the RESET button (B6) at the rear. In case of several resets, please contact the service line. |
UK - Hotto after-sales service:
FR - Hotto service clientèle:
DE - Hotto Kundendienst:
www.hotto.com
HOTTO
Hotto Nederland
Gildestraat 13
6883 DB Velp
The Netherlands
www.hotto.com
info@hotto.com