SJ-BA31IEWGE-EU - Fridge SHARP - Free user manual and instructions
Find the device manual for free SJ-BA31IEWGE-EU SHARP in PDF.


User questions about SJ-BA31IEWGE-EU SHARP
0 question about this device. Answer the ones you know or ask your own.
Ask a new question about this device
Download the instructions for your Fridge in PDF format for free! Find your manual SJ-BA31IEWGE-EU - SHARP and take your electronic device back in hand. On this page are published all the documents necessary for the use of your device. SJ-BA31IEWGE-EU by SHARP.
USER MANUAL SJ-BA31IEWGE-EU SHARP
SJ-BA31IEWGE-EU SJ-BA31IEBGE-EU
Fridge-freezers
User Manual
Bedienungsanleitung
Guide d'utilisation
Handleiding
Manual de Uso
Manual de Instruções
Brugsanvisning
Bruksanvisning
Instruktionsbok
Käyttöohje
Kasutusjuhend
Contents
CHAPTER -1: GENERAL WARNINGS ......2
CHAPTER -2: YOUR FRIDGE FREEZER....6
CHAPTER -3: USING YOUR FRIDGE FREEZER....7
CHAPTER -4: FOOD STORAGE GUIDANCE ......12
CHAPTER -5: DOOR REVERSAL ....13
CHAPTER -6: TROUBLESHOOTING ....13
CHAPTER -7: TIPS FOR SAVING ENERGY ....15
CHAPTER -8: TECHNICAL DATA....15
CHAPTER -9: CUSTOMER CARE AND SERVICE....15
Your fridge freezer conforms to current safety requirements. Inappropriate use can lead to personal injury and damage to property. To avoid the risk of damage read this manual carefully before using your fridge freezer for the first time. It contains important safety information on the installation, safety, use and maintenance of your Fridge Freezer. Retain this manual for future use.
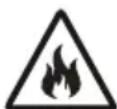
FIRE
Warning; Risk of fire / flammable materials
CHAPTER -1: GENERAL WARNINGS

WARNING: Keep the ventilation openings of the Fridge clear from obstruction.

WARNING: Do not use mechanical devices or other means to accelerate the defrosting process.

WARNING: Do not use other electrical appliances inside the Fridge.

WARNING: Do not damage the refrigerant circuit.

WARNING: When positioning the appliance, ensure the supply cord is not trapped or damaged.

WARNING: Do not locate multiple portable socket-outlets or portable power supplies at the rear of the appliance.

WARNING: To avoid personal injury or damage this appliance must be installed in accordance with the manufacturer instructions.

The small quantity of refrigerant used in this fridge is eco-friendly R600a (an isobutene) and is flammable and osive if ignited in enclosed conditions.
* While carrying and positioning the fridge, do not damage the cooler gas circuit.
* Do not store any containers with flammable materials, such as spray cans or fire extinguisher refill cartridges in the vicinity of the fridge.
* This appliance is intended to be used in household and similar applications such as;
- staff kitchen areas in shops, offices and other working environments which can be equated with ordinary household
- farm houses and by clients in hotels, motels and other residential type environments which can be equated with ordinary household
- bed and breakfast type environments which can be equated with ordinary household
- catering and similar non-retail applications which can be
equated with ordinary household
* Your fridge requires a 220-240V, 50Hz mains supply. Do not use any other supply. Before connecting your fridge, ensure that the information on the data plate (voltage and connected load) matches the mains electricity supply. If in doubt, consult a qualified electrician)
* This appliance can be used by children aged from 8 years and above and persons with reduced physical, sensory or mental capabilities or lack of experience and knowledge if they have been given supervision or instruction concerning use of the appliance in a safe way and understand the hazard involved. Children shall not play with the appliance. Cleaning and user maintenance, shall not be made by children without supervision.
* Children aged from 3 to 8 years are allowed to load and unload refrigerating appliances. Children are not expected to perform cleaning or user maintenance of the appliance, very young children (0-3 years old) are not expected to use appliances, young children (3-8 years old) are not expected to use appliances safely unless continuous supervision is given, older children (8-14 years old) and vulnerable people can use appliances safely after they have been given appropriate supervision or instruction concerning use of the appliance. Very vulnerable people are not expected to use appliances safely unless continuous supervision is given.
* A damaged power cord /plug can cause fire or give you an electric shock. When damaged it must be replaced, this should only be done by qualified personnel.
* This appliance is not intended for use at altitudes exceeding 2000 m.
To avoid contamination of food, please respect the following instructions:
* Opening the door for long periods can cause a significant increase of the temperature in the compartments of the appliance.
* Clean regularly surfaces that can come in contact with food and accessible drainage systems.
* Store raw meat and fish in suitable containers in the refrigerator, so that it is not in contact with or drip onto other food.
* Two-star frozen-food compartments are suitable for storing pre-frozen food, storing or making ice cream and making ice cubes.
* One-, two- and three-star compartments are not suitable for the freezing of fresh food.
* If the refrigerating appliance is left empty for long periods, switch off, defrost, clean, dry, and leave the door open to prevent mould developing within the appliance.
CHAPTER -1: GENERAL WARNINGS
Disposal
- All packaging and materials used are environmentally friendly and recyclable. Please dispose of any packaging in an environmentally friendly manner. Consult your local council for further details.
- When the appliance is to be scrapped, cut off the electrical supply cable and destroy the plug and cable. Disable the door catch in order to prevent children becoming trapped inside.
- A cut off plug inserted into a 16 amp socket is a serious safety (shock) hazard. Please ensure the cut off plug is disposed of safely.
For Denmark products:
The appliance is equipped with a plug approved in the EU (EU-Schuko Plug) and can be used in Finland, Norway and Sweden. In Denmark, the appliance is only approved for use with a wall outlet type E or type CEE7 // 7-S with a ground leg. If there is only wall outlet type K at the connection point, Replacing EU-Schuko plug with the Danish plug must be performed by only an authorized service personnel. Alternatively, connect a suitable and approved power adapter to transition between Schuko plug and Danish earth system. This adapter (min. 10 amps and up to max. 13 amps) can be ordered via at well assorted whitegoods dealer or authorized electrician. Only with one of these methods it can be ensured that the appliance is the correct safety ground. In the absence of earthing installation, an authorised electrician should carry out an earthing installation. In the case of use without earthing installed, we will not be responsible for any loss of use that may occur.
Disposal of your old appliance
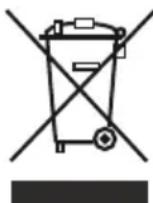
This symbol on the product or package implies that the product should not be treated as domestic waste. Instead, it should be delivered to applicable waste collection places recycling electrical and electronic equipment. Recycling materials will help natural resources be preserved. For more detailed information regarding recycling of this product, please contact local authority, domestic waste disposal service or the shop you have purchased the product from.
Please ask your local authority about the disposal of the WEEE for the reuse, recycle and recovery purposes.
Notes:
- Please read the instruction manual carefully before installing and using your appliance. We are not responsible for the damage occurred due to misuse.
- Follow all instructions on your appliance and instruction manual, and keep this manual in a safe place to resolve the problems that may occur in the future.
- This appliance is produced to be used in homes and it can only be used in domestic environments and for the specified purposes. It is not suitable for commercial or common use. Such use will cause the guarantee of the appliance to be cancelled and our company will not be responsible for the losses to be occurred.
- This appliance is produced to be used in houses and it is only suitable for cooling / storing foods. It is not suitable for commercial or common use and/or for storing substances except for food. Our company is not responsible for the losses to be occurred in the contrary case.

Safety warnings
- Do not connect your Fridge Freezer to the mains electricity supply using an extension lead.
- A damaged power cord / plug can cause fire or give you and electric shock. When damaged it must be replaced, this should only be done by qualified personnel.
- Never bend the power cord excessively.
- Never touch the power cord / plug with wet hands as this could cause a short circuit electric shock.
- Do not place glass bottles or beverage cans in the freezer department. Bottles or cans may explode.
- When taking ice made in the freezer department, do not touch it, ice may cause ice burns and/or cuts.
- Do not remove items from the freezer if your hands are damp or wet. Tis could cause skin abrasions or frost / freezer burns.
- Do not refreeze food once it has thawed out.
Installation Information
Before unpacking and manoeuvring your fridge freezer please take some time to familiarise yourself with the following points.
- Position away from direct sunlight and away from any heat source such as a radiator.
- Your appliance should be at least 50 cm away from stoves, Gas ovens and heater cores, and should be at least 5 cm away from electrical ovens.
- Do not expose your fridge freezer to moisture or rain.
- Your fridge freezer should be positioned at least 20mm away from another freezer.
- Clearance of at least 150 mm is required at the top of your appliance. Do not place anything on top of your appliance.
- For safe operation it is important that your fridge freezer is safe and balanced. The adjustable feet are used to level your fridge freezer. Make sure that your appliance is level before placing any foodstuffs inside it.
- We recommend that you wipe all shelving and trays with a cloth soaked in warm water mixed with a teaspoon of bicarbonate of soda before use. After cleaning rinse with warm water and dry.
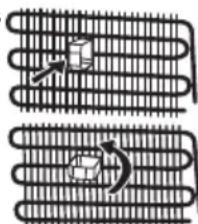
• Install using the plastic distance guides, which can be found at the rear of the appliance. Turn 90 degrees (as shown in the diagram). This will keep the condenser from touching the wall.
- Refrigerator should be placed against a wall with a free distance not exceeding 75 mm.
natural_image
Diagram of two heat exchanger-like structures with internal components and directional arrows (no text or labels)CHAPTER -1: GENERAL WARNINGS
Before Using your Fridge

- Before setting up your fridge freezer, check for any visible damage. Do not install or use your fridge freezer if it is damaged
- When using your fridge freezer for the first time, keep it in an upright position for at least 3 hours before plugging into the mains. This will allow efficient operation and prevents damage to the compressor.
- You may notice a light odour when using your fridge freezer for the first time. This is perfectly normal and will fade away as the fridge starts to cool.
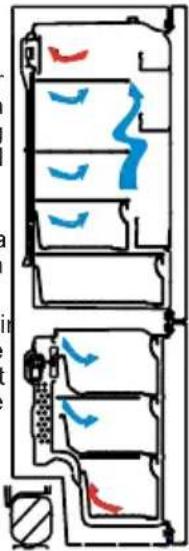
Information about new-generation cooling technology
Fridge freezers with new-generation cooling technology have a different working system than static fridge freezers. In normal fridge freezers, humid air entering the freezer and the water vapour emanating from the foods, turns into frost in the freezer compartment. In order to melt this frost, in other words defrost, the fridge has to be unplugged. In order to keep foods cold during the defrosting period, the user must store the food elsewhere and the user must clear the remaining ice and accumulated frost.
The situation is completely different in freezer compartments equipped with new-generation cooling technology. With the aid of fan, cold and dry air is blown throughout the freezer compartment. As a result of the cold air that is blown easily throughout the compartment – even in the spaces between shelves – foods are frozen equally and properly. And there will be no frost.
The configuration in the refrigerator compartment will be nearly same as the freezer compartment. Air emitted by the fan located at the top of refrigerator compartment is cooled while passing through the gap behind the air duct. At the same time, air is blown out through the holes on the air duct so that cooling process is successfully completed in the refrigerator compartment. Holes on the air duct are designed for even air distribution throughout the compartment.
Since no air passes between the freezer and refrigerator compartment, odours will not mix.
As a result, your fridge with new-generation cooling technology is easy to use and it offers you an access to a huge volume and aesthetic appearance.
text_image
Diagram showing airflow patterns in a vehicle or industrial facility with blue and red directional arrows indicating movement.CHAPTER -2: YOUR FRIDGE FREEZER
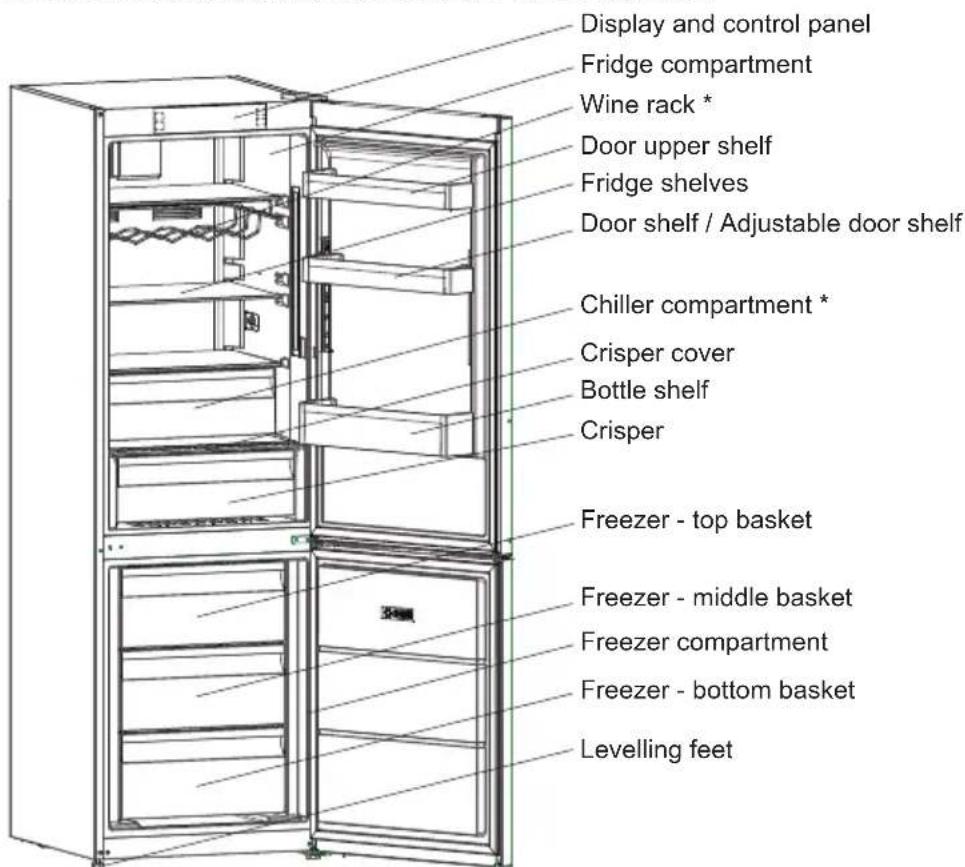
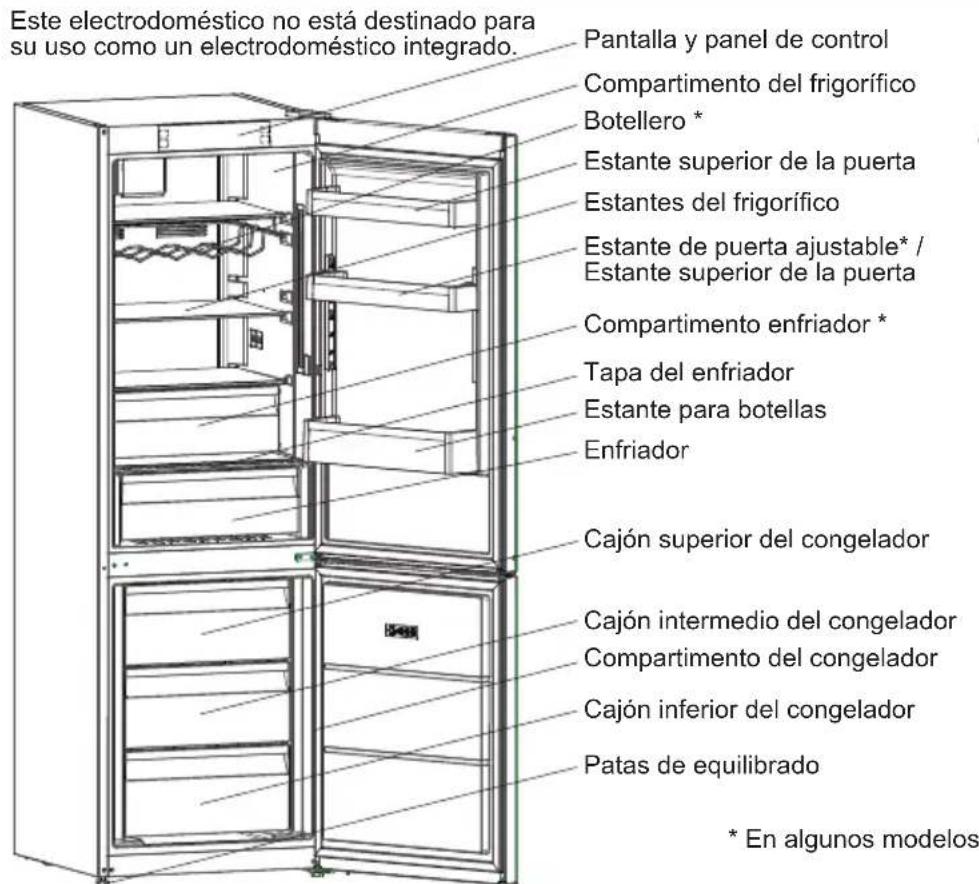
This appliance is not intended to be used as a built-in appliance.
text_image
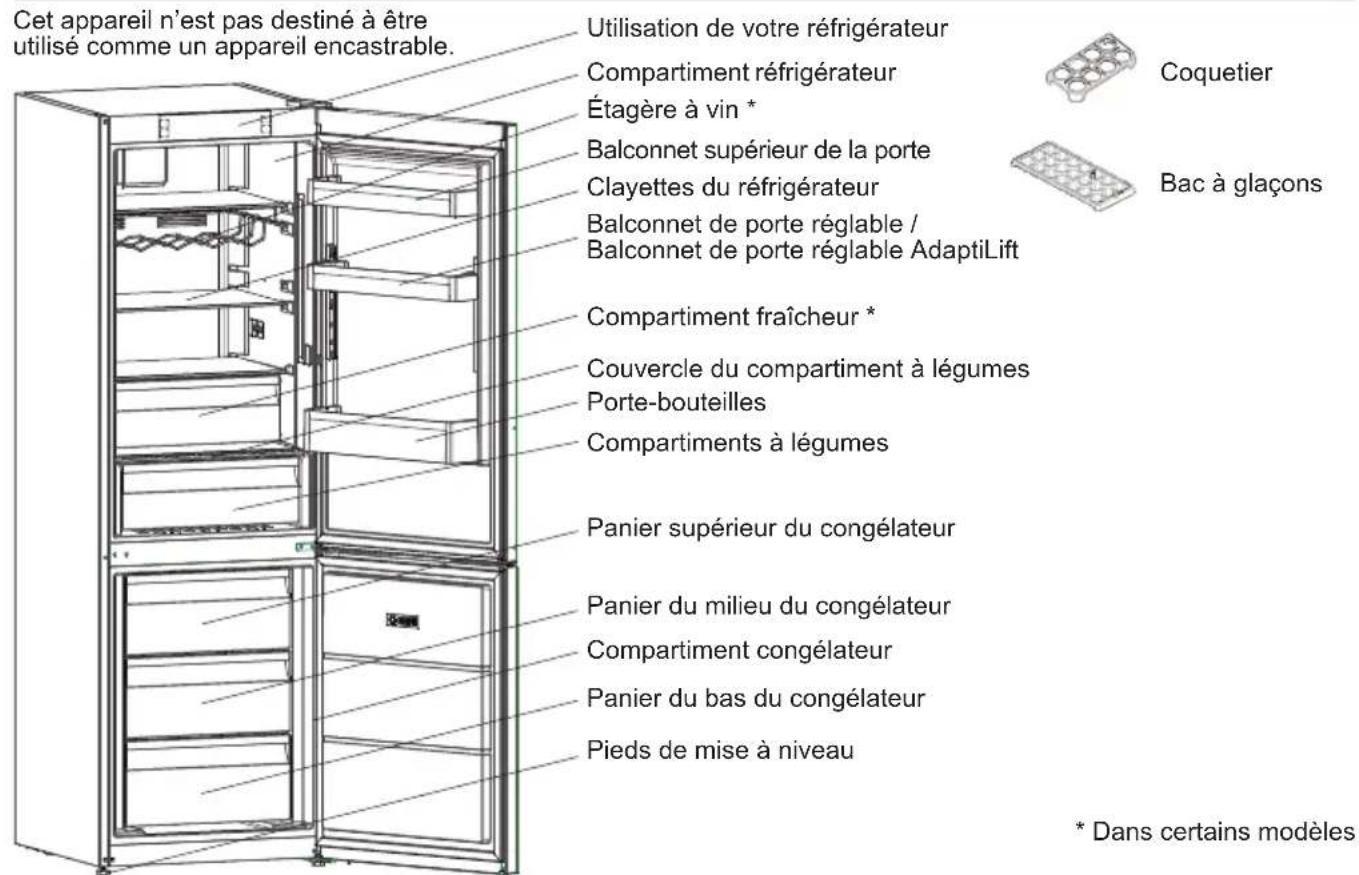
Display and control panel Fridge compartment Wine rack * Door upper shelf Fridge shelves Door shelf / Adjustable door shelf Chiller compartment * Crisper cover Bottle shelf Crisper Freezer - top basket Freezer - middle basket Freezer compartment Freezer - bottom basket Levelling feet
Egg holder
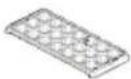
Ice tray
* In some models
This figure has been drawn for informational purposes to show the various parts and accessories in the appliance.
Parts may vary according to the appliance model.
General notes:
Fresh Food Compartment (Fridge): Most efficient use of energy is ensured in the configuration with the drawers in the bottom part of the appliance, and shelves evenly distributed, position of door bins does not affect energy consumption.
Freezer Compartment (Freezer): Most Efficient use of energy is ensured in the configuration with the drawers and bins are on stock position. EN -6-
CHAPTER -3: USING YOUR FRIDGE FREEZER
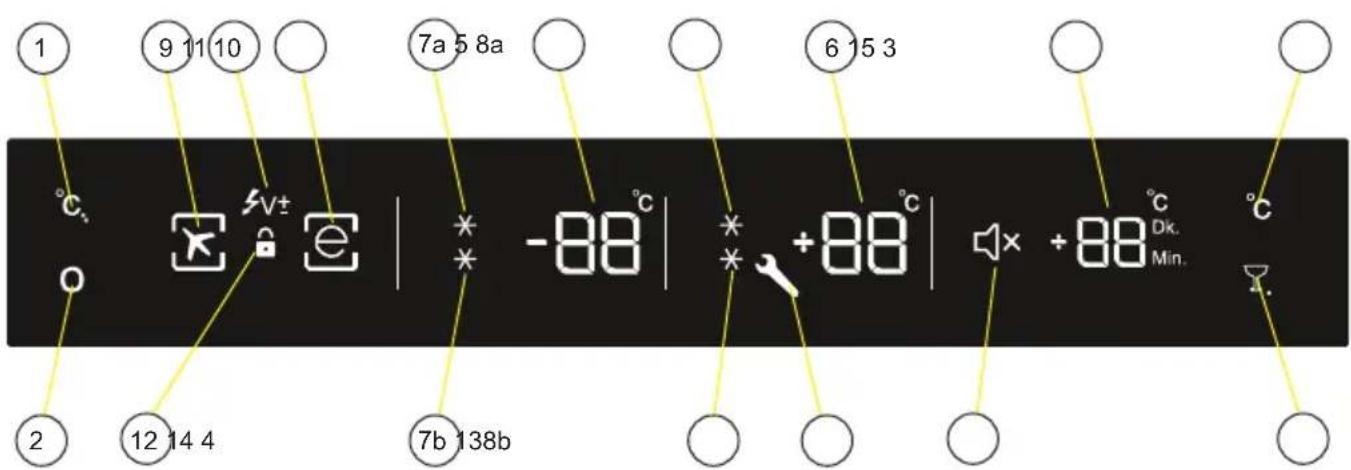
Display and control panel
text_image
1 9 11 10 7a 5 8a 6 15 3 °C V± -88 °C +88 °C +88 °C Dk. Min. °C 2 12 14 4 7b 138b- Freezer Set Button
- Mode Button
- Refrigerator Button
- D.cool & Mute Button
- Freezer Set Value Screen
- Cooler Set Value Screen
- Super Freeze Symbol
- Super Cool Symbol
- Holiday Mode Symbol
- Economy Mode Symbol
- Low Voltage Symbol
- Child Lock Symbol
- Alarm (SR) Symbol
-
Sound Off Symbol
-
Drink Cool Value Screen (Active Symbol May Change According to Language(Min-Dk.))
Operating your fridge
Lighting (If available)
When the product is plugged in for the first time, the interior lights may turn on 1 minute late due to opening tests.
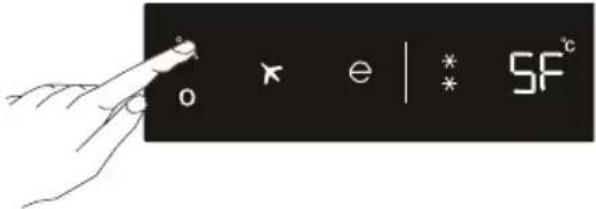
Super freeze mode
How would it be used?
Press the freezer set button until the SF symbol is seen on the screen. The buzzer will beep twice. The mode will be set.
text_image
o * e | * SF°In this mode:
- Cooler and super cool mode temperatures may be adjusted. In this case super freeze mode will continue.
• Economy and Holiday mode cannot be selected. - Super freeze mode can be cancelled using the same selection operation.
Note: This option shall be turned on 24 hours before placing the fresh food to the freezer. After 54h, it returns to the normal set value.
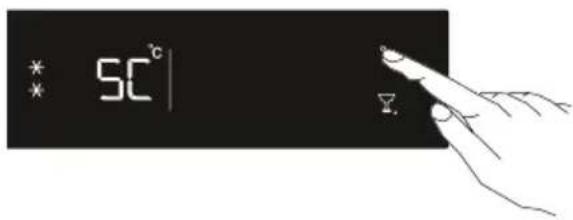
Super cool mode
How would it be used?
Press the cooler set button until the SC symbol is seen on the screen. The buzzer will beep twice. The mode will be set.
text_image
* 50°C * *In this mode:
- The freeze and Super freeze temperature mode may be adjusted. Super cool mode will continue in this case.
• Economy and Holiday mode cannot be selected. - Super cool mode can be cancelled using the same selection operation.
CHAPTER -3: USING YOUR FRIDGE FREEZER
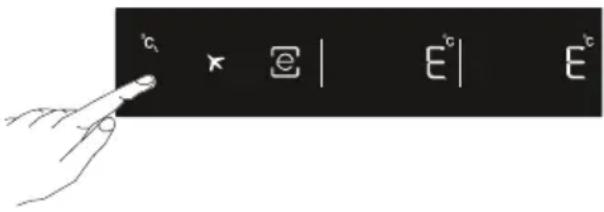
Economy mode
How would it be used?
- Push "mode button" until the eco symbol appears.
- If no button is pressed for 1 second. The mode will be set. The eco symbol will blink 3 times. When the mode is set, the buzzer will beep twice.
- The freezer and refrigerator temperature segments will display "E".
- The economy symbol and light till mode finishes.
text_image
c × e | E | EIn this mode:
- The freezer may be adjusted. When economy mode is cancelled, the selected setting values will commence.
- Cooler may be adjusted. When economy mode is cancelled, the selected setting values will commence.
- Super cool and super freeze modes can be selected. Economy mode is automatically cancelled and the selected mode is activated.
- Holiday mode can be selected after cancelling the economy mode. Then the selected mode is activated.
- To cancel, you will just need to press the mode button.
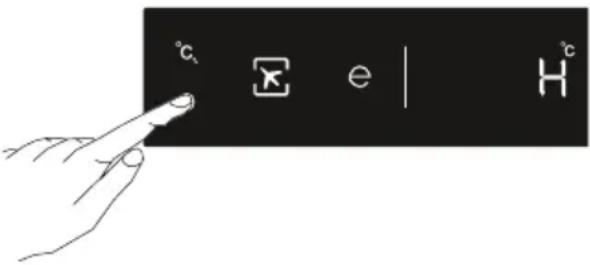
Holiday mode
How would it be used?
- Push the "mode button" until the holiday symbol appears
- If no button is pressed for 1 second. Mode will be set. The holiday symbol will blink 3 times. When the mode is set, the buzzer will beep twice.
- Freezer temperature segment will display "H".
- Holiday symbol and "H" will light till mode finishes.

text_image
°C e H°In this mode:
- The freezer may be adjusted. When holiday mode is cancelled, the selected setting values will commence.
- Cooler may be adjusted. When holiday mode is cancelled, the selected setting values will commence.
- Super cool and super freeze modes can be selected. Holiday mode is automatically cancelled and the selected mode is activated.
- Economy mode can be selected after cancelling the holiday mode. Then the selected mode is activated.
- To cancel, you will just need to press the mode button.
Drink cool mode
Drink cool button should be pressed to activate beverage cooling mode. Each press will increment the time for 5 minutes up to 30 minutes, and then it returns to zero. You can view the time zone you want to set on "Drink cool alarm counter" section. Drink cool mode only lets the refrigerator release an audible alert after a specific period.

text_image
05 Min. °CImportant: It should not be confused with cooling.
Note: You must adjust the time according to the temperature of the bottles before you put them in.
For example, you can set the time as "5 minutes" in the beginning. After this time, if the cooling is insufficient, you might set another 5 or 10 minutes.
While using this mode, you must check the temperature of the bottles regularly. When the bottles are cool enough, you must take them out of the appliance.
In the event that you leave the bottles in when the Drink Cool mode is on, they might explode.
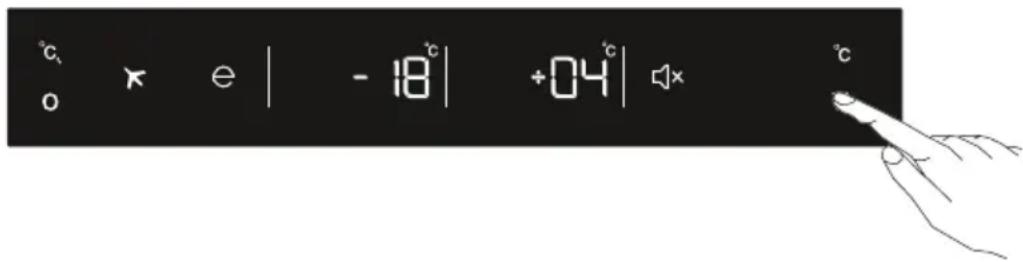
Mute Mode
text_image
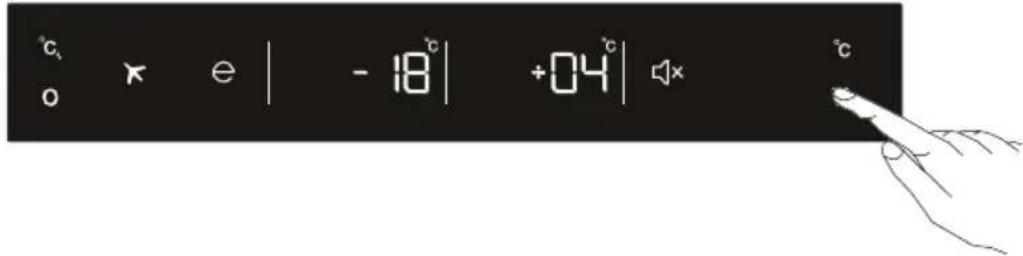
°C o × e | - 18°C | +04°C | × °CThis mode can be activated when you press and hold mute bottom for 3 seconds. When this mode is activated all button sounds and sound alarms will be off.
This mode can be cancelled when you press and hold mute button for 3 seconds.
CHAPTER -3: USING YOUR FRIDGE FREEZER
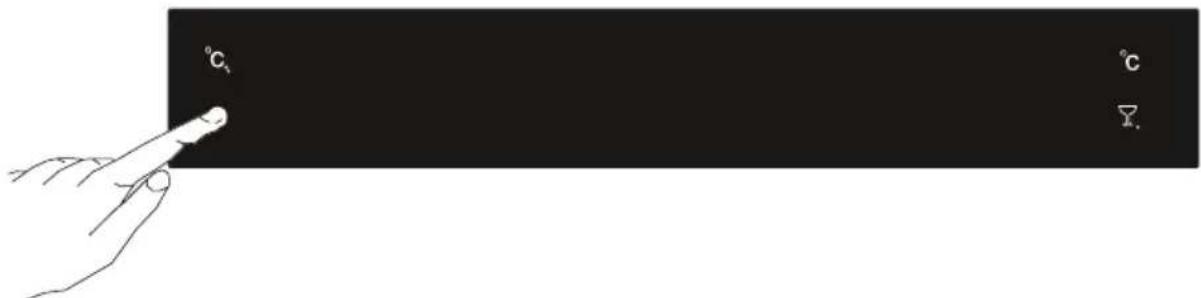
Screen saver mode
How to use?
text_image
℃ ℃ Y.- This mode will be activated when you press on mode button for 5 seconds.
- If pressed on no button in 5 seconds when he mode is active, lights of the control panel will go off.
- If you press any button when lights of control panel are off, the current settings will appear on the screen, and then you can make the adjustment as you want. If you neither cancel screen saver mode nor press on any button in 5 seconds, the control panel will go off again.
- To cancel screen saver mode press on mode button for 5 seconds again.
- When screen saver mode is active you can also activate child lock.
- If you do not press any button for 5 seconds after activating child lock, the lights of the control panel will go off. Then, you can view the previous settings and that child lock symbol is active when you pres any button, and you can cancel child lock as is described in the instruction of that mode.
Function of Child lock
When would it be used?
To prevent children from playing with the buttons and changing the settings you have made, child lock is available in the appliance.
Activating Child Lock

text_image
0 e | -18°C | +04°C | 7.Press on Freezer and Cooler buttons simultaneously for 5 seconds.
Deactivating Child Lock
Press on Freezer and Cooler buttons simultaneously for 5 seconds.
Note: Child lock will also be deactivated if electricity is interrupted or the fridge is unplugged.
Light cancelling mode
When would it be used?
- If you wish to cancel lights of cooler, you can select this mode.
- While pushing on Freezer, Cooler, Mode and D.Cool/Mute Button together for 3 seconds. The mode will be selected in this way. From now on, the lights will not come on when the function is not cancelled by the same way.
- If you want to cancel this mode, repeat the same process or the mode will automatically cancel itself after 24 hours.
Door open alarm function
If cooler or freezer door is opened more than 2 minutes, appliance sounds 'beep beep'.
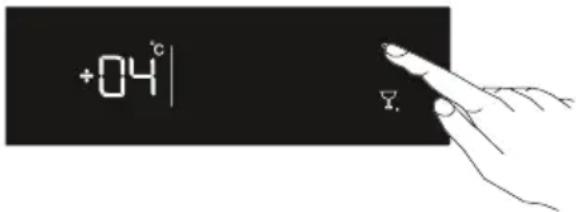
Cooler temperature settings
- Initial temperature value for Cooler Setting Indicator is +4 °C.
- Press cooler button once.
- When you first push this button, the last value appears on the setting indicator of the cooler.
- Whenever you press on this button, lower temperature will be set. (+8°C, +6°C, +5°C, +4°C, +2°C, supercool)
- When you push the cooler set button until supercool symbol appears on the Cooler Setting Indicator, and if you do not push any button in 1 seconds Super Cool will flash.
- If you continue to press, it will restart from +8^ C .
- The temperature value selected before Holiday Mode, Super Freeze Mode, Super Cool Mode or Economy Mode is activated will remain the same when the mode is over or cancelled. The appliance continues to operate with this temperature value.
text_image
+04°C ▽.Freezer temperature settings
- Initial temperature value for Freezer Setting Indicator is -18^ .
- Press freezer set button once.
- When you first push this button, the last set value will blink on screen.
- Whenever you press on this button, lower temperature will be set (-16°C, -18°C, -20°C, -22°C, -24°C superfreeze).
- When you push the freezer set button until superfreeze symbol appears on the Freezer Setting Indicator, and if you do not push any button in 1 seconds Super Freeze will flash.
- If you continue to press, it will restart from -16^ .
- The temperature value selected before Holiday Mode, Super Freeze Mode, Super Cool Mode or Economy Mode is activated will remain the same when the mode is over or cancelled. The appliance continues to operate with this temperature value.

text_image
o × e | - 18 °CWarnings About Temperature Adjustments
- It is not recommended that you operate your fridge in environments colder than 10^ .
- Temperature adjustments should be made according to the frequency of door openings, the quantity of food kept inside the fridge and ambient temperature of the placement of your fridge.
- Your fridge should be operated up to 24 hours according to the ambient temperature without interruption after being plugged in, this is so it is completely cooled. Do not open the doors of your fridge and do not place food inside it during this period.
- A 5 minute delay function is applied to prevent damage to the compressor of your fridge, when you take the plug out and then plug it back in again after an energy breakdown has occurred. Your fridge will start to operate normally after 5 minutes.
- Your fridge is designed to operate in the ambient temperature intervals stated in the standards, according to the climate class stated in the information label. We do not recommend operating your fridge out of the stated temperatures value limits in terms of cooling effectiveness.
- This appliance is designed for use at an ambient temperature within the 10^ - 43^ range.
Climate class and meaning:
T (tropical): This refrigerating appliance is intended to be used at ambient temperatures ranging from 16 °C to 43 °C.
ST (subtropical): This refrigerating appliance is intended to be used at ambient temperatures ranging from 16 °C to 38 °C.
N (temperate): This refrigerating appliance is intended to be used at ambient temperatures ranging from 16 °C to 32 °C.
SN (extended temperate): This refrigerating appliance is intended to be used at ambient temperatures ranging from 10 °C to 32 °C.
Temperature indicator
In order to help you better set your refrigerator, we have equipped it with a temperature indicator located in the coldest area.
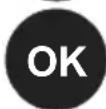
To better store the food in your refrigerator, especially in the coldest area, make sure the message "OK" appears on the temperature indicator. If « OK » does not appear, this means temperature has not been set properly
It may be difficult to see the indicator, make sure it is properly lit. Each time the temperature setting device is changed, wait for the stabilisation of the temperature inside the appliance before proceeding, if necessary,
with a new temperature setting. Please change the position of the temperature setting device progressively and wait at least 12 hours before starting a new check and potential change.
NOTE: Following repeated openings (or prolonged opening) of the door or after putting fresh food into the appliance, it is normal for the indication "OK" not to appear in the temperature setting indicator. If there is an abnormal build up of ice crystals of ice crystals (bottom wall of the appliance) on the refrigerator compartment, evaporator (overloaded appliance, high room temperature, frequent door openings), put the temperature setting device on a lower position until compressor off periods are obtained again.
CHAPTER -3: USING YOUR FRIDGE FREEZER
Store food in the coldest area of the refrigerator.
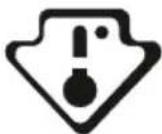
Your foods will be better stored if you put them in the most appropriate cooling area. The coldest area is just above the crisper.
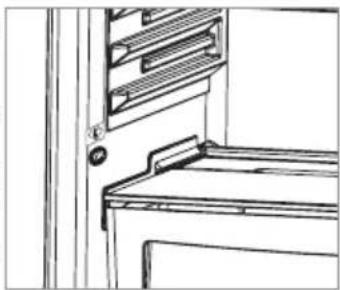
The following symbol indicates the coldest area of your refrigerator. To be sure to have a low temperature in this area, make sure the shelf is located at the level of this symbol, as shown in the illustration.
The upper limit of the coldest area is indicated by the lower side of the sticker (head of the arrow). The coldest area upper shelf must be at the same level with the arrow head. The coldest area is below this level.
As these shelves are removable, make sure they are always at the same level with these zone limits described on the stickers, in order to guarantee temperatures in this area.
natural_image
Line drawing of a cabinet or storage unit with metal grilles and a door (no text or symbols)Accessories
Freezer box
- The freezer box is for foods that need to be accessed more easily.
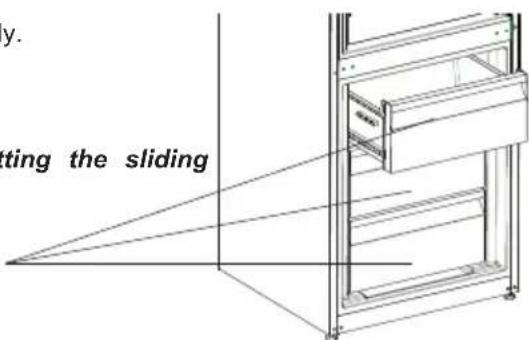
- Removing The freezer box;
• Pull the box out as far as possible - Pull the front of box up and out.
! Make the inverse of the same operation for the resetting the sliding compartment.
Note: Always hold the handle of box while moving in or out.
Freezer boxes
text_image
y. stting the slidingZero Degree Zone (In some models)
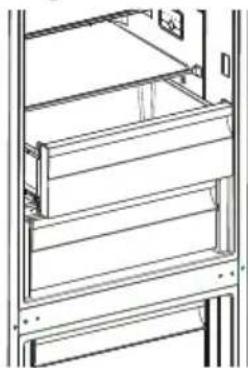
Keeping food in the chiller compartment instead of the freezer or refrigerator compartment allows food retain freshness and flavour longer while preserving its fresh appearance. If the chiller tray becomes dirty, remove it and wash with water.
(Water freezes at 0 °C, but foods containing salt or sugar require lowered temperatures to freeze)
Normally people use the chiller compartment for raw fish, rice, etc...
Do not put foods you want to freeze or ice trays in order to make ice.
Removing the chiller shelf
- Pull the chiller shelf out toward you by sliding it on rails.
- Pull the chiller shelf up from the rail to remove.
After the chiller shelf has been removed, it can support a maximum 20 kg load.
Humidity Controller
When the humidity controller is in the closed position, it allows fresh fruit and vegetables to be stored for a longer time.
In the event the crisper is full, the fresh dial that is located in front of the crisper, should be opened. By means of this, the air in the crisper and humidity rate will be controlled and the shelf life will be extended.
If you see any condensation on the glass shelf, the humidity control should be placed into the open positions.
natural_image
Line drawing of a cabinet or rack structure with no visible text, numbers, or symbols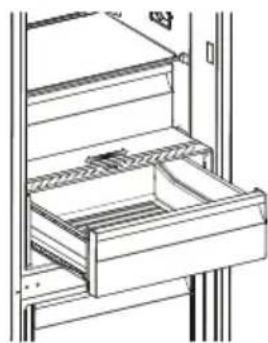
natural_image
Line drawing of a refrigerator drawer with drawers and shelves (no text or symbols)Adapti-Lift Door Shelf (In some models)
natural_image
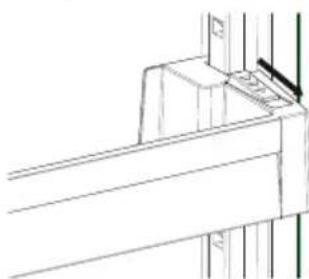
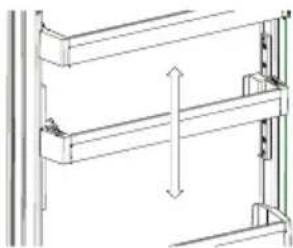
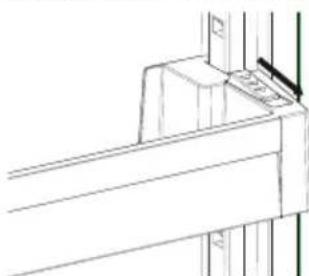
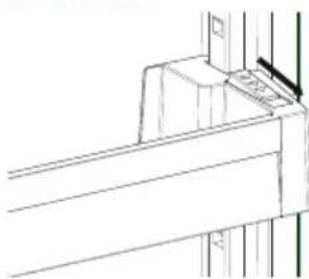
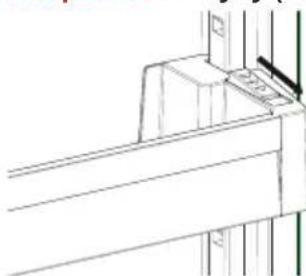
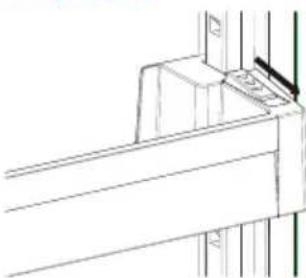
Technical line drawing of a structural joint or bracket (no text or symbols)Six different height adjustments can be made to provide storage areas that you need by Adapti-Lift.
To change the position of Adapti-Lift ;
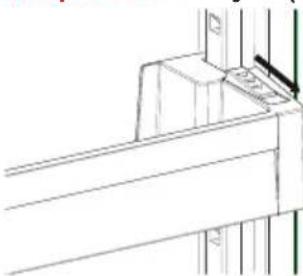
Hold the bottom of the shelf and pull the buttons on the side of the door shelf direction of arrow (Fig.1)
Position door shelf the height you need by moving up and down. After you get the position that you want the door shelf, release the buttons on the side of the door shelf (Fig.2) Before releasing the door shelf, move up down and make sure the door shelf is fixed
natural_image
Technical line drawing of a mechanical assembly with two parallel plates and a vertical double-headed arrow indicating rotation (no text or symbols)Fig.2
Fig.1
Note: Before moving door shelf is loaded, you must hold the shelf by supporting the bottom. Otherwise, door shelf could fall off the rails due to the weight. So damage may occur on the door shelf or rails.
CHAPTER -3: USING YOUR FRIDGE FREEZER
Adapti-Shelf (In some models)
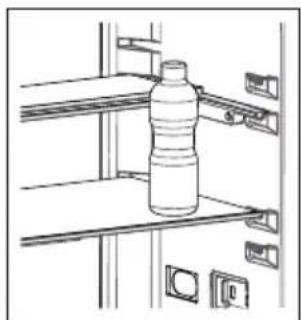
ADAPTI-Shelf mechanism provides higher storage spaces with a simple movement.
• To cover the glass shelf, push it. (Fig. 1)
- You can place your food as you want in the resulting extra space. (Fig. 2)
• To bring the shelf to its original position, pull it toward you. (Fig. 1)

natural_image
Diagram of a multi-level storage or rack system with directional arrows indicating movement (no text or symbols)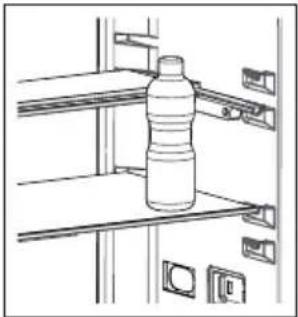
natural_image
Line drawing of a bottled water bottle mounted on a shelf with metal clamps (no text or symbols)Fig. 1 Fig. 2
Visual and text descriptions on the accessories section may vary according which model you have..
• Make sure to unplug the fridge before starting to clean it.
- Do not wash your fridge by pouring water.
• You can wipe the inner and outer sides with a soft cloth or a sponge using warm and soapy water. - Remove the parts individually and clean with soapy water. Do not wash in washing machine.
- Never use flammable, explosive or corrosive material like thinner, gas, acid for cleaning.
- You should clean the condenser with broom at least once a year in order to provide energy saving and increase the productivity.
Make sure that your fridge is unplugged while cleaning.
Cleaning Door Glasses
Water based products which are not abrasive should be used in cleaning glasses.
Defrosting
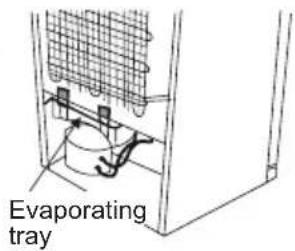
Your refrigerator automatically defrosts. The water formed as a result of defrosting passes through the water collection spout, flows into the vaporization container behind your refrigerator and evaporates by itself in there.
text_image
Evaporating trayReplacing LED Lighting
If your fridge freezer has LED lighting contact the Sharp help desk as this should be changed by authorized personnel only.
CHAPTER -4: FOOD STORAGE GUIDANCE
Refrigerator compartment
- For normal operating conditions, adjusting the temperature value of the cooler partition of the fridge to 4°C is enough.
- To reduce the humidity and consequently increase frost, never place liquids in unsealed containers in the refrigerator. Frost tends to concentrate in the coldest parts of the evaporator and, in time, will require more frequent defrosting.
- Never place warm food in the refrigerator. Warm food should be allowed to cool at room temperature and should be arranged to ensure adequate air circulation in the refrigerator compartment.
- Nothing should touch the back wall as this will cause frost and the packages may stick to the back wall. Do not open the refrigerator door too frequently.
- Arrange the meat and cleaned fish(wrapped in packages or sheets of plastic) which you will use in 1-2 days, in the bottom section of the refrigerator compartment (that is above the crisper) as this is the coldest section and will ensure the best storing conditions.
- You can put fruits and vegetables into the crisper without packing.
- For normal working conditions, it will be sufficient to adjust the temperature setting of your refrigerator to +4 °C.
- The temperature of the fridge compartment should be in the range of 0-8 °C, fresh foods below 0 °C are iced and rotted, bacterial load increases above 8 °C, and spoils.
- Do not put hot food in the refrigerator immediately, wait for the temperature to pass outside. Hot foods increase the degree of your refrigerator and cause food poisoning and unnecessary spoiling of the food.
- Meat, fish, etc. should be store in the chiller compartment of the food, and the vegetable compartment is preferred for vegetables. (if available)
• To prevent cross contamination, meat products and fruit vegetables are not stored together.
- Foods should be placed in the refrigerator in closed containers or covered to prevent moisture and odors.
CHAPTER -4: FOOD STORAGE GUIDANCE
Freezer compartment
- Please use the deep freeze compartment of your refrigerator for storing frozen food for a long time and for producing ice.
- To get maximum capacity for the freezer compartment, please just use glass shelves for upper and middle section. For the bottom section, please use lower basket.
- Please do not place the food you that needs to be frozen next to the already frozen food.
- You should freeze the food to be frozen (meat, minced meat, fish, etc.) by dividing it into portions in such a way that they can be consumed once.
- Please do not refreeze the frozen food once it has already thawed. It may pose a danger to your health as it may cause food poisoning.
- Do not place the hot meals in your deep freeze before they become cold. You would cause the other food frozen beforehand in the deep freeze to become putrefied.
- When you buy frozen food, makes sure that they were frozen under appropriate conditions and that the package is not torn.
- While storing frozen food, the storage conditions on the package should certainly be observed. If there is no additional information, the food must be consumed within the shortest time possible.
- If the frozen food package was subject to humidity and has a foul smell, it might have been previously stored under unsuitable conditions and gone rotten. Do not purchase this type of food!
- The storage durations of frozen food change depending on the ambient temperature, the frequency of the opening and closing of the doors, thermostat settings, food type and the time elapsed from the purchase time of the food to the time it is placed into the freezer. Always follow the instructions on the package and never exceed the indicated storage duration.
- During long lasting power failures, do not open the door of the deep freeze compartment. Your refrigerator will preserve your frozen food for about 18 hours in ambient temperatures of 25^ and for about 13 hours in ambient temperatures of 32^ . This value will decrease under higher ambient temperatures. During longer power failures, do not refreeze your food and consume it as soon as possible.
- Please note: if you want to open the freezer door immediately after closing it, it will not open easily. This is a normal occurrence. After reaching equilibrium condition, the door will open easily.
Important note:
- Frozen foods, when thawed, should be cooked just as fresh foods. If they are not cooked after being thawed they must NEVER be re-frozen.
- The taste of some spices found in cooked dishes (anise, basil, watercress, vinegar, assorted spices, ginger, garlic, onion, mustard, thyme, marjoram, black pepper, etc.) changes and they assume a stronger taste when they are stored for a long period. Therefore, just a small amount of the spice should be added or the desired spice should be added after the food has been thawed.
- The food storage period is dependent on the oil used. Suitable oils include: margarine, half fat, olive oil and butter and the unsuitable oils include: peanut oil and lard.
- The food in liquid form should be frozen in plastic cups and other food should be frozen in plastic folios or bags.
CHAPTER -5: DOOR REVERSAL
Repositioning the door
- It depends on which fridge freezer you have as to whether it is possible the reverse the doors.
- It is not possible where handles are attached at the front of the appliance.
- If your model does not have handles it is possible to reverse the doors, but this needs to be completed by authorised personnel. Please call Sharp service.
CHAPTER -6: TROUBLESHOOTING
Check Warnings;
Your fridge warns you if the temperatures for cooler and freezer are in improper levels or when a problem occurs in the appliance. Warning codes are displayed in the Freezer and Cooler Indicators.
| ERROR TYPE MEANING WHY WHAT TO DO | |||
| SR | "Failure Warning" | There is/are some part(s) Out of order or there is a failure in cooling process | Contact the Sharp helpdesk as soon as possible. |
| LF | Freezer comp. Not Cold enough | This caution will be seen especially after long term of power failure | 1. Do not freeze the foods that are thaw and use in short time period.2. Set the freezer temperature to colder values or set the super freeze, until the compartment gets to normal temperature.3. Do not put fresh food until this failure is off. |
| LC | "Refrigerator comp. Not Cold enough" | Ideal temperature for Ref. Compartment is +4 °C. If you see this warning your foods have risk of spoiling. | 1. Set the refrigerator temperature to colder values or set the super cooling mode until the compartment gets to normal temperature.2. Do not open the door much until this failure is off. |
| LF and LC | "not cold enough Warning" | It is the combination of LF and LC Error type | You will see this failure when first starting the appliance. It will be off after the compartments gets normal temperature |
| HC | Refrigerator comp. too Cold | The foods starts to freeze because of the too much cold temperature | 1. Check if the “Super cooling mode” is on2. Decrease the refrigerator temperature values |
| LOPO | "Low voltage Warning" | When the power supply gets lower than 170 V the appliance gets to steady position. | This not a failure. This prevents any damages on the compressor. This warning will off after the voltage gets required level |
If your fridge is not operating;
• Is there a power failure?
- Is the plug connected to the socket correctly?
- Is the fuse of the socket to which the plug is connected or the main fuse blown?
- Is there any failure at the socket? To check this, plug your refrigerator into a known working socket.
If your fridge is not cooling enough;
• Is the temperature adjustment right?
- Is the door of your fridge opened frequently and left open for a long while?
• Is the door of fridge closed properly?
- Did you put a dish or food on your fridge so that it contacts the rear wall of your fridge so as to prevent the air circulation?
• Is your fridge filled excessively?
- Is there adequate distance between your fridge and the rear and side walls?
- Is the ambient temperature within the range of values specified in the operating manual?
If the food in your refrigerator compartment is over cooled
• Is the temperature adjustment right?
- Are there many food recently put inside the freezer compartment? If so, your fridge may over cool the food inside the refrigerator compartment as it will operate longer to cool these food.
If your fridge is operating too loudly;
To maintain the set cooling level, compressor may be activated from time to time. Noises from your fridge at this time are normal and due to its function. When the required cooling level is reached, noises will be decreased automatically. If the noises persist;
• Is your appliance stable? Are the legs adjusted?
• Is there anything behind your fridge?
- Are the shelves or dishes on the shelves vibrating? Re-place the shelves and/or dishes if this is the case.
- Are the items placed on your fridge vibrating?
Normal Noises;
Cracking (Ice cracking) Noise:
• During automatic defrosting.
- When the appliance is cooled or warmed (due to expansion of appliance material).
Short cracking: Heard when the thermostat switches the compressor on/off.
Compressor noise (Normal motor noise): This noise means that the compressor operates normally Compressor may cause more noise for a short time when it is activated.
Bubbling noise and splash: This noise is caused by the flow of the refrigerant in the tubes of the system.
Water flow noise: Normal flow noise of water flowing to the evaporation container during defrosting. This noise can be heard during defrosting.
Air Blowing Noise (Normal fan noise): This noise can be heard in No-Frost fridge during normal operation of the system due to the circulation of air.
CHAPTER -6: TROUBLESHOOTING
If humidity builds up inside the fridge;
- Has the food been properly packaged? Have the containers been well dried before they were put into the refrigerator?
- Are the doors of the refrigerator opened very frequently? When the door is opened, the humidity found in the air in the room enters the refrigerator. Especially if the humidity rate in the room is too high, the more frequently the door is opened the faster will be the humidification.
If the doors are not opened and closed properly;
- Do the food packages prevent closing of the door?
- Are the door compartments, shelves and drawers placed properly?
- Are door gaskets broken or torn?
• Is your fridge on a level surface?
If the edges of fridge cabinet that the door joint contact are warm;
Especially in summer (hot weather), the surfaces that the joint contact may get warmer during the operation of the compressor, this is normal.
IMPORTANT NOTES:
- The compressor protection thermal fuse will cutout after sudden power breakdowns or after unplugging the appliance, because the gas in the cooling system is not stabilised. This is quite normal, and the fridge will restart after 4 or 5 minutes.
- The cooling unit of your refrigerator is hidden in the rear wall. Therefore, water droplets or ice may occur on the rear surface of your fridge due to the operation of the compressor in specified intervals. This is normal. There is no need to perform a defrosting operation unless the ice is excessive.
- If you will not use your fridge for a long time (e.g. in summer holidays) unplug it. Clean your fridge according to Part 4 and leave the door open to prevent humidity and smell.
- The appliance you have purchased is designed for home type use and can be used only at home and for the stated purposes. It is not suitable for commercial or common use. If the consumer use the appliance in a way that does not comply with these features, we emphasise that the producer and the dealer shall not be responsible for any repair and failure within the guarantee period.
- If the problem persists after you have followed all the instructions above, please consult an authorised service provider.
CHAPTER -7: TIPS FOR SAVING ENERGY
- Always allow foodstuffs to cool before storing in the appliance.
- Thaw food in the fridge compartment, this helps save energy.
CHAPTER -8: TECHNICAL DATA
The technical information is situated in the rating plate on the internal side of the appliance and on the energy label.
The QR code on the energy label supplied with the appliance provides a web link to the information related to the performance of the appliance in the EU EPREL database.
Keep the energy label for reference together with the user manual and all other documents provided with this appliance. It is also possible to find the same information in EPREL using the link https://eprel.ec.europa.eu and the model name and product number that you find on the rating plate of the appliance.
See the link www.theenergylabel.eu for detailed information about the energy label.
CHAPTER -9: CUSTOMER CARE AND SERVICE
Always use original spare parts.
When contacting our Authorised Service Centre, ensure that you have the following data available: Model, Serial Number and Service Index.
The information can be found on the rating plate. You can find the rating label inside the fridge zone on the left lower side.
The original spare parts for some specific components are available for a minimum of 7 or 10 years, based on the type of component, from the placing on the market of the last unit of the model.
Visit our website to:
www.sharphomeappliances.com
Inhalt
text_image
o e | * SFcnatural_image
Line drawing of a cabinet or rack with a door and shelf, no text or symbols presentnatural_image
Technical line drawing of a multi-level cabinet or rack unit with no visible text or symbolsnatural_image
Line drawing of a cabinet or rack structure with no visible text, numbers, or symbolsnatural_image
Line drawing of a refrigerator drawer with drawers and shelves (no text or symbols)natural_image
Technical line drawing of a structural joint or bracket (no text or symbols)natural_image
Technical line drawing of a mechanical assembly with two parallel plates and a vertical dimension arrow (no text or symbols)Abb.2
Abb.1
natural_image
Diagram of a mechanical assembly with two parallel plates and directional arrows indicating motion (no text or symbols)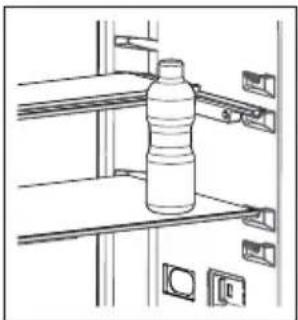
natural_image
Line drawing of a bottled water bottle mounted on a shelf with metal brackets (no text or symbols)Abb. 1 Abb. 2
www.sharphomeappliances.com
Sommaire
PARTIE -1: AVERTISSEMENTS GÉNÉRAUX ...... 33
PARTIE -2: PARTIES ET PIÈCES DE VOTRE REFRIGERATEUR - CONGELATEUR . 38
PARTIE -3: LES DIFFERENTES FONCTION ET POSSIBILITES....38
PARTIE -4: DISPOSITION DES ALIMENTS 44
PARTIE -5: INVERSION DES PORTES 45
PARTIE -6: AVANT D'APPELER LE SERVICE APRÈS-VENTE 45
PARTIE -7: CONSEILS POUR ÉCONOMISER DE L'ÉNERGIE....47
PARTIE -8: DONNÉES TECHNIQUES....47
PARTIE -9: SERVICE ET ASSISTANCE À LA CLIENTÈLE....47
text_image
Diagram showing airflow patterns in a vehicle or tank layout with red and blue directional arrows indicating movement.PARTIE -2: PARTIES ET PIÈCES DE VOTRE REFRIGERATEUR - CONGELATEUR
Mode super congélation
text_image
c e | E | Enatural_image
Line drawing of a cabinet or rack structure with no visible text or symbolsnatural_image
Technical line drawing of a mechanical cabinet or rack frame structure (no text or symbols)PARTIE -3: LES DIFFERENTES FONCTION ET POSSIBILITES
natural_image
Technical line drawing of a multi-level cabinet or rack structure (no text or symbols)Curseur d'humidité
natural_image
Line drawing of a refrigerator drawer with drawers and shelves (no text or symbols)natural_image
Technical line drawing of a structural joint or bracket (no text or symbols)Fig.1
natural_image
Technical line drawing of a mechanical assembly with no visible text or symbolsFig.2
natural_image
Diagram of a shelving unit with shelves and doors, showing an upward arrow indicating motion (no text or symbols present)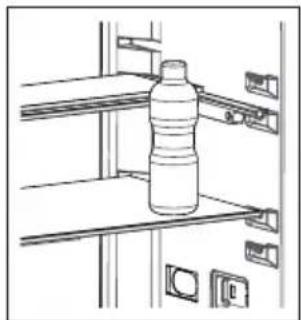
natural_image
Line drawing of a bottled water bottle mounted on a shelf with metal racks (no text or symbols)Fig. 1 Fig. 2
natural_image
Technical line drawing of a structural component with grid and support brackets (no text or symbols)Bac d'évaporation
text_image
° × | E° | E°Tijdens deze modus:
natural_image
Line drawing of a refrigerator interior with door, seat, and shelf (no text or symbols)Accessoires
Vriesvak
natural_image
Technical line drawing of a mechanical cabinet or rack unit with no visible text or symbolsZero Degree Zone (In sommige modellen)
natural_image
Technical line drawing of a cabinet or rack structure with no visible text or symbolsnatural_image
Line drawing of a refrigerator drawer with drawers open (no text or symbols)Adapti-Lift deurschap (In sommige modellen)
natural_image
Pure technical line drawing of a structural joint or bracket (no text or symbols)natural_image
Technical line drawing of a mechanical assembly with no visible text or symbolsnatural_image
Diagram showing two views of a storage shelf with a bottle and directional arrows indicating movement (no text or symbols)Fig. 1 Fig. 2
natural_image
Technical line drawing of a mechanical assembly with a grid-patterned panel and clamping mechanism (no text or symbols)Verdampingslade
De lamp-led vervangen
www.sharphomeappliances.com
Índice
natural_image
Diagram showing two curved heat exchanger-like structures with internal flow arrows (no text or labels)text_image
Diagram showing airflow patterns in a vehicle or container with labeled sections and directional arrowsCAPÍTULO 2: SU FRIGORÍFICO
text_image
° × | E° | E°
text_image
0 x e | - 18°Cnatural_image
Line drawing of a cabinet or storage unit with metal grilles and a door (no text or symbols)Accesorios
natural_image
Technical line drawing of a mechanical cabinet or rack structure (no text or symbols)natural_image
Technical line drawing of a cabinet or rack structure with no visible text or symbolsnatural_image
Line drawing of a refrigerator drawer with shelves and drawers (no text or symbols)CAPÍTULO 3: USO DEL FRIGORÍFICO
natural_image
Technical line drawing of a structural joint or bracket (no text or symbols)natural_image
Technical line drawing of a structural frame with vertical and horizontal arrows indicating movement (no text or symbols)Fig.2
Fig.1
natural_image
Diagram of a multi-level storage or rack system with directional arrows indicating movement (no text or symbols)
natural_image
Line drawing of a bottled water bottle mounted on a shelf with metal racks (no text or symbols)Fig. 1 Fig. 2
www.sharphomeappliances.com
Conteúdos
CAPÍTULO -1: AVISOS GERAIS....81
CAPÍTULO -2: O SEU FRIGORÍFICO 85
CAPÍTULO -3: UTILIZAÇÃO DO FRIGIRÍFICO......86
CAPÍTULO -4: GUIA DO ARMAZENAMENTO DE ALIMENTOS....91
CAPÍTULO -5: INVERSÃO DA PORTA....93
CAPÍTULO -6: RESOLUÇÃO DE PROBLEMAS....93
CAPÍTULO -7: DICAS PARA POUPAR ENERGIA 95
CAPÍTULO -8: DADOS TÉCNICOS 95
CAPÍTULO -9:SERVIÇO E ASSISTÊNCIA AO CONSUMIDOR....95
natural_image
Diagram of a coiled heat exchanger with cooling fins and a valve, showing fluid flow direction (no text or labels)CAPÍTULO -1: AVISOS GERAIS
text_image
Diagram showing airflow patterns in a vehicle or airway system with labeled components and directional arrowsCAPÍTULO -2: O SEU FRIGORÍFICO
natural_image
Line drawing of a double refrigerator with open doors and internal compartments (no text or symbols)Mostrador e painel de controle
Compartimento do frigorífico
Grade de vinho *
text_image
c × | E| EDurante este modo:
text_image
o × e | - 18°Cnatural_image
Line drawing of a cabinet or rack with a door and side panel (no text or symbols)Acessórios
Arca congeladora
natural_image
Technical line drawing of a cabinet or rack structure with no visible text or symbolsnatural_image
Technical line drawing of a cabinet or rack structure with no visible text or symbolsnatural_image
Line drawing of a refrigerator drawer with drawers open (no text or symbols)natural_image
Technical line drawing of a structural joint or bracket (no text or symbols)natural_image
Technical line drawing of a mechanical assembly with no visible text or symbolsFig.1 Fig.2
natural_image
Diagram of a shelving unit with shelves and doors, showing directional arrows (no text or symbols)
natural_image
Line drawing of a bottled water bottle mounted on a shelf with metal racks (no text or symbols)Fig. 1 Fig. 2
natural_image
Technical line drawing of a mechanical assembly with grid and bracket components (no text or symbols)Visite o nosso website para: www.sharphoneappliances.com
Indhold
KAPITEL -1: GENERELLE ADVARSLER....97
KAPITEL -2: DIT K∅LEFRYSESKAB....101
KAPITEL -3: SÅDAN ANVENDES DIT K∅LEFRYSESKAB 102
KAPITEL -4: GUIDE TIL OPBEVARING AF MADVARER....107
KAPITEL -5: VENDING AF D∅R....108
KAPITEL -6: FEJLFINDING 108
KAPITEL -7: TIP TIL ENERGIBESPARELSE 110
KAPITEL -8: TEKNISKE DATA 110
KAPITEL -9: KUNDEPLEJE OG -SERVICE 110
natural_image
Diagram of a coiled heat exchanger with two chambers and directional arrows indicating flow (no text or labels)KAPITEL -1: GENERELLE ADVARSLER
text_image
Hand pointing at a black control panel with icons for 'c', '×', and 'E'I denne tilstand:
natural_image
Line drawing of a refrigerator interior showing front and side views (no text or symbols)
KAPITEL -3: SÅDAN ANVENDES DIT K∅LEFRYSESKAB
Tilbehør
Fryseboksen
natural_image
Technical line drawing of a multi-level refrigerator or rack unit (no text or symbols)Zero Degree Zone (På visse modeller)
natural_image
Line drawing of a cabinet or rack structure with no visible text, numbers, or symbolsnatural_image
Line drawing of a refrigerator drawer with shelves and drawers (no text or symbols)Adapti-Lift Dørhylde (På visse modeller)
natural_image
Technical line drawing of a structural joint or bracket (no text or symbols)natural_image
Technical line drawing of a structural frame with vertical dimension lines (no text or symbols)Fig.1 Fig.2
natural_image
Diagram of a shelving unit with shelves and doors, showing directional arrows indicating movement (no text or symbols)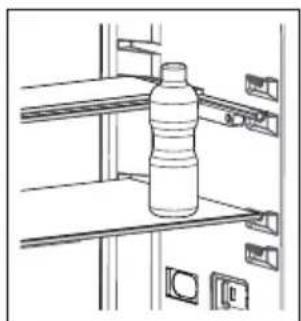
natural_image
Line drawing of a bottled water bottle mounted on a shelf with attached compartments (no text or symbols)natural_image
Technical line drawing of a mechanical assembly or housing component (no text or symbols visible)Fordampningsbakke
text_image
Diagram showing airflow patterns in a vehicle or air system with labeled components and directional arrowsKAPITTEL 2: KOMBISKAPET DITT
text_image
° × | E° | E°text_image
0 e | - 18°Cnatural_image
Line drawing of a refrigerator with a door and shelf (no text or symbols)
KAPITTEL 3: HVORDAN BRUKE KOMBISKAPET DITT
Tilbehør
Fryseboks
natural_image
Technical line drawing of a multi-level refrigerator or rack unit (no text or symbols)Zero Degree Zone (I noen modeller)
Hvis maten holdes i chiller i stedet for fryser eller kjøleskap, vil maten beholde friskhet og smak for en lengre periode og vil samtidig bevare friskt utseende. Hvis skuffen blir skitten, fjerne den og vaske den med vann.
natural_image
Line drawing of a cabinet or rack structure with no visible text or symbolsFuktighetsregulator
natural_image
Line drawing of a refrigerator drawer with drawers open (no text or symbols)Dørhyllen Adapti-Lift (I noen modeller)

natural_image
Technical line drawing of a mechanical bracket or frame assembly (no text or symbols)natural_image
Technical line drawing of a mechanical assembly with no visible text or symbolsnatural_image
Diagram of a shelving unit with two shelves and directional arrows indicating movement (no text or symbols)
natural_image
Line drawing of a bottled water bottle mounted on a shelf with metal racks (no text or symbols)Fig. 1 Fig. 2
KAPITTEL 3: HVORDAN BRUKE KOMBISKAPET DITT
www.sharphomeappliances.com
Installationsinformation
natural_image
Diagram showing two curved heat exchanger-like structures with a person moving inside (no text or symbols)KAPITEL -1: ALLMÄNNA VARNINGAR
text_image
Diagram of a vehicle air intake system with labeled components and airflow indicatorsKAPITEL -2: DIN KYL OCH FRYS
KAPITEL -3: ANVÄNDA DIN KYL OCH FRYS
KAPITEL -3: ANVÄNDA DIN KYL OCH FRYS
Ekonomiläge
Hur används det ?
text_image
Hand pointing at a black control panel with icons for 'c', 'e', and 'E' symbols, likely from a software interface or command.I detta läge:
KAPITEL -3: ANVÄNDA DIN KYL OCH FRYS
Sekretessläge
text_image
°C o × e | - 18°C | +04°C | × °Ctext_image
0 × e | -18°C | +04°Ctext_image
o × e | -18°CVarningar om temperaturjusteringar
KAPITEL -3: ANVÄNDA DIN KYL OCH FRYS
Placera livsmedel i det kallaste området i kylen

natural_image
Line drawing of a cabinet or rack with a door and shelf, no text or symbols presentTillbehör
Fryslåda
natural_image
Technical line drawing of a mechanical assembly with no visible text or symbolsZero Degree Zone (I vissa modeller)
natural_image
Technical line drawing of a cabinet or shelving unit with horizontal shelves and door frame (no text or symbols)Fuktregulatorn
natural_image
Line drawing of a refrigerator drawer with shelves and drawers (no text or symbols)Adapti-Lift dörrhylla (I vissa modeller)
natural_image
Technical line drawing of a structural joint or bracket (no text or symbols)fig. 1
natural_image
Technical line drawing of a mechanical assembly with two parallel plates and a vertical double-headed arrow indicating direction (no text or symbols)fig. 2
KAPITEL -3: ANVÄNDA DIN KYL OCH FRYS
Adapti-Shelf (I vissa modeller)
natural_image
Diagram of a mechanical assembly with two parallel plates and directional arrows indicating motion (no text or symbols)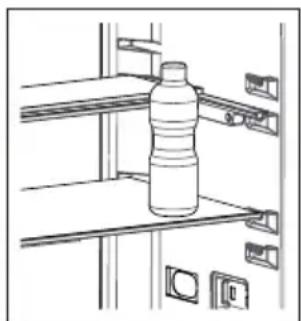
natural_image
Line drawing of a bottled water bottle mounted on a shelf with attached compartments (no text or symbols)Bild 1 Bild 2
www.sharphomeappliances.com
Sisältö
LUKU-1: YLEISIÄ VAROITUKSIA....142
LUKU-2: JÄÄKAAPPIPAKASTIN 146
LUKU 3: JÄÄKAAPPIPAKASTIMEN KÄYTTÄMINEN....147
LUKU 4: RUOAN SÄILYTYSOPAS....152
LUKU 5: OVEN AVAUTUMISSUUNNAN VAIHTO....153
LUKU 6: VIANMÄÄRITYS....153
LUKU 7: ENERGIANSÄÄSTÖVINKKEJÄ....155
LUKU 8: TEKNISET TIEDOT ....155
LUKU 9: ASIAKASPALVELU JA HUOLTO....155
natural_image
Diagram of two heat exchangers with cooling fins and a valve, no text or symbols presentLUKU 1: YLEISET VAROITUKSET
text_image
c × e | E EToiminnon aikana:
natural_image
Line drawing of a cabinet or rack structure with no visible text or symbolsLisävarusteet
Pakastinlaatikko
natural_image
Technical line drawing of a mechanical cabinet or rack unit with no visible text or symbolsLUKU-3: JÄÄKAAPPIPAKASTIMEN KÄYTTÖ
Zero Degree Zone (Joissakin malleissa)
natural_image
Technical line drawing of a cabinet or rack structure with no visible text or symbols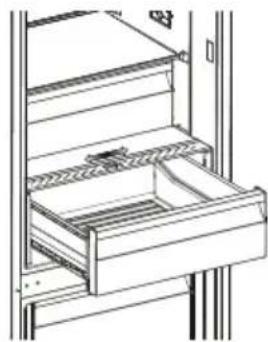
natural_image
Line drawing of a refrigerator drawer with shelves and drawers (no text or symbols)Adapti-Lift ovihylly (Joissakin malleissa)
natural_image
Technical line drawing of a structural joint or bracket (no text or symbols)Kuva 1
natural_image
Technical line drawing of a structural frame with two horizontal members and a vertical double-headed arrow indicating rotation (no text or symbols)Kuva 2
natural_image
Diagram of a multi-level storage or rack system with directional arrows indicating movement (no text or symbols)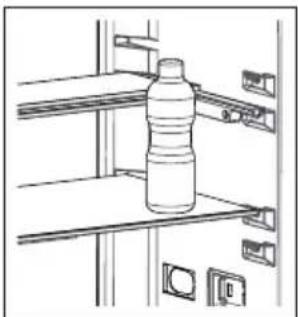
natural_image
Line drawing of a bottled water bottle mounted on a shelf with metal racks (no text or symbols)Kuva 1 Kuva 2
LUKU 6: VIANMÄÄRITYS
LUKU 6: VIANMÄÄRITYS
LUKU 6: VIANMÄÄRITYS
LUKU 8: TEKNISET TIEDOT
LUKU 9: ASIAKASPALVELU JA HUOLTO
www.sharphomeappliances.com
Sisukord
- PEATÜKK: ÜLDHOIATUSED....157
- PEATÜKK: TEIE SÜGAVKÜLMIKUGA KÜLMIK....161
- PEATÜKK: SÜGAVKÜLMIKUGA KÜLMIKU KASUTAMINE .....162
- PEATÜKK: TOIDU HOIUSTAMISE JUHIS....167
- PEATÜKK: UKSE AVAMISSUUNA MUUTMINE....168
- PEATÜKK: TÖRGETE KÖRVALDAMINE....168
- PEATÜKK: NÕUANDED ENERGIA KOKKUHOIDMISEKS 170
- PEATÜKK: TEHNILISED ANDMED 170
- PEATÜKK: KLIENDITEENINDUS....170
natural_image
Diagram of a vehicle dashboard with blue and red airflow indicators (no text or labels)2. PEATÜKK: TEIE SÜGAVKÜLMIKUGA KÜLMIK
text_image
m c × e | E Enatural_image
Line drawing of a cabinet or rack with a door and shelf, no text or symbols present3. PEATÜKK: SÜGAVKÜLMIKUGA KÜLMIKU KASUTAMINE
Tarvikud
Sügavkülmikukast
natural_image
Technical line drawing of a mechanical cabinet or rack unit with no visible text or symbols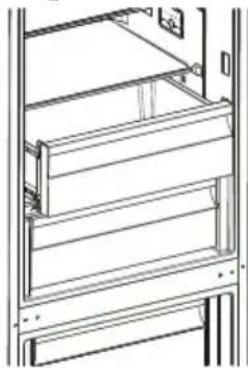
natural_image
Technical line drawing of a mechanical cabinet or rack assembly (no text or symbols)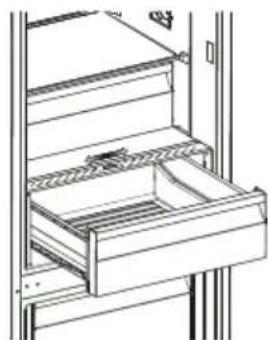
natural_image
Line drawing of a refrigerator drawer with shelves and drawers (no text or symbols)Adapti-Lift ukseriiul (Osadel mudelitel)
natural_image
Technical line drawing of a structural joint or bracket (no text or symbols)joonis 1
natural_image
Technical line drawing of a structural frame with vertical dimension lines (no text or symbols)joonis 2
natural_image
Diagram of a multi-level storage or rack system with directional arrows indicating movement (no text or symbols)Joon. 1 Joon. 2
natural_image
Line drawing of a bottled water bottle mounted on a shelf with metal racks (no text or symbols)3. PEATÜKK: SÜGAVKÜLMIKUGA KÜLMIKU KASUTAMINE
Puhastamine
natural_image
Technical line drawing of a mechanical assembly with grid and bracket components (no text or symbols)LED-valgusti vahetamine
www.sharphomeappliances.com
Service & Support
Visit Our Website
sharphomeappliances.com