
CNS 100-1 E - Heating STIEBEL ELTRON - Free user manual and instructions
Find the device manual for free CNS 100-1 E STIEBEL ELTRON in PDF.

| Product Type | Wall-mounted Electric Convector |
| Brand | Stiebel Eltron |
| Model | CNS 100-1 E |
| Power | 1.0 kW (120 V) |
| Voltage | 120 V |
| Current | 8.3 A |
| Dimensions (W x H x D) | 44.5 x 45.0 x 10.0 cm |
| Weight | 4.4 kg |
| Temperature Range | 7 to 30 °C |
| Frost Protection | Yes, at 7 °C |
| Heating Type | Natural Convection |
| Installation | Wall-mounted, wall bracket fixation |
| Power Supply | Direct connection to circuit breaker, without cord |
| Recommended Breaker | 15 A |
| Cable Section | 14 AWG |
| Controls | On/Off switch, rotary thermostat |
| Temperature Limitation | Possible via pins |
| Maintenance | Clean with damp cloth, do not spray |
| Safety | Overheat protection (automatic shut-off) |
| Warranty | 3 years |
| Standards | ANSI/UL Std. 2021, CAN/CSA Std. 22.2 No. 46 |
| Color | Alpine white |
Frequently Asked Questions - CNS 100-1 E STIEBEL ELTRON
User questions about CNS 100-1 E STIEBEL ELTRON
0 question about this device. Answer the ones you know or ask your own.
Ask a new question about this device
Download the instructions for your Heating in PDF format for free! Find your manual CNS 100-1 E - STIEBEL ELTRON and take your electronic device back in hand. On this page are published all the documents necessary for the use of your device. CNS 100-1 E by STIEBEL ELTRON.
USER MANUAL CNS 100-1 E STIEBEL ELTRON
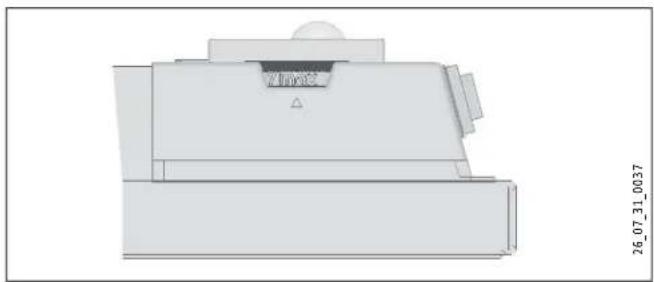
natural_image
Blank rectangular frame with horizontal lines and a curved top border (no text or symbols)
Intertek
Certified to ANSI/UL Std. 2021
Conforms to CAN/CSA Std. 22.2 No. 46
- Important Instructions 2
1.1 Document information 2
1.2 Key to symbols 2 - Safety 3
2.1 Intended use 3
2.2 Safety information 3
2.3 ETL / UL designation 3
2.4 Type label 3 - Register your product ____ 4
- Appliance description ____ 4
- CNS E Operation 4
5.1 Description of the user interface ____ 4
5.2 Frost protection 4
5.3 Limiting the temperature controller ____ 4
5.4 Shutting down 5 - Cleaning, care and maintenance 5
- What to do if ... 5
INSTALLATION
- Safety 5
8.1 General safety instructions 5
8.2 Instructions, standards and regulations ____ 5 - Appliance description
9.1 Standard delivery 5 - Installation 5
10.1 Installing the wall mounting bracket 5
10.2 Appliance installation 6
10.3 Dismounting the appliance 6
10.4 Power supply 6
10.5 Terminal block 6 - Appliance handover 7
- Specifications 7
12.1 Dimensions 7
12.2 Minimum clearances to hard surfaces 7
12.3 Specifications 8
12.4 Wiring Diagram 8 - Warranty 9
OPERATION
1. IMPORTANT INSTRUCTIONS
SAVE THESE INSTRUCTIONS
When using electrical appliances, basic precautions should always be followed to reduce the risk of fi re, electric shock, and injury to persons, including the following:
- Read all instructions before installing or using this heater.
- This heater is hot when in use. To avoid burns, do not let bare skin touch hot surfaces. Keep combustible materials, such as furniture, pillows, bedding, papers, clothes, etc. and curtains at least 3 feet (1 m) from the front of the heater and keep them at least 3 feet (1 m) away from the sides and rear.
- Extreme caution is necessary when any heater is used by or near children or invalids and whenever the heater is left operating and unattended.
- Do not operate any heater after it malfunctions. Disconnect power at service panel and have heater inspected by a reputable electrician before reusing.
1.1 Document information
The chapter Operation is intended for users and heating contractors.
The chapter Installation is intended for heating contractors.

Read these instructions carefully before using the appliance and retain them for future reference. Pass on the instructions to any new users.
1.2 Key to symbols
1.2.1 Layout of safety information
Safety information comprises a warning symbol, a keyword and a text giving information. Safety information is printed on a grey background.
Example:

DANGER: Electrocution Install the appliance in such a way that control equipment...
1 Symbol (see chapter on warning symbols/symbols)
2 Keyword (see chapter on keywords)
3 Description (see chapter on warning symbols/symbols)
4 Information text
1.2.2 Warning symbols/symbols
Warning symbol Description

Injury

Electrocution

Burns or scalding

Other situations

Fire

Never cover the appliance

Appliance disposal
1.2.3 Text symbols and layout in this documentation

Read the text next to this symbol carefully.
» The "»" symbol indicates that you should do something. The action you need to take is described step by step.
- Passages with the "-" symbol show you lists of items.
1.2.4 Information on the appliance

Never cover the appliance
1.2.5 Units of measurement

The dimensions in this document are given in in / mm. Any alternative units of measurements are specified accordingly.
2. Safety
2.1 Intended use
This appliance is designed to heat living areas.
Any other use beyond that described shall be deemed inappropriate. Observation of these instructions is also part of the correct use of this appliance. Any modifications or conversions to the appliance void all warranty rights.
2.2 Safety information
Operate the appliance only when fully installed and with all safety equipment fitted.
The heater must be properly installed before it is used.

DANGER: Electrocution Before cleaning, make sure the power has been turned off at the circuit breaker panel and that the heating element of the heater is cool.

WARNING: Fire
Never operate this appliance ...
...in rooms where the appliance is at risk of fire or explosion as a result of chemicals, dust, gases or vapours.
...in the direct proximity of pipes or receptacles that carry or contain fl ammable or explosive materials. ...if work such as laying cables, grinding or sealing is carried out in the installation room.
...if sprays, fl oor polish or similar products containing napsan are used. Vent the room suffi ciently before heating.
...if the minimum clearances to adjacent object surfaces are not maintained, for example to furniture, net curtains, curtains, textiles or other fl ammable materials (see 13.2, "Minimum clearances to hard surfaces", pg. 7).
...if an appliance component is damaged, the appliance has fallen over or already had a fault.

WARNING: Injury
Where children or persons with limited physical, sensory or mental capabilities are allowed to control this appliance, ensure that this will only happen under supervision or after appropriate instructions by a person responsible for their safety. Children must be supervised to ensure that they never play with the appliance.

WARNING: Fire
Never place any fl ammable, combustible or insulating objects or materials, such as laundry, blankets, magazines, containers with fl oor polish or napsan, spray cans or similar on the appliance or in direct proximity to it.

WARNING Burns
The surfaces of the appliance casing and the expelled air become hot during operation (more than 176^ F / 80 °C).

CAUTION: Overheating
Never cover the appliance

Never step on the appliance.
2.3 ETL / UL designation
Conforms to ANSI/UL Std. 2021
Certified to CAN/CSA Std. 22.2 No. 46
2.4 Type label
The type label is located on the right on the exterior of the appliance.
3. Register your product

You must register this product within 90 days of purchase on our web site in order to activate the standard warranty or to be eligible for the extended warranty. Go to our web site at www.stiebel-eltron-usa.com and click on register your product.
Before beginning the registration process, we suggest that you gather the necessary information which will be as follows:
Type, Example: CNS 100-2 E (from the white label that is on the right side of the unit)
Number listed after "Nr."
Place of Purchase
Purchase Date
First & Last Name
Email address
Physical Address
Phone Number
IF YOU HAVE ANY QUESTIONS CONCERNING THE REGISTRATION PROCESS OR WARRANTY OPTIONS, PLEASE CONTACT STIEBEL ELTRON USA DIRECTLY AT (800)-582-8423.
4. Appliance description
The appliance is an electric direct heater only for installation on a wall.
The appliance is suitable as a full heating system in bathrooms, for example, or for use between seasons and as a booster heater in smaller rooms, such as hobby and guest rooms.
The air in the appliance is heated by a heating element and expelled via natural convection through the air outlet grille at the top. Cool room air flows in through the apertures at the bottom of the appliance.
After mounting the appliance on the wall and making the electrical connection to the main breaker, the appliance is ready for operation.
5. CNS E Operation
The CNS E is a convection operated space heater with a thermostat and an on/off switch.
5.1 Description of the user interface
» Switch the appliance ON via the switch on the right hand side of the appliance.
» Set the required room temperature via the continuously variable temperature selector (for temperatures see specification chapter).
natural_image
3D technical drawing of a mechanical component with no visible text or symbolsAs soon as the selected room temperature is reached, it constantly maintained at this selected temperature thro periodic heating (the output of the appliance must correspond at least to the required heat demand of the room).
If several appliances are installed in a single room, the setting at the temperature selector on each appliance can be different.
To avoid excessive power consumption when windows are open, you should stop the appliance while venting.
5.2 Frost protection
To disable normal heating but maintain protection against freezing, turn the temperature selector as far to the right as possible. In this position, the temperature controller switches on the heating element automatically if the room temperature drops below the frost protection temperature (45 °F / 7 °C).
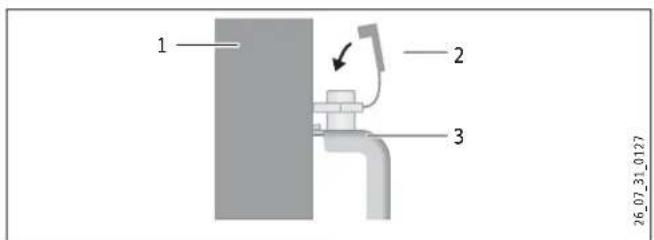
5.3 Limiting the temperature controller
Using the two pins fitted to the back of the control casing, you can fix the temperature controller at a certain setting or limit the temperature setting range.
» Break out the pins.
» To prevent adjustment of the selected temperature, push a pin into the hole opposite (see diagram).
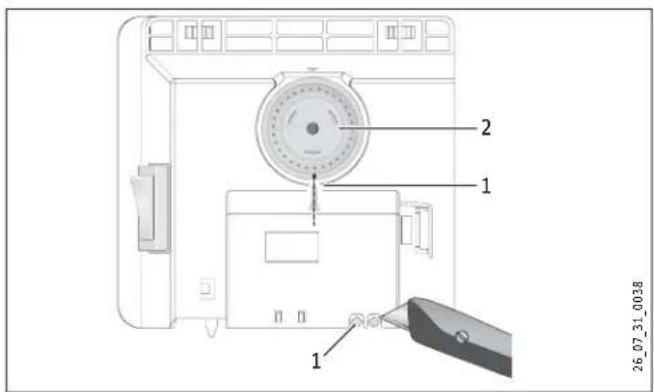
1 Pin
2 Temperature selector
» To limit the temperature setting range, set the minimum and maximum values at the temperature selector, and push a pin for each into the slightly offset hole opposite (see diagram).
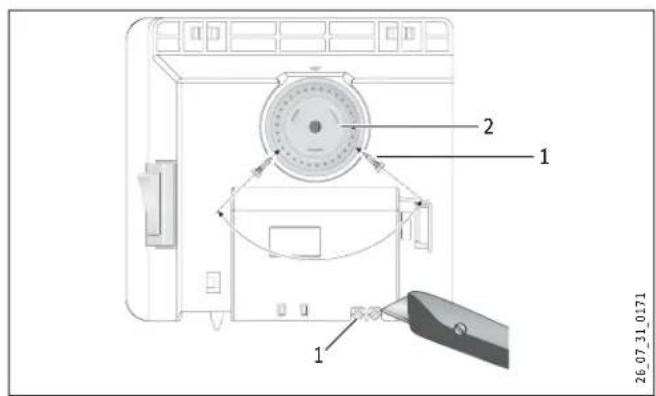
1 Pin
2 Temperature selector
5.4 Shutting down
» Move the switch on the right of the appliance to OFF.
6. Cleaning, care and maintenance

WARNING:
Before cleaning, make sure the power has been turned off at the circuit breaker panel and that the heating element of the heater is cool. Failure to do so could result in serious burns, electrocution, serious bodily injury, or death.
If a pale brownish discolouration appears on the appliance casing, wipe this off as soon as possible with a damp cloth. Clean the appliance when cold with ordinary cleaning products. Avoid abrasive or corrosive cleaning products. 8.2 Inst

CAUTION: Fire
Never spray cleaning spray into the air slot. Ensure that no moisture can enter the appliance.
As part of regular maintenance, we recommend also having the control components checked. The safety and control components should be checked by a contractor no more than ten years after commissioning.
7. What to do if ...
... the appliance does not heat up:
Check the temperature set at the appliance and the circuit breaker box.
The appliance has a safety temperature controller that shuts the appliance down if it overheats. After the cause has been removed (for example air outlet or inlet apertures covered) and the appliance has cooled down for a few minutes, operation starts again.
If you cannot remedy the fault, contact your contractor. To facilitate and speed up your enquiry, please provide the number on the type plate (000000-0000-000000).
INSTALLATION
8. Safety
Only qualified contractors should carry out installation, commissioning, maintenance and repair of the appliance.
8.1 General safety instructions
We guarantee trouble-free function and operational reliability only if the original accessories and spare parts intended for the appliance are used.

DANGER: Electrocution
If you mount the appliance on the wall, do so in such a way that control equipment cannot be touched by a person in the bath or shower.

CAUTION:
-Only fit the wall mounted appliance to a vertical wall that is temperature-resistant to at least 185 °F / 85 °C.
-Observe the minimum clearances to adjacent object surfaces (for minimum clearances see specification chapter).
- Never install the appliance directly below a wall socket.
-Ensure that the power cable is not in contact with any appliance components.
8.2 Instructions, standards and regulations

Observe all applicable national and regional regulations and instructions.

Observe the Building and Garage Regulations [or local regulations].
9. Appliance description
9.1 Standard delivery
» Wall mounting bracket (hooked into the appliance)
10. Installation
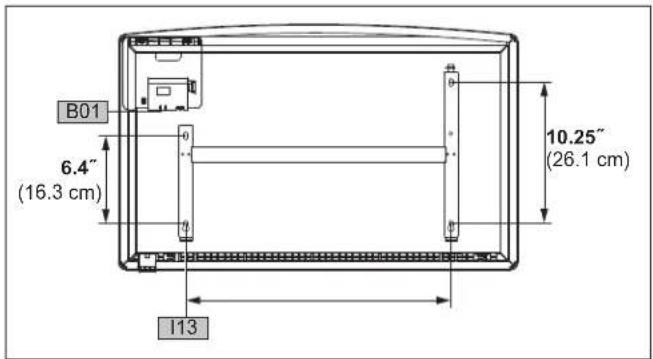
10.1 Installing the wall mounting bracket
You can use the wall mounting bracket as a template for wall mounting; this ensures the required floor clearance.
» Unhook the wall mounting bracket.
» Place the centred wall mounting bracket level on the ground and mark holes 1 and 2.
» Lift up the wall mounting bracket so that its lower holes match up with the markings you have just made on the installation wall.
» Mark holes 3 and 4 on the installation wall.
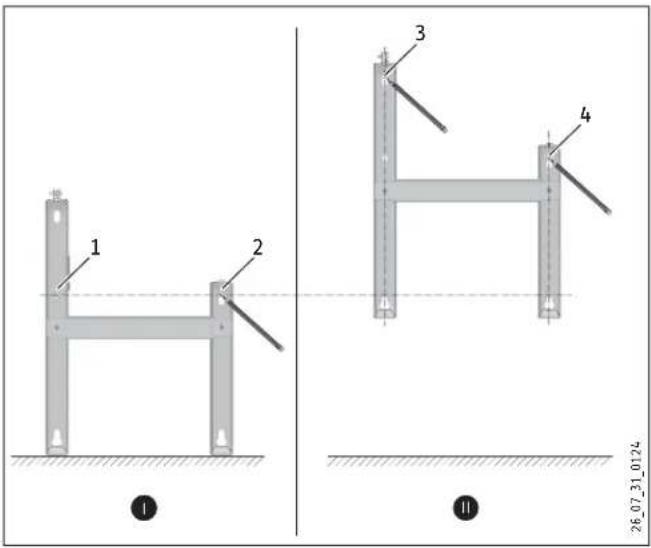
» Drill holes at all four markings. Secure the wall mounting bracket with suitable materials (screws, rawl plugs) depending on the type of wall. With the vertical slots, you can compensate for an offset fi xing hole.
10.2 Appliance installation
» Hook the appliance by its slots in the back of the appliance on to all four tabs of the wall mounting bracket simultaneously.
» Push the appliance to latch it in position.
» Turn the locking bolt in the wall mounting bracket fully clockwise; this locks the appliance in place.
» Push the safety cap onto the locking bolt to prevent it from loosening.
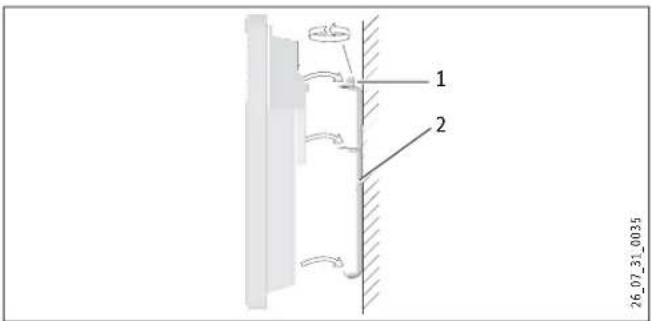
1 Locking bolt
2 Wall mounting bracket
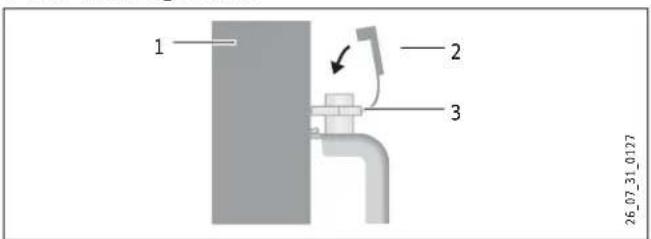
1 Appliance
2 Safety cap
3 Locking bolt
10.3 Dismounting the appliance
» Remove the safety cap from the locking bolt.
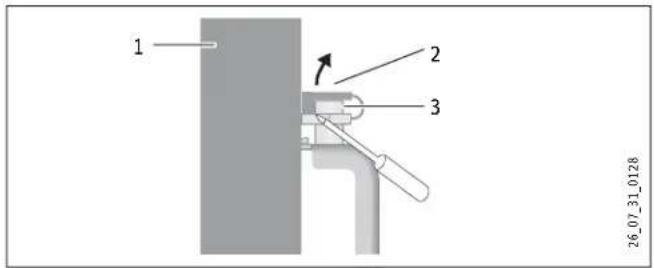
1 Appliance
2 Safety cap
3 Locking bolt
» Undo the locking bolt on the wall mounting bracket.
» Lift the appliance up slightly and pull it forwards and away from the wall mounting bracket.
^e 10.4 Power supply
This appliance does not come with an electric cable. Cable must be routed to the unit from a circuit breaker of suitable size.
Ensure the power cable is of a suitable gauge.
10.5 Terminal block
Consult the chart below for the recommended torque amounts on the terminal block screws.
| Screw Size (mm) | Min. Torque (N·cm) | Min. Torque (Lbf·in) |
| M3.5 | 60-80 | 5.31-7.08 |
Using the proper torque specifications to secure wire to the wiring block helps to avoid personal loss or property damage.

DANGER: Electrocution
Carry out all electrical connection and installation work in accordance with all national, state and local building code.

DANGER: Electrocution
Each heater must be wired directly to the circuit breaker panel with the proper size breaker and wire gauge.

DANGER: Electrocution
Do not plug the heater into a wall outlet.

The specified voltage on the nameplate must match the voltage at the circuit breaker panel.
11. Appliance handover
Explain the functions of the appliance to the user. Draw special attention to the safety information. Hand the operating and installation instructions to the user.
12. Specifications
12.1 Dimensions
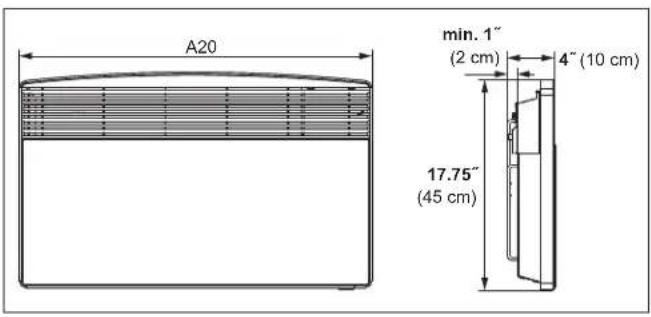

» The image above shows minimum allowed clearances between the installed appliance and any hard surfaces.
| A20 | Appliance | Width | CNS 100-1,-2 E 17^1/2 / 44.5 cm | CNS 150-1,-2 E 23^1/4 / 59.0 cm | CNS 200-2 E 29^1/6 / 74.0 cm | CNS 240-2 E 35^1/6 / 89.0 cm |
| B01 Electrical cable entry | ||||||
| i13 | Wall mounting bracket | Hole spacing | 7^3/4 / 19.5 cm | 13^1/2 / 34.3 cm | 19^1/4 / 49.1 cm | 25^1/4 / 63.9 cm |
12.2 Minimum clearances to hard surfaces

12.3 Specifications
| Model | CNS 100-1 E | CNS 100-2 E | CNS 150-1 E | CNS 150-2 E | CNS 200-2 E | CNS 240-2 E | ||||
| Item No. | 233586 | 231543 | 233587 | 231544 | 231545 | 231546 | ||||
| Voltage | 120 V | 240 V | 208 V | 120 V | 240 V | 208 V | 240 V | 208 V | 240 V | 208 V |
| Wattage | 1.0 kW | 1.0 kW | 0.75 kW | 1.5 kW | 1.5 kW | 1.13 kW | 2.0 kW | 1.5 kW | 2.4 kW | 1.8 kW |
| Amperage | 8.3 A | 4.2 A | 3.6 A | 12.5 A | 6.3 A | 5.4 A | 8.3 A | 7.2 A | 10.0 A | 8.7 A |
| Required circuit breaker ^1 | 15 A | |||||||||
| Required wire size | 14 AWG | |||||||||
| Temperature range | 45-86 °F/ 7-30 °C | |||||||||
| Frost protection setting | 45 °F/ 7 °C | |||||||||
| Height | 17^3/_4" / 45.0 cm | |||||||||
| Width | 17^3/_2" / 44.5 cm | 17^1/_2" / 44.5 cm | 23^1/_4" / 59.0 cm | 23^1/_4" / 59.0 cm | 29^1/_8" / 74.0 cm | 35^1/_16" / 89.0 cm | ||||
| Depth | 3^15/_16" / 10.0 cm | |||||||||
| Weight | 9.7 lb/ 4.4 kg | 9.7 lb/ 4.4 kg | 12.6 lb/ 5.7 kg | 12.6 lb/ 5.7 kg | 15.0 lb/ 6.8 kg | 17.9 lb/ 8.1 kg | ||||
| Color | Alpine white | |||||||||
^1 This is our recommendation as the manufacturer. Check local codes for compliance if necessary.
12.4 Wiring Diagram
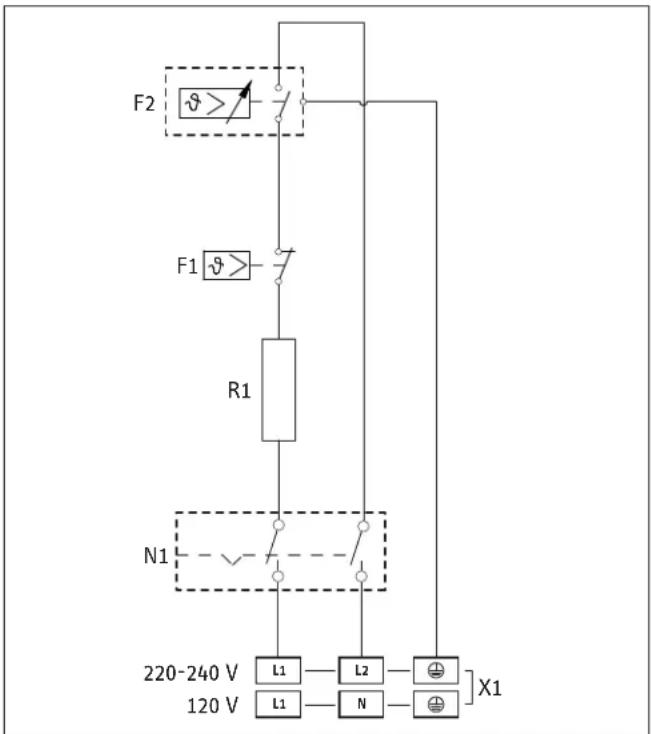
| Label | Description |
| F1 | Thermal cut-out |
| F2 | Thermostat |
| N1 | On/off switch |
| R1 | Heating element |
| X1 | Terminal Block |
13. Warranty
Subject to the terms and conditions set forth in this limited warranty, Stiebel Eltron, Inc. (the "Manufacturer") hereby warrants to the original purchaser (the "Owner") that each Electric Space Heater (the "Heater") shall be free of defects in the Manufacturer's materials or workmanship for a period of three (3) years from the date of purchase. As Owner's sole and exclusive remedy for breach of the above warranty, Manufacturer shall, at the Manufacturer's discretion, send replacement parts for local repair; retrieve the unit for factory repair, or replace the defective Heater with a replacement unit with comparable operating features. Manufacturer's maximum liability under all circumstances shall be limited to the Owner's purchase price for the Heater.
This limited warranty shall be the exclusive warranty made by the Manufacturer and is made in lieu of all other warranties, express or implied, whether written or oral, including, but not limited to warranties of merchantability and fitness for a particular purpose. Manufacturer shall not be liable for incidental, consequential or contingent damages or expenses arising directly or indirectly from any defect in the Heater or the use of the Heater. Manufacturer shall not be liable for any damage to property of Owner arising, directly or indirectly, from any defect in the Heater or the use of the Heater. Manufacturer alone is authorized to make all warranties on Manufacturer's behalf and no statement, warranty or guarantee made by any other party shall be binding on Manufacturer.
Manufacturer shall not be liable for any damage whatsoever relating to or caused by:
- any misuse or neglect of the Heater, any accident to the Heater, any alteration of the Heater, or any other unintended use:
- acts of God and circumstances over which Manufacturer has no control;

The installation, electrical connection and first operation of this appliance should be carried out by a qualified installer.

The company does not accept liability for failure of any goods supplied which have not been installed and operated in accordance with the manufacturer's instructions.
Environment and recycling
We would ask you to help protect the environment. After use, dispose of the various materials in accordance with national regulations.
This Warranty is valid for U.S.A. & Canada only. Warranties may vary by country. Please consult your local Stiebel Eltron representative for the Warranty for your country.
- installation of the Heater other than as directed by Manufacturer and other than in accordance with applicable building codes;
- failure to maintain the Heater or to operate the Heater in accordance with the Manufacturer's specifications;
- improper installation and/or improper materials used by any installer and not relating to defects in parts or workmanship of Manufacturer;
- moving the Heater from its original place of installation;
- use on improper voltage or current;
- disassembly, repair, or alteration by anyone other than the manufacturer.
Should owner wish to return the Heater to manufacturer for repair or replacement under this warranty, Owner must first secure written authorization from Manufacturer. Owner shall demonstrate proof of purchase, including a purchase date, and shall be responsible for all removal and transportation costs. If Owner cannot demonstrate a purchase date this warranty shall be limited to the period beginning from the date of manufacture stamped on the Heater. Manufacturer reserves the right to deny warranty coverage upon Manufacturer's examination of Heater. This warranty is restricted to the Owner and cannot be assigned.
Some States and Provinces do not allow the exclusion or limitation of certain warranties. In such cases, the limitations set forth herein may not apply to the Owner. In such cases this warranty shall be limited to the shortest period and lowest damage amounts allowed by law. This warranty gives you specific legal rights and you may also have other rights which vary from State to State or Province to Province.
Owner shall be responsible for all labor and other charges incurred in the removal or repair of the Heater in the fi eld.
OPERACIÓN
natural_image
Technical line drawing of a mechanical component or assembly (no visible text or symbols)1 Tope
2 Selector de temperatura
5.4 Apagado
natural_image
3D technical drawing of a mechanical component with no visible text or symbols10.1 Installation du support mural
1 Boulon bloquant
2 Support mural
17 West Street | West Hatfield MA 01088
Tel. 413-247-3380 | Fax 413-247-3369
info@stiebel-eltron-usa.com
www.stiebel-eltron-usa.com
STIEBEL ELTRON

- INSTALLATION
- OPERATION
- IMPORTANT INSTRUCTIONS
- SAVE THESE INSTRUCTIONS
- Document information
- Key to symbols
- Layout of safety information
- Warning symbols/symbols
- Text symbols and layout in this documentation
- Information on the appliance
- Units of measurement
- Safety
- Intended use
- Safety information
- WARNING: Fire
- WARNING: Injury
- WARNING Burns
- CAUTION: Overheating
- ETL / UL designation
- Type label
- Register your product
- Appliance description
- CNS E Operation
- Description of the user interface
- Frost protection
- Limiting the temperature controller
- Shutting down
- Cleaning, care and maintenance
- WARNING:
- CAUTION: Fire
- What to do if ...
- Safety
- General safety instructions
- DANGER: Electrocution
- CAUTION:
- Instructions, standards and regulations
- Appliance description
- Standard delivery
- Installation
- Installing the wall mounting bracket
- Appliance installation
- Dismounting the appliance
- e 10.4 Power supply
- Terminal block
- Appliance handover
- Specifications
- Warranty
- Environment and recycling
- OPERACIÓN
- Apagado
- Installation du support mural
Brand : STIEBEL ELTRON
Model : CNS 100-1 E
Category : Heating