
ThinQ G8S - Phone LG - Free user manual and instructions
Find the device manual for free ThinQ G8S LG in PDF.

| Product Type | Phone |
| Brand | LG |
| Model | ThinQ G8S |
| Operating System | Android |
| Rear Camera | Triple camera (standard, telephoto, super wide-angle) |
| Front Camera | Front camera with ToF sensor (time-of-flight) and infrared lighting |
| Sensors | ToF sensor, infrared lighting, proximity sensor, ambient light sensor, fingerprint sensor |
| Connectivity | Wi-Fi, Bluetooth, NFC, GPS |
| Battery | Integrated lithium-ion battery (non-removable by user) |
| Water and Dust Resistance | IP68 (1.5 meters, 30 minutes in water) |
| Audio | DTS:X 3D Surround, stereo headphone jack |
| Biometric Security | Facial recognition, Hand ID (palm vein), fingerprint |
| Special Features | Air Motion, Google Assistant, Always-on display, Floating Bar, Multi Window, AI CAM, QLens, Portrait, Studio, Cine Video |
| Included Accessories | Stereo headset, USB cable, ejection tool, charger, quick start guide, jelly case |
| Maintenance and Cleaning | Clean with a dry cloth; do not use solvents (benzene, thinner, alcohol) |
| Repairability | Battery not user-replaceable; repair by qualified professional |
| Warranty | Limited warranty under conditions (software modification or liquid damage excluded) |
| SAR head | 0.482 W/kg (over 10g) |
| SAR body | 1.587 W/kg (over 10g, 5 mm distance) |
Frequently Asked Questions - ThinQ G8S LG
User questions about ThinQ G8S LG
0 question about this device. Answer the ones you know or ask your own.
Ask a new question about this device
Download the instructions for your Phone in PDF format for free! Find your manual ThinQ G8S - LG and take your electronic device back in hand. On this page are published all the documents necessary for the use of your device. ThinQ G8S by LG.
USER MANUAL ThinQ G8S LG
About this user guide
Thank you for choosing this LG product. Please carefully read this user guide before using the device for the first time to ensure safe and proper use.
• Always use genuine LG accessories. The supplied items are designed only for this device and may not be compatible with other devices.
- Descriptions are based on the device default settings.
- Default apps on the device are subject to updates, and support for these apps may be withdrawn without prior notice. If you have any questions about an app provided with the device, please contact an LG Service Centre. For user-installed apps, please contact the relevant service provider.
- Modifying the device's operating system or installing software from unofficial sources may damage the device and lead to data corruption or data loss. Such actions will violate your LG licence agreement and void your warranty.
- Some content and illustrations may differ from your device, depending on the area, service provider, software version, or OS version, and are subject to change without prior notice.
- Software, audio, wallpaper, images, and other media supplied with your device are licenced for limited use. If you extract and use these materials for commercial or other purposes, you may be infringing copyright laws. As a user, you are fully responsible for the illegal use of media.
- Additional charges may incur for data services, such as messaging, uploading, downloading, auto-syncing and location services. To avoid additional charges, select a data plan suitable to your needs. Contact your service provider to obtain additional details.
- This user guide is written in major languages for each country. Depending on the language used, content may partly differ.
Instructional notices

WARNING: Situations that could cause injury to the user and third parties.

CAUTION: Situations that may cause minor injury or damage to the device.

NOTE: Notices or additional information.
Table of contents
6 Guidelines for safe and efficient use
01
Custom-designed Features
16 Air Motion
20 Camera features
33 Gallery features
39 Sound quality and effects features
39 Floating Bar
40 Google Assistant
42 Hand ID
45 Fingerprint recognition
48 Face Unlock
50 Multi-tasking feature
51 AOD (always-on display)
52 Quick Help
52 Notes on Water Resistant Properties
02
Basic Functions
56 Product components and accessories
57 Parts overview
61 Turning the power on or off
62 Installing the SIM card
65 Inserting the memory card
66 Removing the memory card
66 Battery
69 Touch screen
72 Home screen
81 Screen lock
85 Memory card encryption
86 Taking screenshots
87 Entering text
91 Content sharing
93 Do not disturb
03
Useful Apps
95 Installing and uninstalling apps
96 App trash
97 App Shortcuts
97 Phone
101 Messaging
102 Camera
120 Gallery
123 Contacts
126 QuickMemo+
128 Clock
129 Calendar
130 Tasks
130 Music
131 Calculator
131 LG ThinQ
132 Game Launcher
132 LG Health
134 E-mail
135 HD Audio Recorder
137 File Manager
137 Smart Doctor
138 LG Mobile Switch
138 App trash
138 SmartWorld
139 RemoteCall Service
140 Cell Broadcast
140 Google apps
04
Settings
144 Settings
144 Network & internet
151 Connected devices
156 Sound
157 Display
159 Lock screen & security
160 Privacy
161 Location
162 Extensions
166 Digital Wellbeing & parental controls
166 Apps & notifications
166 Battery
167 Storage
168 Accounts
168 Google
168 System
172 Accessibility
05
Appendix
175 LG Language Settings
175 LG Bridge
176 Phone software update
178 Anti-Theft Guide
179 Open Source Software Notice Information
179 Regulatory information
(Regulation ID number, E-labeling, etc.)
180 Trademarks
181 Laser safety statement
182 DECLARATION OF CONFORMITY
182 Contact office for compliance of this product
182 Wi-Fi (WLAN)
183 More information
187 FAQ
Guidelines for safe and efficient use
Please read these simple guidelines. Not following these guidelines may be dangerous or illegal.
Should a fault occur, a software tool is built into your device that will gather a fault log. This tool gathers only data specific to the fault, such as signal strength, cell ID position in sudden call drop and applications loaded. The log is used only to help determine the cause of the fault. These logs are encrypted and can only be accessed by an authorised LG Repair centre should you need to return your device for repair.
Exposure to radio frequency energy
Radio wave exposure and Specific Absorption Rate (SAR) information.
This device has been designed to comply with applicable safety requirements for exposure to radio waves. These requirements are based on scientific guidelines that include safety margins designed to assure the safety of all persons, regardless of age and health.
- The radio wave exposure guidelines employ a unit of measurement known as the Specific Absorption Rate, or SAR. Tests for SAR are conducted using standardised methods with the device transmitting at its highest certified power level in all used frequency bands.
- While there may be differences between the SAR levels of various LG device models, they are all designed to meet the relevant guidelines for exposure to radio waves.
- The SAR limit recommended by the International Commission on Non-Ionizing Radiation Protection (ICNIRP) is 2 W/kg averaged over 10 g of tissue.
- The highest SAR value for this model tested for use at the ear is 0.482 W/kg (10 g) and when worn on the body is 1.587 W/kg (10 g).
- This device meets RF exposure guidelines when used either in the normal use position against the ear or when positioned at least 5 mm away from the body. When a carry case, belt clip or holder is used for body-worn operation, it should not contain metal and should position the product at least 5 mm away from your body. In order to transmit data files or messages, this device requires a quality connection to the network. In some cases, transmission of data files or messages may be delayed until such a connection is available. Ensure the above separation distance instructions are followed until the transmission is completed.
Information about the RF exposure from FCC
In August 1996, the Federal Communications Commission (FCC) of the United States, with its action in Report and Order FCC 96-326, adopted an updated safety standard for human exposure to radio frequency (RF) electromagnetic energy emitted by FCC regulated transmitters. Those guidelines are consistent with the safety standard previously set by both international and U.S. standards. The design of this device complies with FCC guidelines and these international standards.
Part 15.19 statement
This device complies with part 15 of the FCC Rules. Operation is subject to the following two conditions:
(1) This device may not cause harmful interference, and
(2) this device must accept any interference received, including interference that may cause undesired operation.
Part 15.21 Statement
Changes or modifications not expressly approved by the manufacturer could void the user's authority to operate the equipment.
Body-worn Operation
This device was tested for typical bodyworn operations with the back of the device kept 0.39 inches (1cm) between the user's body and the back of the device. To comply with FCC RF exposure requirements, a minimum separation distance of 0.39 inches (1cm) must be maintained between the user's body and the back of the device.
Any beltclips, holsters, and similar accessories containing metallic components may not be used. Body-worn accessories that cannot maintain 0.39 inches (1 cm) separation distance between the user's body and the back of the device, and have not been tested for typical body-worn operations may not comply with FCC RF exposure limits and should be avoided.
Part 15.105 Statement
This equipment has been tested and found to comply with the limits for a class B digital device, pursuant to Part 15 of the FCC Rules. These limits are designed to provide reasonable protection against harmful interference in a residential installation. This equipment generates uses and can radiate radio frequency energy and, if not installed and used in accordance with the instructions, may cause harmful interference to radio communications. However, there is no guarantee that interference will not occur in a particular installation. If this equipment does cause harmful interference or television reception, which can be determined by turning the equipment off and on, the user is encouraged to try to correct the interference by one or more of the following measures:
• Reorient or relocate the receiving antenna.
- Increase the separation between the equipment and receiver.
- Connect the equipment into an outlet on a circuit different from that to which the receiver is connected.
- Consult the dealer or an experienced radio/TV technician for help.
Product care and maintenance
- Use only in-box accessories which are authorised by LG. LG does not guarantee any damage or failure which is caused by third party accessories.
- Some contents and illustrations may differ from your device without prior notice.
- Do not disassemble this unit. Take it to a qualified service technician when repair work is required.
- Repairs under warranty, at LG's discretion, may include replacement parts or boards that are either new or reconditioned, provided that they have functionality equal to that of the parts being replaced.
- Keep away from electrical appliances such as TVs, radios and personal computers.
- The unit should be kept away from heat sources such as radiators or cookers.
- Do not drop.
- Do not subject this unit to mechanical vibration or shock.
- Switch off the device in any area where you are required to by special regulations. For example, do not use your device in hospitals as it may affect sensitive medical equipment.
- Do not handle the device with wet hands while it is being charged. It may cause an electric shock and can seriously damage your device.
- Do not charge a handset near flammable material as the handset can become hot and create a fire hazard.
- Use a dry cloth to clean the exterior of the unit (do not use solvents such as benzene, thinner or alcohol).
- Do not charge the device when it is on soft furnishings.
- The device should be charged in a well ventilated area.
- Do not subject this unit to excessive smoke or dust.
- Do not keep the device next to credit cards or transport tickets; it can affect the information on the magnetic strips.
- Do not tap the screen with a sharp object as it may damage the device.
- Do not expose the device to liquid or moisture.
- Use accessories like earphones cautiously. Do not touch the antenna unnecessarily.
- Do not use, touch or attempt to remove or fix broken, chipped or cracked glass. Damage to the glass display due to abuse or misuse is not covered under the warranty.
- Your device is an electronic device that generates heat during normal operation. Extremely prolonged, direct skin contact in the absence of adequate ventilation may result in discomfort or minor burns. Therefore, use care when handling your device during or immediately after operation.
- If your device gets wet, immediately unplug it to dry off completely. Do not attempt to accelerate the drying process with an external heating source, such as an oven, microwave or hair dryer.
- The liquid in your wet device, changes the colour of the product label inside your device. Damage to your device as a result of exposure to liquid is not covered under your warranty.
- A mobile device requires proper air circulation in order to dissipate heat. Direct skin contact and inadequate circulation of air flow to the device may cause the device to overheat. The device must be at least 1.0cm from between the user's body.
- Prevent dust of any other foreign substances from getting into the Charger/USB cable port. It may cause heat or fire.
- Avoid exposing the device to low air pressure at high altitude.
- Do not expose the device to extremely low air pressure. Otherwise, it can cause explosion of the battery or leakage of flammable liquid or gas.
Efficient device operation
Electronics devices
All devices may receive interference, which could affect performance.
- Do not use your device near medical equipment without requesting permission. Please consult your doctor to determine if operation of your device may interfere with the operation of your medical device.
- Pacemaker manufacturers recommend that you leave at least 15 cm of space between other devices and a pacemaker to avoid potential interference with the pacemaker.
- This device may produce a bright or flashing light.
- Some hearing aids might be disturbed by devices.
• Minor interference may affect TVs, radios, PCs etc.
- Use your device in temperatures between 0 °C and 35 °C, if possible. Exposing your device to extremely low or high temperatures may result in damage, malfunction, or even explosion.
Road safety
Check the laws and regulations on the use of devices in the area when you drive.
- Do not use a hand-held device while driving.
- Give full attention to driving.
- Pull off the road and park before making or answering a call if driving conditions so require.
- RF energy may affect some electronic systems in your vehicle such as car stereos and safety equipment.
- When your vehicle is equipped with an air bag, do not obstruct with installed or portable wireless equipment. It can cause the air bag to fail or cause serious injury due to improper performance.
- If you are listening to music whilst out and about, please ensure that the volume is at a reasonable level so that you are aware of your surroundings. This is of particular importance when near roads.
Avoid damage to your hearing
To prevent possible hearing damage, do not listen at high volume levels for long periods.
Damage to your hearing can occur if you are exposed to loud sound for long periods of time. We therefore recommend that you do not turn on or off the handset close to your ear. We also recommend that music and call volumes are set to a reasonable level.
- When using headphones, turn the volume down if you cannot hear the people speaking near you, or if the person sitting next to you can hear what you are listening to.

- Excessive sound pressure from earphones and headphones can cause hearing loss.
Glass Parts
Some parts of your device are made of glass. This glass could break if your device is dropped on a hard surface or receives a substantial impact. If the glass breaks, do not touch or attempt to remove it. Stop using your device until the glass is replaced by an authorised service provider.
Blasting area
Do not use the device where blasting is in progress. Observe restrictions and follow any regulations or rules.
Potentially explosive atmospheres
- Do not use your device at a refueling point.
- Do not use near fuel or chemicals.
- Do not transport or store flammable gas, liquid or explosives in the same compartment of your vehicle as your device or accessories.
In aircraft
Wireless devices can cause interference in aircraft.
- Turn your device off before boarding any aircraft.
- Do not use it on the ground without permission from the crew.
Children
Keep the device in a safe place out of the reach of small children. It includes small parts which may cause a choking hazard if detached.
Emergency calls
Emergency calls may not be available on all mobile networks. Therefore you should never depend solely on your device for emergency calls. Check with your local service provider.
Battery information and care
- You do not need to completely discharge the battery before recharging. Unlike other battery systems, there is no memory effect that could compromise the battery's performance.
- Use only LG batteries and chargers. LG chargers are designed to maximise the battery life.
- Do not disassemble or short-circuit the battery.
- Keep the metal contacts of the battery clean.
- Replace the battery when it no longer provides acceptable performance. The battery pack may be recharged hundreds of times before it needs replacing.
- Recharge the battery if it has not been used for a long time to maximise usability.
- Do not expose the battery charger to direct sunlight or use it in high humidity, such as in the bathroom.
- Do not leave the battery in hot or cold places, as this may deteriorate battery performance.
- Risk of explosion if battery is replaced by an incorrect type. Dispose of used batteries according to the instructions.
• Always unplug the charger from the wall socket after the device is fully charged to save unnecessary power consumption of the charger. - Actual battery life will depend on network configuration, product settings, usage patterns, battery and environmental conditions.
- Make sure that no sharp-edged items such as animal's teeth or claws, come into contact with the battery. This could cause a fire.
• Power Consumption (Networked Standby Mode) : 0.7 W
Securing personal information
- Make sure to protect your personal information to prevent data leakage or misuse of sensitive information.
- Always back up important data while using the device. LG is not responsible for any data loss.
-
Make sure to back up all data and reset the device when disposing of the device to prevent any misuse of sensitive information.
-
Read the permission screen carefully while downloading applications.
- Be cautious using the applications that have access to multiple functions or to your personal information.
- Check your personal accounts regularly. If you find any sign of misuse of your personal information, ask your service provider to delete or change your account information.
- If your device is lost or stolen, change the password of your account to secure your personal information.
- Do not use applications from unknown sources.

Notice for Battery replacement
- Li-Ion Battery is a hazardous component which can cause injury.
- Battery replacement by a non-qualified professional can cause damage to your device.
- Do not replace the battery by yourself. The battery can be damaged, which can cause overheat and injury. The battery must be replaced by a qualified professional. The battery should be recycled or disposed separately from household waste.
- In case this product contains a battery incorporated within the product which cannot be readily removed by end-users, LG recommends that only qualified professionals remove the battery, either for replacement or for recycling at the end of this product's working life. To prevent damage to the product, and for their own safety, users should not attempt to remove the battery and should contact LG Service Helpline, or other independent service providers for advice.
- Removal of the battery will involve dismantling of the product case, disconnection of the electrical cables/ contacts, and careful extraction of the battery cell using specialised tools. If you need the instructions for qualified professionals on how to remove the battery safely, please visit http://www.lge.com/global/sustainability/environment/take-back-recycling
01
Custom-designed Features
Air Motion
Air Motion overview
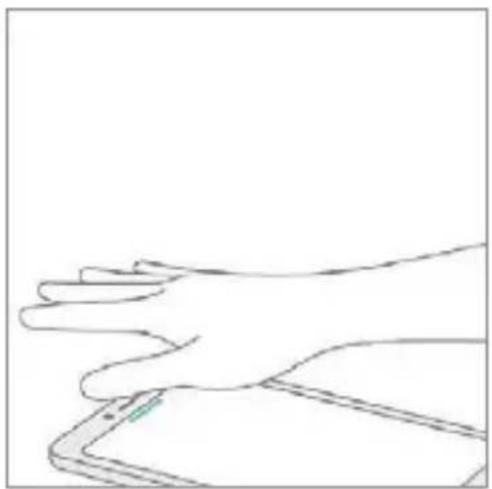
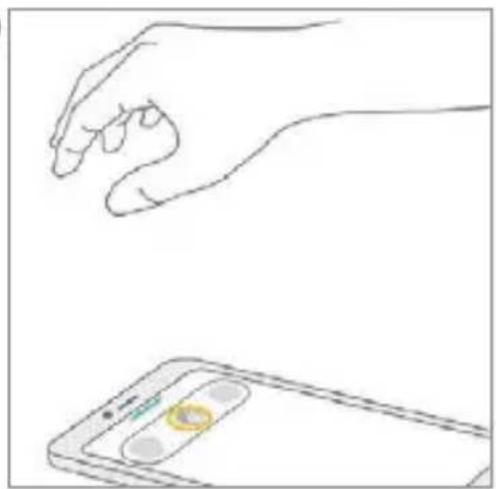
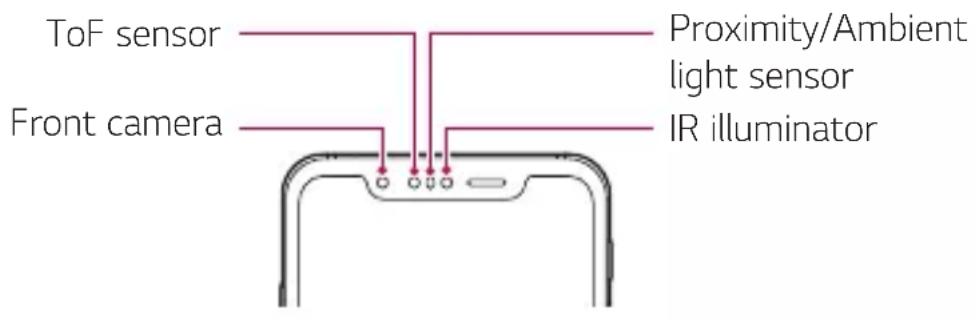
The ToF sensor and IR illuminator located near the front camera can recognise the location and shape of your hand to launch certain apps without touching the screen.
Show your hand to the front camera and then perform hand gestures to launch desired apps.
Air Motion feature activated

- This feature may not be available depending on some apps.
- Make sure that the ToF sensor and IR illuminator are not blocked by a sticker or any other foreign substances.
- Make sure not to move your hand too fast or bring it too far from or close to the device while using the Air Motion feature.
- If your are wearing gloves or the ToF sensor and IR illuminator are exposed to direct sunlight, the recognition accuracy may decrease.
- If your place an object which can reflect light well, the recognition accuracy may decrease or may not work properly.
Using Air Motion
You can launch the desired apps by using the Air Motion feature.
Shortcut and capture
While viewing the Home screen or using an app, you can swipe left or right in the air to open an app or pinch with all fingers to take a screenshot.
1 Tap ○ > Settings > Extensions > Air Motion > Shortcut and capture.
2 Tap to activate this feature.
3 Select desired apps under Swipe left and Swipe right to use as shortcuts with Air Motion.
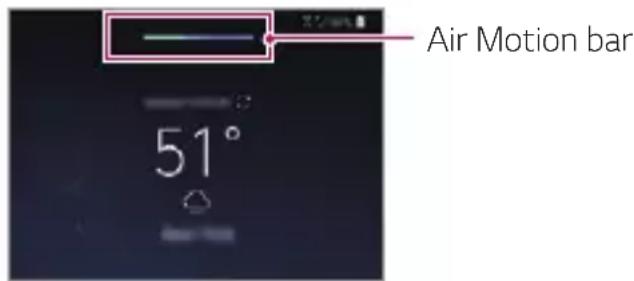
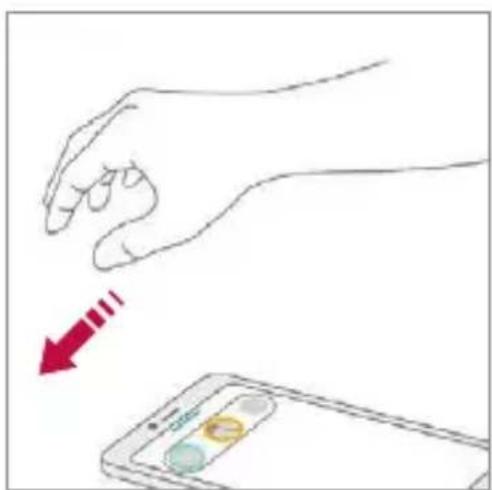
Hand gestures
1 To enable Air Motion, place your palm at a distance of 6 \~ 12 cm (2 \~ 5 inches) from the device.
2 When the Air Motion bar appears at the top of the screen, cup your hand in the air while lifting it to the distance of 15 \~ 20 cm (6 \~ 8 inches) from the device to launch the Swipe shortcuts controller.
3 Swipe your hand left or right to open the desired app. Or, pinch with all fingers to take a screenshot.
1
natural_image
Line drawing of a hand holding a smartphone (no text or symbols)2
natural_image
Line drawing of a hand holding a smartphone with an app icon (no text or symbols)3
natural_image
Illustration of a hand holding a smartphone displaying a small app with a red arrow pointing to it (no text or symbols present)or
natural_image
Line drawing of a hand pointing at a smartphone screen with a circular icon (no text or symbols)To open an app To take a screenshot
Control music and videos
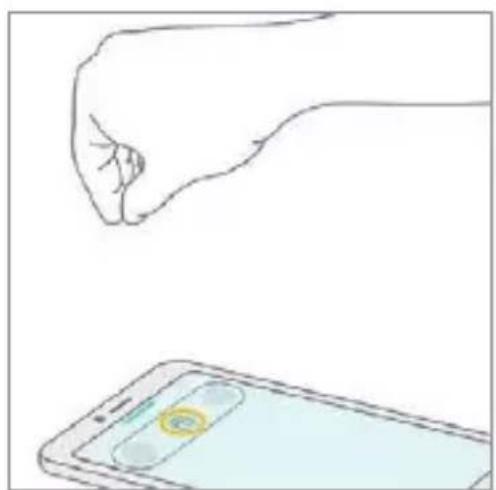
While using the music app or video player, you can pause, play or adjust volumes with your hand gestures in the air.
1 Tap ○> Settings> Extensions> Air Motion> Control music and videos.
2 Tap to activate this feature.
3 Place your hand at a distance of 6 \~ 12 cm (2 \~ 5 inches) from the device to enable Air Motion.
- When the Air Motion bar appears at the top of the screen, cup your hand in the air to launch the Player control controller.
4 Swipe your hand left or right to control the desired function.
- To use the Shortcut and capture feature, swipe left. To pause or play, swipe right.
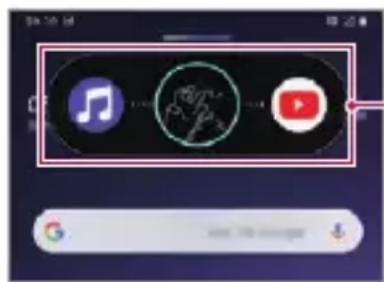
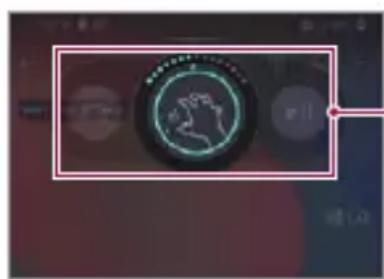
Player controller
- To adjust the volume, cup your hand and wait until the volume controller appears. Then, turn left or right to decrease or increase the volume.
Volume controller

- If you move your hand too fast or perform hand gesture too big, the volume controller feature may not work properly.
Control calls and alarms
You can receive a call or turn off notifications by swiping your hand left or right in the air.
1 Tap ○> Settings> Extensions> Air Motion> Control calls and alarms.
2 Tap to activate this feature.
3 With Air Motion enabled, cup your hand at a distance of 15 \~ 20 cm (6 \~ 8 inches) from the device to launch the controller.
• Air Motion is automatically enabled when a call is received or an alarm or timer rings.
4 Swipe your hand left or right to control as desired.
flowchart
graph LR
    A["Start"] --> B["Midpoint"]
    B --> C["End"]
Alarms controller

- You can end a call by using the Air Motion feature while turning on the speakerphone, or connecting earphones and headsets to the device.
- You cannot end a video call by using the Air Motion feature.
Show hand guide
Turn this on to preview your hand gesture.
Make sure your hand stays within the guide circle while you control the Air Motion controller.
1 Tap ○> Settings> Extensions> Air Motion> Show hand guide.
2 Tap to activate this feature.
Camera features
Triple cameras
The triple cameras, which are located on the back of the device, allow you to take photos or record videos with three different angles of view.
Tap ○ > and select / 4 while taking photos or recording videos with the rear camera.
Triple shot
The triple cameras located on the back of the device take a series of photos with different angles of view and save as a video with slide effect.
1 Tap ○> , then tap More > Triple shot.
2 Tap to take a photo.
• The triple cameras take photos automatically in sequence.

natural_image
Person sitting on a wooden dock beside a calm lake with greenery and distant hills (no visible text or symbols)• A triple shot video is automatically saved in Gallery.

- While taking a photo, hold the device steady until all 3 photos have been taken.
Triple Preview
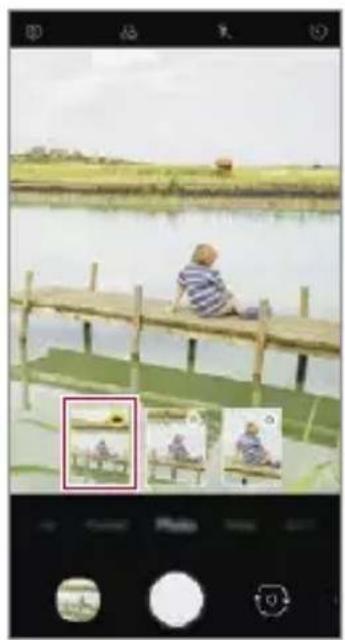
You can preview images of different angles taken by the triple cameras located on the back of the device and select a desired angle to take a photo or record a video.
Before taking a photo, touch and hold a camera view icon to display preview icons of three angles on the right.
natural_image
Child sitting on a wooden dock beside a lake, with a dog on a hill in the background and a hand pointing at it (no text or symbols visible)
natural_image
Child sitting on a wooden dock by a lake, with a dog and greenery in the background (no visible text or symbols)
natural_image
Child sitting on a wooden dock by a lake, viewed from above with three small photos in the corner (no text or symbols visible)- The screen displays the preview image of the selected angle of view.
• After selecting a desired angle, tap ○ to take a photo.
natural_image
Child sitting on a wooden dock beside a lake, with three small inset photos of people on a bench (no text or symbols visible)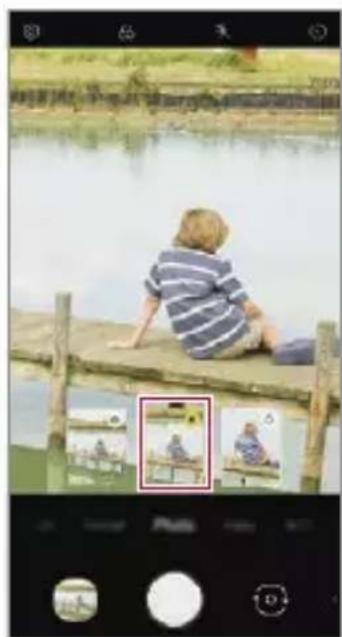
natural_image
Child sitting on a wooden dock by a lake, looking at two small photos of birds (no text or symbols visible)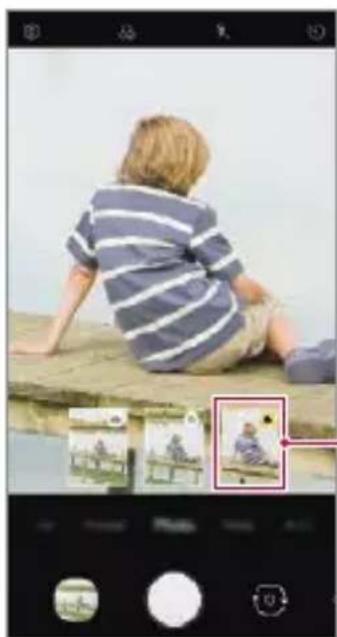
natural_image
Child sitting on a bench viewed from behind, with photo editing interface visible (no text or symbols on main subject)Select preview icon.
Telephoto viewStandard-Angle viewWid
Studio
You can create studio level photos by using Spotlight and Backdrop features in the camera.
Spotlight
You can apply various lighting effects while taking photos.
1 Tap ○> , then tap Studio.
2 Tap-to select a lighting effect.
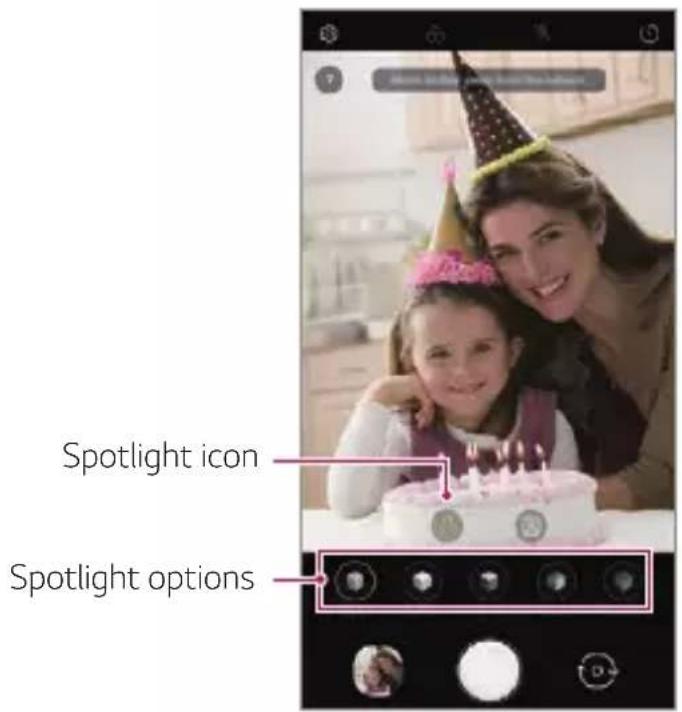
3 Tap the desired lighting effect icon.
4 When Studio effect is available. appears on the screen, tap to take a photo.
- The Studio feature may not work if the camera cannot recognise the subject.
Backdrop
You can apply various effects for background while taking portrait photos.
1 Tap ○> , then tap Studio.
2 Tap 📁 to select a backdrop effect.
- Various background colours appear at the bottom of the screen.
3 Select a background colour you want to apply.
- You can apply the selected colours to the background apart from the subject.

4 When you see the guiding message Studio effect is available, tap to take a photograph.

- If the camera fails to recognise the subject, the studio function cannot be applied to the saved photograph.
- If the surrounding is dark, the camera cannot apply the studio effects.
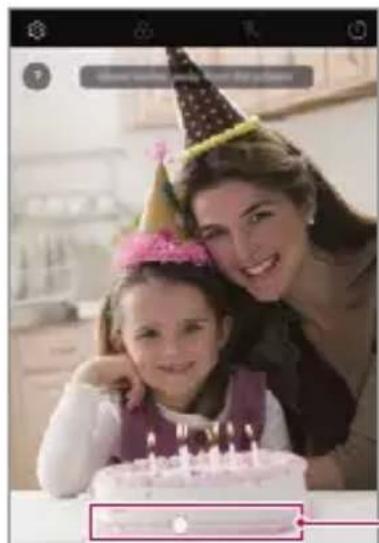
Portrait
You can create an artistic portrait photo, whereby the subject is in focus and the background is blurred. You can also edit the image by applying lighting or colour effect to the background.

- While taking a photo, keep the distance to your subject to 1.3 \~ 5 feet.
• This feature is not available if the surroundings are too dark.
1 Tap ○ > , and tap Portrait.
2 Drag the slide bar to the left or right to adjust the blur strength.
natural_image
A woman and a child at a birthday cake, both wearing party hats, smiling (no visible text or symbols)Adjust blur strength.

3 When Portrait is available. appears on the screen, tap ○ or ● to take a photo.
- The Portrait feature may not work if the camera cannot recognise the subject.
Makeup Pro
While taking selfies, you can apply various makeup techniques.
When using the front camera, adjust the skin tone and apply eye and lip makeups.
1 Tap ○> , switch to the front camera, then tap ⚙.
2 Select a desired makeup option, then drag the slide bar to the left or right to adjust the effect.
- When you select None, the slide bar disappears.
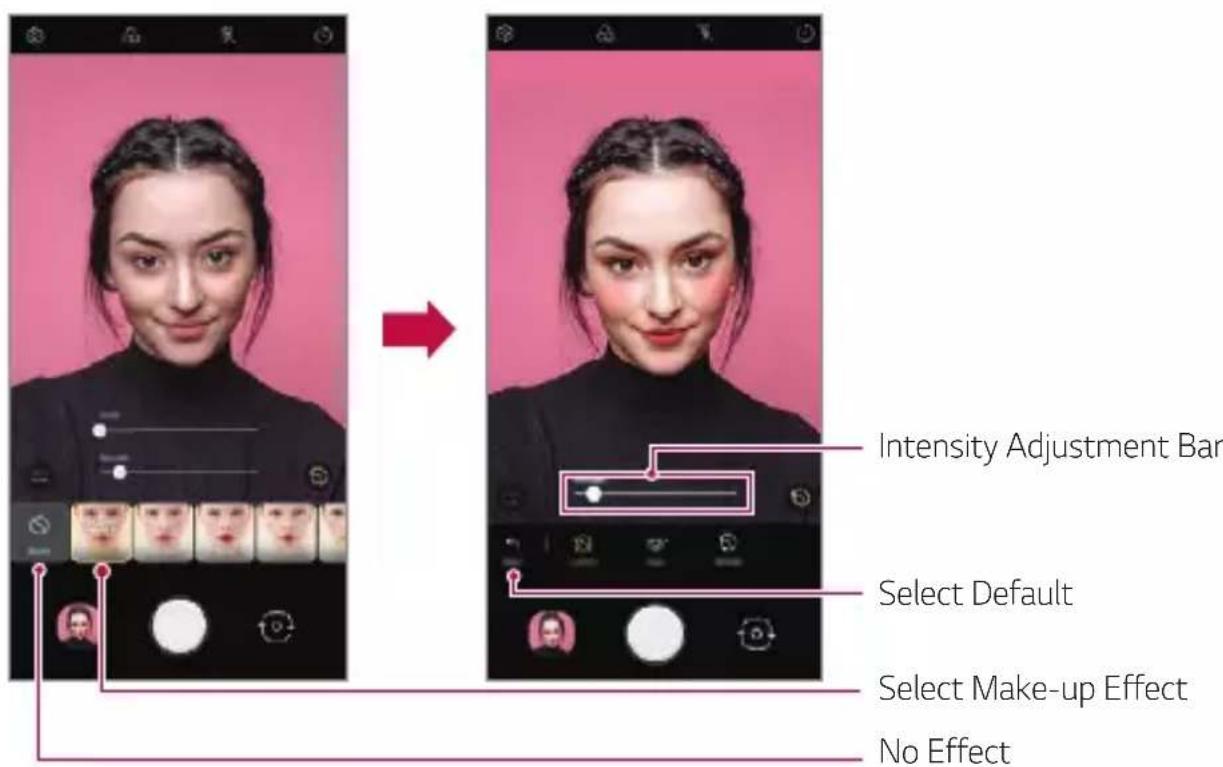
3 Select various makeup effects and apply them to the subject.
- Basic or Makeup Mode, then touch the screen again to apply more detailed makeup effects.
- Move the Intensity Adjustment Bar to adjust the Strength with which the effects are applied.
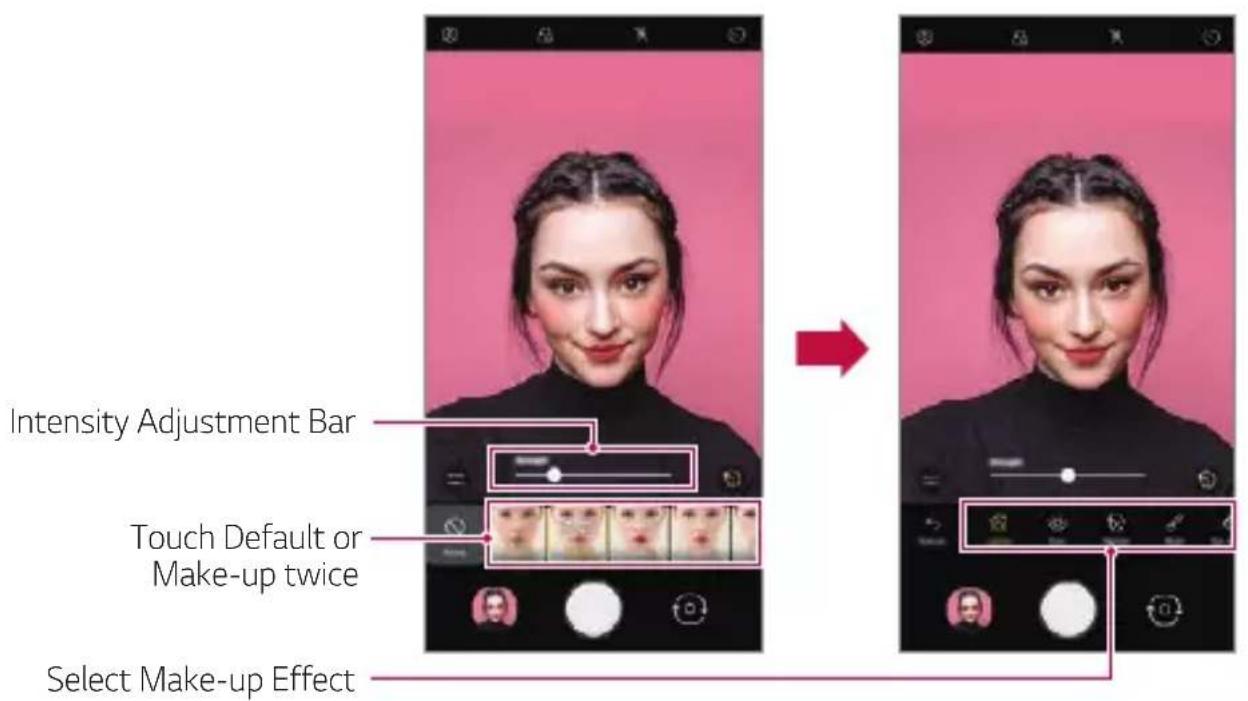
4 Tap to take a photo.
Google Lens
You can get more information or take action on items around you using Google Lens, like landmarks, posters, restaurant menus, animals, flowers, or barcodes, directly in your device.
For example, when you use Google Lens on a:
• Business card: You can save the phone number or address to a contact.
• Book: You can get reviews and other details about it.
- Landmark or building: You can get more details about it.
- Painting in a museum: You can get details about it.
• A plant or animal: You can learn more about it.
• A flyer or event billboard: You can add that event to your calendar.

- Google Lens is available only when your device is connected to the internet. If you use mobile data, you may be charged for data usage, depending on your pricing plan.
- This function may be not supported, or the supported languages may differ depending on the service area.
Use Google Lens
1 Tap○>then tap .
2 Point your camera at an item.
3 To get details or take action:
- Tap the item on your screen.
• To select text: Tap a word, then tap it again and drag the blue dots.
AR features
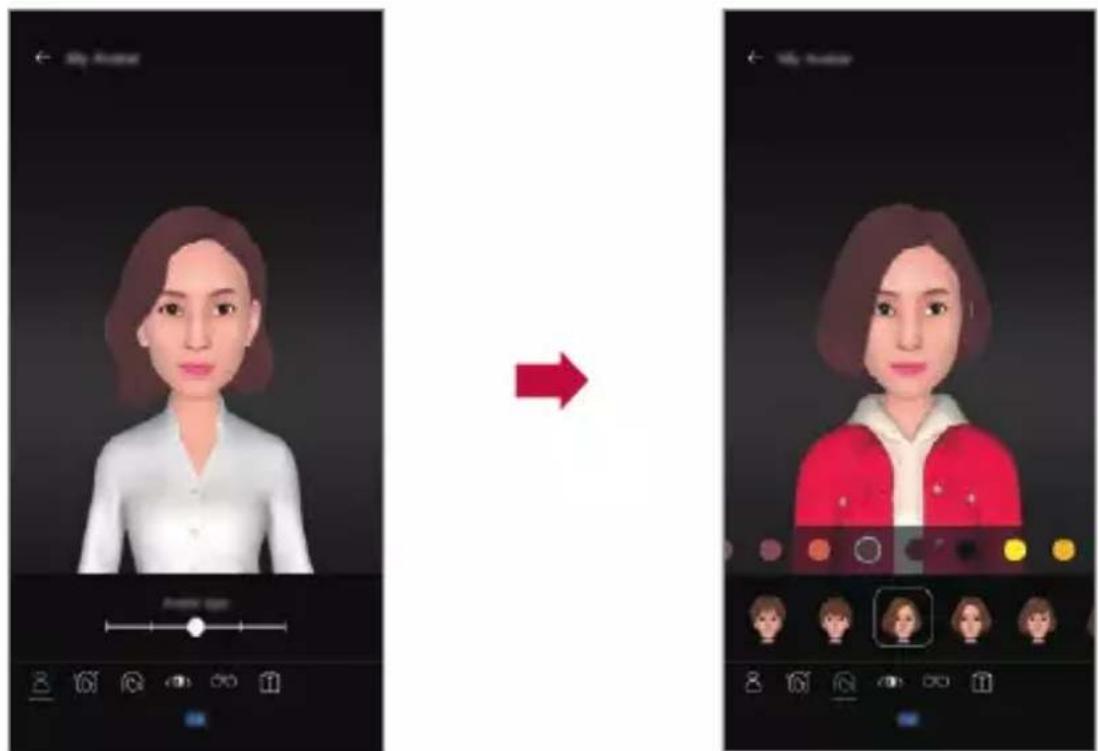
You can use various AR (Augmented Reality) features with the Camera app. You can create your own My Avatar, AR Emoji, or AR Sticker for rich content. My Avatar helps you create a cartoon version of yourself and customise it. AR Emoji help you create 3D animated animal emojis that mimic facial expression. AR Sticker allows you to choose from several different stickers to use on a photo or video while facing your camera.
Creating My Avatar
1 Tap ○> 📋, switch to the front camera, then tap 🌿> 😊.
2 Tap to take a photo.
- Follow the on-screen instructions to align your face on the screen.
- To make My Avatar by using one of the saved photos from Gallery, tap 📋.
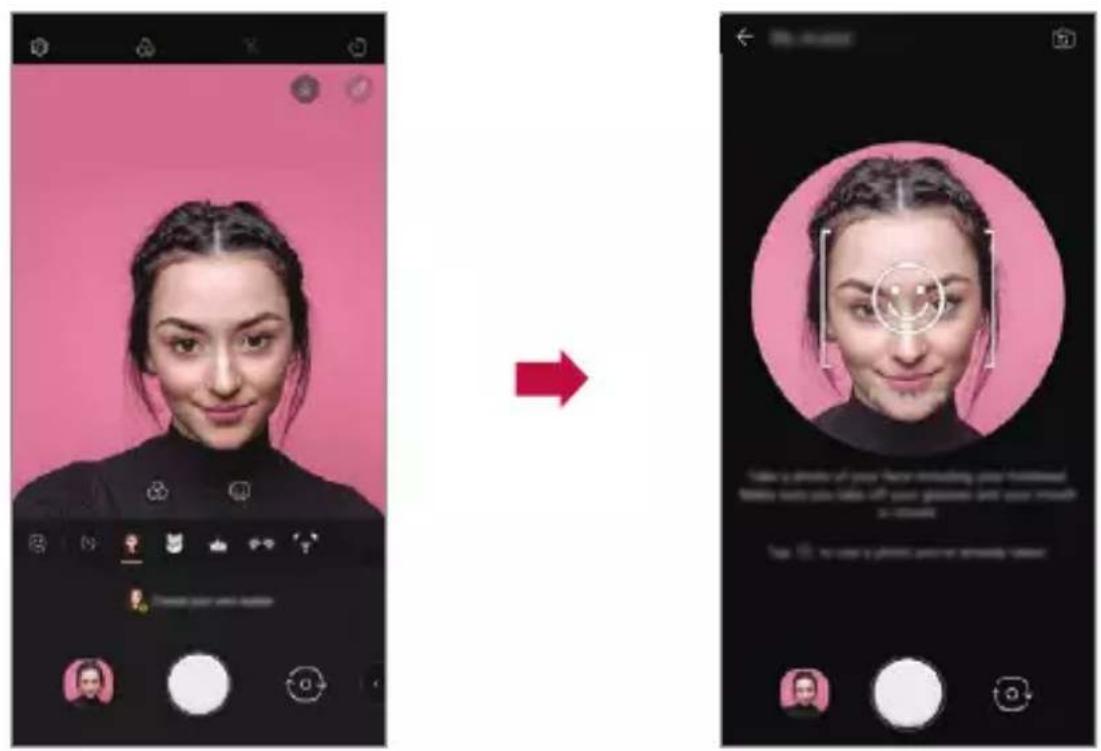
3 Select My Avatar's gender and select details including avatar type, skin tone, hairstyle, and clothes, then tap OK.
• Taken photos are saved in Gallery.
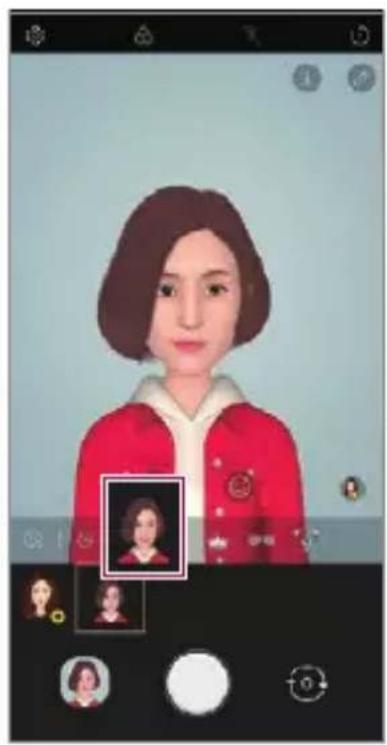
Using My Avatar, AR Emoji, AR Sticker
1 Tap ○> 📋, switch to the front camera, then tap 🙏> 😊.
2 Select an option you want to record.
natural_image
Illustration of a woman in a red hoodie with a highlighted inset portrait (no text or symbols)
natural_image
Illustration of a polar bear wearing a blue sailor-style outfit with red collar, displayed within an app interface (no text or symbols on the bear or background)
natural_image
Close-up of a person wearing a reindeer head with antlers, smiling (no visible text or symbols)My Avatar AR Emoji AR Sticker
3 To take a photo, tap.
To record a video using My Avatar, AR Emojis or AR Stickers, select the video recording menu, and then tap 🎨 > to select the desired item, and tap 🔺 to start shooting the video.
• Taken photos are saved in Gallery.
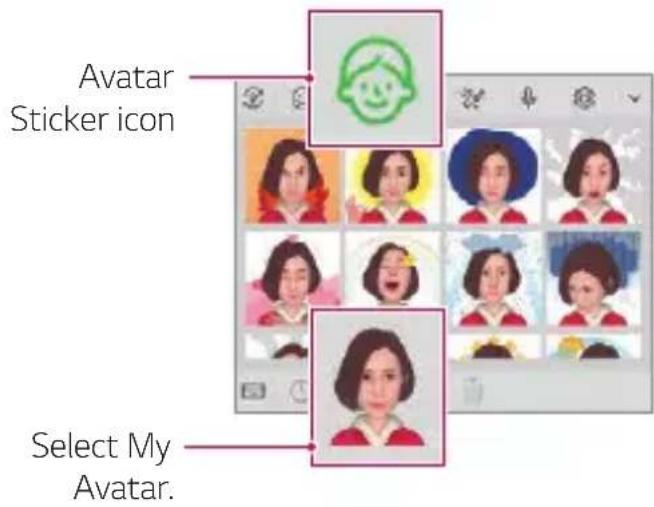
Using Avatar Stickers
1 Tap on the LG Keyboard.
2 Select the desired Avatar Sticker.
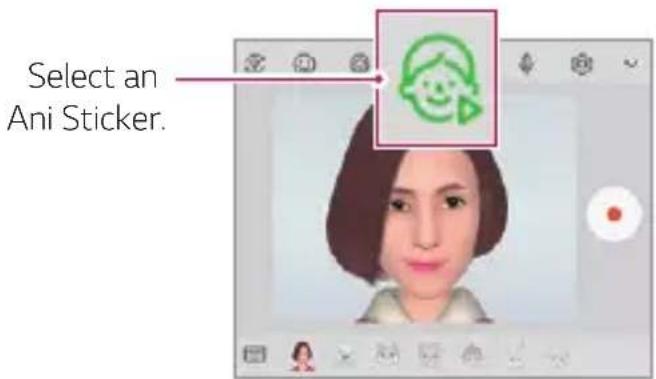
Using Ani Sticker
1 Tap on the LG Keyboard.
2 Select the desired My Avatar.
3 Tap to record voice and video, and then tap to save.
- Ani Stickers with various facial expressions, motions, and voices are created.
4 Tap to upload Ani Sticker.
- Tap to preview the created Ani Sticker.
AI CAM
You can use the AI Cam feature to automatically recognise the object when taking a photo or recording a video for an optimal quality.
1 Tap , then tap AI CAM.
2 When the object is recognised, the best effect for the scene is applied.
• To apply other effects, tap the scene icon.
- A wide range of categories, such as portrait, animals, food, sunrise, sunset, landscape, sky, beach, babies, flowers and text, can be recognised automatically.

- The result of the scene recognition may differ depending on the illumination or the location of the subject while taking photos. Keywords do not appear on the actual photos or videos.
QLens
You can do shopping, search image, or scan QR code by taking a photo with QLens.
1 Tap , then tap.
2 Select the desired option among Visual Search or Scan QR code.
3 Tap the screen to take a photo of the object you want to search or focus the QR code.
• The result will appear after a moment.

- This feature is available only when your device is connected to a network. If you use mobile data, you may be charged for data usage, depending on your pricing plan.
- For Visual Search features, you can select the desired area from the image that you have taken, and then search it again.
- This feature is available only when the rear camera is in the Auto mode.
- This function may not be supported depending on the area.
Cine shot
You can record a moment and make a video with only a part of the scene in motion.
While recording a video, hold the device steady. After recorded, rub the area in the video you want in motion. The selected area starts moving and the rest of the video remains still.
1 Tap ○> , then tap More>
2 Tap to record a 3 second video.
- Hold the device steady while recording the video.
3 Tap and rub the area you want in motion with the cine shot effect.

- Tap to erase the selected area.
- Tap ⏱ to play the selected area in motion forward repeatedly.
- TapⒶ to play the selected area in motion forward and backward repeatedly.
4 Tap SAVE.
• The selected area will be in motion.
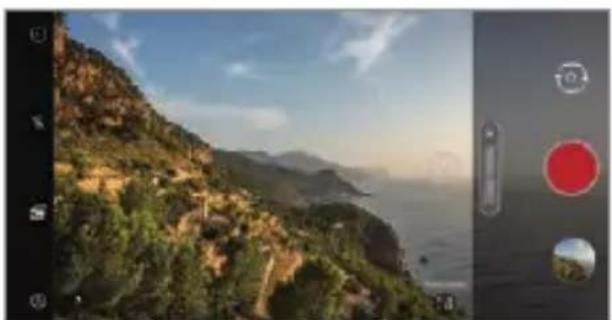
Cine Video
You can record a movie-like video.
1 TapO>
2 Tap More >.
3 Tap to record a video.
• [+] : Record a video by selecting the point zoom feature to zoom in/out around a specific area.
• : Select an effect to apply to the recording. You can also adjust the vignette and strength for each Cine effect. This feature cannot be changed after you have started recording.
natural_image
Coastal landscape with green hills and ocean in the background, captured via smartphone camera interface (no text or symbols on main scene)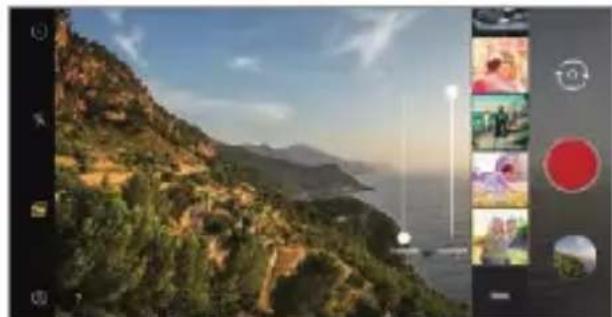
natural_image
Scenic coastal landscape with green hills and ocean in the background, overlaid with a photo editing interface panel (no readable text or symbols)
• The Point Zoom feature supports a zoom speed of up to 3x.
• This feature only supports video recordings in standard angle.
Gallery features
Related content
You can edit and customise related content in the Gallery.
1 While viewing a picture preview, tap 🔒
2 When the icon related to the date or location where you took the photo appears, touch the screen.

natural_image
Two-panel image: top shows two gray stones on a red autumn leaf; bottom shows vibrant red maple leaves in autumn foliage (no text or symbols)- You can view the photos related to the date or location of your choice.
- Tap : to access additional options.
Making a GIF
You can create a GIF file from the Gallery.
1 While viewing an album, tap : > Create GIF.
2 Select the desired photos and videos to create a GIF file and then tap Next.
- You can also add/delete a photograph, adjust the speed or screen ratio, set the photograph order, etc.
3 Tap Save.

• A maximum of 100 images can be used to create a GIF file.
Making a collage
You can make a collage from the associated content.
1 While viewing an album, tap : > Make collage.
2 Select the desired images to add to the collage and then tap Next.
- Select the desired layout from the bottom of the screen.
3 Tap Make.

• A maximum of 9 images can be used to create a collage.
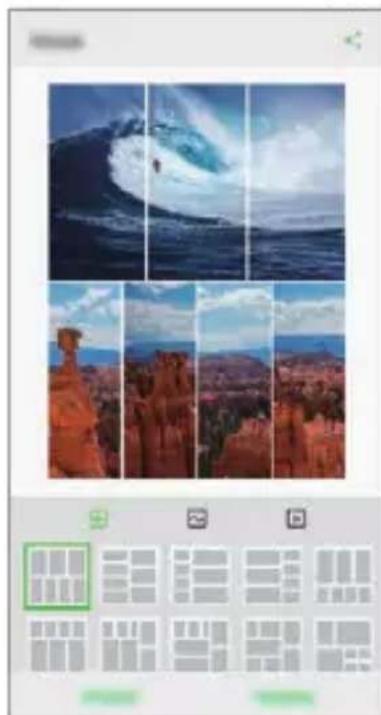
natural_image
Collage of landscape photos showing a large wave crashing against rocky cliffs and blue sky, with no visible text or symbols.Creating a movie
You can create a new movie by putting images and videos together.
1 Run the Gallery app, select a desired folder in the album and tap : > Create movie.
2 Select images or videos for your movie and tap Next.
3 Edit the selected images and videos and then tap Save.
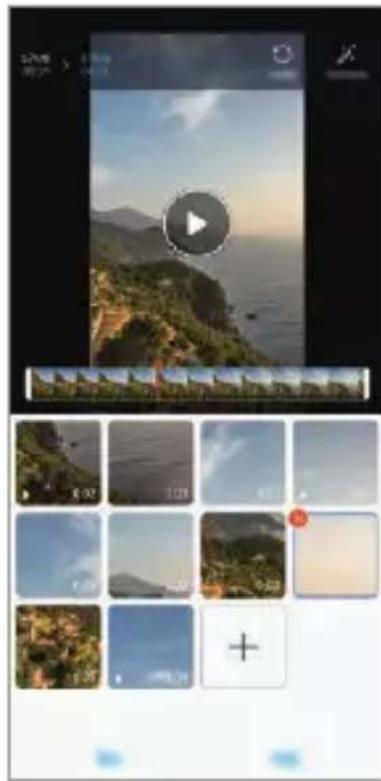
natural_image
Scenic coastal landscape with mountain peaks and a play button overlay (no readable text or symbols)Deleting files
You can select images or videos to delete by tapping at the top left corner of its thumbnail.
Adding files
You can select images or videos to add after tapping – at the bottom of the screen. You can also select the images or videos you have already added.
Rearranging files
To rearrange the images and videos, touch and hold the file you want to move, and then dragging it to the desired location.
Adding file effects
Tap ✗ to add a theme or background music or change the font.
Resetting the movie edits
You can reset the edits made to the movie (e.g. play time) by tapping
Previewing a file
Check your new video before saving it by tapping ⚙After the playback time elapses, the next file is played automatically.

- A maximum of 50 images and videos can be used to create a video.
- The playback time for an image is 3 seconds by default and it cannot be changed. Videos can be trimmed down to a minimum of 1 second.
- This feature may not support some image or video formats.
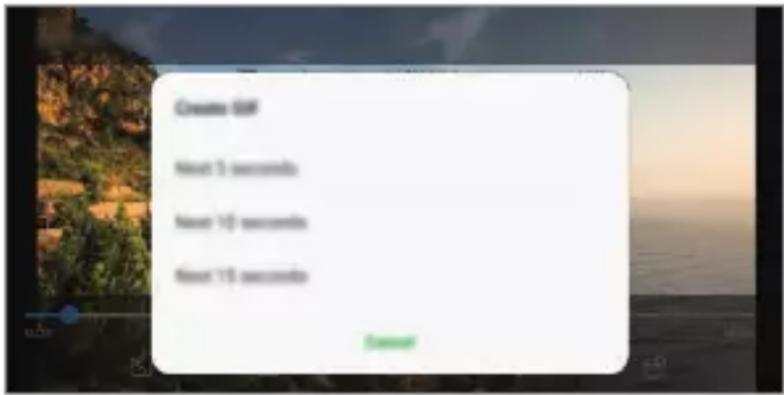
Making a GIF
You can easily make a GIF file using recorded video.
Creating video
1 At the desired starting point while watching a video, tap GIF
2 Select the length of the GIF you want to create.
- GIF is generated for the time selected from the specified starting point.
- For videos that are less than 10 seconds, GIF images are automatically generated for the remaining time.
Creating GIF Photographs
1 In the photograph list in the Gallery, tap : > Create GIF.
2 Select a picture to turn into a GIF photograph, and then tap Next.
- You can add/delete a photograph, adjust the speed or screen ratio, and set the photograph order.

- Creating GIF photographs is a function provided for the user to produce creative images. Violating rights such as intellectual property right or defaming the reputation of another person by using the creating GIF photographs function may lead to a civil or criminal liability in accordance with the related laws. Be cautious not to copy or transmit another person's work without authorization. LG Electronics is not liable in any way for such acts by users.
- You can select up to 100 photographs to produce when you create a GIF.
Sound quality and effects features
DTS:X 3D Surround
You can play a song or video in three-dimensional, immersive and vivid sound. To use this feature, connect earphones, speaker or other external audio devices to your device.
Tap ○ > Settings > Sound > Sound quality and effects, then tap DTS:X 3D Surround ○ to activate this feature.
Adjusting the sound direction
You can adjust the sound direction as desired.
1 Tap ○ > Settings > Sound > Sound quality and effects > DTS:X 3D Surround.
2 Select sound direction.
Floating Bar
Floating Bar overview
You can activate frequently used features, including shortcuts, screen capture, music player, and quick contacts, by touching and then swiping the Floating Bar on the screen.
To enable the Floating Bar feature, tap ○>Settings >Extensions >Floating Bar ○.
Opening and closing the Floating Bar
• To open the Floating Bar: Tap
• To close the Floating Bar: Tap> or <
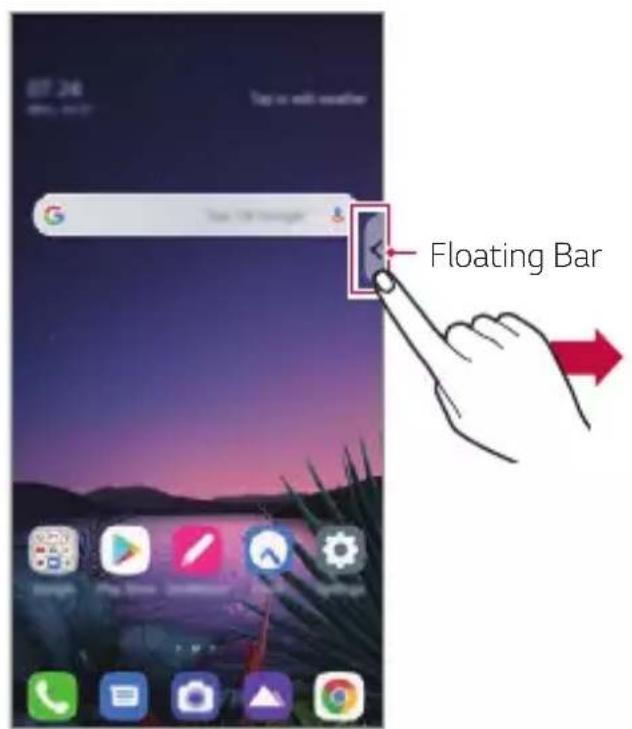

- To access the rest of the bar options, swipe left or right on the floating bar.
Moving the Floating Bar position
Touch and hold Floating Bar, then drag it to the desired location. Either way, it can be moved to any direction.
Google Assistant
Google Assistant overview
Your device has the built-in Google Assistant feature. Find answers and get things done while on-the-go.

- To use this feature, first connect to the network and sign in to your Google Account.
Sign in
1 Touch and hold from the Home screen to launch Google Assistant or press the Google Assistant key on the left side of the device.
2 Tap GET STARTED.
3 Follow the on-screen instructions and say "Ok Google" or "Hey Google".
- The device saves your voice data for recognition.
4 Set whether to use the voice match unlock function.
- If you use the voice match unlock function, you can unlock the device even when the device screen is turned off or the device is charging by saying "Ok Google" or "Hey Google".

- This feature may be more vulnerable to security than the other screen locks, such as Knock Code, Pattern, PIN, and Password.
When a similar voice or your recorded voice is used, the screen may be unlocked.
- You need to unlock the device by using the specified method if you fail to unlock the device with voice recognition. See Setting a screen lock for details.
5 Tap Save.
Accessing by Voice
1 When the home screen is turned off or locked, say "OK Google" or "Hey Google".
2 When the Google Assistant screen appears, say a command or ask a question.
Accessing from Home Screen
1 Touch and hold on the Home screen.
2 Say a command or question when you see • on the bottom of the screen.

- In an environment where Wi-Fi or mobile data connection is poor, the Google Assistant function may be restricted and the speech recognition accuracy rate may be lowered.
- If the speech is ambiguous, the microphone is covered, a media player is playing, or the surrounding is loud, the speech recognition accuracy rate may be lowered. When you are using the product via voice commands, say with accurate pronunciation in a quiet environment for better speech recognition accuracy.
Hand ID
Hand ID overview
You can unlock the screen with your hand by using the Hand ID feature.
Place your device on a flat surface and bring your hand towards the front camera to unlock the screen.

- This feature uses the saved palm vein data on your device. The recognised palm vein data is securely stored in your device.
- The ToF sensor and IR illuminator located near the front camera can recognise your palm vein patterns.
- Hand ID is considered less secure than other lock types.
Precautions for Hand ID
Hand ID recognition accuracy may decrease in the following cases. To increase its accuracy, check the following before using the device.
- Make sure that the ToF sensor and IR illuminator are not blocked by a sticker or any other foreign substances while using the Hand ID feature.
- When water, dust or other foreign substance is on the ToF sensor, IR illuminator or your hand, the Hand ID recognition may not work. Clean and dry the sensor and your hand before having the hand recognised.
- If you bend your hand, Hand ID may not be recognised. Make sure to open your hand comfortable and flat while registering and recognising Hand ID.
- Make sure that the device is parallel with your hand while registering or recognising Hand ID. If you tilt the device or your hand, registering or recognising Hand ID may not work properly.
- Make sure that your device is placed on a flat surface or placed on a stable holder.
- While using the Hand ID feature, keep the distance to your palm to 10 cm (4 inch).
Registering Hand ID
Before using the Hand ID feature, register your palm vein data on your device.
1 Tap ○> Settings> Lock screen & security> Hand ID.
2 Tap Next and unlock the screen according to the specified method.
3 Place the device on a flat surface and tap Start.
4 Register your palm by following the on-screen instructions.
- Place your palm at a distance of 15 \~ 20 cm (6 \~ 8 inches) from the device.
- When the device recognises your palm, slowly lower the palm towards the ToF sensor.
- Tap Continue to register again with the device placed in a different position.
5 When the palm registration is done, tap OK.
Unlocking the screen with Hand ID
You can unlock the screen with your hand.
1 Tap ○ > Settings > Lock screen & security > Hand ID.
2 On the Hand ID settings screen, configure the following settings:
- Delete hand data: You can delete the registered Hand ID data and register it again if the Hand ID does not work properly.
- Cover to wake for Hand ID: You can wake your phone and then use the Hand ID by covering the screen when the screen is off.
- Swipe to unlock: After your device recognises your Hand ID, you must swipe the screen to unlock it.
Fingerprint recognition
Fingerprint recognition overview
You must register your fingerprint on your device first before using the fingerprint recognition function.
You can use the fingerprint recognition function in the following cases:
• To unlock the screen.
• To view the locked content in the Gallery or QuickMemo+.
- Confirm a purchase by signing in to an app or identifying yourself with your fingerprint.

- Your fingerprint can be used by the device for user identification. Very similar fingerprints from different users may be recognised by the fingerprint sensor as the same fingerprint.
- If the device cannot detect your fingerprint, or you forgot the value specified for registration, visit the nearest LG Customer Service Centre with your device and ID card.
Precautions for fingerprint recognition
Fingerprint recognition accuracy may decrease due to a number of reasons. To maximise the recognition accuracy, check the following before using the device.
- The device has a fingerprint sensor. Ensure that the fingerprint sensor is not damaged by a metallic object, such as coin or key.
- When water, dust or other foreign substance is on the fingerprint sensor or your finger, the fingerprint registration or recognition may not work. Clean and dry your finger before having the fingerprint recognised.
- A fingerprint may not be recognised properly if the surface of your finger has a scar or is not smooth due to being soaked in water.
-
If you bend your finger or use the fingertip only, your fingerprint may not be recognised. Make sure that your finger covers the entire surface of the fingerprint sensor.
-
Scan only one finger for each registration. Scanning more than one finger may affect fingerprint registration and recognition.
- The device may generate static electricity if the surrounding air is dry. If the surrounding air is dry, avoid scanning fingerprints, or touch a metallic object such as a coin or a key before scanning fingerprints to remove static electricity.
Registering fingerprints
You can register and save your fingerprint on the device to use fingerprint identification.
1 Tap ○> Settings> Lock screen & security> Fingerprints.

- A lock screen must be set in order to be able to use this feature.
- If the screen lock is not active, configure the lock screen by following the on-screen instructions. See Setting a screen lock for details.
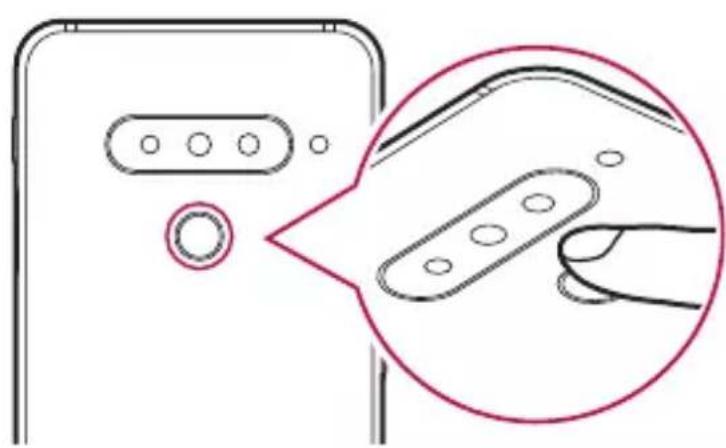
2 Locate the fingerprint sensor on the back of the device and gently put your finger on it to register the fingerprint.

• Gently press the fingerprint sensor so that the sensor can recognise your fingerprint.
- Ensure that your finger covers the entire surface of the fingerprint sensor.
natural_image
Diagram showing a device with a button and a magnified view of its internal components (no text or symbols)3 Follow the on-screen instructions.
- Repeat scanning the fingerprint by moving your finger little by little until the fingerprint is registered.
4 When the fingerprint registration is done, tap OK.
- Tap Add more to register another fingerprint. If you register only one fingerprint and the corresponding finger is not in a good condition, the fingerprint recognition may not work well. As the preventive measure against this kind of situation, register multiple fingerprints.
Managing fingerprints
You can edit or delete registered fingerprints.
1 Tap ○> Settings> Lock screen & security> Fingerprints.
2 Unlock according to the specified lock method.
3 From the fingerprint list, tap a fingerprint to rename it. To delete it, tap ☑.
Unlocking the screen with a fingerprint
You can unlock the screen or view the locked content by using your fingerprint. Activate the desired function:
1 Tap ○> Settings > Lock screen & security > Fingerprints.
2 Unlock according to the specified lock method.
3 On the fingerprint settings screen, activate the desired function:
- Screen lock: Unlock the screen with a fingerprint.
- Content lock: Unlock content with a fingerprint. To do this, make sure that the content lock is set.
Face Unlock
Face unlock overview
You can unlock the screen lock by using the saved facial data.

- This feature may be more vulnerable to security than the other screen locks, such as Knock Code, Pattern, PIN, and Password.
- When a similar face such as a twin is used, the device may recognise it as the registered user and may be unlocked.
- The recognised facial data is securely stored in your device.
- If the device cannot detect your face, or you forgot the value specified for registration, visit the nearest LG Customer Service Centre with your device and ID card.
Precautions for Face Unlock
Face Unlock accuracy may decrease in the following cases. To increase its accuracy, check the following before using the device.
- When your face is covered with a hat, eyeglasses, sunglasses, or mask, or your face is significantly different due to heavy makeup or beard.
- When there are fingerprints or foreign substances on the front of the camera lens, or your device cannot detect your face due to too bright or dark light.
Registering facial data
Before using the Face Unlock feature, register your facial data on your device.
1 Tap ○> Settings> Lock screen & security> Face Unlock.

- To use this feature, the screen lock must be set with a Knock Code, Pattern, PIN, or Password.
- When the screen lock is not set, register the data by following the on-screen instructions. See Setting a screen lock for details.
2 Tap Next and unlock the device according to the specified method.
3 Tap Start and raise your device in the front of your eyes.
- Register your face in a room that is not too bright or dark.
- Hold the device in the distance of 25 \~ 51 cm (10 \~ 20 inches) from your face.
- Position your entire face inside the guideline on the screen, and then move your head slowly in a circle while looking at the screen.
- Keep still while registering your face. You can improve recognition rate by taking steady photos multiple times.

- Only one face can be registered at a time.
4 When the face registration is done, tap OK.
Unlocking the screen with your face
You can release the screen lock with your face instead of a Knock Code, Pattern, PIN, or Password.
1 Tap ○> Settings> Lock screen & security> Select screen lock.
2 Unlock the screen according to the specified method.
3 Tap Allow Face Unlock to allow you to unlock the screen using facial recognition.
Face Unlock options
You can customise Face Unlock options.
1 Tap ○> Settings> Lock screen & security> Face Unlock.
2 Customise the following settings:
- Improve Face Unlock: You can add facial data in various conditions to improve face unlock.
-
Delete face: You can delete the registered facial data and register it again if the face unlock does not work properly.
-
Raise to wake up for Face Unlock: You can wake your phone and then use Face Unlock by raising the phone when the screen is off.
- Swipe to unlock: After your device recognises your face, you must swipe the screen to unlock it.
- Content lock: Allow you to show locked content in Gallery and QuickMemo+ with your face.
Multi-tasking feature
Multi window
1 Tap on the navigation bar.
- Recently-used apps appear. If you tap the app icon, the App info, Multi window, Pop-up window, Pin app menus appear.
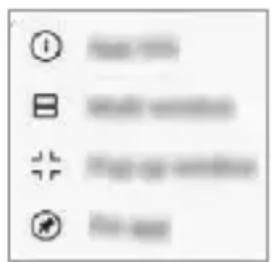
2 Tap the app icon on the top left of the app to be displayed in the multi-window and tap Multi window.
- The selected app appears on the upper half of the screen.
3 Swipe the recently used apps left or right and tap an app to display on the lower half of the screen.
- The selected app appears on the lower half of the screen.

- The multi window feature is not supported in some LG apps or apps downloaded from the Play Store.
AOD (always-on display)
You can view the date, time or signature when the main screen is turned off.
Swipe the bottom of the Always-on display screen to activate features including Camera, Capture+, Wi-Fi, sound settings, Bluetooth ^® , Flash, Music and more.
1 Tap ○> Settings > Display > AOD (always-on display).
2 Select the image you want to display and tap Save.
- Tap the desired image among Digital clock, Analog clock, Dual clock, Signature, Calendar, or Image.
- Drag Quick tools & music player 📄 to swipe over the status icons for Quick tools and the music player.
- Tap AI Pick to see useful information provided based on Context Awareness.
- To set the time period not to activate Always-on display feature, tap Daily timeout.
- To enhance brightness for the Always-on display feature, tap Brighter display.

- The battery may drain faster when you use Always-on display. Turn this feature off to save battery power.
- To deactivate Always-on display feature, tap ○ >Settings Display > AOD (always-on display) and then tap .
Quick Help
You can view help information about the main features of the device, frequently asked questions or the user guide. Search for help information using keywords. You can solve your problems quickly by consulting one-on-one with a specialist.
1 Tap Quick Help.
2 Search for help information by entering keywords in the search field.

- This feature is periodically updated utilising user feedback.
• Available menu items may vary depending on the area or service provider. - You can view the user manual online from the Quick Help app to view detailed information about the device's features.
Notes on Water Resistant Properties
This product is water and dust resistant in compliance with the Ingress Protection rating IP68.
Your product has undergone testing in a controlled environment and is proven to be water and dust resistant in certain circumstances (meets the requirements of classification IP68 as described by the international standard IEC 60529 - Degrees of Protection provided by Enclosures [IP Code]; test conditions: 15-35 °C, 86-106kPa, 1.5 meter, for 30 minutes). Do not expose the device in conditions that are different from the test conditions. Results may vary in actual use.

WARNING
Despite a rating of IP68, your device is not impervious to conditions not tested in LG's controlled environment. Please note that any damages that occur due to such causes changes the colour of the LDI (Liquid Damage Indicator). If the colour of LDI located inside the product changes, the product is to be considered ineligible for any free-of-charge repair services provided under the product's limited warranty.
Avoid exposing the product to environments with excessive dust or moisture. Do not use the product in the following environments.

Do not immerse the product in any liquid chemicals (soap, etc.) other than water.

Do not immerse the product in salt water, including seawater.

Do not immerse the product in a hot spring.

Do not swim with this product.

Do not place the product directly on sand (such as at a beach) or mud.

Do not immerse your product in water deeper than approximately 1.5 meters.
Do not immerse your product in water for longer than 30 minutes.
- If your product becomes wet be sure to wipe the microphone, speaker, and stereo jack with a dry cloth before use.
- Should your product or your hands become wet, dry them before handling the product.
- Do not use the product in places where it may be sprayed with high pressure water (e.g. near a faucet or shower head) or submerge it in water for extended periods of time, as the product is not designed to withstand high water pressure.
- This product is not resistant to shock. Do not drop the product or subject it to shock. Doing so might damage or deform the main unit, causing water leakage.
- The product's water and dust resistant features may be damaged by dropping or receiving an impact.
- If the product gets wet, use a clean, soft cloth to dry it thoroughly.
- The touch screen and other features may not work properly if the device is used while wet.
- Your product is water resistant only when the SIM/Memory card tray is properly inserted into the product.
- Do not open or close the SIM/Memory card tray while the product is wet or immersed in water. Exposing the open tray to water or moisture may damage the product.
- The SIM/Memory card tray contains rubber [packing] to help prevent dust, water, or moisture from entering the product. Do not damage the rubber [packing] as this may allow dust, water, or moisture to enter your product and cause damage.

- Failure to follow the provided instructions may invalidate your device's limited warranty.
- If the device is wet, the LDI located inside the device changes in colour. In this case, the device is ineligible for any free-of-charge repair services provided under the device's limited warranty.
- Despite a rating of IP68, your device is not completely impervious to water in any situation.
02
Basic Functions
Product components and accessories
The following items are included with your device.
- Device
- Stereo headset
-
USB cable
-
Ejection pin
- Charger
- Quick Start Guide
- Jelly Phone Case

- The items described above may be optional.
- The items supplied with the device and any available accessories may vary depending on the area and service provider.
- Always use genuine LG Electronics accessories. Using accessories made by other manufacturers may affect your device's call performance or cause malfunctions. This may not be covered by LG's repair service.
- Some of the device parts are made of tempered glass. If you drop your device on a hard surface or subject it to severe impact, the tempered glass may be damaged. If this happens, stop using your device immediately and contact an LG Customer Service Centre.

- If any of these basic items are missing, contact the dealer from which you purchased your device.
• To purchase additional items, contact an LG Customer Service Centre. - Some items in the product box are subject to change without notice.
- The appearance and specifications of your device are subject to change without notice.
• Device specifications may vary depending on the area or service provider. - Remove the protective film from the Fingerprint sensor before use of the fingerprint recognition feature.
Parts overview
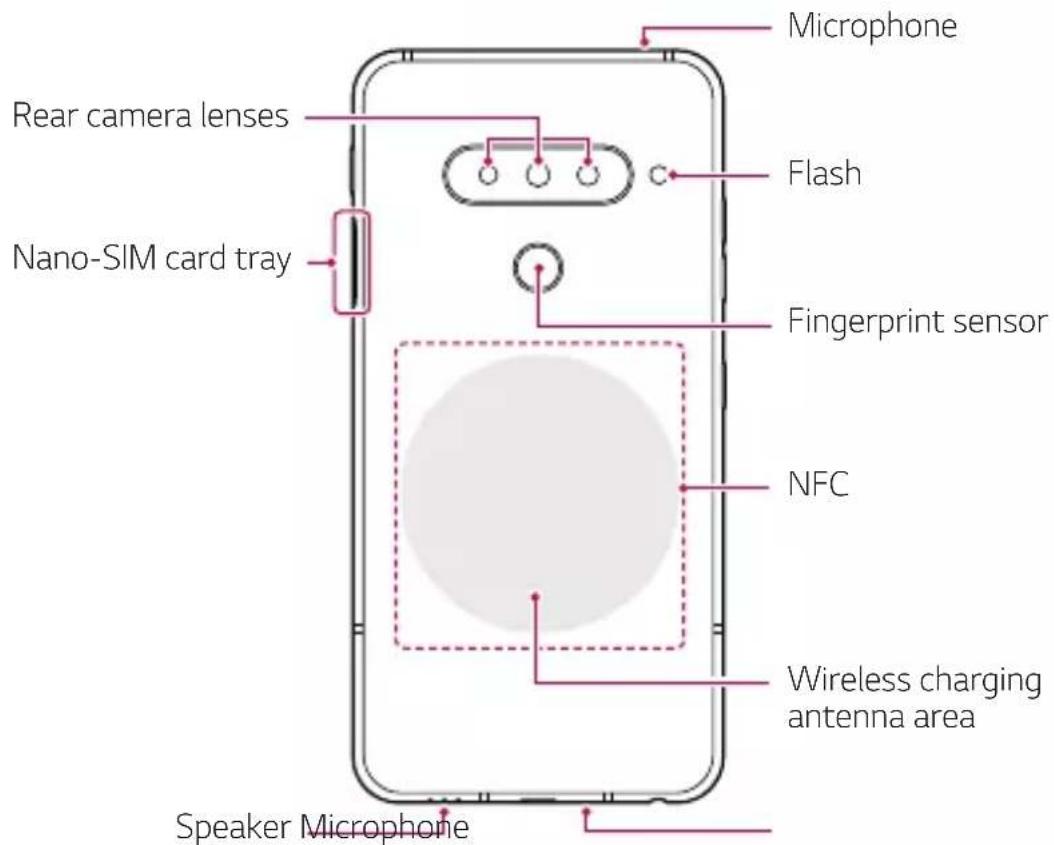

Do NOT attempt to remove the back cover by yourself.
Doing so may severely damage the battery and device, which could cause overheating, fire, and injury. This device's back cover and battery are not to be removed or replaced by a non-qualified professional.
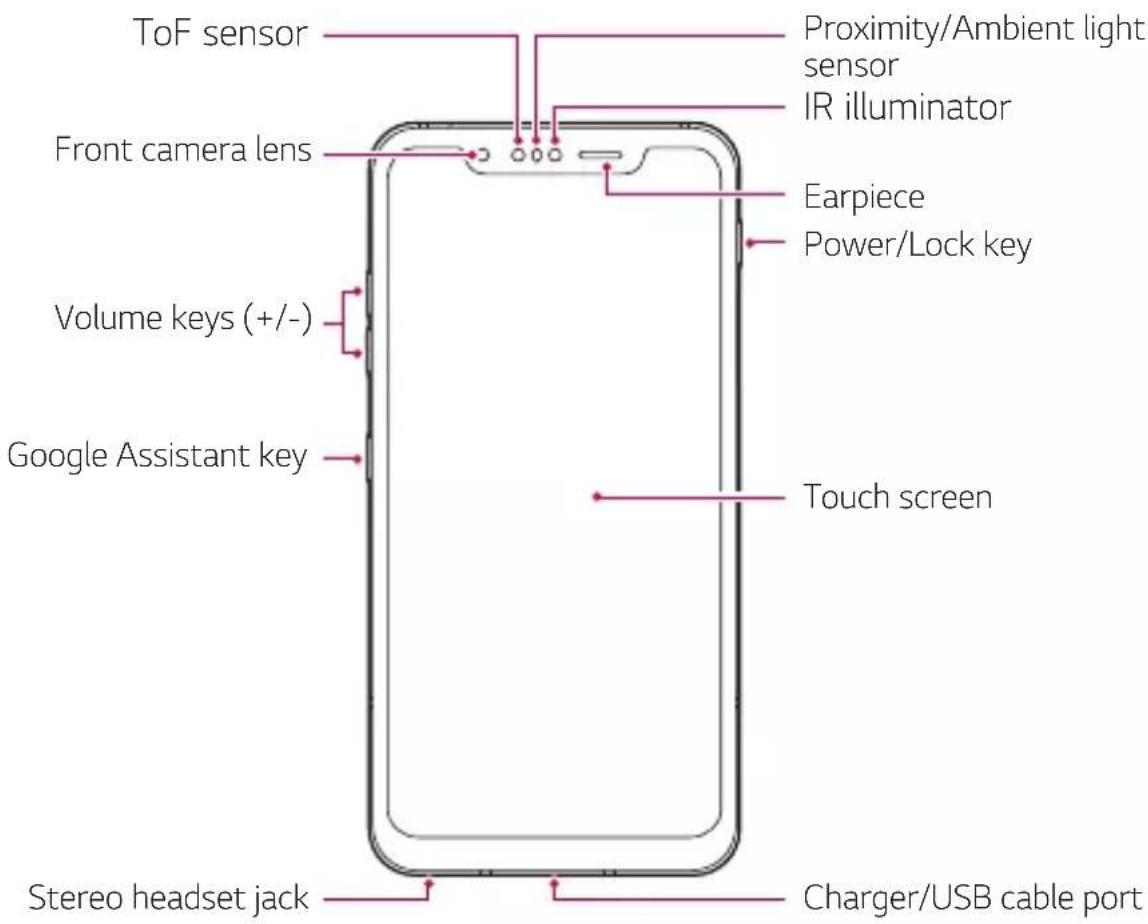
- Z Camera
- Z Camera is composed of a ToF sensor and an IR illuminator to increase the recognition accuracy in a dark place or outdoors by three-dimensionally detecting the distance or depth between the device and an object.
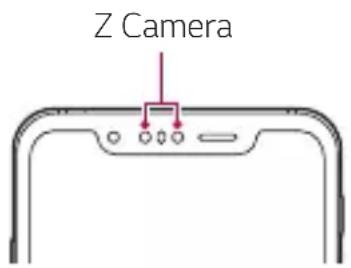
• ToF (Time-of-Flight) sensor
- Measure the accurate distance by detecting the infrared emitted from the IR illuminator.
- IR illuminator
- Emit the infrared light.
• Proximity/Ambient light sensor
- Proximity sensor: During a call, the proximity sensor turns off the screen and disables touch functionality when the device is in close proximity to the human body. It turns the screen back on and enables touch functionality when the device is outside a specific range.
- Ambient light sensor: The ambient light sensor analyses the ambient light intensity when the auto-brightness control mode is turned on.
• Volume keys
- Adjust the volume for ringtones, calls or notifications.
- While using the Camera, gently press a Volume key to take a photo. To take continuous photos, press and hold the Volume key.
- Press the Volume Down key twice to launch the Camera app when the screen is locked or turned off. Press the Volume Up key twice to launch Capture+.
- Power/Lock key
- Briefly press the key when you want to turn the screen on or off.
- Press and hold the key when you want to select a power control option.
- Google Assistant key
- Your device has the Google Assistant built-in. Find answers and get things done while on-the-go. To get started, just tap the Google Assistant key on the side of the phone. Press and hold the key to quickly talk to your Assistant. Press twice to open Visual Snapshot.
- Activate Google Assistant. See the Google Assistant for details.
- Fingerprint sensor
- Turn on the fingerprint recognition feature to simplify the process of unlocking the screen. See Fingerprint recognition overview for details.

- Some functions may be restricted for access, depending on the device specifications.
- The rear of the device includes a built-in NFC antenna. Be cautious when handling the device to avoid damaging or covering the NFC antenna.
- Do not put heavy objects on the device or sit on it. Failure to do so may damage the touch screen.
- Screen-protective film or accessories may interfere with the proximity sensor.
- If your device is wet or is being used in a humid place, the touch screen or buttons may not function properly.
Hold the device correctly as shown below. If you cover the microphone hole with a hand, finger, or protective case while using the device, you may sound unclear during a call.
Good example Bad example
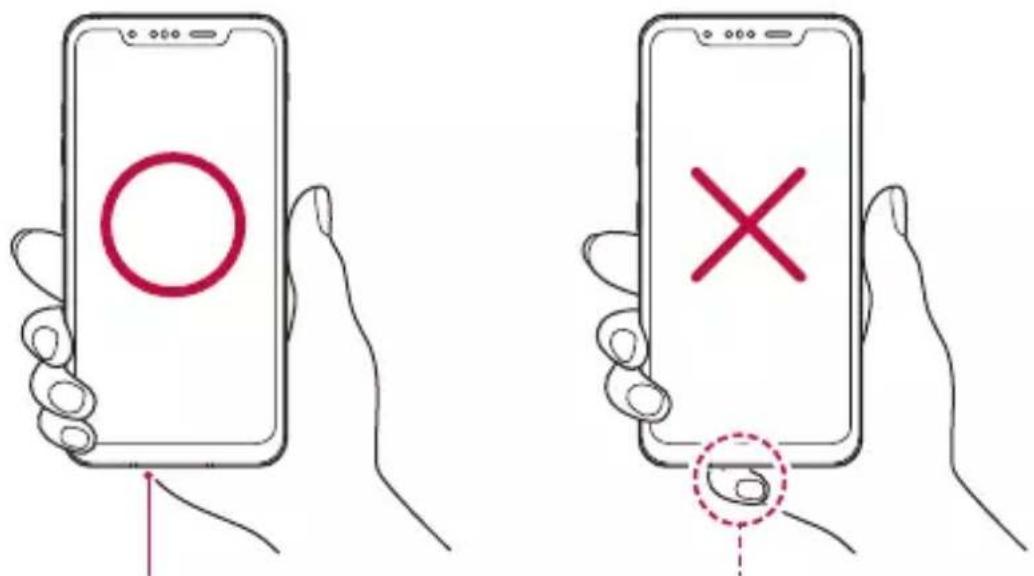
Do not cover the microphone.Microphone
Turning the power on or off
Turning the power on
When the power is turned off, press and hold the Power/Lock key.

- When the device is turned on for the first time, initial configuration takes place. The first booting time for the smart phone may be longer than usual.
Turning the power off
Press and hold the Power/Lock key, then select Power off.
Restarting the device
When the device is not working properly or does not respond, restart it by following the instructions below.
1 Press and hold the Power/Lock key and the Volume Down key at the same time until the power is turned off.
2 When the device is restarted, release the key.
Power control options
Press and hold the Power/Lock key, then select an option.
• Power off: Turn the device off.
• Power off and restart: Restart the device.
Installing the SIM card
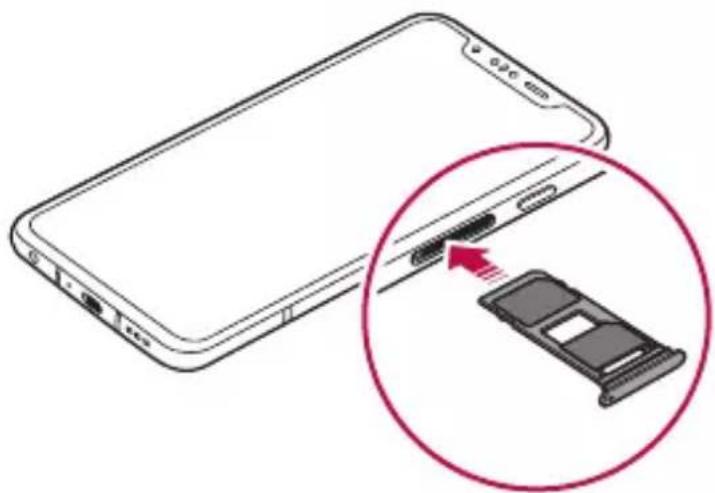
Insert the SIM (Subscriber Identity Module) card provided by your service provider to start using your device.

- Be careful with the ejection pin since it has a sharp edge.

- In order for the water-resistant and dust-resistant features to work effectively, the card tray must be inserted correctly.
1 Insert the ejection pin into the hole on the card tray.
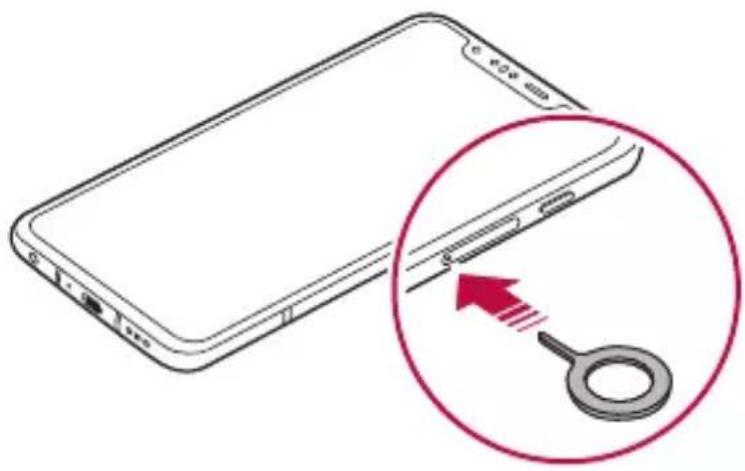
natural_image
Diagram of a smartphone showing the cable being inserted into a key (no text or symbols present)2 Pull out the card tray.
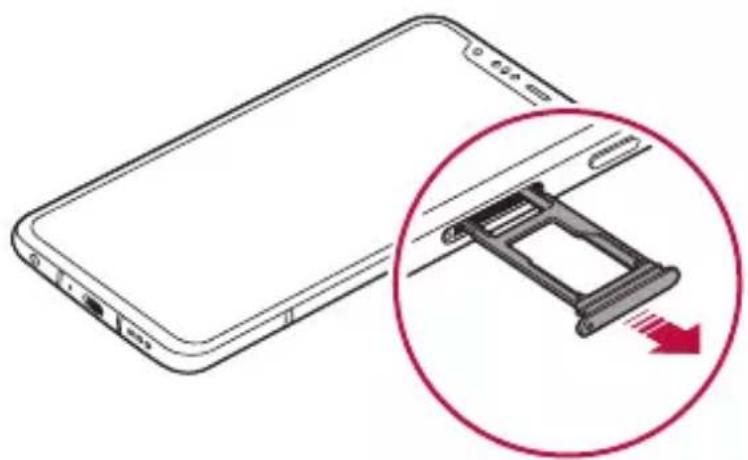
natural_image
Illustration of a smartphone with a magnified inset showing a mechanical component (no text or symbols)3 Put the SIM card on the card tray with the gold-coloured contacts facing downwards. Put the primary SIM card on the SIM card tray 1 and the secondary SIM card on the SIM card tray 2.

- The SIM card tray 2 also serves as the memory card tray. However, you cannot put both the SIM card and the memory card (optional) at the same time.
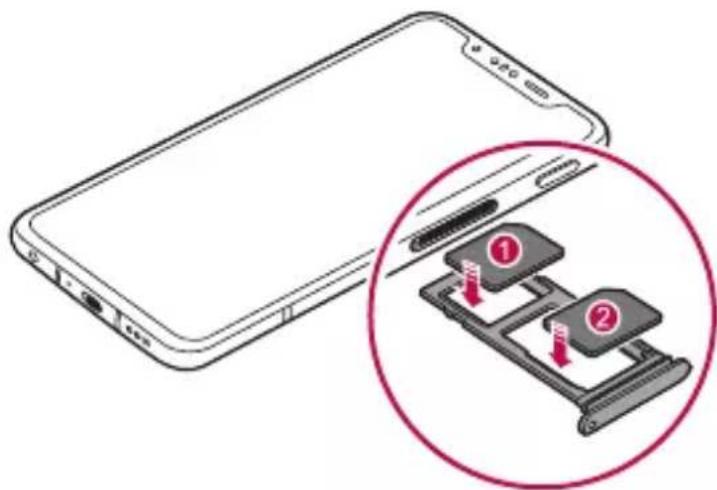
4 Insert the card tray back into the slot.
natural_image
Illustration of a smartphone with an inset showing a cable being inserted into a device (no text or symbols present)
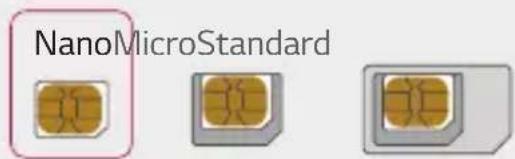
• This device supports only Nano SIM cards.
- For problem-free performance, it is recommended to use the device with the correct type of SIM card. Always use a factory-made SIM card supplied by the operator.
- Do not lose your SIM card. LG is not responsible for damage and other issues caused by loss or transfer of a SIM card.
- Be careful not to damage the SIM card when you insert or remove it.
- When you insert the SIM card or memory card, place it on the card tray correctly.
- When you insert the card tray back into the device, insert it horizontally in the direction of arrow as shown in the figure. Make sure that the card placed on the card tray does not move out of its position.
- Insert the SIM card with the gold-coloured contacts facing downwards.
- Be sure to insert the SIM card into the device by following the instructions in the user manual.
- If you insert to or remove the card tray from the device, be careful not to let water or other liquids enter into the card tray. If a wet card tray or card is inserted into the device, your device may get damaged.
• Memory card is an optional item. - Frequent writing and erasing of data may shorten the memory card lifespan.
- Some memory cards may not be fully compatible with the device. If you use an incompatible card, it may damage the device or the memory card, or corrupt the data stored in it.
Inserting the memory card
Insert the memory card into your device.
The device can support up to a 2 TB microSD card. Depending on the memory card manufacturer and type, some memory card may not be compatible with your device.
1 Insert the ejection pin into the hole on the card tray.
2 Pull out the card tray.
3 Put the memory card on the card tray with the gold-coloured contacts facing downwards.
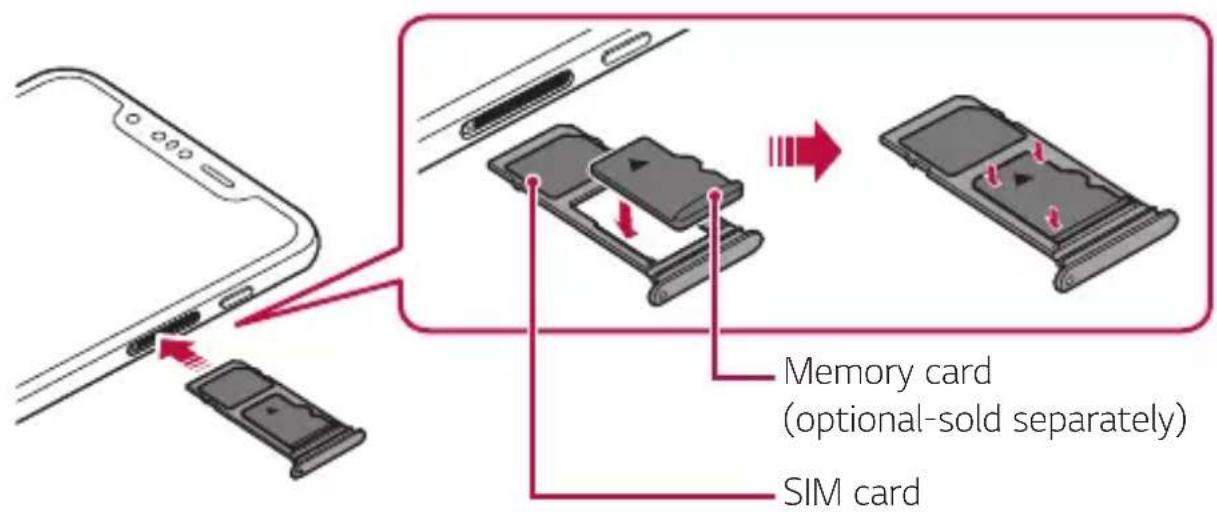
4 Insert the card tray back into the slot.

- Some memory cards may not be fully compatible with the device. If you use an incompatible card, it may damage the device or the memory card, or corrupt the data stored in it.

- Frequent writing and erasing of data may shorten the memory card lifespan.
Removing the memory card
Unmount the memory card before removing it for safety.
1 Tap ○> Settings > Storage > △.
2 Insert the ejection pin into the hole in the card tray and then pull out the card tray from the device.
3 Remove the memory card from the card tray.
4 Insert the card tray back into the slot.

- Do not remove the memory card while the device is transferring or accessing information. This may cause data to be lost or corrupted, or may damage the memory card or the device. LG is not responsible for losses that result from the abuse or improper use of memory cards, including the loss of data.
Battery
Charging the battery
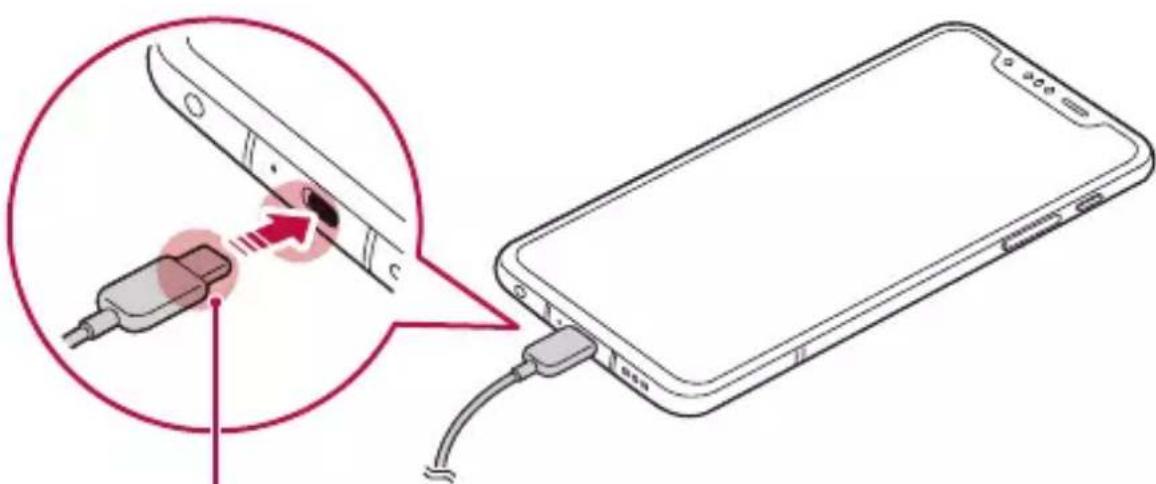
Before using the device, fully charge the battery. Charge the device with the USB Type-C cable.
Charging cable terminal

- Do not use the external terminal, charging cable or gender for the device in presence of moisture. This may cause fire, electric shock, injury, or device malfunction. If there is moisture, stop using the device immediately and remove the moisture completely.
- Make sure to use the USB cable provided with your device.
- Make sure to use an LG-approved charger and charging cable. Charging the battery with a third-party charger may cause the battery to explode or may damage the device.
- Your device has an internal rechargeable battery. For your safety, do not remove the embedded battery.
- Using the device when it is charging may cause electric shock. To use the device, stop charging it.

- Remove the charger from the power socket after the device is fully charged. This prevents unnecessary power consumption.
- A charging adapter that supports fast charging is included with the product.
- The fast charging feature may not work if a fast charging adapter other than the genuine adapter provided with the product is used.
- Another way to charge the battery is by connecting a USB cable between the device and a desktop or laptop computer. This may take a longer time than plugging the adapter to a wall outlet.
- Do not charge the battery by using a USB hub that is unable to maintain the rated voltage. Charging may fail or unintentionally stop.
Precautions when using the device
- Make sure to use the USB cable provided; do not use third party USB cables or chargers with your device. The LG limited warranty does not cover the use of third party accessories.
- Failure to follow the instructions in this guide and improper use may damage the device.
Wireless charging
This device supports wireless charging feature. Charge the device with a Qi certified wireless charger (optional, sold separately).
Charging the battery with a wireless charger
1 Place your device on the centre of the wireless charger aligned with the wireless charging antenna on the back of the device.
- To check the wireless charging antenna area, see Parts overview.
2 When the battery is fully charged, remove the device from the charger.

- When you charge the battery with a wireless charger, do not put a magnetic, metallic or conductive materials between the device and the charger. This may disturb charging or the device and the charger may become heated. In this case, the device, charger or SIM/Memory cards may be damaged.

- If the battery temperature exceeds a certain level while charging the device, charging may be stopped.
- If magnetic, metallic or conductive materials are attached on the back of the device or a protective case is inserted, the device may not charge properly.
- If you charge the battery with a wireless charger in areas where the network signal strength is weak, the network performance of your device may be further degraded.
- Charge the device with a Qi certified wireless charger (optional, sold separately). Because the LG limited warranty does not cover the use of third party accessories, contact the third party manufacturer.
- This product supports wireless charging. Use a Qi certified wireless charger (sold separately) to charge the product. Some coiled wireless chargers may not support wireless charging. Wireless chargers that support EPP (Extended Power Profile) allow high-speed wireless charging.
Using the battery efficiently
Battery lifespan may decrease if you keep many apps and functions running simultaneously and continuously.
Cancel background operations to increase battery life.
To minimise battery consumption, follow these tips:
- Turn off the Bluetooth or Wi-Fi network function when not using them.
- Set the screen timeout to as short a time as possible.
- Minimise the screen brightness.
- Set a screen lock when the device is not used.
- Check the battery level while using any downloaded apps.
Touch screen
You can familiarise yourself with how to control your device by using touch screen gestures.
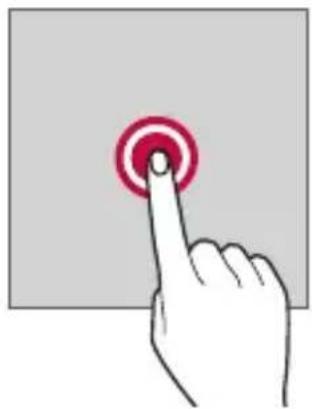
Tapping
Lightly tap with your fingertip to select or run an app or option.

natural_image
Hand pressing a red circular button on a gray background (no text or symbols)Touching and holding
Touch and hold for several seconds to display a menu with available options.
natural_image
Hand pressing a red circular button on a gray background (no text or symbols)Double-tapping
Tap twice quickly to zoom in or out on a web page or map.
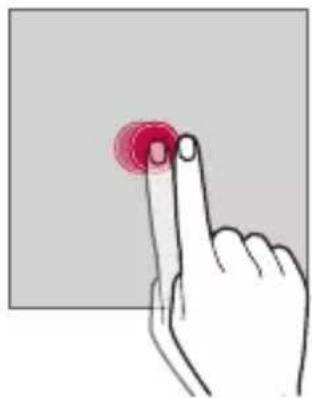
natural_image
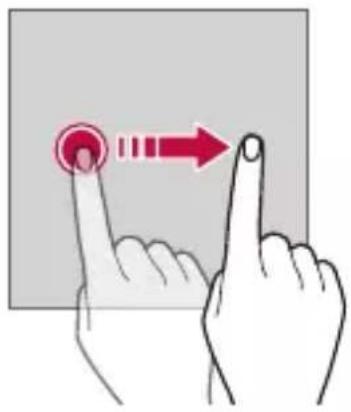
Hand pointing at a red circular button on a gray background (no text or symbols)Dragging
Touch and hold an item, such as an app or widget, then move your finger to another location in a controlled motion. You can use this gesture to move an item.
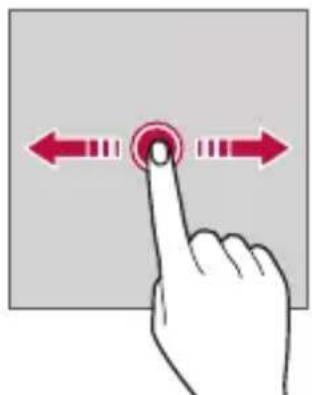
natural_image
Hand pointing at a button with bidirectional arrows indicating left and right motion (no text or symbols)Swiping
Touch the screen with your finger and move it quickly without pausing. You can use this gesture to scroll through a list, a web page, photos, screens, and more.
Pinching and spreading
Pinch two fingers to zoom out such as on a photo or map. To zoom in, spread your fingers apart.

natural_image
Hand holding a finger with red arrows indicating movement or force direction (no text or symbols)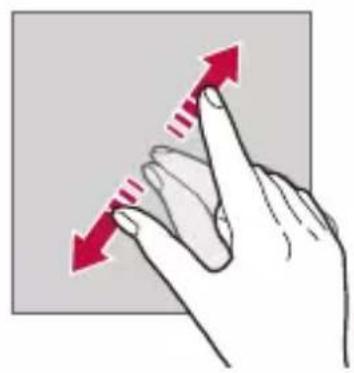
natural_image
Hand pointing upward with red arrows indicating movement (no text or symbols)
- Do not expose the touch screen to excessive physical shock. You might damage the touch sensor.

- A touch screen failure may occur if you use the device near a magnetic, metallic or conductive material.
- If you use the device under bright lights, such as direct sunlight, the screen may not be visible, depending on your position. Use the device in a shady location or a location with an ambient light that is not too bright and bright enough to read books.
- Do not press the screen with excessive force.
• Gently tap with your fingertip on the option you want. - Touch control may not work properly if you tap while wearing a glove or by using the tip of your fingernail.
- Touch control may not work properly if the screen is moist or wet.
- The touch screen may not function properly if a screen-protective film or accessory purchased from a third party store is attached to the device.
- Displaying a static image for extended periods of time may result in after-images or screen burn-in. Turn off the screen or avoid displaying the same image for a long time when you do not use the device.
Home screen
Home screen overview
The Home screen is the starting point for accessing various functions and apps on your device. Tap ○ on any screen to directly go to the Home screen.
You can manage all apps and widgets on the Home screen. Swipe the screen left or right to view all installed apps at a glance.
Home screen layout
You can view all apps and organise widgets and folders on the Home screen.
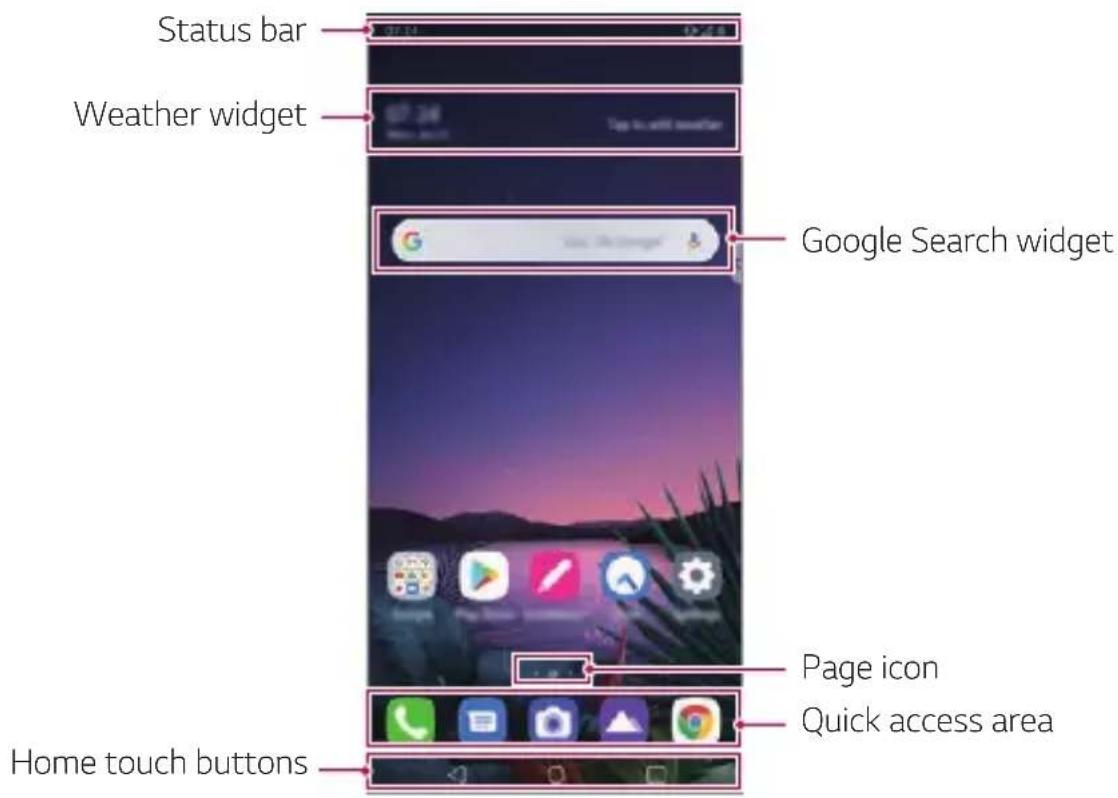

- The Home screen may differ depending on the manufacturer policy, user settings, software version or service provider.
- Status bar: View status icons, the time and the battery level.
- Weather widget: View the information of weather and time for a specific area.
- Google Search widget: Type or speak to pull open Google Search.
- Page icon: Display the total number of Home screen canvases. You can tap the desired page icon to go to the page you selected. The icon reflecting the current canvas will be highlighted.
- Quick access area: Fix main apps at the bottom of the screen so that they can be accessed from any Home screen canvas.
• Home touch buttons
- ◀: Return to the previous screen. Close the keypad or pop-up windows.
- ○: Tap to go to the Home screen. To launch Google Assistant, touch and hold.
- □: Tap to view a list of recently used apps or run an app from the list. To delete all the recently used apps, tap Clear all.
Changing the style of the Home touch buttons
You can change the style of the Home touch buttons.
1 Tap ○> Settings > Display > Navigation bar.
2 Under STYLE, select Gestures, Gesture and Buttons or Buttons only to suit your preferences.
• Gestures: To see recent apps, swipe the Home button—up.
- Gesture and buttons: Back button < and Home button care available. To see recent apps, swipe the Home button ○ up.
- Buttons only: ◀ / / are available. Tap to see recent apps.
Editing the Home touch buttons
You can rearrange the Home touch buttons or add frequently used functions to the Home touch buttons area.
Tap ○ > Settings > Display > Navigation bar > Button combination and customise the settings.
- Several functions, including Notification and Capture+ are provided. A maximum of two additional items can be added.
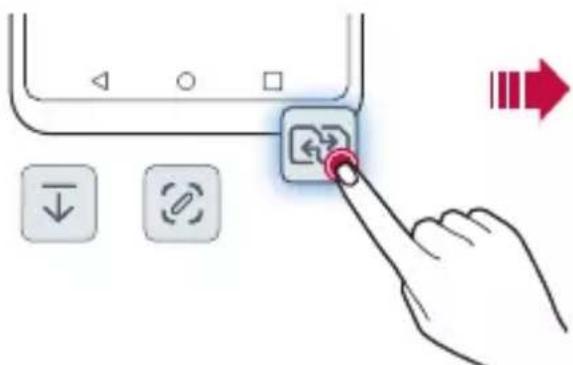
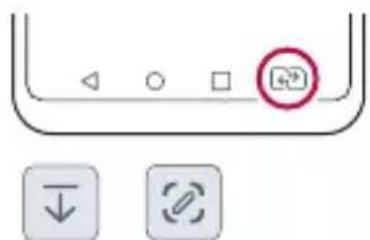
Lock/hide icon
The icon to lock or hide the Home touch buttons appears at the bottom left of the screen.
If you want to lock the Home touch buttons while hiding the buttons, tap □ on the left of the Home touch buttons.
To hide the Home touch buttons again, double-tap ■.

- Some features may not be supported while hiding the Home touch buttons.
Status icons
When there is a notification for an unread message, calendar event or alarm, the status bar displays the corresponding notification icon. Check your device's status by viewing notification icons displayed on the status bar.
| No signal | |
| Data is being transmitted over the network | |
| Alarm is set | |
| Vibrate mode is on | |
| Bluetooth is on | |
| Connected to a computer via USB | |
| Battery level | |
| Airplane mode is on | |
| Missed calls | |
| Wi-Fi is connected | |
| Mute mode is on | |
| GPS is on | |
| Hotspot is on | |
| No SIM card | |
| The NFC mode is on |

- Some of these icons may appear differently or may not appear at all, depending on the device's status. Refer to the icons according to the actual environment and area in which you are using the device and your service provider.
- Displayed icons may vary, depending on the area or service provider.
Notifications panel
You can open the notifications panel by dragging the status bar downward on the main screen.
- You can drag down the notice window or tap the arrow icon to open the list of quick setting icons.
- You can tap 🔔 to add, delete or arrange icons in the notice window.
- If you touch and hold the icon, the settings screen for the corresponding function appears.

- You can use the notifications panel even on the lock screen. Drag the notifications panel while the screen is locked to quickly access the desired features.
Switching the screen orientation
You can set the screen orientation to automatically switch according to the device's physical orientation.
On the notification panel, tap Rotation from the quick access icon list.
You can also tap ○ > Settings > Display and activate Auto-rotate screen.

natural_image
Split image showing a coastal cliff with green vegetation on the left and a coastal cliff with rocky outcrops on the right, both sharing a red double-headed arrow (no text or symbols)Editing the Home screen
On the Home screen, touch and hold on an empty space, then select the desired action from below.
- To rearrange the Home screen canvases, touch and hold on a canvas, then drag it to another location.
- To add a widget to the Home screen, touch and hold on a blank area of the Home screen, then select Widgets.
- To change wallpapers, themes, icons, and AOD, touch and hold on a blank area of the Home screen, then select Wallpaper & theme. You can also tap > Settings > Display > Wallpaper & theme, then select wallpapers, themes, icons, and AOD to apply to the device.
- To configure the Home screen settings, touch and hold on a blank area of the Home screen, then select Home screen settings. See Home screen settings for details.
- To view or reinstall the uninstalled apps, touch and hold on a blank area of the Home screen, then select App trash. See App trash for details.
- To change the default screen, touch and hold on a blank area of the Home screen, move to desired screen, tap 🔒, then tap the screen once more.
Default screen
Viewing the background theme
You can view only the background image by hiding the apps and widgets on the Home screen.
Spread two fingers apart on the Home screen.
- To return to the original screen, which displays apps and widgets, pinch your fingers on the Home screen or tap ◀.
Moving apps on the Home screen
On the Home screen, touch and hold an app, then drag it to another location.
- To keep frequently used apps at the bottom of the Home screen, touch and hold an app, then drag it to the quick access area at the bottom.
- To remove an icon from the quick access area, drag the icon to the Home screen.
Using folders from the Home screen
Creating folders
On the Home screen, touch and hold an app, then drag it over another app.
- A new folder is created and the apps are added to the folder.
Editing folders
On the Home screen, tap a folder and do one of the following actions.
• To edit the folder name and colour, tap the folder name.
- To add apps, touch and hold an app, then drag it over the folder and release it.
- To remove an app from the folder, touch and hold the app and drag it to outside the folder. If the removed app is the only one app that existed in the folder, the folder is removed automatically.
- You can also add or remove apps after tapping⊕ in the folder.

- You cannot change the folder colour while using downloaded theme.
Home screen settings
You can customise the Home screen settings.
1 Tap ○> Settings > Display > Home screen.
2 Customise the following settings:
- Select Home: Select a Home screen mode.
- Wallpaper: Change the Home screen background wallpaper.
- Screen swipe effect: Select an effect to apply when the Home screen canvas switches.
- Icon shape: Choose if you want icons to have square or rounded corners.
- Left Home screen: Select what to display on the screen located left to the main Home screen.
- Sort apps by: Set how apps are sorted on the Home screen.
- Grid: Change the app arrangement mode for the Home screen.
- Hide apps: Select which apps you want to hide from the Home screen.
- Loop Home screen: Enable to allow continuous Home screen scrolling (loop back to first screen after the last screen).

- This function is available when Google feed is enabled.
- Search: Search by swiping down on the Home screen.
- Home screen lock: Enable to prevent apps and widgets from being rearranged or removed.
Screen lock
Screen lock overview
Your device's screen turns off and locks itself if you press the Power/Lock key. This also happens after the device is left idle for a specified period of time.
If you press the Power/Lock key when a screen lock is not set, the Home screen appears immediately.
To ensure security and prevent unwanted access to your device, set a screen lock.

- A screen lock prevents unnecessary touch input on the device screen and reduces battery consumption. We recommend that you activate the screen lock while not using the device.
Setting a screen lock
There are several options available for configuring the screen lock settings.
1 Tap ○> Settings > Lock screen & security > Select screen lock and then select the method you prefer.
2 Customise the following settings:
• None: Deactivate the screen lock function.
- Swipe: Swipe on the screen to unlock the screen.
- Knock Code: Tap the screen in a pattern to unlock the screen.
- Pattern: Draw a pattern to unlock the screen.
• PIN: Enter a numeric password to unlock the screen.
- Password: Enter an alphanumeric password to unlock the screen.
- Fingerprints: Unlock the screen by using your fingerprint.
- Allow Face Unlock: Unlock the screen by allowing the device to recognise your face.
- Allow Hand ID: Unlock the screen by allowing the device to recognise your hand ID.

- If you incorrectly attempt to unlock the device 5 times, the screen is blocked for 30 seconds.
Secure start-up settings
When you select Knock Code, Pattern, PIN or Password as a screen lock method, you can configure your device to be locked whenever turning on the device in order to secure your data.
- You cannot use all functions, except for emergency calls until you unlock the device.
- If you forget your decryption password, you cannot restore encrypted data and personal information.
Precautions for the secure start-up feature
- If you forget your decryption password, you cannot restore encrypted data and personal information.
- Be sure to keep your screen lock passwords separately.
- If you enter the screen lock passwords incorrectly more than the specified times, the device automatically resets itself and the encrypted data and your personal information are deleted automatically and they cannot be restored.
- Be cautious not to enter incorrect screen lock passwords more than the specified times.
- When you turn on the device right after the device resets, encryption also starts. If you stop the encryption arbitrarily, the data may be damaged. Be sure to wait until the reset is completed.
Customise Lock screen
You can customise lock screen.
1 Tap ○> Settings> Lock screen & security> Customize Lock screen.
2 Select a function you want to set.
- Wallpaper: Allow you to set the background for your Lock screen.
- Clock: Allow you to set where to position the clock on the Lock screen.
- Shortcuts: Allow you to choose apps to run on your Lock screen. This setting appears only when a screen lock is set.
- Weather animation: Enable this option to display weather animations for the current location on the Lock screen.
- Contact info for lost phone: Allow you to set text to be displayed on the Lock screen to identify the phone's owner.
Secure lock settings
You can set secure lock settings.
1 Tap ○> Settings> Lock screen & security> Secure lock settings.
2 Select a function you want to set.
- Make pattern visible: Allow you to make pattern visible.
- Lock timer: Allow you to set the amount of time before the screen automatically locks after the backlight turns off (time-out due to inactivity).
- Power key instantly locks: Enable this option to instantly lock the screen when the Power/Lock button is pressed. This setting overrides the Security Lock timer setting.
- Show lockdown option: Allow you to show power menu option to turn off Lock screen notifications, Smart Lock and biometric locks.
- Smart Lock: Allow you to set trusted devices, places, voice, and/or on-body detection that will allow your phone to remain unlocked.

- Menus you can set may be different depending on lock screen methods you choose.
KnockON
You can turn the screen on or off by double-tapping the screen.

- This option is available only on the Home screen provided by LG. It may not function properly on a custom launcher or on the Home screen installed by the user.
- When tapping the screen, use your fingertip. Do not use a fingernail.
- To use the KnockON feature, make sure that the proximity/light sensor is not blocked by a sticker or any other foreign substance.
Turning the screen on
Double-tap the middle of the screen.
- Tapping the top or bottom of the screen may decrease the recognition rate.
Turning the screen off
Double-tap on an empty space on the Home screen and Lock screen. You can also double-tap an empty space on the status bar.
Disable KnockON
If you don't want to use the KnockON function, set as follows:
Tap ○ > Settings > Extensions > KnockON and drag it to disable the function.
Knock Code
You can unlock the screen by creating your own Knock Code. When the screen is locked, you can directly access the Home screen by tapping the screen in a specified sequence.

- You can use your Knock Code together with the KnockON feature.
- Make sure to use your fingertip when tapping the screen.
Creating a Knock Code
1 Tap ○> Settings > Lock screen & security > Select screen lock > Knock Code.
2 Tap the squares in a pattern of your choice to create a Knock Code and tap Next.
3 Input the created Knock Code again for verification, then tap Confirm.
Unlocking the screen with a Knock Code
Unlock the screen by inputting the Knock Code you have created.
You can also input your Knock Code on the touch screen when the screen is turned off.
- It is also possible to enter a Knock Code when the lock screen is turned on.
Memory card encryption
You can encrypt and protect data saved on the memory card. The encrypted data in the memory card cannot be accessed from another device.
1 Tap ○> Settings> Lock screen & security> Encryption & credentials> Encrypt SD card.
2 Read the on-screen overview of memory card encryption and then tap Continue to continue.
3 Select an option and tap Encrypt now.
- New data encryption: Encrypt only data that is saved on the memory card after encryption.
• Full encryption: Encrypt all the data currently saved on the memory card.
- Exclude media files: Encrypt all files, except for media files such as music, photos and videos.

- Once memory card encryption starts, some functions are not available.
- If the device is turned off while encryption is underway, the encryption process will fail, and some data may be damaged. Therefore, be sure to check if the battery level is sufficient before starting encryption.
- Encrypted files are accessible only from the device where the files were encrypted.
- The encrypted memory card cannot be used on another LG device. To use the encrypted memory card on another mobile device, format the card.
- You can activate memory card encryption even when no memory card is installed into the device. Any memory card that is installed after encryption will automatically be encrypted.
Taking screenshots
You can take screenshots of the current screen you are viewing.
Via a shortcut
Press and hold the Power/Lock key and the Volume Down key at the same time for at least two seconds.
- Screenshots can be viewed from the Screenshots folder in the Gallery.
Via Capture+
On the screen where you want to take a screenshot, drag the status bar downwards, then tap [O].

- When the screen is turned off or locked, you can access Capture+ by pressing the Volume Up key twice. To use this feature, tap> Settings > Extensions > Shortcuts and turn on Open Capture+.
• See Writing notes on a screenshot for details.
Entering text
Using the Smart toolbar
You can use various keyboard input methods in one place. You can select the desired input method from the top of the keyboard.
1 Select the desired keyboard input method from the Smart toolbar.
2 Tap and select the input method you want to show on the Smart tool, or reorganise them.
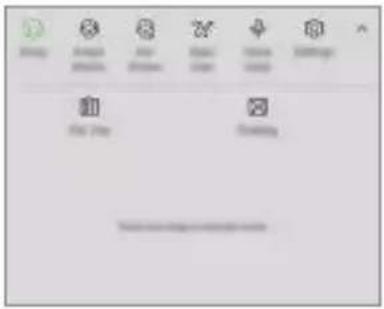

- LG keyboard is not default on your phone. You can change it from the keyboard settings.
- Some supporting input methods may differ depending on the device you have.
- You can turn on or off the Smart tool feature from the keyboard settings.
-
You can also use the keyboard input methods by tapping
-
Add emojis.
• : Add avatar stickers.
• : Add ani-stickers.
• Tap to enter text with your voice.
- To maximise the voice command recognition, speak clearly.
- To enter text with your voice, make sure that your device is connected to a network.
- To select the language for voice recognition, tap >Languages on the voice recognition screen.
- This function may not be supported, or the supported languages may differ depending on the service area.
• :Access keyboard settings.
• : Open the clip tray. See Clip Tray for details
• :Activate floating keyboard when you use the Multi-window feature. You can also move the keyboard to the desired location.
Using the Smart keyboard
You can use the Smart keyboard to enter and edit text.
With the Smart keyboard, you can view text as you type without bothering to alternate between the screen and a conventional keyboard. This allows you to easily find and correct errors when typing.
Moving the cursor
With the Smart keyboard, you can move the cursor to the exact position you want. When typing text, touch and hold on the space bar and then drag left or right.
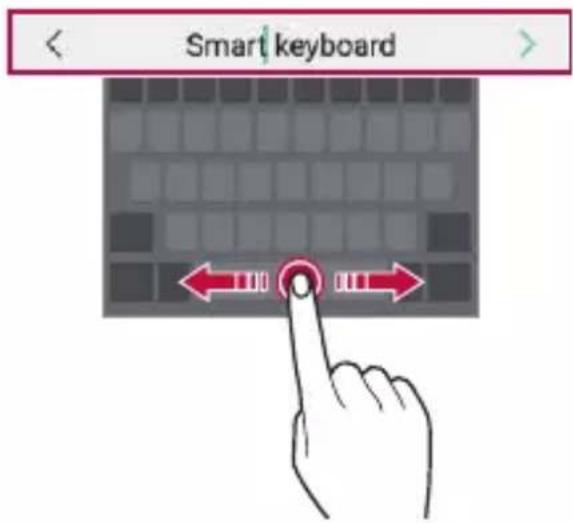

• This option is available only on the QWERTY keyboard.
Suggesting words
Smart keyboard automatically analyses your usage patterns to suggest frequently used words as you type. The longer you use your device, the more precise the suggestions are.
Enter text, then tap a suggested word or gently drag the left or right side of the keyboard upwards.
- The selected word is automatically entered. You do not need to manually type every letter of the word.
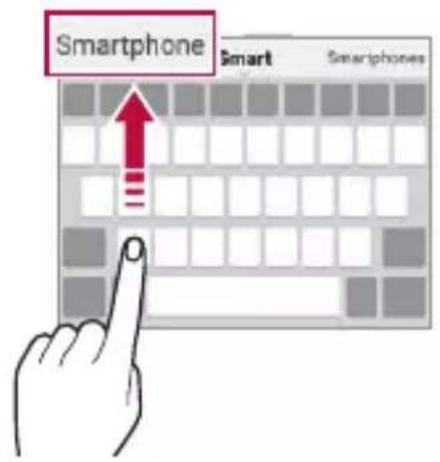
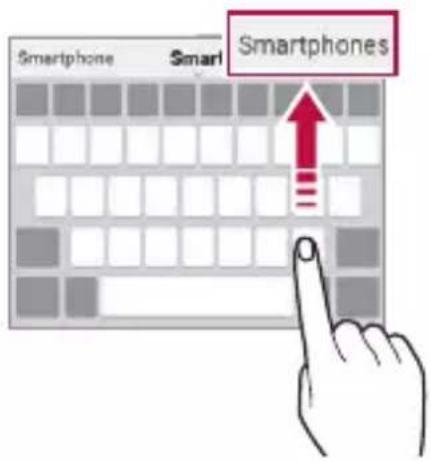
Adding languages to the keyboard
You can make additional languages available for keyboard input.
1 Tap ○> Settings > System > Language & keyboard > Manage > Keyboards > LG Keyboard > Language & keyboard layout > Select languages.
2 Select the languages you want to make available.
Copy and Paste
You can cut or copy text from an app, and then paste the text into the same app. Or, you can run other apps and paste the text into them.
1 Touch and hold around the text you want to copy or cut.
2 Drag ♦ to specify the area to copy or cut.
3 Select either Cut or Copy.
- Cut or copied text is automatically added to the clip tray.
4 Touch and hold the text input window, then select Paste.

- If there is no item that has been copied or cut, the Paste option will not appear.
Clip Tray
If you copy or cut an image or text, it is automatically saved to the clip tray and can be pasted to any space at any time.
1 On the Smart tool, select
You can also touch and hold the text input window, then select Clip Tray.
2 Select and paste an item from the clip tray.
- A maximum of 20 items can be saved to the clip tray.
- Tap 🔊 to lock saved items in order not to delete them, even when the maximum quantity is exceeded. A maximum of ten items can be locked. To delete locked items, unlock them first.
- Tap ☐ to delete the items saved to the clip tray.

- The clip tray may not be supported by some downloaded apps.
Content sharing
Playing content from another device
You can play photos, videos or songs saved on your device from a TV.
1 Connect the TV and your device to the same Wi-Fi network.
2 While viewing the items from the Gallery or Music app, tap : > Play on other device.
Or tap ○>Settings >Connected devices >Screen sharing and then tap ○ to activate it.
3 Select the TV you want to connect to.

- For use with Chromecast, Google Play services should be up to date.
Viewing content from nearby devices
You can view content from various devices, such as a computer, NAS or mobile device, by using the Gallery or Music apps.
Tap ○> Settings> Connected devices> Media server and then tap Content sharing to activate it.
Connecting the devices
Connect both your device and another device that support DLNA function to the same wireless network.

- Make sure that File sharing (DLNA) is activated on both the device and the connected device.
Searching for nearby devices
You can view a list of DLNA devices on the same network by selecting the Nearby devices menu in each app.
Use content from nearby devices as if you were using it on your device.
Sending or receiving files
You can share files between your device and another LG device, or a tablet or computer.
Sending files
From the Gallery or File Manager app, tap : > Share or ✉ then select a device on the file sharing list.
Receiving files
Drag the status bar downward and then tap File sharing.
If your device does not support the file sharing feature, tap ○>Settings >Connected devices >File sharing >SmartShare Beam

- Make sure that your device is connected to the same wireless network as the file transfer target device.
- Make sure that File sharing is activated on both the device and the target device.
Viewing content from your cloud
You can directly view the content saved on your cloud account, without downloading it to your device.
1 From the Gallery or Music app, select : > Cloud.
Or from the File Manager app, select ≡>Cloud.
2 Select a cloud account and sign in.
3 Save or play content in your cloud.
Do not disturb
You can limit or mute notifications to avoid disturbances for a specific period of time.
Tap ○ > Settings > Sound > Do not disturb.
• Mode and select the mode you want:
- Priority only: Receive sound or vibrate notifications for the selected apps. Even when Priority only is turned on, alarms still sound.
- Total silence: Disable both the sound and vibration.
- Select priorities: Receive alarms and the notifications for the selected apps.
- Calls from: Set up a range of notifications when receiving a call.

- Repeated calls: Second call from same caller within 15 min is not silenced.
- Messages from: Set up a range of notifications when receiving a message.
- Use Do not disturb: Turn on the Do not disturb feature.
- SCHEDULE: Set the schedule for which you want to turn on the Do not disturb feature.
• Help: View the help for Do not disturb.
03
Useful Apps
Installing and uninstalling apps
Installing apps
Access an app store to search and download apps.
- You can use SmartWorld, Play Store or the app store provided by your service provider.

- Some app stores may require you to create an account and sign in.
• Some apps may charge fees. - If you use mobile data, you may be charged for data usage, depending on your pricing plan.
• SmartWorld may not be supported depending on the area or service provider.
Uninstalling apps
Uninstall apps that you no longer use from your device.
Uninstalling with the touch and hold gesture
Press and hold any empty area on the screen, and then press of the app you want to delete.
- If apps were uninstalled within 24 hours from now, you can reinstall them. See App trash for details.
Uninstalling by using the settings menu
Tap ○ > Settings > Apps & notifications > App info, select an app, then tap Uninstall.

- Some apps cannot be uninstalled by users.
Uninstalling apps from the app store
To uninstall an app, access the app store from which you download the app and uninstall it.
Installing and uninstalling apps during the setup
When you turn on the device for the first time, you can download recommended apps.
You can skip to the next step without installation.
App trash
You can view the uninstalled apps on the Home screen. You can also reinstall apps which were uninstalled within 24 hours from now.
1 Tap ○ > Management > App trash.
You can also touch and hold an empty area of the Home screen, then tap App trash.
2 Activate the desired function:
- Restore: Reinstall the selected app.
- Remove the uninstalled apps permanently from the device.

- Uninstalled apps are automatically removed from the device 24 hours after they were uninstalled. If you want to reinstall the uninstalled apps, you must download them again from the app store.
- This feature is activated on the default Home screen only. If you uninstall apps while using the EasyHome screen or other launcher, they are immediately and permanently removed from the device.
App Shortcuts
On the Home screen, touch and hold an app icon such as Call, Message, Camera, Gallery and Settings to display a quick access menu. Use apps more easily through App Shortcuts.
- Tap ⓘ to check the app information.
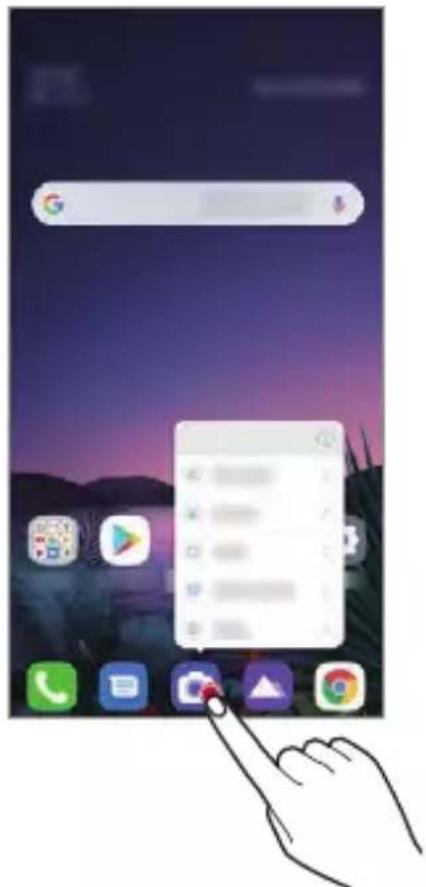

• This feature is available only on some apps.
Phone
Voice call
Make a phone call by using one of the available methods, such as manually entering a phone number and making a call from the contact list or the list of recent calls.
Making a call from the keypad
1 Tap > Dial.
2 Make a call by using a method of your choice:
- Enter a phone number and tap 📞.
- Touch and hold a speed dial number.
- Search for a contact by tapping the initial letter of a contact name in the contact list, and then tap 📞.

- To enter "+" when making an international call, touch and hold number 0.
- See Adding contacts for details on how to add phone numbers to the speed dial list.
Making Calls from Contacts
1 O> Contacts.
2 After selecting the number you want to call from the list of contacts, tap 📞.
Answering a call
To answer a call, drag on the incoming call screen.
- When the stereo headset is connected, you can make calls by using the call/end button on the headset.
- To end a call without turning off the screen, tap ○ >Settings > Network & internet >Call >Answer and end calls and then activate End call with the Power key.
- If you enable Settings > Network & internet > Call > Answer and end calls > End call with the Power key, you can end a call by pressing the Lock/Power key while the call-in-process screen is turned on.
Rejecting a call
To reject an incoming call, drag across the incoming call screen.
- To send a rejection message, drag the rejection message option across the screen.
- To add or edit a rejection message, tap○>Settings >Network & internet >Call >Call blocking & Decline with message >Decline with message.
- When a call is coming in, press the Volume Up, Volume Down or Power/Lock key to mute ringtone or vibration, or to hold the call.
Checking an incoming call while using an app
When a call comes in while using an app, a pop-up notification can be displayed at the top of the screen. You can receive the call, reject the call, or send message from the pop-up screen.

- Tap ○ > Settings > Network & internet > Call > Additional settings > Show voice calls while in an app and then select the desired way you would like to display the incoming call while using an app.
- Floating bar must be enabled if you want to check the calls received using the floating bar while using an app. For more details, refer to the Floating Bar overview.
Viewing missed calls
If there is a missed call, the status bar at the top of the screen displays To view missed call details, drag the status bar downwards. You can also tap ○> Call logs.
Functions accessible during a call
During a call, you can access a variety of functions by tapping the on-screen buttons:
- Contacts: View the contact list during a call.
- Hold: Hold a call.
• Dialpad: Display or hide the dial pad. - Speaker: Turn on the speakerphone function.
- Mute: Mute your voice so that your voice cannot be heard by the other party.
- Bluetooth: Switch the call to a Bluetooth device that is paired and connected.
• :End a call.
• ☐: You can switch to video call from a voice call.
• : Access additional call options.

• Available settings items may vary depending on the area or service provider.
Making a three-way calling
You can make a call to another contact during a call.
1 During a call, tap : Add call.
2 Enter a phone number and tap
- The two calls are displayed on the screen at the same time, and the first call is put on hold.
3 To start a conference call, tap Merge calls.

- You may be charged a fee for each call. Consult with your service provider for more information.
Viewing call records
To view recent call records, tap ○> > Call logs. Then, you can use the following functions:
- To view detailed call records, select a contact. To make a call to the selected contact, tap 📞.
• To delete call records, tap: >Delete.

- The displayed call duration may differ from the call charge. Consult with your service provider for more information.
• The deleted call history can not be restored. - Pinch two fingers or spread your fingers apart to adjust the font size of call logs or contacts.
Configuring call options
You can configure various call options.
1 Tap ○> > Dial or Call logs.
2 Tap : > Call settings and then configure the options to suit your preferences.
Messaging
Sending a message
You can create and send messages to your contacts using the Messaging app.

- Sending messages abroad may incur additional charges. Consult with your service provider for more information.
1 TapO>
2 Tap
3 Specify a recipient and create a message.
• To use multimedia options, tap
• To access optional menu items, tap :.
4 Tap▶to send the message.
Reading a message
You can view exchanged messages organised by contact.
1 TapO>
2 Select a contact from the message list.
Configuring messaging settings
You can change messaging settings to suit your preferences.
1 TapO>
2 Tap : > Settings from the message list.
Camera
Starting the camera
You can take a photo or record a video to cherish all of your memorable moments.
Tap >

- Before taking a photo or recording a video, wipe the camera lens with a soft cloth.
- Be careful not to stain the camera lens with your fingers or other foreign substance.
- Images included in this user guide may be different from the actual device.
- Photos and videos can be viewed or edited from the Gallery. See Gallery overview for details.
Auto mode
You can take photos or record videos by selecting a variety of camera modes and options.
1 Tap ○> , then tap Photo.
2 To take a photo, tap . To record a video, tap .
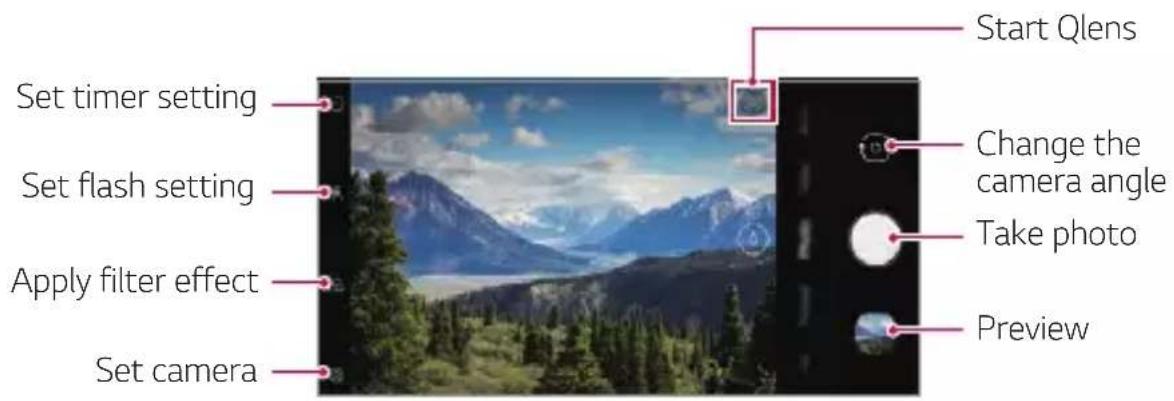
Taking a photo
1 Select a camera mode and tap the subject to focus the camera on.
2 Tap to take a photo.
- You can also press the Volume Down or Volume Up key to take a photo.

- When the screen is turned off or locked, start the camera by pressing the Volume Down key twice. Tap >Settings Extensions >Shortcuts and then tap Open Camera to activate it.
Recording a video
1 Tap ○> □> Video and tap the subject to focus on.
2 Tap to record a video.
• To take a photo while recording a video, tap.
- To pause the video recording, tap. To resume the video recording, tap.
- While recording a video, you may spread or pinch two fingers to zoom in or out.
- While recording a video, you may tap the desired area to adjust the brightness.
- You can switch to and from the front camera and rear camera while recording a video by pressing 🔒.
3 Tap to end the video recording.
Customising the camera options
You can customise a variety of camera options to suit your preferences.
Tap 🎨 on the screen.

• Available options vary depending on the selected camera (front or rear camera) and the selected camera mode.
• Take a photo in FullVision.
• :Select values for aspect ratio and size for taking photos.
• ☐: Select values for resolution and size for recording videos.
| Tips | Allow you to know when someone's eyes are closed or if a photo is blurry. |
| Vision search | When associated info is found in Auto mode, QLens or Google Lens will be used. |
| HDR | Obtain photos in vivid colours and get compensated effects even when they are taken against the light. These functions are provided by the high dynamic range (HDR) technology equipped in the camera. |
| Steady recording Minimise motion blur while recording a video. | |
| Live photo Record the action before and after you take a photo. | |
| Cheese shutter Take photos with voice commands. | |
| Tracking focus | Enable the camera to remain focused on the subject you touch on the screen, even if the subject is moving. (Available when the Standard camera is in use.) |
| Tag locations Save the image with GPS location data. | |
| Grid | Display guide grids so that you can take photos or record videos based on the horizontal and vertical reference lines. |
| Add signature Display a personalised signature on the photos. | |
| Storage | Select if you want to store the pictures and videos in the Internal storage or SD card. (Available when a memory card is inserted.) |
| Help Provide Help for each camera menu. | |
Additional options on the front camera
| Tips | Allow you to know when someone's eyes are closed or if a photo is blurry. |
| Selfie shot | Take a selfie by selecting its option betweenGesture shotandAuto shot. |
| Save as flipped Save as flipped images after taking selfies. | |
Mode Selection
You can conveniently select from the modes displayed on the screen which are selected to suit the shooting environment.
Tap ○ >, then tap More.
- You can change the order of the scene modes by moving the scene mode icon while pressing and holding the icon.
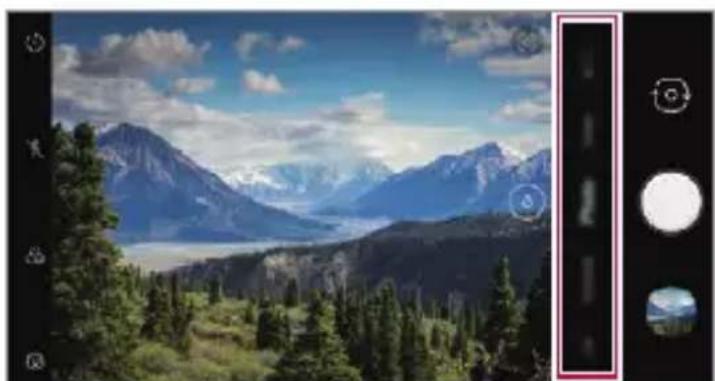
natural_image
Scenic mountain landscape with snow-capped peaks and evergreen trees, framed by a camera lens (no text or symbols visible)Night view
You can take vivid and clear night photos. While taking a photo, hold the device steady. You can adjust photo brightness by dragging the slide bar up or down.
1 Tap ○> , then tap More>
2 To take a photo, tap.
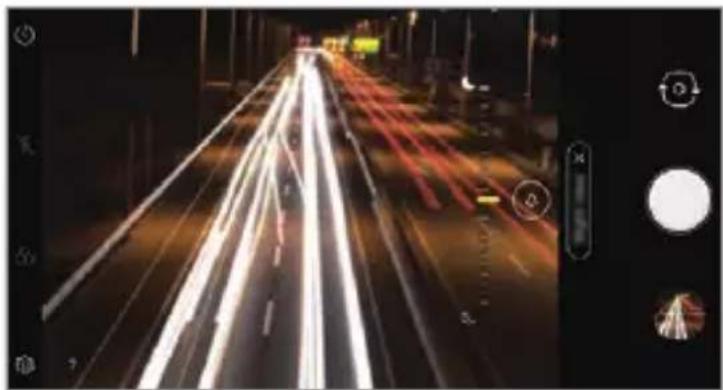
natural_image
Nighttime highway with light trails from multiple lanes, captured via a camera interface (no visible text or symbols)Panorama
You can create a panoramic photo by moving the camera in one direction to photograph and stitch continuous shots of a wide view.
1 Tap ○> , then tap More>
2 Tap and then slowly move the camera in one direction.
- Move the device by following the direction of the arrow in the guideline.
3 Tap to stop capturing the panoramic.
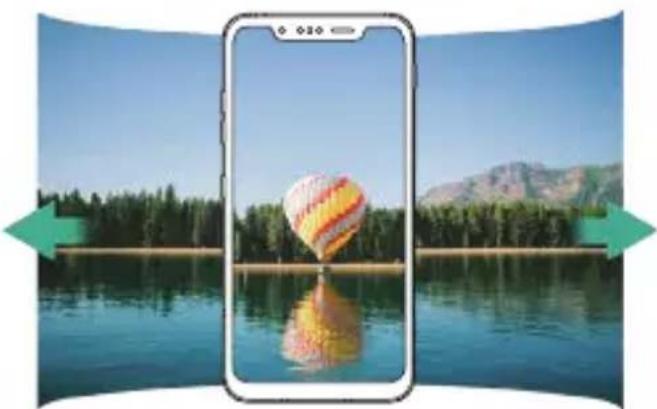
natural_image
Smartphone displaying a hot air balloon over a lake with forest and mountains in the background (no text or symbols visible)Story Shot
You can immediately composite photos taken from the rear camera and the front camera.
1 Tap ○> , then tap More>
2 Tap to take photos.
• Take a photo that will serve as the background of the composite image.
• After a short while, the front camera will automatically take a photo.
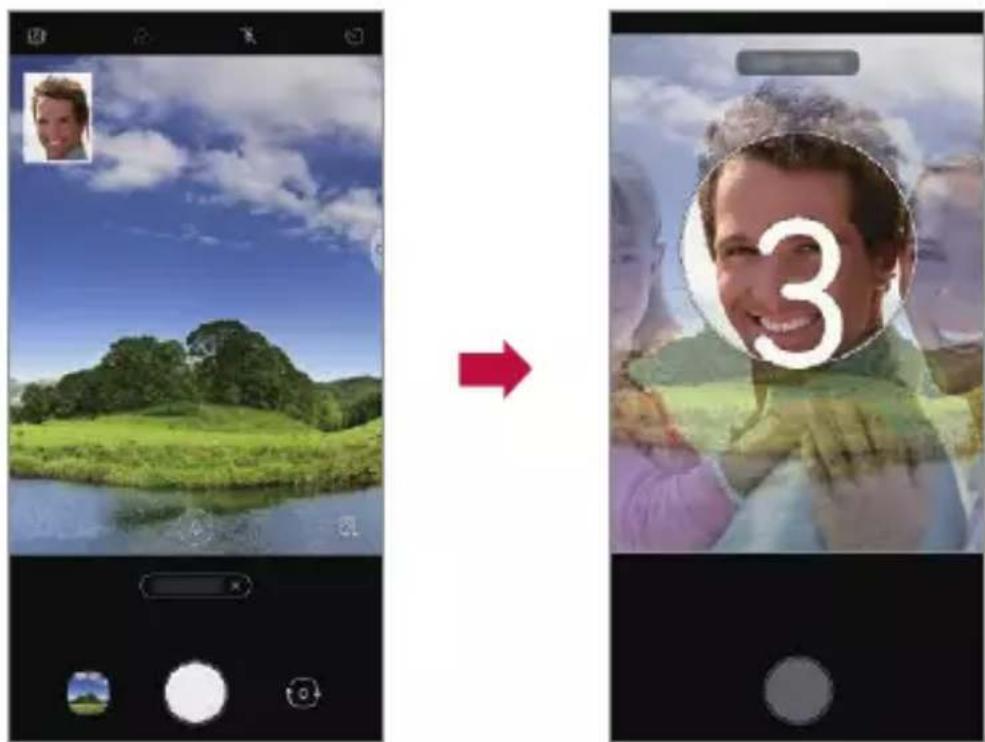

- You can also touch and then select a photo saved in the Gallery for the background of the composite image.
Manual Video mode
User can manually set various functions for recording video. Adjust audio, white balance, focus, brightness, ISO, shutter speed, etc.
1 Tap ○> , then tap More> □.
2 Set the scene menu that is appropriate for the shooting environment.
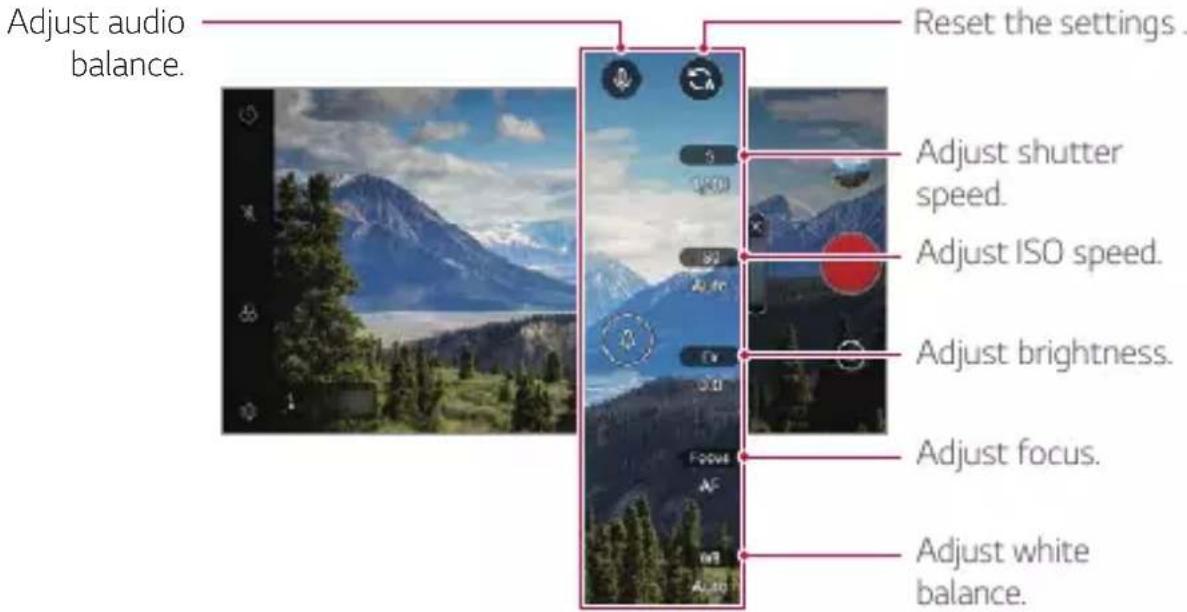
3 Press to start recording.
Option Setting
You can set the camera option according to the desired environment.
Press ⚙️ on the screen.
• :Directly switch over to FullVision
• ☐: Select video resolution and size.
| Frame rate Select the frames per second value. | |
| Bit rate Select the image quality for videos. | |
| Hi-Fi Record a video with Hi-Fi quality sound. | |
| Save as HDR10 | Save a video in the HDR10 format for high definition and vivid colour. |
| Steady recording Minimise motion blur while recording a video. | |
| Tracking focus | Enable the camera to remain focused on the subject you touch on the screen, even if the subject is moving.(Available when the Standard camera is in use.) |
| Tag locations Save the image with GPS location data. | |
| Grid | Display guide grids so that you can take photos or record videos based on the horizontal and vertical reference lines. |
| Storage | Select if you want to store the pictures and videos in the Internal storage or SD card. (Available when a memory card is inserted.) |
| Help Provide Help for each camera menu. | |
Slo-mo
Create a fun video by changing the speed of movement. This function is useful when you want to playback a video at a slower speed compared to the actual speed of the original clip.

- Slow motion for the entire video
- Slow motion effect is applied to the entire video.
- Slow motion for sections
- Slow motion effect is applied to certain sections of the video.
1 Tap ○> , then tap More>
2 Tap to shoot video.
- To pause the video recording, tap 📄. To resume the video recording, tap 🔴.
3 If you want to finish shooting, press

natural_image
Silhouettes of skiers mid-air above a snow-covered mountain peak under a clear blue sky (no text or symbols)Flash Jump-Cut
Photos taken at a regular interval are saved as GIF files.
1 Tap ○> , then tap More>
2 Tap to select how many copies of the photograph to take.
- You can select one among 4, 8, 12, 16 and 20 copies.
3 Tap to take a photo.
- Photos are taken every 3 seconds and saved as a GIF file.
- You can press ☐ before taking the prescribed number of photos to stop the shooting.
- Photos taken are saved as GIF files.
- You can see the saved GIF files using the Gallery app.

- At the moment when the camera takes the photograph, a flash comes on.
- At the bottom of the screen, the total number of photographs taken as well as the number of copies are shown.
- The photographs taken are saved in the GIF format files only.
Triple shot
The triple cameras located on the back of the device take a series of photos with different angles of view and save as a video with slide effect.
See Triple shot for details.
Cine shot
You can record a moment and make a video with only a part of the scene in motion.
See Cine shot for details.
Cine video
You can record a movie-like video.
See Cine Video for details.
Food
You can take a photo or record a video with adjusting the colour slide bar and white balance.
1 Tap ○> , then tap More>
2 To take a photo, tap.
- Drag the colour slide bar on the screen to adjust the white balance and select the best colour.
- If the slide bar is not displayed, tap ⚙ to adjust the white balance.
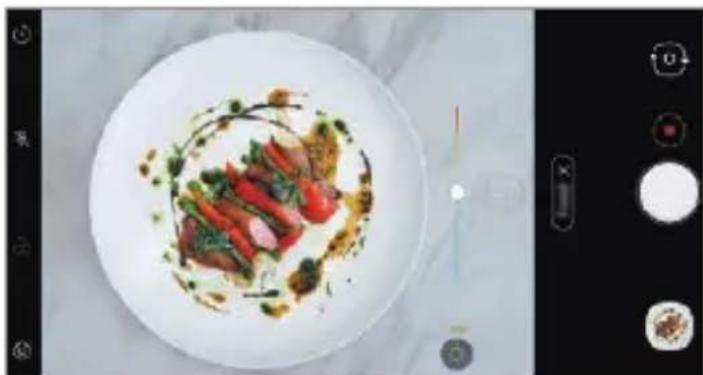
natural_image
Plated dish of sliced meat with garnishes, served on a white plate (no text or symbols visible)YouTube Live
You can record a video and directly upload to YouTube.
To use this feature, you need to verify your phone number.

- YouTube Live is available only when your device is connected to the Internet. If you use mobile data, you may be charged for data usage, depending on your pricing plan.
Portrait
You can take sharp portrait by applying camera lens blur effect.
See Portrait for details.
Google Lens
You can get more information or take action on items around you using Google Lens, like landmarks, posters, restaurant menus, animals, flowers, or barcodes, directly in the device.
AI CAM
You can effectively take photos or record videos since the camera recognises the object when taking a photo or recording a video.
See AI CAM for details.
Manual camera mode
You can create photos featuring professional touch by using a variety of advanced features. Adjust the white balance, focus, brightness, ISO, shutter speed and other options.
1 Tap ; then tap Manual Camera.
2 Customise the following camera settings.
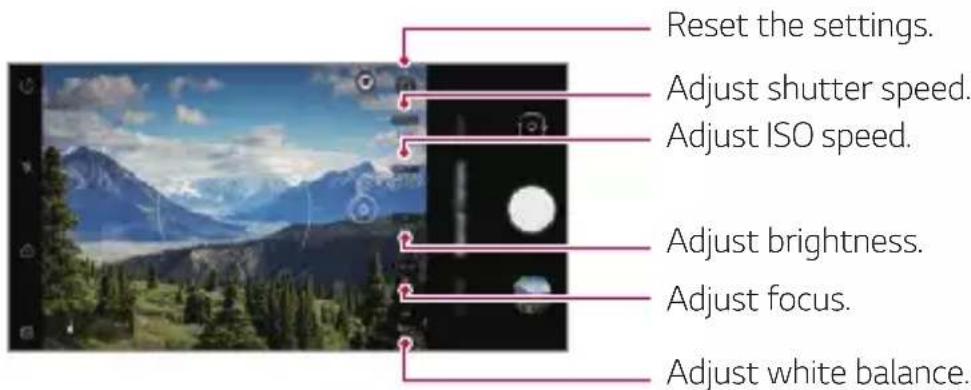
3 Tap to take the photo.
Customising the camera options
You can customise a variety of camera options to suit your preferences.
Tap 🎨 on the screen.
• :Take a photo in FullVision.
• :Select values for aspect ratio and size for taking photos.
| Graphy photos | Adjust the white balance, ISO and shutter speed for the recommended photo. See Graphy for details. |
| Save as RAW | The image is stored as a RAW file format so that you can modify it. The DNG and JPEG files are created while taking a photo, then saved as a non compressed high resolution image. |
| Cheese shutter Take photos with voice commands. | |
| Tracking focus | Enable the camera to remain focused on the subject you touch on the screen, even if the subject is moving.(Available when the Standard camera is in use.) |
| Tag locations Save the image with GPS location data. | |
| Guide | Display guide grids so that you can take photos based on the horizontal and vertical reference lines. |
| Add signature Display a personalised signature on the photos. | |
| Storage | Select if you want to store the pictures and videos in the Internal storage or SD card. (Available when a memory card is inserted.) |
| Help Provide Help for each camera menu. | |
Graphy
You can apply the recommended values for the white balance, ISO and shutter speed as if taken by an expert.
1 Tap >then tap Manual Camera.
2 Tap and select the desired scene from the recommended images.
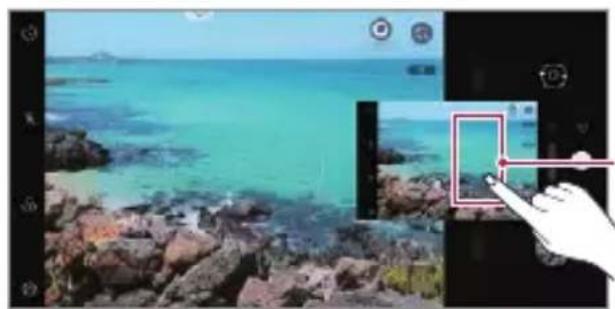
natural_image
Coastal beach scene with turquoise water and rocky shoreline, overlaid with a hand pointing at a camera interface (no text or symbols visible)Select expert photos

natural_image
Coastal coastal scene with turquoise water and rocky shoreline, alongside a close-up of a camera interface (no readable text or symbols)Recommended images
3 Tap to take a photo.
- Photographs are taken under the same photograph settings selected in Graphy.

- This feature is available only in Manual camera mode.
- Tap, then tap from the Graphy menu to deactivate this feature.
Focus peaking
You can adjust the focus on the subject with the focus peaking feature. Access Focus peaking by tapping the Manual focus (MF) button. When Focus peaking is enabled, the subject you focus on appears yellow. Move the the toggle wheel up and down to focus on the desired area, then take the photo.

- This feature is only available in Manual camera mode and Manual video mode.
- Disable this feature by tapping the Focus peaking button once more.
- This feature is not available using the wide-angle camera.
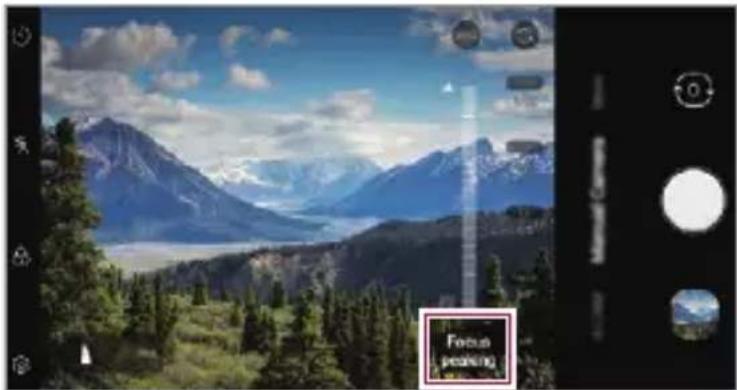
Other useful features in the Camera app
Auto-Exposure/Auto-Focus lock
You can fix the current exposure level and focus position by touching and holding the screen in the Auto mode. To turn off the feature, tap a blank area on the screen.
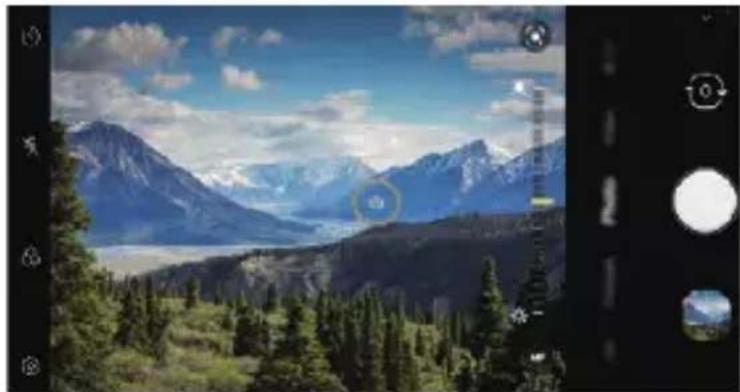
natural_image
Scenic mountain landscape with snow-capped peaks and evergreen trees, captured through a camera lens (no text or symbols visible)
• This feature is available only in specific modes.
Using the Burst Shot
You can take consecutive photos and view them as moving pictures in the Gallery.
1 Run the camera app and select Photo.
2 Tap and hold.
- Multiple, consecutive photos are taken while you are holding down.

• This feature is available only in specific modes.
Switching between cameras
You can switch between the front and rear cameras to suit your environment.
On the camera screen, tap 🔒 or drag the screen in any direction to switch between the front and rear cameras.
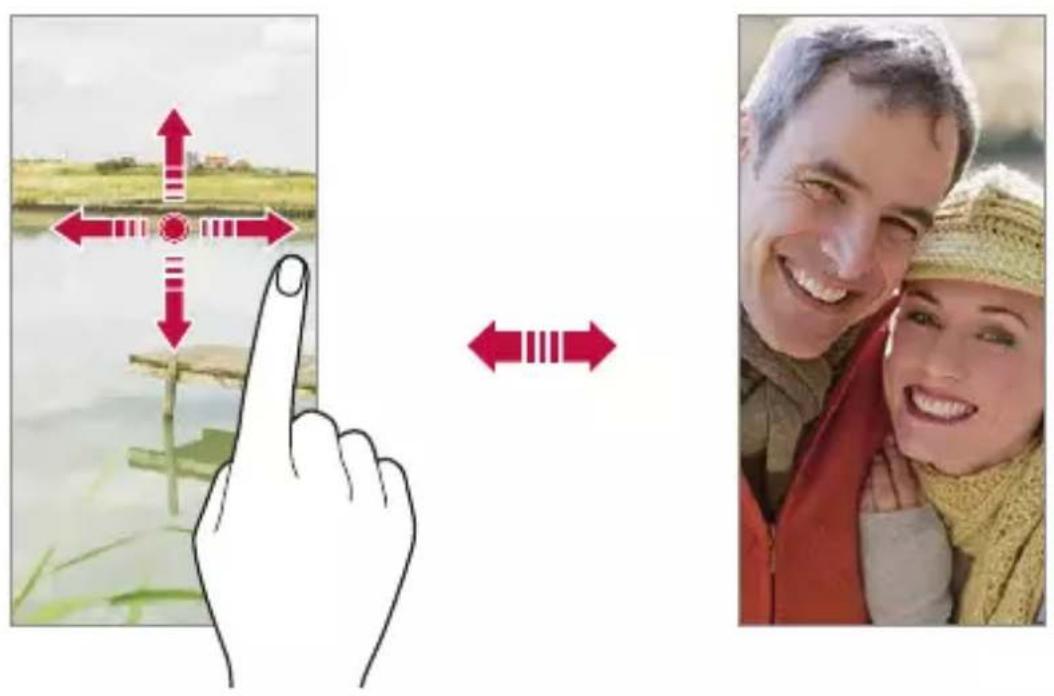

• Use the front camera to take selfies. See Selfie shot for details.
Zoom in or out
You can use zoom in or out on the camera screen while taking a photo or recording a video.
- On the camera screen, pinch or spread two fingers to zoom in or out, then use the displayed slide bar.

- The zoom feature is not available when using the front camera in selfie mode.
Selfie shot
You can use the front camera to view your face on the screen and take selfies.
Gesture shot
You can take selfies by using gestures.
Show your palm to the front camera and then clench your fist.
You can also clench your fist and then open it towards the front camera.
• In three seconds, a photo is taken.
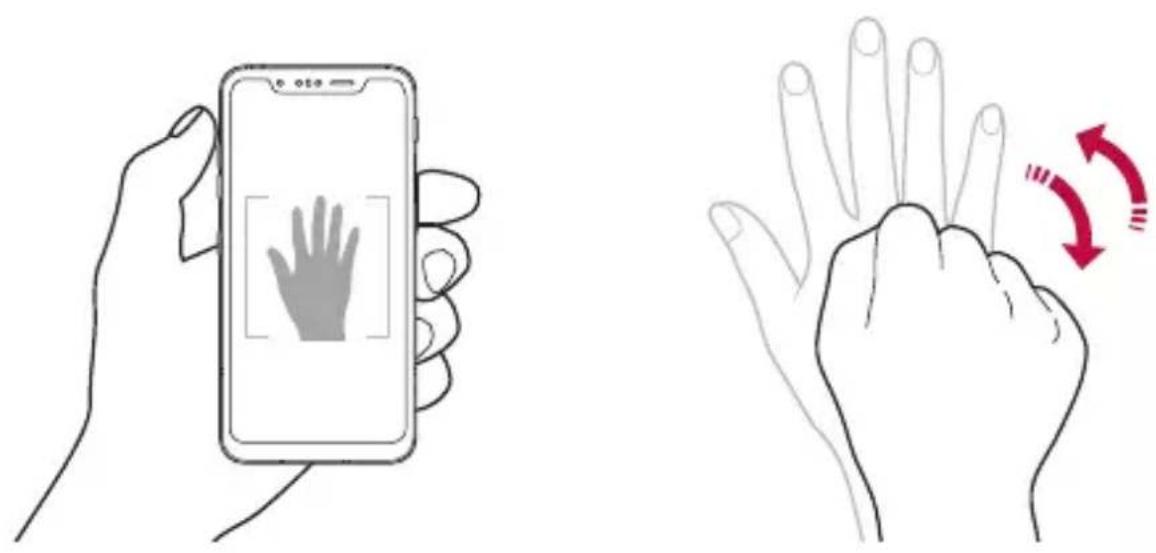

- To use this feature, switch to the front camera mode, then tap ⚙️> Selfie shot > Gesture shot.
• Make sure that your palm and fist are within the reference line so that the camera can detect them.
- This feature may not be available while using some of the camera features.
Auto shot
You can use the face detection feature to take selfies easily and conveniently. You can set the device so that, when you look at the screen, the front camera detects your face and takes a selfie automatically.
- The white coloured guide frame appears when the front camera detects your face. If the subject within the guide frame stops moving, the guide frame colour turns yellow, then the camera takes a photo.

natural_image
Close-up portrait of a smiling person with curly hair, wearing a light blue shirt, against a bright sky background (no text or symbols visible)
- Tap ⚙️> Selfie shot> Auto shot to enable the Auto shot feature.
Interval shot
You can take selfies at an interval.
While using the front camera, you can show your palm to the camera, then clench your fist twice quickly.
- Four photos are taken at regular intervals after a timer delay of three seconds.
Save as flipped
Before taking a photo with the front camera, tap 🎨 > Save as flipped. The image is flipped horizontally.

- When using the front camera, you can change how selfies are taken in the camera options. See Customising the camera options for details.
Signature
You can create a personalised photo by using your signature.
1 Tap ○> 📄, then tap ⚙> Add signature.
2 Enter the signature as desired and tap Add.

• This feature is available only in specific modes.
quick share
You can share a photo or video to the app you want immediately after taking it.
1 Tap >then take a photo or record a video.
2 Tap the app icon that appears on the screen to share it using that app. You can also swipe the icon towards the opposite direction to see what other apps you can use to share your photos and videos.
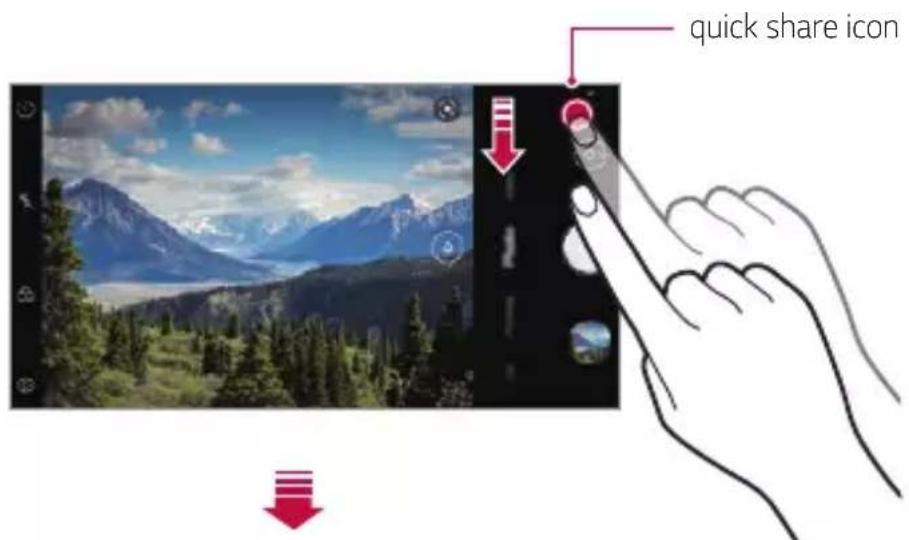
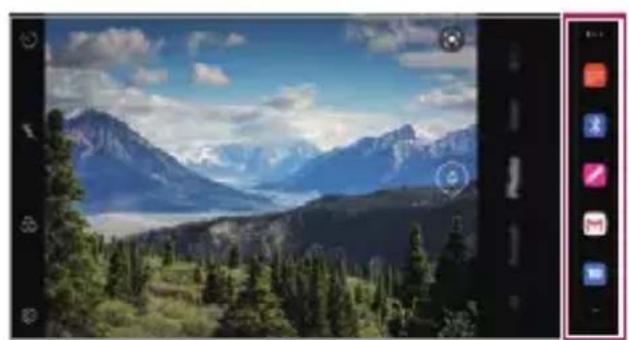
natural_image
Scenic mountain landscape with evergreen trees and snow-capped peaks under a blue sky (no text or symbols visible)
- The app displayed by the quick share icon may vary, depending on the type and frequency of access to the apps installed on the device.
- This feature is available only in specific modes.
Gallery
Gallery overview
You can view and manage photos and videos saved on your device.
1 TapO>
- Saved photos and videos are displayed by folder.
2 Tap a folder and select a file.
• View the selected file in full-screen mode.
- While viewing a photo, swipe left or right to view the previous or next photo.
- While viewing a video, swipe left or right to rewind or fast-forward the video.
- If you save the location information or use a scene mode when shooting, a sub folder is generated for each video.
- To view photos by location at which the photo was taken, tap > Tag locations, then tap . The photos are automatically grouped by location under the Memory tab of the Gallery app.

- Some file formats may not be supported, depending on the installed software.
- Some files may not be opened due to encoding.
- Files that exceed the size limit may cause an error.
- You need to activate the GPS feature to create Memory albums.
Viewing photos
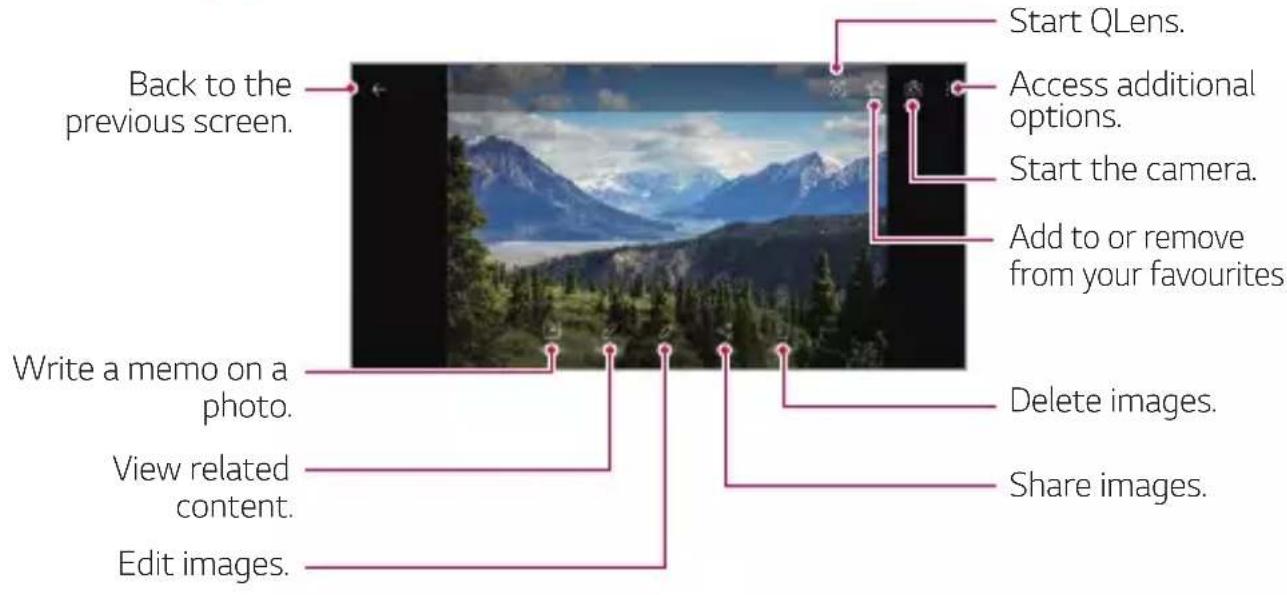

- Details menu appears when the screen is lightly touched. Touching the screen once again makes the menu disappear.
Writing memos on photos
1 While viewing a photo, tap √
2 Write a memo on the photo screen and tap Save.
• The memo is applied to the photo.

- Memo function may not be available in some photo files.
- You can search for memos that have been added by pressing Q of the Gallery app.
View related contents
You can freely edit or configure the related photos in the Gallery.
For more details, refer to Related content.
Edit photos
1 While viewing a photo, tap
2 Edit your photos using various effects and editing tools.
3 Once finished editing, tap Save copy.
Useful Apps 121
Playing a video
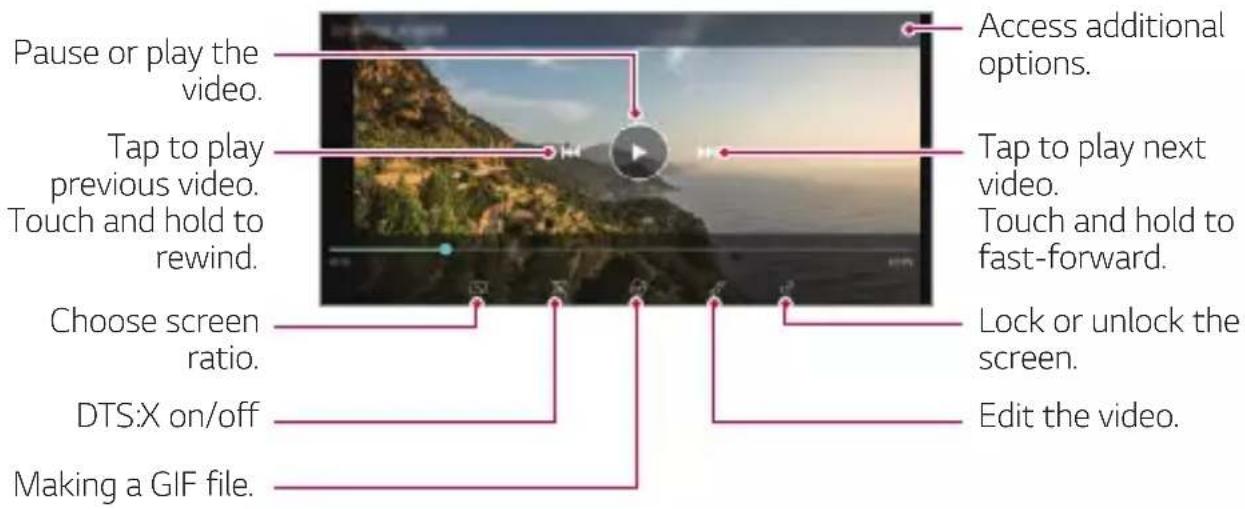

- To adjust the sound volume, drag the right side of the video screen up or down.
- To adjust the screen brightness, drag the left side of the screen up or down.
- Dragging the screen to the left on the video play screen allows you to rewind (REW) and dragging to the right allows you to fast forward (FF).
Editing videos
1 While viewing a video, tap
2 Use a variety of effects and edit tools to edit the video.
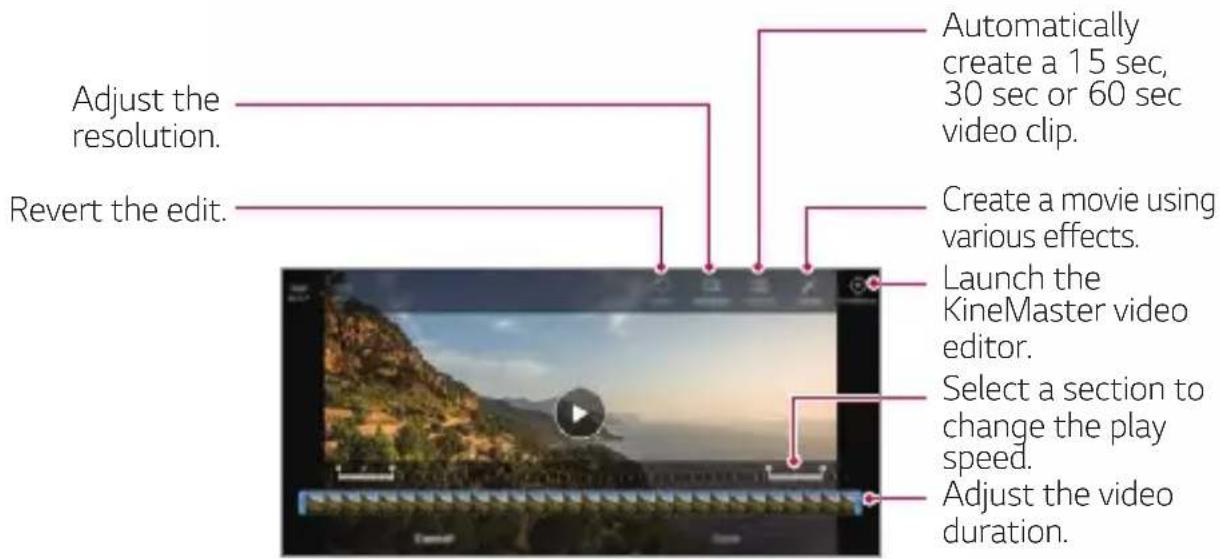
3 Tap Save to save changes.
Deleting files
You can delete files by using one of the following options:
- Touch and hold a file from the file list, then tap Delete.
- Tap from the file list and delete the desired files.
- Deleted files are automatically moved to Trash and they can be restored to the Gallery within 7 days.
- Tap☒ to completely delete the files. In this case, the files cannot be restored.
Sharing files
You can share files by using one of the following options:
- While viewing a photo, tap ✻ to share the file by using the method you want.
- While viewing a video, : >Share to share the file by using the method you want.
- Tap from the file list to select files and share them using the method you want.
Contacts
Contacts overview
You can save and manage contacts.
Tap ○>Essentials >Contacts.
Adding contacts
Adding new contacts
1 On the contact list screen, tap
Useful Apps 123
- A pop-up appears for selecting the saving location for contact. Select the location you want.
2 Enter contact details and tap Save.
Importing contacts
You can import contacts from another storage device.
1 On the contact list screen, tap : > Manage contacts > Import.
2 Select the source and target locations of the contact you want to import, and then tap OK.
3 Select the contacts and tap Import.
Adding contacts to the speed dial list
1 On the contact list screen, tap : > Speed dial.
2 Tap Add contact from a speed dial number.
3 Select a contact.

- While adding a new contact, tap to add a speed dial number.
Searching for contacts
You can search for contacts by using one of the following options:
- Tap the search bar at the top of the Contacts screen and enter the desired contact or phone number you want to search for.
- Scroll the contact list up or down.
• From the index of the contact list screen, tap the initial letter of a contact.

- Pressing the search bar at the top of the Contacts screen and entering a contact or phone number brings up the integrated search results from the call history and contacts list saved onto the product.
Contacts list
Editing contacts
1 On the contact list screen, select a contact.
2 On the contact detail screen, tap and edit details.
3 Tap Save to save changes.
Deleting contacts
You can delete contacts by using one of the following options:
- On the contact list screen, touch and hold a contact you want to delete, then tap Delete contact.
- Tap : >Delete on the contact list screen.

- Deleted contacts may not be restored.
Adding favourites
You can register frequently used contacts as favourites.
1 On the contact list screen, select a contact.
2 On the contact detail screen, tap ☆
Creating groups
1 On the contacts group list, tap +
2 Enter a new group name.
3 Tap Add members, select contacts, then tap Add.
4 Tap Save to save the new group.
QuickMemo+
QuickMemo+ overview
You can make creative notes by using a variety of options on this advanced notepad feature, such as image management and screenshots, which are not supported by the conventional notepad.
Creating a note
1 Tap○QuickMemo+.
2 Tap to create a note.
• : Save a note.
• ←: Undo the previous edit.
• →: Redo the recently deleted edits.
• T : Enter a note by using the keypad.
• :Write notes by hand.
• : Erase handwritten notes.
- ☐: Zoom in or out, rotate or erase the parts of a handwritten note.
• : Access additional options.
3 Tap to save the note.
Writing notes on a screenshot
1 While viewing the screen you want to capture, drag the status bar downwards and then tap [O].
- The screenshot appears as the notepad background theme. Memo tools appear at the top of the screen.
2 Crop the image (if necessary) and take notes as desired.
• Write notes by hand on the photo.
3 Tap and save the notes to the location you want.
- Saved notes can be viewed in either QuickMemo+ or Gallery.
- To save notes in the same location all the time, select the Use as default app checkbox and select an app.

- You can capture the entire screen by using the scroll capture feature.
- While using an app such as Message and Chrome, drag the notifications panel downwards and then tap Capture+>Extended to capture the entire screen you are currently viewing as a single file.
- This feature is available only on some apps that support the scroll capture feature.
- Pinch two fingers or spread your fingers apart to change the memo layout.
Managing folders
You organise and view memos according to the memo type.
1 Select QuickMemo+.
2 Tap on the top part of the screen and then select the desired function.
- All memos: You can collectively view all memos saved in Qmemo+.
- My memos: You can view the memos created in Qmemo+.
- Capture+: You can view the memos created using Capture+.
- Trash: You can view the deleted memos.
- New category: You can add categories.
- You can change the order of categories or add/delete categories. By pressing the category, you can change the category name.

- Some categories do not appear when the folder app initially started. Categories are additionally displayed only when relevant memos exist.
- Deleted memos are moved to the trash and can be recovered within 7 days from the day they were deleted. In the Qmemo+ app, you can change the display type by placing two fingers on the screen and either widening or narrowing the fingers.
Clock
Alarm
You can set an alarm to trigger it at a specified time.
1 Tap > Clock > Alarm.
2 Tap to add a new alarm.
3 Configure the alarm settings and tap Save.

- If you select a previously set alarm, you can edit the alarm.
World clock
You can view the current time in cities around the world.
1 Tap > Clock > World clock.
2 Tap and add a city.
Timer
You can set the timer to trigger an alarm after a specified period of time.
1 Tap ○> Clock> Timer.
2 Set the time and tap Start.
- To suspend the timer, tap Pause. To resume the timer, tap Resume.
3 Tap Stop to stop the timer alarm.
Stopwatch
You can use the stopwatch to record a lap time.
1 Tap ○> Clock> Stopwatch.
2 Tap Start to initiate the stopwatch.
• To record a lap time, tap Lap.
3 Tap Pause to suspend the stopwatch.
• To resume the stopwatch, tap Resume.
- To clear all the records and restart the stopwatch, tap Reset.
Calendar
Calendar overview
You can use the calendar to manage events and tasks.
Adding events
1 Tap ○> Essentials> Calendar.
2 Select a date and then tap +
3 Enter event details and tap Save.
Syncing events
Tap : > Calendars to sync, and select a calendar to sync.

- When your events are saved from the device to your Google account, they are automatically synced with the Google Calendar, too. Then, you can sync other devices with the Google Calendar in order to make those devices have the same events that your device has and to manage your events on those devices.
Tasks
You can register tasks to your device to easily manage schedules.
1 Tap ○> Essentials > Tasks.
2 Tap to add a task.
3 Enter task details and then tap Save.
Music
You can play and manage songs or music albums.
1 Tap ○> Essentials > Music.
2 Select a category.
3 Select a music file.
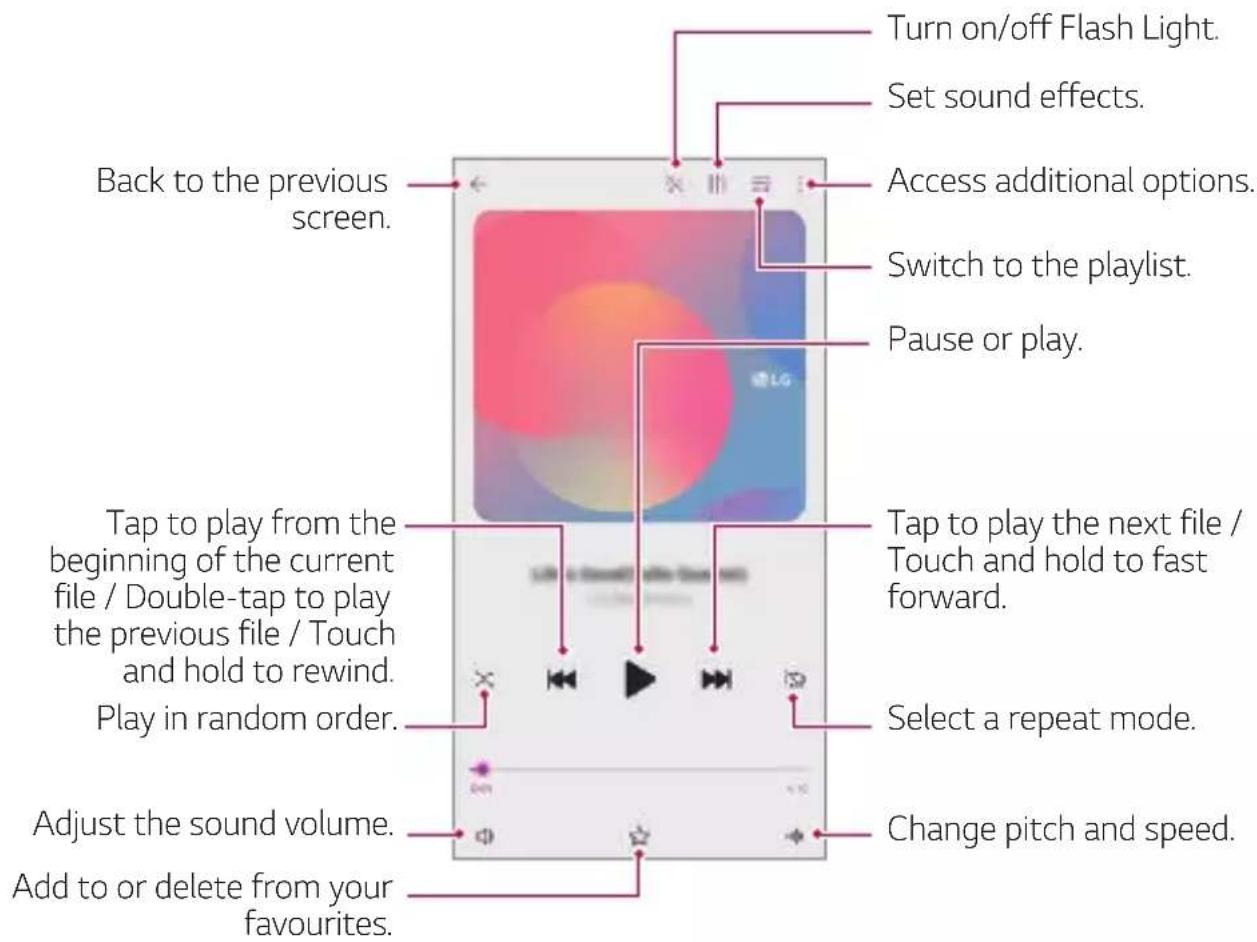

- Some file formats may not be supported, depending on the installed software.
- Files that exceed the size limit may cause an error.
- Music files may be protected by international copyright owners or copyright laws. You may have to obtain legal permission before copying a music file. To download or copy a music file, first check the copyright law for the relevant country.
- If you set the flashlight, flashlight blinks to fit the music being played.
Calculator
You can use two types of calculators: the simple calculator and the scientific calculator.
1 Tap ○> Essentials > Calculator.
2 Use the keypad to make a calculation.
- If you want to calculate from the beginning, tap and hold ✗.
LG ThinQ
You can easily connect the product with IoT appliances to monitor and conveniently use the appliances.
Select ○>Essentials >LG ThinQ

- Washing machine, dryer, styler, dishwasher, oven, and robot cleaner can only be registered when the product is in the standby mode.
- Look for the LG ThinQ mark on the product to see if it can be connected to LG ThinQ app.
- Tap≡ to check various function of the LG ThinQ app.
Game Launcher
You can use Game Launcher to view the entire list of installed games, or set the device to mute or prevent any notifications while playing games.
1 Tap ○> Essentials> Game Launcher.
2 Select the desired option.
LG Health
LG Health overview
You can manage your health and maintain good exercise habits by keeping track of the exercises you do.
Getting started with LG Health
You can configure LG Health when launching the app for the first time or after resetting it.
1 Tap ○> Essentials> LG Health.
2 Follow the on-screen instructions to complete configuration.
Using LG Health
You can view main information on LG Health and manage the amount of physical exercise and health information.
1 Tap ○> Essentials> LG Health.
2 The following options are available.
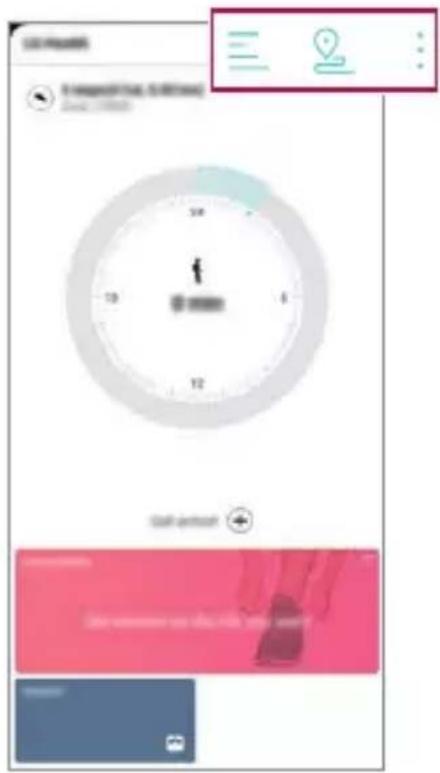
• View your exercise log on the day you want to check.
- ☐: Begin tracking an exercise. The route and amount of your physical exercise are recorded for each exercise type.
- : Set your daily exercise goals including calories and steps, or set various LG Health settings.

- Health-related information provided by LG Health is designed for user convenience and cannot be used for purposes of disease prevention, treatment, diagnosis or other medical issues.
- LG Health may vary or may not be available, depending on the country and service provider. LG Health functions that are available and apps that can be added to LG Health may vary, depending on the country. This is due to differing laws and regulations.
E-mail overview
You can register an email account to your device and then you can check and send emails from your device.

- If you use mobile data, you may be charged for data usage depending on your pricing plan. Consult with your service provider for more information.
Registering email accounts
When you use the email app for the first time, register your email account.
1 Tap ○ > Essentials > E-mail.
2 Select an email service provider.
3 Enter your email address and password and then tap Next to register your account.
- To manually register an email account, tap Manual Setup (if necessary).
Managing email accounts
To view or edit your email account settings, tap : > Settings.
• To add an account, tap Add account.
- To delete an account, tap: >Remove account.
Opening another email account
If several email accounts are registered and you want to view another account, tap ≡ and select another one from the account list.
Checking email
1 Tap and select a mail box.
2 Select an email from the email list.
• The email message appears.
Sending email
1 Tap+
2 Enter the recipient's email address.
3 Enter a subject and message.
- To attach files, tap@.
• To access optional menu items, tap :.
4 Tap to send the email.

- Pinch two fingers or spread your fingers apart to adjust the font size of your email list.
HD Audio Recorder
The HD Audio Recorder allows you to configure the audio settings manually so that you can record audio based on your environment.
Recording modes
You can record a high definition audio file by selecting and configuring the desired audio mode to suit the recording environment.
Tap ○> Essentials> HD Audio Recorder>≡.
Normal
You can record audio without extra settings.
Concert
You can record audio in a concert or other music event.
Custom
You can manually configure the desired settings to record audio.
Studio Mode
With Studio mode, you can play an audio file or music and record your voice at the same time, create a chord by recording your voice multiple times, and record your comments over the presenter's or speaker's original audio file.
1 Tap ○> Essentials> HD Audio Recorder>≡> Custom.
2 Tap _+
3 Select an audio file to use as background music.
4 Tap to record voice.
5 Tap □ to save the recorded file.

- Background music can only be played through earphones. Make sure to plug in earphones before using this feature.
Other useful features for use of the HD Audio Recorder app
GAIN
You can adjust the sensitivity of the sound recorded by the microphone. The higher the GAIN value is set, the more sensitively the sound is recorded.
LCF
You can filter any low-pitched noises such as the low hum of the air conditioner.
The higher the LCF (Low Cut Filter) value is set, the better high-frequency noises are filtered.
LMT
It can prevent clipping of the recorded sound.
The higher the LMT (Limiter) value is set, the greater the likelihood that low frequency sounds will not get clipped.

- To change additional settings, tap : > Settings, then customise the file type, bit depth, sampling rate and other settings.
- When you select the Concert or Custom mode with earphones connected, it appears. Tap and then select the microphone to use.
- You can monitor the sound quality with the connected earpiece while recording audio. While recording audio in Studio mode, sound monitoring is not supported. You can hear only the background music.
File Manager
You can view and manage files saved on your device or cloud.
1 Tap ○ > Management > File Manager.
2 Tap and select the desired storage location.
Smart Doctor
You can use Smart Doctor to diagnose the device's condition and optimise it.
Tap ○ >Management >Smart Doctor.
LG Mobile Switch
Easily transfer data from a used device to a new device via LG Mobile Switch.
1 Tap ○> Management > LG Mobile Switch.
You can also tap ○ > Settings > System > Backup > LG Mobile Switch.
2 Follow the on-screen instructions to select a desired method for transfer.

- Data in a Google Account will not be backed up. When you synchronise your Google Account, Google apps, Google contacts, Google Calendar, Google memo app data and apps downloaded from the Play Store are stored on the Drive app automatically.
- Fully charge the battery before transferring data to avoid unintentional powering off during the process.
App trash
You can see the list of apps deleted on the home screen. The app that was deleted within the last 24 hours can be recovered.
Tap ○ >Management >App trash.
For more details, refer to App trash.
SmartWorld
You can download a variety of games, audio content, apps and fonts provided by LG Electronics. Customise your device to suit your preferences by using Home themes and fonts.

- If you use mobile data, you may be charged for data usage depending on your pricing plan.
- This feature may not be supported depending on the area or service provider.
1 Tap ○> Services > SmartWorld.
2 Tap : LG Account, then sign in.
3 Select and download the desired content items.
Downloading SmartWorld app
If the SmartWorld app is not installed, follow these steps to download it.
1 Tap ○> Settings> System> Update centre> App Updates.
2 From the list, select SmartWorld and tap Download.
RemoteCall Service
Your device can be remotely diagnosed for resolving issues. First, make a phone call to an LG Customer Service Centre as follows:

• To use this function, first you must agree to usage of the function.
- If you use mobile data, you may be charged for data usage depending on your pricing plan.
1 Tap ○> Services > RemoteCall Service.
2 Connect a call to an LG Customer Service Centre.
3 After the call connects, follow the service associate's instructions to enter a six-digit access number.
- Your device is remotely connected and the remote support service starts.
Cell Broadcast
You can view real-time text broadcasts on emergency situations, such as typhoons, floods and earthquakes.
Tap ○>Services >Cell Broadcast.
Google apps
You can use Google apps by setting a Google Account. The Google Account registration window appears automatically when you use a Google app for the first time. If you do not have a Google Account, create one from your device. For details on how to use an app, see the Help in the app.

- Some apps may not work depending on the area or service provider.
Chrome
A fast, simple, and secure web browser, built for the modern web.
Docs
Docs is a collaborative, word-processing tool that powers productivity. Use Docs to create, edit and work together in real-time.
Drive
Drive is a file storage and sharing app that makes it easy to find, share and collaborate on work projects from anywhere, instantly.
Duo
Make simple, high quality video calls to your friends and family on Android phones and iPhones.
Gmail
Gmail is an easy to use mail app that keeps your messages safe, makes your inbox smarter, and helps you stay organised.
The Google app keeps you in the know about the things you care about. Find quick answers, explore your interests, and get a feed of stories and updates on topics that matter to you.
Maps
Going somewhere? Go with Maps, the app you can rely on for real-time GPS navigation, traffic, transit, and details about millions of places, such as reviews and popular times.
News
Comprehensive up-to-date news coverage, aggregated from sources all over the world by Google News.
Photos
Home for all your photos and videos, automatically organised so you can share and save what matters.
Play Movies & TV
Use your Google Account to rent or purchase movies. Purchase content and play it anywhere.
Play Music
Purchase music from the Play Store. Play music saved on your device.
Sheets
Sheets is a collaborative spreadsheet processing tool that powers productivity. Use Sheets to import, organise and analyse information together in real-time.
Slides
Google Slides is a collaborative presentation creation tool that powers productivity. Use Slides to organise information, present results, and make decisions together in real-time.
YouTube
Watch your favourite channels, listen to music you love, and upload videos to share with people around the world.
Keep notes
Create, edit, and share you text and photo notes with Google Account.
Assistant
Your device has the Google Assistant built-in. Find answers and get things done while on-the-go. To get started, just tap the Google Assistant key on the side of the phone or touch and hold the home button of the phone.

- The Google Assistant is not available in certain languages and countries.
04
Settings
Settings
You can customise the device settings in accordance with your preferences.
Tap ○>Settings.

- If you enter a keyword on the search window at the top of the screen, you can conveniently run the items that need to be set.
Network & internet
Dual SIM card
You can configure Dual SIM settings.
1 On the settings screen, tap Network & internet> Dual SIM Card.
2 Customise the following functions:
• SIM card 1: Change the name and icon of the SIM card 1.
• SIM card 2: Change the name and icon of the SIM card 2.
- SIM card colour theme: Change the colour themes for the SIM cards.
- Cost save mode: Activate or deactivate the cost save mode. In the cost save mode, if you make a call to a contact to which a specific SIM is assigned, this SIM is used for the call even if the other SIM is active, for example, it is using mobile data.
- Mobile data: Select a SIM card you want to use for mobile data service. You can also turn off this function.
- Data roaming: Select this option to enable the device to use mobile data when you are roaming outside your home network area.
- Mobile data during calls: Access mobile data using the nondefault data SIM card temporarily during an HD voice call with the same card.
Wi-Fi
You can connect to nearby devices over a Wi-Fi network.
Connecting to a Wi-Fi network
1 On the settings screen, tap Network & internet >Wi-Fi.
2 Tap to activate it.
• Available Wi-Fi networks appear automatically.
3 Select a network.
- You may need to enter the network's Wi-Fi password.
- The device skips this process for previously accessed Wi-Fi networks. If you do not want to automatically connect to a certain Wi-Fi network, tap the network and then tap Forget.
Wi-Fi network settings
On the settings screen, tap Network & internet >Wi-Fi.
- Switch to mobile data: If the mobile data connection function is activated but the device cannot connect to the Internet via Wi-Fi connection, the device automatically connects to the Internet via the mobile data connection.

• This feature depends on the service provider.
- Customise Wi-Fi network settings.
Wi-Fi Direct
You can connect your device to other devices that support Wi-Fi Direct to share data directly with them. You do not need an access point. You can connect with more than two devices by using Wi-Fi Direct.
1 On the settings screen, tap Network & internet >Wi-Fi > : > Advanced Wi-Fi>Wi-Fi Direct.
- Nearby devices that support Wi-Fi Direct automatically appear.
2 Select a device.
- Connection occurs when the device accepts the connection request.

• The battery may drain faster when using Wi-Fi Direct.
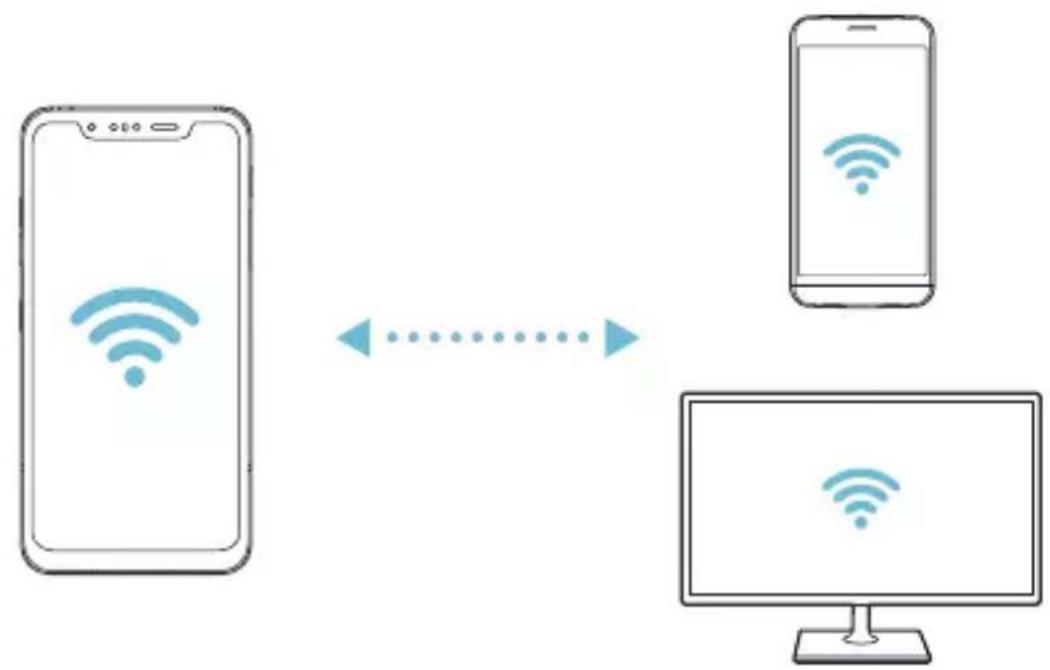
flowchart
graph LR
    A["Smartphone"] <--> B["Mobile Device"]
    B <--> C["Desktop"]
Mobile data
You can turn mobile data on and off. You can also manage mobile data usage.
Turning on mobile data
1 On the settings screen, tap Network & internet> Mobile data.
2 Tap to activate it.
Customising mobile data settings
1 On the settings screen, tap Network & internet> Mobile data.
2 Customise the following settings:
- Mobile data: Set to use data connections on mobile networks.
- Limit mobile data usage: Set a limit for mobile data usage to block mobile data if the limit is reached.
• :Customise mobile data settings.
- Data usage volume is measured based on the product, and the volume calculated by your mobile provider may be different.
Call
You can customise call settings, such as voice call and international call options.

- Some features may not be supported depending on the area or service provider.
1 On the settings screen, tap Network & internet>Call.
2 Customise the settings.
Tethering
USB tethering
You can connect the device to another device via USB and share mobile data.
1 Connect your device and other devices via USB cable.
2 On the settings screen, tap Network & internet> Tethering> USB tethering and then tap to activate it.

- This option uses mobile data and may incur data usage fees, depending on your pricing plan. Consult with your service provider for more information.
- When connecting to a computer, download the USB driver from www.lg.com and install it on the computer.
- You cannot send or receive files between your device and a computer while USB tethering is turned on. Turn off USB tethering to send or receive files.
- Operating systems that support tethering are Window XP or higher, or Linux.
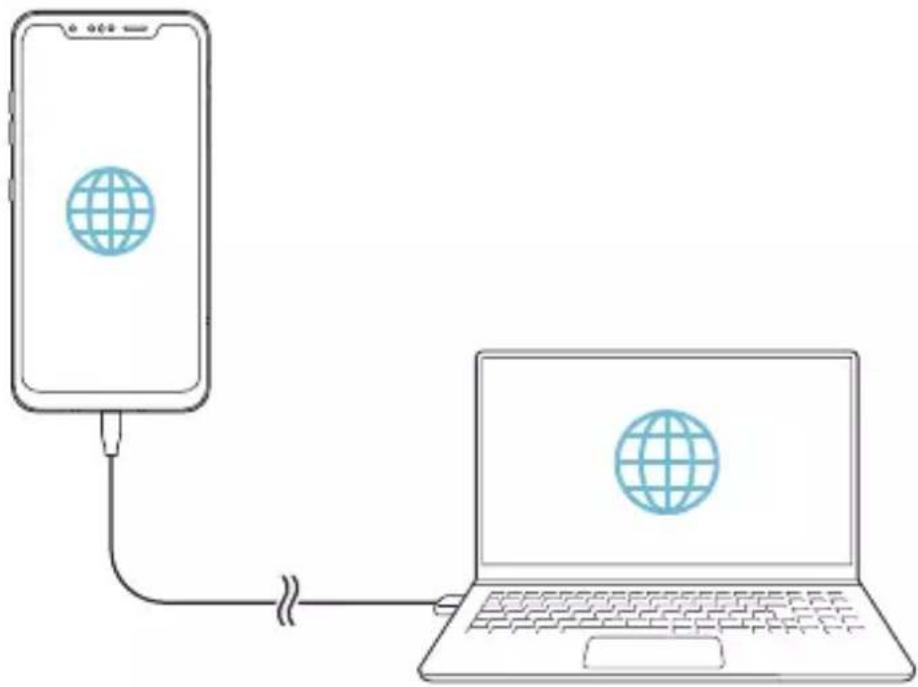
natural_image
Illustration of a smartphone connected to a laptop via cable, showing global network icons (no text or symbols)Wi-Fi hotspot
You can set the device as a wireless router so that other devices can connect to the Internet by using your device's mobile data.
1 On the settings screen, tap Network & internet> Tethering> Wi-Fi hotspot and then tap to activate it.
2 Tap Set up Wi-Fi hotspot, and enter the Wi-Fi name (SSID) and password.
3 Turn on Wi-Fi on the other device, and select the name of the device network on the Wi-Fi list.
4 Enter the network password.

- This option uses mobile data and may incur data usage fees, depending on your pricing plan. Consult with your service provider for more information.
- More information is available at this web site: http://www.android.com/tether#wifi
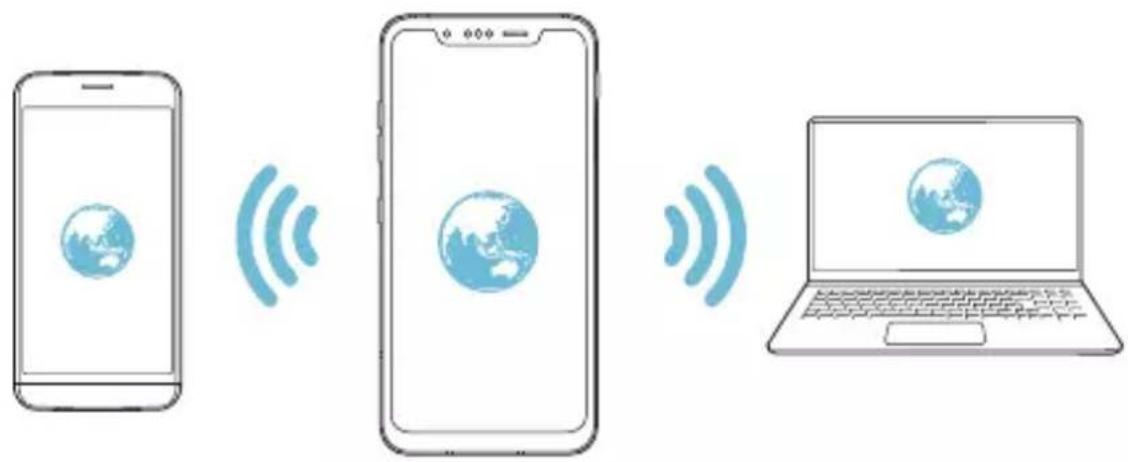
Wi-Fi hotspot turn off timer
When the Wi-Fi hotspot has not been used for a specific period of time, it is automatically disconnected. You can set the time for automatic disconnection.
Bluetooth tethering
A Bluetooth-connected device can connect to the Internet by using your device's mobile data.
1 On the settings screen, tap Network & internet > Tethering > Bluetooth tethering and then tap to activate it.
2 Turn on Bluetooth on both devices and pair them.

- This option uses mobile data and may incur data usage fees, depending on your pricing plan. Consult with your service provider for more information.
- More information is available at this web site: http://www.android.com/tether#Bluetooth_tethering
Help
You can view help on using tethering and hotspots.
On the settings screen, tap Network & internet >Tethering>Help.
Airplane mode
You can turn off the call and mobile data functions. When this mode is on, functions that do not involve data, such as games and music playback, remain available.
1 On the settings screen, tap Network & internet> Airplane mode.
2 Tap Turn on in the confirmation screen.
Mobile networks
You can customise the mobile networks settings.
1 On the settings screen, tap Network & internet> Mobile networks.
2 Customise the following settings:
• Network mode: Select a network type.
- Access Point Names: View or change the access point for using mobile data services. To change the access point, select a choice from the access point list.
• Network operators: Search for network operators and connect automatically to a network.
VPN
You can connect to a safe virtual network, such as an intranet. You can also manage connected virtual private networks.
Adding VPN
1 On the settings screen, tap Network & internet>VPN.
2 Tap+

- This feature is available only when the screen lock is activated. If the screen lock is deactivated, a notification screen appears. Tap Change from the notification screen to activate the screen lock. See Setting a screen lock for details.
3 Enter VPN details and tap Save.
Configuring VPN settings
1 Tap a VPN from the VPNS list.
2 Enter the VPN user account details and tap Connect.
- To save the account details, select the Save account information checkbox.
Private DNS
You can configure the Private DNS (Domain Name System) options.
1 On the settings screen, tap Network & internet> Private DNS.
2 Select the desired option and tap Save.
Connected devices
Bluetooth
You can connect your device to nearby devices that support Bluetooth to exchange data with them. Connect your device to a Bluetooth headset and a keyboard. This makes it easier to control the device.
Pairing with another device
1 On the settings screen, tap Connected devices > Bluetooth.
2 Tap to activate it.
• Available devices appear automatically.
• To refresh the device list, tap.

- Only devices set as visible are displayed on the list.
3 Select a device from the list.
4 Follow the on-screen instructions to perform authentication.
Sending data via Bluetooth
1 Select a file.
- You can send multimedia files or contacts.
2 TapBluetooth.
3 Select a target device for the file.
- The file is sent as soon as the target device accepts it.

- File sharing processes may differ, depending on the file.
Screen sharing
You can play the screen and sound of the device on a different device, such as a TV, that supports the Miracast function.
1 On the settings screen, tap Connected devices > Screen sharing.
2 Tap to activate it.
3 Select a device from the list of nearby devices.
- If the desired device does not appear, tap Search to refresh the list.
- After connecting to the device, the device displays the screen of your device.

- Screen sharing turns off automatically if there is no sharing-compatible device in the vicinity.
NFC
You can use the device as a transportation card or credit card. You can also share data with the other device.
1 On the settings screen, tap Connected devices > NFC.
2 Tap to activate it.
- Touch your device with other device that supports NFC to allow sharing data.

- NFC antenna may be located differently depending on the device type. See Parts overview for details about the NFC antenna area.
Android Beam
You can share files by touching the back of the device to other device. You can also share files including music, videos or contacts and open a web page or launch an app from the other device.
1 On the settings screen, tap Connected devices> Android Beam.
2 Touch the back of the device with another device.

- NFC antenna may be located differently depending on the device type. See Parts overview for details about the NFC antenna area.
Sharing panel
You can share contents from Gallery, Music and File Manager with nearby devices. Also you can share the content with specific people in apps that work with Google Direct Share.
1 On the settings screen, tap Connected devices > Sharing panel.
2 Tap to deactivate each option.
- Nearby devices: You can display the nearby devices to which you can share contents on the Gallery, Music, and File Manager apps.
- Direct share: From an app which supports Google Direct Share, you can display an icon which allows you to share contents to specific people.
File sharing
You can send and receive files between your device and other LG devices or tablets.
1 On the settings screen, tap Connected devices> File sharing.
2 Customise the following settings:
• G8S ThinQ: Change the device name.
- Save to: Set the destination folder to save files sent from other devices in.
- File sharing: Permit receipt of files sent from other devices.
- SmartShare Beam: Share files with other devices via SmartShare Beam.
• Help: You can view help on sharing files.
Media server
You can share media content on your device with nearby devices that support DLNA.
1 On the settings screen, tap Connected devices > Media server.
2 Customise the following settings:
- Content sharing: Share content on your device with nearby devices.
• G8S ThinQ: Set your device's name.

- Depending on the user's product, the menu names may appear differently.
- Content to share: Select the type of media content to share with other devices.
- Allowed devices: View a list of devices permitted to access content on your device.
- Not-allowed devices: View a list of devices not permitted to access content on your device.
MirrorLink
You can connect the device to a car via USB to use the MirrorLink app installed on the device from the infotainment system or the head unit of the car.

- This app is available only in cars that support MirrorLink.
- Download the MirrorLink app from an app store or market. For more information, visit https://mirrorlink.com/apps.
- Some functions may be restricted for driver's safety while using the MirrorLink feature.
1 On the settings screen, tap Connected devices > MirrorLink.
2 Connect the device to an automobile using the USB cable and turn on Connect via USB cable.

- If your device is connected to a vehicle that supports automatic MirrorLink connection, connect via USB cable is automatically activated on your device.
- Tap : to configure MirrorLink USB auto-connect.
Printing
You can connect your device to a Bluetooth printer and print photos or documents saved on the device.
On the settings screen, tap Connected devices > Printing.
- Tap Default Print Service to search for printers you can connect to. Or, tap : >Add printer to manually add a printer.
- Tap⊕ Add service to download the printer app you want.

- This is available only when the mobile network or the Bluetooth function is turned on.
- To download the printer app in Add service, first log on to your Google account.
Sound
You can customise sound, vibrate and notification settings.
On the settings screen, tap Sound and customise the following settings:
- Sound profile: Change the sound mode to Sound, Vibrate only, or Silent.
• Volume: Adjust the sound volume for various items. - Ringtone: Select a ringtone for incoming calls. Add or delete ringtones.
- Notification sound: Select a notification ringtone. Set music saved on the device as a notification ringtone.
- Ring with vibration: Set the device to vibrate and play a ringtone simultaneously.
- Ringtone ID: Create a ringtone for an incoming call from a particular contact.
- Flash alert for incoming call: Set the flash to blink according to LG ringtone.
- Do not disturb: Set the time, range and app type to receive notification messages. Receive notification messages only on particular days of the week.
- Sound quality and effects: Use the function to set the sound quality and effects while playing a song or video.
- Volume: Adjust the sound volume for various items.
- Normalize volume: Use the function to normalise the volumes of different sound sources.
- Equalizer: Use the function to adjust the equaliser settings.
- DTS:X 3D Surround: Use the function to play music or video in three-dimensional, immersive and vivid sound when earphones, speaker or other external audio devices are connected. See DTS:X 3D Surround for details.
- Vibration strength: Adjust the vibration intensity.
- Vibration type: You can select the type of vibration when receiving calls.
- Vibrate on tap: Set the device to vibrate when you tap certain items on the screen.
- Dialing keypad sound: Select the keypad sound effect.
• LG Keyboard sound: Select LG keyboard sound effect.
- Touch sound: Select a sound effect for tapping an item.
- Screen lock sound: Select a sound effect when the screen is locked or unlocked.
Display
You can customise detailed settings for each screen type.
On the settings screen, tap Display and customise the following settings:
- Home screen: Customise settings for the Home screen. See Home screen settings for details.
- Wallpaper & theme: Select a screen wallpaper, theme, icon, and AOD for your device.
- Font: Change the font size, bold text or type.
- New Second Screen: Select how the status bar and app corners will look.
- Navigation bar: Set the style of the navigation bar with Gestures, Gesture and Buttons, or Buttons only. you can also change the button combination when you set Buttons only as a style of the navigation bar.
- AOD (always-on display): Always display information, such as the date, time and notifications, even when the screen is turned off. For details, see AOD (always-on display).
- True View: Allow you to adjust the screen brightness and colour depending on the light source.
- Comfort view: Set the device to reduce amount of blue light on screen to reduce eye strain.
- Night mode: You can apply a dimmed screen theme to avoid glare on the screen at night time.
- Screen colour: Adjust the colour, colour temperature, or RGB values for the desired screen.

- Tap to reset the settings.
- Video enhancement: When playing back a video in full screen mode, you can change the settings for brighter and more dynamic colour display.
- App scaling: Adjust the screen size of apps.

Aspect ratio
• This device uses 18.7:9 aspect ratio.
- Some downloaded apps may not support 18.7:9 aspect ratio. In this case, select the most optimal screen ratio for the app or consult the app provider for more information.
- You can select the aspect ratio for individual apps by tapping ○> Settings > Display > App scaling. Select the desired aspect ratio from Compatibility (16:9), Standard (16.7:9), and Full screen.
- Accent colour: Change the point color for settings, menus, notification windows, etc.
- Display size: Set the items on the screen to a size easy for you to see. Some items may change position.
- Brightness: Use the slide bar to change the device's screen brightness.
- Auto: Set the device so that the screen brightness is automatically adjusted in accordance with the ambient light intensity.
- Screen timeout: Automatically turn off the screen when the device is left idle for a specified period of time.
- Auto-rotate screen: Automatically rotate the screen according to the device's orientation.
- Screen saver: Display a screen saver when the device is connected to the holder or charger. Select a screen saver type to display.
- One-handed screen: Make the screen size smaller to conveniently use the device with one hand. Drag the left/right edge to the middle and hold.
Lock screen & security
You can customise lock screen and security settings.
1 On the settings screen, tap Lock screen & security.
2 Customise the settings.
- Google Play Protect: Scans your device daily for potentially harmful apps.
- Find My Device: Remotely track the device location. You can also protect your data securely if you lost your device.
- Security update: Check for software update and configure automatic installation settings.
- Select screen lock: Select the desired screen lock method. See Setting a screen lock for details.
- Customize Lock screen: Change the information displayed on the locked screen.
- Secure lock settings: Change the secure lock settings.
- Fingerprints: Use your fingerprint to unlock the screen or content. See Fingerprint recognition overview for details.
- Face Unlock: Allow you to unlock the screen with your face. See Face unlock overview for details.
- Hand ID: Allow you to unlock the screen with your hand. See Hand ID overview for details.
- Content lock: Allow you to set a lock type (password or pattern) for your QuickMemo+ and Gallery files.
- Encryption & credentials: Configure the settings for SD card encryption and credentials.
- Encrypt SD card: Encrypt the memory card to prevent use on another device. See Memory card encryption for details.
- Secure start-up: Protect your device with a lock when it powers on. See Secure start-up settings for details.
- Credential protection: View the type of the storage where the security certificate will be saved.
- Trusted credentials: View your system's root CA certificates and user-installed CA certificates.
- User credentials: View and change secure certificate information stored on your device.
- Install from storage: Install a secure certificate from a storage.
- Clear credentials: Delete user-installed secure certificates and related credentials.
- Set up SIM card lock: Lock or unlock the USIM card, or change the password (PIN).
- Phone administrators: Allow privileges to restrict the control or use of the device to particular apps.
- Trust agents: View and use trust agents installed on the device.
- Screen pin: Fix the app screen so that only the currently active app can be used.
- Usage access: View details on usage of apps on the device.
Privacy
You can find and adjust all your privacy settings.
1 On the settings screen, tap Privacy.
2 Customise the settings.
- Permission manager: Allows you to check and change the permissions granted to the apps.
- Lock screen: Allows you to set notifications to show on the lock screen.
- Make passwords visible: Enable this option to briefly show each character of the password as you type it so you can see what you've entered.
- Autofill service from Google: Enable this option to enter your information saved in your account such as password, address, or credit card number with a single tap. You can also disable this option, use the Google Autocomplete feature, or add a new service account.
- Google location history: Allows you to enable or disable Location History. When enabled, Google periodically stores and uses your phone's most recent location data in connection with your Google Account.
From the Location History screen, tap : to view and/or manage your location data. - Activity controls: Select activities and information which you want Google to save.
- Ads: Allows you to check the advertising ID and set the personalised ads.
- Usage and diagnostics: Enable this option to help improve the Android experience by automatically sending diagnostic, device, and app usage data to Google.
Location
You can check how your location information is shared and configure the permission to access your location information.
On the settings screen, tap Location and set the desired function.
Extensions
Smart Doctor
You can use Smart Doctor to diagnose the device's condition and optimise it.
On the settings screen, tap Extensions > Smart Doctor.
Context Awareness
You can automatically change your device settings according to the usage pattern and location.
1 On the settings screen, tap Extensions > Context Awareness.
2 Activate items you want to automatically change settings for.
- Parking Assistant: This option will store your parking locations. If you don't want to receive parking notifications around your home or work place, turn My places notifications off 📄. The parking records are stored in QuickMemo+.
- AUTOMATED: You can set the device to change the sound profile, Bluetooth and Wi-Fi options automatically in different environments, such as At home, Away from home, At work, and Off work. You can also set an app to open when earphones are plugged in or a Bluetooth device is connected.

- To use this feature, home or work location must be preset in My places. On the settings screen, tap Location > My places to set the locations.
Gaming
You can configure settings for game tools, graphics and battery saving feature.
1 On the settings screen, tap Extensions > Gaming.
2 Customise the following settings:
3 Game Launcher: Tap to use the game launcher.
- Game tools: You can run the function while playing games by touching the game tools icon among the home touch buttons.
• Game graphics: Adjust the game graphics.

- When you change the resolutions on some games, the screen display feature may not work properly.
- This function may not be available in certain game apps.
- Break time: Reduce the screen brightness and performance whenever you leave the game running for more than 5 minutes.
Screen recording
You can configure the settings for screen recording.
1 On the settings screen, tap Extensions > Screen recording.
2 Customise the following settings:
- Include yourself in video by: Select one from the following options and tap Save.
- Image: Includes your profile image in video when recording. After selecting this, tap 📋 and select a profile image. Then, adjust the size of the image using the slide bar.
- Front camera: Includes yourself recorded using the front camera while recording the screen.
- Never: Nothing is included.
• Audio source: Choose the audio source between Mic and Contents.
• Video resolution: Select the resolution for screen recording.
To record the screen
1 Drag the status bar downward to open the Quick access icons list.
2 (If necessary, swipe left over the Quick access icons area.) Tap
3 Read the disclaimer and tap Start. It will start recording in 3 seconds.
4 To stop recording, tap-located at the bottom right of the screen. The recorded video will be saved in Gallery.

- If you violate another person's rights such as portrait right or intellectual property right or defame another person's reputation by using the functions provided for the screen recording service, you may be held liable to civil, criminal or administrative charges in accordance with the relevant laws. LG Electronics is not legally responsible in any way for the acts of users.
Dual App
You can install duplicate messenger apps on the product and use two accounts at the same time.
1 On the settings screen, tap Extensions > Dual App.
2 After reading the disclaimer, tap Confirm.
3 In the list of available apps, tap Install to install a copy of a desired app and follow the on-screen instructions.
- On the screen, the list of available dual apps is shown. During installation, app icons are generated on the home screen.
App suggestion
You can quickly access apps that you may need at the moment on the Overview screen.
Floating Bar
You can activate frequently used features including shortcuts, screenshots, Music, Contacts and more by touching and then swiping the Floating Bar on the screen. See Floating Bar overview for details.
Shortcuts
You can use buttons such as the Lock/Power, Volume, and Google Assistant to run certain apps or functions right away.
1 On the settings screen, tap Extensions > Shortcuts.
2 Customise the following settings.
- View notification panel: Swipe down/up on the fingerprint sensor for the notification panel.
- Open Camera: Press Power key twice to open Camera.
- Open Capture+: Press Volume Up key twice to open Capture+ when the screen is locked or off.
- Open Camera: Press Volume Down key twice to open Camera when the screen is locked or off.
- Open Google Assistant: Press the Google Assistant key on the side of the phone.
- Talk to Google Assistant: Press and hold the Google Assistant key to quickly talk to your Assistant.

- Google Assistant does not support certain languages.
Air Motion
Enable this option to recognise the location and shape of your hand to launch certain features or apps without touching the screen.
Show your hand to the front camera and then perform hand gestures to launch desired features or apps.
See Air Motion for details.
KnockON
Double-tap the screen to turn the screen on or off.
See KnockON for details.
Increase touch sensitivity
You can set the touch screen more sensitive to your touch. Recommended to turn this feature on when using a screen protector.
On the settings screen, tap Extensions > Increase touch sensitivity.
Digital Wellbeing & parental controls
You can view the product use time and set the timer for each app. Also, you can manage the mobile phone use time by using the Wind Down and Focus Mode.
Select Digital Wellbeing & parental controls on the settings screen and set the desired function.
Apps & notifications
You can check a list of installed apps, and configure the settings for notifications, app permissions, and more.
1 On the settings screen, tap Apps & notifications.
2 Customise the settings.
Battery
You can view the current battery information or turn on power-saving mode.
1 On the settings screen, tap Battery.
2 Customise the following settings:
- Battery usage: View the battery usage details.
- Battery percentage on status bar: Display the remaining battery level as a percentage on the status bar.
- Optimized charging: Automatically adjust charging speed according to how you charge to reduce heat and extend lifespan of battery.
- Adaptive battery: Allow you to save the battery by stopping apps running in the background.
- Background restrictions: Enable this option to restrict background apps to save the battery while using the device. Restricted apps for power saving may not work properly or may not send you notifications.
- Battery saver: Reduce battery consumption by cutting down some device settings, such as the display brightness, speed and vibration intensity.
- Power saving exclusions: Select apps to use without any functional limitation while in power saving or battery optimisation mode.
Storage
You can view and manage internal storage on the device or storage space of the memory card.
1 On the settings screen, tap Storage.
2 Customise the following settings:
- Internal storage: View the total storage space and free space in the device's internal storage. View a list of apps in use and the storage capacity for each app.
- SD card: View the total storage space and free space in the memory card. This option appears only when a memory card is inserted. To unmount the memory card, tap △.
Accounts
You can add users to share your device and register a cloud account.
1 On the settings screen, tap Accounts.
2 Customise the settings.
You can use Google settings to manage your Google apps and account settings.
On the settings screen, tap Google.
System
Update centre
You can check and install the latest version of the app or software provided by LG.
1 On the settings screen, tap System> Update centre.
2 Customise the following settings:
- App Updates: Check if an app update is available. If available, you can install the update.
- Software Update: Check if a software update is available. If available, you can install the update.
Language & keyboard
You can customise language and keyboard settings for your device.
1 On the settings screen, tap System> Language & keyboard.
2 Customise the following settings:
• Language: Select a language to apply for the device.
- Manage keyboards: You can change the product's basic keyboard setting, set the use environments for LG Keyboard or other installed keyboards, and set the speech recognition function for Google Voice input. Also, you can set whether to display the keyboard button in the navigation bar on the home screen so that you can quickly switch to another keyboard.
- Physical keyboard: Select to use the physical keyboard, or check keyboard shortcut keys.
- Autofill service: Enable this option to enter your information saved in your account such as password, address, or credit card number with a single tap. You can also disable this option, use Google Autocomplete, or add a new service account.
- Text-to-speech output: Configure the settings for text-to-speech output.
- Pointer speed: Adjust the pointer speed of a mouse or trackpad.
- Reverse mouse buttons: Reverse the right mouse button to perform primary direct-manipulation actions.
Date & time
You can customise date and time settings for your device.
1 On the settings screen, tap System> Date & time.
2 Customise the settings.
Memory
You can view the average amount of memory usage over a certain period of time and the memory occupied by an app.
1 On the settings screen, tap System> Memory.
2 Tap to set a time slot to retrieve data.
Backup
You can back up data saved on your device to another device or account.
1 On the settings screen, tap System> Backup.
2 Customise the following settings:
- LG Mobile Switch: Allow you to transfer data from an old LG device to your new LG device. See LG Mobile Switch for details.
- Backup & restore: Back up your device data or restore data to your device from a backup.

- Resetting your device may delete backup files saved in storage. Make sure to copy and store the important backup files to your PC.
- Google backup: Change Google drive backup settings. You can also check the backup account currently used, or add a new backup account.
Restart & reset
You can reset the device including network and app settings.
1 On the settings screen, tap System > Restart & reset.
2 Customise the following settings:
- Auto-restart: Automatically restart and optimise the phone at a set time. Tap to activate this feature. The device automatically restarts at a set time and optimise itself. Select a day and time for restart.

- You can set the device to restart itself once a week. The device automatically restarts in an hour from the preset time.
- Once the device restarts, notifications and badges are erased. Save important data before the preset time.
- The Auto-restart feature is not activated in the following situations: When the screen is turned on, when the device is in use, when the battery level is 30% or less, when the USIM card is locked, or when the device lock is activated while turning on the device.
- Depending on the telecommunication provider, the auto-restart function may or may not be available.
- Network settings reset: Reset Wi-Fi, Bluetooth and other network settings.
- Reset app preferences: Reset the settings for an app. The data saved in the app will not be deleted.
- Factory data reset: Reset all settings for the device and delete data.

- Resetting and resetting your device deletes all data on it. Enter your device name, Google Account and other initial information again.
• After data initialization, the data cannot be restored.
About phone
You can view information about your device, such as the name, status, software details and legal information.
On the settings screen, tap System > About phone and view information.
Regulatory & safety
You can view regulatory marks and related information on your device.
On the settings screen, tap System > Regulatory & safety.
Accessibility
You can manage accessibility plug-ins installed on your device.
1 On the settings screen, tap Accessibility.
2 Customise the following settings:
- Vision >TalkBack: Set the device to notify screen status or actions via voice.
- Vision > Voice notifications: Set the device to read the caller information via voice.
- Vision>Font: Change the font size, bold text or type.
- Vision > Display size: Set the items on the screen to a size easy for you to see. Some items may change position.
- Vision > Touch zoom: Zoom in or out by tapping the screen three times.
- Vision > Window zoom: Zoom in or out within a window and invert the colour.
- Vision > Large mouse pointer: Magnify the mouse pointer.
- Vision > High contrast screen: Turn the background colour into black for a high contrast screen.
- Vision > Screen colour inversion: Increase the display colour contrast for people with low vision.
- Vision > Screen colour adjustment: Adjust the display colour.
- Vision > Monochrome: Switch the screen to grayscale mode.
- Vision > End call with the Power key: End a call by pressing the Power/Lock key.
- Hearing > Captions: Turn on the subtitle service when playing videos for the hearing impaired.
- Hearing > Flash alerts: Set the device to notify you with a blinking light for incoming calls, messages and alarms.
-
Hearing > Mute all sounds: Mute all sounds and lower volume on the receiver.
-
Hearing > Audio channel: Select the audio type.
- Hearing > Sound balance: Adjust the audio output balance. Use the slide bar to change the balance.
- Motor & cognition > Touch assistant: Turn on the touch board to make buttons and gestures easier to use.
- Motor & cognition> Touch input: Enter text by touching and holding the screen or modify it by simply touching the screen.
- Motor & cognition> Physical keyboard: Customise the keyboard settings.
- Motor & cognition > Auto mouse click: Automatically click the mouse pointer in case of no movement.
- Motor & cognition > Touch and hold for calls: Answer or decline calls by touching and holding the call button instead of dragging it.
- Motor & cognition > Screen timeout: Turn off the screen automatically when the device is left idle for a specified period of time.
- Motor & cognition > Touch control areas: Limit the touch area so that only a particular portion of the screen can be controlled by touch input.
- Accessibility features shortcut: Quickly access a frequently used function by pressing the Power key and the Volume Up key simultaneously.
- Auto-rotate screen: Automatically change the screen orientation according to the physical position of the device.
- Amazon Assistant: Amazon Assistant provides product comparisons automatically as you shop in select apps on your device.
- Select to Speak: Allow you to tap items to hear spoken feedback.
- Switch Access: Create key combinations to control your device.
05
Appendix
LG Language Settings
Select a language to use on your device.
- Tap○> Settings> System> Language & keyboard> Language> Add language, and select a language.
- Touch and hold and drag it to the top of the language list to set it as a default language.
LG Bridge
LG Bridge overview
LG Bridge is an app that helps you manage the photos, music, videos and documents saved on your LG smartphone from your computer conveniently. You can back up contacts, photos and more to the computer or update the device software.

• See LG Bridge help for details.
- The supported features may vary depending on the device.
- LG USB driver is a necessary program to connect your LG smartphone with the computer and is installed when you install LG Bridge.
LG Bridge functions
- Manage the files on the device from a computer via Wi-Fi connection or mobile data connection.
- Back up data from the device to a computer or restore data from a computer to the device via USB cable connection.
- Update the device software from a computer via USB cable connection.
Installing LG Bridge on a computer
1 Go to www.lg.com from your computer.
2 Select your region.
3 Click Support > Software & Firmware.
4 Enter the name of your device.
OR
Select by the Product Category.
5 Go to PC Sync > LG Bridge to download the setup file.
- Go to Details to view the minimum requirements for installing LG Bridge.
Phone software update
LG Mobile phone software update from the Internet
For more information about using this function, please visit http://www.lg.com/common/index.jsp, select your country and language.
This feature allows you to conveniently update the firmware on your phone to a newer version from the Internet without needing to visit a service centre. This feature will only be available if and when LG makes a newer firmware version available for your device.
Because the mobile phone firmware update requires the user's full attention for the duration of the update process, please make sure you check all instructions and notes that appear at each step before proceeding. Please note that removing the USB cable during the upgrade may seriously damage your mobile phone.

- LG reserves the right to make firmware updates available only for selected models at its own discretion and does not guarantee the availability of the newer version of the firmware for all handset models.
LG Mobile Phone software update via Over-the-Air (OTA)
This feature allows you to conveniently update your phone's software to a newer version via OTA, without connecting a USB cable. This feature will only be available if and when LG makes a newer firmware version available for your device.
To perform the phone software update,
Settings > System > Update centre > Software Update > Check now for update.

- Your personal data from internal phone storage—including information about your Google Account and any other accounts, your system/application data and settings, any downloaded applications and your DRM licence—might be lost in the process of updating your phone's software. Therefore, LG recommends that you backup your personal data before updating your phone's software. LG does not take responsibility for any loss of personal data.
- This feature depends on the area or service provider.
Anti-Theft Guide
Set up your device to prevent other people from using it if it's been reset to factory settings without your permission. For example, if your device is lost, stolen, or wiped, only someone with your Google Account or screen lock information can use the device.
All you need to make sure your device is protected is:
- Set a screen lock: If your device is lost or stolen but you have a screen lock set, the device can't be erased using the Settings menu unless your screen is unlocked.
- Add your Google Account on your device: If your device is wiped but you have your Google Account on it, the device can't finish the setup process until your Google Account information is entered again.
After your device is protected, you'll need to either unlock your screen or enter your Google Account password if you need to do a factory reset. This ensures that you or someone you trust is doing the reset.

- Do not forget your Google Account and password you had added to your device prior to performing a factory reset. If you can't provide the account information during the setup process, you won't be able to use the device at all after performing the factory reset.
Open Source Software Notice Information
To obtain the source code under GPL, LGPL, MPL, and other open source licenses, that is contained in this product, please visit http://opensource.lge.com.
In addition to the source code, all referred license terms, warranty disclaimers and copyright notices are available for download.
LG Electronics will also provide open source code to you on CD-ROM for a charge covering the cost of performing such distribution (such as the cost of media, shipping, and handling) upon email request to opensource@lge.com.
This offer is valid for a period of three years after our last shipment of this product. This offer is valid to anyone in receipt of this information.
Regulatory information (Regulation ID number, E-labeling, etc.)
For regulatory details, go to Settings > System > Regulatory & safety.
Trademarks
- For DTS patents, see http://patents.dts.com. Manufactured under license from DTS Licensing Limited. DTS, the Symbol, & DTS and the Symbol together, DTS:X, and the DTS:X logo are registered trademarks or trademarks of DTS, Inc. in the United States and/or other countries. © DTS, Inc. All Rights Reserved.

• Copyright ©2020 LG Electronics Inc. All rights reserved. LG and the LG logo are registered trademarks of LG Group and its related entities.
• G8S ThinQ is a trademark of LG Electronics Inc.
- Google, Google Maps, Gmail, YouTube, Google Duo, Google Play, Android, Chrome, Google Photos, Google Play Protect, Google Calendar, Google Docs, Google Drive, Google Sheets and other related marks and logos are trademarks of Google LLC.
- Bluetooth® is a registered trademark of Bluetooth SIG, Inc. worldwide.
- Wi-Fi® and the Wi-Fi logo are registered trademarks of the Wi-Fi Alliance.
- All other trademarks and copyrights are the property of their respective owners.

Laser safety statement
Caution!
This product employs a Laser system. To ensure proper use of this product, please read this owner's manual carefully and retain for future reference. Should the unit require maintenance, contact an authorised service centre.
Use of controls, adjustments, or the performance of procedures other than those specified herein may result in hazardous radiation exposure.
To prevent direct exposure to laser beam, do not try to open the enclosure or make direct contact with the laser.
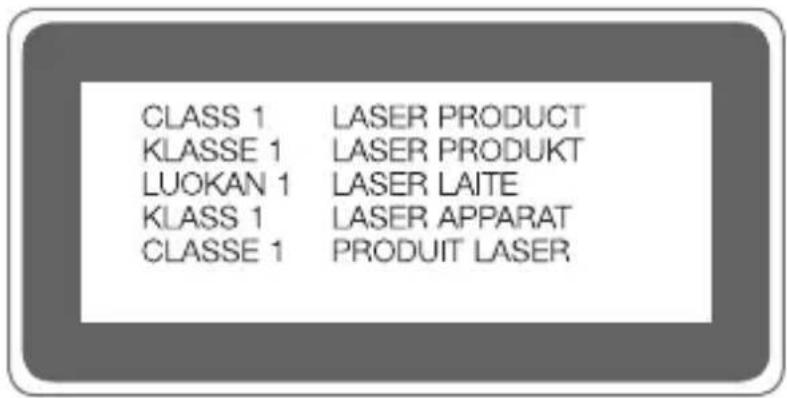
DECLARATION OF CONFORMITY
Hereby, LG Electronics declares that this LM-G810EAW product is in compliance with the essential requirements and other relevant provisions of Directive 2014/53/EU.
A copy of the Declaration of Conformity can be found at http://www.lg.com/global/declaration
Contact office for compliance of this product
LG Electronics European Shared Service Center B.V.
Krijgsman 1, 1186 DM Amstelveen, The Netherlands
Wi-Fi (WLAN)
The use of the 5150 - 5350 MHz band is restricted to indoor use only.
 | AT | BE | BG | CH | CY | CZ | DE | DK | EE | EL | ES | FI | FR | |||
| HR | HU | IE | IS | IT | LI | LT | LU | LV | MT | NL | NO | PL | ||||
| PT | RO | SE | SI | SK | UK | AL | ME | RS | MK | TR | BA | XK |
More information
Tempered glass parts
Tempered glass parts of this device are not permanent and they may wear out over time.
- If you drop your device on a hard surface or subject it to severe impact, the tempered glass may be damaged.
If this happens, stop using your device immediately and contact an LG Customer Service Centre.
- You can purchase protective cases to protect your device from damage on the market.
Note that these protective cases are not covered under the warranty service provided by LG Electronics and safety is not guaranteed.
Aspect ratio
This device uses 18.7:9 aspect ratio.
- Some downloaded apps may not support 18.7:9 aspect ratio.
In this case, select the most optimal screen ratio for the app or consult the app provider for more information.
Guide to data transfers
- For the data that can be exchange between LG devices or between the LG device and a third party device, see the following table.
| Type Item | details | LG device → LG device | Third party Android device → LG device | iOS device → LG device |
| Personal data | Contacts, messages, dial logs, calendar, voice recordings | ○ ○ | ○ | |
| Memos | ○ | × | ○ | |
| Alarms | ○ | × | × | |
| Media data | Photos, videos, songs, documents | ○ ○ | ○ | |
| Screen settings | Home screen settings (folders and widgets) | ○ | × | × |
| Lock screen settings (screen lock settings excluded) | ○ | × | × | |
| Apps | Downloaded apps | ○ | ○ | - |
| Personal data of the downloaded app | ○ | × | ||
| Others | Public certificate | ○ | ○ | × |
| Settings (Wi-Fi, Bluetooth, Calls, sound & notification, accessibility, battery) | ○ | × | × |

- Some data may not be transmitted depending on the software version, app version, operating system, manufacturer or service provider's policy.
| Supported Frequency Bands Transmitter Output power | |
| GSM 900 33.7 dBm | |
| GSM 1800 30.7 dBm | |
| WCDMA B1 24.7 dBm | |
| WCDMA B3 25.5 dBm | |
| WCDMA B8 25.5 dBm | |
| LTE B1 24.7 dBm | |
| LTE B3 25.5 dBm | |
| LTE B7 25.5 dBm | |
| LTE B8 25.5 dBm | |
| LTE B20 25.5 dBm | |
| LTE B28 25.5 dBm | |
| LTE B38 25.5 dBm | |
| LTE B40 25.5 dBm | |
| BT 2.4GHz 13 dBm | |
| WLAN 2.4GHz 21.5 dBm | |
| WLAN 5.2GHz 22 dBm | |
| WLAN 5.6GHz 22 dBm | |
| WLAN 5.8GHz 14 dBm | |
| NFC -25 dBuA/m | |
Travel Adapter Information can be found at http://www.lg.com/global/support/cedoc/cedoc
Disposal of your old appliance
-
This crossed-out wheeled bin symbol indicates that waste electrical and electronic products (WEEE) should be disposed of separately from the municipal waste stream.
-
Old electrical products can contain hazardous substances so correct disposal of your old appliance will help prevent potential negative consequences for the environment and human health. Your old appliance may contain reusable parts that could be used to repair other products, and other valuable materials that can be recycled to conserve limited resources.
-
You can take your appliance either to the shop where you purchased the product, or contact your local government waste office for details of your nearest authorised WEEE collection point. For the most up to date information for your country please see www.lg.com/global/recycling
Disposal of waste batteries/accumulators
-
This symbol may be combined with chemical symbols for mercury (Hg), cadmium (Cd) or lead (Pb) if the battery contains more than 0.0005% of mercury, 0.002% of cadmium or 0.004% of lead.
-
All batteries/accumulators should be disposed separately from the municipal waste stream via designated collection facilities appointed by the government or the local authorities.
-
The correct disposal of your old batteries/accumulators will help to prevent potential negative consequences for the environment, animal and human health.
-
For more detailed information about disposal of your old batteries/accumulators, please contact your city office, waste disposal service or the shop where you purchased the product.
FAQ
This chapter lists some problems you might encounter when using your device. Some problems require you to call your service provider, but most are easy to fix yourself.
SIM card error
Make sure the SIM card is correctly inserted.
No network connection or dropped network
Signal is weak. Move to a window or an open area.
You are outside the carrier network area. Move and check the network.
Calls are not available
New network not authorised.
Make sure you have not set call barring for the incoming number.
Make sure you have not set call barring for the number you are dialling.
Device cannot be turned on
When the battery is completely discharged, your device will not turn on.
Fully charge the battery before turning on the device.
Charging error
Make sure device is charging at a normal temperature.
Check the charger and its connection to the device.
Use only in-box accessories which are authorised by LG.
The battery depletes faster than when first purchased
When you expose the device or the battery to very cold or hot temperatures, the battery life may be reduced.
Battery consumption will increase when you use certain features or apps, such as GPS, games or the Internet.
The battery is consumable and the battery life will get shorter over time.
Error messages appear when launching the camera
Charge the battery.
Free some memory by transferring files to a computer or deleting files from your device.
Restart the device.
If you are still having trouble with the camera app after trying these tips, contact a LG Electronics Service Center.
The photo quality is poor
The quality of your photos may vary, depending on the surroundings and the photography techniques you use.
If you take photos and videos, standard angle quality is better than wide-angle.
If you take photos in dark areas, at night or indoors, image noise may occur or images may be out of focus.
If you have any problems, reset the options.
The touch screen responds slowly or incorrectly
If you attach a screen protector or optional accessories to the touch screen, the touch screen may not function properly.
If you are wearing gloves, if your hands are not clean while touching the touch screen or if you tap the screen with sharp objects or your fingertips, the touch screen may malfunction.
The touch screen may malfunction in humid conditions or when exposed to water.
Restart your device to clear any temporary software bugs.
If the touch screen is scratched or damaged, visit a LG Electronics Service Center.
Hangs or freezes
Restart the device
- If your device freezes or hangs, you may need to close apps or turn the device off and then on again.
Perform a boot-up
- A soft reset may be used to reset the device if the screen freezes, or the buttons, touch screen or device are no longer responding.
- To perform a soft reset of your device, simply press and hold the Volume Down and Power keys until the device restarts.
Reset the device
- If the methods above do not solve your problem, perform a factory data reset.
- On the settings screen, tap System > Restart & reset > Factory data reset.
- This method resets all settings for the device and deletes data.
Before performing the factory data reset, remember to make back-up copies of all important data stored in the device.
- If you registered a Google Account to the device, you must sign in to the same Google Account after resetting the device.
Bluetooth device is not located
Make sure the Bluetooth wireless feature is activated on your device.
Make sure the Bluetooth wireless feature is activated on the device you wish to connect to.
Make sure your device and the other Bluetooth device are within the maximum Bluetooth range (10 m).
If the tips above do not solve your problem, contact a LG Electronics Service Center.
A connection is not established when you connect the device to a computer
Make sure the USB cable you are using is compatible with your device. Make sure you have the proper driver installed and updated on your computer.
Downloaded application causes a lot of errors
Application has problems.
Remove and reinstall the application.
natural_image
Line drawing of a hand holding a smartphone (no text or symbols)2
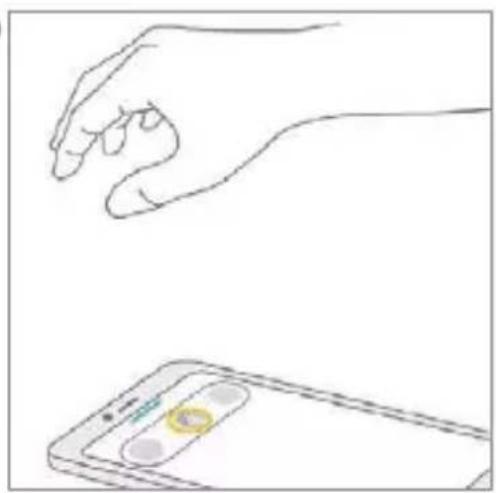
natural_image
Line drawing of a hand holding a smartphone with a circular app icon (no text or symbols)3
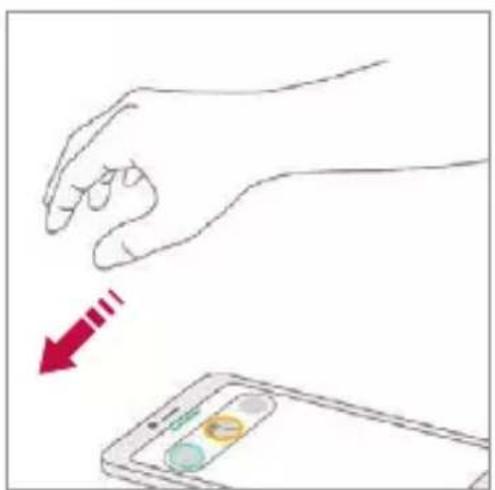
natural_image
Illustration of a hand holding a smartphone with a red arrow pointing to it, no text or symbols presentou
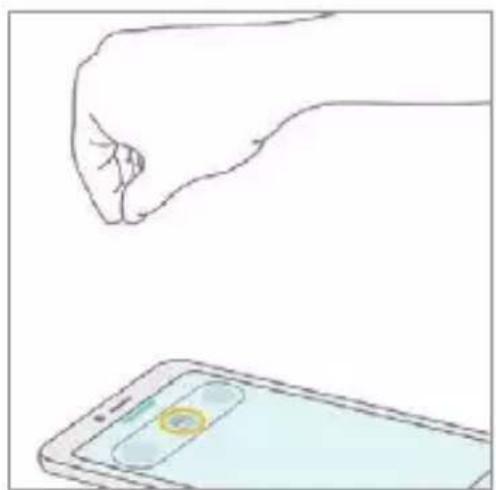
natural_image
Line drawing of a hand holding a smartphone with a circular app icon (no text or symbols)Commande de lecteur
Commande de volume

natural_image
Mountain landscape with evergreen trees and snow-capped peaks under a blue sky (no text or symbols visible)Caméra de recul
natural_image
Child sitting on a wooden dock beside a calm lake with grass and distant shoreline (no visible text or symbols)natural_image
Three-panel photo sequence showing a child sitting on a wooden dock, with hand cursor clicking the finger on the lock (no text or symbols)natural_image
Child sitting on a wooden dock beside a lake, with two small inset photos of children in the water (no text or symbols visible)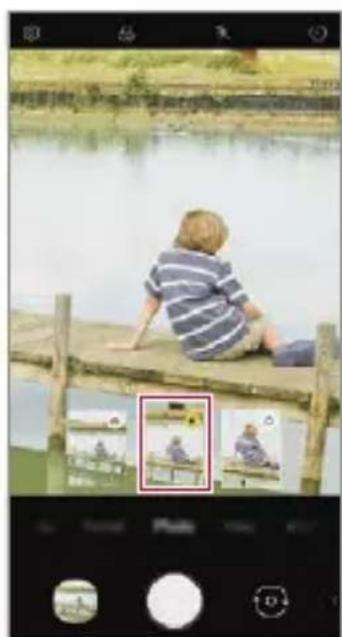
natural_image
Child sitting on a wooden dock beside a calm lake, with two small photos of birds on the water nearby (no text or symbols visible)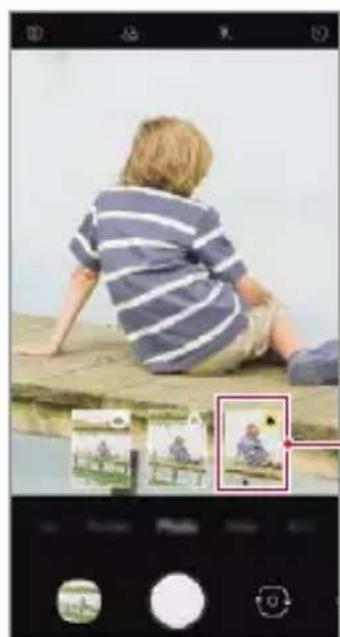
natural_image
Child sitting on a bench viewed from behind, with three small inset photos showing a person in the background (no text or symbols visible)natural_image
Woman and child at a birthday cake with party hat, smiling (no visible text or symbols)Utilisation de Mon avatar, AR Emoji, AR Sticker
natural_image
Illustration of a person in a red hoodie with a highlighted face, displayed within an app interface (no text or symbols on the image itself)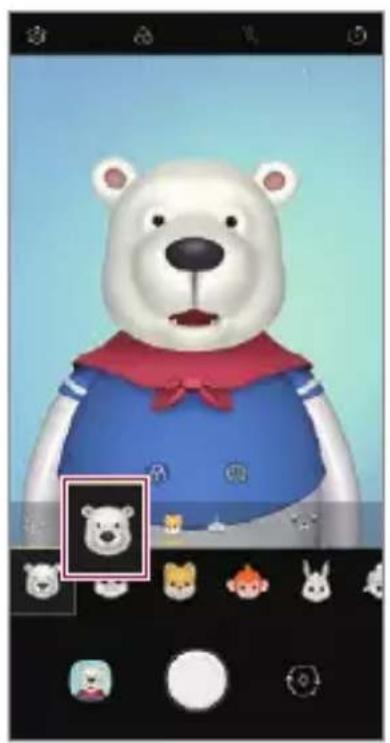
natural_image
Illustration of a polar bear wearing a blue outfit with red collar, accompanied by a small icon of a bear in the upper right corner (no text or symbols on the bear or background)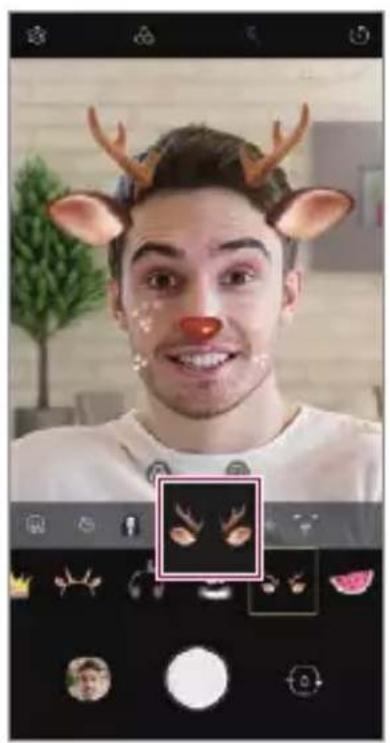
natural_image
Close-up of a person with reindeer antlers and a red nose, wearing a white top (no visible text or symbols)Mon Avatar AR Emoji Autocollant AR
natural_image
Scenic coastal landscape with lush green hills and distant mountains under a clear sky (no text or symbols visible)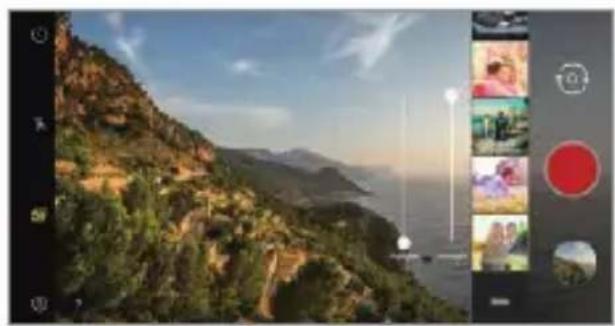
natural_image
Scenic coastal landscape with lush green hills and distant sea, overlaid with a photo editing interface panel (no readable text or symbols)
natural_image
Two-panel image: top shows three round stones on a leaf-covered surface; bottom shows vibrant red maple leaves in autumn foliage.natural_image
Collage of landscape photos showing a large wave crashing against rocky cliffs, with no visible text or symbols.Création d'un film
natural_image
Scenic coastal landscape with mountain peaks and a play button overlay (no readable text or symbols)
natural_image
Diagram showing a device with a button and a magnified view of its internal components (no text or symbols)- Touche Google Assistant
natural_image
Diagram of a smartphone showing the cable being inserted into a keyhole, with a magnified inset highlighting the cable attachment (no text or symbols present)2 Retirez le support de carte.
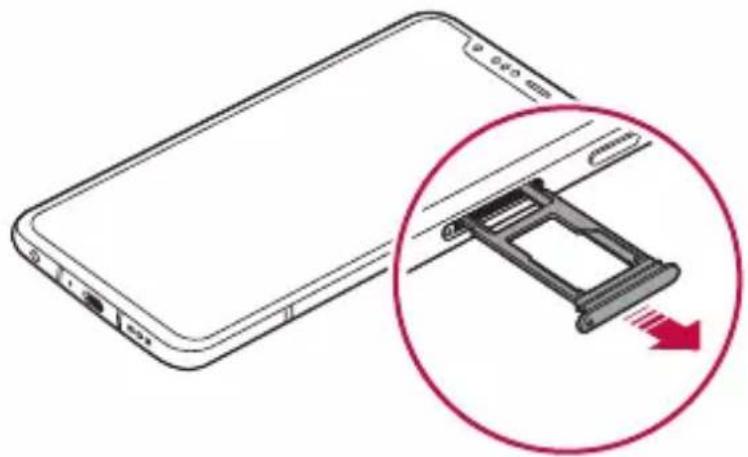
natural_image
Diagram of a smartphone showing internal components and a magnified view of the internal structure (no text or symbols)natural_image
Illustration of a smartphone with an inset showing a cable being inserted into a device (no text or symbols present)
natural_image
Hand pointing at a red circular button on a gray background (no text or symbols)natural_image
Hand pointing at a red circular button on a gray background (no text or symbols)Faire glisser
natural_image
Hand pointing at a button with bidirectional arrows (no text or symbols)Glisser
Rapprocher/écarter
natural_image
Hand pointing at a finger with red arrows indicating movement or force direction (no text or symbols)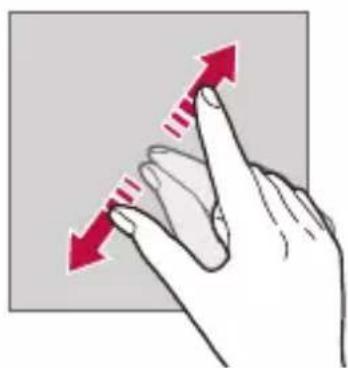
natural_image
Hand pointing upward with red arrows indicating movement (no text or symbols)
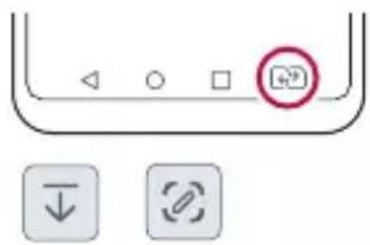

natural_image
Split image showing a coastal cliff with green vegetation on the left and a coastal cliff with rocky outcrops on the right, both connected by a red double-headed arrow (no text or symbols)Écran par défaut


natural_image
Scenic mountain landscape with evergreen trees and snow-capped peaks under a blue sky, alongside a vertical black-and-white photo editing interface (no text or symbols on the landscape itself)Vue nocturne
natural_image
Nighttime highway with light trails from traffic, captured through a smartphone camera interface (no visible text or symbols)Panorama
natural_image
Smartphone displaying a hot air balloon over a lake with forest and mountain background (no text or symbols)Cliché personnalisé

natural_image
Silhouettes of skiers mid-air above a snow-covered mountain peak under a clear blue sky (no text or symbols)Jump-cut flash
natural_image
A plated dish with sliced meat and herbs, served on a white plate, alongside a camera interface (no text or symbols visible)YouTube Live
Mode Apparel photo manuel
natural_image
Scenic mountain landscape with snow-capped peaks and evergreen trees under a blue sky (no text or symbols visible)


natural_image
Close-up portrait of a smiling man with curly hair, wearing a light blue shirt, hands clasped (no visible text or symbols)

natural_image
Illustration of a smartphone connected to a laptop via a cable, showing global network icons (no text or symbols present)Point d'accès Wi-Fi
DÉCLARATION DE CONFORMITÉ
LG Electronics European Shared Service Center B.V.
Krijgsman 1, 1186 DM Amstelveen, The Netherlands
Wi-Fi (WLAN)
natural_image
Line drawing of a hand holding a tablet device (no text or symbols)2
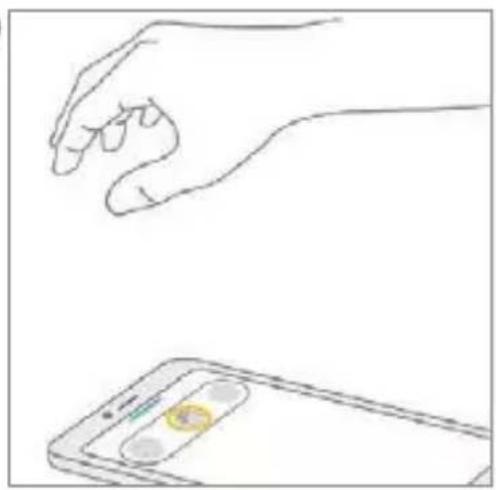
natural_image
Line drawing of a hand holding a smartphone with a circular app icon (no text or symbols)3
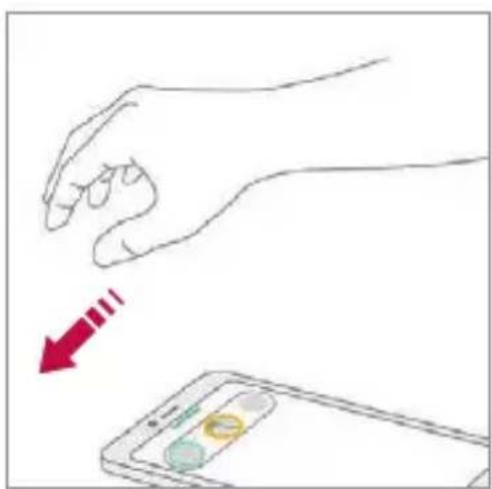
natural_image
Line drawing of a hand holding a smartphone with a red arrow pointing to it (no text or symbols present)sau
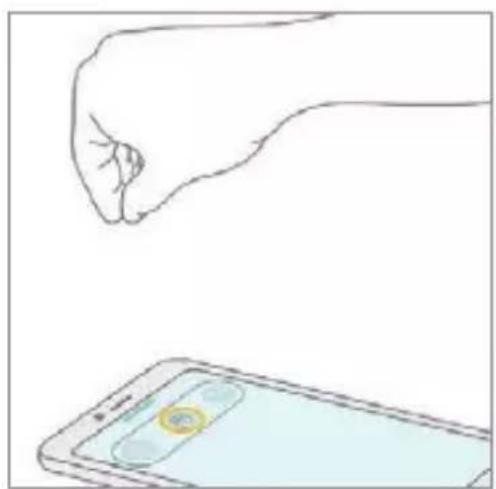
natural_image
Illustration of a hand holding a smartphone displaying a circular app icon (no text or symbols present)Sistem de control Player
Sistem de control volum

Sistem de control alarme

natural_image
Mountain landscape with evergreen trees and snow-capped peaks under a blue sky (no text or symbols visible)Unghi standard/ Telephoto/Unghi super larg
Camera din spate
Triple shot
natural_image
Child sitting on a wooden dock beside a calm lake with green grass and distant hills (no visible text or symbols)natural_image
Three-panel photo sequence showing a child sitting on a wooden dock near a lake, with hand cursor pointing at the finger (no text or symbols)natural_image
Person sitting on a wooden dock beside a lake, with three inset photos of people on a bench (no visible text or symbols)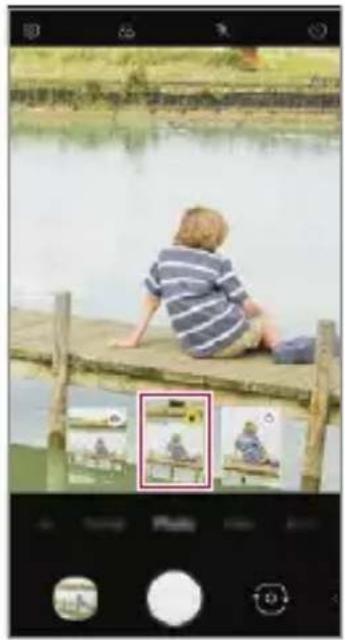
natural_image
Child sitting on a wooden dock beside a calm lake, looking out at three small photos (no text or symbols visible)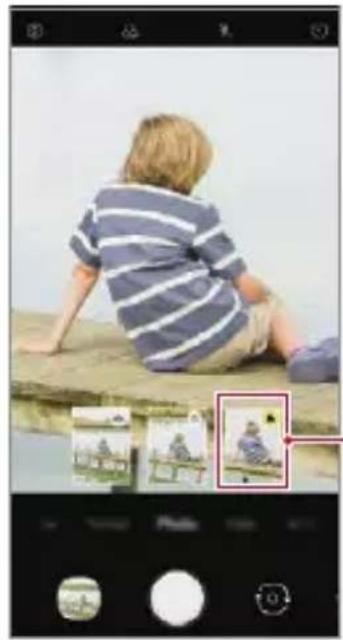
natural_image
Child sitting on a bench viewed from behind, with photo editing interface overlay (no readable text or symbols)natural_image
Two women smiling at a birthday cake, one wearing a party hat and the other a beanie (no visible text or symbols)Utilizare Avatarul meu, Emoticon AR, Autocolant AR
natural_image
Illustration of a woman in a red jacket with a highlighted face, displayed within an app interface (no text or symbols on the image itself)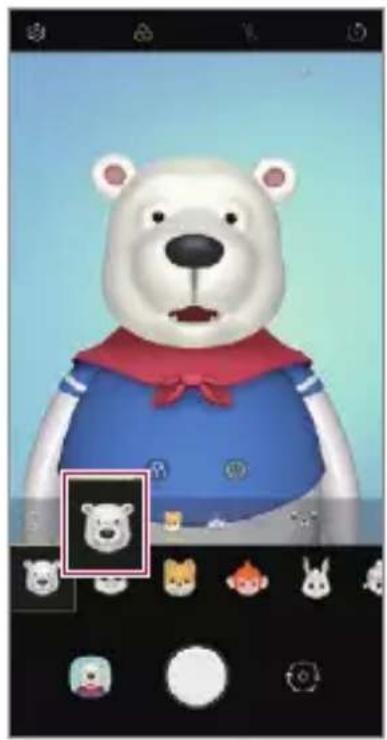
natural_image
Illustration of a polar bear wearing a blue sailor-style outfit with red collar, displayed within an app interface (no text or symbols on the bear or background)
natural_image
Person wearing reindeer head with antlers, smiling (no visible text or symbols)Avatarul meu Emoticon AR Autocolant AR
natural_image
Scenic coastal landscape with a hilltop overlooking the sea and greenery, no visible text or symbols
natural_image
Scenic mountain landscape at dusk with Great Wall and watchtowers, overlaid with a photo editing interface panel (no readable text or symbols)
natural_image
Two-panel image: top shows gray stones on autumn leaves; bottom shows vibrant red maple leaves in a garden setting (no text or symbols)natural_image
Collage of landscape photos showing a large wave crashing against rocky cliffs, with no visible text or symbols.Crearea unui film
natural_image
Video editing interface showing a coastal landscape with mountains and a play button, alongside a grid of thumbnail thumbnails below (no readable text or symbols)Crearea fotografiilor de tip GIF

natural_image
Diagram showing a device with a button and a magnified view of its internal components (no text or symbols)1 Atingeti Quick Help.
- Senzor ToF (Time-of-Flight)
natural_image
Diagram of a smartphone showing the cable being inserted into a keyhole, with a magnified inset highlighting the cable attachment (no text or symbols present)natural_image
Illustration of a smartphone with a magnified inset showing a mechanical component (no text or symbols)natural_image
Illustration of a smartphone with an inset showing a device being inserted (no text or symbols present)
natural_image
Hand pointing at a circular button on a plain background (no text or symbols)natural_image
Hand with index finger pressing a red circular button (no text or symbols)Tragere
natural_image
Hand pointing at a button with bidirectional arrows (no text or symbols)Glisarea
natural_image
Illustration of a hand pressing a button with a red arrow indicating right motion (no text or symbols)natural_image
Hand holding a finger with red arrows indicating movement or force direction (no text or symbols)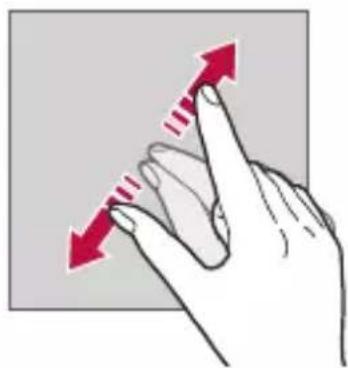
natural_image
Hand pointing upward with red arrows indicating movement (no text or symbols)
Blocare/ascundere butoane


natural_image
Split image showing a coastal cliff with misty sea and a coastal hillside with greenery, connected by a red double-headed arrow (no text or symbols)Ecran implicit
Vizualizarea temei de fundal


natural_image
Scenic mountain landscape with snow-capped peaks and evergreen trees, framed by a camera lens (no text or symbols visible)Vedere noapte
natural_image
Nighttime highway with light trails from multiple lanes, captured through a smartphone camera interface (no visible text or symbols)Panoramă
natural_image
Smartphone displaying a hot air balloon over a lake with forest and mountain background (no text or symbols)Poveste foto

natural_image
Silhouettes of skiers mid-air above a snow-covered mountain peak under a clear blue sky (no text or symbols)Salt și tăiere
natural_image
Plated dish of stir-fried vegetables with garnishes, served on a white plate (no text or symbols visible)YouTube Live
natural_image
Scenic mountain landscape with snow-capped peaks and evergreen trees, captured through a camera lens (no text or symbols visible)


natural_image
Close-up portrait of a smiling man with curly hair, wearing a light-colored shirt, against a beach background (no text or symbols visible)

natural_image
Illustration of a smartphone connected to a laptop via cable, showing global network icons (no text or symbols)Hotspotul Wi-Fi
DECLARATIE DE CONFORMITATE
natural_image
Line drawing of a hand holding a smartphone (no text or symbols)2
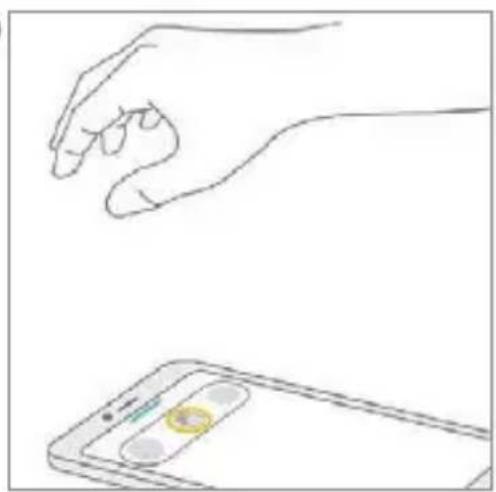
natural_image
Line drawing of a hand holding a smartphone with a circular app icon (no text or symbols)3

natural_image
Illustration of a hand holding glasses with a red arrow pointing to a smartphone displaying a yellow coin (no text or symbols)ali

natural_image
Illustration of a hand holding a smartphone displaying an app icon (no text or symbols present)natural_image
Mountain landscape with evergreen trees and snow-capped peaks under a cloudy sky (no text or symbols visible)natural_image
Child sitting on a wooden dock beside a lake with green vegetation and distant hills (no visible text or symbols)- videoposnetek s trojnim posnetkom je samodejno shranjen v Galerija.

- Med fotografiranjem napravo držite na miru, dokler ne bodo posnete tri fotografije.
Trojni predogled
natural_image
Three-panel photo sequence showing a child sitting on a wooden dock, looking at a camera interface with a hand pointing to the image (no text or symbols in the main scene)Prilagodite moč učinka zameglitve.
3 Ko se na zaslonu pojavi Portret je na voljo., za fotografiranje tapnite

- Kadar fotoaparat ne more prepoznati motiva, funkcija Portreta morda ne bo delovala.
Makeup Pro
Uporaba funkcije Moj avatarj, AR emoji, AR-nalepka
1 Tapnite ○ > preklopite na fotoaparat na sprednji strani in nato tapnite 🌿 > 😊
2 Izberite možnost, ki jo želite posneti.

natural_image
Illustration of a woman in a red jacket with a small inset portrait, displayed within a photo editing interface (no text or symbols on the main image)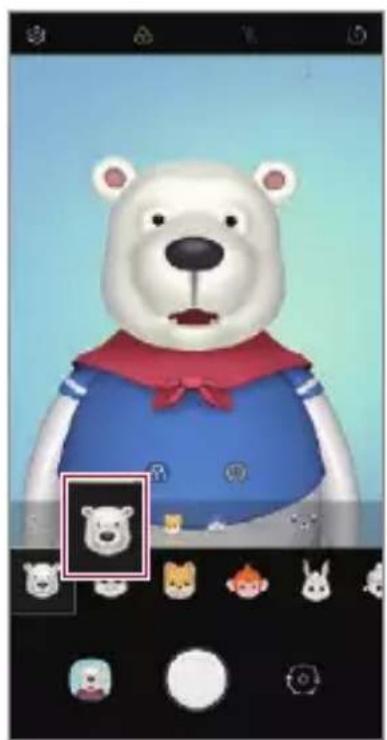
natural_image
Illustration of a polar bear wearing a blue sailor-style outfit with red bow, displayed within an app interface (no text or symbols on the character itself)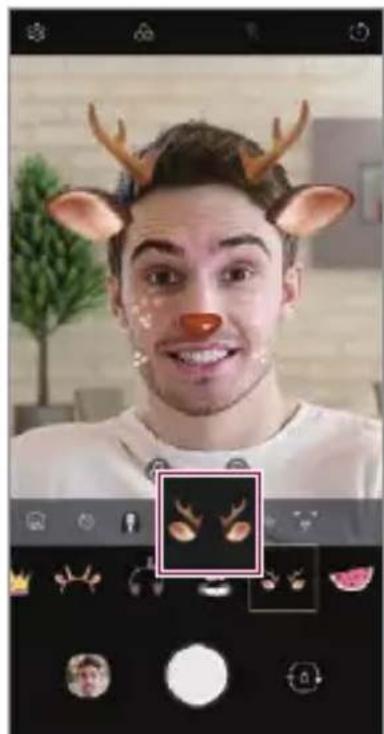
natural_image
Close-up of a person wearing a deer head with antlers, smiling (no visible text or symbols)Moj avatar AR emoji AR-nalepka
3 Za fotografiranje tapnite.
Za snemanje videoposnetka, kjer boste uporabili Moj avatar, AR Emoji ali AR-nalepka, izberite meni za snemanje videoposnetka in tapnite
AI CAM
1 Tapnite ○> in nato Več .>
2 Za snemanje 3-sekundnega videoa tapnite
• Med snemanjem videoposnetka napravo držite pri miru.
natural_image
Scenic coastal landscape with green hills, distant sea, and a red circular overlay on the right (no text or symbols)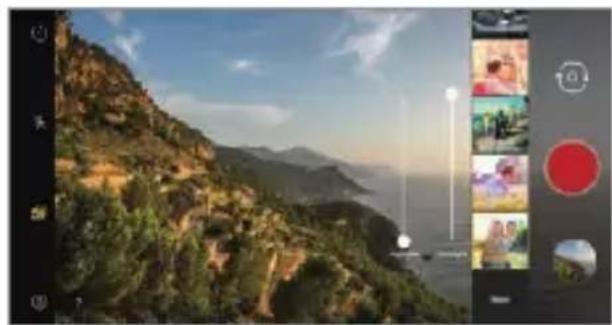
natural_image
Scenic coastal landscape with lush green hills and distant mountains under a clear sky, alongside a photo editing interface panel (no readable text or symbols on the landscape itself)
natural_image
Two-panel image: top shows gray stones on autumn leaves; bottom shows vibrant red maple leaves in a garden setting (no text or symbols)natural_image
Collage of six photographs showing a large wave crashing against the sea, with red rock formations in the foreground and sky in the background (no text or symbols visible)Ustvarjanje filma
natural_image
Scenic coastal landscape with mountains, sea, and a play button overlay (no readable text or symbols)Brisanje datotek
Ustvarjanje fotografij GIF
1 Na seznamu fotografij v galeriji se dotaknite : Ustvari GIF.
2 Izberite fotografijo, ki jo želite spremeniti v fotografijo GIF in se nato dotaknite Naprej.

- Za dostop do ostalih možnosti vrstice, na plavajoči vrstici podrsajte levo ali desno.
Premikanje Floating Bar
Plavajočo vrstico pritisnite in jo zadržite, nato jo povlecite na želeno lokacijo.
natural_image
Diagram showing a device with a button and circular connector, connected to a magnified view of a hand holding a small electronic component (no text or symbols present)• Tipalo ToF (Time-of-Flight)
- Tipka Google Assistant
- Vaša naprava ima vgrajeno funkcijo Google Assistant. Poiščite odgovore in urejajte zadeve, medtem ko ste na poti. Da začnete, se samo dotaknite tipke Google Assistant na strani telefona. Za hiter vnos govornih ukazov v vaš Pomočnik se dotaknite tipke in jo zadržite. Pritisnite dvakrat, da odprete Vizualni posnetek.
- Aktivirajte Google Assistant. Za podrobnosti si oglejte razdelek Google Assistant.
natural_image
Diagram of a smartphone showing the cable being inserted into a keyhole, with a magnified inset highlighting the internal structure (no text or symbols present)2 Izvlecite pladenj za kartice.
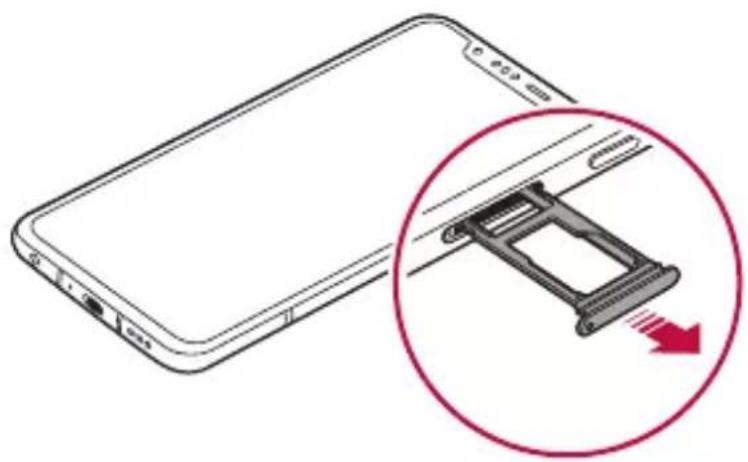
natural_image
Illustration of a smartphone with a magnified inset showing a mechanical component (no text or symbols)natural_image
Diagram showing a smartphone with an attached device and a magnified inset highlighting the internal structure (no text or symbols present)
natural_image
Hand pointing at a red circular button on a gray background (no text or symbols)Vlečenje
Pritisnite in pridržite element, denimo aplikacijo ali pripomoček, nato pa z nadzorovanim gibom premaknite prst na drugo mesto. S to potezo lahko premikate elemente.
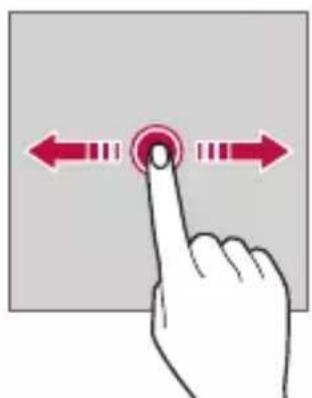
natural_image
Hand pointing at a button with bidirectional arrows (no text or symbols)Vlečenje
Približevanje in razmikanje prstov
Približajte dva prsta za pomanjševanje, denimo fotografije ali zemljevida. Za povečevanje prsta razmaknite.
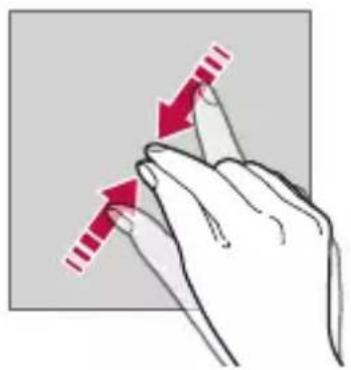
natural_image
Illustration of a hand holding a finger with red arrows indicating movement or force direction (no text or symbols)
natural_image
Hand pointing upward with red arrows indicating movement (no text or symbols)
Zaklepanje/skrivanje ikon

natural_image
Two scenic mountain landscapes with coastal waters and green slopes, one showing a red double-headed arrow indicating direction (no text or symbols)Urejanje osnovnega zaslona
Privzeti zaslon
Prikaz teme ozadja


• Ta funkcija je na voljo samo v nekaterih aplikacijah.
Telefon
Glasovni klic
natural_image
Scenic mountain landscape with snow-capped peaks and evergreen trees, framed by a camera lens (no text or symbols visible)Nočni pogled
natural_image
Nighttime highway photo with light trails from multiple lanes, captured through a camera interface (no visible text or symbols)Panorama
Panoramsko fotografijo ustvarite s premikanjem fotoaparata v eno smer, da neprekinjene posnetke zlepite v Wide view.
1 Tapnite ○>In nato Več .>
2 Tapnite in počasi premikajte fotoaparat v eno smer.
natural_image
Smartphone displaying a hot air balloon over a lake with forest and mountain background (no text or symbols)Slika z zgodbo
1 Tapnite ○> in nato Več .>
2 Za fotografiranje tapnite.

natural_image
Silhouettes of skiers on a snowy slope against a clear blue sky (no text or symbols)Izrez hitrega skoka
1 Tapnite ○> in nato Več .>
2 Za fotografiranje tapnite.
- Povlecite drsnik za barvo na zaslonu, da prilagodite ravnovesje beline in izberete najboljšo barvo.
- Če drsnik ni prikazan, tapnite -☀-, da prilagodite ravnovesje beline.
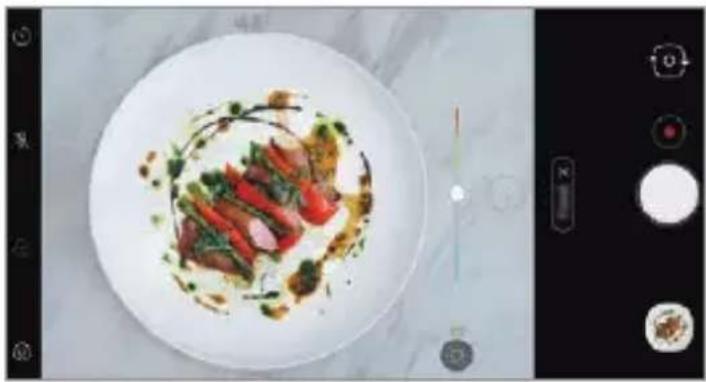
natural_image
Plated dish of cooked meat garnished with herbs and sauce, displayed in a white bowl (no text or symbols visible)YouTube Live
natural_image
Scenic mountain landscape with snow-capped peaks and evergreen trees under a blue sky (no text or symbols visible)


natural_image
Close-up portrait of a smiling person with curly hair, wearing a light blue shirt, against a bright outdoor background (no text or symbols visible)
- Tapnite 🎨 > Samoportret je posnet > Samodejni posnetek, da omogočite funkcijo Samodejni posnetek.
Intervalno fotografiranje
Samoportrete lahko snemate v intervalih.
• Prikaz dnevnika vadbe na želeni dan.
natural_image
Illustration of a smartphone connected to a laptop via cable, showing global network icons (no text or symbols)Wi-Fi Vroča točka
• Copyright ©2020 LG Electronics Inc. Vse pravice pridržane. LG in logotip LG sta registrirani blagovni znamki družbe LG Group in povezanih podjetij.
Izjava o varnosti laserja
Pozor!
IZJAVA O SKLADNOSTI
S tem LG Electronics izjavlja, da je ta izdelek LM-G810EAW v skladu z bistvenimi zahtevami in drugimi ustreznimi določili direktive 2014/53/EU.
natural_image
Line drawing of a hand holding a smartphone (no text or symbols)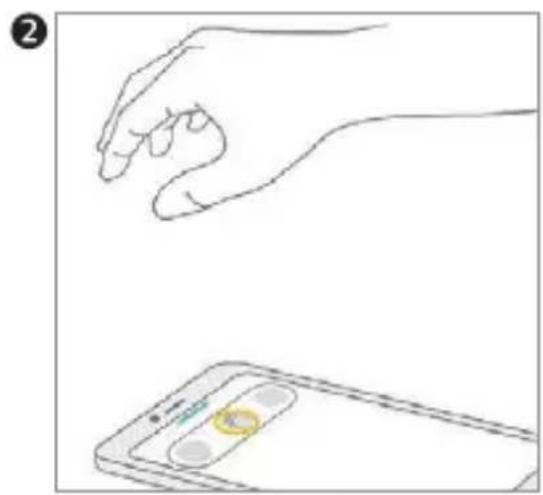
natural_image
Line drawing of a hand holding a smartphone with a circular app icon (no text or symbols)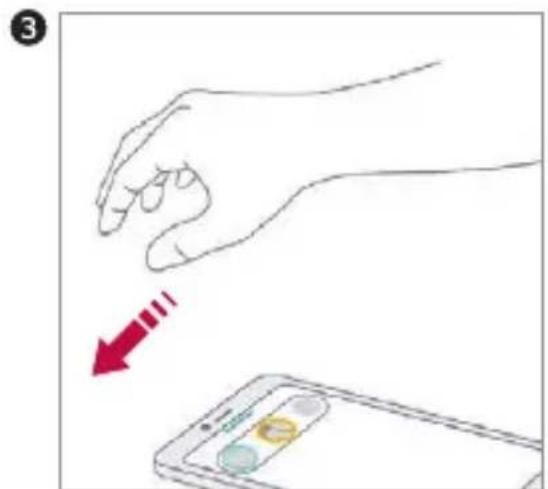
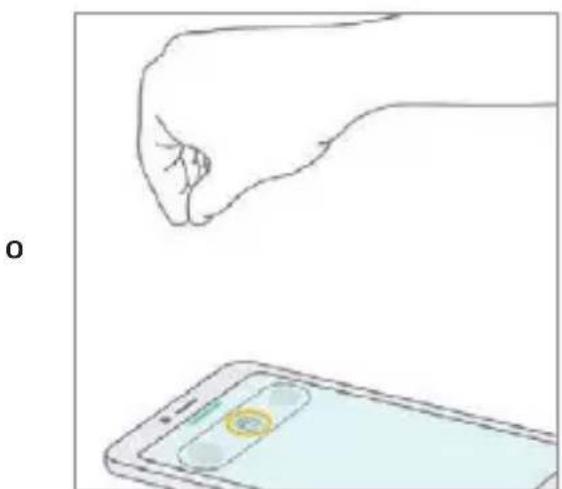
natural_image
Illustration showing a hand holding a smartphone with an app interface (no text or symbols)natural_image
Mountain landscape with evergreen trees and clear blue sky, no visible text or symbolsnatural_image
Child sitting on a wooden dock beside a calm lake with green grass and distant buildings (no visible text or symbols)natural_image
Three-panel photo sequence showing a child sitting on a wooden bridge near a lake, with a hand pointing at the finger on the right (no text or symbols)natural_image
Child sitting on a wooden dock beside a lake, with three small inset photos of a person on a bench (no text or symbols visible)
natural_image
Child sitting on a wooden dock beside a calm water body, with two small photos of birds on the right (no visible text or symbols)
natural_image
Child sitting on a bench looking at a photo frame, with three small photos shown below (no text or symbols visible)natural_image
A woman and a child wearing party hats, smiling while holding a birthday cake (no visible text or symbols)natural_image
Illustration of a person in a red hoodie with a highlighted inset portrait (no text or symbols)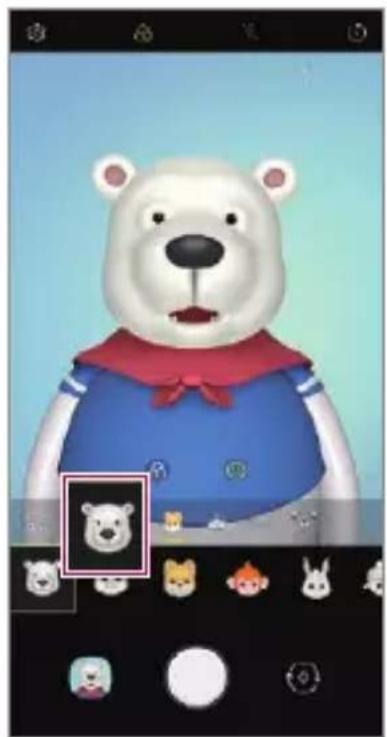
natural_image
Illustration of a polar bear wearing a blue sailor-style outfit with red collar, displayed within an app interface (no text or symbols on the bear or background)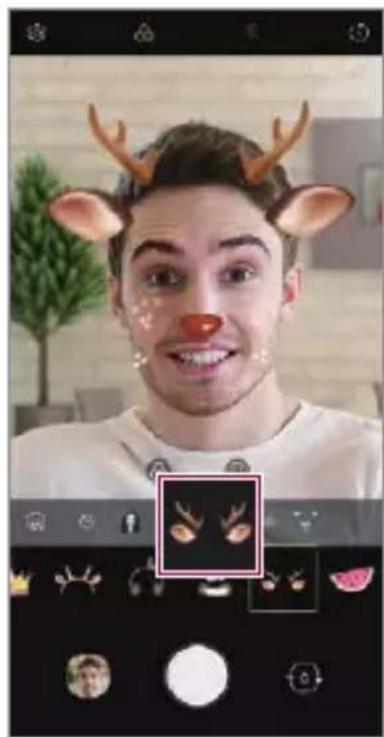
natural_image
Scenic coastal landscape with green hills and ocean, no visible text or symbols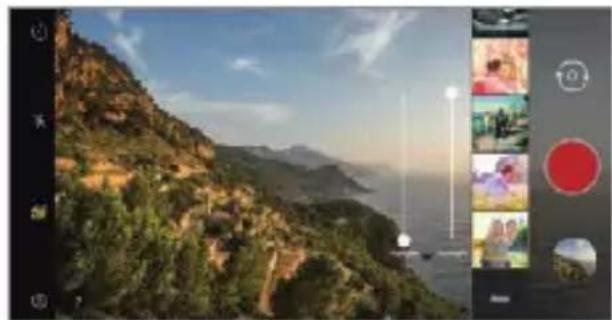
natural_image
Scenic coastal landscape with lush green hills and distant mountains under a clear sky, overlaid with a photo editing interface panel (no readable text or symbols on the landscape itself)
natural_image
Two-panel image: top shows three round stones on a leaf-covered surface; bottom shows vibrant red maple leaves in autumn foliage.natural_image
Collage of landscape photos showing a large wave crashing against rocky cliffs, with no visible text or symbols.Crear una película
natural_image
Video editing interface showing a coastal landscape with mountains and sky, alongside a grid of thumbnail thumbnails of scenic landscapes.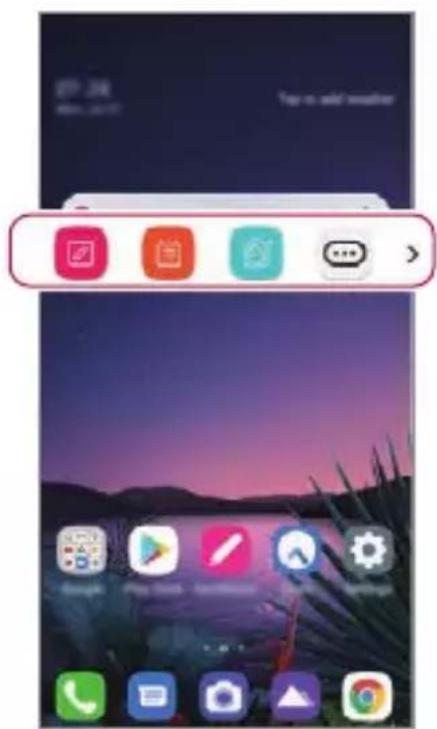
natural_image
Diagram showing a device with a button and a magnified view of its internal components (no text or symbols)natural_image
Diagram of a smartphone showing the cable being inserted into a keyhole, with a magnified inset highlighting the connector (no text or symbols present)natural_image
Illustration of a smartphone with a magnified inset showing a mechanical component (no text or symbols)natural_image
Diagram showing a smartphone with an attached device and a magnified inset highlighting the internal structure (no text or symbols present)
natural_image
Hand pointing at a red circular button on a gray background (no text or symbols)Arrastrar
natural_image
Hand pointing at a button with bidirectional arrows (no text or symbols)Deslizar
natural_image
Illustration of a hand pressing a button with a red arrow, no text or symbols presentnatural_image
Hand pointing to a red arrow with motion lines, no text or symbols present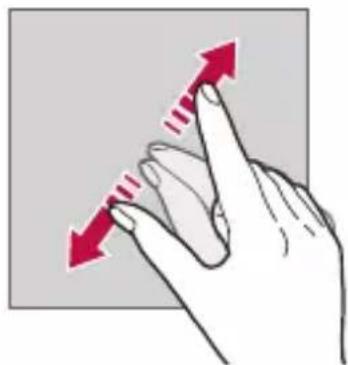
natural_image
Hand pointing upward with red arrows indicating movement (no text or symbols)
natural_image
Split image showing a coastal cliff with misty sky and a coastal hillside with greenery, connected by a red double-headed arrow (no text or symbols)Pantalla predeterminada


natural_image
Scenic mountain landscape with snow-capped peaks and evergreen trees, adjacent to a camera lens interface (no text or symbols on the landscape itself)Vista Nocturna
natural_image
Nighttime highway with light trails from multiple lanes, captured through a camera interface (no visible text or symbols)Panorámica
natural_image
Smartphone displaying a hot air balloon over a lake with forest and mountain background (no text or symbols)Captura de historia

natural_image
Silhouettes of skiers mid-air above a snow-covered mountain peak under a clear blue sky (no text or symbols)Flash Jump-Cut
natural_image
Plated dish of stir-fried vegetables with herbs and sauce, displayed in a white bowl (no text or symbols visible)YouTube Live
natural_image
Scenic mountain landscape with snow-capped peaks and evergreen trees, captured through a camera lens (no text or symbols visible)


natural_image
Close-up portrait of a smiling person with curly hair, wearing a light blue shirt, against a bright outdoor background (no text or symbols visible)
Disparo a intervalo (Selfies)

natural_image
Illustration of a smartphone connected to a laptop via cable, showing global network icons (no text or symbols)LG Electronics European Shared Service Center B.V.
Krijgsman 1, 1186 DM Amstelveen, The Netherlands
Wi-Fi (WLAN)
natural_image
Line drawing of a hand holding a tablet device (no text or symbols)2
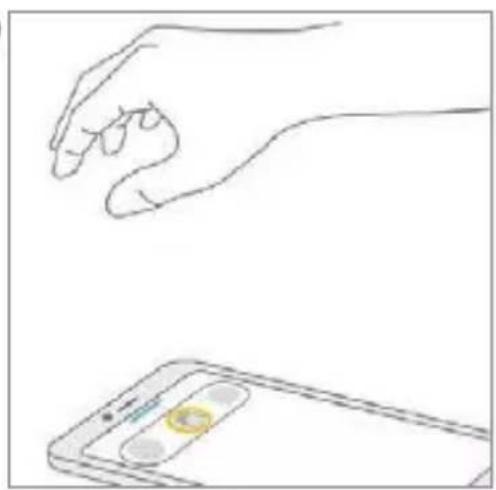
natural_image
Line drawing of a hand holding a smartphone with a circular app icon (no text or symbols)3
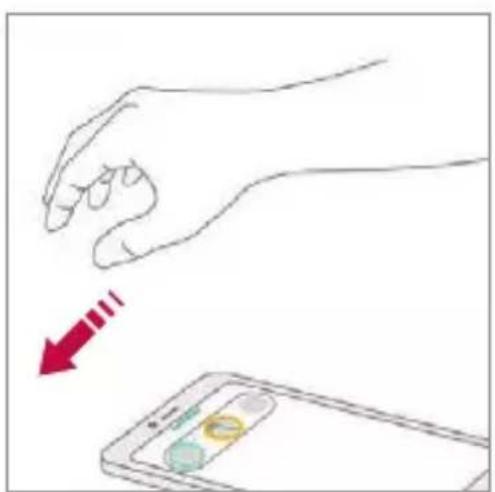
natural_image
Illustration of a hand holding a smartphone with a red arrow pointing to it, no text or symbols presentlub
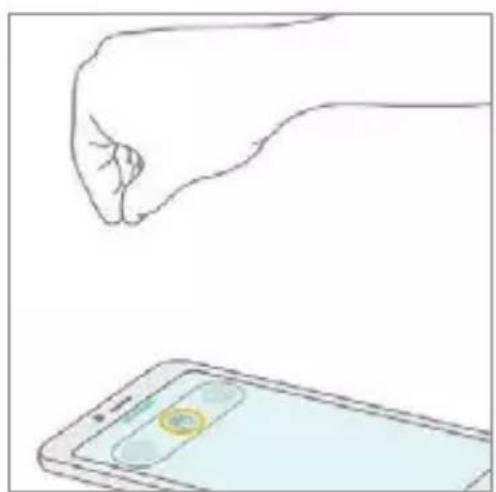
natural_image
Line drawing of a hand holding a smartphone with a circular app icon (no text or symbols)natural_image
Child sitting on a wooden dock beside a calm lake, with green fields and distant hills in the background (no visible text or symbols)natural_image
Three-panel photo sequence showing a child sitting on a wooden dock near a lake, with a hand pointing at the finger on the right (no text or symbols)natural_image
Woman and child at a birthday cake with party hats, smiling (no visible text or symbols)natural_image
Illustration of a woman with short brown hair wearing a red jacket, displayed in a smartphone interface (no text or symbols on the image itself)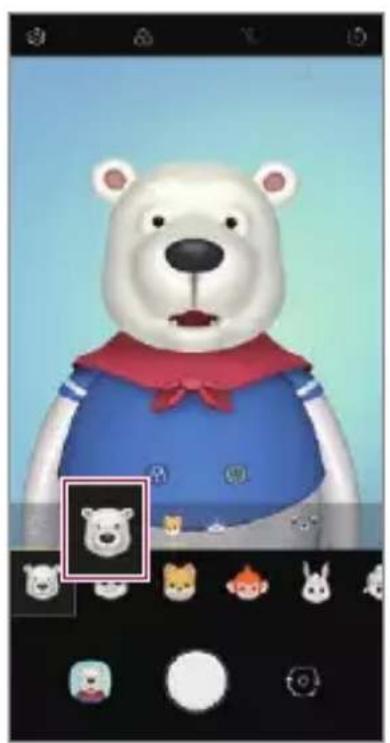
natural_image
Illustration of a polar bear wearing a blue sweater with a red bow, displayed within an app interface (no text or symbols on the bear or background)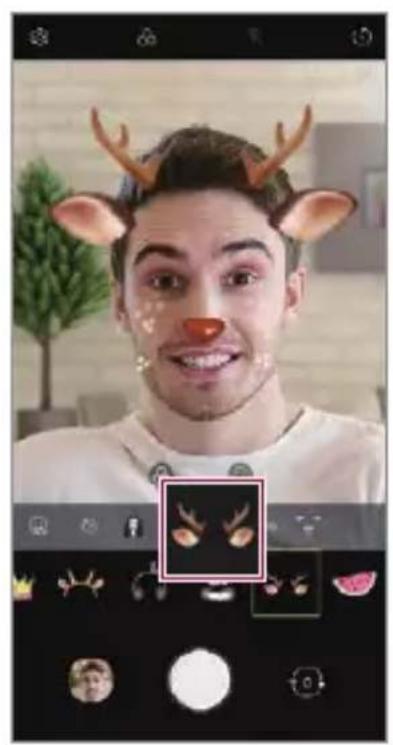
natural_image
Scenic coastal view with a hillside village and sea, no visible text or symbols
natural_image
Scenic coastal landscape with green hills and distant mountains under a twilight sky, alongside a photo editing interface panel (no readable text or symbols)
natural_image
Two-panel image: top shows two gray stones on a red autumn leaf; bottom shows vibrant red maple leaves in autumn foliage (no text or symbols)natural_image
Collage of landscape photos including a large wave, desert rock formations, and a person on the water surface (no text or symbols visible)Tworzenie filmu
natural_image
Scenic coastal landscape with mountain peaks and a play button overlay (no readable text or symbols)Usuwanie plików
Tworzenie zdjęć GIF
