USER MANUAL One+ RY18CS20A RYOBI
natural_image
Close-up of a Ryobi brand motorcycle component with visible branding (no readable text beyond logo)
natural_image
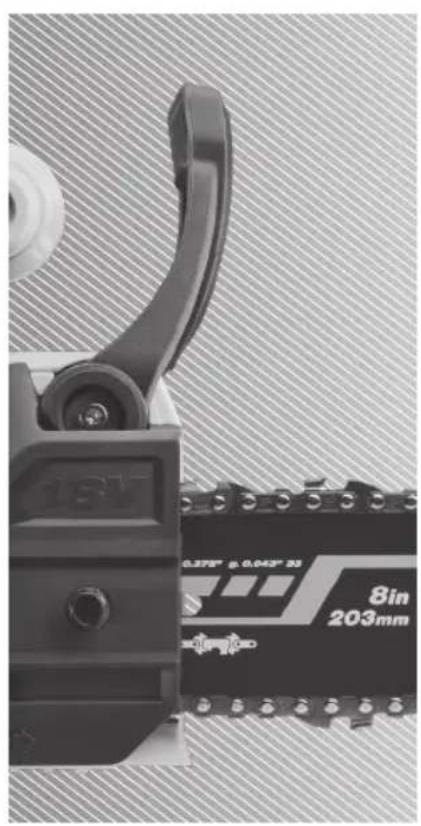
Close-up of a mechanical component with a curved handle and a 203mm base (no visible text or symbols)

EN
FR
DE
ES
IT
NL
PT
DA
SV
FI
NO
RU
PL
CS
HU
RO
LV
LT
ET
HR
SL
SK
BG
UK
TR
RY18CS20A

| Important! | It is essential that you read the instructions in this manual before assembling, maintaining and operating the product. |
| Attention! | Il est essentiel que vous lisiez les instructions contenues dans ce manuel avant d'assembler, d'entretenir et d'utiliser le produit. |
| Achtung! | Es ist wichtig, dass Sie vor Zusammenbau, Wartung und Benutzung des Produktes die Anweisungen in dieser Anleitung lesen. |
| ¡Atención! | Resulta fundamental que lea este manual de instrucciones antes de realizar el montaje, el mantenimiento y de utilizar este producto |
| Attenzione! | E’ importante leggere le istruzioni contenute nel presente manuale prima di montare il prodotto, svolgere le operazioni di manutenzione sullo stesso e metterlo in funzione. |
| Let op! | Het is van essentieel belang dat u de instructies in deze gebruiksaanwijzing leest voor u het product monteert, onderhoudt en gebruikt. |
| Atenção! | É fundamental que leia as instruções deste manual antes da montagem, manutenção e operação do aparelho. |
| OBS! | Det er vigtigt, at man læser instrukserne i denne brugsanvisning, inden man samler, vedligeholder og betjener produktet. |
| Observera! | Det är viktigt att du läser instruktionerna i manualen före montering, användning och underhåll av produkten. |
| Huomio! | On tärkeää, että luet tämän käsikirjan ohjeet ennen tuotteen kokoamista, huoltoa ja käyttöä. |
| Advarsel! | Det er viktig at du leser instruksjonene i denne manualen før sammensetning, vedlikehold og bruk av produktet |
| Внимание! | Необходимо прочитать инструкции в данном руководстве перед сборкой, обслуживанием и эксплуатацией этого изделия. |
| Uwaga! | Koniecznie należy przeczytać instrukcje zawarte w tym podręczniku przed montażem, obsługą oraz konserwacją produktu. |
| Dûležité upozornění! | Neinstalujte, neprovádějte údržbu ani nepoužívejte tento výrobek dříve, než si přečtete pokyny uvedené v tomto návodu. |
| Figyelem! | Fontos, hogy a termék összeszerelése, karbantartása és használata előtt elolvassa a kézikönyvben található utasításokat. |
| Atenție! | Este esențial să citiți instrucțiunile din acest manual înainte de asamblare, efectuarea întreținerii și operarea produsului. |
| Uzmanību! | Ir svarīgi izlasīt šīs rokasgrāmatas instrukcijas pirms uzstādīšanas, apkopes un preces darbināšanas. |
| Dèmesio! | Prieš surenkant, prižiūrint ir naudojant gaminį, būtina perskaityti šiame vadove pateiktus nurodymus. |
| Tähtis! | Enne masina kokkupanekut, hooldamist ja kasutama hakkamist tuleb käesolevas juhendis esitatud juhised kindlasti läbi lugeda. |
| Upozorenje! | Vrlo je važno da ste prije sklapanja, održavanja i rada s ovim proizvodom pročitali upute u ovom priručniku. |
| Pomembno! | Pomembno je da pred montažo vzdrževanjem in uporabo tega izdelka preberete navodila v tem priročniku. |
| Upzornenie! | Je dôležité, aby ste si pred montážou, údržbou a obsluhou produktu prečitali pokyny v tomto návode. |
| Важно! | Изключително важно е да прочетете инструкциите в настоящото ръководство, преди да преминете към сглобяване, поддръжка или работа с продукта. |
| Важливо! | Дуже важливо, щоб ви прочитали інструкції в цьому керівництві перед складанням, обслуговуванням та експлуатацією цієї машини. |
| Önemli! | Ürünü monte etmeden, kullanmadan ve bakımını yapmadan önce bu kılavuzdaki talimatları okumanız önemlidir. |
Subject to technical modification | Sous réserve de modifications techniques | Technische Änderungen vorbehalten | Bajo reserva de modificaciones técnicas | Con riserva di eventuali modifiche tecniche | Technische wijzigingen voorbehouden | Com reserva de modificações técnicas | Med forbehold for tekniske ændringer | Med förbehåll för tekniska ändringar | Tekniset muutokset varataan | Med forbehold om tekniske endringer | могут быть внесены технические изменения | Z zastrzeżeniem modyfikacji technicznych | Změny technických údajů vyhrazeny | A můszaki módosítás jogát fenntartjuk | Sub rezerva modificațiilor tehnice | Paturam tiesības mainīt tehniskos raksturlielumus | Pasiliekant teisę daryti techninius pakeitimus | Tehnilised muudatused võimalikud | Podloæno tehniëkim promjenama | Tehnične spremembe dopuščene | Právo na technické zmeny je vyhradené | Подлежи на технически модификации | Є ob’єктом для технічних змін | Teknik değişikliğe tabidir.
Safety, performance, and dependability have been given top priority in the design of your cordless chainsaw.
INTENDED USE
The cordless chainsaw is intended for outdoor use only. For safety reasons, the product must be adequately controlled by using a two-handed operation at all times.
The product is designed for cutting branches, logs, and beams of a diameter determined by the cutting length of the guide bar. It is designed to cut wood only.
The product is to be used in domestic applications only by adults who have received adequate training on the hazards and preventative measures to be taken while using the product. It should not be used for professional tree services.
Do not use the product for any other purpose.
GENERAL PRODUCT SAFETY WARNINGS
⚠ WARNING! Read all safety warnings, instructions, illustrations and specifications provided with this power tool. Failure to follow all instructions listed below may result in electric shock, fi re, and/or serious injury.
Save all warnings and instructions for future reference.
The term “power tool” in the warnings refers to your mains-operated (corded) product or battery-operated (cordless) product.
WORK AREA SAFETY
- Keep work area clean and well lit. Cluttered or dark areas invite accidents.
- Do not operate power tools in explosive atmospheres, such as in the presence of flammable liquids, gases or dust. Power tools create sparks which may ignite the dust or fumes.
- Keep children and bystanders away while operating a power tool. Distractions can cause you to lose control.
ELECTRICAL SAFETY
■ Power tool plugs must match the outlet. Never modify the plug in any way. Do not use any adapter plugs with earthed (grounded) power tools. Unmodified plugs and matching outlets will reduce risk of electric shock.
- Avoid body contact with earthed or grounded surfaces, such as pipes, radiators, ranges and refrigerators. There is an increased risk of electric shock if your body is earthed or grounded.
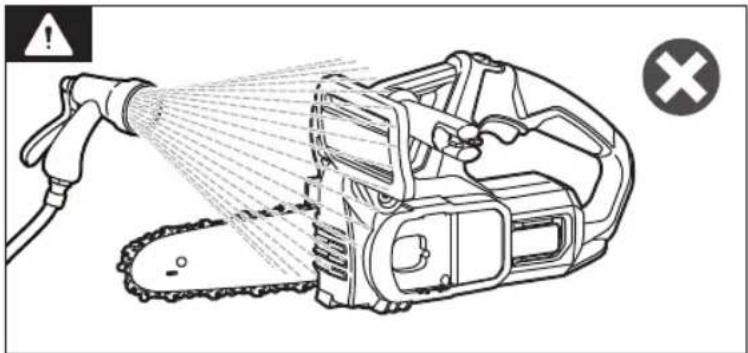
- Do not expose power tools to rain or wet conditions. Water entering a power tool will increase the risk of electric shock.
- Do not abuse the cord. Never use the cord for carrying, pulling or unplugging the power tool. Keep cord away from heat, oil, sharp edges or moving parts. Damaged or entangled cords increase the risk of electric shock.
- When operating a power tool outdoors, use an extension cord suitable for outdoor use. Use of a cord suitable for outdoor use reduces the risk of electric shock.
■ If operating a power tool in a damp location is unavoidable, use a residual current device (RCD) protected supply. Use of an RCD reduces the risk of electric shock.
PERSONAL SAFETY
■ Stay alert, watch what you are doing and use common sense when operating a power tool. Do not use a power tool while you are tired or under the influence of drugs, alcohol or medication. A moment of inattention while operating power tools may result in serious personal injury.
■ Use personal protective equipment. Always wear eye protection. Protective equipment such as a dust mask, non-skid safety shoes, hard hat or hearing protection used for appropriate conditions will reduce personal injuries.
■ Prevent unintentional starting. Ensure the switch is in the off-position before connecting to power source and/or battery pack, picking up or carrying the tool. Carrying power tools with your finger on the switch or energising power tools that have the switch on invites accidents.
■ Remove any adjusting key or wrench before turning the power tool on. A wrench or a key left attached to a rotating part of the power tool may result in personal injury.
■ Do not overreach. Keep proper footing and balance at all times. This enables better control of the power tool in unexpected situations.
■ Dress properly. Do not wear loose clothing or jewellery. Keep your hair and clothing away from moving parts. Loose clothes, jewellery or long hair can be caught in moving parts.
If devices are provided for the connection of dust extraction and collection facilities, ensure these are connected and properly used. Use of dust collection can reduce dust-related hazards.
- Do not let familiarity gained from frequent use of tools allow you to become complacent and ignore tool safety principles. A careless action can cause severe injury within a fraction of a second.
- Do not force the power tool. Use the correct power tool for your application. The correct power tool will do the job better and safer at the rate for which it was designed.
- Do not use the power tool if the switch does not turn it on and off. Any power tool that cannot be controlled with switch is dangerous and must be repaired.
- Disconnect the plug from the power source and/or remove the battery pack, if detachable, from the power tool before making any adjustments, changing accessories, or storing power tools. Such preventive safety measures reduce the risk of starting the power tool accidentally.
■ Store idle power tools out of the reach of children and do not allow persons unfamiliar with the power tool or these instructions to operate the power tool. Power tools are dangerous in the hands of untrained users.
- Maintain power tools and accessories. Check for misalignment or binding of moving parts, breakage of parts and any other condition that may affect the power tool's operation. If damaged, have the power tool repaired before use. Many accidents are caused by poorly maintained power tools.
- Keep cutting tools sharp and clean. Properly maintained cutting tools with sharp cutting edges are less likely to bind and are easier to control.
■ Use the power tool, accessories and tool bits etc. in accordance with these instructions, taking into account the working conditions and the work to be performed. Use of the power tool for operations different from those intended could result in a hazardous situation.
- Keep handles and grasping surfaces dry, clean and free from oil and grease. Slippery handles and grasping surfaces do not allow for safe handling and control of the tool in unexpected situations.
■ Recharge only with the charger specified by the manufacturer. A charger that is suitable for one type of battery pack may create a risk of fire when used with another battery pack.
■ Use power tools only with specifically designated battery packs. Use of any other battery packs may create a risk of injury and fire.
- When battery pack is not in use, keep it away from other metal objects, like paper clips, coins, keys, nails, screws or other small metal objects, that can make a connection from one terminal to another. Shorting the battery terminals together may cause burns or a fire.
■ Under abusive conditions, liquid may be ejected from the battery; avoid contact. If contact accidentally occurs, flush with water. If liquid contacts eyes, additionally seek medical help. Liquid ejected from the battery may cause irritation or burns.
- Do not use a battery pack or tool that is damaged or modified. Damaged or modified batteries may exhibit unpredictable behaviour resulting in fire, explosion or risk of injury.
- Do not expose a battery pack or tool to fire or excessive temperature. Exposure to fire or temperature above 130°C may cause explosion.
■ Follow all charging instructions and do not charge the battery pack or tool outside the temperature range specified in the instructions. Charging improperly or at temperatures outside the specified range may damage the battery and increase the risk of fire.
SERVICE
■ Have your power tool serviced by a qualified repair person using only identical replacement parts. This will ensure that the safety of the power tool is maintained.
■ Never service damaged battery packs. Service of battery packs should only be performed by the manufacturer or authorized service providers.
GENERAL CHAINSAW SAFETY WARNINGS
- Keep all parts of the body away from the saw chain when the chainsaw is operating. Before you start the chainsaw, make sure the saw chain is not contacting anything. A moment of inattention while operating chainsaws may cause entanglement of your clothing or body with the saw chain.
■ Always hold the chainsaw with your right hand on the rear handle and your left hand on the front handle. Holding the chainsaw with a reversed hand configuration increases the risk of personal injury and should never be done.
- Hold the chainsaw by insulated gripping surfaces only, because the saw chain may contact hidden wiring. Saw chains contacting a "live" wire may make exposed metal parts of the chainsaw "live" and could give the operator an electric shock.
■ Wear eye protection. Further protective equipment for hearing, head, hands, legs and feet is recommended. Adequate protective equipment will reduce personal injury by flying debris or accidental contact with the saw chain.
- Do not operate a chainsaw in a tree, on a ladder, from a rooftop, or any unstable support. Operation of a chainsaw in this manner could result in serious personal injury.
■ Always keep proper footing and operate the chainsaw only when standing on fixed, secure and level surface. Slippery or unstable surfaces may cause a loss of balance or control of the chainsaw.
- When cutting a limb that is under tension, be alert for spring back. When the tension in the wood fibres is released, the spring loaded limb may strike the operator and/or throw the chainsaw out of control.
■ Use extreme caution when cutting brush and saplings. The slender material may catch the saw chain and be whipped toward you or pull you off balance.
- Carry the chainsaw by the front handle with the chainsaw switched off and away from your body. When transporting or storing the chainsaw, always fit the guide bar cover. Proper handling of the chainsaw will reduce the likelihood of accidental contact with the moving saw chain.
■ Follow instructions for lubricating, chain tensioning and changing the bar and chain. Improperly tensioned or lubricated chain may either break or increase the chance for kickback.
- Cut wood only. Do not use chainsaw for purposes not intended. For example: do not use chainsaw for cutting metal, plastic, masonry or non-wood building materials. Use of the chainsaw for operations different than intended could result in a hazardous situation.
This chainsaw is not intended for tree felling. Use of the chainsaw for operations different that intended could result in serious injury to the operator or bystanders.
■ Follow all instructions when clearing jammed material, storing or servicing the chainsaw. Make sure the switch is off and the battery pack is removed. Unexpected actuation of the chainsaw while clearing jammed material or servicing may result in serious personal injury.
CAUSES AND OPERATOR PREVENTION OF KICKBACK:
Kickback may occur when the nose or tip of the guide bar touches an object, or when the wood closes in and pinches the saw chain in the cut.
Tip contact in some cases may cause a sudden reverse reaction, kicking the guide bar up and back towards the operator.
Pinching the saw chain along the top of the guide bar may push the guide bar rapidly back towards the operator.
Either of these reactions may cause you to lose control of the saw which could result in serious personal injury. Do not rely exclusively upon the safety devices built into your saw. As a chainsaw user, you should take several steps to keep your cutting jobs free from accident or injury.
Kickback is the result of chainsaw misuse and/or incorrect operating procedures or conditions and can be avoided by taking proper precautions as given below:
- Maintain a firm grip, with thumbs and fingers encircling the chainsaw handles, with both hands on the saw and position your body and arm to allow you to resist kickback forces. Kickback forces can be controlled by the operator, if proper precautions are taken. Do not let go of the chainsaw.
- Do not overreach and do not cut above shoulder height. This helps prevent unintended tip contact and enables better control of the chainsaw in unexpected situations.
■ Only use replacement guide bars and saw chains specified by the manufacturer. Incorrect replacement guide bars and saw chains may cause chain breakage and/or kickback.
- Follow the manufacturer's sharpening and maintenance instructions for the saw chain. Decreasing the depth gauge height can lead to increased kickback.
ADDITIONAL SAFETY WARNINGS
■ Attend a professionally organised course on the use and maintenance of chainsaws, preventative actions, and first aid. Keep these instructions safe for later use.
■ Chainsaws are potentially dangerous tools. Accidents involving the use of chainsaws often result in loss of limbs or death. Falling branches, toppling trees, rolling logs can all kill. Diseased or rotting timber poses additional hazards. Assess your capability of completing the task safely. If there is any doubt, leave it to a professional tree surgeon.
■ Do not cut vines or small undergrowth (less than 75 mm in diameter).
It is recommended to practise cutting logs on a saw-horse or cradle when operating the product for the first time.
■ The size of the work area depends on the job being performed and the size of the tree or workpiece involved. For example, felling a tree requires a larger work area than making other cuts, such as bucking cuts. The operator needs to be aware and in control of everything happening in the work area.
- Do not cut with your body in line with the guide bar and chain. If you experience kickback, this position helps prevent the chain from coming into contact with your head or body.
- Do not use a back-and-forward sawing motion. Let the chain do the work. Keep the chain sharp, and do not try to push the chain through the cut.
- Do not put pressure on the saw at the end of the cut. Be ready to take on the weight of the saw as it cuts free from the wood. Failure to do so could result in possible serious personal injury.
- Do not stop the saw in the middle of a cutting operation. Keep the saw running until it is already removed from the cut.
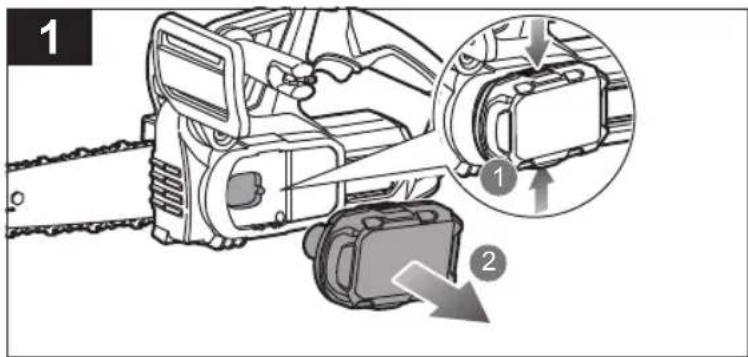
■ To reduce the risk of injury associated with contacting moving parts, always turn off the product, remove the battery pack, and make sure that all moving parts have come to a complete stop:
• before cleaning or clearing a blockage
• before leaving the product unattended
• before installing or removing attachments
- before checking, conducting maintenance, or working on the product
■ Injuries may be caused, or aggravated, by prolonged use of the product. When using the product for prolonged periods, ensure to take regular breaks.
If the product is dropped, suffers heavy impact, or begins to vibrate abnormally, immediately stop the product and inspect for damage or identify the cause of the vibration. Any damage should be properly repaired or replaced by an authorised service centre.
■ Operate the product only in temperatures between 0^ C and 40^ C.
■ Store the product in a location where the ambient temperature is between -10^ and 50^ .
PERSONAL PROTECTIVE EQUIPMENT
Good quality personal protective equipment, as used by professionals, helps reduce the risk of injury to the operator. The following items should be used when operating the product:
■ Safety helmet
- should comply with EN 397 and be CE marked
■ Hearing protection
-should comply with EN 352-1 and be CE marked
■ Eye and face protection
- should be CE marked and comply with EN 166 (for safety glasses) or EN 1731 (for mesh visors)
Gloves
-should comply with EN 381-7 and be CE marked
■ Leg protection (chaps)
- should comply with EN 381-5, be CE marked and provide all-round protection
■ Chainsaw safety boots
- should comply with EN ISO 20345:2004 and be marked with a shield depicting a chainsaw to show compliance with EN 381-3. (Occasional users may use steel toe-cap safety boots with protective gaiters, which conform to EN 381-9 if the ground is even and there is little risk of tripping or catching on undergrowth).
■ Chainsaw jackets for upper body protection
- should comply with EN 381-11 and be CE marked
ADDITIONAL BATTERY SAFETY WARNINGS
■ To reduce the risk of fire, personal injury, and product damage due to short circuit, never immerse the tool, battery pack, or charger in fluid or allow fluid to flow inside them. Corrosive or conductive fluids, such as seawater, certain industrial chemicals, and bleach or bleach-containing products, etc., can cause a short circuit.
- Charge the battery pack in a location where the ambient temperature is between 10°C and 38°C.
■ Store the battery pack in a location where the ambient temperature is between 0°C and 20°C.
INSTRUCTIONS CONCERNING THE PROPER TECHNIQUES FOR BASIC LIMBING AND CROSS-CUTTING
UNDERSTANDING THE FORCES WITHIN THE WOOD
When you understand the directional pressures and stresses inside the wood, you can reduce the pinches or at least expect them during your cutting. Tension in the wood means the fibres are being pulled apart, and if you cut in this area, the kerf or cut tends to open as the saw goes through. If a log is being supported on a saw-horse and the end is hanging unsupported over the end, tension is created on the upper surface due to the weight of the overhanging log stretching the fi bres. Likewise, the underside of the log is compressed and the fi bres are being pushed together. If a cut is made in this area, the kerf tends to close up during the cut. This cut would pinch the blade.
PUSH AND PULL
The reaction force is always opposite to the direction the chain is moving. The operator must be ready to control the tendency for the product to pull away and push backwards. The product pulls away (forward motion) when cutting on the bottom edge of the bar. The product pushes backwards (towards the operator) when cutting along the top edge.
SAW JAMMED IN THE CUT
Turn off the product, and remove the battery pack. Do not try to force the chain and bar out of the cut as this is likely to break the chain, which may swing back and strike the operator. This situation normally occurs because the wood is incorrectly supported, which forces the cut to close under compression, thereby pinching the blade. If adjusting the support does not release the bar and chain, use wooden wedges or a lever to open the cut and release the saw. Never try to start the chainsaw when the guide bar is already in a cut or kerf.
SKATING/BOUNCING
When the chainsaw fails to dig in during a cut, the guide bar can begin hopping or dangerously skidding along the surface of the log or branch, possibly resulting in the loss of control of the chainsaw. To prevent or reduce skating or bouncing, always use the saw with both hands. Make sure that the saw chain establishes a groove for cutting.
Never cut small, fl exible branches or brushes with your chainsaw. Their size and fl exibility can easily cause the saw to bounce towards you or bind up with enough force to cause a kickback. The best tool for that kind of work is a hand saw, pruning shears, an axe, or other hand tools.
REMOVING BUTTRESS ROOTS
A buttress root is a large root extending from the trunk of the tree above the ground. Remove large buttress roots before felling. Make the horizontal cut into the buttress first, followed by the vertical cut. Remove the resulting loose section from the work area. Follow the correct tree felling procedure after removing the large buttress roots.
BUCKING A LOG
Bucking is cutting a log into lengths. It is important to make sure your footing is firm and your weight is evenly distributed on both feet. When possible, the log should be raised and supported by the use of limbs, logs or chocks. Follow the simple directions for easy cutting. When the log is supported along its entire length, it is cut from the top (overbuck).
When the log is supported on one end, cut 1/3 the diameter from the underside (underbuck). Then make the fi nished cut by overbucking to meet the fi rst cut.

When the log is supported on both ends, cut 1/3 the diameter from the top (overbuck). Then make the finished cut by underbucking the lower 2/3 to meet the first cut.
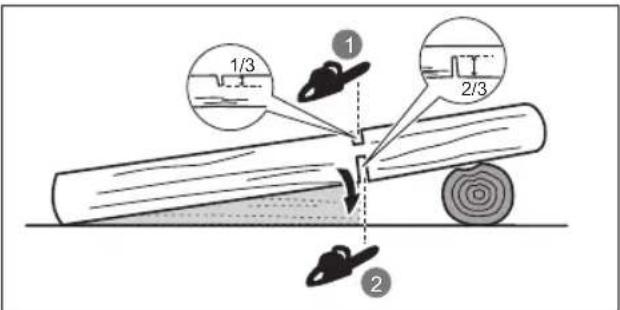
When bucking on a slope always stand on the uphill side of the log. To maintain control when "cutting through", release the cutting pressure near the end of the cut without relaxing your grip on the chainsaw handles. Do not let the chain contact the ground. After completing the cut, wait for the saw chain to stop before you move the chainsaw. Always stop the motor before moving from tree to tree.
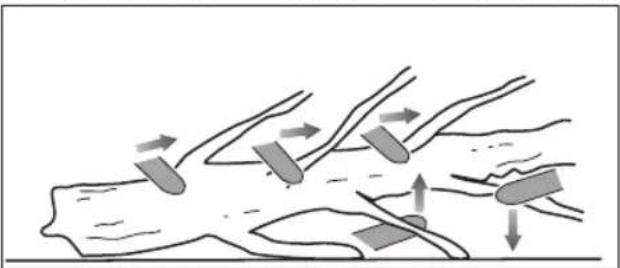
LIMBING A TREE
Limbing is removing the branches from a fallen tree. When limbing, leave larger lower limbs to support the log off the ground. Remove the small limbs in one cut. Branches under tension should be cut from the bottom up to avoid binding the chainsaw.
natural_image
Diagram showing fluid flow around a pipe with directional arrows indicating movement (no text or labels)
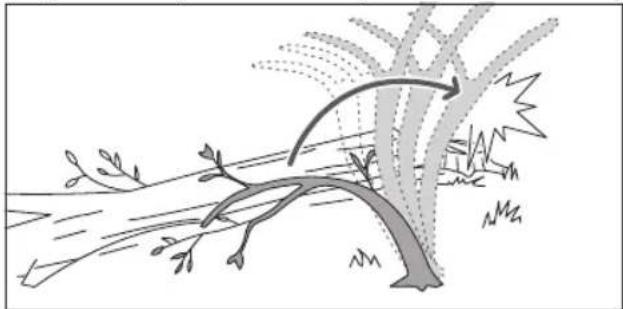
SPRINGPOLES
A springpole is any log, branch, rooted stump, or sapling that is bent under tension by other wood so that it springs back if the wood holding it is cut or removed.
On a fallen tree, a rooted stump has a high potential of springing back to the upright position during the bucking cut to separate the log from the stump. Watch out for springpoles—they are dangerous. Do not attempt to cut bent branches or stumps that are under tension unless you are professionally trained and competent to do so.
natural_image
Diagram illustrating a tree with wind patterns and leaves, showing water flow from branches to ground (no text or labels)
⚠ WARNING! Springpoles are dangerous and could strike the operator, causing the operator to lose control of the chainsaw. This could result in a severe or fatal injury to the operator. Cutting spring poles should be done by trained users.
TRANSPORTATION AND STORAGE
■ Turn off the product, remove the battery pack, and allow the product to cool down before storing or transporting.
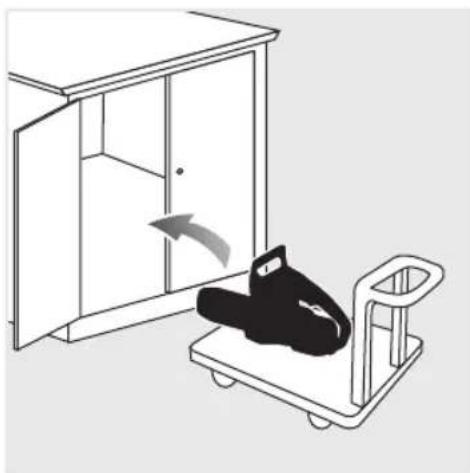
■ Remove all foreign materials from the product. Store the product in a cool, dry, and well-ventilated place that is inaccessible to children. Keep the product away from corrosive agents, such as garden chemicals and deicing salts. Do not store the product outdoors.
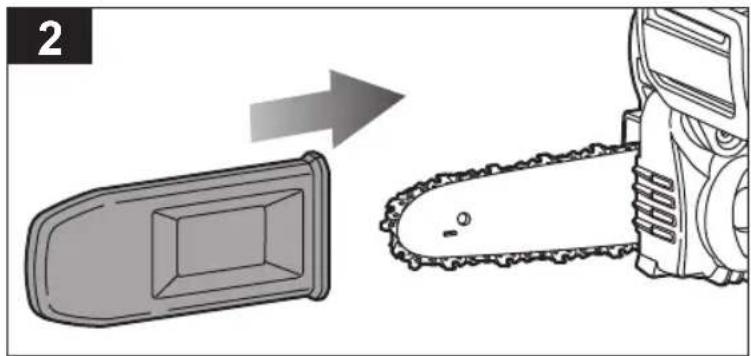
■ Fit the guide bar cover before storing the product or during transportation.
■ For transportation, secure the product against movement or falling to prevent injury to persons or damage to the product.
TRANSPORTING LITHIUM BATTERIES
Transport the battery in accordance with local and national provisions and regulations.
Follow all special requirements on packaging and labelling when transporting batteries by a third party. Ensure that no batteries can come in contact with other batteries or conductive materials while in transport by protecting exposed connectors with insulating, non-conductive caps or tape. Do not transport batteries that are cracked or leaking. Check with the forwarding company for further advice.
MAINTENANCE
- Use only original manufacturer's replacement parts, accessories, and attachments. Failure to do so can cause possible injury, can contribute to poor performance, and may void your warranty.
■ Servicing requires extreme care and knowledge and should be performed only by a qualified service technician. Have the product serviced by an authorised service centre only.
■ You may make adjustments or repairs described in this manual. For other repairs, have the product serviced by an authorised service centre only.
■ Consequences of improper maintenance, removal, or modification of safety devices, may cause the product to not function correctly, increasing the potential for serious injury. Keep the product professionally maintained.
■ Sharpening the chain safely is a difficult precision task that should be performed only by experienced skilled professionals. The manufacturer strongly recommends that a worn or dull chain is replaced with a new one, available at your authorised service centre. The part number is available in the product specification table in this manual.
■ Follow the instructions for lubricating and chain tension checking and adjustment.
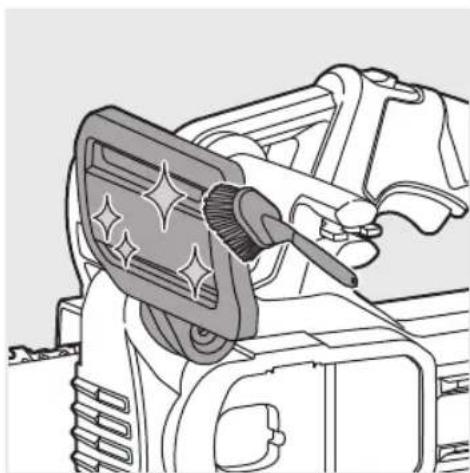
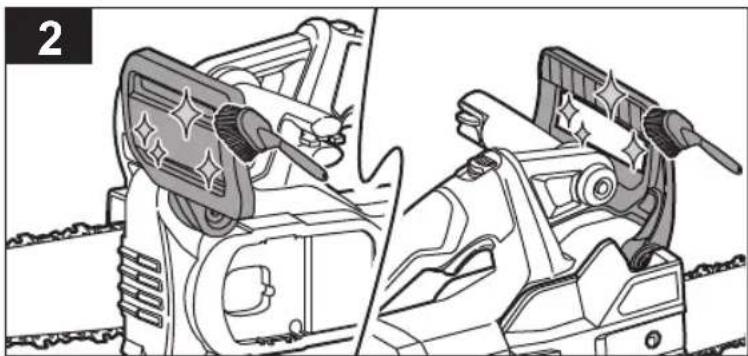
■ After each use, clean the plastic parts with a soft, dry cloth.
- Check all nuts, bolts, and screws at frequent intervals for security to ensure that the product is in safe working condition. Any part that is damaged should be properly repaired or replaced by an authorised service centre.
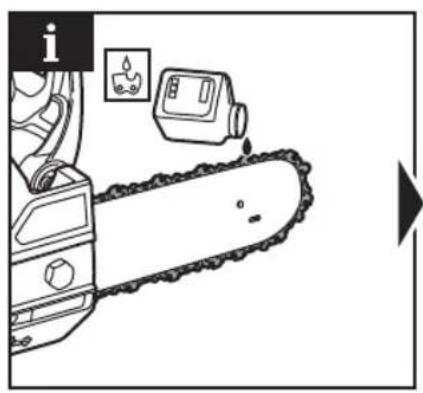
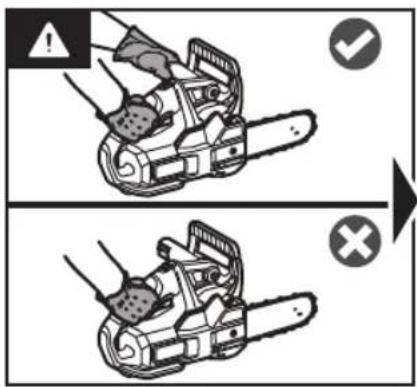
■ Add lubricant directly onto the bar and chain before each use and every 3 minutes during use.
MAINTENANCE SCHEDULE
Daily check
Bar lubrication Before each use and frequently
Chain tension Before each use and frequently
Chain sharpness Before each use (visual check)
For damaged parts Before each use
For loose fasteners Before each use
Inspect and clean
Bar Before each use
Complete saw After each use
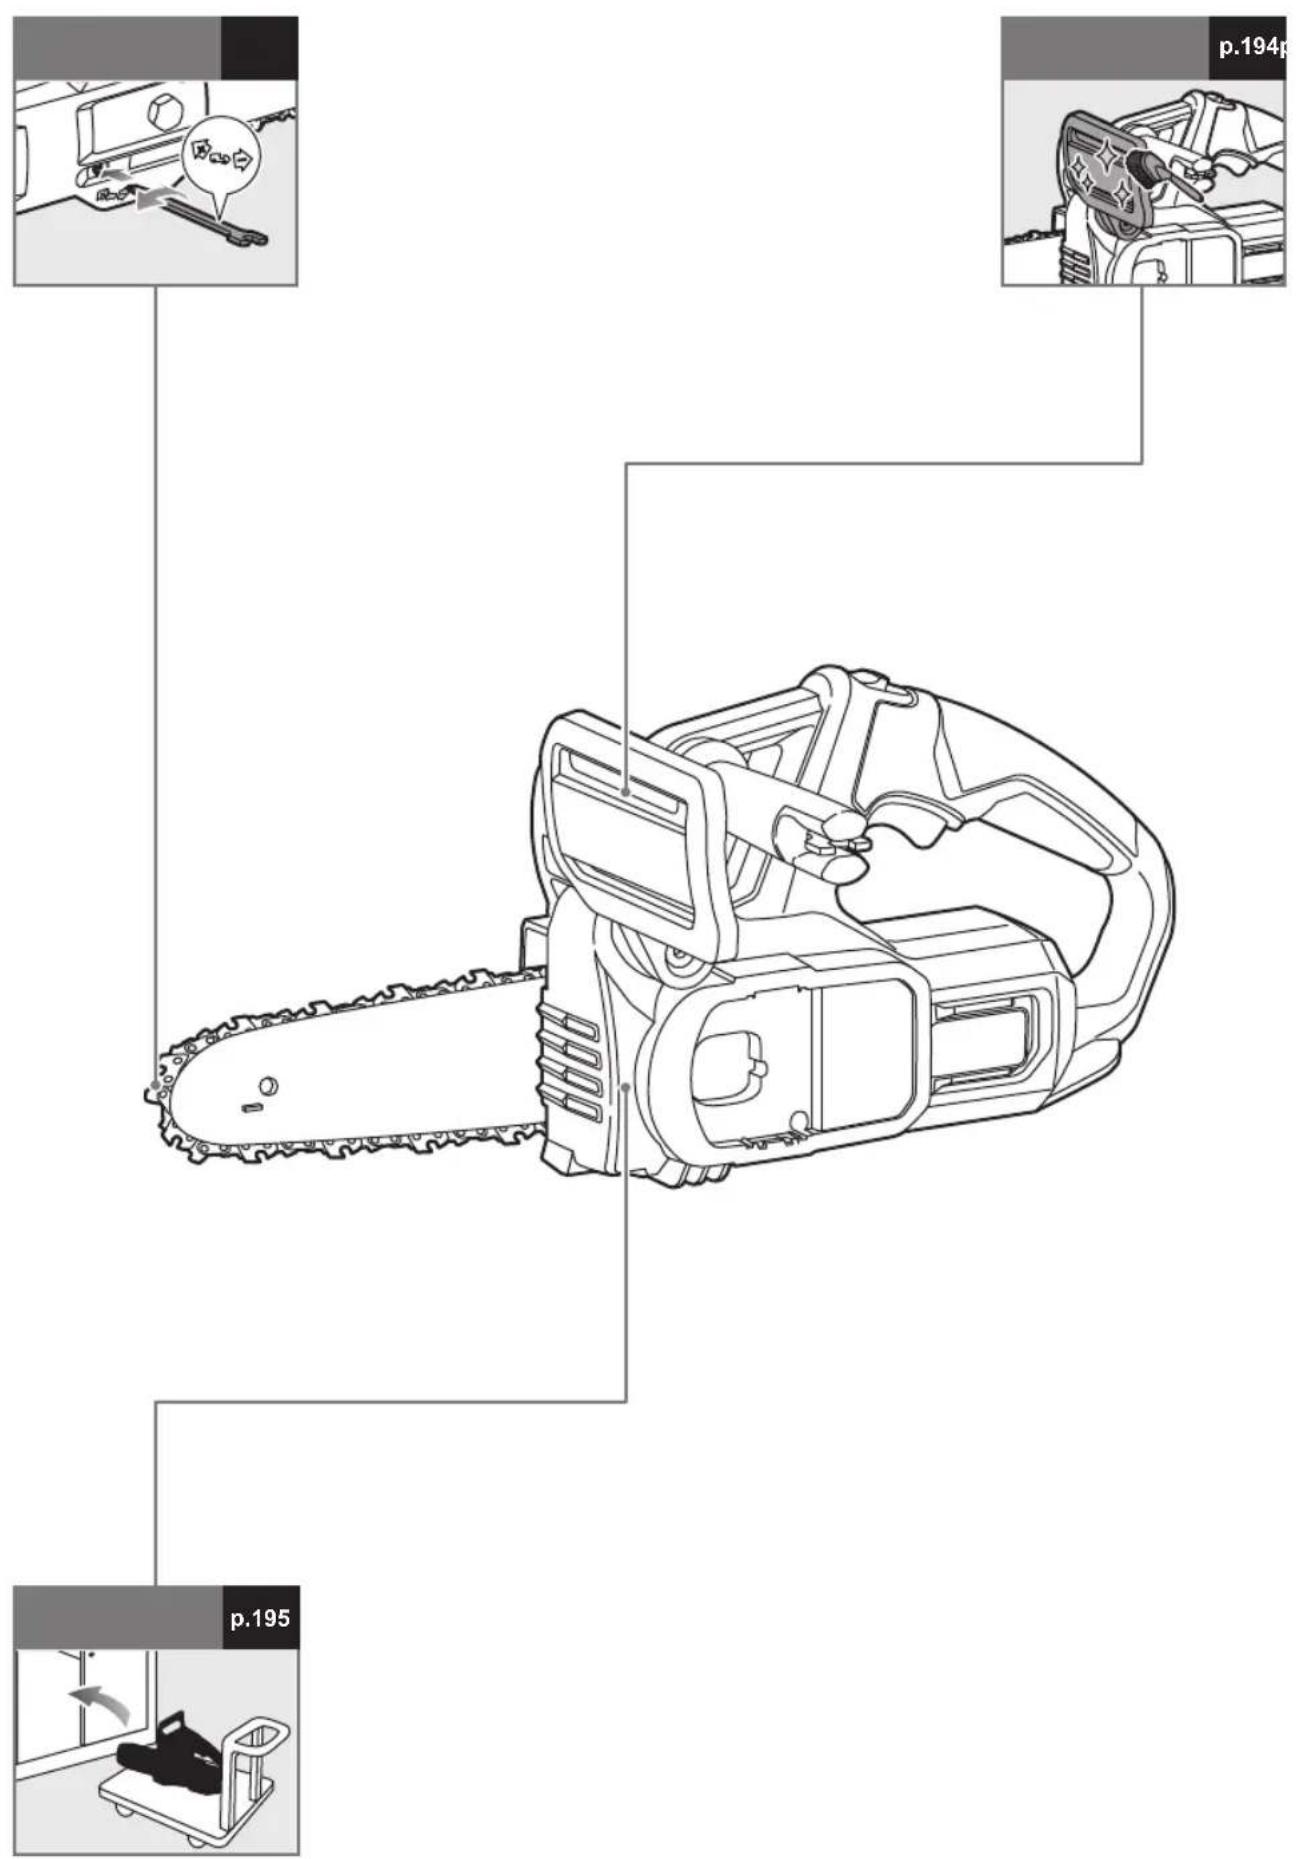
KNOW YOUR PRODUCT
See page 189.
- Guide bar
- Saw chain
- Front hand guard
- Front handle
- Rear handle
- Operator's manual
- Wrench
- Chain tensioning screw
- Switch trigger
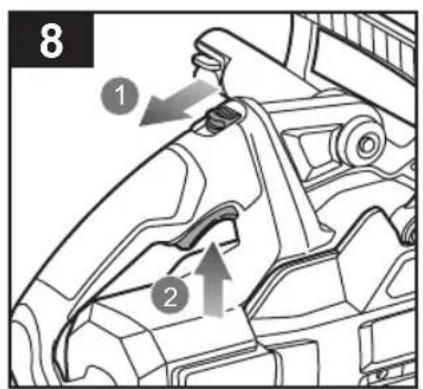
- Trigger release
- Sprocket cover
- Sprocket cover screw
- Lubricant
- Guide bar cover
- Battery pack
- Charger
SAFETY DEVICES
CHAIN CATCHER
The chain catcher prevents the saw chain from being thrown back towards the operator if the saw chain comes loose or breaks.
GUIDE BARS
Generally, guide bars with small radius tips have a somewhat lower potential for kickback. Use a guide bar and matching chain that is just long enough for the job. Longer bars increase the risk of loss of control during sawing.
Regularly check the chain tension. When cutting smaller branches (less than the full length of the guide bar) the chain is more likely to be thrown off if the tension is not correct.
LOW-KICKBACK SAW CHAIN
The low-kickback saw chain helps to reduce the possibility of a kickback event.
The rakers (depth gauges) ahead of each cutter can minimise the force of a kickback reaction by preventing the cutters from digging in too deeply. Use only replacement guide bar and chain combinations that are recommended by the manufacturer.
As saw chains are sharpened, they lose some of the low-kickback qualities, and extra caution is required. For safety, replace saw chains when cutting performance decreases.
SPIKED BUMPER
The integral bumper spike may be used as a pivot when making a cut. It helps to keep the body of the chainsaw steady while cutting. When cutting, push the product forward until the spikes dig into the edge of the wood, then move the rear handle up or down in the direction of the cutting line to help ease the physical strain of cutting.
OVER-TEMPERATURE PROTECTION
The battery pack has over-temperature protection, which is designed to protect the battery cells from damage in the event of high temperatures. This feature may cause the battery to stop powering the product until the battery cells cool down. If the battery pack is warm to touch, allow it to cool down before resuming operation. If the product still does not work, connect the battery pack to the charger, which can also indicate over-temperature protection. When the battery cells cool down, the charger begins to charge the battery.
NOTE: High ambient temperatures above 30^ C and high-power tools, such as chainsaws, can cause the battery cells to heat up faster. Monitor the battery pack regularly, and if it is warm to touch, change the battery or allow the battery to cool down.
NOTE: The battery pack LED indicator stops working if the battery protection feature has caused the battery pack to stop powering the product.
SYMBOLS ON THE PRODUCT


Safety alert
Read and understand all instructions before operating the product. Follow all warnings and safety instructions.
Wear eye, ear, and head protection.
Wear non-slip safety footwear when using the product.
Wear non-slip, heavy-duty gloves.
Beware of chain saw kickback and avoid contact with bar tip.


Do not expose the product to rain or damp conditions.
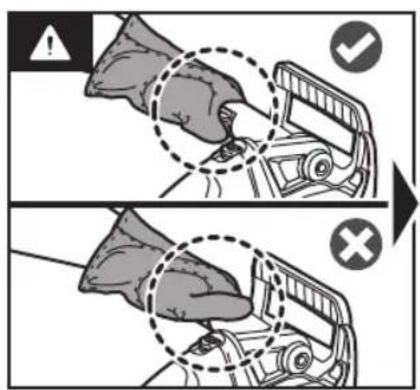
Hold and operate the saw properly with both hands.
Do not operate the saw using only one hand.
European Conformity Mark
British Conformity Mark
EurAsian Conformity Mark
Ukraine Conformity Mark
Waste electrical products should not be disposed of with household waste. Please recycle where facilities exist. Check with your local authority or retailer for recycling advice.
Guaranteed sound power level
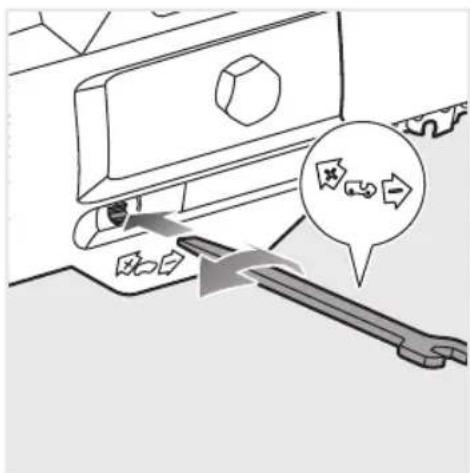
Rotate to adjust the chain tension
+ = Tighten the chain
- = Loosen the chain
Moving direction of the chain.
(Marked under the sprocket cover)
SYMBOLS IN THIS MANUAL

Parts or accessories sold separately

Note

Warning

Wear eye and face protection.

Wear upper body protection.

Wear leg protection.

Stop the product.
GETTING STARTED
See page 190 - 192.
- Wear Personal Protective Equipment (PPE).
Wear full eye protection, ear protection, non-slip heavy-duty gloves, substantial footwear, and protective clothing at all times while operating the product. Do not operate the product when barefoot or wearing open sandals.
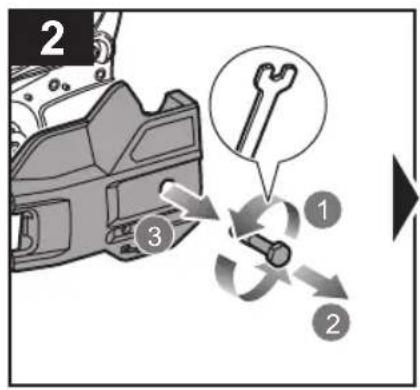
- Loosen the sprocket cover screw and remove the sprocket cover.
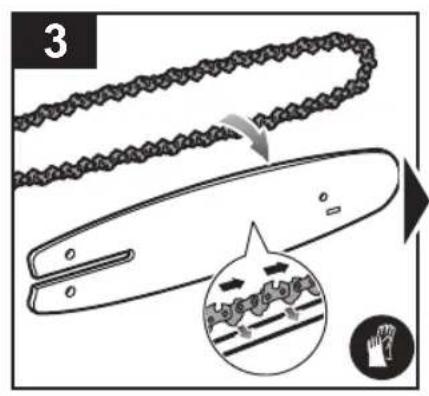
- Place the chain drive links into the bar groove. Position the chain so that there is a loop at the back of the bar. The saw chain should face in the direction of chain rotation. If the chain faces backwards, turn the loop over.
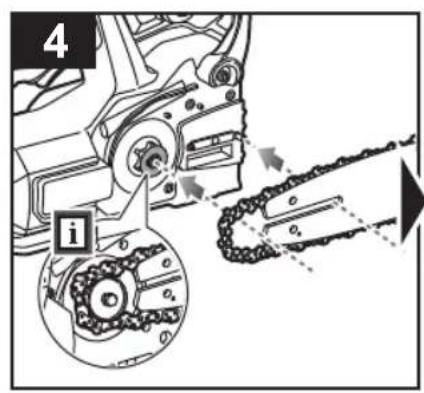
- Hold the chain in position on the bar, and place the loop around the drive sprocket. Lower the bar so that the bolt goes through the slot in the bar. Rotate the assembly so that the bolt and hole align.
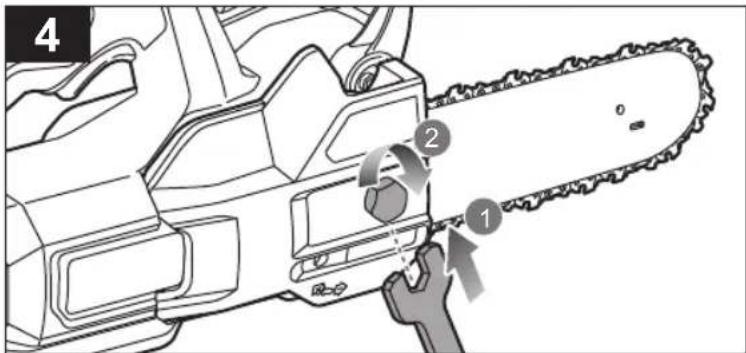
- Replace the sprocket cover and tighten the sprocket cover screw.
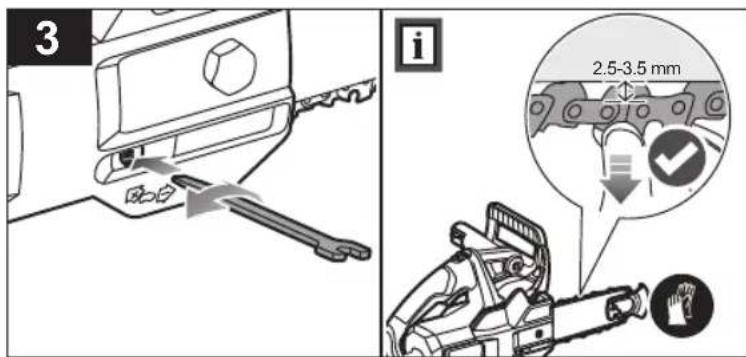
- Adjust the chain tension. Turn the chain tensioning screw using the combination wrench. Frequently check the chain tension while adjusting.
-To increase the chain tension, turn the chain tensioning screw clockwise.
- To reduce the chain tension, turn the chain tensioning screw counterclockwise.
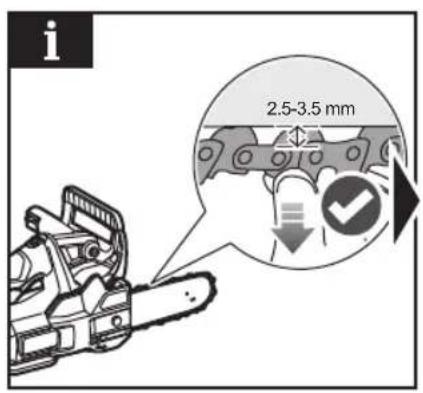
NOTE: The chain tension is correct when the gap between the cutter in the chain and the bar is between 2.5 and 3.5 mm. Pull the chain in the middle of the lower side of the bar downwards (away from the bar), and measure the distance between the bar and the chain cutters.
NOTE: The temperature of the chain increases during normal operation, causing the chain to stretch. Check the chain tension frequently and adjust as required. A chain that is tensioned while warm may be too tight upon cooling. Make sure that the chain tension is correctly adjusted as specified in these instructions.
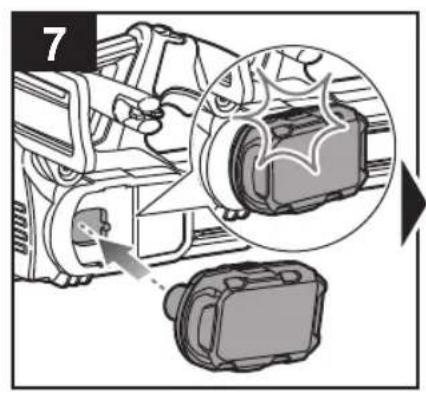
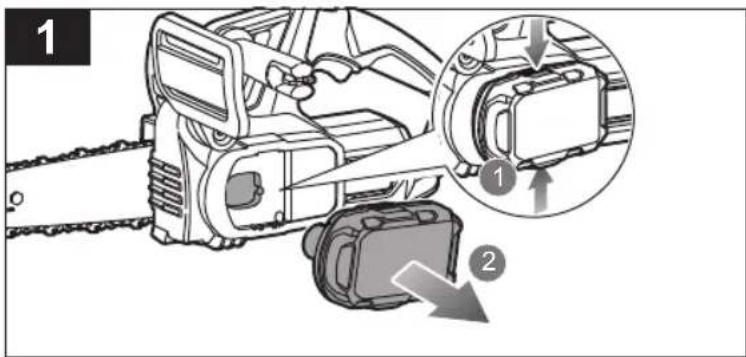
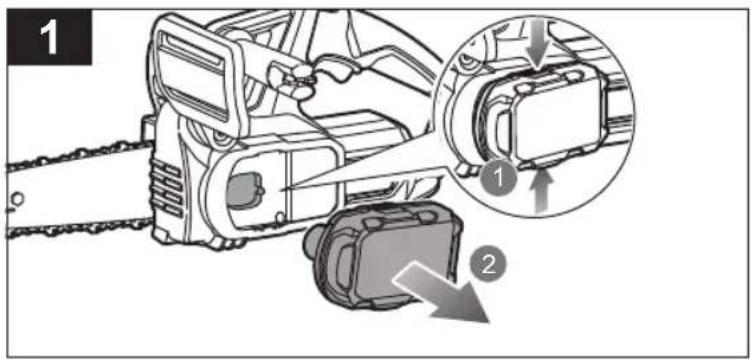
- Install the battery pack.
Align the raised ribs on the battery pack with the grooves in the product's battery port. Insert the battery pack into the product. Make sure that the latch of the battery pack clicks in place and that the battery pack is fully seated and securely attached before beginning operation.
⚠ WARNING! Grip both handles with the thumbs and fingers encircling the handles. Ensure that the left hand is holding the front handle so that the thumb is underneath.
⚠ WARNING! Always hold the product with the right hand on the rear handle and the left hand on the front handle.
- Start the product.
Pull the trigger release, and squeeze the switch trigger.
■ Protection auditive
natural_image
Diagram showing fluid flow around a pipe with directional arrows indicating movement (no text or labels)
TIGES RESSORTS
natural_image
Diagram illustrating a tree with raindrops and branches, showing water flow from a branch to a leafy ground (no text or labels)
SYMBOLES APPLIQUÉS SUR LE PRODUIT

Alerte de sécurité

VERSTEHEN SIE DIE KRÄFTE IN DEM HOLZ
natural_image
Diagram showing fluid flow around a pipe with directional arrows indicating movement (no text or labels)
FEDERSTÖCKE
natural_image
Diagram illustrating tree branches and sunlight rays, showing water flow from a branch to ground (no text or labels)
MACHEN SIE SICH MIT IHREM PRODUKT VERTRAUT
Siehe Seite 189.
SYMBOLE AUF DEM PRODUKT

Sicherheitswarnung

natural_image
Diagram showing fluid flow around a pipe with directional arrows indicating movement (no text or labels)
BARRAS ELÁSTICAS
natural_image
Diagram illustrating tree branches and sunlight rays over a river, with no text or symbols present.
natural_image
Diagram of a hand holding a tool with directional arrows indicating movement or force (no text or symbols present)
POLI A MOLLA
natural_image
Diagram illustrating a tree with wind patterns and a lightning bolt, showing branches and ground vegetation (no text or symbols)
ALGEMENE PRODUCTVEILIGHEIDSWAARSCHUWINGEN
ALGEMENE VEILIGHEIDSWAARSCHUWINGEN MET BETREKKING TOT KETTINGZAGEN
natural_image
Diagram showing fluid flow around a pipe with directional arrows indicating movement (no text or labels)
VEERSTOK
natural_image
Diagram of a tree with branches and leaves, showing water flow and disturbance (no text or labels)
- = Ketting losmaken
natural_image
Diagram showing fluid flow around a pipe with directional arrows indicating movement (no text or labels)
GALHOS
natural_image
Diagram illustrating tree branches and water flow with arrows indicating direction (no text or labels)
SAV HAR SAT SIG FAST I SAVERILLEN.
natural_image
Diagram showing fluid flow around a pipe with directional arrows indicating movement (no text or labels)
FJEDERSTÄNGER
natural_image
Diagram illustrating tree growth with arrows indicating movement, no text or symbols present
SYMBOLER PÅ PRODUKTET

Sikkerheds Varsel

SÅGEN HAR FASTNAT I KAPET
natural_image
Diagram showing fluid flow around a pipe with directional arrows indicating movement (no text or labels)
FJÄDERSTÄNGER
natural_image
Diagram illustrating tree branches and wind patterns (no text or labels)
TRANSPORT OCH FÖRVARING
SYMBOLER PÅ PRODUKTEN

Säkerhetsvarning

natural_image
Diagram showing fluid flow around a pipe with directional arrows indicating movement (no text or labels)
KIREYDET
natural_image
Diagram illustrating tree branches and sunlight rays over a river, with no text or symbols present.
SAG KJ∅RT FAST I KUTTET.
natural_image
Diagram showing fluid flow around a pipe with directional arrows indicating movement (no text or labels)
FJÆRSTENGER
natural_image
Diagram of a tree with branches and leaves, showing water flow and growth (no text or symbols)
KJENN PRODUKTET DITT
Se side 189.
SYMBOLER PÅ PRODUKTET
natural_image
Diagram showing fluid flow around a pipe with directional arrows indicating movement (no text or labels)
ПРУЖИНЯЩИЕ ДЕРЕВЬЯ
natural_image
Diagram illustrating tree growth with arrows indicating movement, no text or symbols present
natural_image
Diagram of a biological or geological structure with directional arrows indicating movement or flow (no text or symbols present)
NAPREŻONE GALEZIE
natural_image
Diagram illustrating tree growth with arrows indicating direction and surrounding vegetation (no text or labels)
natural_image
Diagram showing fluid flow around a pipe with directional arrows indicating movement (no text or labels)
ODPRUŽENÉ VĚTVĚ
natural_image
Diagram of a tree with wind patterns and ground vegetation, no text or symbols present
natural_image
Diagram showing fluid flow around a pipe with directional arrows indicating movement (no text or labels)
ÁGRÉSZEK
natural_image
Diagram of a tree with branches and leaves, showing water flow and disturbance (no text or symbols)
natural_image
Diagram showing fluid flow around a pipe with directional arrows indicating movement (no text or labels)
TIJE DE SUSPENSIE DE AMORTIZARE
natural_image
Diagram of a tree with branches and leaves, showing water flow and disturbance (no text or labels)
natural_image
Diagram showing fluid flow around a pipe with directional arrows indicating movement (no text or labels)
ATSPERİGI KRÜMI
natural_image
Diagram of a tree with wind patterns and ground vegetation, no text or symbols present
natural_image
Diagram showing fluid flow around a pipe with directional arrows indicating movement (no text or labels)
JTEMPIMO JÈGŲ VEIKIAMI PJOVINIAI
natural_image
Diagram illustrating a tree with leaves and branches, showing water flow and erosion (no text or labels)
SEADME ÜLDISED OHUTUSJUHISED
natural_image
Diagram showing fluid flow around a pipe with directional arrows indicating movement (no text or labels)
TAGASILÖÖGIOKSAD
natural_image
Diagram illustrating tree branches and water flow with arrows indicating direction (no text or labels)
natural_image
Diagram of fluid flow around a pipe with directional arrows indicating movement (no text or labels)
NAPETE GRANE
Savijeno šiblje je grana, panj bez korjena ili grm koji je savijen zbog nekog drugog komada drveta, tako da se naglo otpušta kad odrežemo ili uklonimo komad tog drveta koji ga drži.
natural_image
Diagram illustrating tree growth with arrows indicating movement, no text or symbols present
⚠ UPOZORENJE! Savijeno šiblje je opasno je jer vas može udariti i možete izgubiti kontrolu nad motornom pilom. Što može dovesti do teških ili smrtonosnih ozljeda. Rezanje savijenog šiblja moraju obavljati obučeni korisnici.
PRIJEVOZ I SKLADIŠTENJE
DODATNA VARNOSTNA OPOZORILA
natural_image
Diagram showing fluid flow around a pipe with directional arrows indicating movement (no text or labels)
VZMETNE PALICE
Odskočno deblo je vsako deblo, veja, ukoreninjen štor ali mlado drevesce, ki je upognjeno pod pritiskom zaradi drugega lesa, tako da odskoči nazaj, će odžagamo ali odstranimo les, ki ga zadržuje.
natural_image
Diagram of a tree with leaves and branches, showing water flow direction (no text or labels)
OSOBNÉ OCHRANNÉ POMÓCKY
natural_image
Diagram of fluid flow around a pipe with directional arrows indicating movement (no text or labels)
NAPNUTÉ KONÁRE
natural_image
Diagram illustrating tree branches and water flow with arrows indicating direction (no text or labels)
OBOZNÁMTE SA S VAŠÍM PRODUKTOM
Pozrite stranu 189.
- Vodiaca lišta
- Pílová ret'az
- Predný chránič ruky
- Predná rukovät
- Zadná rukovät
- Návod na obsluhu
- Klúč
- Skrutka na nastavenie napnutia ret'aze
- Vypínač
- Západka plynovej páčky
- Kryt reťazového kolesa
- Skrutka krytu ozubeného kolesa
- Mazivo
- Kryt vodiacej lišty
- Batéria
- Nabíjačka
BEZPEČNOSTNÉ ZARIADENIA
ZACHYTÁVAČ REŤAZE
Zachytávač ret'aze zabraňuje odhodeniu pílovej ret'aze smerom k obsluhe, ak sa ret'az uvoľní alebo roztrhne.
VODIACE LIŠTY
natural_image
Diagram showing fluid flow around a pipe with directional arrows indicating movement (no text or labels)
ПРУЖИННИ ПРЪТИ
natural_image
Diagram illustrating tree growth with arrows indicating movement, no text or symbols present
natural_image
Diagram showing fluid flow around a pipe with directional arrows indicating movement (no text or labels)
ПРУЖНІ ШТАНГИ
natural_image
Diagram illustrating a tree with wind patterns and leaves, showing water flow from branches to the ground (no text or labels)
natural_image
Diagram showing fluid flow around a pipe with directional arrows indicating movement (no text or labels)
YAYLI DIREKLER
natural_image
Diagram illustrating tree branches and sunlight rays, showing water flow from a branch to a tree with scattered leaves (no text or labels)
natural_image
Mechanical assembly diagram showing a tool inserted into a housing component (no text or symbols visible)

natural_image
Line drawing of a chain-linking gear with a device and a warning icon (no text or symbols)

6
8

natural_image
Line drawing of a car interior with a hand using a power tool (no text or symbols)
natural_image
Line drawing of two mechanical components, one with a hammer and sparkles, the other with a tool, both without any text or symbols.
natural_image
Illustration of a chainsaw with spray gun, showing mechanical components and warning symbols (no text or labels)
natural_image
Illustration of a person using a cart to lift a large cabinet, with an arrow indicating motion (no text or symbols)
natural_image
Diagram showing a chain drive being processed from a mechanical component, with no visible text or symbols.

| English Français Deutsch Español Italiano |
| Product specifications | Caractéristiques produit Produkt-Spezifikationen Características del producto Caratteristiche del prodotto |
| Cordless chainsaw | Tronçonneuse sans fil Akku-Ketten- | säge Motosierra inalámbrica Sega a catena senza filo | | |
| Model | Modèle | Modell | Modelo | Modello |
| Rated voltage | Tension nominale | Nennspannung Tensión nominal | Voltaggio nominale | |
| No-load speed | Vitesse de rotation à vide | Leerlaufgeschwindigkeit | Velocidad sin carga | Velocità senza carico |
| Guide bar length | Longueur du guide-chaîne | Länge der Führungsschiene | Longitud de la barra guía | Lunghezza barra di guida |
| Usable cutting length | Longueur de coupe utile | Anwendbare Schnittlänge | Largo de corte | Lunghezza di taglio disponibile |
| Chain stopping time | Temps d'arrêt de la chaîne | Nachlaufzeit Kette | Tiempo para la parada de la cadena | Tempo di arresto catena |
| Chain length | Longueur de la chaîne | Kettenlänge | Longitud de la cadena | Lunghezza catena |
| Chain pitch | Gouge de la chaîne | Kettenteilung | Paso de la cadena | Passo catena |
| Chain gauge | Pas de la chaîne | Kettenstärke | Calibre de la cadena | Sezione catena |
| Drive links quantity | Nombre de maillons d'entraînement | Anzahl der Antriebsglieder | Cantidad de eslabones del accionamiento | Quantità maglie guida |
| Weight (without battery pack, guide bar, chain, and oil) | Poids (sans la batterie, la barre de guidage, la chaîne et l'huile) | Gewicht (ohne Akku, Führungsschiene, Kette und Öl) | Peso (sin batería, barra de guía, cadena ni aceite) | Peso (senza pacco batteria, barra guida, catena e olio) |
| Vibration level (in accordance with IEC 62841-1 and IEC 62841-4-1) | Niveau de vibration (selon IEC 62841-1; IEC 62841-4-1) | Vibrationsgrad (gemäß IEC 62841-1; IEC 62841-4-1) | Nivel de vibración (de acuerdo con IEC 62841-1; IEC 62841-4-1) | Livello vibrazioni (in accordo con la direttiva IEC 62841-1; IEC 62841-4-1) |
| Front handle | Poignée avant | Vorderer Handgriff | Mango delantero | Manico anteriore |
| Rear handle | Poignée arrière | Hinterer Handgriff | Mango trasero | Manico posteriore |
| Uncertainty of measurement | Incertitude de la mesure | Unsicherheit der Messung | Incertidumbre de medición | Incertezza delle misurazioni |
| Noise emission level (in accordance with IEC 62841-1 and IEC 62841-4-1) | Niveau d'émission sonore (selon IEC 62841-1; IEC 62841-4-1) | Schallenergiepegel (gemäß IEC 62841-1; IEC 62841-4-1) | Nivel de emisión de ruido (de acuerdo con IEC 62841-1; IEC 62841-4-1) | Livello di emissione rumore (in accordo con la direttiva IEC 62841-1; IEC 62841-4-1) |
| A-weighted sound pressure level at the operator's position | Niveau de pression sonore pondéré A au niveau de l'opérateur | A-bewerteter Schalldruckpegel an der Position des Anwenders | Nivel de presión sonora ponderado A en la posición del operario | Livello di pressione sonora pesato A alla posizione dell'operatore |
| Uncertainty of measurement | Incertitude de la mesure | Unsicherheit der Messung | Incertidumbre de medición | Incertezza delle misurazioni |
| A-weighted sound power level | Niveau de puissance sonore pondéré A | A-bewerteter Schalleistungspegel | Nivel de potencia acústica ponderada en A | Livello di potenza sonora pesato A |
| Uncertainty of measurement | Incertitude de la mesure | Unsicherheit der Messung | Incertidumbre de medición | Incertezza delle misurazioni |
| Battery and charger | Batterie et chargeur | Akku und Ladegerät | Bateria y cargador | Batteria e caricatore |
| Model | Modèle | Modell | Modelo | Modello |
| Battery pack | Bloc de batterie Akkupack | Batería | Batteria | |
| Charger | Chargeur | Ladegerät | Cargador | Caricatore |
| Compatible battery packs | Blocs des batterie compatibles | Kompatible Akkus | Paquetes de batería compatibles | Gruppo batterie compatibili |
| Compatible chargers | Chargeurs compatibles | Kompatible Ladegeräte | Cargador compatible | Caricatore compatibile |
| Replacement parts | Pièces de rechange | Ersatzteile | Piezas de repuesto | Parti di ricambio |
| Manufacturer | Fabricant: | Hersteller | Fabricante | Ditta produttrice |
| Chain | Chaîne coupante Kette | Cadena | Catena | |
| Bar | Guide-chaîne | Führungsschiene | Barra | Barra |
| The chain must be fitted with the bar from the same manufacturer according to above combinations. | La chaîne doit être appairée avec un guide-chaîne de la même marque selon les combinaisons ci-dessus. | Die Kette muss mit einer Schiene von demselben Hersteller, entsprechend den oben genannten Kombinationen, montiert sein. | La cadena debe llevar una barra del mismo fabricante según las combinaciones anteriores. | La catena deve essere montata con una barra prodotta dalla stessa ditta produttrice seguendo le indicazioni di cui sopra. |

| Nederlands Português Dansk Svenska |
| Productgegevens Características do aparelho Produktspecifikationer Produktspecifikationer |
| Snoerloze kettingzaag | Electroserra Recarregável | Ledningsfri kædesav | Sladdlös motorsåg | |
| Model | Modelo | Model | Modell | RY18CS20A |
| Toegekende spanning | Tensão nominal | Mærkespænding | Spänning | 18 V d.c. |
| Snelheid zonder lading | Velocidade sem carga | Tomgangshastighed | Hastlighet utan belastning | 4,6 m/s |
| Zwaardlengte | Comprimento da lâmina-guia | Sværdets længde | Klingans längd | 203 mm |
| Bruikbare zaaglengte | Comprimento de corte útil | Anvendelig skærer længde | Användbar sågningslängd | 180 mm (7 in.) |
| Stoptijd van de ketting | Tempo de paragem da correia | Kædens stoptid | Tidsåtgång för kedjan att stanna | <2 s |
| Kettinglengte | Comprimento da correia | Kædelængde | Kedjelängd | 20 cm (8 in.) |
| Kettingsteek | Passo da corrente | Kædestigning | Kedjedelning | 3/8 in. |
| Tanddiepte | Calibre da corrente | Max. tilladeligt kædeslør | Kedjetjockiek | 0,043 in. |
| Aantal aandrijfschakels | Quantidade de ligações do motor | Antal drivled | Mängden drivlänkar | 33 |
| Gewicht (zonder accu, geleidestang, ketting en olie) | Peso (sem unidade da bateria, barra de guia, correia e óleo) | Vægt (uden batteripakke, sværd, kæde og olie) | Vikt (utan batteripaket, sågsvård, kedja och olja) | 1,9 kg |
| Trillingsniveau (in overeenstemming met IEC 62841-1; IEC 62841-4-1) | Nivel de vibração (em conformidade com IEC 62841-1; IEC 62841-4-1) | Vibrationsniveau (iht. IEC 62841-1; IEC 62841-4-1) | Vibrationsnivå (enligt IEC 62841-1; IEC 62841-4-1) | |
| Voorste handvat | Pega frontal | Forhåndtag | Främre handtag | 3,0 m/s2 |
| Achterste handvat | Pega traseira | Baghåndtag | Bakre handtag | 2,8 m/s2 |
| Onzekerheid bij meting | Incerteza de medições | Målingsusikkerhed | Osäkerhet för mått | 1,5 m/s2 |
| Geluidsemissieniveau (in overeenstemming met IEC 62841-1; IEC 62841-4-1) | Nivel de emissão de ruldo (em conformidade com IEC 62841-1; IEC 62841-4-1) | Støjemissionsniveau (iht. IEC 62841-1; IEC 62841-4-1) | Bullerutsläppsnivå (enligt IEC 62841-1; IEC 62841-4-1) | |
| A-gewogen geluidsdrukniveau op de plaats van de bediener | Nivel de pressão sonora ponderado A na posição do operador | A-vægtet lydtryksniveau ved operatørens position | A-viktad ljudtrycksnivå vid operatörsplats | 82,2 dB(A) |
| Onzekerheid bij meting | Incerteza de medições | Målingsusikkerhed | Osäkerhet för mått | 3,0 dB |
| A-gewogen geluidsniveau | Nivel de potência sonora ponderada A | A-vægtet lydeffektniveau | A-vägd ljudeffektsnivå | 90,2 dB(A) |
| Onzekerheid bij meting | Incerteza de medições | Målingsusikkerhed | Osäkerhet för mått | 2,8 dB |
| Accu en oplader | Bateria e carregador | Batteri og oplader | Batteri och batteriladdare | | |
| Model | Modelo | Model | Modell | RY18CS20A-125 | RY18CS20A-0 |
| Accu | Bateria | Batteri | Batteri | 2,5 Ah | - |
| Lader | Carregador | Oplader | Batteriladdare | RC18115 | - |
| Compatibele accupacks | Baterias compatíveis | Kompatible batterier | Kompatibla batteripaket | RB18.. |
| Compatibele oplader | Carregador compatível | Kompatibel oplader | Kompatibel laddare | BCL1418., RC18.. |
| Vervangonderdelen | Peças de substituição | Reservedele | Utbytesdelar | |
| Fabrikant | Fabricante | Producent | Tillverkare | TRILINK |
| Ketting | Corrente | Kæde | Kedja | RAC270 |
| Zwaard | Barra | Sværd | Stöd | RAC235 |
| De ketting moet op een zwaard van dezelfde fabrikant worden gemonteerd volgens de volgende combinaties. | A correia deve levar uma barra do mesmo fabricante consoante as combinações anteriores. | Kæden skal sættes på et sværd fra samme producent ifølge ovenstående kombinationer. | Kedjan måste sitta på ett svård från samma tillverkare enligt ovan nämnda kombinationer. | |


| Suomi Norsk Русский Polski Čeština |
| Tuotteen tekniset tiedot | Produktspesifikasjoner Характеристики изделия Parametry techniczne Technické údaje produktu |
| Langaton moottorisaha | Kabellos motorsag Беспроводная цепная пила Bezprzewodowa piła | lańcuchowa | Akumulátorová řetězová pila |
| Malli | Modell Модель Model Model | | |
| Nimellisjännite | Nominell spenning | Номинальное напряжение | Napięcie znamionowe | Jmenovité napětí |
| Nopeus ilman kuormaa | Tomgangshastighet | Холостая скорость | Prędkość obrotowa bez obciążenia | Rychlost naprázdno |
| Terälevyn pituus | Sagsverdlengde | Длина пильной шины | Długość prowadnicy | Délka vodici lišty |
| Leikkuupituus | Brukbar kuttelengde | Используемая режущая длина | Użyteczna długość cięcia | Využitelná řezací délka |
| Ketjun pysäytysaika | Kjedestopplid | Время остановки цепи | Czas hamowania lańcucha | Doba do zaslavení řetězu |
| Ketjun pituus | Kjedelengde | Длина цепи | Długość lańcucha | Délka řetězu |
| Ketjun jako | Inndeling av kjede | Зубья пильной цепи | Przecinak kształtowy lańcucha | Článek řetězu |
| Ketjun paksuus | Kjedeslørelse | Шаг пильной цепи | Skok lańcucha | Rozteč řetězu |
| Vetolenkkien määrä | Drivlinkmengde | Количество звеньев | Liczba ogniw napędu | Počet hnacích článků řetězu |
| Paino (ilman akkupakkausta, terälaippaa, ketjua ja öljyä) | Vekt (uten batteripakke, føringsstang, kjede og olje) | Вес (без аккумуляторного блока, направляющей шины, цели и масла) | Masa (bez akumulatora, prowadnicy, lańcucha i oleju) | Hmotnost (bez baterií, vodicí lišty, řetězu a oleje) |
| Tärinălaso (standardin IEC 62841-1; IEC 62841-4-1 mukaisesti) | Vibrasjonsnivá (iht. IEC 62841-1; IEC 62841-4-1) | Уровень вибрации (в соответствии с IEC 62841-1; IEC 62841-4-1) | Poziom wibracji (zgodnie z normą IEC 62841-1; IEC 62841-4-1) | Úroveň vibraci (v souladu s IEC 62841-1; IEC 62841-4-1) |
| Etukädensija | Fremre håndtak | Передняя ручка (280 mm / 330 mm) | Przedni uchwyt | Přední rukojeť |
| Takakädensija | Bakre håndtak | Задняя ручка | Tylny uchwyt | Zadní rukojeť |
| Mittausten epätarkkuus | Usikkerhet ved måling | Погрешность измерения | Niepewność pomiaru | Nejistota měření |
| Melutaso (standardin IEC 62841-1; IEC 62841-4-1 mukaisesti) | Støyutslipsnivá (iht. IEC 62841-1; IEC 62841-4-1) | Уровень шума (в соответствии с IEC 62841-1; IEC 62841-4-1) | Poziom emisji hałasu (zgodnie z normą IEC 62841-1; IEC 62841-4-1) | Hladina emise hluku (v souladu s IEC 62841-1; IEC 62841-4-1) |
| A-painotettu käyttäjään kohdistuva äänenpainetaso | A-veket lydtrykk ved operatørposisjon | Амплитудно-взвешенный уровень звукового давления на рабочем месте оператора | Poziom ważonego ciśnienia akustycznego w pozycji operatora | Hladina akustického tlaku važená funkcí A |
| Mittausten epätarkkuus | Usikkerhet ved måling | Погрешность измерения | Niepewność pomiaru | Nejistota měření |
| A-painotettu äänenteho | A-veket lydeffektnivá | Уровень А-взвешенной звуковой мощности | A-ważony poziom mocy akustycznej | Hladina akustického výkonu važená funkcí A |
| Mittausten epätarkkuus | Usikkerhet ved måling | Погрешность измерения | Niepewność pomiaru | Nejistota měření |
| Akku ja laturi | Batteri og lader | Аккумуляторная батарея и зарядное устройство | Akumulator i ladowarka | Nabiječka a baterie |
| Mali | Modell Модель Model Model | | | |
| Akku | Batteri | Аккумулятор | Akumulator | Baterie |
| Laturi | Lader | Зарядное устройство | Ładowarka | Nabiječka |
| Yhteensopivat akut | Kompatible batteripakker Совместимая аккумуляторная батарея | Pasujące akumulatory | Kompatibilní akumulátory |
| Yhteensopiva laturi | Kompatíbel lader | Совместимое зарядное устройство | Zgodna ladowarka | Kompatibilní nabiječka |
| Varaosat | Erstatningsdeler | Запасные части Części zamienne Náhradní díly | |
| Valmistaja | Produsent | Изготовитель | Producent | Výrobce |
| Ketju | Kjede | Пильная цепь | Łańcuch tnący | Ostrá část řetězu |
| Terälevy | Skinne | Шина | Prowadnica | Lišta |
| Ketjun on oltava saman valmistajan toimittamaan terälevynn sopiva, yllä mainittujen yhdistelmien mukaisesti. | Kjede mà benyttes med styreskinne fra samme produsent i henhold til ovenstående kombinasjoner. | Цепь следует использовать с пильной шиной того же производителя в соответствии с приведенными выше сочетаниями. | Należy stosować kombinacje lańcucha i prowadnicy wymienione powyżej, obydwa elementy muszą pochodzić od tego samego producenta. | Řetěz musí být upevněn na liště od stejného výrobce dle vyše uvedených kombinacích. |


| Magyar Română Latviski Lietuviškai |
| Termék müszaki adatai Specificațiile produsului Produkta specifikacijas Gaminio techninės savybės |
| Akkumulátoros láncfūrész Fierăstrău electric cu lanț, cu acumulator | Bezvadu elektriskais motorzágis | Akumuliatorinis grandininis pjūklas | |
| Típus | Model | Modelis | Modelis | RY18CS20A |
| Névleges feszültség | Tensiunea nominală | Nominālais spriegums | Nominali įtampa | 18 V d.c. |
| Üresjáratı fordulatszám | Viteză fără sarcină | Tukšgaitas ātrums | Greitis be apkrovimo | 4,6 m/s |
| Lâncvezető hossza | Lungime a barei de ghidare | Sliedes garums | Kreipiamosios juostos ilgis | 203 mm |
| Hasznos vágáshossz | Lungime de tăiere utilizabilă | Izmantojamais griešanas garums | Naudojamas pjovimo ilgis | 180 mm (7 in.) |
| Lâncleállitási idő | Tîmp oprire lanț | Kēdes apstăšanās laiks | Grandinės sustabdymo trukmé | <2 s |
| Lânc hossza | Lungimea lanțului | Kēdes garums | Grandinės ilgis | 20 cm (8 in.) |
| Fog osztás | Lamele lanțului | Kēdes asmenlši | Pjovimo grandinės dantukas | 3/8 in. |
| Fogak közötti távolság | Pasul lanțului | Kēdes parameters | Pjovimo grandinės žingsnis | 0,043 in. |
| Vágófogak mennyisége | Număr zale de legătură | Piedziņas posmu skaits | Varomuju grandžių klekis | 33 |
| Tõmeg (akku, vezetõrúd, lánc és olaj nélkül) | Greutate (fără acumulator, ghidaj, lanț și ulei) | Svars (bez akumulatoru bloka, kēdes sliedes, kēdes un eljas) | Svoris (be akumuliatoriaus, kreipiamosios juostos, grandinės ir alyvos) | 1,9 kg |
| Vibrációs szint (az IEC 62841-1; IEC 62841-4-1 szerint) | Nivel de vibrație (în conformitate cu IEC 62841-1; IEC 62841-4-1) | Vibrácijas līmenis (saskaņa ar IEC 62841-1; IEC 62841-4-1) | Vibracijos lygis (pagal IEC 62841-1; IEC 62841-4-1 standarta) | |
| Elülső fogantyú | Mâner anterior | Priekšējais rokturis | Priekinė rankena | 3,0 m/s2 |
| Hátsó fogantyú | Mânerul principal | Aizmugurējais rokturis | Galinė rankena | 2,8 m/s2 |
| Mérės bizonytalansága | Nesiguranța măsurătorii | Mērijuma nenoteiktība | Matavimo paklaida | 1,5 m/s2 |
| Hangkibocsátási szint (az IEC 62841-1; IEC 62841-4-1 szerint) | Nivel emisie zgomot (în conformitate cu IEC 62841-1; IEC 62841-4-1) | Trokšņu emisijas līmenis (saskaņa ar IEC 62841-1; IEC 62841-4-1) | Skleidžiamo triukšmo lygis (pagal IEC 62841-1; IEC 62841-4-1 standarta) | |
| A-súlyozott hangnyomásszint a kezelő helyén | Valoare A nivel presiune zgomot la poziņia operatorului | A-novērtējuma skanas spiediena līmenis operatora darba vietā | A dažninės charakteristikos garso slėgio lygis operatoriaus vietoje | 82,2 dB(A) |
| Mérės bizonytalansága | Nesiguranța măsurătorii | Mērijuma nenoteiktība | Matavimo paklaida | 3,0 dB |
| A-súlyozott hangteljesítményszint | Nivel de putere acustică ponderatā A | A-līmeņa skanas jaudas līmenis | A-svertinis akustinis lygis | 90,2 dB(A) |
| Mérės bizonytalansága | Nesiguranța măsurătorii | Mērijuma nenoteiktība | Matavimo paklaida | 2,8 dB |
| Akkumulátor és töltő | Bateria și încarcătorul | Akumulators un lādētājs | Akumuliatorius ir įkroviklis | | |
| Típus | Model | Modelis | Modelis | RY18CS20A-125 | RY18CS20A-0 |
| Akkumulátor | Acumulator | Akumulators | Baterija | 2,5 Ah | - |
| Töltő | Încârcător | Lādētājs | Įkroviklis | RC18115 | - |
| Kompatibilis akkumulátorok | Acumulatori compatibili | Savietojami akumulatoru komplekti | Suderinami baterijos paketai | RB18.. |
| Kompatibilis töltő | Încârcător compatibili | Saderīgs lādētājs | Suderinamas įkroviklis | BCL1418.., RC18.. |
| Cserealkatrészek | Piese de schimb | Rezerves daļas | Atsarginės detalės | |
| Gyártó | Producător | Ražotājs | Gamintojas | TRILINK |
| Fūrészlianc | Lanțul ferăstrăului | Zāgēšanas kēde | Pjovimo grandinė | RAC270 |
| Láncvezető | Lamā | Sliede | Apsagas | RAC235 |
| A láncot ugyanazon gyártójú láncvezetőjével kell használni, a fenti párosítas szerinti. | Lanțul trebuie să fie montat cu lamā de la același producător, conform combinațiilor de mai sus. | Kēde ir jāsalāgo ar atbilstoša ražotāja sliedi minētajās kombinācijās. | Grandinę būtina pritvirtinti naudojant to paties gamintojo strypą pagal aukščiau nurodytus derinius. | |


The declared vibration total values and the declared noise emission values given in this instruction manual have been measured in accordance with a standardised test and may be used to compare one tool with another. They may be used for a preliminary assessment of exposure.
The declared vibration and noise emission values represent the main applications of the tool. However, if the tool is used for different applications, used with different accessories, or poorly maintained, the vibration and noise emission may differ. These conditions may significantly increase the exposure levels over the total working period. An estimation of the level of exposure to vibration and noise should take into account the times when the tool is turned off or when it is running idle. These conditions may significantly reduce the exposure level over the total working period.
Identify additional safety measures to protect the operator from the effects of vibration and noise, such as maintaining the tool and the accessories, keeping the hands warm (in case of vibration), and organising work patterns.
FR

AVERTISSEMENT
EN RYOBI WARRANTY APPLICATION CONDITIONS
In addition to any statutory rights resulting from the purchase, this product is covered by a warranty as stated below.
- The warranty period is 24 months for consumers and commences on the date when the product was purchased. This date has to be documented by an invoice or other proof of purchase. The product is designed and dedicated to consumer and private use only. So there is no warranty provided in case of professional or commercial use. This warranty applies only on new products.
- There is a possibility to extend for a part of the range of power tools (AC/DC) the warranty period over the period described above using the registration on the www.ryobitools.eu website. The eligibility of products for extended warranty is clearly displayed in stores and / or on packaging and is contained within the product documentation. The end user is required to register his/her newly-acquired products online within 30 days from the date of purchase. The end user may register for the extended warranty in his/her country of residence if listed on the online registration form where this option is valid. Furthermore, end users must give their consent to the storage of their personal data that is required to be entered online. They must also accept the terms and conditions. The registration confirmation receipt, which is sent out by e-mail, and the original invoice showing the date of purchase will serve as proof of the extended warranty.
- The warranty covers all defects of the product during the warranty period due to faults in workmanship or material at the purchase date. The warranty is limited to repair and/or replacement and does not include any other obligations including but not limited to incidental or consequential damages. The warranty is not valid if the product has been misused, used contrary to the instruction manual, or has been incorrectly connected to a power supply. This warranty does not apply to:
– any damage to the product that is the result of improper or lack of maintenance
– any product that has been altered or modified
– any product where original identification (trade mark, serial number) markings have been defaced, altered or removed
– any damage caused by non-observance of the instruction manual
– any product not displaying the CE approval mark on the rating plate
– any product that has been attempted to be repaired by a non-authorised warranty service centre or without prior authorisation by Techtronic Industries
– any product connected to improper power supply (amps, voltage, frequency)
– any product used with inappropriate fuel mixture (fuel, oil, ratio of oil/ fuel mixture)
– any damage caused by external influences (water, chemical, physical, shocks) or foreign substances
– normal wear and tear spare parts
– inappropriate use, overloading of the tool
– use of non-approved accessories or parts
- Accessories provided with the tool or purchased separately including but not limited to blades, saw chains, cutting lines, etc.
– Any periodic adjustments to or maintenance cleaning of carburettors
- Components (parts and accessories) subject to natural wear and tear, including but not limited to bump knobs, drive belts, clutch, blades of hedge trimmers or lawn mowers, harness, cable throttle, carbon brushes, power cord, tines, felt washers, hitch pins, blower fans, blower and vacuum tubes, vacuum bag and straps, guide bars, saw chains, hoses, connector fittings, spray nozzles, wheels, spray wands, inner reels, outer spools, cutting lines, spark plugs, air filters, gas filters, mulching blades, etc.
- For servicing, the product must be sent or presented to a RYOBI authorised service station listed for each country in the following list of service station addresses. In some countries your local RYOBI dealer undertakes to send the product to the RYOBI service organisation. When sending a product to a RYOBI service station, the product should be safely packed without any dangerous contents such as petrol, marked with sender's address and accompanied by a short description of the fault.
- A repair / replacement under this warranty is free of charge. It does not constitute an extension or a new start of the warranty period. Exchanged parts or products become our property. In some countries delivery charges or postage will have to be paid by the sender. Your statutory rights arising from the purchase of the product remain unaffected.
- This warranty is valid in the European Community, Switzerland, Iceland, Norway, Liechtenstein, Turkey, Russia, and the United Kingdom. Outside these areas, please contact your authorised RYOBI dealer to determine if another warranty applies.
AUTHORISED SERVICE CENTRE
Any request or issue with the product can be addressed to your local authorised service centres (visit www.ryobitools.eu) or directly to: Techtronic Industries GmbH, Max Eyth Straße 10, 71364 Winnenden, Germany. Please state the serial number and product type printed on the label.
FR RYOBI CONDITIONS D'APPLICATION DE LA GARANTIE
Cordless chainsaw
Brand: RYOBI | Manufacturer ^1 | Model number ^2 | Serial number range ^3
We declare as the manufacturer under our sole responsibility that the product mentioned below fulfills all the relevant provisions of the following European Directives, European Regulations and harmonised standards ^1
Measured sound power level.... 90.2 dB(A)
Guaranteed sound power level.... 93 dB(A)
Conformity assessment method to Annex V Directive 2000/14/EC amended by 2005/88/EC.
Authorised to compile the technical file: ^5
Max-Eyth-Straße 10, 71364 Winnenden, Germany
^2 RY18CS20A
^3 47591601000001 - 47591601999999
4 2006/42/EC, 2014/30/EU, 2000/14/EC, 2005/88/EC, 2011/65/EU,
EN 62841-1:2015; EN 62841-4-1:2020, EN IEC 55014-1:2021,
EN IEC 55014-2:2021, EN IEC 63000:2018
Todd Chipner
Vice President, Quality – Asia
^5 Alexander Krug, Managing Director
Techtronic Industries GmbH
Max-Eyth-Straße 10, 71364 Winnenden, Germany
Manufacturer: Techtronic Industries GmbH
Max-Eyth-Straße 10, 71364 Winnenden, Germany
We declare as the manufacturer under our sole responsibility that the product
mentioned below
Cordless chainsaw
Brand: RYOBI
Model number: RY18CS20A
Serial number range: 47591601000001 - 47591601999999
fulfills all the relevant provisions of the following Regulations: S.I. 2008/1597
(as amended), S.I. 2016/1091 (as amended), S.I. 2012/3032 (as amended), S.I.
2001/1701 (as amended) and that the following designated standards have been
used:
EN 62841-1:2015, EN 62841-4-1:2020, BS EN IEC 55014-1:2021,
BS EN IEC 55014-2:2021, BS EN IEC 63000:2018
Measured sound power level: 90.2 dB(A)
Guaranteed sound power level: 93 dB(A)
Conformity assessment method to S.I. 2001/1701 Schedule 8 (as amended)
Todd Chipner
Vice President, Quality – Asia
Authorised to compile the technical file:
Techtronic Industries (UK) Ltd
Fieldhouse Lane
Marlow Bucks SL7 1HZ
UK


EN RYOBI is a trade mark of Ryobi Limited, and is used under license.
FR RYOBI est une marque déposée de Ryobi Limited, et est utilisée sous license.
DE RYOBI ist ein Markenzeichen von Ryobi Limited und wird in Lizenz verwendet.
ES RYOBI es una marca registrada de Ryobi Limited, y se utiliza bajo licencia.
IT L'utilizzo del marchio registrato RYOBI è legato alla licenza concessa da Ryobi Limited.
NL RYOBI is een handelsmerk van Ryobi Limited en wordt onder licentie gebruikt.
PT RYOBI é uma marca comercial de Ryobi Limited, e é utilizada sob licença.
DA RYOBI er et varemærke tilhørende Ryobi Limited og bruges under licens.
SV RYOBI är en del av varumärke Ryobi Limited och dess användning är licensierad.
FI RYOBI on Ryobi Limitedin omistama tavaramerkki, ja sitä käytetään lisenssin puitteissa.
NO RYOBI er et varemerke for Ryobi Limited, og brukes under lisens.
RU RYOBI является товарным знаком компании Ryobi Limited, используемым по лицензии.
PL RYOBI to znak towarowy firmy Ryobi Limited i jest używany zgodnie z udzieloną licencją.
CS RYOBI je ochranná známka společnosti Ryobi Limited a její použivani podléhá licenci.
HU A RYOBI a Ryobi Limited védjegye, használata licenc keretében történik.
RO RYOBI este o marcă comercială a firmei Ryobi Limited și este utilizată sub licență.
LV RYOBI ir Ryobi Limited preču zīme un tiek izmantota saskaņa ar licenci.
LT „RYOBI“ yra „Ryobi Limited“ prekės ženklas, naudojamas pagal licencija.
ET RYOBI on ettevõtte Ryobi Limited kaubamärk, mida kasutatakse litsentsi alusel.
HR RYOBI je žig tvrtke Ryobi Limited i koristi se po licenci
SL RYOBI je blagovna znamka družbe Ryobi Limited in se uporablja na podlagi dovoljenja.
SK RYOBI je ochranná známka spoločnosti Ryobi Limited a používa sa na základe licencie.
BG RYOBI e търговска марка на Ryobi Limited и се използва под лиценз.
UK RYOBI є товарним знаком Ryobi Limited, і використовується за ліцензією.
TR RYOBI, Ryobi Limited şirketine ait olup, lisans altında kullanılan bir ticari markadır.


natural_image
Three vertical panels with diagonal striped patterns, no text or symbols present

Techtronic Industries GmbH
Max-Eyth-Straße 10,
71364 Winnenden, Germany
Techtronic Industries (UK) Ltd
Fieldhouse Lane
Marlow Bucks SL7 1HZ
UK
960994134-01

