KBBX102MPA - Fridge KITCHENAID - Free user manual and instructions
Find the device manual for free KBBX102MPA KITCHENAID in PDF.

User questions about KBBX102MPA KITCHENAID
0 question about this device. Answer the ones you know or ask your own.
Ask a new question about this device
Download the instructions for your Fridge in PDF format for free! Find your manual KBBX102MPA - KITCHENAID and take your electronic device back in hand. On this page are published all the documents necessary for the use of your device. KBBX102MPA by KITCHENAID.
USER MANUAL KBBX102MPA KITCHENAID
BOTTOM-MOUNT BUILT-IN REFRIGERATOR OWNER'S MANUAL
GUIDE D'UTILISATION DU RÉFRIGÉRATEUR ENCASTRÉ AVEC CONGÉLATEUR EN BAS
Table of Contents/Table des matières
REFRIGERATOR SAFETY....2
Refrigerator Safety 2
MAINTENANCE AND CARE 3
Cleaning 3
Lights 5
Vacation and Moving Care 5
Refrigerator Shelves And Freezer Compartment....5
INSTALLATION REQUIREMENTS....6
Parts and Features....6
Refrigeration Compartment 7
Location Requirements 8
Electrical Requirements 8
Opening Dimensions 8
Product Dimensions 9
INSTALLATION INSTRUCTIONS 9
Unpack the Refrigerator 9
Refrigerator Installation Preparation.... 10
Refrigerator Cabinetry Installation 11
Door Panel Installation and Alignment 12
Remove and Replace Drawers 16
Refrigerator Door Reversal 17
Your safety and the safety of others are very important.
We have provided many important safety messages in this manual and on your appliance. Always read and obey all safety messages.

This is the safety alert symbol.
This symbol alerts you to potential hazards that can kill or hurt you and others.
All safety messages will follow the safety alert symbol and either the word "DANGER" or "WARNING." These words mean:
DANGER
WARNING
You can be killed or seriously injured if you don't immediately follow instructions.
You can be killed or seriously injured if you don't follow instructions.
All safety messages will tell you what the potential hazard is, tell you how to reduce the chance of injury, and tell you what can happen if the instructions are not followed.
IMPORTANT SAFETY INSTRUCTIONS
WARNING: To reduce the risk of fire, electric shock, or injury to persons when using your appliance, follow basic precautions, including the following:
■ Children should be supervised to ensure that they do not play with the appliance.
■ This appliance is not intended for use by persons (including children) with reduced physical, sensory, or mental capabilities, or lack of experience and knowledge, unless they have been given supervision or instruction concerning use of the appliance by a person responsible for their safety.
■ Do not use an extension cord.
If power supply cord is damaged, it must be replaced by the manufacturer, its service agent, or a similarly qualified person in order to avoid a hazard.
■ Connect to potable water supply only.
■ This appliance is intended to be used in household and similar applications such as: staff kitchen areas in shops, offices, and other working environments; farm houses and by clients in hotels, motels, and other residential-type environments; bed and breakfast-type environments; and catering and similar non-retail applications.
■ Do not store explosive substances such as aerosol cans with a flammable propellant in this appliance.
■ Do not use replacement parts that have not been recommended by the manufacturer (e.g., parts made at home using a 3D printer).
- Keep ventilation openings, in the appliance enclosure or in the built-in structure, clear of obstruction.
■ Do not use mechanical devices or other means to accelerate the defrosting process, other than those recommended by the manufacturer.
■ Do not damage the refrigerant circuit.
■ Do not use electrical appliances inside the food storage compartments of the appliance, unless they are of the type recommended by the manufacturer.
■ Ice maker kit can be added to some models. See serial tag inside the food compartment of appliance for ice maker kit model information.
A qualified service technician must install the water line and ice maker. See installation instructions supplied with ice maker kit for complete details.
SAVE THESE INSTRUCTIONS
NOTE: The appliance must be disconnected from the power supply before any installation or service operation - risk of electric shock.
Proper Disposal of Your Old Refrigerator
WARNING: Risk of child entrapment. Before you throw away your old refrigerator or freezer:
■ Take off the doors.
■ Leave the shelves in place so that children may not easily climb inside.
WARNING
Suffocation Hazard
Remove doors or lid from your old appliance.
Failure to do so can result in death or brain damage.
IMPORTANT: Child entrapment and suffocation are not problems of the past. Junked or abandoned freezers or refrigerators, are s dangerous, even if they will sit for "just a few days." If you are getting rid of your old refrigerator or freezer, please follow these instructions to help prevent accidents.
Important information to know about disposal of refrigerant
Dispose of refrigerator in accordance with Federal and Local regulations. Refrigerants must be evacuated by a licensed, EPA certified refrigerant technician in accordance with established procedures.
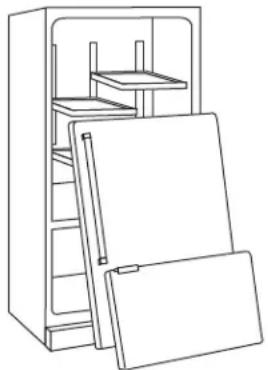
natural_image
Line drawing of a refrigerator with open doors and shelves (no text or symbols)IMPORTANT: C-Pentane is used as blowing agent in the insulation foam and it is a flammable gas.
This appliance does not contain CFCs. The refrigerant circuit contains R600a (HC). Appliances with Isobutane (R600a): isobutane is a natural gas without environmental impact, but is flammable. Therefore, make sure the refrigerant circuit pipes are not damaged, especially when emptying the refrigerant circuit.
MAINTENANCE AND CARE
Cleaning
WARNING

Explosion Hazard
Risk of Fire or Explosion.
Flammable Refrigerant Used.
Do Not Use Mechanical Devices to Defrost Refrigerator. Do Not Puncture Refrigerant Tubing.
Both the refrigerator and freezer sections defrost automatically. However, clean both sections about once a month to avoid odor buildup. Wipe up spills immediately.
IMPORTANT:
Because air circulates between all sections, any odors formed in one section will transfer to the other. You must thoroughly clean all sections to eliminate odors. To avoid odor transfer and drying out of food, wrap or cover foods tightly.
■ Do not use abrasive or harsh cleaners such as window sprays, scouring cleansers, flammable fluids, muriatic acid, cleaning waxes, concentrated detergents, bleaches or cleansers containing petroleum products on doors and cabinet, plastic parts, interior and door liners or gaskets. Do not use paper towels, scouring pads, or other harsh cleaning tools.
■ For stainless steel models, stainless steel is corrosion resistant and not corrosion-proof. To help avoid corrosion of your stainless steel, keep your surfaces clean by using the following cleaning instructions.
Cleaning the Touch Screen Display on the Dispenser Panel (on some models):
- Make sure the refrigerator is unplugged or the power is disconnected before wiping the screen to avoid unintentionally changing the settings.
- Mix a solution of mild detergent in warm water. Dampen a soft, lint-free cloth with the solution and gently wipe the screen.
NOTE: Do not spray or wipe liquids directly onto the screen or over-saturate the cloth. - Plug in refrigerator or reconnect power.
Cleaning the Interior:
IMPORTANT: Refrigerator shelves with under-shelf, LED lighting are not dishwasher safe.
- Unplug refrigerator or disconnect power.
- Hand wash, rinse, and dry removable parts and interior surfaces thoroughly. Use a clean sponge or soft cloth and a mild detergent in warm water.
- Plug in refrigerator or reconnect power.
Cleaning the Exterior:
IMPORTANT: Damage to smooth finish due to improper use of cleaning products or using non-recommended cleaning products is not covered under the warranty. Sharp or blunt instruments w mar the finish.
- Unplug refrigerator or disconnect power.
- Using a clean sponge or soft cloth and a mild detergent in warm water, wash, rinse, and thoroughly dry stainless steel and painted metal exteriors.
To keep your stainless steel refrigerator looking like new and to remove minor scuffs or marks, it is suggested that you use the manufacturer's approved stainless steel cleaner and polish. This cleaner is for stainless steel parts only. Refer to the Quick Start Guide for ordering information.
NOTE : When cleaning stainless steel, always wipe in the direction of the grain to avoid cross-grain scratching.
Do not allow the stainless steel cleaner and polish to come into contact with any plastic parts such as the trim pieces, dispenser covers, or door gaskets. If unintentional contact does occur, clean plastic part with a sponge and mild detergent in warm water. Dry thoroughly with a soft cloth.
3. Plug in refrigerator or reconnect power.
Style 1: Smooth Door/Painted Metal
| DO USE DO NOT USE | |
| ■ Soft, clean cloth ■ Abrasive cloths■ Paper towels or newsprint■ Steel-wool pads | |
| ■ Warm, soapy water with a mild detergent | ■ Abrasive powders or liquids■ Window sprays■ Ammonia■ Acidic or vinegar-based cleaners■ Oven cleaners■ Flammable fluids |
NOTE: Paper towels scratch and may dull the clear coat of the painted door. To avoid possible damage, use only soft, clean cloths to polish and wipe the door.
Style 2: Stainless Steel
| DO USE DO NOT USE | |
| ■ Soft, clean cloth ■ Abrasive cloths■ Paper towels or newsprint■ Steel-wool pads | |
| ■ Warm, soapy water with a mild detergente | ■ Abrasive powders or liquids■ Ammonia■ Citrus-based cleaners■ Acidic or vinegar-based cleaners■ Oven cleaners |
| ■ For heavy soil, use only a manufacturer's approved stainless steel cleaner and polish | ■ Abrasive powders or liquids■ Ammonia■ Citrus-based cleaners■ Acidic or vinegar-based cleaners■ Oven cleaners■ Abrasive cloths■ Paper towels or newsprint■ Steel-wool pads |
NOTES:
If unintentional contact does occur, clean plastic part with a sponge and mild detergent in warm water. Dry thoroughly with a soft cloth.
■ Avoid exposing stainless steel appliances to caustic or corrosive elements such as high-salt, high-moisture, or high-humidity environments. Damage due to exposure to these elements is not covered under the warranty.
■ Just because a cleaner is a liquid does not mean it is nonabrasive. Many liquid cleansers formulated to be gentle on tile and smooth surfaces still damage stainless steel.
■ When cleaning stainless steel, always wipe in the direction of the grain to avoid cross-grain scratching.
■ Citric acid permanently discolors stainless steel. To avoid damaging the finish of your stainless steel refrigerator:
Do not allow these substances to remain on the finish:
- Mustard
- Citrus-based sauces
- Tomato juice
• Citrus-based products - Marinara sauce
Condenser Cleaning
WARNING

Explosion Hazard
Risk of Fire or Explosion due to Puncture of Refrigerant Tubing;
Follow Handling Instructions Carefully.
Flammable Refrigerant Used.
There is no need for routine condenser cleaning in normal home operating environments. If the environment is particularly greasy or dusty or there is significant pet traffic in the home, the condenser should be cleaned every 6 months to ensure maximum efficiency.
Use a vacuum cleaner with a soft brush to clean the grille, the open areas behind the grille, and the front surface area of the condenser.
NOTE: If you are unable to clean the condenser, please call for 3 service.
Lights
IMPORTANT: The lights in both the refrigerator and freezer 6. compartments use LED technology. If the lights do not illuminate 7, when the door or drawer is opened, call for assistance or service. Refer to the Quick Start Guide for contact information.
Light system (depending on model)
A. Light Source Class G
This product contains a light source of energy efficiency class G.
B. Light Source Class F
This product contains 2/4 lateral light sources of energy efficiency class F and a top light source of energy class G.
A. Light Source Class G
This product contains a top light source of energy efficiency class G.
Vacation and Moving Care
Vacation
If You Choose to Leave the Refrigerator On While You're Away: Use up any perishables and freeze other items.
If You Choose to Turn Off the Refrigerator Before You Leave
- Remove all food from the refrigerator.
- Turn off the Temperature control(s). See the "Quick Start Guide."
- Clean refrigerator, wipe it, and dry well.
- Tape rubber or wood blocks to the tops of both doors to prop them open far enough for air to get in. This stops odor and mold from building up.
Moving
When you are moving your refrigerator to a new home, follow these steps to prepare it for the move.
- If your refrigerator has an automatic ice maker:
■ Turn off the water supply to the ice maker at least one day ahead of time.
■ Disconnect the water line from the back of the refrigerator.
■ When the last load of ice drops, raise the wire shutoff arm to the Off (up) position or press the switch to Off, depending on your model.
-
Remove all food from the refrigerator and pack all frozen food in dry ice.
-
Empty the ice tray.
- Turn off the Temperature control(s). See the "Quick Start Guide."
- Unplug the refrigerator.
- Clean, wipe, and dry thoroughly.
- Take out all removable parts, wrap them well, and tape them face. together so they don't shift and rattle during the move.
- Tape the doors closed and tape the power cord to the back of the refrigerator.
When you get to your new home, put everything back and refer to the "Installation Instructions" section for preparation instructions.
Refrigerator Shelves And Freezer Compartment
Refrigerator has different type of shelves as given below:
■ Glass shelf
■ Foldable shelf*
■ Door shelves
■ Bottle shelf
NOTE: All of the door shelves and shelves are removable.
Features and technical data may vary depending on the model.
Important information to know about glass shelves and covers:
Do not clean glass shelves or covers with warm water when they are cold. Shelves and covers may break if exposed to sudden temperature changes or impact, such as bumping. Tempered glass is designed to shatter into many small, pebble-size pieces. This is normal. Glass shelves and covers are heavy. Use both hands when removing them to avoid dropping.
The shelves in your refrigerator are adjustable to match your individual storage needs.
Storing similar food items together in your refrigerator and adjusting the shelves to fit different heights of items will make finding the exact item you want easier. It will also reduce the amount of time the refrigerator door is open, and save energy.
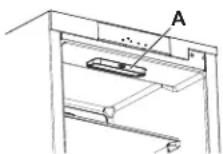
Foldable Shelf\*
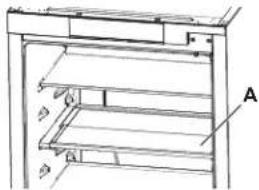
This shelf can be used in 3 different ways:
- Full-depth: The entire surface can be utilized.
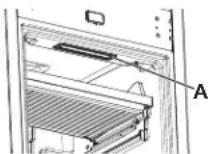
natural_image
Technical line drawing of a multi-level mechanical or architectural structure with labeled component A (no text or symbols present)A. Foldable Shelf
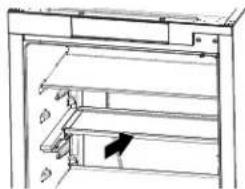
- Half-depth: To adjust the shelf to half-depth, slightly raise the front part then pull it in. Half-depth is used to create the space for taller items kept on below shelf and to use the rear part of the shelf.
natural_image
Technical line drawing of a mechanical assembly with no visible text or symbols- Flipped up: To flip the shelf up, first adjust the halfway position from half-depth and then flip down to using the shelf in half-depth and full-depth. It will create more space for tall and bulky items kept on below shelf.

natural_image
Diagram of a mechanical device with an arrow indicating rotational motion (no text or symbols present)Freezer Compartment
The details of freezer compartment are as follows:
- Ice Cubes: Fill the water in ice tray up to capacity of it and put into freezer compartment.
IMPORTANT: Do not use sharp or pointed objects to remove the ice from ice tray.
The quantity of frozen food for 12 hours and 24 hours duration is given on the rating plate.
-
Easy Access Tray: Freezer tray is useful to easily access frequently used products, freeze or simply store leftovers or small items.
-
Maker's Pad: The metallic panel freeze the food faster. Lift the metallic panel from left angle to remove and clean easily.
INSTALLATION REQUIREMENTS
Parts and Features
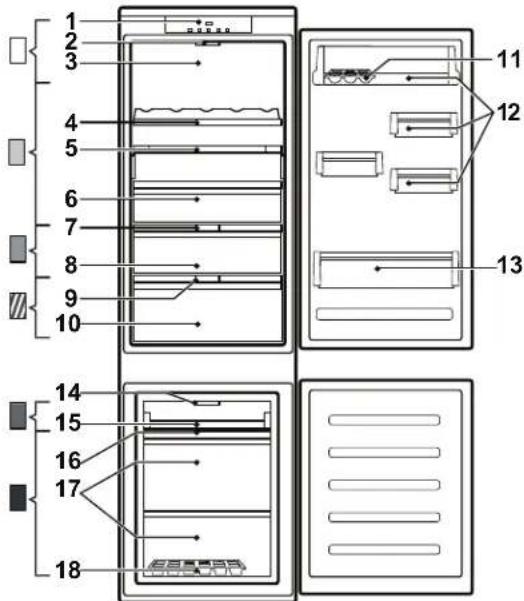
text_image
1 2 3 4 5 6 7 8 9 10 11 12 13 14 15 16 17 18Refrigerator Compartment
-
Control Panel
-
LED Light
-
Multiflow
-
Bottle Rack*
-
Glass Shelf
-
Foldable Shelf*
-
Multitemperature Knob*
-
Multitemperature Drawer*
-
Humidity Control Knob*
-
Fruit And Vegetable Drawer
-
Egg Tray
-
Door Shelves
-
Bottle Shelf
Freezer Compartment
-
LED Light*
-
Easy Access Tray
-
Maker's Pad*
-
Middle and Bottom Drawers (Storage Area For Frozen And Deep Frozen Food)
-
Ice Tray
*On Some Models
Refrigerator Cooling Zones
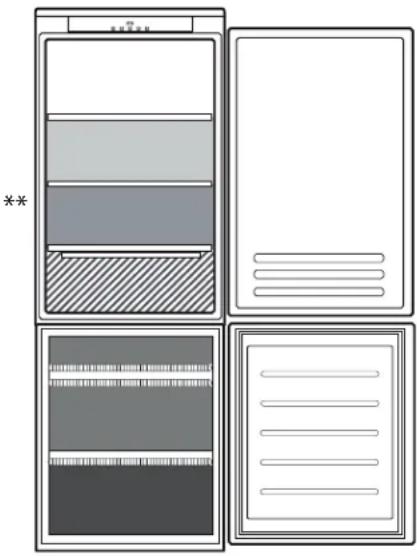
text_image
***
Minor cool zone
Suggested for the storage of tropical fruit, cans, drinks, eggs, sauces, pickles, butter, jam.

Cool Zone
Suggested for the storage of cheese, milk, daily food, delicatessen, yogurt.

Coolest Area\*\*
Suggested for storage of cold cuts, desserts, meat and fish.

Fruit & Vegetable Drawer

Freezer Drawers

Freezing Zone Drawer (Max cool zone)
Suggested to freeze fresh/cooked food.
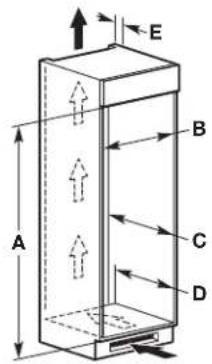
Multiflow Air Distribution
The multiflow helps to distribute equally the cold air in the cavity for a better food preservation. Food can be placed on any shelf of the appliance.
NOTE: Prevent blockages of the air distribution vents which ensures its free movement.
Multitemperature Zone\*
There are 3 temperature selection positions to preserve the meat/fish, dairy food and fruit/veggies, offering extra storage space for your fresh greens.
■ Left position: meat and fish
■ Mid position: dairy food (cheese and yogurt)
■ Right position: fruits and vegetables
text_image
GTA TIN CSFor the correct functioning of the multitemperature zone drawer, it is necessary that:
■ the appliance is turned on
■ one of the following special functions is not selected: Standby, Cooling-Off, Vacation (in this case, remove the food contained in it).
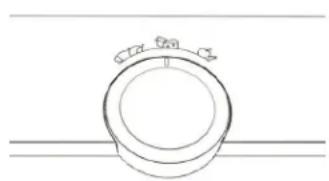
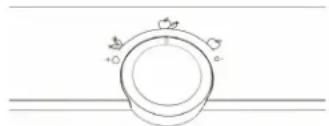
Humidity control\*
Open the humidity regulator (position B) if you want to store food, like fruit, in a less humid environment or close it (position A) to store food, like vegetables, in a more humid environment.
text_image
A BTurn the knob to the left for storing vegetables (for which a more humid environment is recommended), rotate the knob to the right for storing fruit (for which a less humid environment is recommended) and turn the knob to the middle for storing a mixture of fruit and vegetables.
natural_image
Simple line drawing of a circular object with two small icons above it, no text or symbols present.Refrigeration Compartment
The refrigerator compartment allows for the storage of fresh food and drink. The refrigerator compartment defrosts automatically. The occasional presence of drops of water on the internal back wall of the compartment is a sign of the automatic defrosting phase. The defrosting water is channelled into a drain and then collected in a container, where it evaporates.
NOTE: The ambient temperature, how often the doors are opened and the position of the appliance may affect the internal temperatures in the two compartments. Set the temperatures according to these factors. In very humid conditions, condensation may form in the refrigerator compartment, especially on the glass shelves. In this case, it is recommended that you close containers with liquids in (e.g. a pot of stock), wrap up food with a high water content (e.g. vegetables) and turn on the fan, if there is one. All of the drawers, door shelves and shelves can be removed.
NOTE: Avoid storing unwrapped food in direct contact with internal surfaces of the refrigerator or freezer compartments.
Location Requirements
WARNING

Explosion Hazard
Keep flammable materials and vapors, such as gas away from appliance.
Use nonflammable cleaner.
Failure to do so can result in death, explosion, or
Floor must support the refrigerator weight, more than 600 lbs (272 kg), door panels, and contents of the refrigerator.
Each refrigerator needs to be installed in a separate cabinet frame.
NOTE: This refrigerator is intended for use in a location where temperature ranges from a minimum of 13^ C ( 55^ F) to a maximum of 43^ C ( 110^ F). The preferred room temperature range for optimum performance, which reduces electricity usage and provides superior cooling, is between 15^ C ( 60^ F) and 32^ C ( 90^ F). It is recommended that you do not install the refrigerator near a heat source, such as an oven or radiator.
Electrical Requirements
WARNING

Electrical Shock Hazard
Plug into a grounded 3 prong outlet.
Do not remove ground prong.
Do not use an adapter.
Do not use an extension cord.
Failure to follow these instructions can result in death, fire, or electrical shock.
Before you move your refrigerator into its final location, it is important to make sure you have the proper electrical connection.
If the supply cord is damaged, it must be replaced by the manufacturer or its service agent or a similarly qualified person. Do not use a cord that shows cracks or abrasion damage along its length or at either the plug or connector end.
Recommended Electrical Connection
It must be possible to disconnect the appliance from the power supply by unplugging it if plug is accessible, or by a multi-pole switch installed upstream of the socket in accordance with the wiring rules and the appliance must be earthed in conformity with national electrical safety standards. Do not use an extension cord.
IMPORTANT: If this product is connected to a GFCI (Ground Fault Circuit Interrupter) protected outlet, nuisance tripping of the power supply may occur, resulting in loss of cooling. Food quality and flavor may be affected. If nuisance tripping has occurred, and if the condition of the food appears poor, dispose of the food.
NOTE: Before performing any type of installation or cleaning, or line, removing a light bulb, turn cooling off or turn the control (Thermostat, Refrigerator or Freezer Control depending on the model) to Off. On models with a digital temperature control, press the minus sign touch pads repeatedly until a dash (-) appears in fire. both the freezer and refrigerator displays. Disconnect the refrigerator from the electrical source. When you are finished, reconnect the refrigerator to the electrical source and turn cooling on or reset the control (Thermostat, Refrigerator or Freezer Control depending on the model) to the desired setting. See the "Quick Start Guide".
^the Opening Dimensions
This refrigerator is designed to be installed inside a frame that is between kitchen cabinets. The inside of the frame should be a minimum of 69/16 " (1776 mm) high, 2/16 " (557 mm) wide, and 217/_8 " (555 mm) deep (front to back).
For proper ventilation, you must allow adequate unobstructed space behind the refrigerator and below and above the frame. Air enters below the refrigerator and exits above it.
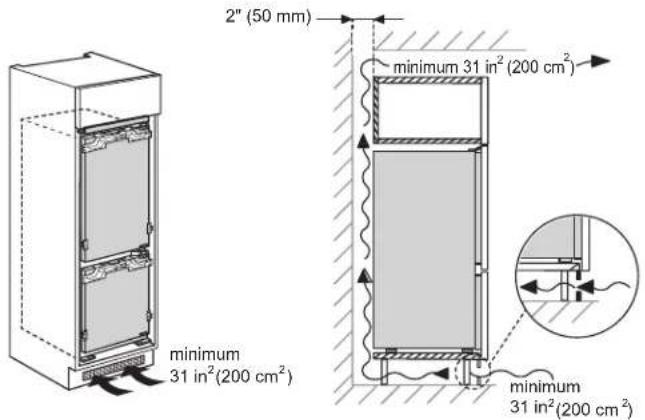
Allow a clearance minimum of 2" (50 mm) at the top of the frame. The minimum depth of the base of the frame7/is" 2(520 mm) (front to back).
The base can be as desired, but height should match height of toe kick of surrounding cabinets. A vent with an opening of at least 31 sq in (200 sq cm) is required for proper ventilation. If the space between the top of the frame and the ceiling is open air, allow a minimum of _8 " (200 mm) above the refrigerator. If the space between the top of the frame and the ceiling is enclosed as part of the surrounding cabinetry, a vent with an opening of at least 31 sq in (200 sq cm) is required.
The bottom of the vent must be a minimum of (200 mm) above the refrigerator.
NOTE: Vent covers are not supplied with the unit.
text_image
A B C D E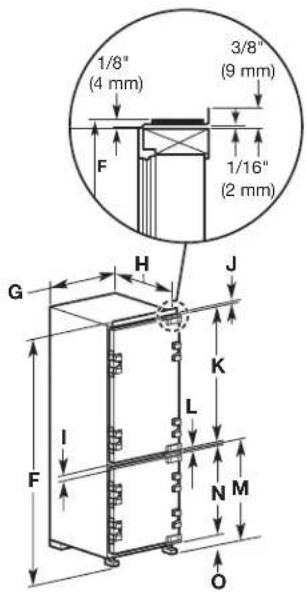
text_image
1/8" (4 mm) 3/8" (9 mm) F 1/16" (2 mm) G H J K L I F N M O| Dimension Table | |
| A | 69^15/_16" (1776 mm) |
| B | 22^1/_16" (560 mm) |
| C | Minimum 21/_8" (555 mm) |
| D | Minimum 20/_16" (520 mm) |
| E | Minimum 2" (50 mm) |
| F | 69^11/_16" (1770 mm) |
| G | 21^15/_16" (557 mm) |
| H | 21^7/_16" (545 mm) |
| I | 2^15/_16" (75 mm) |
| J | 1^1/_8" (28 mm) |
| K | 40^5/_16" (1024.5 mm) |
| L | 13/16" (20 mm) |
| M | 27^11/_16" (703.5 mm) |
| N | 27" (685.5 mm) |
| O | 5/16" (8 mm) |
text_image
2" (50 mm) minimum 31 in²(200 cm²) minimum 31 in²(200 cm²) minimum 31 in²(200 cm²)Product Dimensions
The unit is 69_16 (1770 mm) high, 1_16 (557 mm) wide, and 217/16 (545 mm) deep (front-to-back).
The refrigerator door (including hinges [x2]) is 140 (1024.5 mm) high. The freezer door (including hinges [x2]) is 27" (685.5 mm) high.
The space between the refrigerator and freezer doors is 2^15/_16 " (75 mm). The space between the door hinges is 13/16" (20 mm). A grounded 3 prong electrical outlet should be placed within 4" (101 mm) of the right side cabinets or end panel. See "Electrical Requirements" for additional information.
INSTALLATION INSTRUCTIONS
Unpack the Refrigerator
WARNING
Excessive Weight Hazard
Use two or more people to move and install or uninstall appliance.
Failure to do so can result in back or other injury.
IMPORTANT: To avoid a hazard due to instability of the appliance, it must be fixed to the furniture in accordance with the manufacturer instructions, and the furniture must be fixed to the wall.
Refrigerator Delivery
■ If door opening is 36" (914 mm) or less, then removal of doors, drawer, and hinges is required.
■ Cart the refrigerator from the side for all door openings.
Remove the Packaging
■ Remove tape and glue residue from surfaces before turning on the refrigerator. Rub a small amount of liquid dish soap over the adhesive with your fingers. Wipe with warm water and dry.
■ Do not use sharp instruments, rubbing alcohol, flammable fluids, or abrasive cleaners to remove tape or glue. These products can damage the surface of your refrigerator. For more information, see "Refrigerator Safety."
■ Dispose of/recycle all packaging materials.
■ Once installed, packaging waste (plastic, Styrofoam parts etc.) must be stored out of reach of children.
When Moving Your Refrigerator:
Your refrigerator is heavy. When moving the refrigerator for cleaning or service, be sure to cover the floor with cardboard or hardboard to avoid floor damage. Always pull the refrigerator straight out when moving it. Do not wiggle or "walk" the refrigerator when trying to move it, as floor damage could occur.
Clean Before Using
After you remove all of the packaging materials, clean the inside of your refrigerator before using it. See the cleaning instructions in "Refrigerator Care."
Important information to know about glass shelves and covers:
Do not clean glass shelves or covers with warm water when they are cold. Shelves and covers may break if exposed to sudden temperature changes or impact, such as bumping. Tempered glass is designed to shatter into many small, pebble-size pieces. This is normal. Glass shelves and covers are heavy. Use both hands when removing them to avoid dropping.
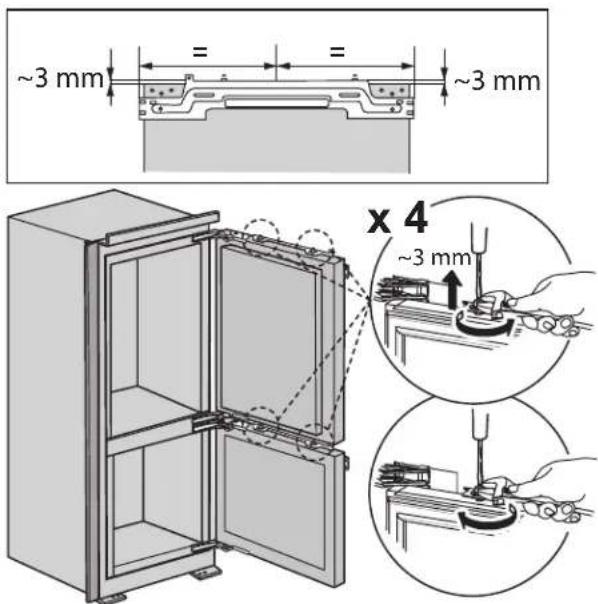
Refrigerator Installation Preparation
Before installing the refrigerator into cabinet, follow the steps given below:
- Press fit the insulation tape on the side of refrigerator as shown in figure.
Also attach 4 bracket caps on the door hinges.
IMPORTANT: Cabinet wall thickness should be less than 20 mm to fit the caps properly.
- Loosen the 4 screws of the bracket by rotating counterclockwise with the help of screw driver. Pull the bracket 3 mm up and then tighten the screws to fix it.
text_image
~3 mm = = ~3 mm x 4 ~3 mm- Attach the 4 brackets on the sides of the refrigerator by using Philip screws.
text_image
20 mm <20 mm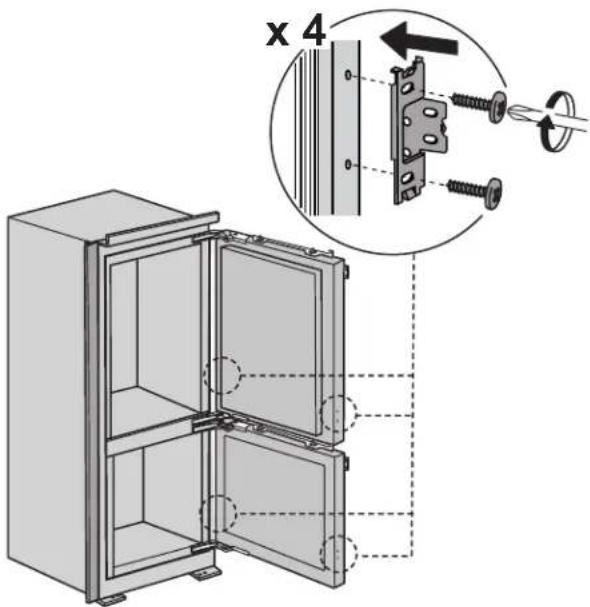
text_image
x 4-
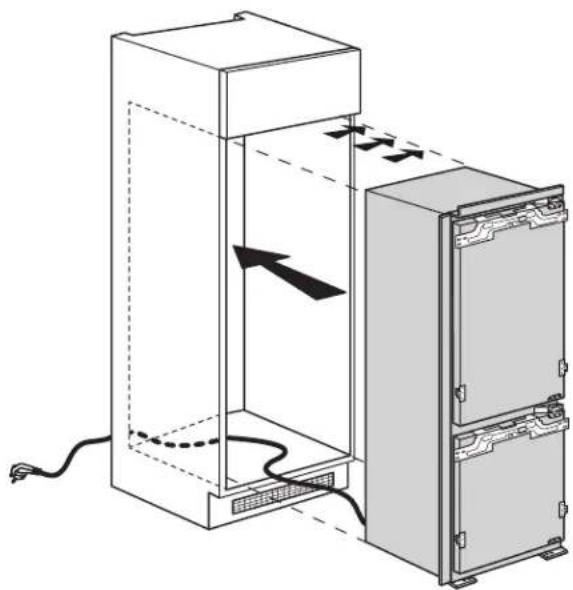
Pass the wiring from the hole which is present on the backside of the cabinet.
-
Finally move the refrigerator into the cabinet.
natural_image
Diagram of a refrigerator unit with internal components and airflow arrows, no text or symbols presentRefrigerator Cabinetry Installation
Follow the below steps to fix the refrigerator with the cabinet.
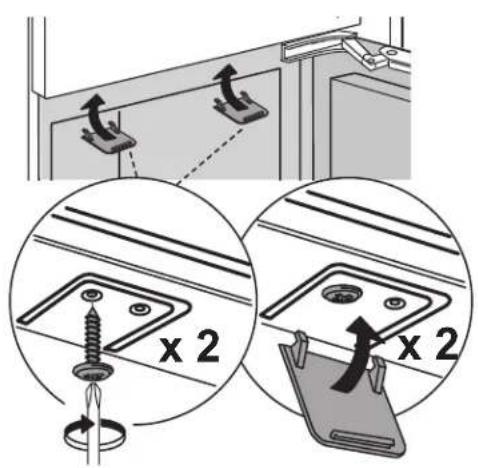
- Attach the refrigerator to the cabinet at upper side with the help of the 2 screws.
Press fit the screw cap onto it.
text_image
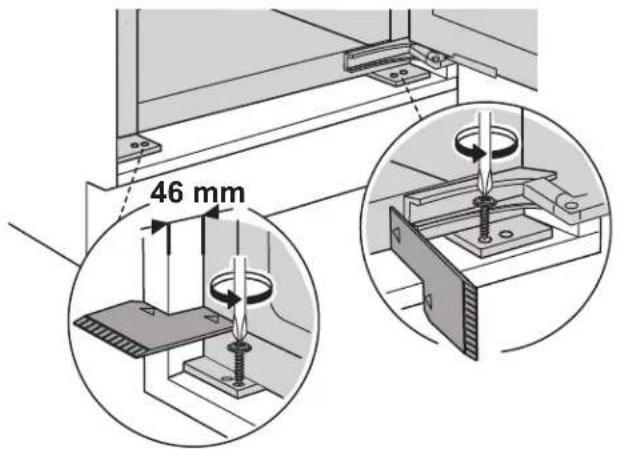
Diagram illustrating screw fastening and mounting process with magnified views showing 2x2 ratio of fastening to mounting plate.- Use right angle tool in the bottom to position the refrigerator. Then fix the refrigerator to the cabinet with the 2 screws.
text_image
46 mm- Install middle, upper and lower hinges of the refrigerator and place screw caps on it.
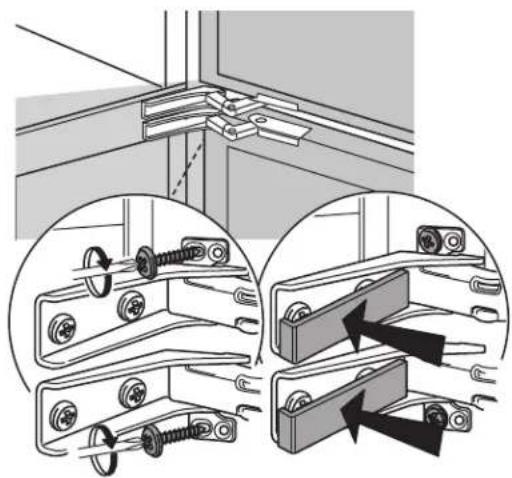
natural_image
Technical illustration of mechanical assembly with two views showing bolted components and fasteners (no text or symbols)Door Panel Installation and Alignment
Door Panels Requirements (each door)
Maximum Weight: 26.5 lbs (12 Kg)
Minimum Panels Dimensions:
Refrigerator Door Panel: 741 (1062.5 mm) x
23 ^1/4 " (590 mm) x 3/4" (20 mm)
Freezer Door Panel: 328 (720.5 mm) x 231/4" (590 mm) x 3/4" (20 mm)
For maximum dimensions, please review the following diagram.
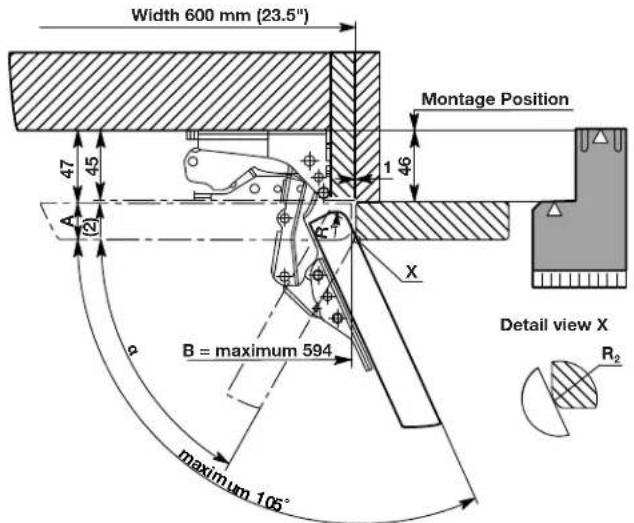
text_image
Width 600 mm (23.5") 47 45 A (2) B = maximum 594 1 46 Montage Position X ρ maximum 105° Detail view X R₂| Cabinet frame wall thickness 16 mm | |||||||
| minimumR1 [mm] | B [mm] | ||||||
| 594 | 593 | 592 | 59 | 1 590 | |||
| A[mm] | 16 0 0 | 0 0 0 | |||||
| 17 0 0 | 0 0 0 | ||||||
| 18 0 0 | 0 0 0 | ||||||
| 19 0 0 | 0 0 0 | ||||||
| 20 0 0 | 0 0 0 | ||||||
| 21 0.4 | 0 0 0 0 | ||||||
| 22 2.6 | 2 1.3 0.7 | 0 | |||||
| 23 5 4 | 4 3.8 3.2 | 2 2.6 | |||||
| 24 7.5 | 7 6.5 6 | 5.5 | |||||
How to read this diagram:
For example if the door panel width dimension "B" is 593 mm and thickness of door panel dimension "A" is 22 mm that means that door panel require radius "R1" minimum 2 mm.
Door Panel Installation
Assemble the panel alignment tool by inserting the long arm of the main piece into the cutout of the smaller piece, and adjust it so that the base is at the appropriate height, aligned with the base of the surrounding cabinet doors. Use a screwdriver to tighten the panel alignment tool's 9.5 mm screw and hold it in place.
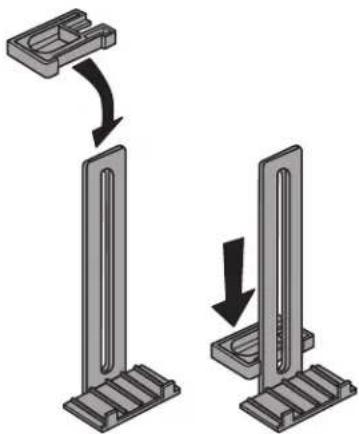
natural_image
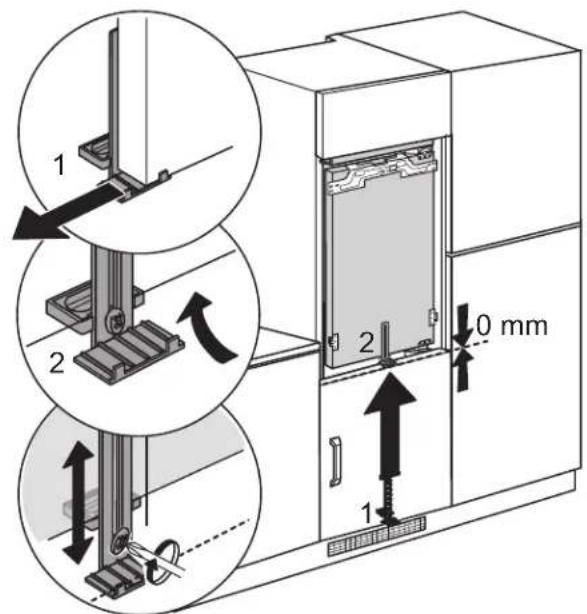
Mechanical assembly diagram showing two steps of a bracket with arrows indicating motion (no text or symbols)Freezer Door Panel Installation
- Mount the panel alignment tool onto the freezer door. Align the smaller piece with the screws on the bottom of the door, and slide it to the left.
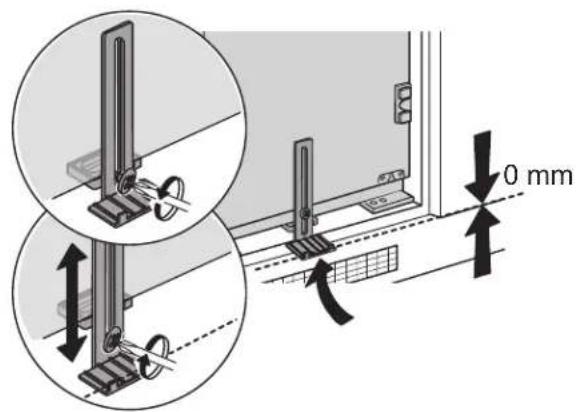
text_image
0 mm- Peel the protective paper covers off of the adhesive pads on 4. each freezer door panel mount. There are two adhesive pads on each of the four panel mounts.
Slowly tilt the panel to attach it to the adhesive pads on the panel mounts. Firmly press against the corners of the door to ensure that the panel is properly attached to the adhesive pads.
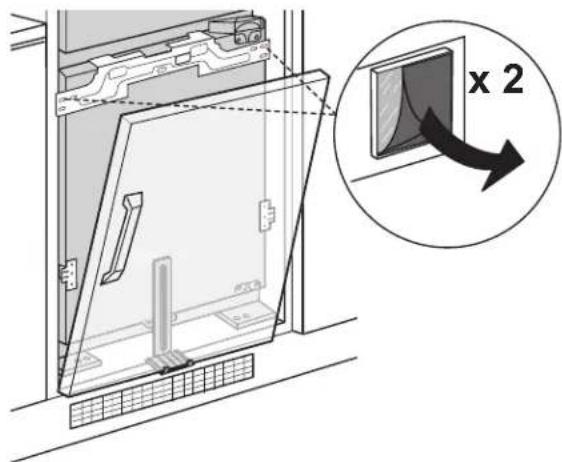
text_image
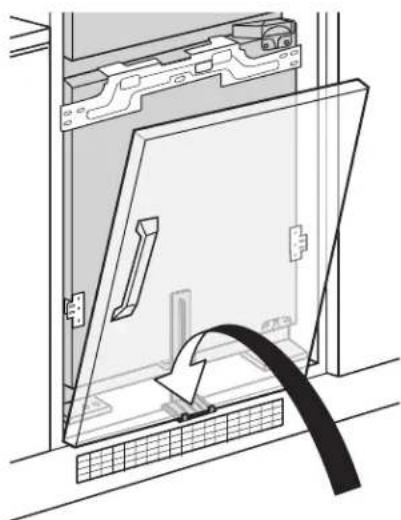
x 2- At an angle, rest the base of the freezer door panel on the panel alignment tool.
natural_image
Diagram showing two hands adjusting a wall-mounted device with directional arrows, no text or symbols present- Attach the freezer door with panel by using only upper 4 screws. Loosen the panel alignment tool's screw and remove the tool from the freezer door by sliding it to the right and off of the door.
natural_image
Diagram of a device with a cable inserted into a panel, showing internal components and a lightning bolt symbol (no text or labels)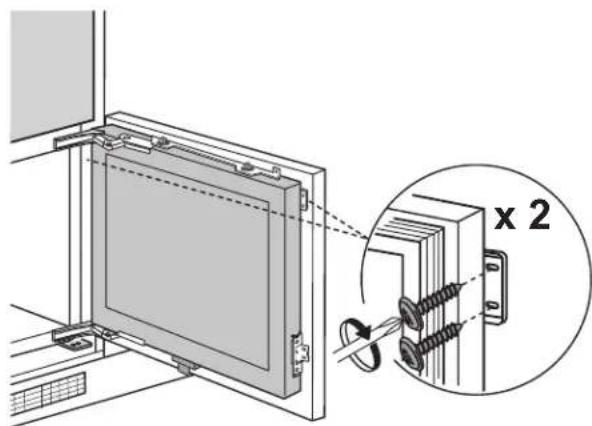
text_image
Technical diagram showing a mounted device with a magnified inset highlighting a 2x2 component detail.Refrigerator Door Panel Installation
- Mount the panel alignment tool onto the refrigerator door.
Align the smaller piece with the screws on the bottom of the door, and slide it to the left.
text_image
1 2 2 1 0 mm- Peel the protective paper covers off of the adhesive pads on each refrigerator door panel mount. There are two adhesive pads on each of the four panel mounts.
text_image
x 2- At an angle, rest the base of the refrigerator door panel on the panel alignment tool.

natural_image
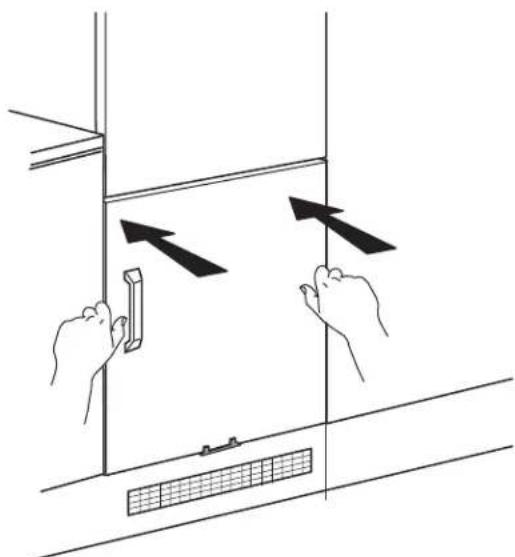
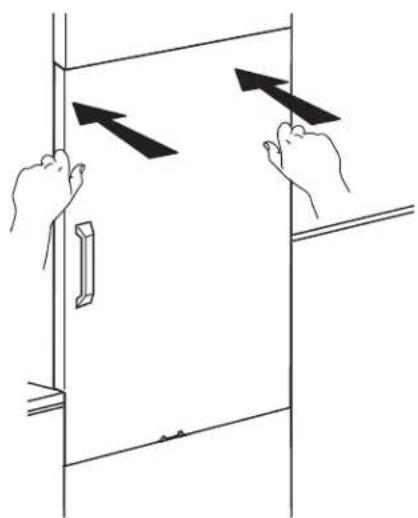
Diagram of a door with open lid and cable inserted, showing internal components (no text or symbols)- Slowly tilt the panel to attach it to the adhesive pads on the panel mounts. Firmly press against the corners of the door to ensure that the panel is properly attached to the adhesive pads.
natural_image
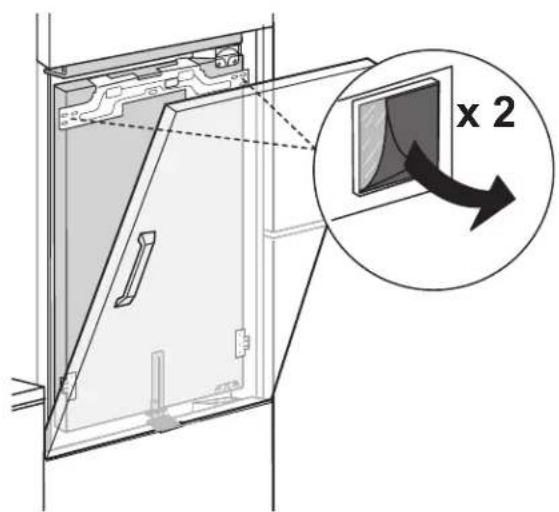
Illustration of two hands holding a door with arrows indicating direction (no text or symbols)- Attach the refrigerator door with panel by using only upper 4 screws. Loosen the panel alignment tool's screw and remove the tool from the refrigerator door by sliding it to the right and off of the door.
text_image
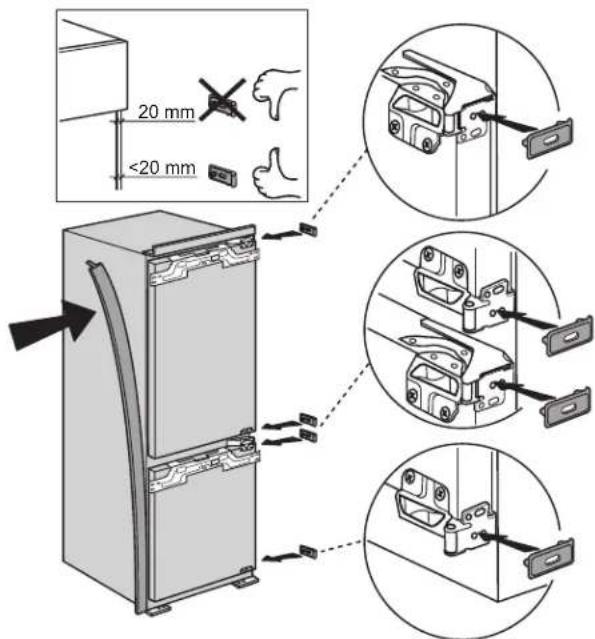
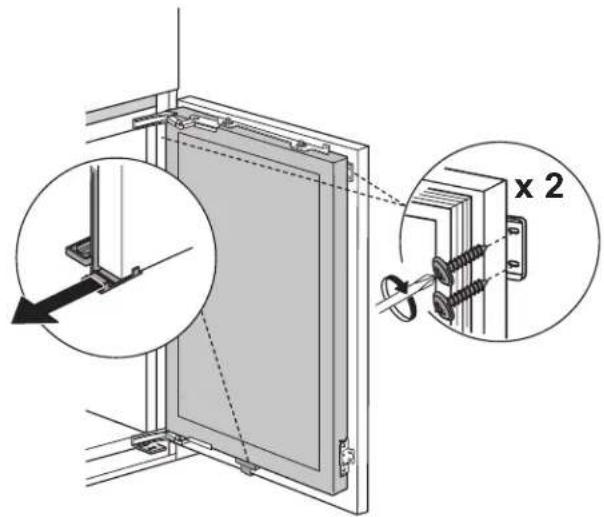
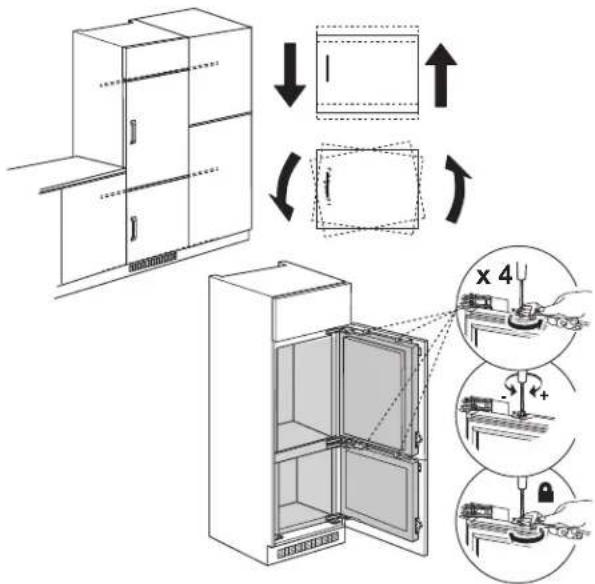
Technical diagram showing assembly of a door frame with labeled components and magnified detail viewDoor Panel Alignment
- Align the refrigerator and freezer door panels horizontally by adjusting 4 screws shown in figure. Once all adjustments done lock the screws.
text_image
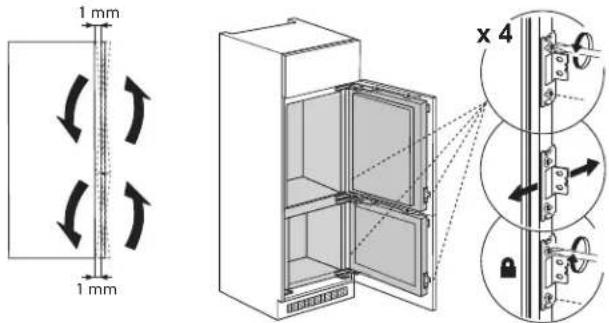
Diagram illustrating refrigerator interior and door assembly steps with labeled components and motion indicators- Align the refrigerator and freezer door panels vertically by adjusting side brackets with the help of screw driver within 1 mm. Once all adjustments done lock the screws.
NOTE: Do not use impact driver. Secure screws by hand.
text_image
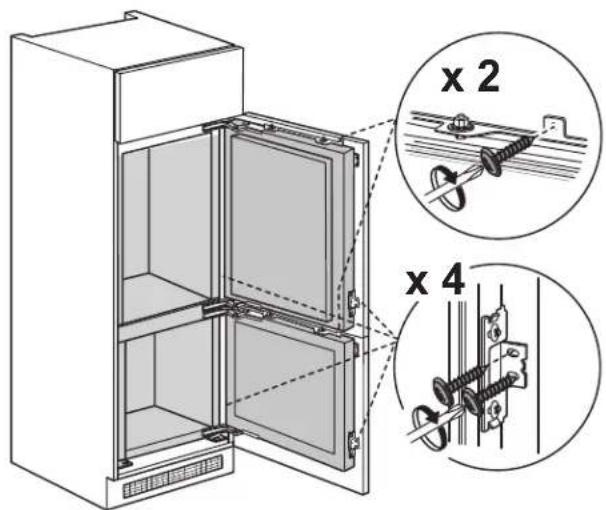
1 mm 1 mm x 4- After proper alignment, fix the remaining brackets.
text_image
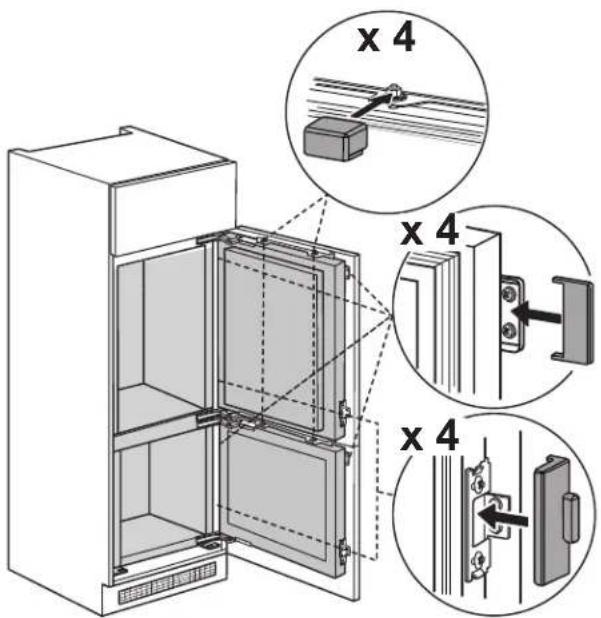
Technical diagram of an open refrigerator with labeled parts and magnified insets showing screw installation details- Place the screw covers on the all brackets of refrigerator and freezer doors.
text_image
x 4 x 4 x 4Remove and Replace Drawers
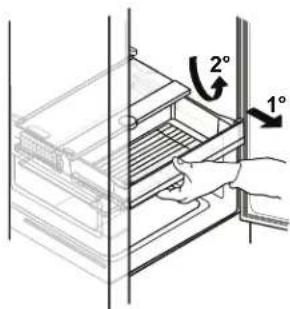
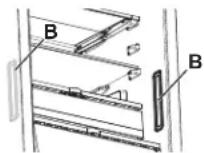
- Lift the freezer drawer by and drawer cover by.2 Then remove both from refrigerator.
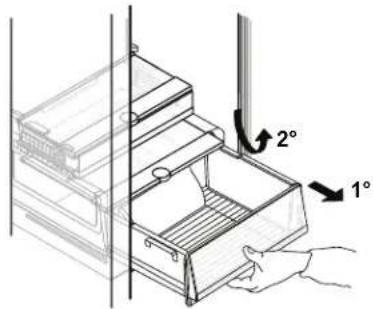
text_image
2° 1°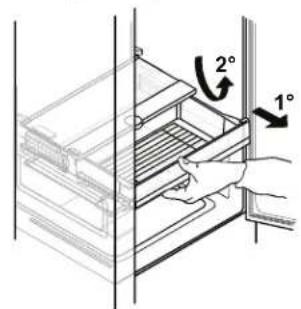
text_image
Diagram showing a hand inserting a 2° and 1° angle into a rack with labeled parts and directional arrows.- "CLICK" sound should come while lifting the drawer cover then take the cover out.
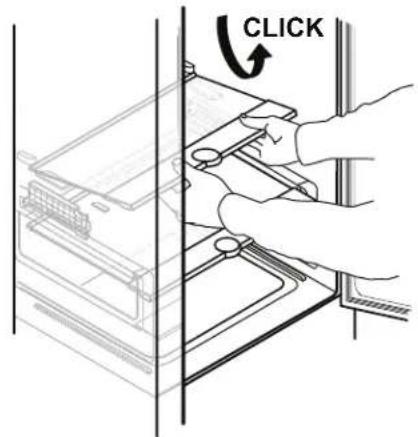
text_image
CLICK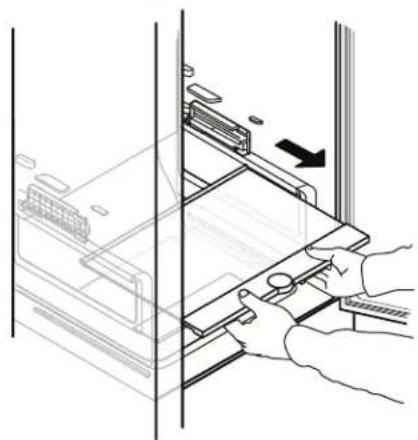
natural_image
Line drawing of hands installing or adjusting a device panel with a black arrow indicating the component (no text or symbols present)- Rotate the guideways to inward direction and remove it.
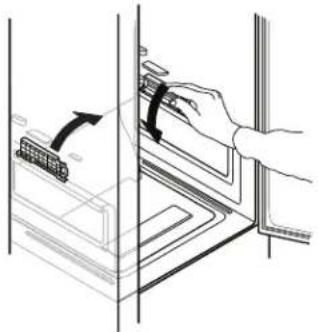
natural_image
Illustration of a hand operating a door with a scroll wheel, showing a mechanical component (no text or symbols)- To remove the drawer flap, pull it outward till "CLICK" sound come.

text_image
CLICK- Wash the drawer cover.
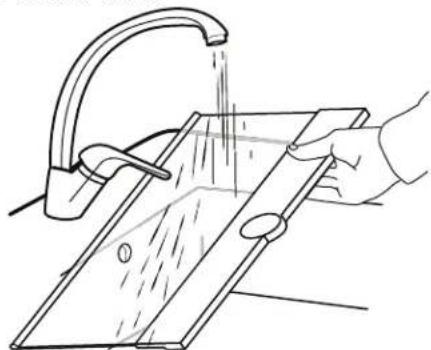
natural_image
Line drawing of a hand using a faucet to clean or wash water from a metal plate (no text or symbols)- For replacement of the freezer drawer, reverse the procedure.
Refrigerator Door Reversal
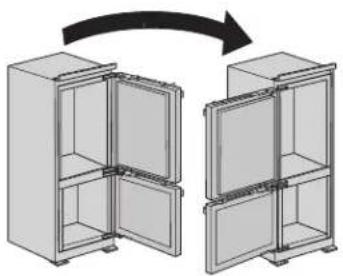
natural_image
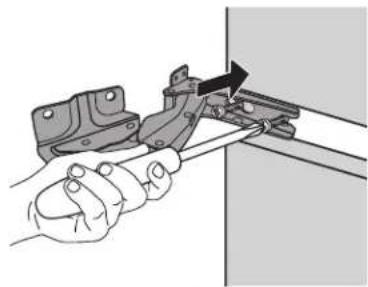
Diagram showing two 3D cabinet arrangements with one open and one closed, no text or symbols present- Use Phillips screwdriver to remove the screws from top hinge and bottom hinge. Take the hinges aside.

natural_image
Hand holding a mechanical lever with arrows indicating motion (no text or symbols)
natural_image
Mechanical assembly diagram showing a hand using a screwdriver to adjust components on a bracket (no text or symbols visible)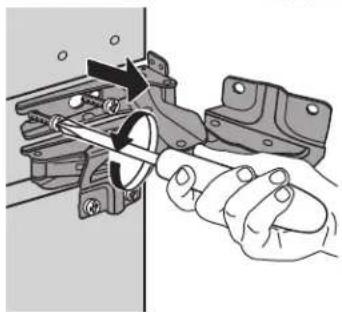
natural_image
Illustration of a hand using a tool to adjust or install a mechanical component (no text or symbols visible)- Use the same screws to install the top hinge on the opposite (bottom) side of the refrigerator door. Repeat for the bottom hinge.
natural_image
Illustration of a hand using a tool to adjust or install a mechanical component (no text or symbols visible)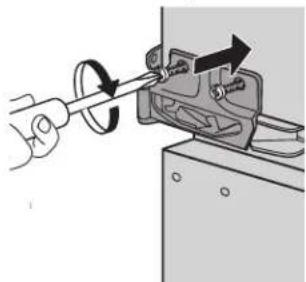
natural_image
Illustration of a hand using a tool to adjust or install a mechanical component (no text or symbols visible)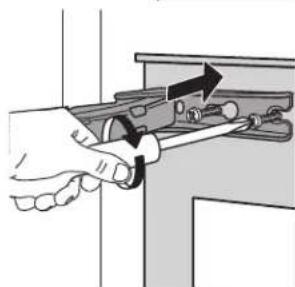
natural_image
Illustration of a hand using a tool to adjust or install a mechanical component (no text or symbols visible)-
Remove the hole plugs from the opposite side of the refrigerator door.
-
Insert the hole plugs where the hinge screws were located prior to the door reversal.
natural_image
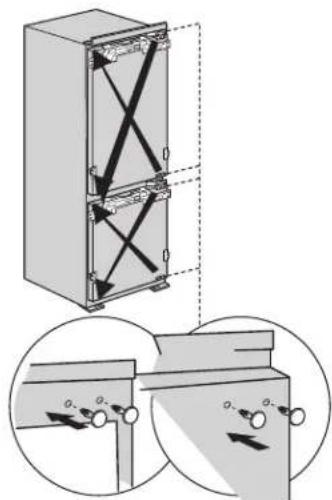
Technical illustration of a mechanical device with cross-bracing and internal components, shown in two views (no text or symbols)- Repeat the process to reverse the freezer door.
SÉCURITÉ DU RÉFRIGÉRATEUR
natural_image
Line drawing of a refrigerator with multiple doors and shelves (no text or symbols)Tablette repliable\*
natural_image
Technical line drawing of a multi-level shelving unit with labeled component A (no text or symbols beyond label)A. Tablette repliable
natural_image
Line drawing of a cabinet or rack structure with shelves and doors, no text or symbols presentnatural_image
Diagram of a mechanical assembly with an arrow indicating rotational motion (no text or symbols present)Compartiment de congélation
natural_image
Diagram of a refrigerator interior layout with patterned panels and doorways (no text or symbols)
natural_image
Simple line drawing of a circular mechanical component with two concentric rings and a central shaft (no text or symbols)natural_image
Simple line drawing of a circular ring with two small protrusions and a plus symbol, no text or labels present.natural_image
Diagram of a refrigerator unit with internal components and airflow indicators (no text or symbols)text_image
Technical diagram showing two mechanical assembly steps with screw fasteners and a 2x magnified view of the component.natural_image
Technical diagram showing mechanical assembly with two views of a bracket and fasteners (no text or symbols)natural_image
Diagram showing two mechanical components with arrows indicating motion, no text or symbols presenttext_image
Diagram showing a door opening with a magnified inset highlighting a double-headed arrow labeled 'x 2'natural_image
Diagram of a device with a cable inserted into a panel, showing internal components and a grid pattern (no text or symbols)natural_image
Diagram showing two hands holding a door and a grid bar, with arrows indicating direction (no text or symbols)text_image
Technical diagram showing a device with labeled components and magnified view of a wall-mounted component, marked 'x 2'natural_image
Diagram of a door with a handle and cable inserted, showing internal components (no text or symbols)natural_image
Diagram showing two hands holding a door with arrows indicating direction (no text or symbols)text_image
Technical diagram showing a door frame assembly with labeled components and directional arrows indicating movement or assembly.text_image
Diagram illustrating refrigerator interior and door assembly with labeled components and directional arrowstext_image
Diagram of an open refrigerator with labeled parts and zoomed-in insets showing 2x and 4x measurements.text_image
Technical diagram of an refrigerator with labeled components and cross-sectional viewstext_image
Diagram showing a hand holding a rack with two 2° and 1° angle annotations indicating angular measurements.