MWPS60TM-1 - Microwave Oven Porter & Charles - Free user manual and instructions
Find the device manual for free MWPS60TM-1 Porter & Charles in PDF.


User questions about MWPS60TM-1 Porter & Charles
0 question about this device. Answer the ones you know or ask your own.
Ask a new question about this device
Download the instructions for your Microwave Oven in PDF format for free! Find your manual MWPS60TM-1 - Porter & Charles and take your electronic device back in hand. On this page are published all the documents necessary for the use of your device. MWPS60TM-1 by Porter & Charles.
USER MANUAL MWPS60TM-1 Porter & Charles
natural_image
Illustration of a kitchen oven with control buttons and a blank door (no text or symbols)Contents
Grounding Instructions....3
Important safety instructions ....4
Precautions to avoid possible exposure to excessive Microwave energy....6
Precautions to be observed before and during servicing to avoid possible exposure to excessive Microwave energy....7
The advantages of microwaves....10
Description of microwave oven....11
Basic settings 13
Basic functions....15
When the oven is working....17
Defrosting....18
Cooking with a microwave oven 20
Cooking with the grill 22
What kind of ovenware can be used? 25
Oven Cleaning and Maintenance....27
What should I do if the oven doesn't work? 29
Technical characteristics....30
Installation instructions ....31
Installation....65
GROUNDING INSTRUCTIONS
This appliance must be grounded. In the event of an electrical short circuit, grounding reduces the risk of electric shock by providing an escape wire for the electric current.
Warning! IMPROPER USE OF THE GROUNDING CAN RESULT IN A RISK OF ELECTRICAL SHOCK.
Consult a qualified technician if the grounding instructions are not completely understood, or if doubt exists as to whether the appliance is properly grounded, and do not use an extension cord. If the power supply cord is too short, have a qualified electrician or serviceman install an outlet near the appliance.
IMPORTANT SAFETY INSTRUCTIONS
When using electrical appliances basic safety precautions should be followed, including the following:
Warning! To reduce the risk of burns, electric shock, fire, injury to persons, or exposure to excessive microwave energy:
- Read all instructions before using the appliance.
- Read and follow the specific “PRECAUTIONS TO AVOID POSSIBLE EXPOSURE TO EXCESSIVE MICROWAVE ENERGY” found in this manual.
- This appliance must be grounded. Connect only to properly grounded outlet. See “GROUNDING INSTRUCTIONS” found in this manual.
- Install or locate this appliance only in accordance with the provided installation instructions.
- Some products such as whole eggs and sealed containers – for example, closed glass jars are able to explode and should not be heated in this oven.
- Use this appliance only for its intended use as described in the manual. Do not use corrosive chemicals or vapors in this appliance. This type of oven is specifically designed to heat, cook, or dry food. It is not designed for industrial or laboratory use.
- As with any appliance, close supervision is necessary when used by children.
- Do not operate this appliance if it is has a damaged cable, if it is not working properly, or if it has been damaged or dropped.
- This appliance should be serviced only by qualified service personnel. Contact nearest authorized service facility for examination, repair, or adjustment.
- Do not cover or block any openings on the appliances.
- Do not store this appliance outdoors. Do not use this product near water – for example, near a kitchen sink, in a wet basement, near a swimming pool, or similar locations.
- Do not immerse the cable in water.
- Keep the cable away from heated surfaces.
- Do not let the cable hang over edge of table or counter.
- When cleaning surfaces of door and oven that comes in contact when closing the door, use only mild, nonabrasive soaps, or detergents applied with a sponge or soft cloth.
IMPORTANT SAFETY INSTRUCTIONS
To reduce the risk of fire in the oven cavity:
- Do not overcook food. Carefully attend appliance when paper, plastic, or other combustible materials are placed inside the oven to facilitate cooking.
- Remove wire twist-ties from paper or plastic bags before placing bag in oven.
- If materials inside the oven ignite, keep oven door closed, turn oven off, and disconnect the power by shutting off at the fuse or circuit breaker panel.
- Do not use the cavity for storage purposes. Do not leave paper products, cooking utensils, or food in the cavity when not in use.
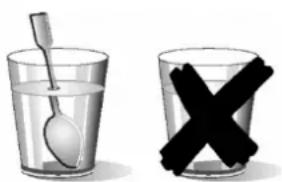
- Liquids such as water, coffee, or tea are able to be overheated beyond the boiling point without appearing to be boiling. Visible bubbling or boiling when the container is removed from the microwave oven is not always present. THIS COULD RESULT IN VERY HOT LIQUIDS SUDDENLY BOILING OVER WHEN THE CONTAINER IS DISTURBED OR A UTENSIL IS PLACED INTO THE LIQUID.
natural_image
Two glasses: one with a spoon inside, the other with a black 'X' symbol (no text or symbols present)To avoid that type of situation when heating liquids, put a teaspoon or glass rod inside the container.
PRECAUTIONS TO AVOID POSSIBLE EXPOSURE TO EXCESSIVE MICROWAVE ENERGY
(a) Do not attempt to operate this oven with the door open since open-door operation can result in harmful exposure to microwave energy. It is important not to interfere or tamper with the safety interlocks.
(b) Do not place any object between the oven front face and the door or allow soil or cleaner residue to accumulate on sealing surfaces.
(c) Do not operate the oven if it is damaged. It is particularly important that the oven door closes properly and that there is no damage to the: (1) door (bent), (2) hinges and latches (broken or loosened), (3) door seals and sealing surfaces.
(d) The oven should not be adjusted or repaired by anyone except properly qualified service personnel.
Pacemakers:
Most pacemakers are shielded from interference from electronic products, including microwaves. However, patients with pacemakers may wish to consult their physicians if they have concerns.
PRECAUTIONS TO BE OBSERVED BEFORE AND DURING SERVICING TO AVOID POSSIBLE EXPOSURE TO EXCESSIVE MICROWAVE ENERGY
(a) Do not operate or allow the oven to be operated with the door open.
(b) Make the following safety checks on all ovens to be serviced before activating the magnetron or other microwave source, and make repairs as necessary: interlock operation, proper door closing, seal and sealing surfaces (arcing, wear, and other damage), damage to or loosening of hinges and latches, evidence of dropping or abuse.
(c) Before turning on microwave power for any service test or inspection within the microwave generating compartment, check the magnetron, wave guide or transmission line, and cavity for proper alignment, integrity and connection.
(d) Any defective or misadjusted components in the interlock, monitor, door seal, and microwave generation and transmission systems, shall be repaired, replaced, or adjusted by procedures described in this manual before the oven is released to the owner.
(e) A microwave leakage check, to verify compliance with the Federal Performance Standard, should be performed on each oven prior to release to the owner.
Microwave safety
- Warning! Never leave the oven unwatched, especially when using paper, plastic or other combustible materials. These materials can char and may fire. FIRE RISK!
- Warning! Do not heat pure alcohol or alcoholic drinks in the microwave. FIRE RISK!
- Warning! Do not heat liquids or other foods in closed containers since these may explode readily.
- Warning! This appliance is not intended for use by persons (including children) with reduced physical, sensory or mental capabilities, or lack of experience and knowledge, unless they have been given supervision or instruction concerning use of the appliance by a person responsible for their safety. Children should be supervised to ensure that they do not play with the appliance.
- Warning! If the oven has a combined function mode (microwave with other means of heating), children should not be allowed to use the oven without adult supervision on account of the high temperatures generated.
-
Warning! The oven cannot be used if:
-
The door is not closed correctly;
- The door hinges are damaged;
- The surfaces of the contact between the door and the oven front are damaged;
- The door window glass is damaged;
- There is frequent electrical arcing inside the oven even though there is no metal object inside.
The oven can only be used again after it has been repaired by a Technical Assistance Service technician.
Beware!
- Never heat baby foods or drinks in bottles or jars with the teats or lids on them. After heating the food mix or shake well so that the heat is spread evenly. Check the food temperature before feeding this to the child. DANGER OF BURNING!
- To avoid food overheating or burning it is very important not to select long time periods or power levels that are too high when heating small quantities of food. For example, a bread roll can burn after 3 minutes if the power selected is too high.
- For toasting, use just the grilling function and watch the oven all the time. It you use a combined function to toast bread it will catch fire in a very short time.
- Make sure you never catch the power cables of other electrical appliances in the hot door or the oven. The cable insulation may melt. Danger of short-circuiting!
Microwave safety
This oven is exclusively for domestic use!
Use the oven only for preparing meals.
Avoid damaging the oven or other dangerous situations by following these instructions:
- Do not switch on the oven without the turntable support, the turntable ring and the respective plate being in place.
- Never switch on the microwave when it is empty. If there is no food inside there may be an electrical overcharge and the oven could be damaged. RISK OF DAMAGE!
- For carrying out oven programming tests put a glass of water inside the oven. The water will absorb the microwaves and the oven will not be damaged.
- Use only dishes suitable for microwaves. Before using dishes and containers in the microwave, check that these are suitable (see the section on types of dishes).
- Never remove the mica cover on the ceiling of the oven interior! This cover stops fat and pieces of food damaging the microwave generator.
- Do not keep any inflammable object inside the oven as it may burn if the oven is switched on.
- Do not use the oven as a pantry.
- Eggs with their shells and whole boiled eggs must not be heated in microwave ovens because they may explode.
- Do not use the oven for frying as it is impossible to control the temperature of oil heated by microwaves.
- To avoid being burnt, always use oven gloves for handling dishes and containers and touching the oven.
- Do not lean or sit on the open oven door. This may damage the oven, especially in the hinge zone. The door can bear a maximum weight of 8 kg.
- The turntable and the grills can bear a maximum load of 8 kg. To avoid damaging the oven, do not exceed this load.
Cleaning:
- Warning! Your microwave oven must be cleaned regularly. All food remains must be removed (see section on Oven Cleaning). If the microwave oven is not kept clean its surface may deteriorate and this may shorten the oven's working life and could even result in a dangerous situation.
- The door contact surfaces (the front of the cavity and the inside part of the doors) must be kept very clean in order to ensure the oven functions correctly.
- Do not use harsh abrasive cleaners or sharp metal scrapers to clean the oven door glass since they can scratch the surface, which may result in shattering of the glass.
- Do not use high pressure or stream jet cleaning appliances.
- Please follow the instructions regarding cleaning in the section "Oven Cleaning and Maintenance".
Repairs:
- Warning – Microwaves! The outer protection of the oven must not be removed. It is dangerous for anyone not authorized by the manufacturer to carry out any kind of repair or maintenance work.
- If the power cable is damaged it should be substituted by the manufacturer, authorized agents or technicians qualified for this task in order to avoid dangerous situations. Furthermore, special tools are required for this task.
- Repair and maintenance work, especially of current carrying parts, can only be carried out by technicians authorized by the manufacturer.
The advantages of microwaves
In conventional ovens, heat radiated by electrical elements or gas burners slowly penetrates the food from outside to inside. On account of this a major amount of energy is wasted heating the air, the oven components and the food containers.
In a microwave oven, heat is generated by the food itself and the heat travels from inside to outside. No heat is lost to the air, the walls of the oven cavity or the dishes and containers (if these are suitable for use in microwave oven), in other words, only the food is heated.
Microwave ovens have the following advantages:
- Shorter cooking times; in general these are up to 3/4 less than the time required for conventional cooking.
- Ultra-fast food defrosting, thus reducing the danger of bacterial development.
- Energy savings.
- Conservation of the nutritional value of foods due to the shorter cooking times.
- Easy to clean.
How a microwave oven works
In a microwave oven there is a high tension valve called a magnetron which converts electrical energy into microwave energy. These electromagnetic waves are channelled to the interior of the oven through a wave guide and distributed by a metallic spreader or through a turntable.
Inside the oven the microwaves propagate in all directions and are reflected by the metal walls, uniformly penetrating the food.
Why food heats up
Most foods contain water and water molecules vibrate when subjected to microwaves.
The friction between molecules produces heat which raises the temperature of the food, defrosting it, cooking it or keeping it hot.
Since the heat arises inside the food:
- This can be cooked with little or no liquid or fats/oils;
- Defrosting, heating or cooking in a microwave oven is quicker than in a conventional oven;
- The vitamins, minerals and nutritional substances in the food are conserved;
- The natural colour and aroma of the food are unchanged.
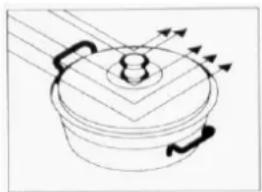
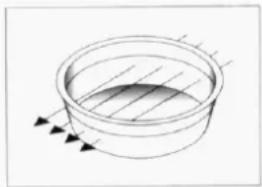
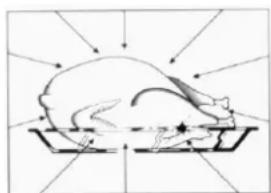
Microwaves pass through china, glass, cardboard or plastic but do not go through metal. For this reason, metal containers or ones with metal parts must not be used in a microwave oven.
Microwaves are reflected by metal...
natural_image
Simple line drawing of a cooking pot with arrows indicating direction (no text or symbols)... but go through glass and china...
natural_image
Simple line drawing of a circular container with internal lines and arrows indicating flow or movement (no text or symbols)and are absorbed by foods.
natural_image
Illustration of a mouse on a tray with directional arrows indicating motion (no text or symbols)Description of microwave oven
text_image
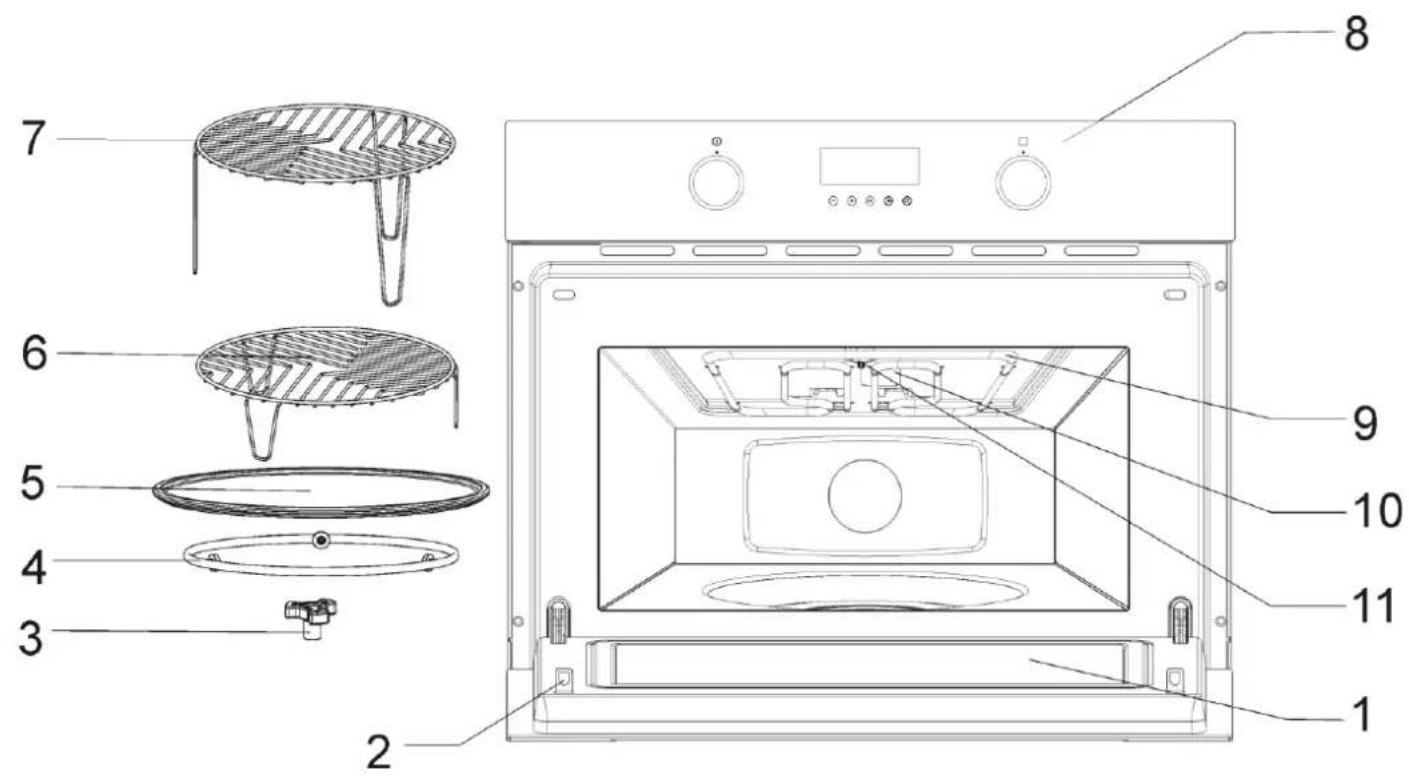
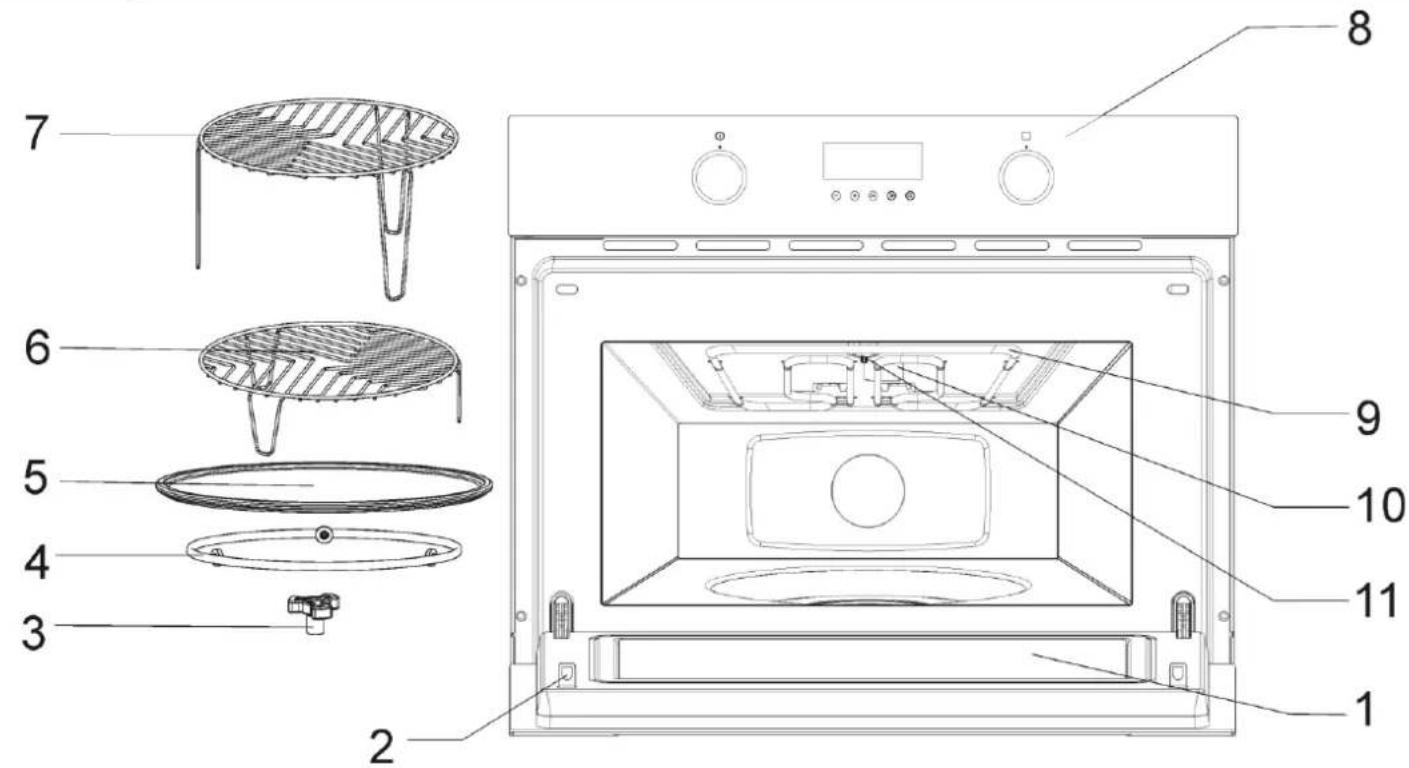
Technical diagram of an oven with numbered parts for identification- Door window glass
- Catches
- Turntable support
- Turntable ring
- Turntable plate
-
Low grill
-
High grill
- Control panel
- Grill
- Mica cover
- Lamp
text_image
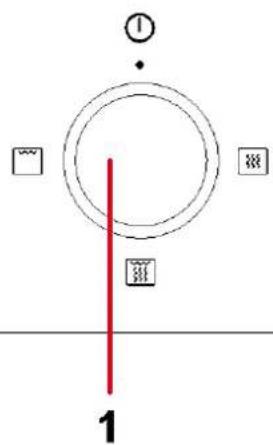
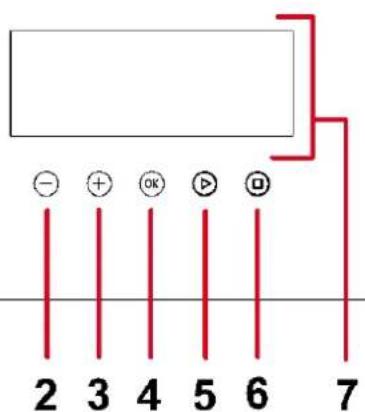
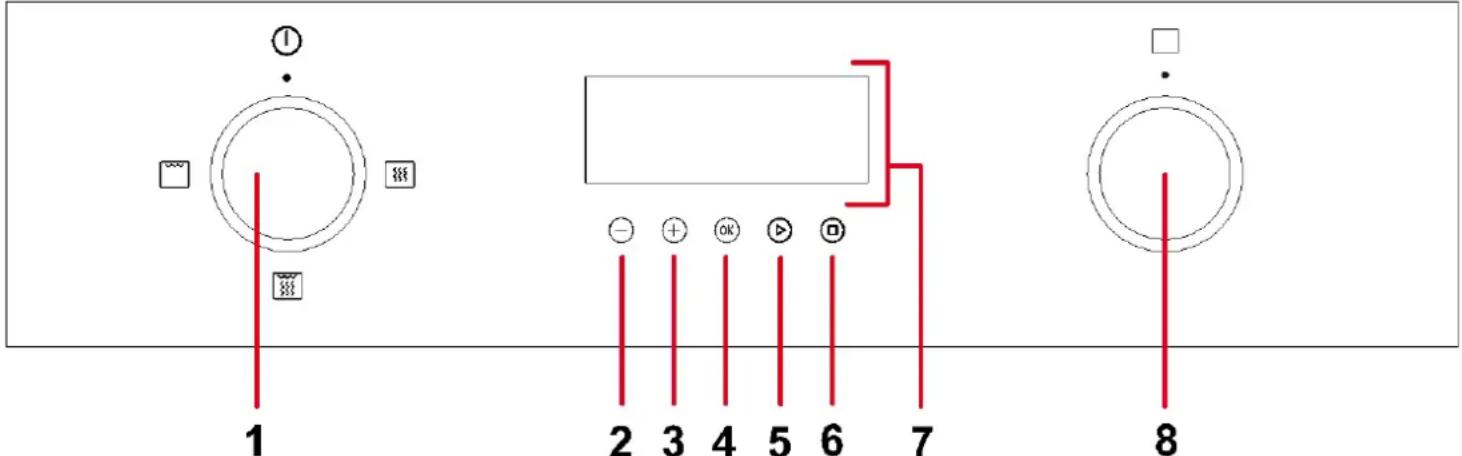
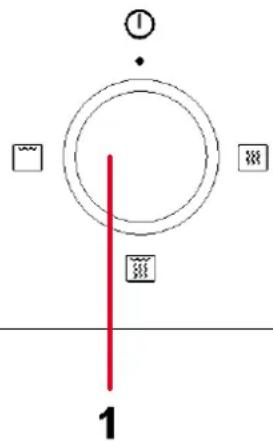
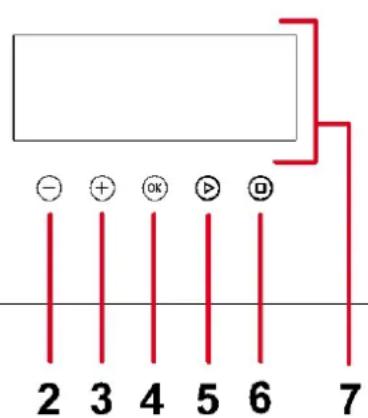
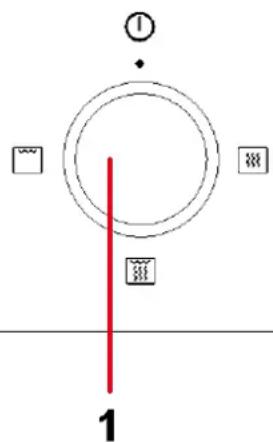
① 1- Function selector
- “-” key
- “+” key
- OK key
text_image
- + OK ▶ 0 2 3 4 5 6 7- Start key
- Stop key
- Display
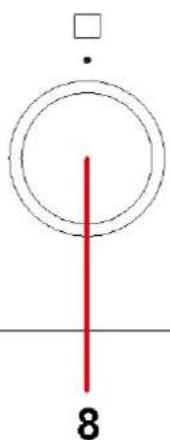
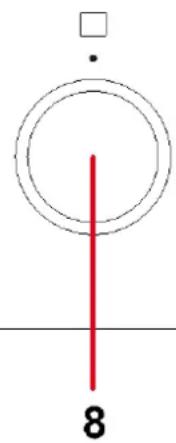
- Microwave power level selector
text_image
8Description of microwave oven
Description of Functions
| Function | Microwaves Power | Foods | |
 | Microwave | 150 W | Slow defrosting for delicate foods; keeping food hot |
| 300 W | Cooking with little heat; boiling rice. Rapid defrosting | ||
| 550 W | Melting butter. Heating baby food | ||
| 750 W | Cooking vegetables and food. Cooking and heating carefully Heating and cooking small portions of food. Heating delicate food | ||
| 1000 W | Cooking and rapidly heating liquids and pre-cooked foods | ||
 | Microwave + Grill | 150 W | Toasting food |
| 300 W | Grilling poultry and meat | ||
| 550 W | Cooking pies and cheese-topped dishes | ||
| 750 W | Use carefully: food might burn. | ||
| 1000 W | Use carefully: food might burn. | ||
 | Grill | --- | Grilling food |
Basic settings
Setting the clock
After your microwave oven is first connected or after a power failure, the clock display will flash to indicate that the time shown is not correct.
text_image
1 2 3 4 5 6 7 8To set the clock, proceed as follows:
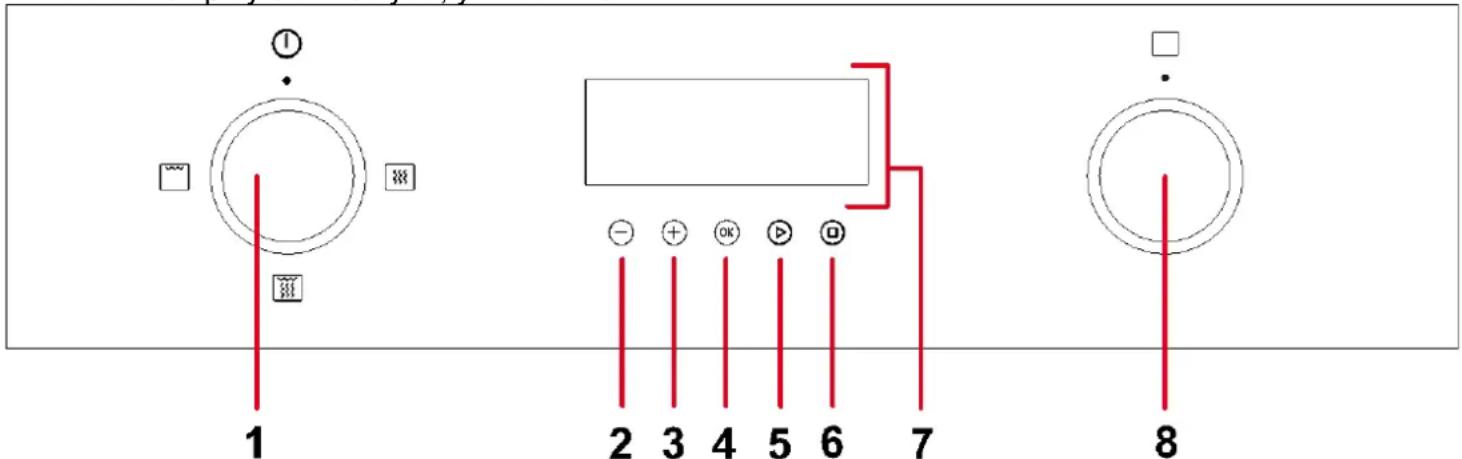
- Press the “+” key until the Clock Indicator Light starts to flash.
- Press the OK key.
-
Press “-” and “+” keys to set the correct hour value.
-
Press the OK key to validate the hour value. The minute numbers will start to flash.
- Press “-” and “+” keys to set the correct minute value.
- To finish, press the OK key again.
Hiding / Displaying the Clock
If the clock display disturbs you, you can hide it.
text_image
1 2 3 4 5 6 7 8-
Press the “-” and “+” keys simultaneously for 5 seconds. The dots that separate the hours and minutes will flash but the rest of the clock display will be hidden.
-
If you want to see the clock again, press the “-” and “+” simultaneously again for 5 seconds.
Basic settings
Child lock
The oven can be blocked against improper use (e.g., to prevent children from using it).
text_image
① 1- To block the oven, press the Stop key for 3-5 seconds. When the oven is blocked "SAFE" appears on the display and the oven performs no function.
text_image
- + OK ▶ 7 2 3 4 5 6- To unblock the oven press again the Stop key for 3-5 seconds..
text_image
8Timer
text_image
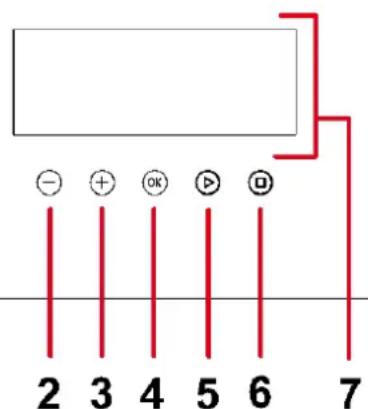
① 1- Press the “+” key until the Timer indicator light flashes.
- Press the Start key.
- The numbers flash. Press the “-” and “+” keys to set the desired time.
text_image
- + OK @ 2 3 4 5 6 7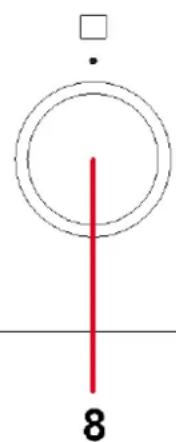
text_image
8- Press the Start key. The timer will countdown to zero and at the end of the set time the oven will sound 3 beeps every 30 seconds until the Stop key is pressed.
To cancel the active Timer function repeat the above steps but setting the time to zero.
Basic functions
Microwave
Use this function to cook and heat up vegetables, potatoes, rice, fish and meat.
text_image
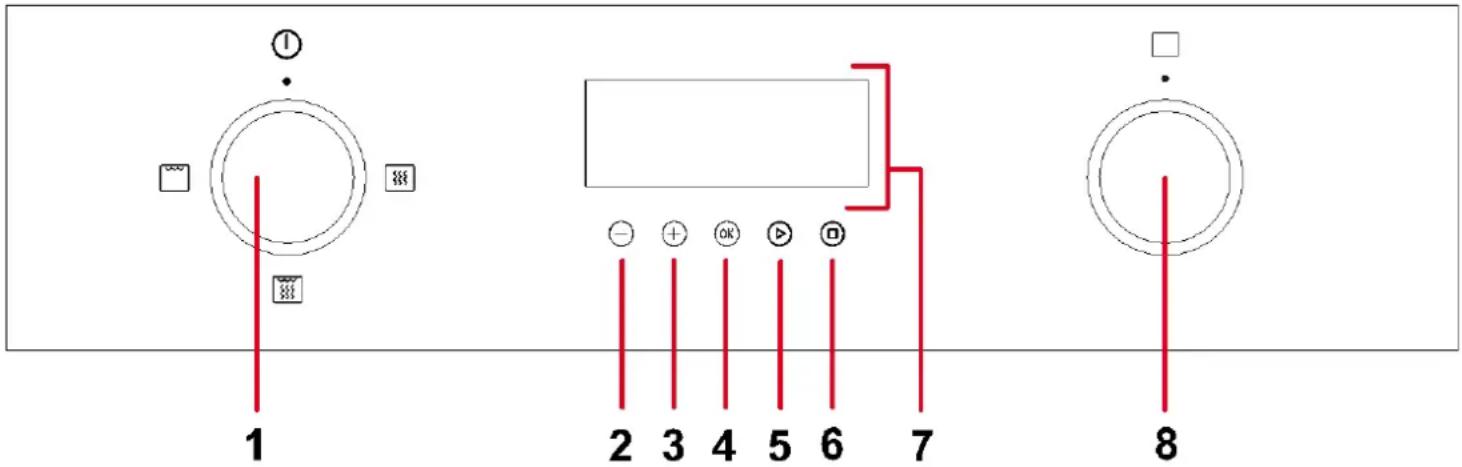
1 2 3 4 5 6 7 8- Turn the Function selector to the microwave position “” The Operating time indicator Light and Display (numbers) start to flash.
-
With the “-” and “+” keys, select the desired time.
-
Set the desired microwave power level with the Microwave power level selector (see technical features).
- Press the Start key. The cooking process begins.
Grill
Use this function to brown the surface of food quickly.
text_image
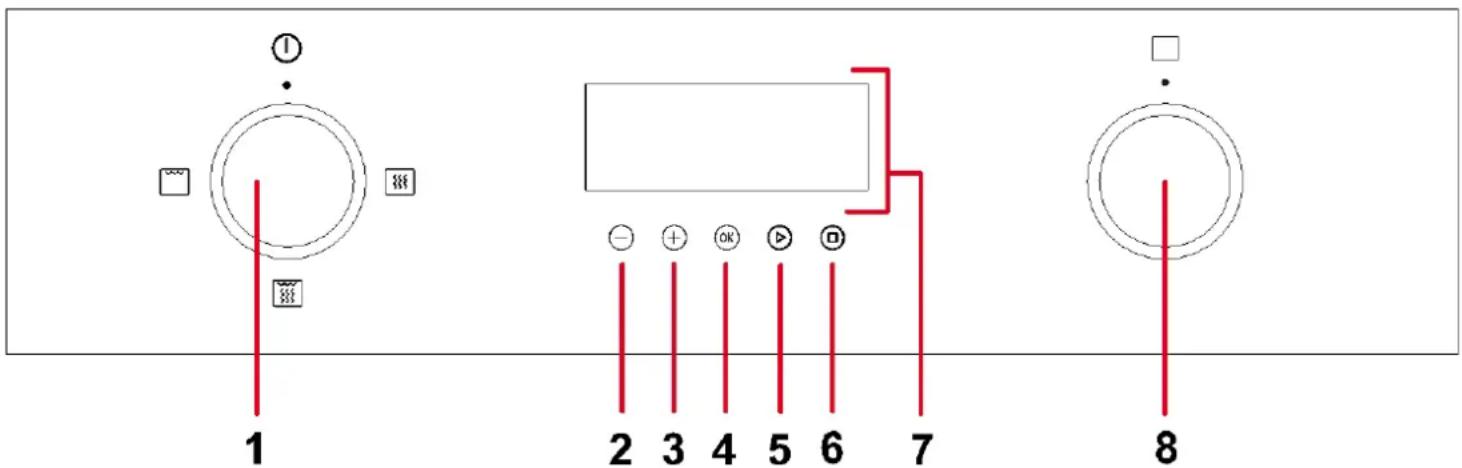
1 2 3 4 5 6 7 8- Turn the Function selector to the grill position “☐”. The Operating time indicator light and Display (numbers) start to flash.
-
With the “-” and “+” keys, select the desired time.
-
Press the start key. The cooking process will begin.
Please note: The position of the microwave power level selector does not affect the operation.
Basic functions
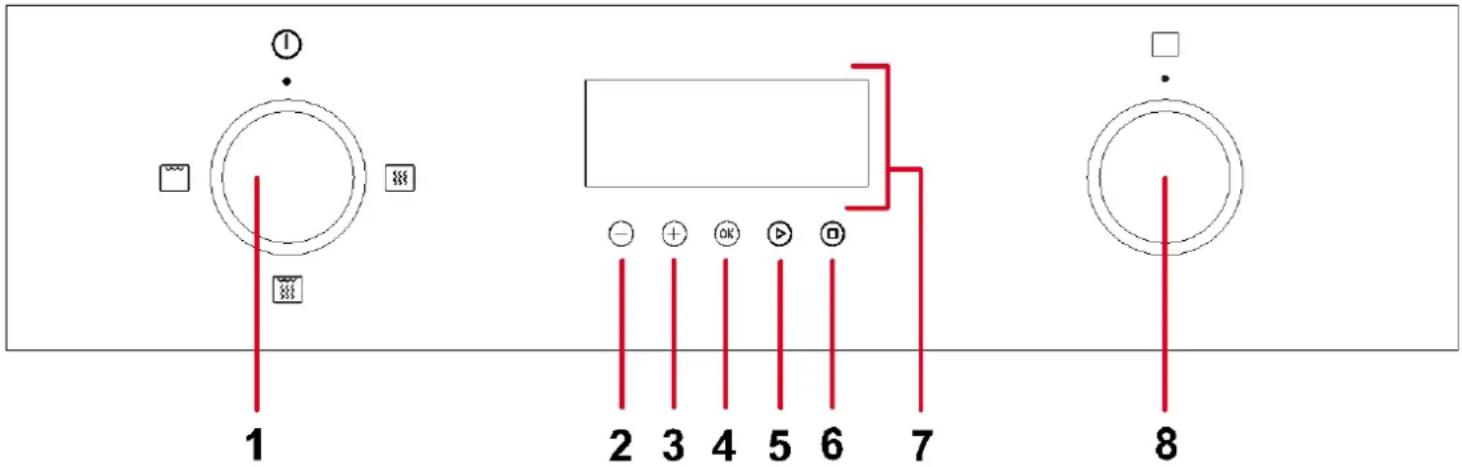
Microwave + Grill
Use this function to cook lasagne, poultry, baked potatoes and casseroles.
text_image
1 2 3 4 5 6 7 8- Turn the function selector to the microwave + grill position “The Operating time indicator light and Display (numbers) start to flash.
-
With the “-” and “+” keys, select the desired time.
-
Set the desired microwave power level with the Microwave power level selector (see technical features).
- Press the Start key. The cooking process will begin.
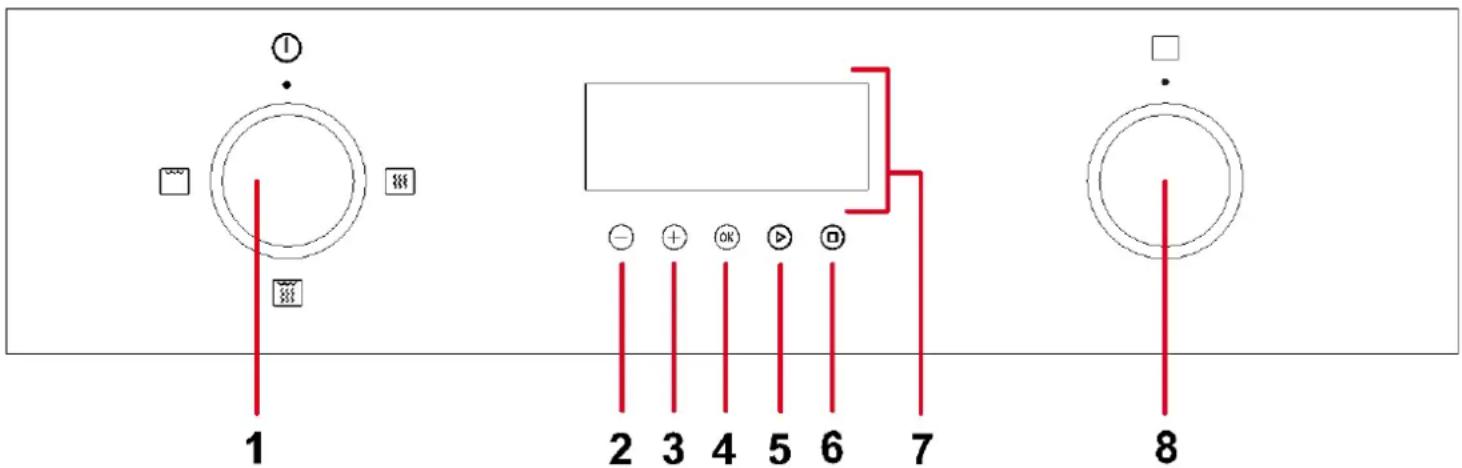
Quick start
This function can be used with all the basic functions (microwave, grill, and microwave + grill).
text_image
1 2 3 4 5 6 7 8-
In the Standby mode (function selector in any position: microwave, grill or microwave + grill) press the Start key. The oven starts to operate for 30 seconds.
-
If you want to increase the operating time press the Start key again. Each time you press this key the operating time will be increased by 30 seconds.
When the oven is working...
Interrupting a cooking cycle
You can stop the cooking process at any time by pressing the Stop key once or by opening the oven door.
In both cases:
- Microwave emission is stopped immediately.
- The grill is de-activated but is still very hot. Danger of burning!
- The timer stops automatically, indicating the operating time that is left.
If you wish, at this time you can:
- Turn or stir the food to ensure it will be evenly cooked.
- Change the process parameters.
To restart the process, close the door and press the Start key
Altering parameters
The operating parameters
■ Time (with the “-” and “+” keys)
■ Function (with the function selector)
■ Power (with the microwave power level selector)
can be altered when the oven is operating or when the cooking process has been interrupted by simply turning the respective knob to the new value.
Cancelling a cooking cycle
If you wish to cancel the cooking process, press the Stop key twice.
End of a cooking cycle
At the end of the process you will hear one beep and the display will show the word "End".
Defrosting
General instructions for defrosting
- When defrosting, use only dishes that are appropriate for microwaves (china, glass, suitable plastic).
- The defrost function by weight and the tables refer to the defrosting of raw food.
- The defrosting time depends on the quantity and thickness of the food. When freezing food keep the defrosting process in mind. Distribute the food evenly in the container.
- Distribute the food as best as possible inside the oven. The thickest parts of fish or chicken drumsticks should be turned towards the outside. You can protect the most delicate parts of food with pieces of aluminium foil. Important: The aluminium foil must not come into contact with the oven cavity interior as this can cause electrical arcing.
- Thick portions of food should be turned several times.
- Distribute the frozen food as evenly as possible since narrow and thin portions defrost more quickly than the thicker and broader parts.
- Fat-rich foods such as butter, cream cheese and cream should not be completely defrosted. If they are kept at room
temperature they will be ready to be served in a few minutes. With ultra-frozen cream, if you find small pieces of ice in it, you should mix these in before serving.
- Place poultry on an upturned plate so that the meat juices can run off more easily.
-
Bread should be wrapped in a napkin so that it does not become too dry.
-
Turn the food at regular intervals.
-
Remove frozen food from its wrapping and do not forget to take off any metal twist-tags. For containers that are used to keep frozen food in the freezer and which can also be used for heating and cooking, all you need to do is take off the lid. For all other cases you should put the food into containers that are suitable for microwave use.
-
The liquid resulting from defrosting, principally that from poultry, should be discarded. In no event should such liquids be allowed to come into contact with other foods.
-
Do not forget that by using the defrosting function you need to allow for standing time until the food is completely defrosted.
Defrosting
To defrost food you should select Microwave function with one of the following Power Levels:
| Power Level | Power |
| Defrost / Keep Warm | 150 W |
| Defrost | 300 W |
The table below shows different defrosting and standing times (in order to ensure the food temperature is evenly distributed) for different types and weights of food, plus recommendations.
| Food | Weight (g) | Defrosting time (min) | Standing time (min) | Recommendation |
| Portions of meat, veal, beef, pork | 100 | 2-3 | 5-10 | Turn once |
| 200 | 4-5 | 5-10 | Turn once | |
| 500 | 10-12 | 10-15 | Turn twice | |
| 1000 | 21-23 | 20-30 | Turn twice | |
| 1500 | 32-34 | 20-30 | Turn twice | |
| 2000 | 43-45 | 25-35 | Turn three times | |
| Goulash | 500 | 8 -10 | 10-15 | Turn twice |
| 1000 | 17-19 | 20-30 | Turn three times | |
| Minced meat | 100 | 2-4 | 10-15 | Turn twice |
| 500 | 10-14 | 20-30 | Turn three times | |
| Sausages | 200 | 4-6 | 10-15 | Turn once |
| 500 | 9-12 | 15-20 | Turn twice | |
| Poultry (portions) | 250 | 5-6 | 5-10 | Turn once |
| Chicken | 1000 | 20-24 | 20-30 | Turn twice |
| Poularde | 2500 | 38-42 | 25-35 | Turn three times |
| Fish fillet | 200 | 4-5 | 5-10 | Turn once |
| Trout | 250 | 5-6 | 5-10 | Turn once |
| Prawns | 100 | 2-3 | 5-10 | Turn once |
| 500 | 8-11 | 15-20 | Turn twice | |
| Fruit | 200 | 4-5 | 5-10 | Turn once |
| 300 | 8-9 | 5-10 | Turn once | |
| 500 | 11-14 | 10-20 | Turn twice | |
| Bread | 200 | 4-5 | 5-10 | Turn once |
| 500 | 10-12 | 10-15 | Turn once | |
| 800 | 15-17 | 10-20 | Turn twice | |
| Butter | 250 | 8-10 | 10-15 | |
| Cream cheese | 250 | 6-8 | 10-15 | |
| Creams | 250 | 7-8 | 10-15 |
Cooking with a microwave oven
Warning! Read the section "Microwave Safety" before cooking with your microwave.
Follow these recommendations when cooking with your microwave:
- Before heating or cooking foods with peel or skin (e.g. apples, tomatoes, potatoes, sausages) prick them so that they do not burst. Cut the food up before starting to prepare it.
- Before using a container or dish make sure that it is suitable for microwave use (see the section on types of ovenware).
- When cooking food with very little moisture (e.g. defrosting bread, making popcorn, etc.) evaporation is very quick. The oven then works as if it was empty and the food may burn. The oven and the container may be damaged in such a situation. You should therefore set just the cooking time necessary and you must keep a close eye on the cooking process.
- It is not possible to heat large quantities of oil (frying) in the microwave.
- Remove pre-cooked food from the containers they come in since these are not always heat resistant. Follow the food manufacturer's instructions.
- If you have several containers, such as cups, for example, set them out uniformly on the turntable plate.
- Do not close plastic bags with metal clips. Use plastic clips instead. Prick the bags several times so that the steam can escape easily.
- When heating or cooking foods, check that they reach at least a temperature of 70^ C.
- During cooking, steam may form on the oven door window and may start to drip. This situation is normal and may be more noticeable if the room temperature is low. The oven's safe working is not affected by this. After you have finished cooking, clean up the water coming from the condensation
- When heating liquids, use containers with a wide opening, so that the steam can evaporate easily.
Prepare the foods as per the instructions and keep in mind the cooking times and power levels indicated in the tables.
Keep in mind that the figures given are only indicative and can vary depending on the initial state, temperature, moisture and type of food. It is advisable to adjust the times and power levels to each situation. Depending on the exact characteristics of the food you may need to increase or shorten the cooking times or increase or decrease the power levels.
Cooling with microwaves...
-
The greater the amount of food, the longer the cooking time. Keep in mind that:
-
Double the quantity » double the time
-
Half the quantity » half the time
-
The lower the temperature, the longer the cooking time.
- Foods containing a lot of liquid heat up more quickly.
- Cooking will be more uniform if the food is evenly distributed on the turntable. If you put dense foods on the outside part of the plate and less dense ones on the centre of the plate, you can heat up different types of food simultaneously.
- You can open the oven door at any time. When you do this the oven switches off automatically. The microwave will only start working again when you close the door and press the start key.
- Foods that are covered require less cooking time and retain their characteristics better. The lids used must let microwaves pass through and have small holes that allow steam to escape.
Cooking with a microwave oven
Tables and suggestions – Cooking vegetables
| Food | Quantity (g) | Addition of liquids | Power (Watt) | Time (min.) | Standing Time (min.) | Instructions |
| Cauliflower | 500 | 100 ml | 750 | 9-11 | 2-3 | Divide into florets |
| Broccoli | 300 | 50 ml | 750 | 6-8 | 2-3 | Cut into slices |
| Mushrooms | 250 | 25 ml | 750 | 6-8 | 2-3 | Turn 1 x, cover |
| Peas & carrots, | 300 | 100 ml | 750 | 7-9 | 2-3 | Cut into cubes or slices. Cover. |
| Frozen carrots | 250 | 25 ml | 750 | 8-10 | 2-3 | Turn 1 x |
| Potatoes | 250 | 25 ml | 750 | 5-7 | 2-3 | Peel, cut into uniform pieces. Cover, turn 1 x |
| Pepper | 250 | 25 ml | 750 | 5-7 | 2-3 | Cut into pieces or slices. Cover. Turn 1 x |
| Leek | 250 | 50 ml | 750 | 5-7 | 2-3 | |
| Frozen Brussel sprouts | 300 | 50 ml | 750 | 6-8 | 2-3 | Cover. Turn 1 x |
| Sauerkraut | 250 | 25 ml | 750 | 8-10 | 2-3 | Cover. Turn 1 x |
Tables and suggestions – Cooking fish
| Food | Quantity (g) | Power (Watt) | Time (min.) | Standing Time (min.) | Instructions |
| Fish fillets | 500 | 550 | 10-12 | 3 | Cook covered over. Turn after half of cooking time. |
| Whole fish | 800 | 750 | 2-3 | 2-3 | Cook covered over. Turn after half of cooking time. You may wish to cover up the small edges of the fish. |
| 300 | 7-9 |
Cooking with the grill
For good results with the grill, use the grill rack supplied with the oven.
Fit the grill rack in such a way that it doesn't come into contact with the metal surfaces of the oven cavity since if it does there is a danger of electric arcing which may damage the oven.
IMPORTANT POINTS:
- When the microwave grill is used for the first time there will be some smoke and a smell coming from the oils used during oven manufacture.
- The oven door window becomes very hot when the grill is working. Keep children away.
-
When the grill is operating, the cavity walls and the grill rack become very hot. You should use oven gloves.
-
If the grill is used for extended period of time it is normal to find that the elements will switch themselves off temporarily due to the safety thermostat.
- Important! When food is to be grilled or cooked in containers you must check that the container in question is suitable for microwave use. See the section on types of ovenware!
- When the grill is used it is possible that some splashes of fat may go onto the elements and be burnt. This is a normal situation and does not mean there is any kind of operating fault.
- After you have finished cooking, clean the interior and the accessories so that cooking remains do not become encrusted.
Cooking with the grill
Tables and suggestions – Grill without microwave
| Fish | Quantity (g) | Time (min.) | Instructions |
| Fish | |||
| Bass | 800 | 18-24 | Spread lightly with butter. After half of cooking time turn and spread with seasoning. |
| Sardines/gurnard | 6-8 fish. | 15-20 | |
| Meat | |||
| Sausages | 6-8 units | 22-26 | Halfway through, pierce and turn over. |
| Frozen hamburgers | 3 units | 18-20 | Turn over 2 or 3x |
| Spare rib (approx. 3 cm thick) | 400 | 25-30 | Baste with oil, turn over halfway through |
| Others | |||
| Toast | 4 units | 112 -3 | Keep an eye on the toasting process, turn over |
| Toasted sandwiches | 2 units | 5-10 | Keep an eye on the toasting process. |
Heat up the grill beforehand for 2 minutes. Unless indicated otherwise, use the grill rack. Place the grid on a bowl so that the water and the fat can drop.
The times shown are merely indicative and can vary as a function of the composition and quantity of the food, as well as the final condition wished for. Fish and meat taste great if, before grilling, you brush them with vegetable oil, spices and herbs and leave to marinate for a few hours. Only add salt after grilling.
Sausages will not burst if you prick them with a fork before grilling.
After half the grilling time has passed, check on how the cooking is going and, if necessary, turn the food over.
The grill is especially suitable for cooking thin portions of meat and fish. Thin portions of meat only need to be turned once, but thicker portions should be turned several times.
Cooking with the Grill
Tables and suggestions – Microwave + Grill
The microwave + grill function is ideal for cooking quickly and, at the same time, browning foods. Furthermore, you can also grill and cook cheese
covered food. The microwave and the grill work simultaneously. The microwave cooks and the grill toasts.
| Food | Quantity (g) | Dish | Power (Watt) | Time (min.) | Standing time (min.) |
| Cheese topped pasta | 500 | Low dish | 300 | 12-17 | 3-5 |
| Cheese topped potatoes | 800 | Low dish | 550 | 20-22 | 3-5 |
| Lasagne | approx. 800 | Low dish | 550 | 15-20 | 3-5 |
| Grilled cream cheese | approx. 500 | Low dish | 300 | 18-20 | 3-5 |
| 2 fresh chicken legs (grilled) | 200 each | Low dish | 300 | 10-15 | 3-5 |
| Chicken | approx. 1000 | Low and wide dish | 300 | 35-40 | 3-5 |
| Cheese topped onion soup | 2 x 200 g cups | Soup bowls | 300 | 2-4 | 3-5 |
Before using a dish in the microwave oven make sure that it is suitable for microwave use. Only use dishes or containers that are suitable for microwave use.
The dish to be used in the combined function must be suitable for microwave and grill use. See the section on types of ovenware!
Keep in mind that the figures given are merely indicative and can vary as a function of the initial state, temperature, moisture and type of food.
If the time is not enough to brown the food well, put it under the grill for another 5 or 10 minutes.
Please follow the standing times and don't forget to turn the meat pieces.
Unless indicated to the contrary, use the turntable plate for cooking.
The values given in the tables are valid when the oven cavity is cold (it is not necessary to pre-heat the oven).
What kind of ovenware can be used?
Microwave function
For the microwave function, keep in mind that microwaves are reflected by metal surfaces. Glass, china, clay, plastic, and paper let microwaves pass.
For this reason, metal pans and dishes or containers with metal parts or decorations cannot be used in the microwave. Glass ware and clay with metallic decoration or content (e.g. lead crystal) cannot be used in microwave ovens.
The ideal materials for use in microwave ovens are glass, refractory china or clay, or heat resistant plastic. Very thin, fragile glass or china should only be used for short period of times (e.g. heating).
Hot food transmits heat to the dishes which can become very hot. You should, therefore, always use an oven glove!
How to test ovenware you want to use
Put the item you want to use in the oven for 20 seconds at maximum microwave power. After that time, if it is cold and just slightly warm, it is suitable to use. However, if it heats up a lot or causes electric arcing it is not suitable for microwave use.
Grill function
In the case of the grill function, the ovenware must be resistant to temperature of at least 300^ C.
Plastic dishes are not suitable for use in the grill.
Microwave + grill function
In the microwave + grill function, the ovenware used must be suitable for use in both the microwave and the grill.
Aluminium containers and foil
Pre-cooked food in aluminium containers or in aluminium foil can be put in the microwave if the following aspects are respected:
- Keep in mind the manufacturer's recommendations written on the packaging.
- The aluminium containers cannot be more than 3 cm high or come in contact with the cavity walls (minimum distance 3 cm). Any aluminium lid or top must be removed.
- Put the aluminium container directly on top of the turntable plate. If you use the grill rack, put the container on a china plate. Never put the container directly on the grill rack!
- The cooking time is longer because the microwaves only enter the food from the top. If you have any doubts, it is best to use only dishes suitable for microwave use.
- Aluminium foil can be used to reflect microwaves during the defrosting process. Delicate food, such as poultry or minced meat, can be protected from excessive heat by covering the respective extremities/edges.
- Important: aluminium foil cannot come into contact with the cavity walls since this may cause electrical arcing.
Lids
We recommend you use glass or plastic lids or cling film since:
- This will stop excessive evaporation (mainly during very long cooking times);
- The cooking times are shorter;
- The food does not become dry;
- The aroma is preserved.
The lid should have holes or openings so that no pressure develops. Plastic bags must also be opened. Baby feeding bottles or jars with baby food and similar containers can only be heated without their tops / lids otherwise they can burst.
What kind of ovenware can be used?
Table of Ovenware
The table below gives you a general idea of what type of ovenware is suitable for each situation.
| Operating modeType of ovenware | Microwave | Grill | Microwave + Grill | |
| Defrosting / heating | Cooking | |||
| Glass and china 1)Home use, not flame resistant, can be used in dish washer | yes | yes | no | no |
| Glazed chinaFlame resistant glass and china | yes | yes | yes | yes |
| China, stone ware 2)Unglazed or glazed without metallic decorations | yes | yes | no | no |
| Clay dishes 2)GlazedUnglazed | yesno | yesno | nono | nono |
| Plastic dishes 2)Heat resistant to 100°CHeat resistant to 250°C | yesyes | noyes | nono | nono |
| Plastic films 3)Plastic film for foodCellophane | noyes | noyes | nono | nono |
| Paper, cardboard, parchment 4) | yes | No | no | no |
| MetalAluminium foilAluminium wrappings 5)Accessories | yesnoyes | noyesyes | yesyesyes | noyesyes |
-
Without any gold or silver leaf edging; no lead crystal.
-
Keep the manufacturer's instructions in mind!
-
Do not use metal clips for closing bags. Make holes in the bags. Use the films only to cover the food.
-
Do not use paper plates.
-
Only shallow aluminium containers without lids/tops. The aluminium cannot come into contact with the cavity walls.
Oven Cleaning and Maintenance
Cleaning is the only maintenance normally required.
Warning! Your microwave oven should be cleaned regularly, with all food remains being removed. If the microwave is not kept clean its surfaces may deteriorate, reducing the oven's working life and possibly resulting in a dangerous situation.
Warning! Cleaning should be done with the oven power switched off. Take the plug out of the socket or switch off the oven's power circuit.
Do not use aggressive or abrasive cleaning products, scourers that scratch surfaces or sharp objects, since stains may appear.
Do not use high pressure or stream jet cleaning appliances.
Front surface
Normally you just need to clean the oven with a damp cloth. If it is very dirty, add a few drops of dishwashing liquid to the cleaning water. Afterwards, wipe the oven with a dry cloth.
In an oven with an aluminium front, use a glass cleaning product and a soft cloth that does not release any fibres or threads. Wipe from side to side without exerting any pressure on the surface.
Immediately remove lime, fat, starch or egg white stains. Corrosion can occur under these stains.
Do not let any water get inside the oven.
Oven interior
After each time the oven is used, clean the inside walls with a damp cloth since this is the easiest way to remove splashes or spots of food that may have stuck to the inside.
To remove dirt that is harder to shift, use a non-aggressive cleaning product. Do not use oven sprays or other aggressive or abrasive cleaning products.
Always keep the door and the oven front very clean to ensure that the door opens and closes properly.
Make sure water does not enter the microwave ventilation holes.
Regularly take out the turntable plate and the respective support and clean the cavity base, especially after any liquid spillage.
Do not switch on the oven without the turntable and the respective support being in place.
If the oven cavity is very dirty, put a glass of water on the turntable and switch on the microwave oven for 2 or 3 minutes at maximum power. The steam released will soften the dirt which can then be cleaned easily using a soft cloth.
Unpleasant odours (e.g. after cooking fish) can be eliminated easily. Add a few drops of lemon juice or vinegar in a cup of water. Put a spoonful of coffee in the cup to avoid the water boiling over. Heat the water for 2 to 3 minutes at maximum microwave power.
Oven Cleaning and Maintenance
Oven ceiling
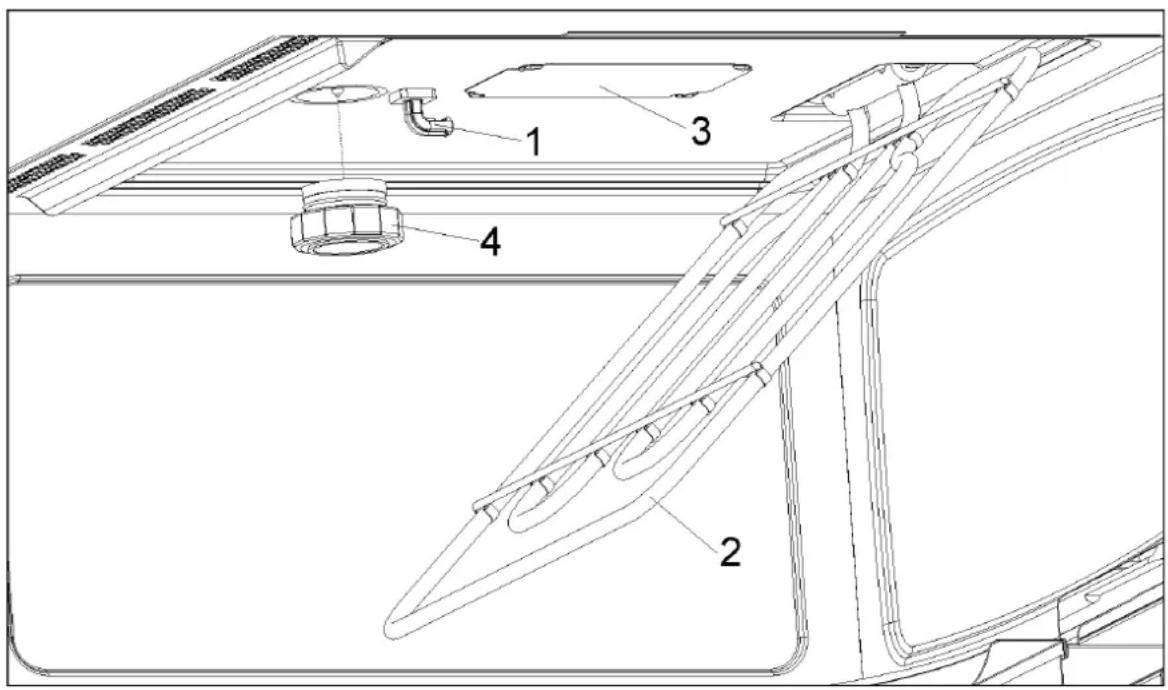
If the oven ceiling is dirty, the grill can be lowered to make cleaning easier.
To avoid the danger of burning, wait until the grill is cold before lowering it.
Proceed as follows:
- Turn the grill support by 180^ (1).
- Lower the grill gently (2). Do not use excessive force as this may cause damage.
- After cleaning the ceiling, put the grill (2) back in its place, carrying out the previous operation.
IMPORTANT WARNING: The grill heating element support (1) may fall when it is rotated. If this happens, insert the grill heating element support (1) into the slot in the ceiling of the cavity and rotate it 90° to the grill heating element support (2) position.
The mica cover (3) located in the ceiling must always be kept clean. Any food remains that collect on the mica cover can cause damage or provoke sparks.
Do not use abrasive cleaning products or sharp objects.
To avoid any risk, do not remove the mica cover.
The glass lamp cover (4) is located on the oven ceiling and can be removed easily for cleaning. For this you just need to unscrew it and clean it with water and dishwashing liquid.
Accessories
Clean the accessories after each use. If they are very dirty, soak them first of all and then use a brush and sponge. The accessories can be washed in a dish washing machine.
Make sure that the turntable plate and the respective support are always clean. Do not switch on the oven unless the turntable and the respective support are in place.
text_image
Technical diagram of a mechanical assembly with numbered components, likely for engineering or manufacturing documentation.What should I do if the oven doesn't work?
WARNING! Any type of repair must only be done by a specialised technician. Any repair done by a person not authorised by the manufacturer is dangerous.
You do not need to contact Technical Assistance to resolve the following questions:
- The display is not showing! Check if:
- The time indication has been switched off (see section on Basic Settings).
- Nothing happens when I press the keys! Check if:
- The Safety Block is active (see section on Basic Settings).
• The oven does not work! Check if:
- The oven's power is switched on.
- The door is completely closed. The door should close with an audible click.
- There are any foreign bodies between the door and the cavity front.
- When the oven is operating I can hear some strange noises! Check if:
- There is any electrical arcing inside the oven caused by foreign metallic objects (see section on type of ovenware).
- The ovenware is touching the oven walls.
- There are any loose items of cutlery or cooking tools inside the oven.
- The food doesn't heat up or heats very slowly! Check if:
- You have inadvertently used metal ovenware.
- You have selected the correct operating times and power level.
- The food you have put inside the oven is a larger amount or colder than you usually put in.
- The food is too hot, dried out or burnt! Check if you selected the correct operating time and power level.
- I hear some noises after the cooking process is finished! This is not a problem. The cooling fan keeps on working for some time. When the temperature has dropped sufficiently, the fan will switch itself off.
- The oven switches on but the interior light does not go on! If all the functions work properly it is probable that the lamp has blown. You can keep on using the oven.
Replacement of the light bulb
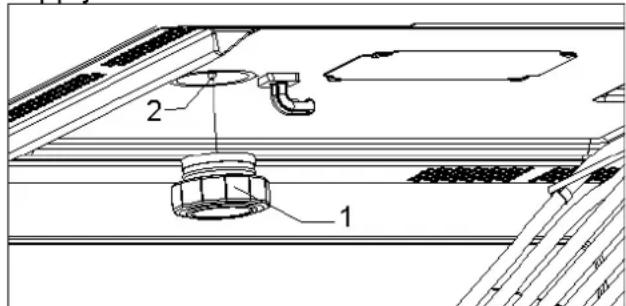
To substitute the light bulb, proceed as follows:
- Disconnect the oven from the power supply. Take the plug out of the socket or switch off the oven's power circuit.
- Unscrew and remove the glass light cover (1).
- Remove the halogen light bulb (2). Warning! The bulb may be very hot.
- Fit a new 12V / 10W halogen bulb. Warning! Do not touch the light bulb surface directly with your fingers because you may damage the bulb. Follow the lamp manufacturer's instructions.
- Screw the glass light cover into place (1).
- Connect the oven again to the power supply.
text_image
Technical diagram showing labeled components of a mechanical assembly with numbered parts 1 and 2NOTE: Replacement bulbs can be ordered from EURO-PARTS 1-866-722-2262
Technical characteristics
Specifications
- AC Voltage...... (See rating plate)
• Power required.... 3300 W - Grill power.... 1500 W
- Microwave output power. 1000 W
- Microwave frequency 2450 MHz
- Exterior dimensions (W×H×D).... 595 × 455 × 472 mm
- Interior dimensions (W×H×D).... 420 × 210 × 390 mm
- Oven capacity. 38 l
- Weight.... 35 kg
Installation instructions
Before installation
Check that the input voltage indicated on the rating plate is the same as the voltage of the power outlet you are going to use. The rating plate is located on the front part of the cavity and it is only visible after opening the door.
If required by the National Electrical Code (or Canadian Electrical Code), this appliance must be installed on a separate branch circuit.
Installer – show the owner the location of the circuit breaker or fuse. Mark it for easy reference.
Before installing, turn power OFF at the service panel. Lock service panel to prevent power from being turned ON accidentally.
Be sure your appliance is properly installed and grounded by a qualified technician. Installation, electrical connections and grounding must comply with all applicable codes.
Open the oven door and take out all the accessories and remove the packing material.
Do not remove the mica cover on the ceiling of the interior! This cover stops fat and pieces of food damaging the microwave generator.
Warning! The front surface of the oven may be wrapped with a protective film. Before using the oven for the first time, carefully remove this film, starting on the inside.
Make sure that the oven is not damaged in any way. Check that the oven door closes correctly and that the interior of the door and the front of the oven opening are not damaged. If you find any damage contact the Technical Assistance Service.
DO NOT USE THE OVEN if the metal conduit is damaged, if the oven does not function correctly or if it has been damaged or dropped. Contact the Technical Assistance Service.
Place the oven on a flat and stable surface. The oven must not be put close to any sources of heat, radios or televisions.
Electrical supply
Before installing the oven have a qualified electrician verify that your home is provided with adequate electrical service and that the addition of the oven will not overload the branch circuit on which it is to be installed.
A separate three-wire or four-wire single phase, 240 Volt, 60 Hz, branch circuit is required.
For hook-up of the oven you will need to have an approved junction box installed where it will be easily reached through the front of the cabinet where the oven will be located. The oven has 3 feet of conduit.
Allow two to three feet of slack in the line so that the oven can be moved if servicing is ever necessary.
DO NOT shorten the flexible conduit.
Wiring requirements
When making the wire connections, use the entire length of the conduit provided (3 feet). The conduit must not be cut.
Before making connections make sure the power is off and read and observe the following:
- A separate three-wire or four-wire, single phase, 240 Volt, 60 Hz branch circuit is required for the oven.
- The oven must be connected with Copper or Aluminum wire.
- In the United States:
Wiring must conform to the National Electrical Code, ANSI/NFPA No. 7 latest edition. You can obtain a copy of the National Electrical Code by writing to: National Fire Protection Association Batterymarch Park Quincy, MA 02269
In Canada:
Wiring must conform to Canadian Electrical Code C22.1- latest edition. You can obtain a copy of the Canadian Electrical Code by writing to: Canadian Standards Association 178 Rexdale Boulevard Rexdale (Toronto), Ontario, Canada M9W 1R3
- Wire size (Copper or Aluminum wire) and connections must be suitable for the rating of the appliance as per the National Electrical Code requirements. The flexible armoured cable extending from the oven should be connected directly to the junction box.
- The junction box should be located so as to allow as much slack as possible between the junction box and the oven so it can be moved if servicing is ever required.
- A U.L. listed conduit connector must be provided at each end of the power supply cable.
Electrical connections
Be sure your appliance is properly installed and grounded by a qualified technician. Ask your dealer to recommend a qualified technician or an authorized repair service.
This appliance is manufactured with a green GROUND wire connected to the oven chassis. After making sure that the power has been turned off, connect the flexible conduit from the oven to the junction box using a U.L. listed conduit connector. The figures and the instructions provided below present the most common way of connecting the ovens.
Your local codes and ordinances, of course, take precedence over these instructions.
WARNING" Risk of Electric Shock, frame grounded to neutral of appliance through a link.
Grounding through the neutral conductor is prohibited for new branch-circuit installations (1996 NEC); mobile homes; and recreational vehicles, or in an area where local codes prohibit grounding through the neutral conductor. For installations where grounding through the neutral conductor is prohibited:
- Disconnect the ground from the neutral at free end of conduit;
- Use grounding terminal or lead to ground unit; and
- Connect neutral terminal or lead to branch circuit neutral in usual manner.
3-Wire branch circuit (for US only)
Refer to the following Figure, where local codes allow the connection of GROUND wire from the oven to the branch circuit NEUTRAL wire (gray or white colored wire):
- If local codes permit, connect the green GROUND wire from the oven and the white wire from the oven to the branch circuit NEUTRAL wire (gray or white colored wire).
- Connect the red and black leads from the oven to the corresponding leads in the junction box.
Grounded Neutral
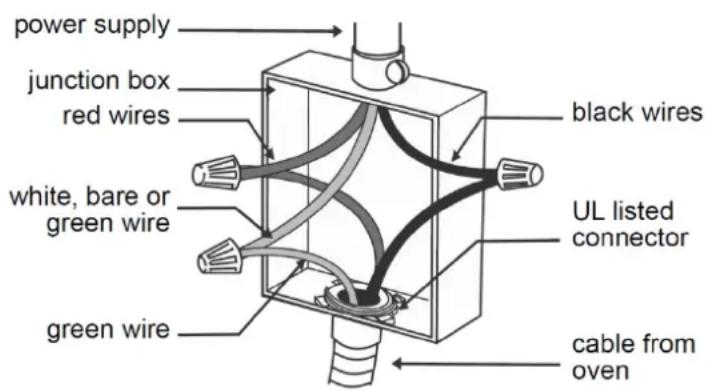
text_image
power supply junction box red wires white, bare or green wire green wire black wires UL listed connector cable from oven4-Wire branch circuit (for US and CANADA)
Refer to the following Figure:
- Disconnect ground from neutral at free end of conduit.
- Connect the green GROUND wire from the oven to the GROUND wire in the junction box (bare or green colored wire).
- Connect the red and black leads from the oven to the corresponding leads in the junction box.
Ungrounded Neutral
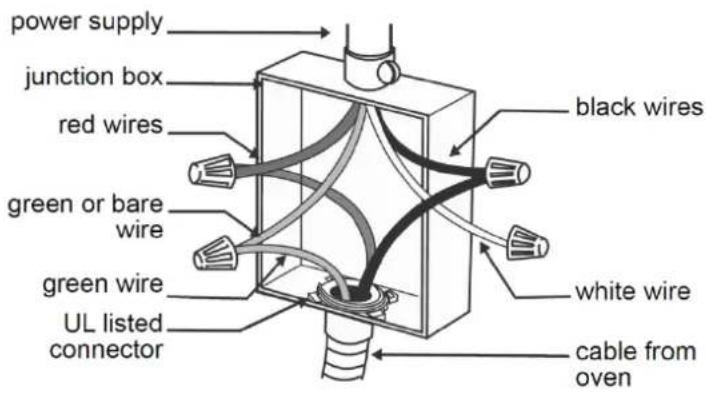
text_image
power supply junction box red wires green or bare wire green wire UL listed connector black wires white wire cable from ovenAfter installation
The oven only functions when the door is closed correctly.
After the first use, clean the inside of the oven and the accessories, following the cleaning instructions given in the section "Oven cleaning and maintenance".
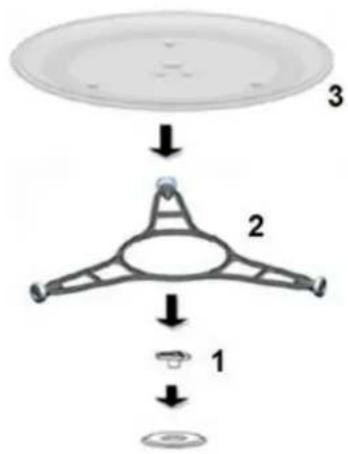
Fit the Turntable support in the center of the oven cavity and put the Turntable ring and the Turntable plate on top, making sure they slot in. Whenever you use the microwave, the turntable plate and the respective accessories must be inside and correctly fitted. The turntable plate can rotate in both directions.
flowchart
graph TD
    A["Top Circular Component"] --> B["Center"]
    B --> C["Bottom Ring"]
    C --> D["Bottom Ring"]
Sommaire
natural_image
Simple line drawing of a cooking pot with arrows indicating direction (no text or symbols)natural_image
Simple line drawing of a circular container with internal shading and directional arrows (no text or symbols)natural_image
Line drawing of a chicken on a tray with directional arrows indicating flow or movement (no text or symbols)Description du four
text_image
Exploded view diagram of an oven with numbered parts for identificationtext_image
- + OK ▶ 0 2 3 4 5 6 7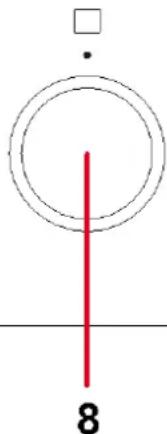
text_image
8text_image
- + OK ▶ 7 2 3 4 5 6
text_image
8text_image
- + OK ▶ 0 2 3 4 5 6 7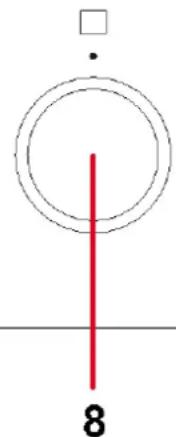
text_image
8text_image
- + OK ▶ □ 2 3 4 5 6 7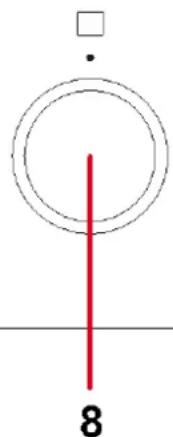
text_image
8text_image
Technical diagram of a mechanical assembly with numbered components, likely for engineering or manufacturing documentation.text_image
Technical diagram showing labeled components of a mechanical assembly with numbered parts 1 and 2Installation/ Installation
EN - Positioning the oven
The appliance is designed for building-in to cabinets made from any heat-resistant material. Comply with the dimensions shown in following pictures.
When installing in tall units bear in mind that the top/rear of the unit must have an opening 100 mm deep.
text_image
MIN 21 5/8" MIN 3 15/16" 23 5/8" 21 5/8" 22-22 3/8" MIN 18 1/8" MIN 22 13/16" 20 7/16" 20-22 3/8" 21 5/16" 23 7/16" 17 9/16" 20 7/16" 13/16" 17 15/16"Installation/ Installation
natural_image
Technical line drawing of a furnace or chamber with internal components and a magnified inset showing a cylindrical component (no text or symbols)EN
- Push oven completely into the cabinet and centre it.
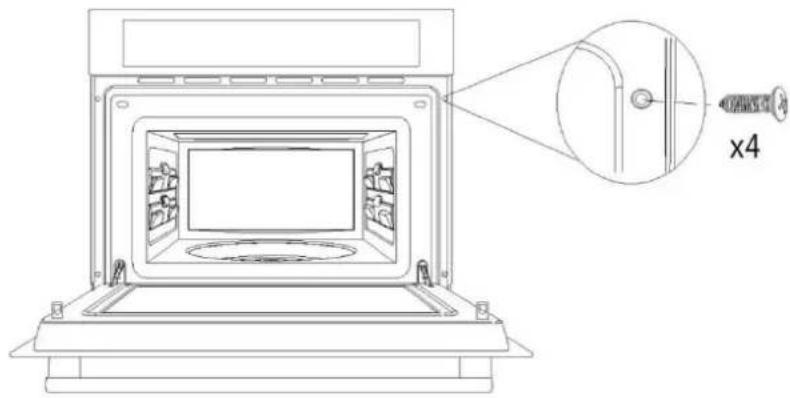
- Open microwave door and fasten the appliance to the cabinet using the four screws provided. Insert the screws through the front holes.
FR
Porter&Charles products are designed and built to the highest standards.
We expect your appliances to provide many years of trouble free enjoyment.
In the event of an appliance requiring attention, each appliance is covered by a 2-year warranty from the date of purchase.
Refer to warranty policy for complete terms and conditions.
Coverage is for costs of parts and labour for appliances in capital cities & metropolitan areas. We reserve the right to charge directly for handling expenses outside the metropolitan region.
Porter&Charles products are supported by a national service support system. Call our customer service department for attention.
Please retain your invoice to quote should you require service assistance. This will identify your product for our priority service back-up. Please attach your invoice to this manual for easy future reference. To register your purchase, you can either complete the section below to mail or fax, or register online at www.porterandcharles.ca/warranty-information.
Porter&Charles
871 Cranberry Court
Oakville, ON L6L 6J7
Canada
Toll: 1-866-699-4973
Tel: 905-829-8389
Fax: 905-829-8409
info@ela.ca
www.porterandcharles.ca
For Service & Parts:
EURO-PARTS
Toll: 1-866-722-2262
service@euro-parts.ca
parts@euro-parts.ca
www.euro-parts.ca
Important: Please record details of your purchase below and mail or e-mail to Porter&Charles
-cut along line
Name: ____ Tel No ____
Address:
City : ____ Prov/State: ____ Postal Code/ZIP: ____
Where purchased: ____ Purchase date: ____
Items purchased:
Serial No's: :