
VE-DWVFI - Dishwasher Porter & Charles - Free user manual and instructions
Find the device manual for free VE-DWVFI Porter & Charles in PDF.


| Product Type | Built-in Dishwasher |
| Brand | Porter & Charles |
| Model | VE-DWVFI |
| Width | 60 cm |
| Depth | 60 cm |
| Height | 85 cm |
| Weight | 45 kg |
| Energy Efficiency Class | E (EU) |
| Annual Energy Consumption | 260 kWh |
| Noise Level | 46 dB(A) |
| Place Settings | 12 |
| Water Consumption per Cycle | 10.5 L |
| Drying Efficiency | A (EU) |
| Number of Programs | 6 |
| Programs | Eco, Intensive, Normal, Quick, Rinse, Glass |
| Delay Start | Yes (1-24 hours) |
| Self-Cleaning Filter | Yes |
| Water Softener | Built-in |
| Salt and Rinse Aid Indicator | Yes |
| Child Lock | Yes |
| Leak Protection | AquaStop |
| Spare Parts Availability | Up to 10 years after purchase |
| Repair Index | 7.5/10 |
| Installation Type | Fully integrated |
Frequently Asked Questions - VE-DWVFI Porter & Charles
User questions about VE-DWVFI Porter & Charles
0 question about this device. Answer the ones you know or ask your own.
Ask a new question about this device
Download the instructions for your Dishwasher in PDF format for free! Find your manual VE-DWVFI - Porter & Charles and take your electronic device back in hand. On this page are published all the documents necessary for the use of your device. VE-DWVFI by Porter & Charles.
USER MANUAL VE-DWVFI Porter & Charles

VE-DWVFI
CONTENTS
- IMPORTANT SAFETY INSTRUCTIONS ....3
2.RECYCLING....6
3.INSTALLATION....8 - TECHNICAL SPECIFICATIONS ....9
4.1.General Appearance....9
4.2.Technical Specifications 9
5.BEFORE USING THE APPLIANCE ....10
5.1. Preparing your Dishwasher for first use 10
5.2.Setting the Water softener 11
5.3.Filling the Dishwasher Salt Dispenser 13
5.4. Salt refill indicator....14
5.5. Detergent usage ...... 14
5.6. Filling the Detergent 14
5.7. Using combined detergents ....15
5.8. Rinse-aid usage 16
5.9. Filling the rinse-aid and setting ....16
6.LOADING YOUR DISHWASHER....17
6.1. Lower rack 19
6.2. Incorrect Loads....21
7.PROGRAM TABLE....27 - THE CONTROL PANEL....29
8.1. KEYS 30
8.2. PREPARING THE MACHINE....30
8.3. PROGRAM SELECTION....30
9.CLEANING AND MAINTENANCE 35
9.1. Cleaning the Machine and Filters 36
9.2. Spray Arms 36
10. TROUBLESHOOTING....39
11.PRACTICAL INFORMATION......41
Thank you for choosing this product.
This User Manual contains important information on safety and instructions intended to assist you in the operation and maintenance of your appliance.
Please take the time to read this User Manual before using your appliance and keep this book for future reference.
| Icon Type Meaning | ||
 | WARNING Serious injury or death risk | |
 | RISK OF ELECTRIC SHOCK Dangerous voltage risk | |
 | FIRE Warning; Risk of fire / flammable materials | |
 | CAUTION Injury or property damage risk | |
 | IMPORTANT / NOTE Operating the system correctly | |
INTRODUCTION
Please read this user manual and particularly the safety instructions completely and carefully. They will save you time and effort and help to ensure optimum dishwasher performance.
Be sure to observe all listed warnings and cautions. Look particularly for the icons with exclamation marks inside. The information icon will also provide important references.
WARNING: Indicates a potentially hazardous situation which, if not avoided, could result in death or serious injury.
CAUTION: Indicates a potentially hazardous situation which, if not avoided, may result in injury. It may also be used to alert against unsafe practices.
NOTICE: Indicates a potentially hazardous situation which, if not avoided, may result in damage to the dishwasher, the tableware, the equipment or the environment.
1. IMPORTANT SAFETY INSTRUCTIONS
⚠ WARNING: When using the dishwasher, follow basic precautions. Read all instructions before using the dishwasher! Save these operating instructions and pass them on to any future user.
- Use the dishwasher only for its intended purpose as described in this user manual. This appliance is intended for normal household use only. Do not change the specification of the appliance. The manufacturer disclaims responsibility for damage or injury caused by improper use of this appliance.
- The information in this user manual must be followed to minimize the risk of fire or explosion and to prevent property damage, personal injury or loss of life
- Use only detergents or wetting agents recommended for use in a dishwasher and keep them out of the reach of children.
- When loading items to be washed:
1) Locate sharp items so that they are not likely to damage the door seal, and
2) Load sharp knives with the handles up to reduce the risk of type injuries.
- Do not wash plastic items unless they are marked “dishwasher safe” or the equivalent. For plastic items not so marked, check the manufacturer’s recommendations.
- Do not touch the HEATING ELEMENT during or immediately after use.
- Do not operate your dishwasher unless all ENCLOSURE panels are properly in place.
- Do not tamper with controls.
- Do not abuse, sit on, or stand on the door or dish rack of the dishwasher.
- The cup racks are designed to support cups, glasses and kitchen utensils. When the cup racks are in the dishwasher do not lean on or use the cup racks to support your body weight.
- This appliance must be grounded. In the event of a malfunction or breakdown, grounding will reduce the risk of electric shock by providing a path of least resistance for electric current. This appliance is equipped with a cord having an equipment-grounding conductor and a grounding plug. The plug must be plugged into an appropriate outlet that is installed and grounded in accordance with all local codes and ordinances.
WARNING:
Improper connection of the equipment-grounding conductor can result in a risk of electric shock. Check with a qualified electrician or service representative if you are in doubt whether the appliance is properly grounded. Do not modify the plug provided with the appliance, if it will not fit the outlet, have a proper outlet installed by a qualified electrician.
- Some dishwasher detergents are strongly alkaline. They can be extremely dangerous if swallowed. Avoid contact with the skin and eyes and keep children and infirm persons away from the dishwasher when the door is open.
Consult a doctor immediately if detergent has been swallowed or inhaled.
- Do not remove the dishes from the appliance until the
program is complete. Some detergent may remain on the dishes.
- Check that the detergent dispenser is empty after the completion of each wash program.
- Do not drink and play with the water in the appliance. Harmful residues could be present.
- To reduce the risk of injury, do not allow children to play in or on a dishwasher.
- When children become old enough to operate the appliance, it is the responsibility of the parents/legal guardians to ensure the children are instructed in safe practices by qualified persons.
- Do not leave the appliance with the open door unattended to avoid stepping accidentally onto it.
⚠ WARNING: Before any maintenance operation, deactivate
the appliance and disconnect the mains plug from the socket.
- Do not use high pressure water sprays and/or steam to clean the appliance.
- Ensure that there are no visible water leaks during and after the first use of the appliance.
- To avoid floor damage and possible mold growth, do not allow wet areas to remain around or under the dishwasher.
- To avoid dishwasher damage, do not allow water to remain in your dishwasher systems through extended periods of freezing
RISK OF INJURY: To avoid risk of injury, always use caution when opening the door during or following a wash cycle as hot water or steam may escape.
- Do not store or use flammable liquids or vapors in the area of the dishwasher, near or on the appliance.
- Under certain conditions, hydrogen gas may be produced in a hot-water system that has not been used for two weeks or more. HYDROGEN GAS IS EXPLOSIVE. If the hot-water system has not been used for such a period, before using the dishwasher turn on all hot-water faucets and let the water flow from each for several minutes. This will release any accumulated hydrogen gas. As the gas is flammable, do not smoke or use an open flame during this time.
- Please check the water supply line periodically. It is susceptible to breakage. It becomes less flexible as time goes by. Replace it immediately when it is torn, cut, swollen or there is water leakage.
2. RECYCLING
Remove the door to the washing compartment when removing an old dishwasher from service or discarding it. Ensure that the appliance presents no danger to children while being stored for disposal. Before disposing the dishwasher:
- Disconnect the appliance from the mains supply.
- Cut off the mains cable and discard it.
- Remove the door catch to prevent children and pets to get closed in the appliance
Oldappliances may contain materials that can be recycled. Please contact your local recycling authority about the possibility of recycling these materials.
Please check the water supply line periodically. It is susceptible to breakage. It becomes less flexible as time goes by. Replace it immediately when it is torn, cut, swollen or there is water leakage.
Please keep the dishwasher package out of the reach of children after unpacking it.
WARNING!:
Risk of injury or suffocation! Ensure that any plastic wrappings, bags, small pieces etc. are disposed of safely and kept out of the reach of children.
SAVE THESE INSTRUCTIONS
3. INSTALLATION
⚠ WARNING: When installing the dishwasher, follow basic precautions, including the following:
Please check the standards and local codes for placement of machine.
- Installation, maintenance and repair should be performed by a qualified installer. Work by unqualified persons could be dangerous and may void the warranty.
- Do not operate the appliance if damaged, malfunctioning, partially disassembled or if it has missing or broken parts.
- Before installation or service, disconnect the power supply to the work area by unplugging the unit, “tripping” the circuit breaker or removing the fuse.
- Only connect the dishwasher to the power supply when all installation and plumbing work is complete.
- Never connect the ground wire to gas lines, or hot water pipes, plumbing lines.
- Do not install or store the dishwasher where it can be exposed to below freezing temperatures or exposed to weather.
- Dishwasher must be secured to adjacent cabinetry using the brackets provided. Failure to do this may cause damage to property or bodily injury.
- Connect to a properly rated, protected and sized power supply circuit to avoid electrical overload. The dishwasher is designed for an electrical supply of 120 V (volts), 60 Hz (hertz),
AC, connected to a dishwasher-dedicated, properly grounded electrical circuit with a fuse or breakers rated for 15 amperes. Electrical supply conductors shall be a minimum of # 16 AWG copper wire rated at 75 °C (167 °F) or higher. These requirements must be met to prevent injury and machine damage. Consult a qualified electrician if in doubt. - Do not use any extension cord or portable outlet device to connect the dishwasher to a power supply.
⚠ WARNING: Danger of suffocation! Ensure that any plastic wrappings, bags, small pieces etc. are disposed of safely and kept out of the reach of children.
4. TECHNICAL SPECIFICATIONS


4.1. General appearance
- Upper basket with racks
- Upper spray arm
- Lower basket
- Lower spray arm
- 3 rd basket(Model Depending)
- Top nozzle(Model Depending)
- Filters
- Rating plate
- Control panel
- Detergent and rinse-aid dispenser
- Salt dispenser(Model Depending)
- Upper basket track latch
- Drying Unit: This system provides better drying performance for your dishes.
4.2 Technical specifications
| Load capacity | 14 place settings |
| Permissible water pressure | 43.5-145psi (0.3 - 10 bars) |
| Electrical connection | 120 V (volts), 12 A (amps), 60Hz (hertz) |
| Total power | 1400(W) |
| Heater power | 1100 W (watts) |

NOTICE: Because we continually strive to improve our products, we may change our specifications and design without prior notice. This device corresponds to the following directives:
UL 749 Household Dishwasher directive.
5. BEFORE USING THE APPLIANCE
5.1 Preparing your Dishwasher for first use
- Make sure the electricity and supply water specifications match the values indicated in the installation instructions for the machine.
- Open the door of the dishwasher.
- Remove all packaging material inside the machine.
- Set the water softener level. (See chapter of setting the water softener))(model depending)
- Set the rinse aid dosage (See chapter of filling the rinse-aid and setting)
- Fill the salt container (see chapter of filling the dishwasher salt dispenser) (model depending)
• Fill the rinse aid compartment. (See chapter of filling the rinse aid and setting)
- Place the dishes in accordance with the instructions in the user manual.
- Put adequate amount of detergent into the detergent dispenser. (See chapter of filling the detergent)
- Make sure that the upper and lower impellers rotate freely.
- Select program according to amount of dirt
- Close the door of the dishwasher.( Push the baskets in. Then lift the door upwards and push until it clicks into position)

CAUTION: To prevent injuries, ensure that your hand is not jammed or crushed between the door and appliance

WARNING: While the appliance is running if you open the door all functions are automatically interrupted

CAUTION: There may be a escape of hot steam when you open the door of your machine. Be careful of getting injured.
5.2. Setting the Water Softener (Model Depending)
Dishwasher needs soft water for good cleaning results. Hard water results in a build-up of calcium deposits on dishware and in the dishwasher. Your dishwasher has a special water softening system to remove the hardness of the tap water. Setting this system correctly will increase the washing effectiveness.
Water supplies with a hardness level higher than 9\ °f (French Water Hardness) needs to be softened.
If the hardness level of the water that you use is above 9° f (French standard for water hardness) or if you are using well water, than it is recommended to use filter and water purification devices.
The dishwasher is programmed at the factory setting level 1 (inactive) of water hardness. If this setting corresponds to the hardness of your water, you do not need to do anything more.
The dishwasher must be programmed for the water hardness in your area.
To find out the hardness level of water in your area, contact your local Water Board or Determine water hardness level by the help of test strip provided.

WARNING: If you move to a different location, the level of water hardness will possibly be different. It is essential to setting again the water hardness in order to obtain optimum washing efficiency.
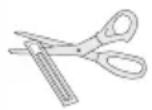
Test Strip(If available)
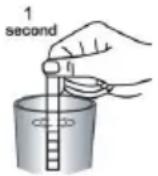
The washing effectiveness of your machine depends on the softness of the tap water. For this reason, your machine is equipped with a system that reduces the hardness in mains water supply. The washing effectiveness will increase when the system is correctly set. To find out the water hardness level of water in your area, contact your local water board or determine water hardness level by using the test strip(if available). Follow step in the image when use the test strip.
| Run water through tap (1min.) | Keep the strip in water (1sec) | Shake the strip. | Wait (1min.) | Set the hardness level of your machine. | |
 |  |  |  |  | 123456 |

WARNING: If the water is well water or has a hardness level above 9° f, we recommend that you use filter and refinement devices.
Water Hardness Table
| Level | German °dH | French °f | British °E | Indicator |
| 10-5 | 0-9 0-6 L1 is shown on display. | |||
| 2 6-11 | 10-20 7-14 L2 is shown on display. | |||
| 3 12-17 | 21-30 15-21 L3 is shown on display. | |||
| 4 18-22 | 31-40 22-28 L4 is shown on display. | |||
| 5 23-31 | 41-55 29-39 L5 is shown on display. | |||
| 6 32-50 | 56-90 40-63 L6 is shown on display. |
Adjust the water hardness setting of your machine according to the level specified on the test strip(if available.

NOTE: Hardness level is adjusted to level 1 as a factory setting.

NOTE: If you only ever use combination products in your dishwasher, you can change the softener level.
SALT INDICATOR
Please check the salt indicator on the control panel to see whether there is adequate amount of softening salt in the dishwasher or not. You need to refill the salt reservoir with salt whenever salt warning indicator appears on the control panel of your machine. In order to add salt to the machine,
- Open the door of the machine,
- Press and hold Start/Pause + On/Off key for 3 seconds,
- The machine gives an audible warning when it is ON,
- Then, press and program Selection + Cancel key until "SL" is represented on the display,
- The amount of Salt is adjusted by pressing program Selection + Cancel key,
- After the adjustment, turn off (by pressing Start/Pause + On/Off key) the machine to save the selected salt amount.
5.3 Filling the Dishwasher Salt Dispenser (Model Depending)
WARNING: Culinary and table salts do not dissolve in water easily, using these kind of salts will damage water softener system in your machine.
NOTE: Machine can only be used by special dishwasher salt to soften the water. Do not use any small grained or powdered type of salts which can easily soluble. Using any other type of salt can damage your machine. The manufacturer is not liable for damages resulting from the use of the wrong type of salt
WARNING: Dishwasher detergent will damage the softener assembly. Do not fill the salt container with dishwasher detergent.
WARNING: If the water in your area is very soft and consistently lower than 9°f (French Water Hardness) you do not have to add dishwasher salt.

- To put softener salt, first remove the lower basket and then open the salt compartment cap by turning it counter clockwise.(fig 1-2)
- Add first fill the compartment with 1kg salt and water (fig 3) at overflowing level If available, using the funnel (fig 4) provided will make filling easier.
- Refit the cap and close it.
WARNING: Starting the machine with any wash program is recommended after filling the salt container, in case of any spilled salt solutions. This prevents damage to the machine
NOTE: Fill the salt compartment with water only for the first time you fill the salt compartment
NOTE: If the salt warning lamp on the control panel illuminates fill the salt compartment with salt again.
WARNING: Use softener salt specifically produced for use in dishwashers
WARNING: If you switch to using detergent that does not contain salt or rinse aid, it is important to remember to add dishwasher salt and rinse aid.
5.4. Salt Refill Indicator (Model Depending)
WARNING: If the salt indicator light comes on during a program you need to wait until the end of the program to fill the salt reservoir with dishwasher salt.
After the salt reservoir has been filled, the refill indicator may still be lit up if the salt concentration has not yet reached the correct level. It will go out when the correct concentration is reached.
NOTE: The salt refill indicator will be turned off if you have programmed the dishwasher for a water hardness below 9 °f.
5.5. Detergent usage
⚠ WARNING: Use a detergent specifically designed for use in domestic dishwashers.
You can find powder, gel, and tablet detergents in the market that have been designed for household dishwashers.
Detergent should be put into the compartment prior to starting the machine.
Add the proper detergent for the selected program to ensure the best performance. Use less detergent if the dishes are only lightly soiled. Using excess detergent can leave a film on dishes and in the dishwasher resulting in poor wash performance. Do not use detergent tablets for shorter wash cycles. The tablet may not dissolve completely, causing detergent residue on dishes and inefficient cleaning
NOTE: The amount of detergent needed depends on the cycle, load size, and soil level of dishes. Too much detergent in soft water may cause glass corrosion and does not dissolve in water.
⚠ WARNING: Do not use too much detergent if your water supply is soft.
⚠ WARNING: Keep your detergents in cool, dry places out of reach of children. See the detergent manufacturer's instructions for further information.
⚠ WARNING:Detergent tablets do not fully dissolve with short programmes.
To prevent detergent residues on the tableware, we recommend that you use the tablets with long programmes.
WARNING: Do not use detergent in Rinse cycle
If you do not know the hardness of your water supply, use 15 ml / 3 tsp detergent. Increase the amount of detergent if you see white water marks especially on the surface of the glassware.
Should you need more information concerning the detergent you will use, contact detergent manufacturers directly.
Check that the detergent dispenser is empty after the completion of each wash program
5.6. Filling the Detergent
NOTE: The dispenser should be refilled just before the start of each program.
- Push the latch to open the detergent container as shown in the image( fig 1).


-
Pour/put the detergent into the dispenser. (fig 2)
-
Detergent pod has level lines inside. It is possible to measure the right detergent amount using these lines. Detergent pod can take totally 40 cm3 detergent. Open the dishwasher detergent and pour into the larger compartment 25 cm3 if your dishes are heavily soiled or 15 cm3 if they are less soiled. You may have to add more detergent into your machine, depending on the degree of soil and on the water hardness level in your area.
-
Close the flap of dispenser.

NOTE: The flap is always open at the end of a program.

WARNING: Follow instructions on the package of the detergent when using liquid dishwasher detergent, concentrated powder detergent, or tablet detergent

WARNING: Amounts may vary if you use liquid or concentrated powder detergent. Tablet detergents should be placed in detergent container.

WARNING: Deviations are possible depending on how dirty the dishes are and how hard the water is in your location.

WARNING: Use only the proper amount of detergent. Continued use of too much detergent may cause machine damage.
5.7. Using combined detergents
Detergent manufacturers also manufacture combined detergents that are called 2 in 1 – 3 in 1-5 in 1...
The 2 in1 detergents contain detergent+ salt or rinse aid. While using the 2 in 1 detergents, it should be observed which functions the tablet consists of.
The other tablet detergents also have detergent+rinse aid +salt+various extra functions.
Generally, combined detergents produce sufficient results under certain usage conditions only. Such detergents contain rinse aid and/or salt in preset amounts.
Points to consider when using this type of products:
• Always make sure to check the specifications of the product you will use or whether or not it is a combined product.
- Check if the detergent used is appropriate for the hardness of mains water that machine is appertaining to.
- Observe the instructions on packagings when using such products.
- If such detergents are in the form of tablets, never put them into the interior section or the cutlery basket of the dishwasher. Always put the tablets into the detergent compartment in the detergent dispenser.
- They produce good results for certain types of usage only. If you are using this type of detergents, you need to contact the manufacturers and find out about the suitable conditions of use.
- When the conditions of use of such products and the machine settings are appropriate, they ensure savings in salt and/or rinse aid consumption.
- Contact the detergent manufacturers if you are not obtaining good wash results (if your dishes stay calcareous and wet) after having used 2 in 1 or 3 in 1 detergents. The scope of warranty for your machine does not cover any complaints caused by the use of these types of detergents.
Recommended usage: If you want to obtain better results while using combined detergents, add salt and rinse aid into your machine and adjust the water hardness setting and the rinse aid setting to the lowest position.

CAUTION: Solubility of the tablet detergents produced by different companies can vary depending on the temperature and time. Therefore, it is not recommended to use such detergents in short programs. It is more suitable to use powder detergents in such pro-grams.
Warning: Should any problem, which you have not encountered before, arise with the use of this type of detergents, contact the detergent manufacturers directly.
When you give up using combined detergents
- Fill the salt and rinse aid compartments.
- Adjust the water hardness setting to the highest position and run an empty-wash.
- Adjust the water hardness level.
- Make the suitable rinse aid setting.
5.8.Rinse-aid usage
Rinse-aid makes dishes sparkle and helps them to dry without spotting. Rinse-aid is required for stain-free utensils and clear glasses.
(!)Use only rinse-aid for domestic dishwashers..
(!)Filling the rinse aid reservoir with detergent will damage the reservoir. Only pour rinse aid formulated for residential dishwashers into the reservoir

NOTE: When the Rinse Aid indicator lights up, the rinse aid reservoir contains sufficient rinse aid for 2 - 3 programs only. When using “Tab” detergents rinse aid is not needed.
5.9 Filling the rinse-aid and setting

1) To fill the rinse aid compartment, open the rinse-aid compartment cap(Fig.A)
2) Fill the compartment with rinse aid to the MAX level and then close the cap. Be careful not to overfill the rinse aid compartment and wipe up any spills.
3) Close the cap until it click. Otherwise water can enter the rinse aid reservoir during a program.
In order to change the rinse aid level, follow the below steps before turning on the machine
In order to add rinse aid to the machine,
- Open the door of the machine,
- Press and hold Start/Pause + On/Off key for 3 seconds,
- The machine gives an audible warning when it is ON,
- Then, press and hold program Selection + Cancel key until "rA" is represented on the display,
- The amount of rinse aid is adjusted by pressing program Selection + Cancel key,
- After the adjustment, turn off (by pressing Start/Pause + On/Off key) the machine to save the selected rinse aid amount

NOTE: If the dishes are not drying properly or are spotted, increase the level. If blue stains form on your dishes, decrease the level.
| Level | Brightener Dose Indicator | |
| 1 | Rinse-aid not dispensed r1 is shown on the display. | |
| 2 | 1 dose is dispensed r2 is shown on the display. | |
| 3 | 2 doses are dispensed r3 is shown on the display. | |
| 4 | 3 doses are dispensed r4 is shown on the display. | |
| 5 | 4 doses are dispensed r5 is shown on the display. |
6. LOADING YOUR DISHWASHER
If you properly place your dishes into the machine, you will be using it in the best way in terms of energy consumption, washing and drying performance.
You can load into the lower basket such round and deep items as pots with long handles, pot lids, plates, salad plates, cutlery sets. The upper basket has been designed for tea plates, dessert plates, salad bowls, cups and glasses. When placing long stem glasses and goblets, lean them against the basket edge, rack or glass supporter wire and not against other items. Do not lean long glasses against one another or they cannot remain steady and may receive damage. It is more appropriate to locate the thin narrow parts into the middle sections of baskets. You can place spoons among the other cutlery sets in order to prevent them from sticking to one another.
You are recommended to use the cutlery grid in order to obtain the best result. To avoid any possible injuries, always place such long-handle and sharp-pointed dishes as serving fork, bread knife etc. with their sharp points facing down or horizontally on the baskets.

WARNING: Place your dishes into your machine in a way that they will not prevent the upper and lower spray arms from spinning.

NOTE: Place all large and very dirty items in the lower rack

WARNING: Do not put in the appliance items that can absorb water (sponges, household cloths).

NOTE: Place all containers such as cups, glasses and pots into the dishwasher with the opening facing downwards (so that no water can collect).
NOTE: Dishes and cutlery should not be placed above each other.
NOTE: Do not overload your dishwasher and pay attention to manufacturer instructions regarding dishes which are appropriate for use in a dishwasher. Only with suitable dishes (mentioned in section 5) will you obtain optimal washing results with a sensible use of energy
High temperature water and dishwasher detergent may form a chemical synthesis that can damage certain items.
WARNING: Be careful when loading and unloading sharp items. Load sharp knives with the handles up to reduce the risk of personal injury.
Follow the below steps before loading dishwasher.
- Open the door
- Remove coarse food leftovers from tableware.
- Load the dishwasher.
NOTE: While the appliance is running if you open the door all functions are automatically interrupted. Once the door is closed functions will continue to work.
Upper rack ( Model Depending)
Load the upper rack with dessert plates, cups, glasses etc.
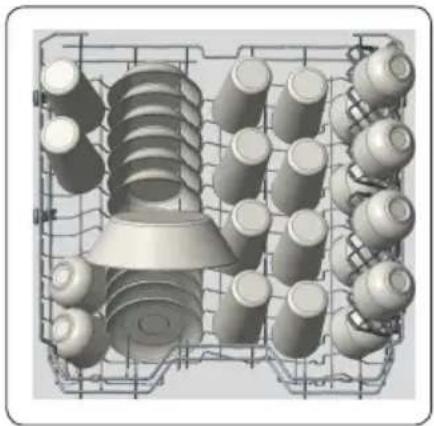
Top rack load pattern for 10 place settings.

Additional Loading Pattern 12 place settings
6.1. Lower rack ( Model Depending)
You can load into the lower basket such round and deep items as pots with long handles, pot lids, plates, salad plates, cutlery sets. The lower rack should not be used for small items such as cups, wine glasses, or small plates.
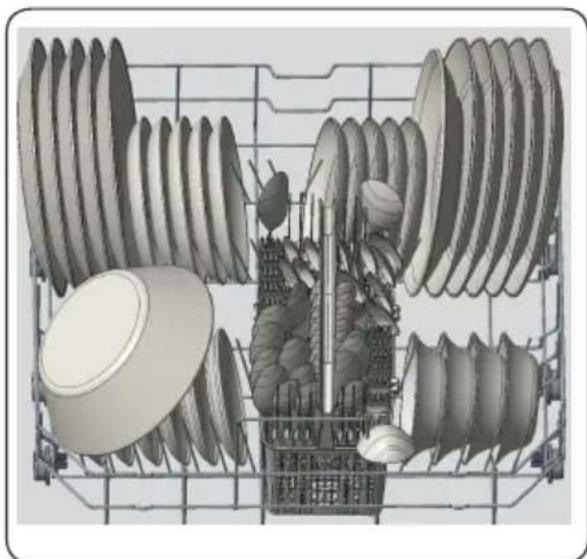

Bottom rack load patterns for 10 place settings.
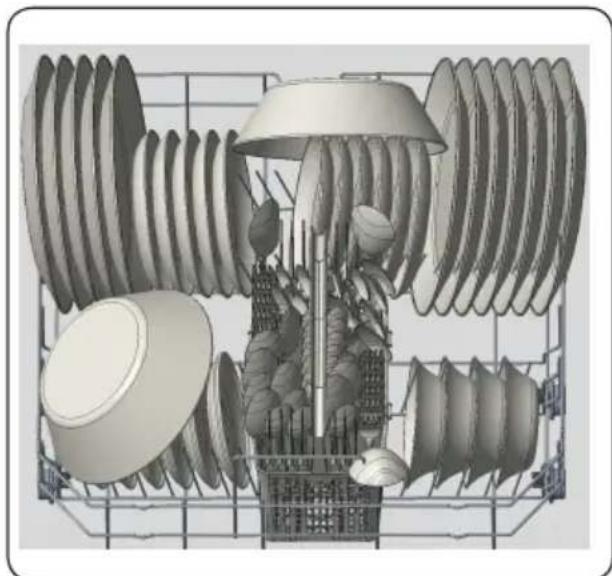
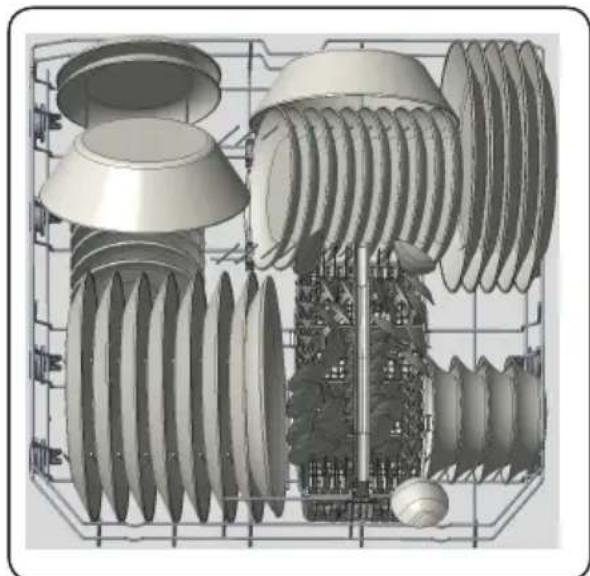
Additional Loading patterns12 place settings
NOTE: Place all large and very dirty items in the lower rack.
WARNING: Large knives and other utensils with sharp tips and edges must be placed horizontally into the upper rack due to risk of injury. Other smaller knives and sharp utensils should be placed with sharp side down in the cutlery basket.

NOTE:
Make sure that large items do not interfere with the rotation of the spray arms, and do not prevent the detergent dispenser from opening.
Loading cutlery basket (Model Depending)


WARNING: Sharp cutlery may have shifted position during the wash operation and can be also wet and slippery. Carefully remove them to prevent injury.

NOTE: Small items should therefore be placed in the cutlery tray or cutlery basket (model depending). Because small items can fall through the holders from the baskets.
6.2. Incorrect Loads


Top Basket
Rack with height adjustment
These racks are designed to increase the capacity of top basket. You can place your cups and glasses on these racks. Thanks to adjustable feature of the racks, you can place glasses of different sizes under the racks.
Height adjustment plastics mounted on the basket allow racks to be in 2 different positions.
You can also place long knives, forks and spoons on these racks horizontally for them not to block the movement of spray arms


Top basket horizontal wire located on top basket allows you to place your plates and bowls where required. Also you can wash kitchenware such as pan or pot by closing the horizontal wire.


NOTICE: Bringing the wires to the horizontal position by holding them from the tips may cause them to bend. Therefore, it will be appropriate to bring the wires in the middle to horizontal or vertical position by holding them from their stems and pushing.
The basket height adjustment mechanism on the top basket of your machine is designed to let you adjust the height of your top basket upwards or downwards, without removing it from your machine when it is full, and create large spaces at the top or bottom area of your machine as needed. Basket of your machine is set to upper position in factory settings. In order to raise your basket, hold it from both sides and pull it upwards. In order to lower it, hold it from both sides again, and leave it. In loaded basket adjustment mechanism, make sure that both sides are in the same position. (up or down)
NOTICE: Make sure that both levers catch in the same height position.
Height Setting (Model Depending)
1) Height Setting - when basket is empty (model depending)
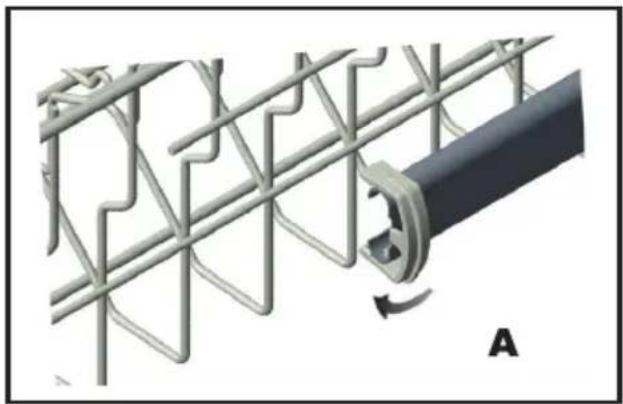
In certain models, the height setting of the upper rack may be changed using the wheels which are present at two height levels.

- Release the latches on both the right and left tracks of the upper rack by turning them to the outside A.
- Pull out the rack completely B.
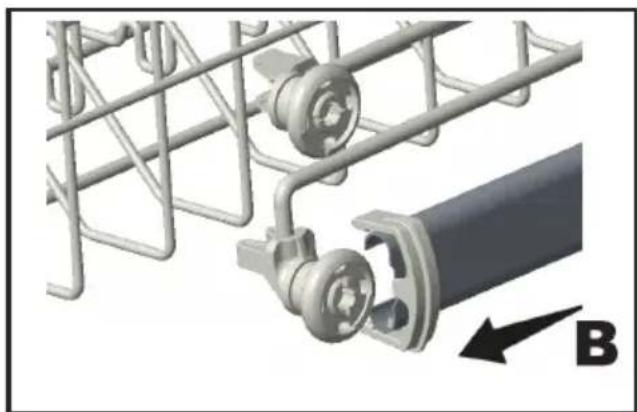
- Place the rack into the tracks again at the desired height C.
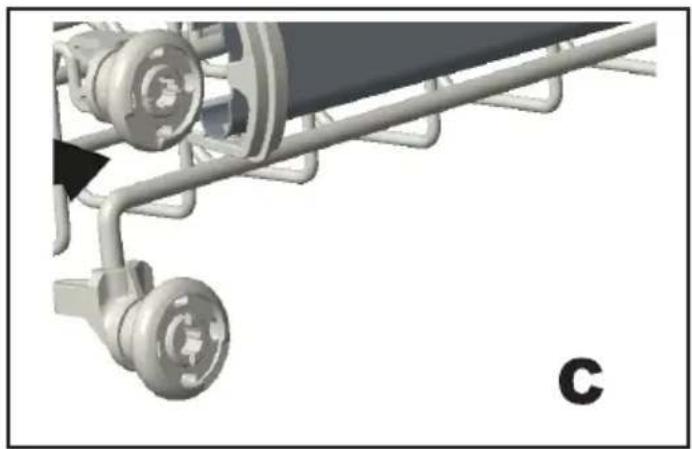
- Push the latches back into the correct position.
2) Height Setting - when basket is filled (model depending)
The upper basket includes a mechanism which enables the height of the basket to be adjusted up (1) or down (2) without having to remove the basket. Hold the basket on both sides and pull it up or push it down, ensuring both sides of the upper basket are in the same position.


Lower Basket Folding Racks
Folding racks consisting of four parts that are located on the lower basket of your machine are designed in order to let you place big items easier such as pots, pans, etc. If requested, each part can be folded separately, or all of them can be folded and larger spaces can be obtained. You can use folding racks by raising them upwards, or by folding.


Silverware Basket ( (Model Depending)
Silverware basket is designed to wash your dishes such as knife, fork, spoon, etc. in a cleaner manner.
Since the cutlery basket can be moved ,you can create a wider space while placingyour dishes to the lower basket and freeup space for your dishes in different sizes.

Upper Cutlery Basket (Model Depending)
The upper cutlery basket is designed for you to place forks, spoons and knives, long dippers and small items.
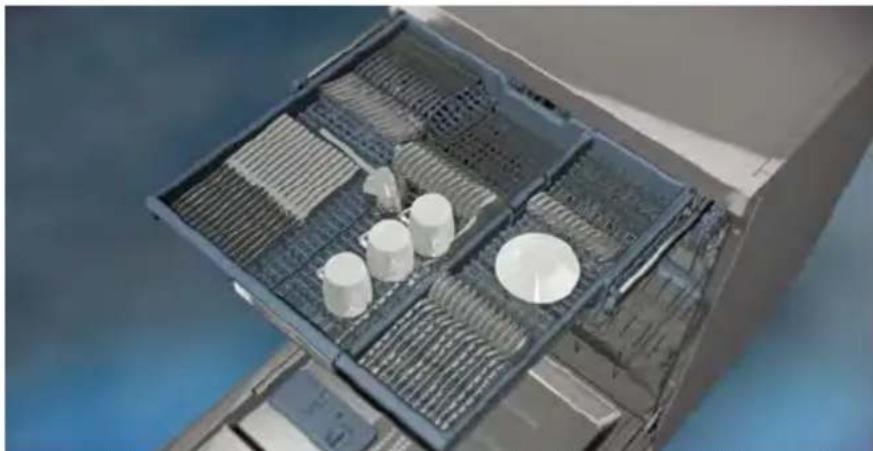
Because it can easily be taken out of the machine, it allows your dishes to be taken out of the machine along with the basket after washing.
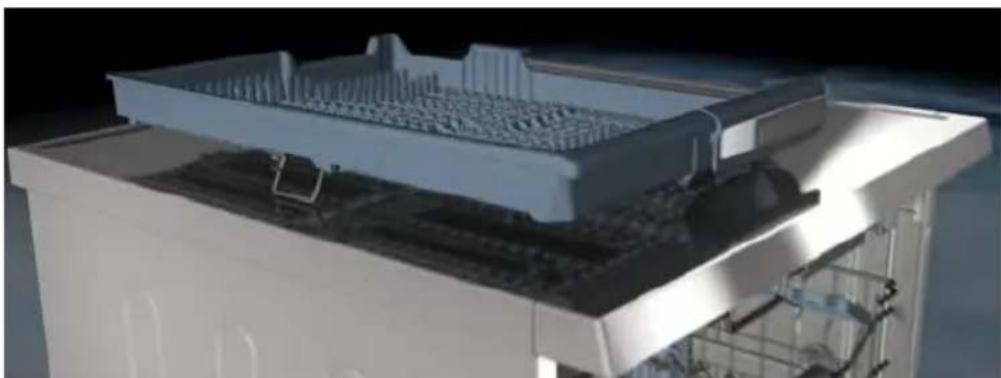
The Upper Cutlery Basket is composed of two pieces; if you need to make space for the dishes in the upper basket, you can take out the left or right part of the upper cutlery basket in order to obtain more space.


Warning: Knives and other sharp objects must be placed horizontally in the cutlery basket.
7. PROGRAMS and OPTIONS TABLE
| Programs | Durations (min) | Descriptions | |
| Auto | DIRTY | 155 | This program automatically adjusts the temperature and the quantity of water, the energy consumption and the program duration. |
| CLEAN | 110 | ||
| Intensive plus | 165 | Suitable for heavily soiled dishes that are kept waiting. | |
| Intensive | 130 | Suitable for heavily soiled dishes | |
| Super | 50 | Suitable for normally soiled daily dishes with faster program. | |
| Daily | 117 | Suitable for normally soiled daily dishes. | |
| Regular | DIRTY | 145 | Standard program for daily, regular or typical use to completely wash a load of normally soiled dishes. |
| CLEAN | 122 | ||
| Delicate | 90 | Suitable for lightly soiled delicate dishes. | |
| Rinse | 15 | Suitable to rinse dishes that you plan to wash later. | |
| Options | ||||||
| Half Load | Extra Rinse | Extra Dry | Hi-Temp | Sanitize | ||
| Programs | Rinse | √ | x | xxxx | ||
| Delicate | √ | √ | √ | x | x | |
| Regular | √ | √ | √ | √ | √ | |
| Daily | √ | √ | √ | √ | √ | |
| Super | √ | √ | √ | √ | √ | |
| Intensive | √ | √ | √ | √ | √ | |
| Intensive Plus | √ | √ | √ | √ | √ | |
| Auto | √ | √ | √ | √ | √ | |

NOTE: The program duration may change according to the amount of dishes, the water temperature, the ambient temperature and selected additional functions.

NOTE: The energy-usage label is based on the "Regular" program. This program is most efficient in terms of its combined energy and water consumption at cleaning mally soiled dishes.
- Only use powder detergent for short programmes.
- Short programmes do not include drying.
- To assist drying, we recommend slightly opening the door after a cycle is complete.
- Only use powder detergent for short programmes.
- Short programmes do not include drying.
• To assist drying, we recommend slightly opening the door after a cycle is complete
Water Temperature
Hot water is needed for best dishwashing and drying results. Water entering dishwasher should be at least 120° F ( 49° C) to give satisfactory results.
To check water temperature entering dishwasher:
- Turn on hot water faucet nearest dishwasher for several minutes to clear cool water from pipes.
- Hold a candy or meat thermometer in stream of water to check the temperature.
-
If temperature is below 120°F (49°C), have a qualified person raise the hot water heater thermostat setting.
-
OPERATING THE PRODUCT

- Display
- On/Off Key + Start/Pause Key
- Program Selection Key + Cance Key
- Extra Function Key
i. Sanitize Function
ii. Extra Rinse Function
iii. Extra Dry Function
5.Delay Timer Key
- Options Key
a. Hi-Temp Function
b. Half Load Function
7.Power On Indicator
8. Rinse Aid Indicator
9.End of program Indicator
8.1. KEYS
On/Off Key
This key is used as On/Off key if the corresponding button is held down for 3 seconds. Otherwise, it can be used as Start/Pause key. It is used to turn on or turn off the machine. Machine will turn on with Regular program in On mode and the number and the duration of the regular program will appear on the display. Each of program number and the duration will sequentially represent for 2 seconds. In Off position, the display will turn off.
Start/Pause Key
It is used to start or pause a selected program or function.
Program Selection/Cancel Key
They are used to select the washing program you determined from the programs table. The cancel key is activated when Program Selection/Cancel Key is held down for 3 seconds.
Delay Timer Key
It should be pressed to make the time delay settings.
8.2. Preparing the machine
- Open the door of the dishwasher.
- Place the dishes in accordance with the instructions in the user manual.
- Make sure that the upper and lower impellers rotate freely.
- Put adequate amount of detergent into the detergent dispenser.
- Check if the Salt and Rinse Aid indicators light and add salt and/or rinse aid if needed.
8.3. Program Selection
- Press the On/Off key to turn on your machine. Note that the door of the dishwasher is OPEN position.
- Refer the "Programs Table" to deter-mine a washing program suitable of your dishes.
- Press program selection key until the number of the program you selected
appears on the display.
In order to start the selected program, Start/Pause key must be pressed and the door of the diswasher must be closed within 4 seconds after the Start/Pause key is pressed.
If the door is not closed within 4 seconds, the machine will not start. In this case; to start the selected program, the door must be opened, the Start/Pause key must be pressed and the door must be closed again within 4 seconds after the Start/Pause key is pressed.
If the door of the machine is opened when the machine is running, the machine stops working. If the door is closed back within 4 seconds after the door is opened, the machine will continue.
If the door stays open for more than 4 seconds, Start/Pause key must be pressed and the door of the diswasher must be closed within 4 seconds after the Start/Pause key is pressed.
8.4. Auxiliary functions
Washing programs of your dishwasher are designed to obtain the best cleaning effect, considering the type of the soil, soiling degree and properties of the dishes to be washed. Auxiliary functions are provided in order to enable you to save time, water and energy and to perform a more comfortable washing with conditions specific to you.
i. Auxiliary functions may cause changes in the program duration.
ii. Auxiliary functions are not suitable for all washing programs. Indicator of the auxiliary function that is not compatible with the program will not be active. Besides, the machine gives aural warning via buzzer.
To add auxiliary function to the program:
- Select the desired washing program by pressing the program Selection key.
- In the selected washing program, if auxiliary function is selected, the corresponding indicator will be active. If the Extra Function key is pressed again, the corresponding indicator of another auxiliary function will be active.
- The selection of the auxiliary function will be cancelled when you press the Extra Function key six times.
Sanitize Function
Sanitize function raises the water temperature in the final rinse.
i. At the end of a successful sanitization, “--” is displayed on the display and End of program indicator will be active.
ii. "Available programs and options are indicated on program Table and Options
Table charts
Extra Rinse Function
If this option is selected, the machine performs the extra cold rinse for the dishes.
Extra Dry Function
The machine changes the water temperature from the value described for each different program and the extra dry is performed.
Half Load Function
It is used to operate the machine without loading it completely.
- Load your dishes in the machine as you like.
- Turn the machine on with On/Off key.
- Select the desired program and press the Half Load key. The Half Load indicator will light on the display.
- Press Start/Pause key to start the selected program and close the door of the machine.
- With the Half Load function you can save power while using the lower and/or upper baskets of the machine.
Hi-Temp Function
When this option is selected, both the water temperature and the washing time are increased.
8.5. Programming the washing time
Delay Timer
If an economical electricity tariff is applied in your region, you can use the Delay Timer function to wash your dishes during appropriate hours. You can delay the start of the selected program until 19 hours. Delay Timer cannot be set after the program starts.
- Press the Delay Timer function key after selecting the washing program and other auxiliary functions.
- Once you press the Delay Timer key, Display will show "1h" and Display will show program number, program duration and delay time alternately for 2 seconds.
- Set the desired time by pressing the Delay Timer key. Time will increase with the increments of 1 hour every time you press the key.
- In order to start the selected program with delay, Start/Pause key should be pressed and the door of the dishwasher must be closed within 4 seconds.

NOTE: The use of Delay Timer has a special case.
a. Assume that you have selected a program with delay and pressed Start/Pause key. After a length of time, you have opened the door of the machine. If the door of the machine is closed within 4 seconds, the machine resumes on for the duration of delay timer. This is also valid if the door of the machine is not closed within 4 seconds.
Changing the settings while Delay Timer is enabled
While the Delay Timer function is activated, you cannot make changes in the washing program, auxiliary functions or the duration of delay time. i. Program and auxiliary functions cannot be set/changed after the program has started.
To cancel the Delay Timer function
- Open the door of the dishwasher
- Press and hold program Selection + Cancel key for 3 seconds
- When the program Selection + Cancel key is pressed and held, "1" appears on the display. At the end of the cancellation process, "--" appears on the display and delaying process is cancelled.
i. You can select and start a new program following the cancellation of Delay Timer function.
ii. Delay Timer function can not be set after the program starts.
8.6.Starting the Program
First of all, open the door of your machine and in order to start your machine after selecting the program and auxiliary functions, Start/Pause + On/Off key. Once the program starts, the estimated time remained to the end of the program will appear on the display.
i. Your machine performs water softening depends on model hardness level of the supply water (Model depending). Remaining time displayed towards the end in some programs can be different from the time indicated at the beginning due to this process. The total time can also change while the program is running depending on the ambient temperature where your machine is installed, temperature of the supply water and amount of the dishes.
ii. Pay attention not to open the door of the machine when it is running. Stop the machine by pressing Start/Pause key as soon as the door of the machine is opened. In other situation, the machine will stop automatically after 4 seconds when the door of the machine is opened and any key is not pressed. To start a program, Start/Pause key is pressed and close the door of the machine within 4 seconds.
iii. If the door is opened while the machine is running, the machine will switch to the standby mode. Press Start/Pause key and close the machine door within 4 seconds, then the program will resume.
8.7. Child (key) Lock
Not Available
8.8. Cancelling the program
- Press program Selection + Cancel key for 3 seconds to cancel the program.
- After 3 seconds, "1" will show on the display. For a couple of minutes the machine will fulfill the necessary operations required to cancel the program.
i. There might be residues of detergent or rinse aid left in the machine and/or on the pieces being washed depending on the step the program you have cancelled was in.
8.9. Salt Indicator(Model Depending)
Please check the salt indicator on the control panel to see whether there is adequate amount of softening salt in the dishwasher or not. You need to refill the salt reservoir with salt whenever salt warning indicator appears on the control panel of your machine.
8.10. Rinse aid indicator
Please check the rinse aid indicator on the control panel to see whether there is adequate amount of rinse aid in the dishwasher or not. You need to refill the rinse aid reservoir with rinse aid whenever rinse aid warning indicator appears on the control panel of your machine.
8.11. End of program
End of program indicator will light up continuously when the washing pro-
gramme is over. 1. Open the door of the machine.
- Press Start/Pause + On/Off key to turn off your machine.
- Close the tap.
- Unplug the machine from the socket.
i. Leave your dishes in the machine for about 15 minutes to cool down after they are washed. Your dishes will dry in a shorter time if you leave the door of your machine ajar during this period. This process will increase the drying effectiveness of your machine.
8.12. Water cut-off warning
If mains water is cut or water inlet tap is turned off the machine can not take water in and "F5" will flash continuously on the display. As long as the problem continues, the washing program is stopped and water inlet is checked regularly by the user. If the water inlet is provided, the machine gets ready to start a new program.
8.13. Overflowing warnLng
If the machine intakes too much water or there is leakage at any of the components then the machine will detect this and "F1" will flash on the display. As long as the overflowing continues, safety algorithm will be active and try to discharge the water. If overflowing stops and safety is assured, "F1" will disappear. If "F1" does not disappear, there is a permanent fault. In this case, the authorized service should be contacted.
9.MAINTENANCE AND CLEANING

WARNING : Before cleaning or carrying out maintenance, switch off the appliance, disconnect the mains plug and turn off the water tap.
Your dishwasher can only be repaired by an authorized service agent. Do not try to repair your machine unless any recommendation by this manual

WARNING : All surfaces are susceptible to scratching. Contact with unsuitable cleaning agents can alter or discolor all surfaces.

WARNING: Keep the floor around your dishwasher clean and dry to prevent any possible injury. We recommend to keep your dish washer clean, empty and door cracked open to allow air to circulate in case of any extended unused time.
Dishwasher door can be damaged by abrasive cleaners, scouring pads, abrasive cloths.
Cleaning the machine in regular intervals prolongs the machine's service life.
Oil and lime may accumulate in the machine's washing section. In case of such accumulation; -Fill the detergent compartment without loading any dishes into the machine, select a program that runs at high temperature, and start the machine. In case of insufficiency, use special cleansing material available in the market. (Cleansing material produced special to machines by detergent producers.)
Cleaning the seals in the machine door,
-To clean any accumulated residues in the door seals, wipe the seals regularly by using a dampened cloth.
Cleaning the machine,
Clean the filters and spray arms at least once a month.
Unplug your machine and turn off its tap before starting the cleaning.
Do not use hard materials when cleaning your machine. Wipe with a fine cleaning material and a dampened cloth.
Filters
Check if any food wastes have remained on the coarse and fine filters. If any food wastes are left, remove the filters and clean them thoroughly under the water tap.
Filter
a. Micro Filter
b. Coarse Filter
c. Metal/Plastic


9.1. Spray arms
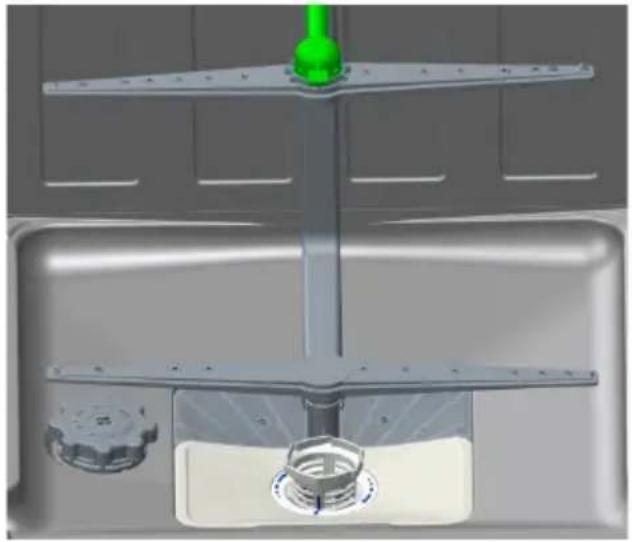
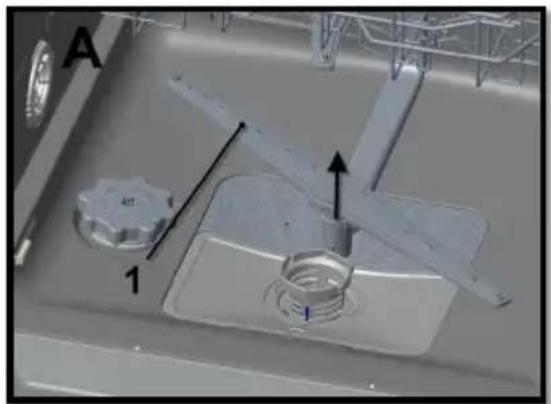
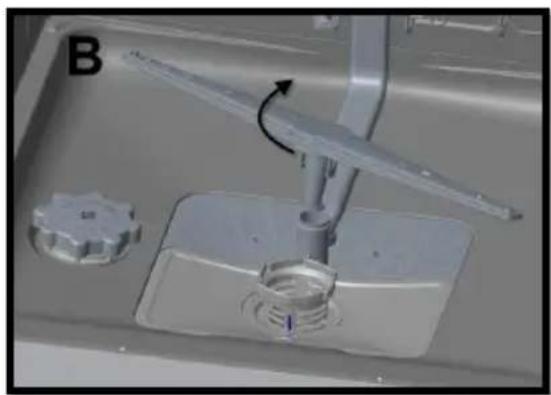
Check whether or not the holes for the upper and lower spray arms are clogged. If there is any clogging, remove the spray arms and clean them under water.
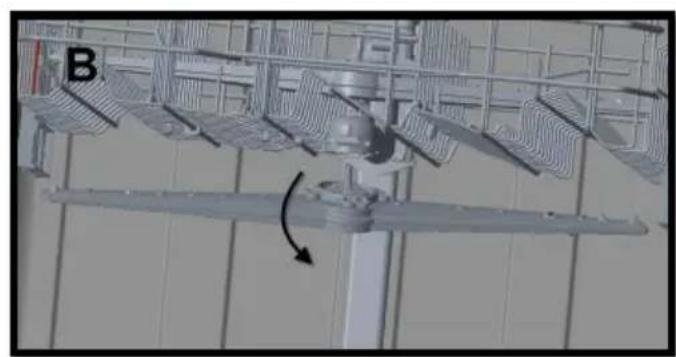
You can remove the lower spray arm by pulling it upwards, while the upper spray arm nut can be removed by turning the nut to the left.
Be sure that the nut is perfectly tightened when refitting the upper spray arm.
Hose filter
Water is prevented by the inlet hose filter so as to avoid any damage to your machine because of any contamination (sand, clay, rust etc. that might be occasionally carried in through the mains water supply or the indoor plumbing, and to forestall such complaints as yellowing and formation of deposits after washing. Check the filter and the hose from time to time and clean them if necessary. To clean the filter, first turn off your tap and then remove the hose. After removing the filter from the hose,
clean it under the tap. Insert the cleaned filter back into its place inside the hose. Refit the hose.
9.2. Cleaning the impellers
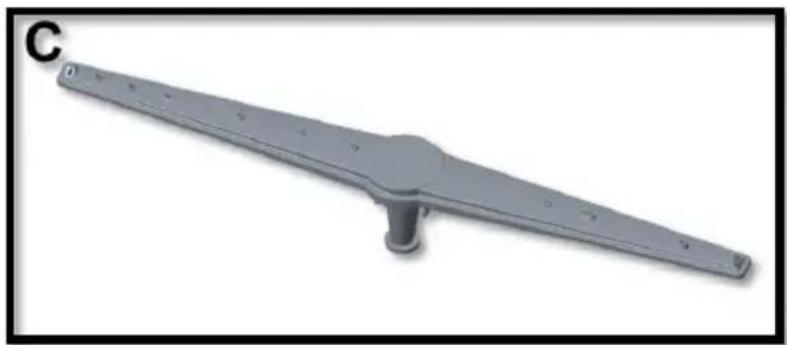
Clean the impellers at least once a week in order for the machine operates efficiently. LOWER IMPELLER
Check if the holes on the lower impeller (1 are clogged. If they are clogged, remove and clean the impeller. Pull the lower impeller up to remove it (A, B.
UPPER IMPELLER
Check if the holes on the upper impeller (1 are clogged. If they are clogged, remove and clean the impeller. Turn its nut to left to re-move the upper impeller (A, B. Make sure that the nut is tightened well when installing the upper impeller.


SHOULD NOT BE WASHED IN YOUR DISHWASHER
Rust-sensitive steel parts like iron and cast iron that can rust and stain other utensils and damage the interior stainless steel liner of the dishwasher and void the warranty. Do not wash copper, brass, pewter, bronze or tin.
- Cutlery with wooden or horn handles and cutlery with mother-of-pearl or porcelain handles will deteriorate over time if put in the dishwasher.
- Plastics may lose their shape or color with hot water, please follow the instructions of plastic manufacturers. Be sure that plastic items are marked “dishwasher safe”.
- Glued dishes or cutlery are not suitable for machine washing since certain adhesives may get soft or dissolve with hot water.
- Aluminum may fade over time. Minerals in water and detergent may cause the aluminum to darken or spot.
- Sterling silver articles should not be washed in the dishwasher because they tend to discolor and become dull by dishwasher detergent.
• Silverware and stainless steel items should not be in contact with each other. Mixing these items can cause staining. Remove and hand dry these items immediately when the program ends. - Decorated glasses, porcelain, fine china and china with gold rims are sensitive to machine washing. They may lose their patterns and colors over time.
- Crystal and very fine glassware may become opaque (etch) losing their shine over time. You may prefer to wash them by hand.
- Do not wash sponges or dish cloths in dishwasher.
- Do not wash art and craft articles in dishwasher.
- Disposable plastics and disposable aluminum cannot withstand high temperatures; do not wash them in the dishwasher.

WARNING: If in doubt, wash by hand or follow the instructions from the manufacturer of utensils, dishes, glasses or pots and pans. Do not wash items soiled with cigarette ash, candle wax, varnish, paints or chemicals since they can damage your dishwasher.

WARNING: Empty the lower rack first and then the upper rack. This will avoid water dripping from the upper rack onto dishes in the lower rack.

WARNING: In general, it is not advisable to open the door while the dishwasher is in operation. If the door is opened, a safety device stops the dishwasher. Care should be taken when opening the door immediately following the cycle, as steam may escape.
- TROUBLESHOOTING
| FAULT POSSIBLE CAUSE TROUBLESHOOTING | ||
| The program does not start. | Your Dishwasher is not plugged in. Plug your Dishwasher in. | |
| Your Dishwasher is not switched on. | Switch your Dishwasher on by pressing the On/Off key. | |
| Fuse blown. Check your indoor fuses. | ||
| Water inlet tap is closed. Turn on the water inlet tap. | ||
| Your Dishwasher door is open. Close the Dishwasher door. | ||
| Water inlet hose and machine filters are clogged. | Check the water inlet hose and machine filters and make sure they are not clogged. | |
| Water remains inside the machine. | Water drain hose is clogged or twisted. | Check the drain hose, then either clean or untwist it. |
| The filters are clogged. Clean the filters. | ||
| The program is not finished yet. Wait until the program is finished. | ||
| Machine stops during washing. | Power failure. Check mains power. | |
| Water inlet failure. Check water tap. | ||
| Shaking and hitting noises are heard during a wash operation. | The spray arm is hitting the dishes in the lower basket. | Move or remove items blocking the spray arm. |
| Partial food wastes remain on the dishes. | Dishes placed incorrectly, sprayed water not reaching affected dishes. | Do not overload baskets. |
| Dishes leaning each another. | Place dishes as instructed in the section on loading your dishwasher. | |
| Not enough detergent used. | Use the correct amount of detergent, as instructed in the program table. | |
| Wrong wash program selected. | Use the information in the program table to select the most appropriate program. | |
| Spray arms clogged with food waste. | Clean the holes in the spray arms with thin objects. | |
| Filters or water drain pump clogged or filter misplaced. | Check the drain hose and filters are correctly fitted. | |
| Whitish stains remains on dishes. | Not enough detergent used. | Use the correct amount of detergent, as instructed in the program table. |
| Rinse aid dosage and/or water softener setting set too low. | Increase rinse aid and/or water softener level. | |
| High water hardness level. Increase water softerner level and add salt. | ||
| Salt compartment cap not closed properly. | Check that the salt compartment cap is closed properly. | |
| Dishes do not dry. | Drying option is not selected. Select a program with a drying option. | |
| Rinse aid dosage set too low. Increase rinse aid dosage setting. | ||
| Rust stains form on the dishes. | Stainless-steel quality of the dishes is insufficient. | Use only dishwasher-proof sets. |
| High level of salt in wash water. | Adjust the water hardness level using water hardness table. | |
| Salt compartment cap not closed properly. | Check that the salt compartment cap is closed properly. | |
| Too much salt spilled in the Dishwasher while filling it with salt. | Use funnel while filling salt to the compartment to avoid spillage. | |
| A poor mains grounding. Consult a qualified electrician immediately. | ||
| Detergent remains in the detergent compartment. | Detergent was added when the detergent compartment was wet. | Make sure detergent compartment is dry before use. |
AUTOMATIC FAULT WARNINGS AND WHAT TO DO
| TROUBLE CODE | POSSIBLE FAULT WHAT | TO DO |
| F5 | Insufficient water | Make sure the water inlet tap is open and water is flowing |
| Separate the inlet hose from the tap and clean the filter of the hose. | ||
| Contact for service if the error continues. | ||
| F3 | Continuous water input | Close the tap and contact for service. |
| F2 | Inability to discharge water | Water discharge hose and filters may be clogged. |
| Cancel the program. | ||
| If the error continues, contact for service. | ||
| F8 | Heater error | Contact for service. |
| F1 Overflow | Unplug the machine and close the tap. | |
| Contact for service. | ||
| FE Faulty electronic card Contact for service. | ||
| F7 Overheating Contact for service. | ||
| F9 Divisor position error Contact for service. | ||
| F6 Faulty heater sensor Contact for service. | ||
11. PRACTICAL INFORMATION
- When the machine isn't in operation:
- Disconnect the plug and close the tap.
- Leave the door slightly open to prevent odour formation.
- Select the dry option to remove water droplets.
- Place dishes in the machine properly to achieve the best energy consumption, washing and drying performance. Please see the program and consumption table for more information.
- Rinse dirty dishes before placing them in the dishwasher.
- Only use the Rinse program when necessary.
- Do not place the machine near a refrigerator because it will reach high temperatures.
- If the machine is located in an area that is at risk of freezing, close the tap, disconnect the inlet hose from the tap and drain the water inside the hose and the machine completely.
Warranty
Porter&Charles products are designed and built to the highest standards.
We expect your appliances to provide many years of trouble free enjoyment.
In the event of an appliance requiring attention, each appliance is covered by a 2 year warranty from the date of purchase.
Refer to warranty policy for complete terms and conditions.
Coverage is for costs of parts and labour for appliances in capital cities & metropolitan areas. We reserve the right to charge directly for handling expenses outside the metropolitan region.
Porter&Charles products are supported by a national service support system.
Call our customer service department for attention.
Please retain your invoice to quote should you require service assistance. This will identify your product for our priority service back-up. Please attach your invoice to this manual for easy future reference. To register your purchase, you can either complete the section below to mail or fax, or register online at www.porterandcharles.ca/warranty-information.
Porter&Charles
871 Cranberry Court
Oakville, ON L6L 6J7
Canada
Toll: 1-866-699-4973
Tel: 905-829-8389
Fax: 905-829-8409
Email: marketing@euro-line-appliances.com
For Service & Parts:
EURO-PARTS
1-866-722-2262
Important: Please record details of your purchase below and mail or e-mail to Porter&Charles
-cut along line
Name: ____ Tel No ____
Address:
City : ____ Prov/State: ____ Postal Code/ZIP: ____
Where purchased: ____ Purchase date: ____
Items purchased:
Serial No's: :
- CONTENTS
- THANK YOU FOR CHOOSING THIS PRODUCT
- INTRODUCTION
- IMPORTANT SAFETY INSTRUCTIONS
- WARNING
- ⚠ WARNING: BEFORE ANY MAINTENANCE OPERATION, DEACTIVATE
- RECYCLING
- INSTALLATION
- TECHNICAL SPECIFICATIONS
- GENERAL APPEARANCE
- BEFORE USING THE APPLIANCE
- 5.1 PREPARING YOUR DISHWASHER FOR FIRST USE
- SETTING THE WATER SOFTENER (MODEL DEPENDING)
- TEST STRIP(IF AVAILABLE)
- WATER HARDNESS TABLE
- SALT INDICATOR
- 5.3 FILLING THE DISHWASHER SALT DISPENSER (MODEL DEPENDING)
- SALT REFILL INDICATOR (MODEL DEPENDING)
- DETERGENT USAGE
- FILLING THE DETERGENT
- USING COMBINED DETERGENTS
- POINTS TO CONSIDER WHEN USING THIS TYPE OF PRODUCTS
- WHEN YOU GIVE UP USING COMBINED DETERGENTS
- 5.8.RINSE-AID USAGE
- 5.9 FILLING THE RINSE-AID AND SETTING
- IN ORDER TO CHANGE THE RINSE AID LEVEL, FOLLOW THE BELOW STEPS BEFORE TURNING ON THE MACHINE
- LOADING YOUR DISHWASHER
- UPPER RACK ( MODEL DEPENDING)
- LOWER RACK ( MODEL DEPENDING)
- NOTE
- LOADING CUTLERY BASKET (MODEL DEPENDING)
- INCORRECT LOADS
- TOP BASKET
- RACK WITH HEIGHT ADJUSTMENT
- HEIGHT SETTING (MODEL DEPENDING)
- HEIGHT SETTING - WHEN BASKET IS EMPTY (MODEL DEPENDING)
- HEIGHT SETTING - WHEN BASKET IS FILLED (MODEL DEPENDING)
- LOWER BASKET FOLDING RACKS
- SILVERWARE BASKET ( (MODEL DEPENDING)
- UPPER CUTLERY BASKET (MODEL DEPENDING)
- PROGRAMS AND OPTIONS TABLE
- WATER TEMPERATURE
- KEYS
- ON/OFF KEY
- START/PAUSE KEY
- PROGRAM SELECTION/CANCEL KEY
- DELAY TIMER KEY
- PREPARING THE MACHINE
- PROGRAM SELECTION
- AUXILIARY FUNCTIONS
- TO ADD AUXILIARY FUNCTION TO THE PROGRAM
- SANITIZE FUNCTION
- EXTRA RINSE FUNCTION
- EXTRA DRY FUNCTION
- HALF LOAD FUNCTION
- HI-TEMP FUNCTION
- PROGRAMMING THE WASHING TIME
- DELAY TIMER
- CHANGING THE SETTINGS WHILE DELAY TIMER IS ENABLED
- TO CANCEL THE DELAY TIMER FUNCTION
- 8.6.STARTING THE PROGRAM
- CHILD (KEY) LOCK
- CANCELLING THE PROGRAM
- SALT INDICATOR(MODEL DEPENDING)
- RINSE AID INDICATOR
- END OF PROGRAM
- WATER CUT-OFF WARNING
- OVERFLOWING WARNLNG
- 9.MAINTENANCE AND CLEANING
- FILTER
- SPRAY ARMS
- HOSE FILTER
- CLEANING THE IMPELLERS
- UPPER IMPELLER
- SHOULD NOT BE WASHED IN YOUR DISHWASHER
- PRACTICAL INFORMATION
- WARRANTY
Brand : Porter & Charles
Model : VE-DWVFI
Category : Dishwasher