IQ500.4 - Receiver KICKER - Free user manual and instructions
Find the device manual for free IQ500.4 KICKER in PDF.


| Product Type | 4-channel mobile audio amplifier |
| Brand | KICKER |
| Model | IQ500.4 |
| Power Supply | 12 V DC (vehicle battery) |
| Maximum Current Draw | 100 A (recommended fuse 100 A) |
| Recommended Power Wire Gauge | 4 AWG (up to 3.05 m) or 1/0 AWG (beyond) |
| Filter Type | High-pass, low-pass, or full-range (switchable) |
| Crossover Adjustment | Frequency and slope adjustable via software |
| Bass Boost (KICK EQ) | 0 to 18 dB at 40 Hz |
| Input Gain Adjustment | Variable, -26 dB to 0 dB (via control or software) |
| Audio Inputs | RCA stereo (high or low level) |
| Audio Outputs | RCA for pass-through to another amplifier |
| Auto Turn-On | +12 V remote wire, DC offset detection, or audio detection |
| Connectivity | Mini-USB for PC configuration; Bluetooth via IQI accessory (sold separately) |
| Remote Control | IQRC (optional): gain, bass boost, center frequency, bandwidth |
| Configuration Software | TWEEQ (Windows, Mac compatible via Boot Camp) |
| Built-in Protections | Overheat, over-voltage, under-voltage, over-current |
| Maintenance and Cleaning | Wipe with a dry, lint-free cloth |
| Safety | Do not use in prolonged distortion; install a fuse within 45 cm of the battery |
| Warranty | According to the laws of the country of purchase (see www.kicker.com/warranty) |
| Spare Parts and Repairability | Contact an authorized KICKER dealer |
Frequently Asked Questions - IQ500.4 KICKER
User questions about IQ500.4 KICKER
0 question about this device. Answer the ones you know or ask your own.
Ask a new question about this device
Download the instructions for your Receiver in PDF format for free! Find your manual IQ500.4 - KICKER and take your electronic device back in hand. On this page are published all the documents necessary for the use of your device. IQ500.4 by KICKER.
USER MANUAL IQ500.4 KICKER
KICKER's new IQ-series of amplifiers represent the pinnacle of mobile amplifier technology. From the high-end components we've painstakingly selected, including an unparalleled level of DSP power, to KICKER's own TWEEQ™ software, our development team has set the bar again for high-end mobile audio electronics. The TWEEQ application allows for an unprecedented amount of control over all aspects of your acoustic demands by laptop; or with your phone or tablet via the IQI Bluetooth® accessory. Experience a revolution, take charge of your music, and hear why KICKER's innovation is unmatched!
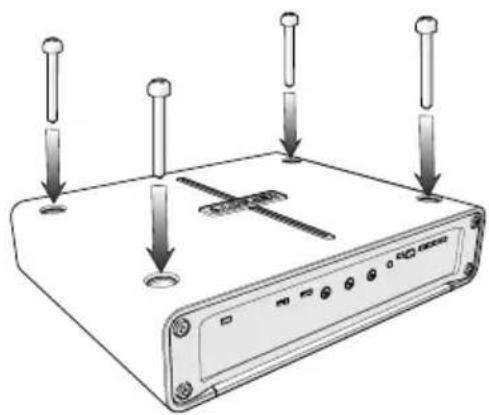
Mount the amplifier to the desired location using the included screws. Do not drill into any electronics, wiring, or vehicle mechanisms.
Wiring
Wire +12V and Ground connections. Install a fuse within 18" of battery and in-line with power cable connected to your amplifier. See diagram on next page for reference. See the following charts for appropriate gauge and fuse ratings.
natural_image
Diagram of a wireless router with four pins and a central switch, no text or symbols presentModel External Fuse
IQ500.1 60 Ampere
IQ500.2 60 Ampere
IQ500.4 60 Ampere
IQ1000.1 100 Ampere
IQ1000.5 100 Ampere
Ampere ≤4ft 4–7ft 7–10ft 10–13ft 13–16ft 16–19ft 19–22ft 22–28ft
60 8GA 8GA 4GA 4GA 4GA 4GA 1/0GA 1/0GA
100 4GA 4GA 4GA 4GA 1/0GA 1/0GA 1/0GA 1/0GA
Use the IQI to connect and control multiple IQ amps via Bluetooth, stream music directly from your Bluetooth device, and much more!
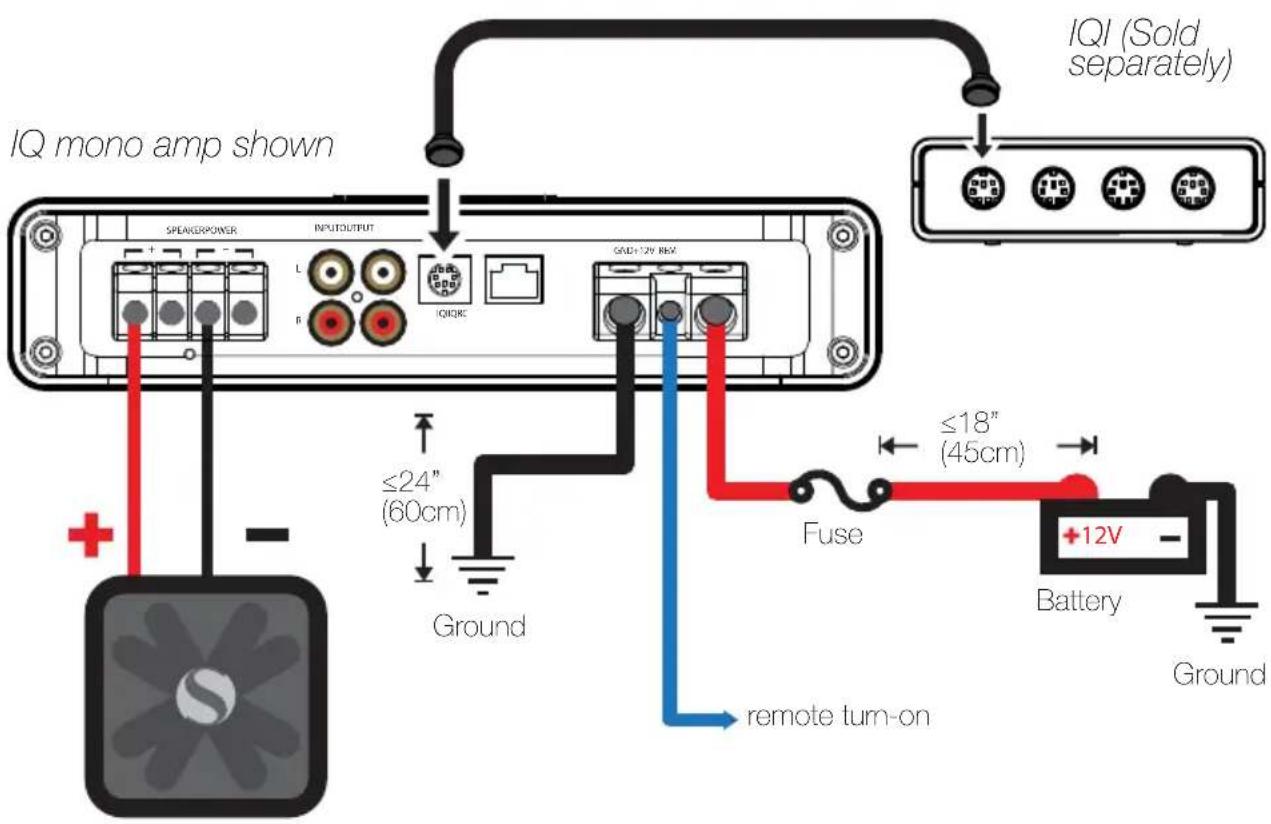
Wire your speakers to the IQ amplifier using 16GA or larger wiring. Connect the output of your source unit to the RCA Inputs of the IQ amplifier. Use the IQ's RCA Outputs to pass the signal to another amplifier.
If your source unit uses HI-Level outputs, use the KICKER KISL to easily attach RCA plugs to your bare wires. Consult a mobile electronics specialist if you are unsure. See the following diagram for reference.
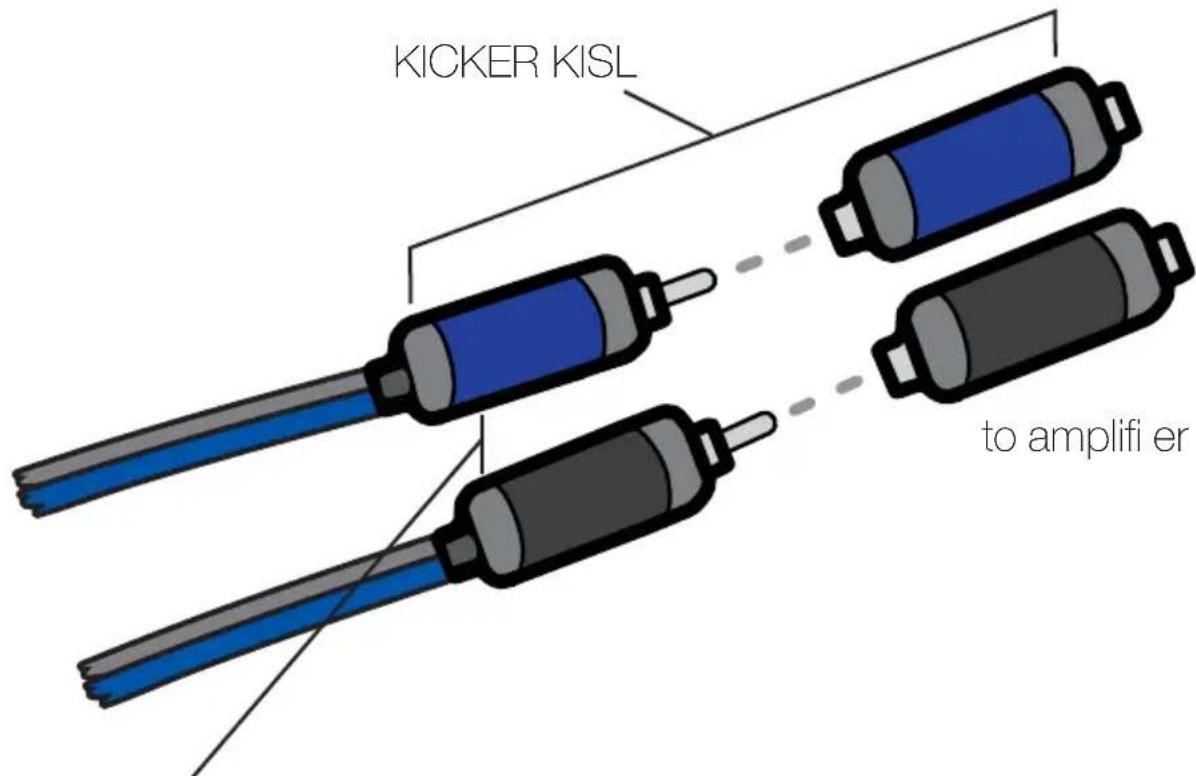
from source unit high-level speaker outputs
IQRC Installation
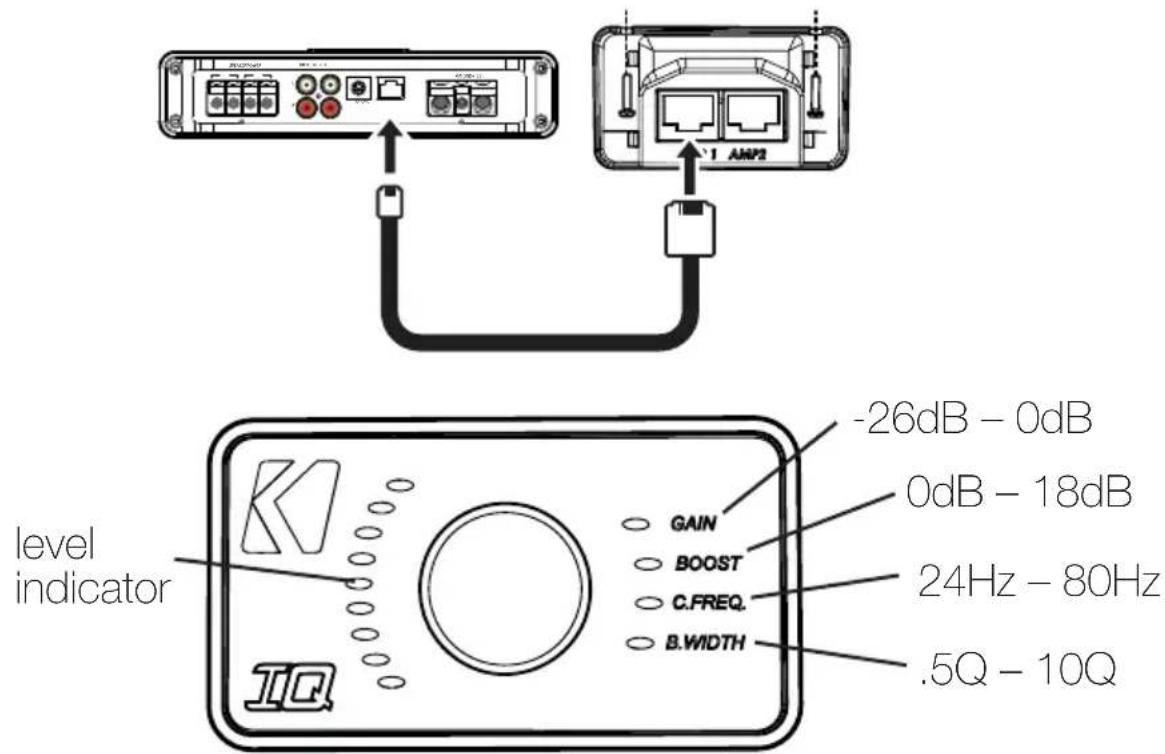
With the IQRC, you have the ability to control the gain, bass boost, center frequency, and bandwidth levels remotely for up to two matched amplifiers. Push the control knob to select the feature, then rotate to increase or decrease the values. To surface-mount the IQRC remote bass level control, screw the remote to the chosen location, then run the cable from the controller to the "IQRC" jack on the amplifier panel. Do NOT connect/disconnect while the amplifier is on. AMP 1 must be connected before AMP 2 will be made active.
Features & Operation
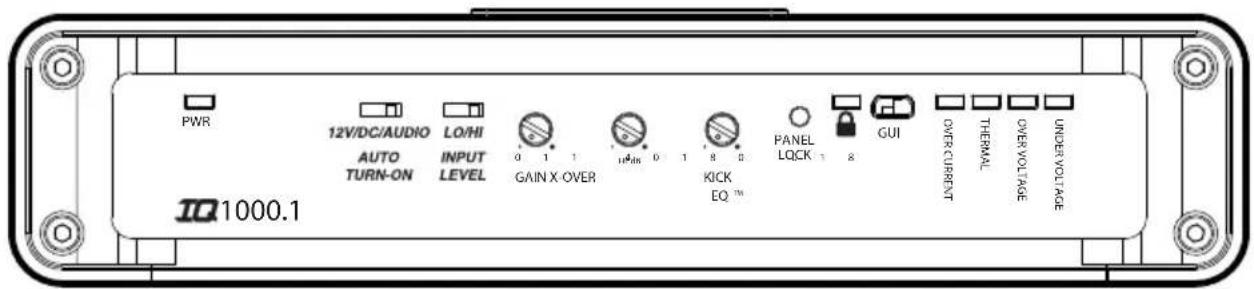
The IQ-Series is unlike any amplifier on the market today. It is fully functional using the analog end panel controls, but unlocks its full potential when the DSP (Digital Signal Processor) is taken advantage of. We recommend familiarizing yourself with the following controls.
AUTO TURN-ON: Set the switch to +12V to use the remote turn-on lead from your source unit. Run 18 gauge wire from the Remote Turn-On Lead on your source unit to the terminal labeled REM between the amplifier's positive and negative power terminals. The DC Offset mode detects a 6V DC offset from the HI-Level speaker outputs when the source unit has been turned on. The Audio setting detects the incoming audio signal from your source unit and automatically turns on the amp. Using either the DC Offset or Audio mode causes the REM terminal to have a +12V out for turning on additional amplifiers.
INPUT LEVEL: The RCA inputs on KICKER IQ amplifiers are capable of receiving either Hi or Low-level signals from a source unit.
GAIN: The input gain control is not a volume control. It matches the output of the source unit to the input level of the amplifier. Turn the source unit up to about 3/4 volume. Next, slowly turn the gain up until you can hear audible distortion, then turn it down a little.
X-OVER: Use the XOVER switch(es) on the end panel of the amplifier to set the internal crossovers to OFF, HI, or LO. When the switch is set to OFF, a full bandwidth signal will be amplified. Set the switch to HI if you want the amplifier's internal crossover to serve as a high-pass filter. Set the switch to LO if you want the amplifier's internal crossover to serve as a low-pass filter.
FADER: Turn on the FADER switch if you are running two sets of inputs to the amplifier. Leave the fader switch OFF if you want to drive all channels from a single stereo input.
KICK EQ: Adjust the bass boost from 0–18dB, centered at 40Hz.
PANEL LOCK: When active (LED ON) the amplifier is using the settings from the Tweeq software. When it is not active (LED OFF) the amplifier is using the end panel controls.
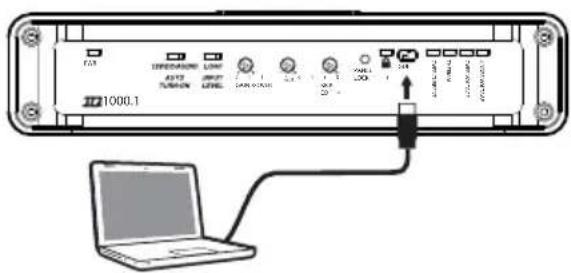
GUI: Connect to your computer or tablet and run the KICKER TWEEQ software for real-time control of your amp's DSP.
Software Setup (Windows)
KICKER TWEEQ may be compatible with the Mac OS through Boot Camp, but is not supported.
TWEEQ is a new DSP software configuration tool for the IQ-series of amps. Because the smartest amp demands the smartest application, we've developed TWEEQ in-house with our customer's needs at the forefront of the creation process. The IQ amplifiers are fully-functional without TWEEQ, but to get the most out of your new KICKER amp, use it on your computer, or your tablet or phone using the IQI Bluetooth accessory, and hear the difference!
Installation
Visit www.kicker.com/tweeq and click the DOWNLOAD button. Open the installation file and follow the instructions to complete the installation.
Setup
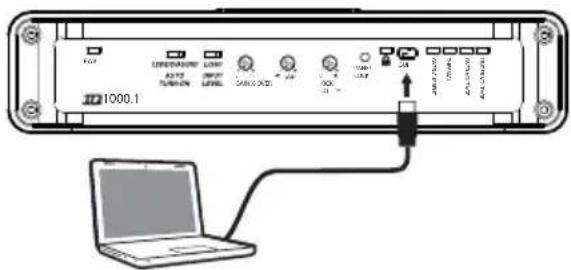
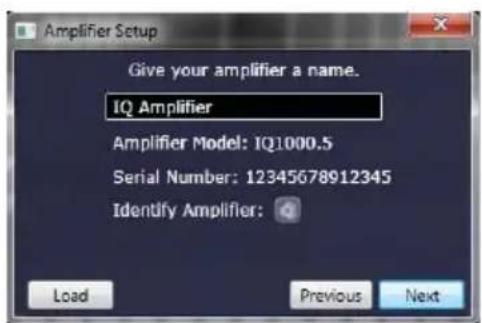
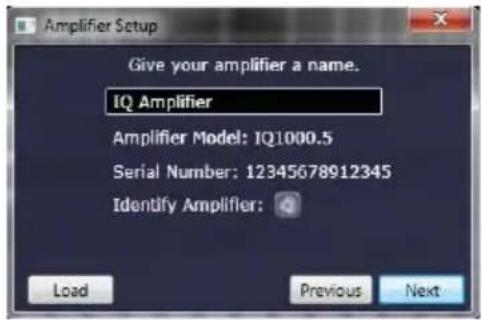
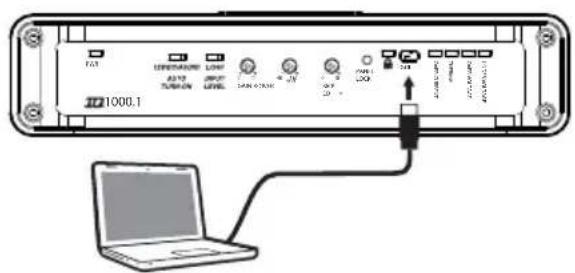
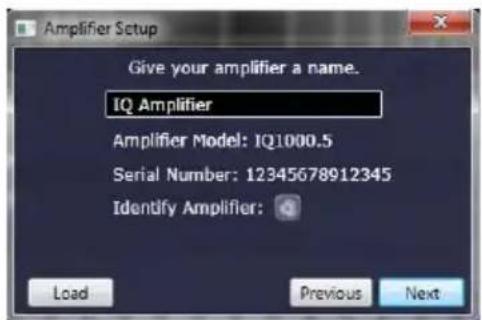
Power on and connect your IQ amplifi er to your computer via mini-USB connection. Run Tweeq.exe and wait for the software to scan for any connected amplifi ers. You will be prompted to begin the config uration wizard.
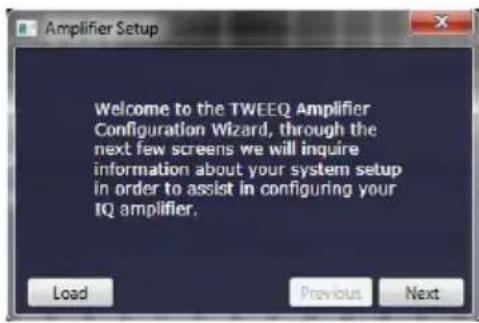
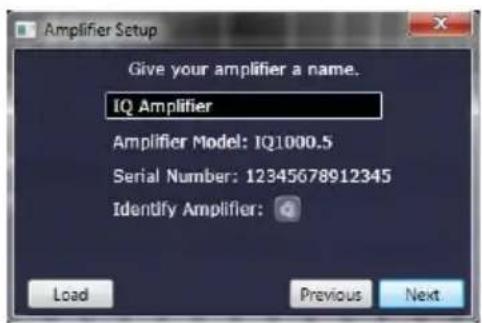
TWEEQ will scan and identify all connected amplifiers. KICKER has support for multi-amp installations using the IQI accessory. You may also use a USB hub to connect multiple amps, however technical support is not available for this setup.
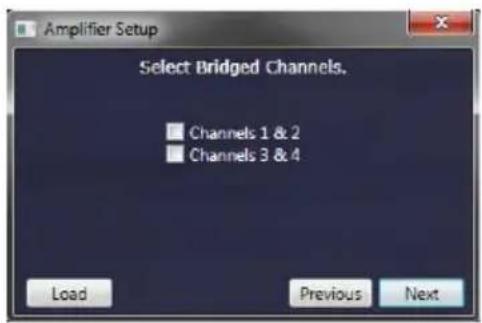
Choose to bridge the channels if both channels are used to drive a common load.
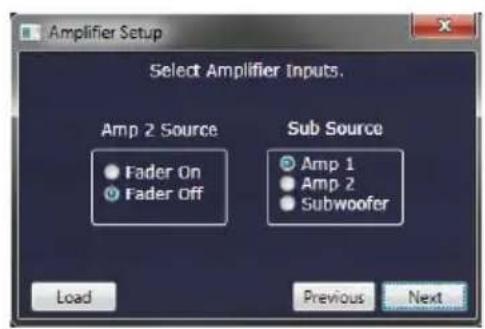
Turn the FADER ON if you are running two sets of inputs to the amplifier. Turn the FADER OFF if you want to drive all channels from a single stereo input. For example, turn the FADER ON if you are only using AMP 1 as your input source. Select the input source for the subwoofer signal, if applicable.
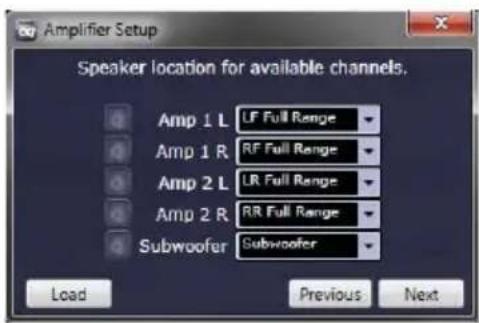
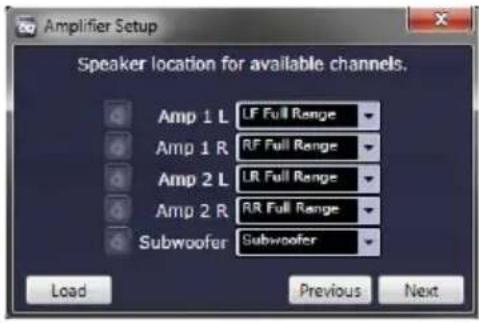
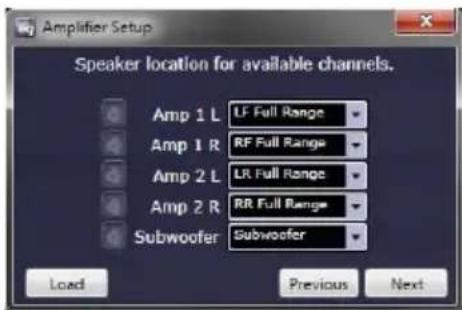
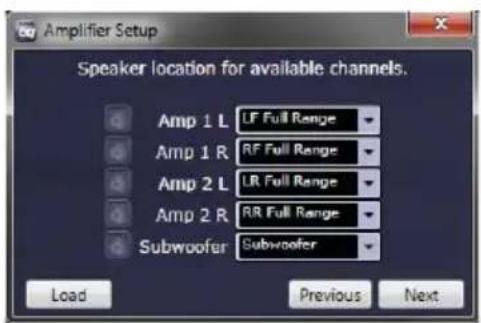
Select the type of driver used by each channel. This will assist the TWEEQ software in automatically confi guring your crossover. See Page 13 for reference chart.
Select the speaker-size for each channel. This further assists the software in confi guring your crossover. If you have a 2 or 4-channel amp and selected to use a Full-Range signal in the previous window you will not see this dialog box.
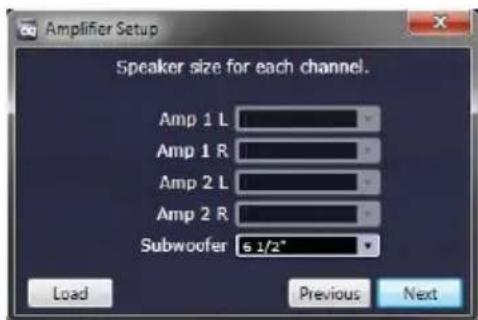
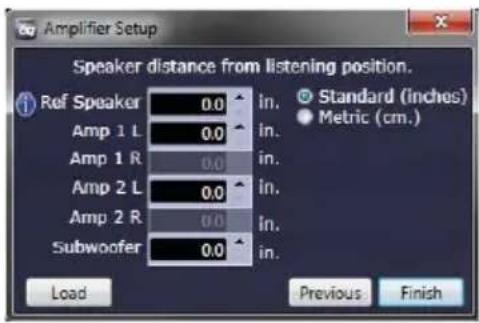
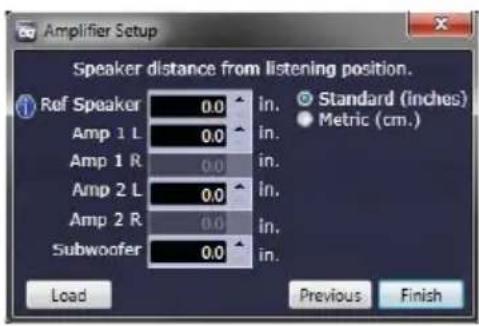
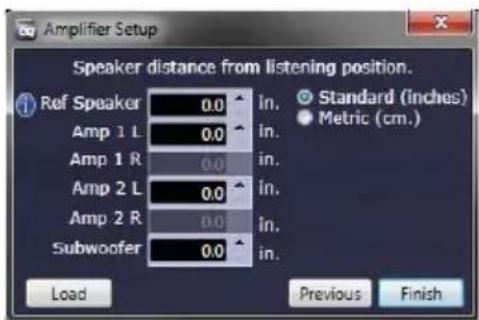
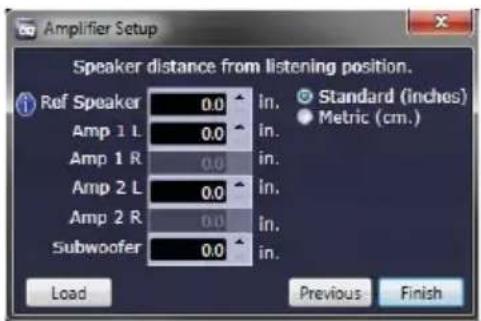
Set the distance of each speaker from the primary listening position. This will automatically configure the correct time-delay for each speaker to present the best sound-stage. The Reference Speaker setting should be set if there is a speaker in use that is not connected to your currently chosen amp, and is also the farthest from the listening position.
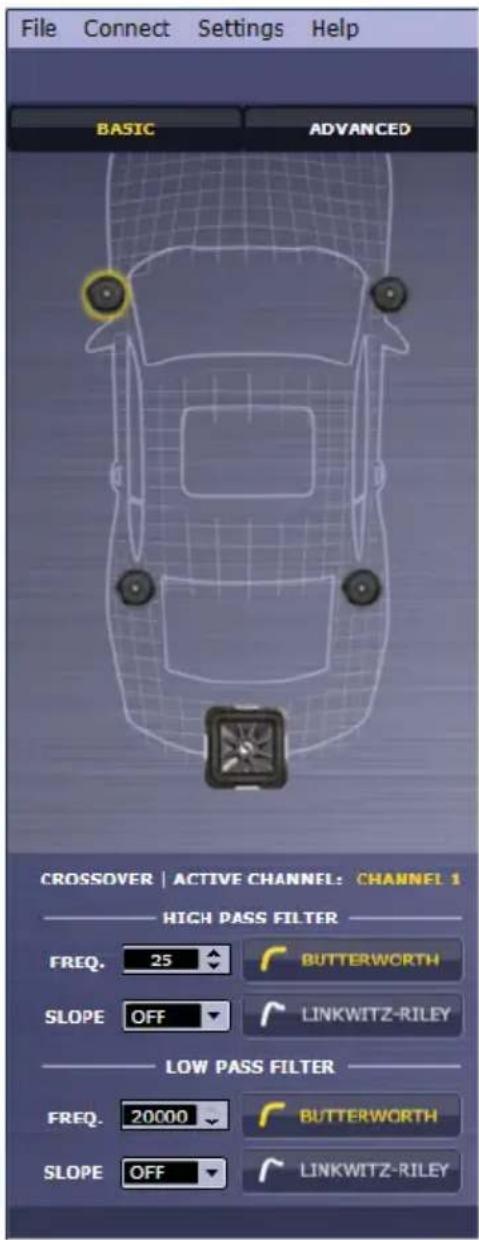
Congratulations! Your IQ Amplifier has been automatically configured using the TWEEQ Wizard. You may save this preset by selecting File>Save at the top left of the application. It is recommended that you save this initial configuration for restoration and A/B listening purposes.
You may continue to fi ne-tune the DSP for your specifi c application(s), including adjusting Time-Delay and Crossover settings. For complete instructions on the KICKER TWEEQ application, download the full manual from www.kicker.com/support.
Driver XOVER Type
Full Range No XOVER
Midrange High-pass
Midbass Band-pass
Sub Band-pass
Tweeter High-pass
IQQS+C-20141204
natural_image
Diagram of a device with four pins and a switch, no text or symbols presentModelo Fusible externo
IQ500.1 60 amperios
IQ500.2 60 amperios
IQ500.4 60 amperios
IQ1000.1 100 amperios
IQ1000.5 100 amperios
Amperios ≤4ft 4-7ft 7-10ft 10-13ft 13-16ft 16-19ft 19-22ft 22-28ft
60 Cal. 8 Cal. 8 Cal. 4 Cal. 4 Cal. 4 Cal. 4 Cal. 1/0 Cal. 1/0
100 Cal, 4 Cal, 4 Cal, 4 Cal, 4 Cal, 1/0 Cal, 1/0 Cal, 1/0 Cal, 1/0
natural_image
Diagram of a wireless router with four pins and a central switch, no text or symbols present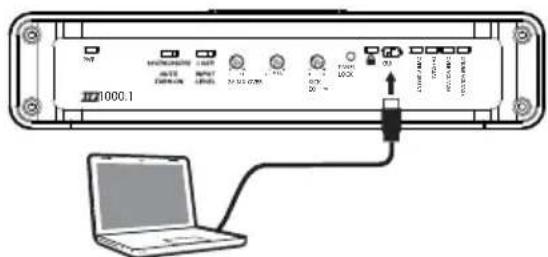
natural_image
Diagram of a network device with four pins and a central switch, no text or symbols presentModel External Fuse
IQ500.1 60 Ampere
IQ500.2 60 Ampere
IQ500.4 60 Ampere
IQ1000.1 100 Ampere
IQ1000.5 100 Ampere
KICKER products are warranted against defects. Duration and terms of warranty depend on the laws in the country in which it was purchased. For details see your local KICKER Dealer or www.kicker.com/warranty.
Our goods come with guarantees that cannot be excluded under the Australian Consumer Law. You are entitled to a replacement or refund for a major failure and for compensation for any other reasonably foreseeable loss or damage. You are also entitled to have the goods repaired or replaced if the goods fail to be of acceptable quality and the failure does not amount to a major failure.
WARNING: KICKER products are capable of producing sound levels that can permanently damage your hearing! Please use common sense when controlling volume.
©2015 Stillwater Designs
Brand : KICKER
Model : IQ500.4
Category : Receiver