
GFA 12-H Professional - Screwdriver BOSCH - Free user manual and instructions
Find the device manual for free GFA 12-H Professional BOSCH in PDF.

| Product Type | Hammer drill adapter for cordless drill driver |
| Brand | Bosch |
| Model | GFA 12-H Professional |
| Part number | 1 600 A01 L1N |
| Rated voltage | 12 V |
| No-load speed (depending on the drill used) | 0 – 1 300 rpm (GSR 12V-15 FC) or 0 – 1 750 rpm (GSR 12V-35 FC) |
| Impact rate (depending on the drill used) | 2 600 min⁻¹ (GSR 12V-15 FC) or 3 700 min⁻¹ (GSR 12V-35 FC) |
| Max drilling diameter – Concrete | 10 mm |
| Max drilling diameter – Masonry | 16 mm |
| Weight (with drill and battery) | 2.3 – 2.5 kg (depending on the battery) |
| Operating temperature | -20 °C to +50 °C |
| Recommended charging temperature | 0 °C to +35 °C |
| Compatibility | Bosch Cordless drill drivers GSR 12V-15 FC and GSR 12V-35 FC |
| Chuck type | SDS plus (via adapter) |
| Functions | Drilling and hammer drilling in concrete, brick, and natural stone |
| Included accessories | Auxiliary handle with depth stop, belt clip |
| Lighting | Integrated LED (on the drill) |
| Safety | Immediate stop in case of blockage, electrical insulation of handles, protection against unintentional restarts |
| Maintenance | Clean the ventilation slots and the tool holder after each use. Do not use aggressive products. |
| Spare parts and repairability | Parts available on bosch-pt.com. Repair by Bosch authorized service in under 5 days in France. |
| General information | Operating instructions available in 28 languages (199 pages). Observe the safety instructions. |
Frequently Asked Questions - GFA 12-H Professional BOSCH
User questions about GFA 12-H Professional BOSCH
0 question about this device. Answer the ones you know or ask your own.
Ask a new question about this device
Download the instructions for your Screwdriver in PDF format for free! Find your manual GFA 12-H Professional - BOSCH and take your electronic device back in hand. On this page are published all the documents necessary for the use of your device. GFA 12-H Professional by BOSCH.
USER MANUAL GFA 12-H Professional BOSCH
natural_image
Illustration of a handheld electric drill with a black handle and control panel (no text or symbols)natural_image
3D rendered image of a handheld electric drill bit with labeled parts (14), no text or symbols presentGSR 12V-15 FC
GSR 12V-35 FC
4

natural_image
Close-up of a mechanical component with a circular inset showing a curved surface and directional arrow (no text or symbols)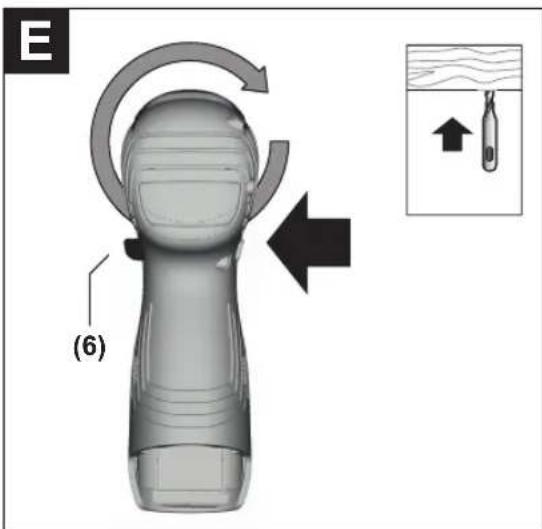


Deutsch
Sicherheitshinweise
www.bosch-pt.com/serviceaddresses
Entsorgung

General Power Tool Safety Warnings
WARNING
Read all safety warnings, instructions, illustrations and specifica-
tions provided with this power tool. Failure to follow all instructions listed below may result in electric shock, fire and/or serious injury.
Save all warnings and instructions for future reference.
The term "power tool" in the warnings refers to your mains-operated (corded) power tool or battery-operated (cordless) power tool.
Work area safety
▶ Keep work area clean and well lit. Cluttered or dark areas invite accidents.
▶ Do not operate power tools in explosive atmospheres, such as in the presence of flammable liquids, gases or dust. Power tools create sparks which may ignite the dust or fumes.
▶ Keep children and bystanders away while operating a power tool. Distractions can cause you to lose control.
Electrical safety
▶ Power tool plugs must match the outlet. Never modify the plug in any way. Do not use any adapter plugs with earthed (grounded) power tools. Unmodified plugs and matching outlets will reduce risk of electric shock.
▶ Avoid body contact with earthed or grounded surfaces, such as pipes, radiators, ranges and refrigerators. There is an increased risk of electric shock if your body is earthed or grounded.
▶ Do not expose power tools to rain or wet conditions. Water entering a power tool will increase the risk of electric shock.
▶ Do not abuse the cord. Never use the cord for carrying, pulling or unplugging the power tool. Keep cord away from heat, oil, sharp edges or moving parts.
Damaged or entangled cords increase the risk of electric shock.
When operating a power tool outdoors, use an extension cord suitable for outdoor use. Use of a cord suitable for outdoor use reduces the risk of electric shock.
▶ If operating a power tool in a damp location is unavoidable, use a residual current device (RCD) protected supply. Use of an RCD reduces the risk of electric shock.
Personal safety
▶ Stay alert, watch what you are doing and use common sense when operating a power tool. Do not use a power tool while you are tired or under the influence of drugs, alcohol or medication. A moment of inattention while operating power tools may result in serious personal injury.
▶ Use personal protective equipment. Always wear eye protection. Protective equipment such as a dust mask, non-skid safety shoes, hard hat or hearing protection used for appropriate conditions will reduce personal injuries.
▶ Prevent unintentional starting. Ensure the switch is in the off-position before connecting to power source and/or battery pack, picking up or carrying the tool. Carrying power tools with your finger on the switch or energising power tools that have the switch on invites accidents.
Remove any adjusting key or wrench before turning the power tool on. A wrench or a key left attached to a rotating part of the power tool may result in personal injury.
▶ Do not overreach. Keep proper footing and balance at all times. This enables better control of the power tool in unexpected situations.
▶ Dress properly. Do not wear loose clothing or jewellery. Keep your hair and clothing away from moving parts. Loose clothes, jewellery or long hair can be caught in moving parts.
▶ If devices are provided for the connection of dust extraction and collection facilities, ensure these are con-
nected and properly used. Use of dust collection can reduce dust-related hazards.
▶ Do not let familiarity gained from frequent use of tools allow you to become complacent and ignore tool safety principles. A careless action can cause severe injury within a fraction of a second.
Power tool use and care
▶ Do not force the power tool. Use the correct power tool for your application. The correct power tool will do the job better and safer at the rate for which it was designed.
▶ Do not use the power tool if the switch does not turn it on and off. Any power tool that cannot be controlled with the switch is dangerous and must be repaired.
▶ Disconnect the plug from the power source and/or remove the battery pack, if detachable, from the power tool before making any adjustments, changing accessories, or storing power tools. Such preventive safety measures reduce the risk of starting the power tool accidentally.
▶ Store idle power tools out of the reach of children and do not allow persons unfamiliar with the power tool or these instructions to operate the power tool. Power tools are dangerous in the hands of untrained users.
Maintain power tools and accessories. Check for misalignment or binding of moving parts, breakage of parts and any other condition that may affect the power tool's operation. If damaged, have the power tool repaired before use. Many accidents are caused by poorly maintained power tools.
▶ Keep cutting tools sharp and clean. Properly maintained cutting tools with sharp cutting edges are less likely to bind and are easier to control.
▶ Use the power tool, accessories and tool bits etc. in accordance with these instructions, taking into account the working conditions and the work to be performed. Use of the power tool for operations different from those intended could result in a hazardous situation.
▶ Keep handles and grasping surfaces dry, clean and free from oil and grease. Slippery handles and grasping surfaces do not allow for safe handling and control of the tool in unexpected situations.
Battery tool use and care
▶ Recharge only with the charger specified by the manufacturer. A charger that is suitable for one type of battery pack may create a risk of fire when used with another battery pack.
▶ Use power tools only with specifically designated battery packs. Use of any other battery packs may create a risk of injury and fire.
▶ When battery pack is not in use, keep it away from other metal objects, like paper clips, coins, keys, nails, screws or other small metal objects, that can make a connection from one terminal to another.
Shorting the battery terminals together may cause burns or a fire.
▶ Under abusive conditions, liquid may be ejected from the battery; avoid contact. If contact accidentally occurs, flush with water. If liquid contacts eyes, additionally seek medical help. Liquid ejected from the battery may cause irritation or burns.
▶ Do not use a battery pack or tool that is damaged or modified. Damaged or modified batteries may exhibit unpredictable behaviour resulting in fire, explosion or risk of injury.
▶ Do not expose a battery pack or tool to fire or excessive temperature. Exposure to fire or temperature above 130^ C may cause explosion.
▶ Follow all charging instructions and do not charge the battery pack or tool outside the temperature range specified in the instructions. Charging improperly or at temperatures outside the specified range may damage the battery and increase the risk of fire.
Service
▶ Have your power tool serviced by a qualified repair person using only identical replacement parts. This will ensure that the safety of the power tool is maintained.
▶ Never service damaged battery packs. Service of battery packs should only be performed by the manufacturer or authorized service providers.
Hammer Safety Warnings
Safety instructions for all operations
▶ Wear ear protectors. Exposure to noise can cause hearing loss.
▶ Use auxiliary handle(s), if supplied with the tool. Loss of control can cause personal injury.
▶ Hold the power tool by insulated gripping surfaces, when performing an operation where the cutting accessory may contact hidden wiring. Cutting accessory contacting a "live" wire may make exposed metal parts of the power tool "live" and could give the operator an electric shock.
Safety instructions when using long drill bits with rotary hammers
▶ Always start drilling at low speed and with the bit tip in contact with the workpiece. At higher speeds, the bit is likely to bend if allowed to rotate freely without contacting the workpiece, resulting in personal injury.
▶ Apply pressure only in direct line with the bit and do not apply excessive pressure. Bits can bend, causing breakage or loss of control, resulting in personal injury.
Additional Safety Information
▶ Switch the power tool off immediately if the application tool becomes blocked. Be prepared for high torque reactions which cause kickback. The application tool becomes blocked when it becomes jammed in the workpiece or when the power tool becomes overloaded.
14 | English
▶ Use suitable detectors to determine if there are hidden supply lines or contact the local utility company for assistance. Contact with electric cables can cause fire and electric shock. Damaging gas lines can lead to explosion. Breaking water pipes causes property damage.
▶ Always wait until the power tool has come to a complete stop before placing it down. The application tool can jam and cause you to lose control of the power tool.
▶ Secure the workpiece. A workpiece clamped with clamping devices or in a vice is held more secure than by hand.
In case of damage and improper use of the battery, vapours may be emitted. The battery can set alight or explode. Ensure the area is well ventilated and seek medical attention should you experience any adverse effects. The vapours may irritate the respiratory system.
▶ Do not modify or open the battery. There is a risk of short-circuiting.
The battery can be damaged by pointed objects such as nails or screwdrivers or by force applied externally. An internal short circuit may occur, causing the battery to burn, smoke, explode or overheat.
▶ Only use the battery in the manufacturer's products. This is the only way in which you can protect the battery against dangerous overload.
Protect the battery against heat, e.g. against continuous intense sunlight, fire, dirt, water and moisture. There is a risk of explosion and short-circuiting.
▶ Do not touch any application tools or adjacent housing components shortly after operation. These can become very hot during operation and cause burns.
The application tool may jam during drilling. Make sure you have a stable footing and hold the power tool firmly with both hands. Otherwise you could lose control of the power tool.
▶ Take care when carrying out demolition work using the chisel. Falling fragments of the demolition material could injure you or any bystanders.
Product Description and Specifications

Read all the safety and general instructions.
Failure to observe the safety and general instructions may result in electric shock, fire and/or serious injury.
Please observe the illustrations at the beginning of this operating manual.
Intended use
The power tool (GSR 12V-15 FC/GSR 12V-35 FC with rotary hammer adapter GFA 12-H) is intended for hammer drilling in concrete, brick and stone.
The rotary hammer adapter GFA 12-H may only be used with the GSR 12V-15 FC and GSR 12V-35 FC cordless drill/drivers.
Product Features
The numbering of the product features refers to the diagram of the power tool on the graphics page.
(1) Holder
(2) Torque presetting ring
(3) Gear selector switch
(4) Battery release button ^a)
(5) Rechargeable battery ^a)
(6) Rotational direction switch
(7) On/off switch
(8) Battery charge indicator
(9) Worklight
(10) Locking ring
(11) Belt clip
(12) Rotary hammer adapter GFA 12-H
(13) Auxiliary handle with depth stop
(14) Handle (insulated gripping surface)
(15) Snap-in pin
a) The accessories illustrated or described are not included as standard delivery.
Items included
Hammer adapter (12), auxiliary handle with depth stop (13) and belt clip (11).
Application tools and other accessories shown or described are not part of the standard delivery scope.
You can find the complete selection of accessories in our accessories range.
Technical Data
| Hammer adapter with auxiliary handle GFA 12-H GFA 12-H | ||
| Article number | 1 600 A01 L1N 1 600 A01 L1N | |
| Cordless screwdriver GSR 12V-15 FC GSR 12V-35 FC | ||
| Article number | 3 601 JF6 0.. 3 601 JH3 0.. | |
| No-load speed ^A) | min^-1 | 0–1 300 0–1 750 |
1 609 92A 9UU | (31.10.2024) Bosch Power Tools
Hammer adapter with auxiliary handle GFA 12-H GFA 12-H
| Impact rate ^A) | min ^-1 | 2 600 3 700 |
| Rated voltage V= 12 12 | ||
| Max. drilling diameter | ||
| – Concrete mm 10 10 | ||
| – Masonry mm 16 16 | ||
| Weight ^B) | kg 2.3–2.5 2.2–2.4 | |
| Recommended ambient temperature during charging | °C 0 to +35 0 to +35 | |
| Permitted ambient temperature during operation and during storage | °C –20 to +50 –20 to +50 |
A) Measured at 20–25 °C with rechargeable battery GBA 12V 6.0Ah
B) Depending on battery in use
Values can vary depending on the product, scope of application and environmental conditions. To find out more, visit www.bosch-professional.com/wac.
Noise/vibration information
Noise emission values determined according to EN 62841-2-6.
GSR 12V-15 FC:
Typically, the A-weighted noise level of the power tool is: Sound pressure level 90.5 dB(A); sound power level 98.5 dB(A). Uncertainty K = 3 dB.
Wear hearing protection!
GSR 12V-35 FC:
Typically, the A-weighted noise level of the power tool is: Sound pressure level 91 dB(A); sound power level 99 dB(A). Uncertainty K = 3 dB.
Wear hearing protection!
Vibration total values a_i (triax vector sum) and uncertainty K determined according to EN 62841-2-6:
GSR 12V-15 FC:
Hammer drilling into concrete: a_h = 13.1 m/s^2 , K = 1.5 m/ s^2 ,
GSR 12V-35 FC:
Hammer drilling into concrete: a_h = 15.2 m/s^2 , K = 1.5 m/s^2 . The vibration level and noise emission value given in these instructions have been measured in accordance with a standardised measuring procedure and may be used to compare power tools. They may also be used for a preliminary estimation of vibration and noise emissions.
The stated vibration level and noise emission value represent the main applications of the power tool. However, if the power tool is used for other applications, with different accessories or is poorly maintained, the vibration level and noise emission value may differ. This may significantly increase the vibration and noise emissions over the total working period.
To estimate vibration and noise emissions accurately, the times when the tool is switched off or when it is running but not actually being used should also be taken into account. This may significantly reduce vibration and noise emissions over the total working period.
Implement additional safety measures to protect the operator from the effects of vibration, such as servicing the power tool and accessories, keeping their hands warm, and organising workflows correctly.
Assembly
Before carrying out any work on the power tool (e.g. maintenance, tool change etc.), remove the battery from the power tool. There is risk of injury from unintentionally pressing the on/off switch.
Changing the Tool
The dust protection cap largely prevents the penetration of drilling dust into the tool holder during operation. When inserting the tool, make sure that the dust protection cap does not become damaged.
▶ Replace a damaged dust protection cap immediately. It is recommended that you have use an after-sales service for this.
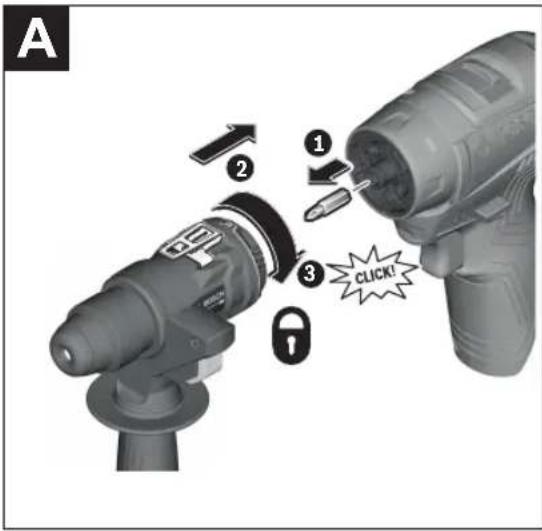
Fitting the adapter (see figure A)
Remove the application tool.
Insert the adapter into the holder (1). Turn the locking ring (10) until it audibly engages.
Inserting the SDS plus Application Tool into the Adapter (see figure B)
The SDS plus drill chuck enables you to change the application tool easily and conveniently without needing to use additional tools.
- Insert the application tool all the way into the holder of the locking sleeve.
- Check that it is locked by pulling on the tool.
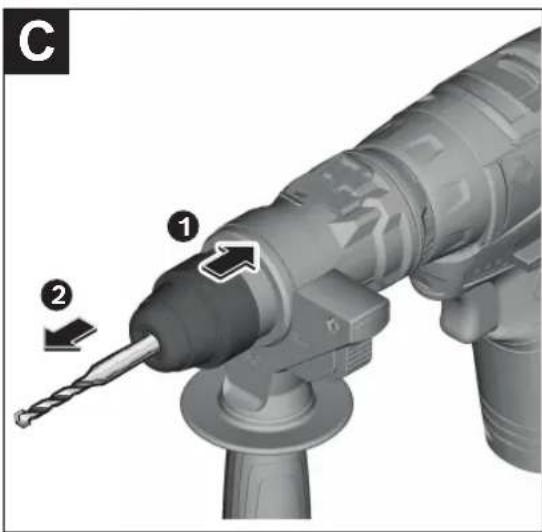
Removing the Application Tool (see figure C)
Pull back the locking sleeve and remove the application tool.
Swivelling the Auxiliary Handle (see figure H)
You can swivel the auxiliary handle (13) to any angle for a safe work posture that minimises fatigue.
16 | English
- Turn the lower gripping end of the auxiliary handle (13) anticlockwise and swivel the auxiliary handle (13) into the required position. Then, turn the lower gripping end of the auxiliary handle (13) clockwise to retighten.
Make sure that the retaining strap of the auxiliary handle slots into the corresponding groove of the housing.
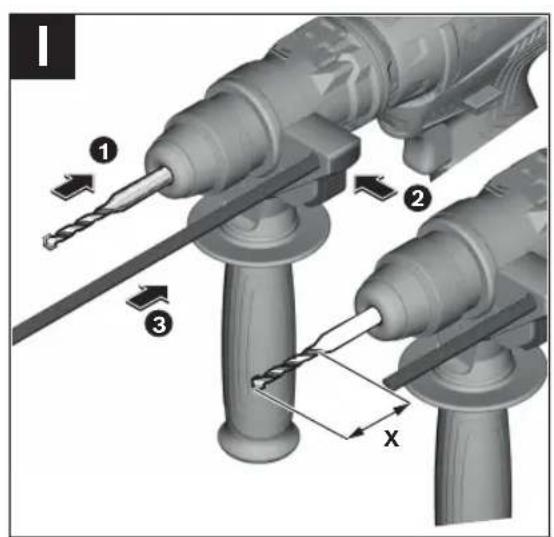
Setting the Drilling Depth (see figure I)
You can use the depth stop to set the required drilling depth X.
Press the button for depth stop adjustment and insert the depth stop into the auxiliary handle (13).
The fluting on the depth stop must face upwards or downwards.
- Push the SDS plus application tool into the SDS plus tool holder as far as it will go. Otherwise, the movability of the SDS plus drilling tool can lead to incorrect adjustment of the drilling depth.
- Pull out the depth stop until the distance between the tip of the drill bit and the tip of the depth stop corresponds with the desired drilling depth X.
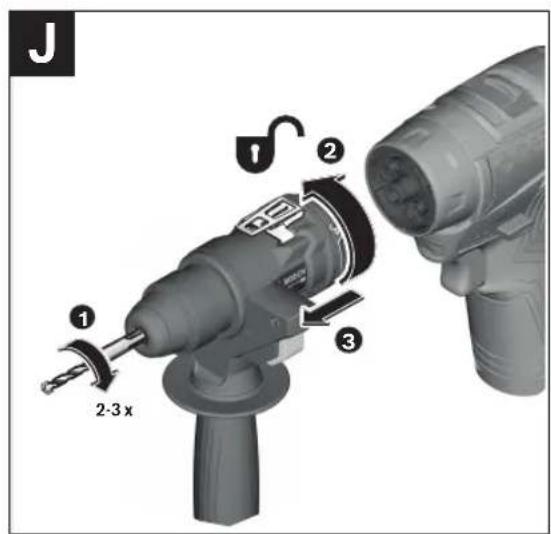
Removing the adapter (see figure J)
Remove the application tool.
Unlock the adapter in the direction and pull it off the holder (1).
Dust/Chip Extraction
Dust from materials such as lead-containing coatings, some wood types, minerals and metal can be harmful to one's health. Touching or breathing-in the dust can cause allergic reactions and/or lead to respiratory infections of the user or bystanders.
Certain dust, such as oak or beech dust, is considered carcinogenic, especially in connection with wood-treatment additives (chromate, wood preservative). Materials containing asbestos may only be worked by specialists.
- Provide for good ventilation of the working place.
- It is recommended to wear a P2 filter-class respirator.
Observe the relevant regulations in your country for the materials to be worked.
- Avoid dust accumulation at the workplace. Dust can easily ignite.
Operation
Starting Operation
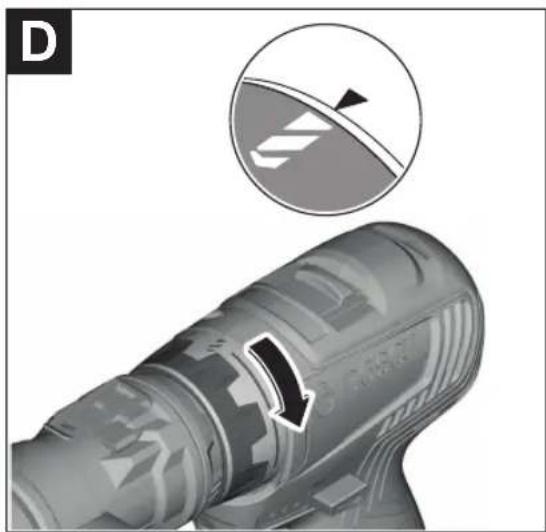
Selecting the Drilling or Hammer Drilling Operating Mode (see figure D)
Set the torque presetting ring (2) to the "drilling" symbol.
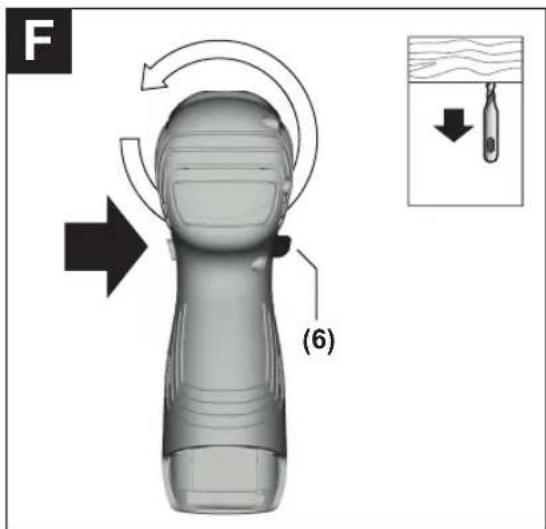
Adjusting the rotational direction (see figures E-F)
▶ Only operate the rotational direction switch (6) when the power tool is not in use.
The rotational direction switch (6) is used to change the rotational direction of the power tool. However, this is not possible while the on/off switch (7) is being pressed.
Right rotation: To drill and to drive in screws, press the rotational direction switch (6) through to the left stop.
Left Rotation: To loosen and unscrew screws and nuts, press the rotational direction switch (6) through to the right stop.
Mechanical gear selection
▶ Only operate the gear selector (3) when the power tool is not in use.
▶ Always push the gear selector switch as far as it will go. Otherwise, the power tool may become damaged.
You can preselect two speed ranges with the gear selector (3).
| Gear selector switch (3) position | Speed Torque Application range |
1 Low High For heavy-duty ap-
plications:
e.g. hammer drilling with large diameters
2 High Low For light-duty ap-
plications:
e.g. hammer drilling with small diameters
Switching on/off
To start the power tool, press and hold the on/off switch (7).
The worklight (9) lights up when the on/off switch (7) is lightly or fully pressed, allowing the work area to be illuminated in poor lighting conditions.
The worklight (9) will remain lit for approximately ten seconds after the on/off switch (7) has been released.
Adjusting the speed
You can adjust the speed of the power tool when it is on by pressing in the on/off switch (7) to varying extents.
A light pressure on the on/off switch (7) results in a low rotational speed. Increased pressure on the switch causes an increase in speed.
Practical advice
After working at a low speed for an extended period, you should operate the power tool at the maximum speed for approximately three minutes without load to cool it down.
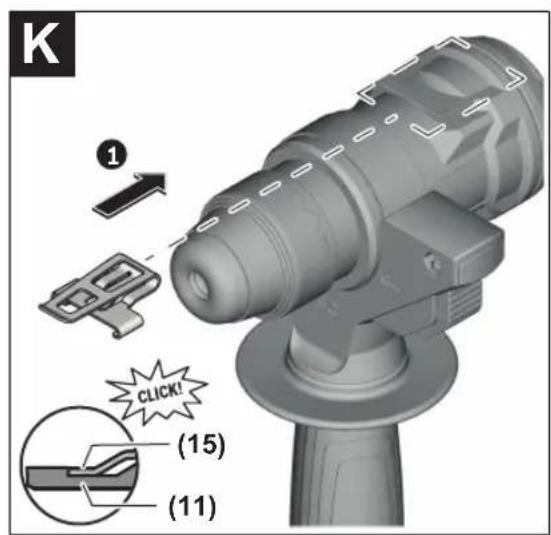
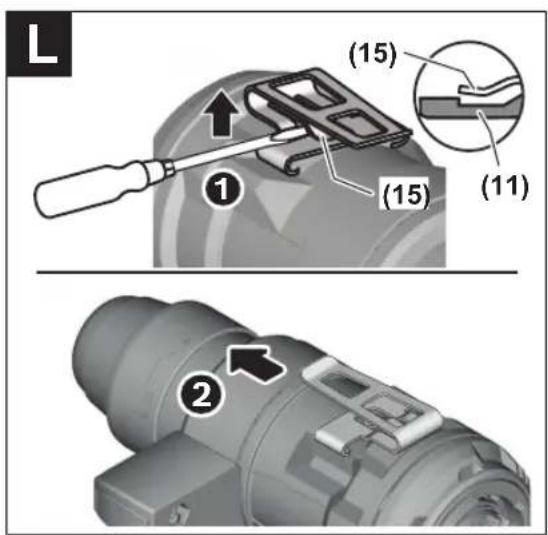
Belt clip (see figures K–L)
You can use the belt clip (11) to hang the adapter on a belt, for example. You then have both hands free and the adapter is always at hand.
- When fitting it, ensure that the snap-in pin (15) on the belt clip engages in the recess of the adapter housing.
- To remove the belt clip, lift the snap-in pin (15) using a sharp object and pull off the belt clip.
Maintenance and Service
Maintenance and Cleaning
Before carrying out any work on the power tool (e.g. maintenance, tool change etc.), remove the battery from the power tool. There is risk of injury from unintentionally pressing the on/off switch.
▶ To ensure safe and efficient operation, always keep the power tool and the ventilation slots clean.
After each use, clean the application tool, the rotary hammer adapter GFA 12-H with tool holder, and the ventilation slots of the power tool.
After-Sales Service and Application Service
Our after-sales service responds to your questions concerning maintenance and repair of your product as well as spare parts. You can find explosion drawings and information on spare parts at: www.bosch-pt.com
The Bosch product use advice team will be happy to help you with any questions about our products and their accessories.
In all correspondence and spare parts orders, please always include the 10-digit article number given on the nameplate of the product.
Great Britain
Robert Bosch Ltd. (B.S.C.)
P.O. Box 98
Broadwater Park
North Orbital Road
Denham Uxbridge
UB 9 5HJ
At www.bosch-pt.co.uk you can order spare parts or arrange the collection of a product in need of servicing or repair.
Tel. Service: (0344) 7360109
E-Mail: boschservicecentre@bosch.com
You can find further service addresses at:
www.bosch-pt.com/serviceaddresses
Disposal

Power tools, rechargeable batteries, accessories and packaging should be sorted for environmental-friendly recycling.
Do not dispose of power tools and batteries/re-chargeable batteries into household waste!
Only for EU countries:
Power tools that are no longer suitable for use and defective or used batteries must be disposed of separately. Use the designated collection systems.
If disposed incorrectly, waste electrical and electronic equipment may have harmful effects on the environment and human health, due to the potential presence of hazardous substances.
Only for United Kingdom:
According to The Waste Electrical and Electronic Equipment Regulations 2013 (SI 2013/3113) (as amended) and the Waste Batteries and Accumulators Regulations 2009 (SI 2009/890) (as amended), products that are no longer usable must be collected separately and disposed of in an environmentally friendly manner.
Battery packs/batteries:
Li-ion:
Please observe the notes in the section on transport Transport.
Français
Robert Bosch (France) S.A.S.
www.bosch-pt.com/serviceaddresses
Calle Robert Bosch No. 405
www.bosch-pt.com/serviceaddresses
Eliminación

www.bosch-pt.com/serviceaddresses
Eliminação

www.bosch-pt.com/serviceaddresses
Smaltimento

www.bosch-pt.com/serviceaddresses
Afvalverwijdering

Bosch Service Center
Telegrafvej 3
2750 Ballerup
På www.bosch-pt.dk kan der online bestilles reservedele eller oprettes en reparations ordre.
Tlf. Service Center: 44898855
Fax: 44898755
E-Mail: vaerktoej@dk.bosch.com
Yderligere serviceadresser findes under:
www.bosch-pt.com/serviceaddresses
Bortskaffelse

Bosch Service Center
Telegrafvej 3
2750 Ballerup
Danmark
Tel.: (08) 7501820 (inom Sverige)
Fax: (011) 187691
Vidare serviceadresser finner du under:
www.bosch-pt.com/serviceaddresses
Avfallshantering

www.bosch-pt.com/serviceaddresses
Deponering

www.bosch-pt.com/serviceaddresses
Hävitys

www.bosch-pt.com/serviceaddresses
Απόσυρση

www.bosch-pt.com/serviceaddresses
Tasfiye

Robert Bosch Sp. z o.o.
www.bosch-pt.com/serviceaddresses
Utylizacja odpadów

Bosch Service Center PT
K Vápence 1621/16
692 01 Mikulov
www.bosch-pt.com/serviceaddresses
Likvidace

www.bosch-pt.com/serviceaddresses
Likvidácia

www.bosch-pt.com/serviceaddresses
Eltávolítás

www.bosch-pt.com/serviceaddresses
www.bosch-pt.com/serviceaddresses
Утилізація

www.bosch-pt.com/serviceaddresses
Service scule electrice
Strada Horia Măcelariu Nr. 30–34, sector 1
013937 Bucureşti
www.bosch-pt.com/serviceaddresses
Eliminare

Service scule electrice
Strada Horia Măcelariu Nr. 30–34, sector 1
013937 Bucureşti, România
www.bosch-pt.com/bg/bg/
www.bosch-pt.com/serviceaddresses
Бракуване

www.bosch-pt.com/serviceaddresses
Отстранување

www.bosch-pt.com/serviceaddresses
Uklanjanje dubreta

Električne alate, akumulacione baterije, pribor i pakovanja treba predati na reciklažu koja je u skladu sa zaštitom životne sredine.
Ne bacajte električne alate i akumulatore/baterije u kućno djubre!
Samo za EU-zemlje:
www.bosch-pt.com/serviceaddresses
Odlaganje

Poskrbite za okolju prijazno recikliranje električnih orodij, akumulatorskih baterij, pribora in embalaž.
www.bosch-pt.com/serviceaddresses
Zbrinjavanje

www.bosch-pt.com/serviceaddresses
www.bosch-pt.com/serviceaddresses
www.bosch-pt.com/serviceaddresses
Šalinimas

www.bosch-pt.com/serviceaddresses
처리

ل Effect. Departices Marketing for the Practure of the Practure of the Practure of the Practure of the Practure of the Practure of the Practure of the Practure of the Practure of the Practure of the Practure of the Practure of the Practure of the Practure of the Practure of the Practure of the Practure of the Practure of the Practure of the Practure of the Practure.
Robert Bosch Morocco SARL
- شارع الملازم محمد م representatives
20300 الدار البيضاء
www.bosch-pt.com/serviceaddresses
www.bosch-pt.com/serviceaddresses
Head of Product Certification

i.v. h=mc
Robert Bosch Power Tools GmbH, 70538 Stuttgart, GERMANY Stuttgart, 07.10.2024
IV
CE
Declaration of Conformity
Hammer adapter with auxiliary handle Article number
GFA 12-H 1 600 A01 L1N
We declare under our sole responsibility that the stated products comply with all applicable provisions of the regulations listed below and are in conformity with the following standards.
Technical file at: Robert Bosch Ltd. (PT/SOP-GB), Broadwater Park, North Orbital Road, Uxbridge UB9 5HJ, United Kingdom
The Supply of Machinery (Safety) Regulations 2008

BOSCH
Robert Bosch Power Tools GmbH, 70538 Stuttgart, Germany represented (in terms of the above regulations) by
Robert Bosch Limited, Broadwater Park, North Orbital Road, Uxbridge UB9 5HJ, United Kingdom
Vonjy Rajakoba
Managing Director - Bosch UK
Martin Sibley
Business Operations and Aftersales Director

Robert Bosch Ltd. Broadwater Park, North Orbital Road, Uxbridge UB9 5HJ, United Kingdom, as authorised representative acting on behalf of Robert Bosch Power Tools GmbH, 70538 Stuttgart, Germany
Place of issue: Uxbridge Date of issue: 07/10/2024