GFRF21IX - Oven Glem Gas - Free user manual and instructions
Find the device manual for free GFRF21IX Glem Gas in PDF.

| Product type | Gas built-in oven |
| Brand | Glem Gas |
| Model | GFRF21IX |
| Power supply | Gas (G30/31 or G20) and electricity (230 V) |
| Oven power | 3.1 kW (liquid gas), 3.1 kW (natural gas) |
| Grill power | 2.4 kW (liquid gas), 2.4 kW (natural gas) |
| Gas consumption (oven) | 189 g/h (G30/31) / 296 l/h (G20) |
| Gas consumption (grill) | 124 g/h (G30/31) / 229 l/h (G20) |
| Oven injector | 79 (G30/31) / 125 (G20) |
| Grill injector | 60 (G30/31) / 108 (G20) |
| Functions | Gas oven, gas grill, rotisserie, fan, light, mechanical timer 60 min |
| Provided accessories | Grid, drip tray, Air Fryer basket (depending on model) |
| Material | Stainless steel, glass |
| Safety | Safety valve, shutdown if flame extinguished, lock if door partially open |
| Cleaning | Manual cleaning, door disassembly, removable gaskets |
| Repairability | Spare parts available, replaceable bulb (15 W or 25 W, T300 °C) |
| Installation | Built-in, gas and electrical connection by qualified technician |
Frequently Asked Questions - GFRF21IX Glem Gas
User questions about GFRF21IX Glem Gas
0 question about this device. Answer the ones you know or ask your own.
Ask a new question about this device
Download the instructions for your Oven in PDF format for free! Find your manual GFRF21IX - Glem Gas and take your electronic device back in hand. On this page are published all the documents necessary for the use of your device. GFRF21IX by Glem Gas.
USER MANUAL GFRF21IX Glem Gas
p.2 MANUALE USO E MANUTENZIONE
p.18 USE AND MAINTENANCE MANUAL
p.34 MODE D'EMPLOI ET D'ENTRETIEN
p.47 MANUAL DE USO Y MANTENIMIENTO
natural_image
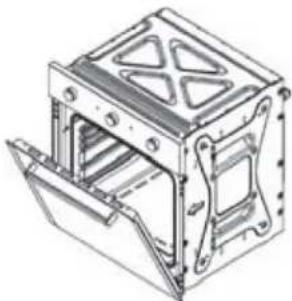
Simple line drawing of a cabinet with three circular tops and a horizontal beam (no text or symbols)BUILT-IN
Gas Oven
INTRODUZIONE
Cara/Caro Cliente,
natural_image
Technical line drawing of a mechanical device with internal components and mounting base (no text or symbols)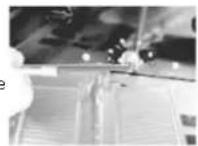
natural_image
Technical line drawing of a mechanical assembly with a lever and clamping mechanism (no text or symbols)natural_image
Technical line drawing of an oven with internal grating and ventilation ducts (no text or symbols)natural_image
Gray square tray with side holes, no text or symbols visibleAIRFRYER:
natural_image
Line drawing of a rectangular plastic basket with mesh structure (no text or symbols)
natural_image
Simple circular diagram with two input symbols and one output symbol, no text or labels present.SELETTORE (V.2):
natural_image
Technical line drawing of a mechanical housing or enclosure with internal compartments and mounting holes (no text or symbols)natural_image
Interior view of an oven with a 3° angle indicator and a zigzag line on the side (no text or symbols beyond the angle marker)natural_image
Interior view of an oven with visible air duct and outlet lines (no text or symbols)natural_image
Close-up of a metal clamp securing a piece of material into a container (no text or symbols visible)natural_image
Close-up of a mechanical component with wires and a curved pipe, no visible text or symbols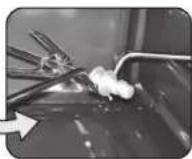
natural_image
Close-up of a metallic mechanical component with wires and a small white arrow pointing to a detail (no visible text or symbols)natural_image
Close-up of a medical device with labeled parts A and B, showing a close-up view of a circular component (no text or symbols present)natural_image
Close-up of a curved mechanical component or bracket with internal lines, no visible text or symbolsnatural_image
Line drawing of a hand inserting a component into a device (no text or symbols)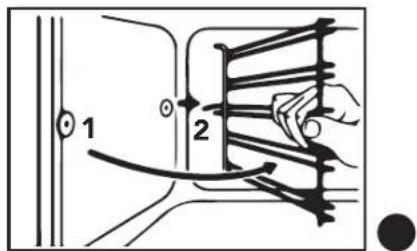
Thank you for having purchased our product.
IMPORTANT:
Keep these use instructions with your product. Should the product be sold or transferred to other people, ensure that it is accompanied by its instructions. We ask that you carefully read these recommendations before installing and using the product. They have been drafted for your safety and the safety of those near you. This manual gives indications to maintain the aesthetic and functional qualities of the oven unaltered.
This appliance complies with the following:
- 2014/35/EC Low Voltage (Directive)
- 2014/30/EC Electromagnetic Compatibility (Directive)
- 2016/426/EC Gas Appliance (Regulation)
- 1935/2004/EC Material intended to come into contact with food (Regulation)
- 2002/95/EC Restriction of the use of certain hazardous substances in electrical and electronic equipment (Directive)
- 2010/30/EC Energy labelling of household ovens (Directive)
- 65/2014 Energy labelling of household ovens (Regulation)
Note: The oven category is: Il2H3+, G30/31 28/37 mbar-, G20 20 mbar.
For technical data, see the technical data table.
With the constant aim to improve our products, we reserve the right to amend their technical, functional or aesthetic features, parallel to the technical evolution.

IMPORTANT:
Before starting the oven, carefully read this installation ad use manual in order to know its functioning better.
INDEX
03 Oven use and safety warnings
04 Installation
05 Place of installation
06 Gas connection
07 Injector replacement
07 Thermostat minimum regulation
09 Controls Description
10 Turning on the gas oven
10 Use of the grill
15 Oven maintenance and cleaning
INSTRUCTIONS FOR THE INSTALLER:
QUALIFIED TECHNICIAN who must carry out the installation, commissioning and testing of the appliance.
INSTRUCTIONS FOR THE USER:
These include recommendations for use, description of the controls and the correct cleaning and maintenance of the oven.

OVEN USE AND SAFETY WARNINGS

Warning: this appliance and accessible parts may heat up during use. Be careful not to touch the heating elements. The appliance should be kept out of the reach of children younger than 8 years unless supervised at all times.

The appliance can only be used by children older than 8 years and by people with reduced physical, sensory, mental capabilities or lack of experience or knowledge only if strictly supervised whilst using it or if they have been shown how to use it in a safe way and understand the hazards involved. Do not let children play with the appliance. Children must not be allowed to clean the appliance unsupervised.

Warning: the accessible parts may get hot when in use: keep children well away from the appliance.

Never use steam or high-pressure equipment to clean the oven; this may cause problems to the electrical safety devices.

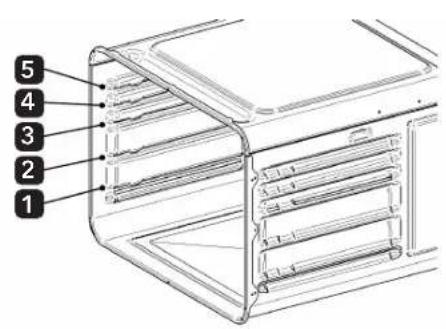
Pan supports and pans must be positioned inside the oven utilising the special guides in a proper way (the oven is equipped with 5 levels on side guides to position the pans and the pan supports at different level as described in detail in chapters 7 and 4).

Disconnect the oven from the mains before every intervention which requests access to the live parts.

Make sure that the appliance is switched off before replacing the oven light in order to avoid electrical shocks.

Do not utilise abrasive sponges or sharp scrapers to clean the oven glass door as this may scratch the surface causing the glass to shatter.

This appliance is exclusively intended for non-professional use. Do not use the appliance for commercial or industrial purposes or for any other purpose for which it was not conceived.

This appliance has been conceived for domestic and private use. It is exclusively intended for cooking food products. Therefore, any liability for uses different to those indicated is declined. None of the components of this oven are made with asbestos. Do not amend and try to amend the technical features of this appliance, as this might present a danger for yourself and for those near you.

Before using the oven for the first time, heat it up empty for about 15 min. Ensure the room is ventilated. You may smell a particular odour or notice a small emission of smoke. THIS IS NORMAL.

The appliance becomes hot during use. Do not touch the heating elements inside the oven. Do not go near the hot upper elements with your hands when inserting or removing the pans or pan supports from the oven, use thermal kitchen gloves. When cooking food, only use plates or pans resistant to high temperatures. Never place aluminium foil directly on to the oven support surface, as the accumulated heat may cause the enamel to deteriorate. Do not lay heavy objects on the oven door and ensure that children do not sit on it. When cleaning the inside, ensure the oven is cold and that it is switched off.

The alcohol vapours inside the hot cooking compartment may catch fire. Do not cook food containing large quantities of beverages with a high alcohol content. Only use small quantities of beverages with a high alcohol content. Open the door of the appliance carefully.
RESPECTING THE ENVIRONMENT
The packaging materials of this appliance can be recycled. Participate in recycling to contribute to safeguard the environment. Throw the different materials in the appropriate containers at your disposal in your town/city. This appliance contains recyclable materials. They are marked with this logo indicating that the appliance used must not be disposed of with urban waste. They are therefore compliant with European Directive 2002/96/EC on waste electrical and electronic equipment. Contact your town/city or your dealer to know the collection points nearest to you.
We thank you for your collaboration in safeguarding the environment.
INSTALLATION
This appliance complies with EEC circular 82/499 relative to limitation of radio-electric interference. The also oven complies with the D.L. n.108 of 25/01/92 (Directive 93/68/CE). This appliance can be installed and operate only in rooms which are permanently ventilated.
Installation must be carried out following the instructions in this manual on the part of qualified technical personnel. Maintenance and inspection must be carried out with the appliance disconnected electrically and the gas system cock closed. Installation must comply with the Standards in force.
Installation is at the charge of the purchaser. Any requests made to the Manufacturer which depend on improper installation will not be covered by the warranty. The qualified technician must leave you a declaration of conformity for the work carried out when he has done. The same is to be considered liable for harm to persons or objects caused by connections that do not comply with Standards.
Oven positioning
The oven is designed to be built into furniture. The sizes must respect the quota indicated in figure 1.
FIGURA 1
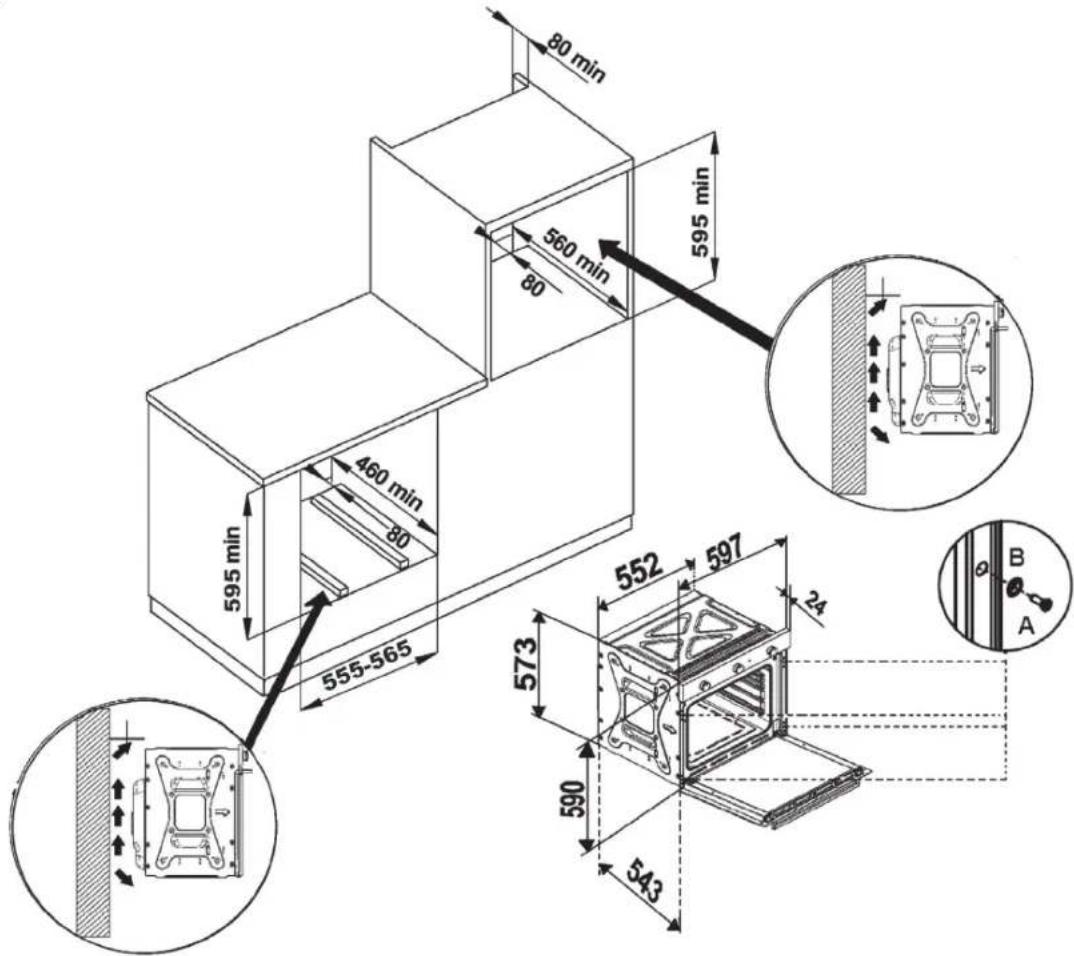
Tighten the 4 screws by firstly inserting them inside the bush and then inside the frame (figures 1 Ref. A/B).
The upper/rear part of the cabinet must have an opening of at least 80-90 mm deep, as indicated in figure 1.
- For installations underneath the "top" surface, ensure that the rear/lower part of the cabinet has an opening similar to that shown in figure 1.
Do not use the door as lever to insert the oven inside the cabinet. Do not put pressure on the open door.
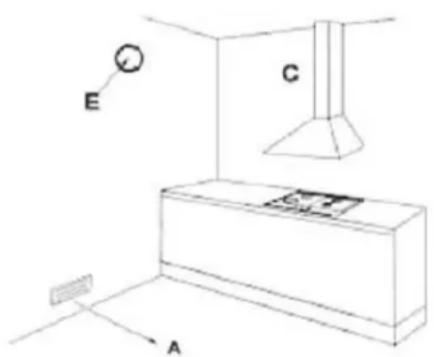
PLACE OF INSTALLATION

The appliance must be installed and used in suitable areas and in any case, it must be conformity with laws in force. The installer must refer to laws in force concerning ventilation and evacuation of combustion products. It is reminded that the necessary area for combustion is 2 m3/h per kW of power (gas) installed.
The area where the gas appliance is installed must have a natural flow of air, necessary for gas combustion.
The flow of air must come from one or more openings made on a free section of at least 100 cm2(A).
This opening must be constructed in a manner so that it is not obstructed internally and must be near the floor, preferably on the opposite side of combustion product evacuation.
When it is not possible to make these openings, the air can come from an adjacent room, ventilated as required, as long as this room is not a bedroom, have a dangerous environment or sunk down.
Combustion products exhaust
The gas cooking apparatus have to discharge the combustion products through hoods connected directly to chimney flues or directly to outside, see figure. Should it not be possible to install a hood, the use of an electric fan applied to an external wall or to the room window is necessary. This electric fan must have a capacity which guarantees an air exchange in the kitchen at least 3÷5 times its volume.
Components illustrated in the figure:
A: Opening for air input
C: Hood for combustion products evacuation
E: Electric fan for combustion products evacuation
GAS CONNECTION

Before installing, ensure that the local distribution conditions (gas nature and pressure) and the oven regulation are compatible. To do this, verify the data of the product label applied on the oven and this booklet.
The gas connection must comply with Standards. The oven must be connected to the gas plant using stiff metal tubes or stainless-steel flexible tubes in the wall, with a maximum extension of 2 m.
When using flexible metal tubes, ensure that they do not come into contact with moving parts or are crushed.
Carry out the connection so as not to cause any kind of stress on the apparatus.
The gas input connection is threaded "G1/2".
For ISO R7 connections, it is not necessary to interpose the gasket.
For ISO R228 connections, it is necessary to interpose the head washer provided.
After the connecting operations, verify the connections sealing with a soapy solution.
Electrical connection
Ensure that the voltage corresponds to that indicated in the plaque located on the oven door frame.
The cables for the connection to the mains must be protected from direct contact with the oven's metal casing.
THE PLAQUE MUST NEVER BE REMOVED.

Warning: the earth connection must be compliant with law.
If using a fixed direct connection to the electrical network, it is necessary to provide a proper device with ensures the disconnection from the mains with a distance of contact opening which allows complete disconnection in conditions of overvoltage category III, in accordance with the rules of installation. Avoid using reductions or adaptors as they may cause overheating or burning.
After installation, carry out a brief oven check, following the instructions reported further down. In case the appliance does not function, disconnect it from the mains and contact the after-sales assistance centre nearest to you.
DO NOT ATTEMPT TO REPAIR THE APPLIANCE.
The oven is provided with a cable without a plug. The plug to be used must be the standardised, being aware that:
- Yellow-green: earth
- Blue: neutral
- Brown: phase

WARNING!
The manufactures declines any liability for damage suffered by persons and things, caused by the non-compliance of the above prescriptions or deriving from the tampering of even a single part of the appliance and use of non-original spare parts.
Technical specifications
| TYPE OF BURNER | TYPE OF GAS | PRESSURE (mbar) | NOMINAL THERMAL POWER (kW) | GAS CONSUMPTION | INJECTOR MARKING (1/100) mm | |
| OVEN LIQUID GAS | G30/31 28..30/37 3 | 1 189 g/h | 79 | |||
| GRILL LIQUID GAS | G30/31 28..30/37 2 | 4 124 g/h | 60 | |||
| OVEN | NATURAL GAS | G20 | 20 | 3.1 | 296 l/h | 125 |
| GRILL | NATURAL GAS | G20 | 20 | 2.4 | 229 l/h | 108 |
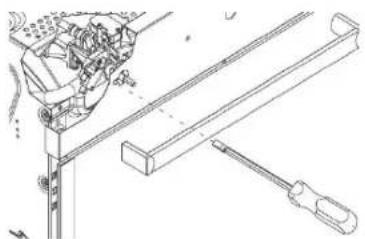
INJECTOR REPLACEMENT
Oven burner
Before replacing injectors, check that the oven is not connected electrically. The operations are the following:
- Open the oven door completely;
- Extract the oven plate by unscrewing the 3 screws that stop it (Fig. A);
- Remove the burner, freeing it from the fastening screws.
Using an adequate key, you can unscrew the injectors and replace them with others suitable for the type of gas listed on the table technical data.
- Put the bed plate back in place, taking care not to damage the glow plug wires and thermocouple tubes and tighten the screws.

natural_image
Technical line drawing of a mechanical device with internal components and mounting base (no text or symbols)FIG. A

Grill Burner (if provided)
As regards the grill burner, proceed as follows:
- Open the oven door completely;
- Loosen the screws to remove the burner, unscrews the injectors using a suitable spanner and replace them with injectors appropriate for the type of gas shown in the Technical Data.
- When finished, put the grill burner back and tighten the screws.

THERMOSTAT MINIMUM REGULATION
This operation is carried out when the oven is built into the cabinet and after qualified personnel have carried out the electrical and gas connections. The operation is necessary when passing from one type of gas to another (form natural gas G20 to liquid gas G30) in order to guarantee a minimum temperature close to 150 °C.
The operations are the following (Fig.3):
FIGURE 3
natural_image
Technical line drawing of a mechanical assembly with a tool handle and component (no text or symbols)» Open the door (the burner inside the oven turn only when the door is open). »Remove the bed plate (see indications in paragraph 6, Fig. A).
»Turn the oven on at the maximum temperature for 20 minutes.
»When it is turned on, closed the door.
» Bring the thermostat knob back to the indicative temperature of 150 °C. »Remove the knob.
Insert a screwdriver in hole in parallel with the thermostat leg and regulate the by-pass until a reduced but stable flame obtained. This operation must be carried out with the oven door closed.
» Act on the by-pass screw with a flat-bladed screwdriver. It is sufficient to unscrew the by-pass to regulate the minimum, passing from liquid gas to methane gas.
» To function with G30/31 gas (LPG), the regulation by-pass screws must be screwed all the way.

When the burner has been regulated, check that the flame remains at a minimum carrying out these operations:
» Rotate the knob from the min. position to the max. position 3 times.
» Open and close the oven door continuously for 4/5 times, neither too quickly nor to slowly.
» If the flame goes out, regulate the by-pass once again (slightly increasing the minimum).
When these operations are over (injector replacement, air regulation and minimum regulation) turn the oven off and update the data label on the oven door frame, indicating the new type of gas in use.
Pre-use of oven and accessories
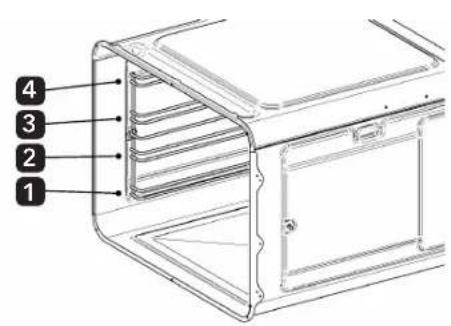
Before using the oven for the first time, remove all accessories and wash them with dishwashing soap. Dry them and then re-mount them in the oven. Heat the oven at the maximum temperature for about 20 minutes in order to eliminate unpleasant odours caused by oils used by the manufactures. The oven is equipped with 5 levels on side guides to position the pans and pan supports at different heights or 4 levels on metal rod side guides.
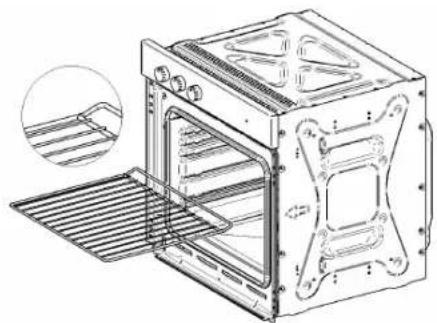
PAN SUPPORT: Used as support for containers with food for cooking. Caution: the pan support must be inserted in the direction indicated in the following image.
BAKING PAN: Use for cooking food by covering the pan with parchment paper. It can also be used as a container for collecting grease that drips from dishes when cooking food with the pan support.
natural_image
Technical line drawing of an oven with internal structure and a magnified inset showing the exterior panel (no text or symbols)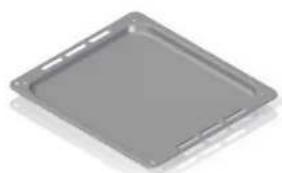
natural_image
3D rendering of a gray square plate with mounting holes (no text or symbols)AIR FRYER:
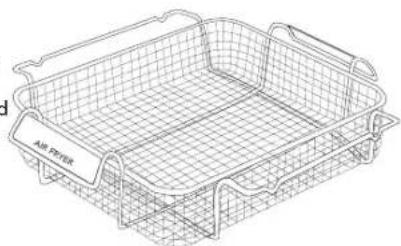
Standard on some models, it is a stainless steel basket for air frying. The basket uses the movement of hot air in the oven cavity to distribute the heat evenly around the food.
We recommend using the Air fryer with a ventilated function.
The Air Fryer basket perfectly cooks any frozen food such as chips or fish fillets. Cook according to the normal instructions on the package. Instead of turning the food during cooking, simply shake the basket halfway through the cycle. Use the middle shelf (3rd level from the bottom) and place the pan on the first shelf (1st level from the bottom) to collect cooking residues.
natural_image
Line drawing of a rectangular air filter basket with mesh grid (no text or symbols)
Do not use additional oil and/or grease when using this accessory.

I accessories are present on certain models and markets.
It is possible to request the original accessories, in the model provided, through the authorised after-sales assistance centres.
CONTROLS DESCRIPTION
Act on control devices placed on the oven panel to select the various functions with the knob.
radar
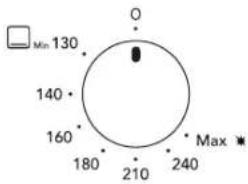
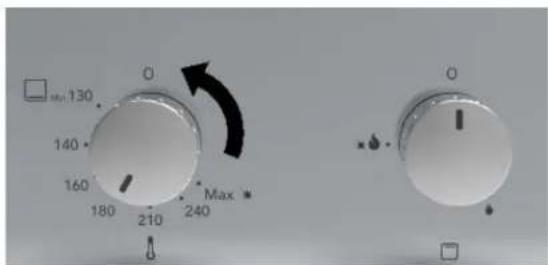
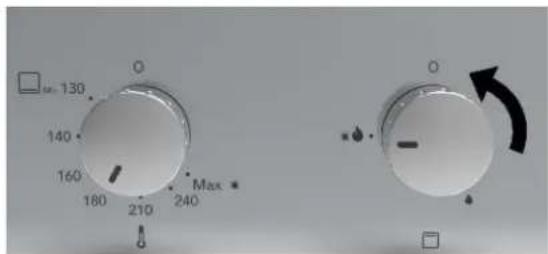
| Position | Value | |---|---| | Min | 130 | | Max | 240 | | Point | 160 | | Point | 180 | | Point | 210 | | Point | 240 | | Point | 140 | | Point | 130 |THERMOSTAT KNOB FOR GAS OVEN WITH ELECTRIC GRILL:
Allows to choose the most suitable temperature for the food to be cooked. Turn the knob anticlockwise to select the temperature from 130 °C to MAX and operate the oven burner. Turn the knob clockwise to operate the grill burner. Press the thermostat knob to ignite the burner.
Allows to choose the most suitable temperature for the food to be cooked. Turn the knob anticlockwise to select the temperature from 130 °C to MAX and operate the oven burner. Turn the knob clockwise to operate the grill burner. Press the thermostat knob to ignite the burner. The oven is always turned off bringing the knob index back to the panel index.
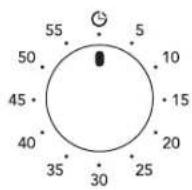
MECHANICAL MINUTE COUNTER:
The minute counter can be regulated for a maximum period of one hour. The regulation knob must be turned clockwise until 60-minute position, and then placed at the desired time, rotating it clockwise. When the pre-set time is over, an acoustic signal goes off, which stops automatically. The minute counter does not interrupt the oven functioning when the acoustic signal goes off.
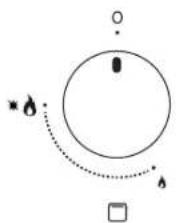
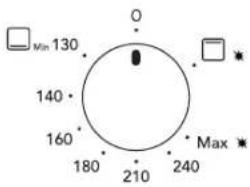
GAS GRILL SELECTOR KNOB:
Allows you to activate / deactivate the grill burner and adjust the flame power. By turning the knob anticlockwise, you can choose most suitable flame power, starting from the highest up to the lowest. Press the thermostat knob to ignite the burner. The grill gas is always turned off bringing the knob index back to the panel index.
flowchart
graph TD
    A["Start"] --> B((End))
    B --> C["Control Point"]
    C --> D["End"]
    style A fill:#f9f,stroke:#333
    style B fill:#ccf,stroke:#333
    style C fill:#cfc,stroke:#333
    style D fill:#fcc,stroke:#333
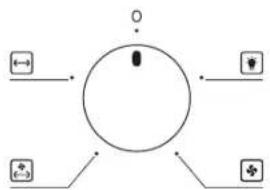
MULTIFUNCTION SWITCH (V.1):
Allows you to select one function at a time between the following: oven light, fan, fan + turnspit, turnspit. The oven is always turned off bringing the knob index back to the panel index.
SWITCH (V.2):
Allows you to select one function at a time between the following: oven light, turnspit. The oven is always turned off bringing the knob index back to the panel index.
flowchart
graph TD
    A[" "] --> B(( ))
    C[" "] --> B
    D[" "] --> B
    E[" "] --> B
    F["+"] --> B
    G["+"] --> B
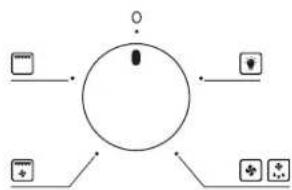
MULTIFUNCTION SWITCH (V.3):
Allows you to select one function at a time between the following: oven light, electric grill, electric grill + fan and fan. The oven is always turned off bringing the knob index back to the panel index.
Light signal
PILOT LIGHT (ORANGE) FOR OVEN WITH ELECTRIC GRILL

When the light turns on, it means that the grill heating.
COOLING UNDER WAY INDICATOR FOR OVEN WITH GRILL GAS

The light is on during cooling. Cooling may be extended as necessary after the oven is turned off.
TURNING ON THE GAS OVEN
The oven is turned on with the DOOR OPEN in the following way:
» Press the thermostat knob lightly and rotate it anti-clockwise to the maximum position.
» Press the knob all the way down to trigger the electric turning on and hold it a few seconds until the safety device is activated.
»Then position the knob on the desired temperature.
The oven burner is provided with a safety valve which blocks the gas flow in the following cases:
- The thermostat knob is rotated accidentally with gas flowing immediately to the oven burner.
• The burner flame goes out accidentally.
• There is no gas flow from the network. - Avoid the burner from turning off during regulation of the oven form the maximum to the minimum temperature, the thermostat is provided with a stopping device. To turn the burner off from the minimum position, just press the knob lightly and rotate it until the knob index coincides the fixed index on the front.
natural_image
Technical line drawing of a mechanical housing or enclosure with internal compartments and mounting holes (no text or symbols)TURNING ON: the oven burner is turned on with the oven door open. Should the door be only partially open; safety device blocks the burners from turning on automatically.
USE OF THE GRILL
How to use the selector with the electric grill oven with turnspit:
Position 0: Off

Position 1: Oven light

Position 2: Turnspit
Turn the gas oven on and select thermostat knob between 100 °C and 250 °C. This type of cooking is carried out the oven door closed.

Position 3: Grill + Turnspit
This type of cooking is particularly good for quick gilding of foods. The selector in this position allows the automatic use of the turnspit + grill.

Position 4: Grill
This type of cooking is particularly good for quick gilding of foods. The selector in this position allows the automatic use of the grill.
USE OF THE SELECTOR OVEN:
How to use the selector with the electric grill oven with fan, without turnspit:
Position 0: Off

Position 1: Oven light

Position 2: Fan:
Turn the gas oven on and place the thermostat commutator in a position between 150 °C and the maximum temperature in order to activate the fan.

Position 3: Defrosting
The food can be defrosted quickly by selecting only the fan function.

Position 4: Grill + Fan
The selector in this position allows automatic use of the grill + fan.

Position 5: Grill
The selector in this position allows automatic use of the grill. This type of cooking is particularly good for quick gilding of foods.
How to use the selector with the electric grill oven without turnspit:
Position 0: Off

Position 1: Oven light

Position 2: Grill
This type of cooking is particularly good for quick gilding of foods. The selector in this position allows the automatic use of the grill.

If during functioning of the electric grill the oven thermostat knob should turn by accident, a safety device will block the grill function. To restore it, just rotate the oven knob until the knob index coincides with the fixed on the panel (thermostat closing).
How to use the selector with the gas grill oven:
Position 0: Off

Position 1: Oven light

Position 2: Turnspit

Position 3: Fan

Position 4: Fan + Turnspit
Before introducing food inside the oven, it is recommended to pre-heat it for at least 5 minutes.
Place the food to be grilled on the appropriate pan support or on the pan, placing it on the highest guide (see paragraph 7.1) depending on the volume of the food to be grilled.
Place the dripping-pan on the step underneath the food in order to collect the grease.
Depending on the type of food to be cooked (meat, fish, chicken, etc.) it is necessary to turn the food on order to expose both sides to the rays of the heating elements.
COOKING WITH THE GRILL MUST NOT EXCEED 30 MINUTES.

Note: the grill does not work when the over burner is in use.
Use gas oven with gas grill (oven door closed)
The oven burner most always be lit with the oven door fully open and the cavity empty. Press and turn the oven knob counterclockwise to the MAX position. Holding the knob down, bring a lit match (or a spark, or lighter) close to the hole on the base of the oven. Keep the knob pressed down for approximately 10 seconds then release it. Closed the oven door, set the cooking temperature at 180^ C and wait 20 minutes than open the oven door and put foods inside the oven on the desired level and ignite the gas grill.

WARNING: It's advisable to utilise the grill function with the door closed for max 25 minutes, to avoid an excessive overheating of the external surfaces. Use the gas oven with the gas grill together following the instructions below:
1) Set the gas oven temperature on 180^ C and wait 20 minutes to preheat (see picture A)
Picture A
2) Set the grill gas temperature at the MAX. position (see picture B)
Picture B
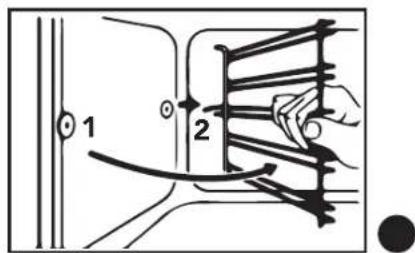
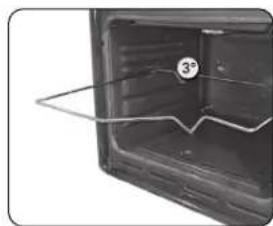
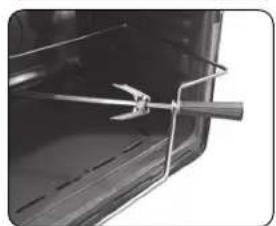
Use of the turnspit:
In the oven you can use the turnspit combined with the operation of the grill or oven. The turnspit activates with the "Turnspit" cooking mode. Put the food on the turnspit so that it can be supported by the two forks; balance the weight in the centre to avoid unnecessary strain on the turnspit motor as it rotated. Then proceed as follows:
natural_image
Interior view of an oven with a 3° angle indicator and a wire mesh around the door (no text or symbols on the interior)1) Place the frame inside the third guide starting from the bottom.

natural_image
Interior view of an oven with visible air ducts and ventilation ducts (no text or symbols)2) Position the pulley onto the frame so that it remains driven.
natural_image
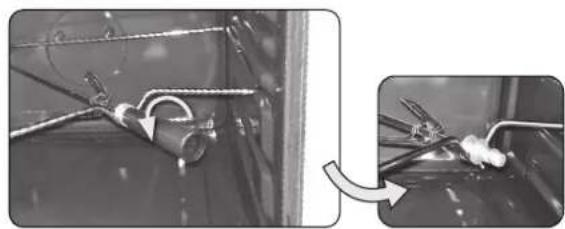
Close-up of a metal tool securing a piece of material into a container (no text or symbols visible)3) Remove the plastic handle by unscrewing it.
natural_image
Close-up of a mechanical assembly with wires and a pipe, showing a close-up view (no text or symbols visible)4) Introduce the frame with the food on the spit-pole until the pole point is inside the hole located on the oven rear wall.

natural_image
Close-up of a medical or laboratory procedure with tubing and a tool, no visible text or symbols5) Once cooking is completed, tighten the plastic handle to the spit to be able to extract it.

Position a pan on the first guide from the bottom and pour some water to avoid the formation of smoke.
OVEN MAINTENANCE AND CLEANING
Disconnect the oven power supply before every intervention that requires access to live parts.
Cleaning the stainless steel
In order to keep the stainless steel in good condition, clean it regularly each time it is used, first allowing it to cool down.
Daily routine cleaning
To clean and preserve the stainless-steel surfaces, always use only specific products without abrasive.
Use instructions: pour the product on to a damp cloth and wipe the internal surface of the oven, accurately rinse and dry with a soft cloth.
Food or residue stains
Never use metal sponges or sharp scrapers, the surface may be damaged. Use normal, non-abrasive products for steel, using tools made of plastic or wood material if necessary. Accurately rinse and dry with a soft cloth. Avoid letting sugary food residue dry inside the oven (e.g. jam, chocolate, etc.). In time they may ruin the enamel coating the inside of the oven.

In order to keep the oven in peak condition, clean it properly each time it is used, first allowing it to cool down. For easier cleaning, extract all removable parts.
Oven cleaning (without self-cleaning panels)
Clean the oven pan support and the side guides with hot water and non-abrasive detergents, rinse and dry. The door can be removed for easier cleaning (see point 4.8 "Dismantling of the door").
Glass door
To clean use kitchen absorbent paper, in case of persistent dirt, wash with a damp cloth and common detergent. Do not use abrasive detergents or sharp metal scrapers to clean the glass door, since they may scratch the glass surface and cause it to break. We recommend keeping the glass of the door as clean as possible.
The oven requires small maintenance interventions should, in time, those parts subject to wear, such as gaskets, lamp, etc., require replacing. Instructions for these types of interventions are supplied below.
Disconnect the oven power supply before every intervention that requires access to live parts.
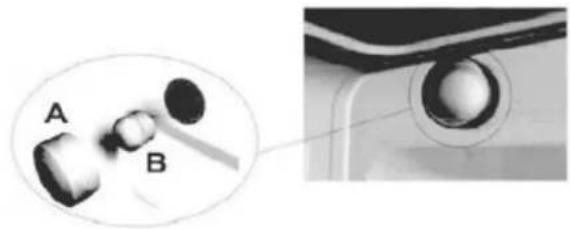
Replacement of the internal lamp
Remove protection cover A by unscrewing it anti-clockwise, replace lamp B with a similar one (see figure on the side).
Mount the protection once again and screw it clockwise until it is tight.
Only use oven lamps (T300 °C) 15W./25W depending on models.
Never touch the lamp with bare fingers, always use protective gloves.
Only use lamps obtained from authorised after-sales centres.
natural_image
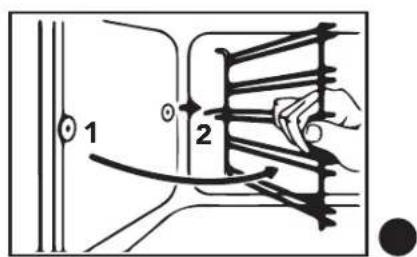
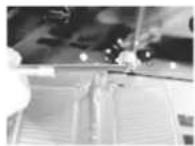
Close-up of a mechanical component with labeled parts A and B, showing a circular detail (no text or symbols beyond labels)Dismantling of the door
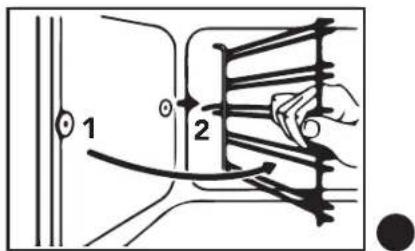
Lift levers "1" up to the ledge with hinges "2" and hold the door at the two sides with both hands near the same hinges. Lift the door upwards forming an angle of approx. 45° and carefully extract it. For the mounting, place hinge "2" in the appropriate grooves, therefore leave the door to lean downwards, ensure it remains blocked in grooves "3", then release levers "1" (figure on the side).

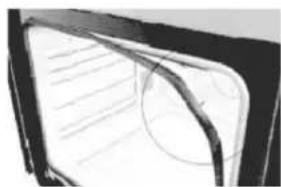
Dismantling of the oven door gaskets
To better clean the oven, the door gasket can be removed. Before removing the gasket it is necessary to dismantle the oven door as described in paragraph 4.8 "Dismantling of the door". With the door dismantled, lift the tabs located in the middle and at each corner, as shown in the figure. Once cleaning is completed, re-mount the gasket keeping the longest side horizontal and place the tabs in the respective holes, starting from the upper ones.
natural_image
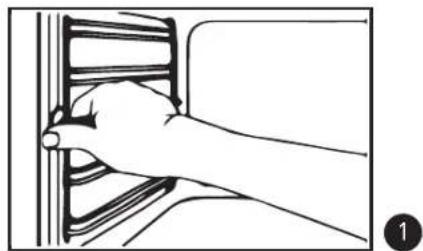
Close-up of a curved mechanical component with internal lines and a circular mark (no text or symbols visible)Disassembling the shelf supports
- First slide the extraction guide out of the side wall by pulling it forwards.
- Slide the rear extraction guide out of the side wall and remove it.
natural_image
Line drawing of a hand inserting a component into a wall (no text or symbols)-
To reinstall the supports, follow the procedure indicated in reverse.
GUIDE TO COOKING
Types of cooking Specialista\*
| Types of cooking | Food | Shelf position | Temperature °C | Cooking time (min) | Accessory | |
 GRATIN(1) GRATIN(1) | Scallops | -15  | 180 - 190 10 - 15 | Air Fryer code 084F21(3) | ||
| Mussels 200 - 220 10 | ||||||
| Lobster 220 - 250 10 | ||||||
| Cauliflowers 200 - 220 8 | ||||||
| Broccoli 180 - 200 15 | Level 2 or 3 | |||||
| Artichokes 170 - 180 15 | -20 | |||||
 LEAVENING(2) LEAVENING(2) | Fresh baking yeast | 22 - 25 g |  | 0^ -(light only) | 2 (1,5-3) hours | - |
| 18 - 20 g 4 (2,5-5) ho | ||||||
| 14 - 16 g 6 (4-8) hour | ||||||
| 10 - 12 g | 8 (5-10) hours | |||||
| 6 - 8 g 10 (6-12) houn | Level 1 | |||||
| 1 - 4 g 12 (8-15) hours | ||||||
| Solid sourdough | 250 - 300 g | Level 1 | 0^ -(light only) | 5 (4-7) hours | - | |
| 200 - 220 g | 8 (7-10) hours | |||||
| 150 - 180 g | 11 (10-13) hours | |||||
| 100 - 120 g | 14 (13-16) hours | |||||
| 50 - 80 g | 17 (16-19) hours | |||||
| 10 - 30 g | 20 (19-24) hours | |||||
(1) Gratin is a culinary technique performed at high temperatures in which a dish is topped with a crispy and golden crust. It is therefore not recommended to use it for the entire cooking time to avoid burning or drying out the inside of the dish. The best solution is to cook the food and proceed without the gratin preparation, which only needs to be added in the final stage.
(2) Table of rising times for 1 kg of 00/0 flour mixed with baking yeast or sourdough. The inside of the oven cavity is ideal for leavening as it is temperature-controlled and draught-free. The ideal temperature for a proper leavening process is 28-30^ C, which is why only oven light is needed.
(3) Do not use additional oil and/or grease when using this accessory. Recommended level for using the Air Fryer: 3rd.
General notes: The data provided here must be considered a guideline. Therefore, it can and must be changed based on your own tastes and habits. The time reported in the table does not include pre-heating the oven, which is always recommended. The time and temperature provided refer to an average amount of food: 1/1.5 kg for meat, pastry/pizza/bread dough 0.5/0.8 Kg. Multiple cooking on several levels must be carried out by placing the containers in the centre of each rack.
* Only available in certain markets.
Notes

Cher Client,
natural_image
Technical line drawing of a mechanical oven or rack unit with internal compartments and mounting base (no text or symbols)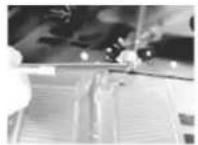
natural_image
Technical line drawing of a mechanical assembly with a lever and clamping tool (no text or symbols)natural_image
Technical line drawing of an oven with a side view showing internal structure and ventilation slots (no text or labels)natural_image
Gray square tray with flanges and small holes, no text or symbols visibleAIRFRYER :
natural_image
Line drawing of a wire mesh basket with handles and a label indicating 'A#14048' (no other text or symbols)
natural_image
Simple diagram of a circle with two input symbols and one output symbol, no text or labels present.natural_image
Technical line drawing of a mechanical housing or enclosure with internal components and mounting holes (no text or symbols)natural_image
Interior view of a refrigerator with a 3° angle indicator and a white line drawing on the door (no text or symbols beyond the label)natural_image
Interior view of an oven with visible wiring and arrows indicating components (no text or symbols)natural_image
Close-up of a metal tool securing a piece of material into a container (no text or symbols visible)natural_image
Close-up of a mechanical assembly with wires and a cylindrical component, showing a magnified view (no text or symbols)natural_image
Close-up of a metallic pipe or wire with a white arrow pointing to a small component (no visible text or symbols)natural_image
Close-up of a mechanical component with labeled parts A and B, showing a circular opening detail (no text or symbols beyond labels)natural_image
Close-up of a car's front window showing the roof and side panel (no text or symbols visible)natural_image
Line drawing of a hand inserting a component into a wall (no text or symbols)-
natural_image
Technical line drawing of a mechanical oven or rack unit with internal compartments and mounting brackets (no text or symbols)FIG. A
natural_image
Technical line drawing of a mechanical assembly with a tool handle and component (no text or symbols)natural_image
Technical line drawing of an oven with internal structure and a magnified inset showing internal components (no text or symbols)natural_image
Gray square tray with rounded corners and small side holes, no text or symbols visibleAIRFRYER:
natural_image
Line drawing of a rectangular metal basket with grid pattern (no text or symbols)
natural_image
Simple diagram showing a circle with a dot, a star symbol, and a dashed curved line with arrows pointing outward (no text or labels)PERILLA DE LA PARRILLA DE GAS:
natural_image
Simple diagram of a circle with two directional arrows and a small symbol at the top (no text or labels)SELECTOR (V.2):
natural_image
Technical line drawing of a mechanical housing or enclosure with internal components and mounting holes (no text or symbols)natural_image
Interior view of a double oven with a 3° angle indicator and a wavy line marking the interior (no text or symbols on the oven itself)natural_image
Interior view of an oven with visible air ducts and a wire, no text or symbols presentnatural_image
Close-up of a metal clamp securing a piece of material inside a container (no text or symbols visible)natural_image
Close-up of mechanical components with wiring and a magnified inset showing a detail (no visible text or symbols)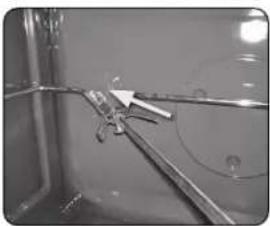
natural_image
Close-up of a metallic pipe joint with a white arrow pointing to a small component (no visible text or symbols)natural_image
Close-up of a medical device with labeled parts A and B, showing a circular component inserted into a housing (no text or symbols beyond labels)natural_image
Close-up of a car window with visible lane markings and a curved line (no text or symbols)natural_image
Line drawing of a hand inserting a component into a device (no text or symbols)