Olympus Neo - Coffee grinder EUREKA - Free user manual and instructions
Find the device manual for free Olympus Neo EUREKA in PDF.


| Product type | Professional dosing coffee grinder |
| Brand | Eureka |
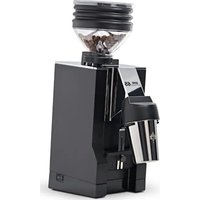
| Model | Olympus Neo |
| Dimensions (H × W × D) | 590 × 221 × 264 mm |
| Net weight | 15.2 kg |
| Power supply | 220-240 V, 50/60 Hz |
| Power consumption | 340 W |
| Hopper capacity | 1.4 kg |
| Grinding speed | 4.5-5.5 g/s |
| Rotation speed (burrs) | 1350-1650 rpm |
| Burr type | Flat steel burrs |
| Grind adjustment | Continuous micrometric knob |
| Dose programming | 1 cup and 2 cups, adjustable in increments of ~0.05 s |
| Continuous dispensing mode | Yes (hold the activation button > 0.5 s) |
| Display | LCD with dose indicators and counters |
| Portafilter fork | Height-adjustable, fits any portafilter |
| Dispensing spout | Height-adjustable |
| Materials | Metal body, plastic hopper |
| Burr lifespan | Approximately 250 kg of coffee |
| Cleaning | Hopper washable with soapy water; burrs cleaned with brush/compressed air |
| Safety | Automatic shutdown if jammed, unplug before maintenance |
| Intended use | Professional (restaurants, cafeterias, etc.) - not for mass production |
Frequently Asked Questions - Olympus Neo EUREKA
User questions about Olympus Neo EUREKA
0 question about this device. Answer the ones you know or ask your own.
Ask a new question about this device
Download the instructions for your Coffee grinder in PDF format for free! Find your manual Olympus Neo - EUREKA and take your electronic device back in hand. On this page are published all the documents necessary for the use of your device. Olympus Neo by EUREKA.
USER MANUAL Olympus Neo EUREKA
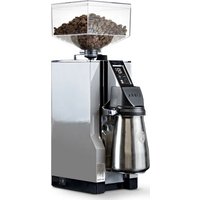
OLYMPUS NEO ZENITH NEO
natural_image
Two black industrial waste grilles with digital display screens, no visible text or symbolsLIBRETTO ISTRUZIONI
USER HANDBOOK - GEBRAUCHANWEISUNGEN MANUEL D'INSTRUCTIONS - INSTRUCCIONES DE MANEJO
Istruzioni Originali - Translation of the Original Instructions - Übersetzung der Originalanleitungen - Traduction des Instructions Originales - Traducción de las Instrucciones Originales
AVVERTENZE E SICUREZZE
The producer has reasonably considered every precaution possible, so to assure user's safety. Anyway, in installing and using the grinder, various conditions may create uncontrollable and unpredictable events; so, it's always necessary to evaluate any risks and consider what follows:
- Before connecting the grinder, it's necessary to verify that plate data match with electric net ones.
- Both installation and repair must respect safety instructions and the inforce rules of the country in which the grinder is installed.
- The grounding wire is necessary, like the installation. Both must respect the inforce rules of the country in which the grinder is installed.
- Adaptors, multiple outlets and extension cables are not suggested.
- Do not use this grinder if it is damaged on the cable. In case of malfunctioning, switch off the grinder and take it to the closest authorised service center.
- Do not immerse the grinder, the cable or the plug into water or other liquids. It's necessary to avoid that internal parts enter in contact with other liquids.
- Do not use any water jets, unsuitable detergents or steam-cleaners to clean.
- During its use, install the grinder on a flat and stable surface being able to sustain the weight of the grinder.
- The grinder is intended to be used only to grind roasted coffee beans. A different use is considered unsuitable and dangerous. The producer cannot be considered responsible for possible damages related to misuse or erroneous and unreasonable actions.
- The grinder cannot be used in extreme environmental conditions. In any case, use the grinder just between -5^ C ÷ +30^ C degrees.
- This grinder has been conceived for commercial use, like restaurant kitchen, cantines, hospitals and shops, like bakeries and butchers. It is not suitable for continuous food production.
- Do not allow children or untrained people to use the grinder.
- The grinder can be used by children being 8 years old or above and by people with reduced physical, sensory or mental capabilities; by people without adequate experience just when monitored and if these have received user instruction on the grinder. Cleaning cannot be performed by unmonitored children.
IMPORTANT WARNINGS
- Do not pull the cable or the grinder itself to disconnect its power cable.
- Do not use the grinder with wet or damp hands.
- Do not use the grinder when you are barefoot.
- Before cleaning or servicing, unplug the grinder from the electric net.
- Do not leave the grinder switched on when not necessary. When it is not working, unplug the grinder.
- Do not obstruct the fan or heat elimination systems. Do not enter any water or
liquids.
- While the grinder is working, do not enter spoons, forks or other utensils in the spout or the coffee container to perform anything.
- To solve any blockage in the spout, always switch off the grinder before.
- In case of failure of the motor, switch off the grinder and contact an authorised service center.
- Prevent the grinder to be used under any weather conditions (sun, rain, ecc.).
• Children must be monitored to prevent they play with the grinder.
- The owner is responsible for monitoring the installation of the grinder, so to assure it has been installed in environmental conditions that will not create a safety or health danger for the users.
- If you decide not to use anymore this grinder, we suggest to make it inoperative. After having it unplugged, cut the cable. In case of failure, switch it off and do not tamper with.
CONSERVATION OF THE MANUAL
This manual must always be at any user disposal. The user must be informed on the correct use of the grinder and on potential risks. It must be conserved in a dry, clean and heat-protected place. Use the manual so to avoid any damage to itself. Do not remove, rip or write on any manual parts. In case you cannot find the manual, take contact with the re-seller or the producer for further information.
UNPACKING THE GRINDER
- It's necessary to check out that there is not any damage on the grinder, looking at the external packaging
• After having removed the packing, check out there are no damages on the grinder.
- Check out the entirety of all components. In case of defects or damages, inform immediately the authorised reseller.
- The packing (box, cellophane, metallic parts, styrofoam, etc.) can cut, wound or be dangerous if mismanaged. Prevent children or non-responsible people entering in contact with the packing.
- This symbol on the grinder or on the packing informs that the grinder cannot be

considered like a usual home waste; it must be delivered to a suitable waste collection facility that recycle electric and electronic devices. If this grinder is correctly disposed of, you will prevent potential damages to both environment and health; these damages may occur in case the grinder is not correctly disposed of. Waste recycling
protects natural sources. For further information on the recycling of this product, you can contact your local authority, local recycling center or the reseller you purchased the grinder from.
IMPORTANCE OF THE MANUAL
This manual is addressed to the user of the grinder and it is considered part of this product. It shares information on its correct use and maintenance, including information on user's safety. This manual must be held during all the grinder's lifespan and must be transmitted to any user or future owner. All information in this manual do not replace safety rules and technical data on the installation and functioning of the grinder and its packing. This manual reflects the nowadays state of the art and it cannot be considered inadequate just because revised on the base of new technologies. The producer may modify the manual without revising previous editions, except in special cases. A misuse of the grinder, or a different use than the one described on the manual, will invalidate any warranty or responsibility of the producer. The grinder can be used just by a responsible adult. It's necessary to preserve the manual, as the producer cannot be held responsible for any damage on people or things, or any damage on the grinder in case it is misused or in case safety and maintenance rules are not respected.
WARNUNGEN UND
CONSERVATION DU MANUEL
IMPORTANCE DU MANUEL
EC DECLARATION OF CONFORMITY

Declare under our responsibility, that the product:
MACINADOSATORE PER CAFFE' MODELLI:
COFFEE GRINDER MODELS:
ZENITH NEO - OLYMPUS NEO
VERSIONE /VERSION : 220-240V/50-60Hz; 220V/60Hz
EQUIPAGGIATE CON DOSATORE ELETTRONICO
MATRICOLA DAL / SERIAL Nr. FROM : XX XXX 21 04 XXXX
To which this declaration relates, following the provisions of the directives:
Low Voltage Directive (LVD) 2014/35/EU - RED Directive 2014/53/EU - EMC Directive 2014/30/EU
RoHS Directive 2011/65/EU - MD Directive 2006/42/EC - WEEE
Directive 2012/19/EU
following the provisions of the regulation:
UNI EN 12100/1-2; UNI EN ISO 13857; CEI EN 55014-1/2; CEI EN 61000-3-2/3;
CEI EN 60335-1; CEI EN 60335-2-64; CEI EN 62233; EN 60704-1:1994;
we authorize the following person to compile the technical file:
Sig. Filippo Conti – Via Luigi Longo, 39/41 – 50019 Sesto Fiorentino (FI) - ITALY
Date : Marzo 2021
The legal representative:
Eilippo Conti

natural_image
Mechanical component diagram showing a cylindrical tank with a downward arrow indicating motion or force (no text or symbols present)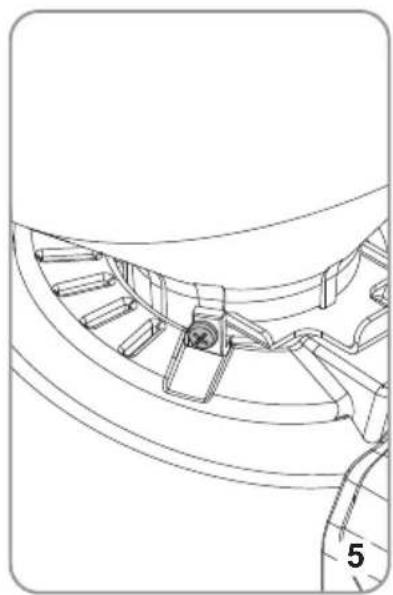
natural_image
Technical line drawing of a mechanical component with no visible text or symbols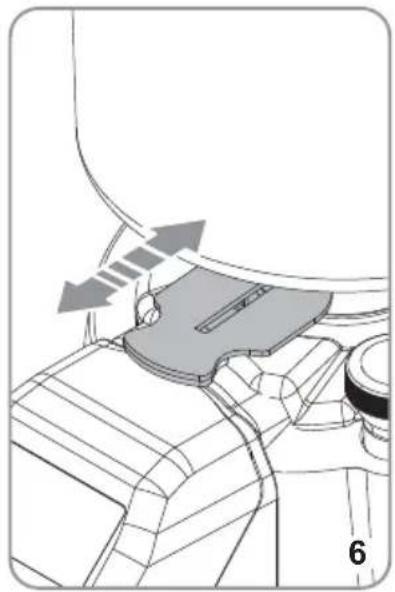
natural_image
Technical diagram of a mechanical component with directional arrows indicating movement or force (no text or symbols present)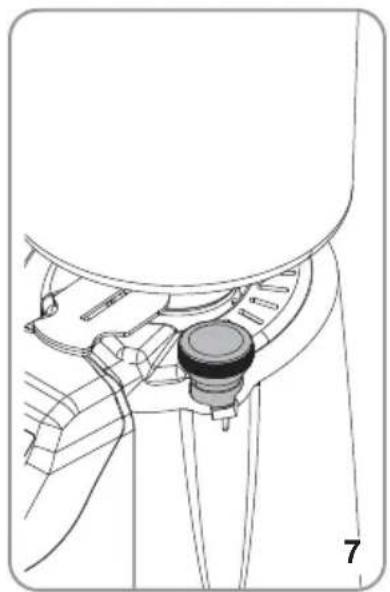
natural_image
Technical line drawing of a mechanical component with no visible text or symbols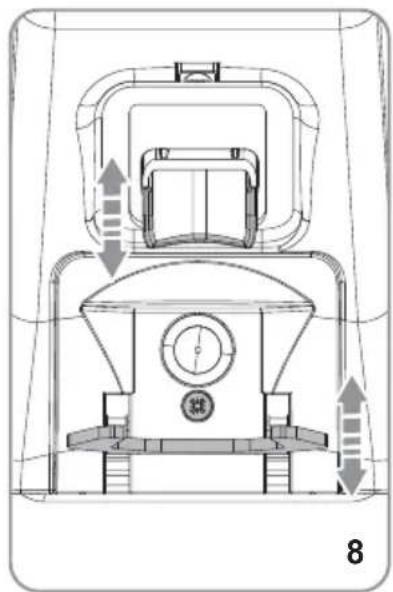
natural_image
Technical line drawing of a mechanical device with directional arrows indicating motion or flow (no text or symbols)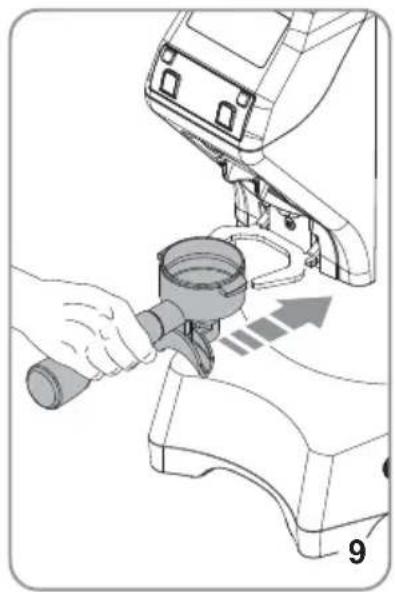
natural_image
Illustration of a hand using a tool to clean or wash a device from a machine (no text or symbols visible)• VERSIONE ITALIANA 22
• ENGLISH VERSION 30
• DEUTSCHE VERSION 36
• VERSION FRANÇAISE 44
- VERSIÓN ESPAÑOLA 52
5.5.1 ACCENSIONE MACCHINA
* The value given is for the actual revolutions of the burrs.
ZENITH NEO
- Ton: 35 s
- Toff: 360 s
OLYMPUS NEO
- Ton: 35 s
- Toff: 240 s
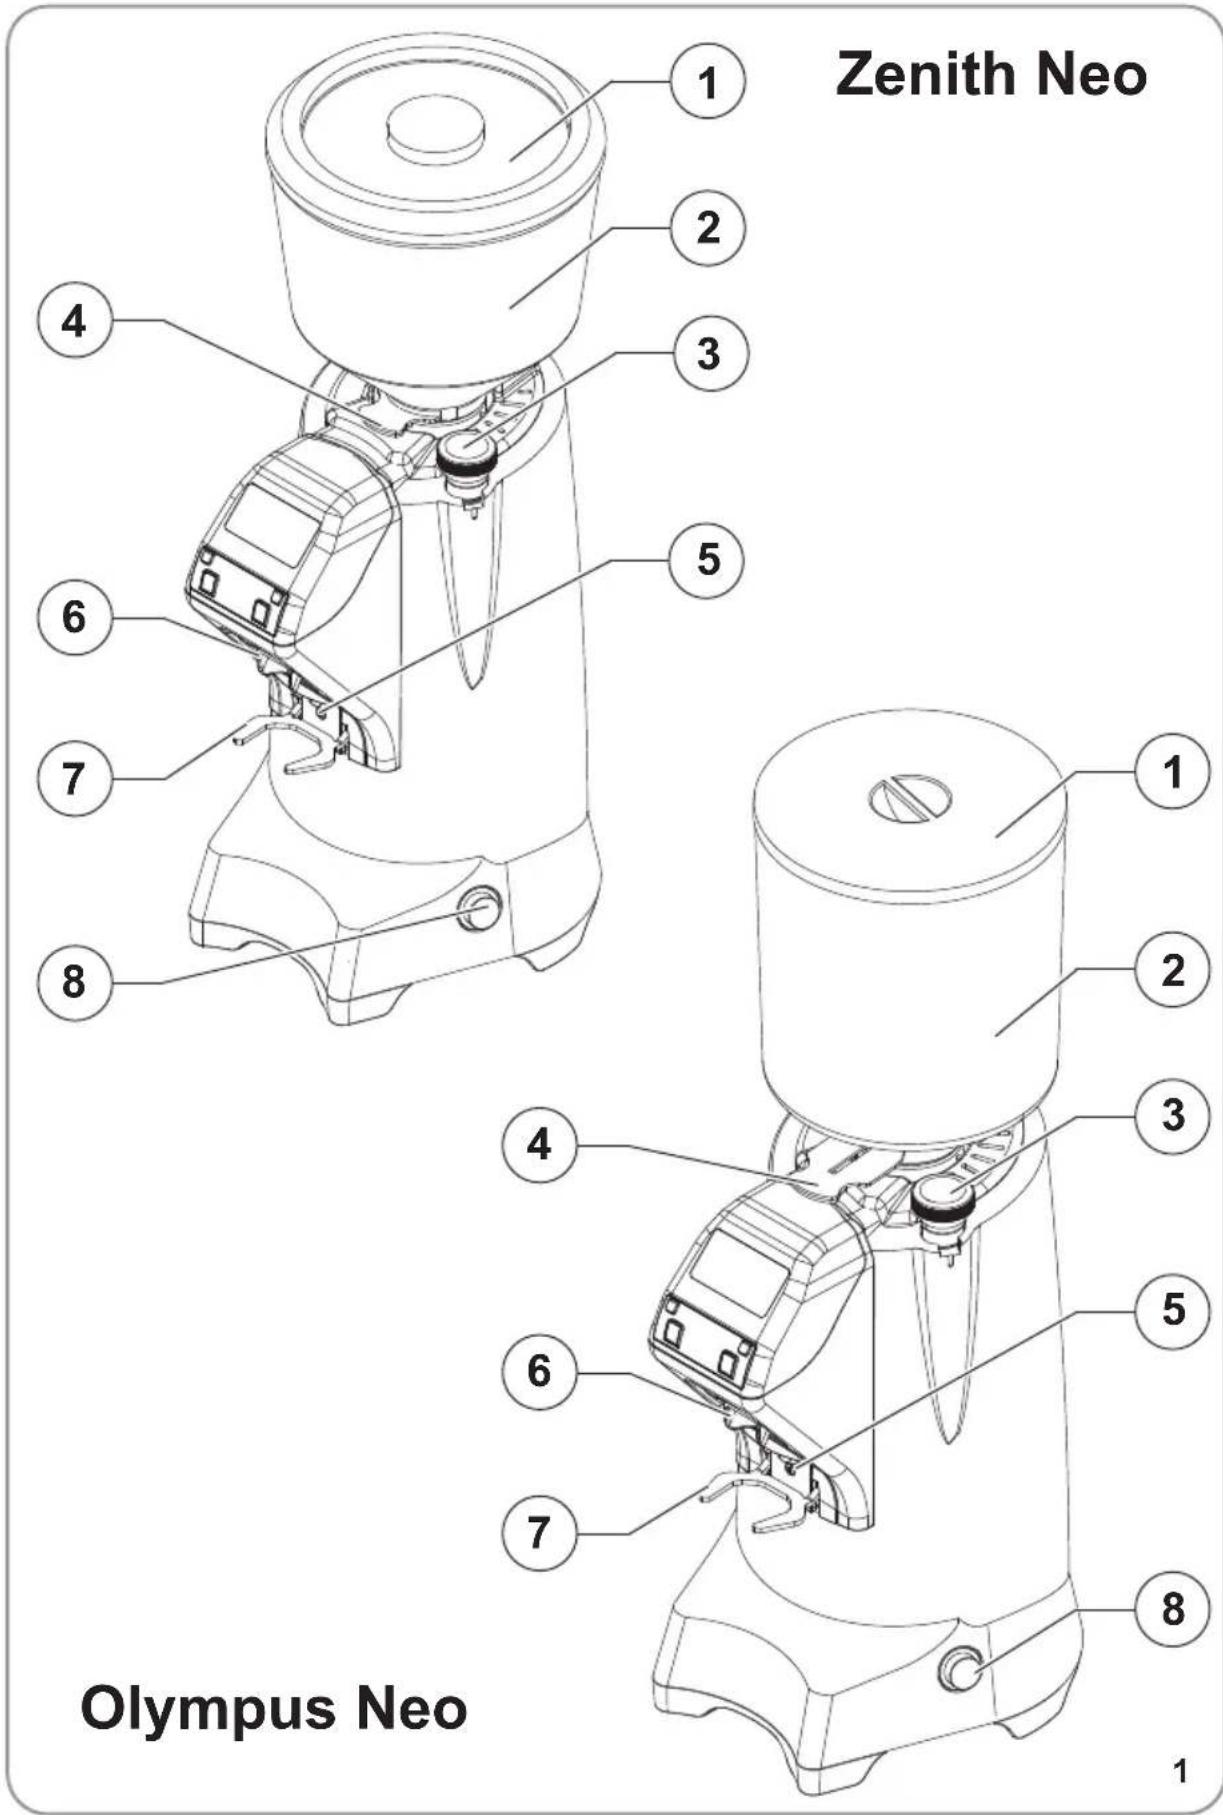
3 PRODUCT DESCRIPTION
- Container lid
- Coffee beans container
- Grinding adjusting knob
- Coffee bean container for opening/closing tab
- Activation button for grinding
-
Dispensing spout
-
Filter holder fork
- Switch on button
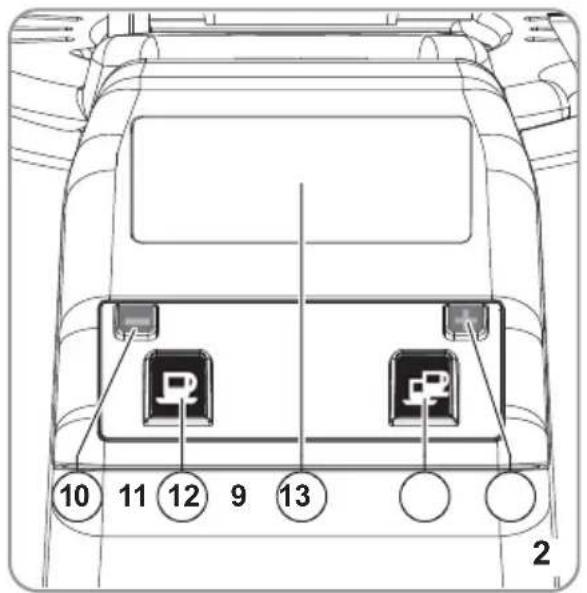
- LCD Display
- Decreasing key
- Increasing key
- Luminous key for 1 coffee dose
- Luminous key for 2 coffee dose
4 LOCKING THE CONTAINER
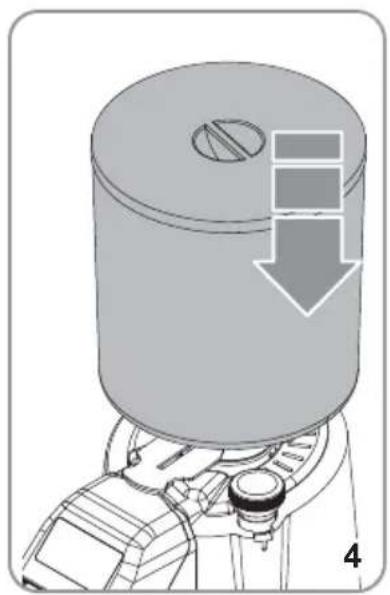
Before operating the appliance, it is necessary to fit the coffee bean container (2).
- Insert the container (2) into its seat (Fig.4), positioning it so that the hole lines up with the screw on the back part of the appliance.
- Tighten the lock screw (Fig.5).
5 INSTRUCTIONS FOR USE
5.1 INTRODUCTION
This appliance can make very precise doses as it refers to grinding time.
It is furthermore necessary to set up the appliance before operating, by determining first of all the coffee blend type (more roasted or less), the degree of grinding, the height of the filterholder fork (7) and the position of the delivery nozzle (6). Grinding time is then set for each dose key by weighting the grinding product.
• After having plugged the appliance in, push the tab (4) at the bottom of the coffee bean container (2) to close it (Fig.6).
- Remove the cover (1) from the container (2) and fill it with coffee beans.
- Turn on the machine by acting from the switch (8).
- Pull the tab (4) permitting passage of coffee beans.
- Select the single or double dose through the corresponding keys (12)

or (13)

- Place the filter holder onto the fork (7) push it forward until it touches the key (5) to dispense the ground coffee from the corresponding spout (6) (Fig. 9). Automatic dispensing stops once the preset time has elapsed.
5.2 GRINDING SETTING
Set grinding by means of the adjusting knob (3)(Fig.7), by rotating it clockwise to make powder finer or anticlockwise to increase the size of its grain as shown on the knob.
Setting is stepless; it is to be gradually performed, by grinding some coffee every two notches maximum.
When knob is rotated of a turn with stationary motor, the appliance may stop.
5.3 DISPENSING SYSTEM REGULATION
- According to filter holder and the type of coffee beans used, adjust height of the dispensing spout (6)(Fig.8) in order to permit a correct coffee dispensing.
5.4 FILTERHOLDER FORK ADJUSTMENT
- By using a crosshead screwdriver, loosen the fastening screw of the filter holder fork (7)(Fig.8).
- Raise or lower the fork in order to adjust it according to filter holder dimensions.
- Once having reached the correct position, tighten the fork fastening screw (7).
- The fork is suitable for any type of filter holder present on the market.
5.5 APPLIANCE SETTING
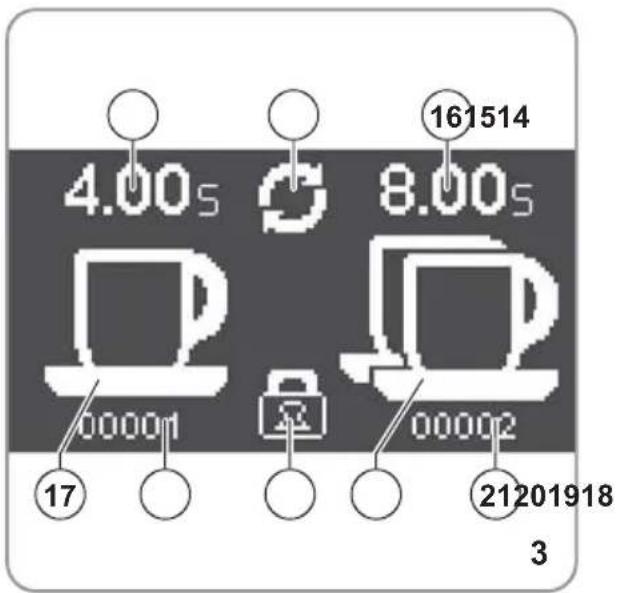
Display indicator legend (Fig. 3).
- Dispensing time of preset 1 dose
- Continuous dispensing enabled
- Dispensing time of preset 2 doses
-
Dispensing visualization of 1 dose
-
Counter of dispensed 1 dose
- Padlock (locked programming)
- Dispensing visualization of 2 doses
- Counter of dispensed 2 doses
5.5.1 APPLIANCE SWITCH-ON
When switching the appliance on for the first time, it is configured in the mode set by the factory and anyway, in the following uses, it will maintain the last mode previous to switch off.
When switching the appliance on, the following screen is shown for 7.5 seconds.

5.5.2 DOSE DISPENSING AND SETTING (DISPLAY)
- By pressing the key for one dose (12) this lights up and the cup is filled (17) during dispensing.
- With a single press (rapid) of the grinding start key (5), dispensing the coffee and countdown until zero are activated.
- Once dispensing is completed, the grinding time returns to set value.
• The single dose counter (18) is increased of 1. -
By pressing the key for two doses (13) this lights up and the cup is filled (20) during dispensing.
-
With a single press (rapid) of the grinding start key (5), dispensing the coffee and countdown until zero are activated.
- Once dispensing is completed, the grinding time returns to set value.
• The double dose counter (21) is increased of 1.
- By pressing the increasing key (11) and decreasing one (10) the dispensing time of the selected dose is increased or decreased of more or less 5 hundredths of a second.
- If the increasing key (11) or decreasing one (10) is held down, the time is increased or decreased by pressing time of the button.
You can stop the automatic dispensing before it is finished the grinding time. During dispensing with the filter press the start button of the grinding (5) to stop dispensing:
- Press the Start button grinding (5) to resume delivery for the remaining time;
- Press the dose button (blinking) to stop dispensing. The grinding time returns to the set value.
5.5.3 CONTINUOUS DISPENSING MODE ACTIVATION
Pressing with the filter holder the start grinding button (5) for more than 0.5 seconds, you start dispensing in continuous mode. During the continuous delivery you turn on both dose buttons (12) and (13)
and shows the symbol (15) on the display.
The last delivery to the start of the button pressing time grinding (5).
When you release the start grinding button (5), ending the continuous delivery and the machine returns to the automatic mode of dose selection.
5.5.4 PARTIAL DOSE COUNTER ZEROING
By pressing both keys (11) and (10) for more than 5 seconds, both dose counters are reset (18-21).
5.5.5 FUNCTION BLOCK
Pressing both buttons (11) and (10) to their release, locks the adjustment of the dose delivery time. Furthermore, display shows the symbol (19). Press again both buttons (11) and (10) to unlock.
5.5.6 APPLIANCE SWITCH ON WITH CONCEALED CONTENTS
If the key (12) is kept pressed, when switching the appliance on, a screen is entered where the following data are displayed:
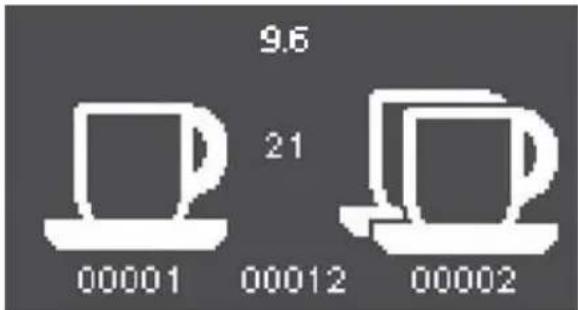
• Above, the firmware version;
- At the center, the display brightness index, adjustable with buttons (11) and
(10)
- Bottom left, the total counter of single doses dispensed (not resettable);
- Bottom center, the counter of the continuous delivery time, and often in seconds (not resettable);
- Bottom right, the total counter of double doses delivered (not resettable).
To return to the machine's delivery menu, press one of the two coffee buttons. The machine is restarted and the display shows the first power-on screen, then the delivery.
5.5.7 APPLIANCE DEFAULT VALUE SETTING
If the key (13) is kept pressed, when switching the appliance on, its values are brought to the preset default ones.
The concealed counters are not reset.
The display appears as the one of appliance switch on.
6 CLEANING AND MAINTENANCE

ATTENTION
Unplug the grinder from the electrical net before performing any cleaning and maintenance. Do not pull the feeding cable or the grinder itself to unplug.

ATTENTION
Maintenance and cleaning must be performed by trained technicians, authorised by the producer.

ATTENTION
Do not perform any approximate maintenance and always use original spare parts.
6.1 CLEANING
Cleaning is fundamental for the correct use of the grinder. A neglected grinder can negatively impact on the coffee dispensing and on the precision of the dose and the grind. Before cleaning, check if the grinder is unplugged.
6.2 HOPPER CELANING
After having removed the hopper, clean the internal parts of it with water and neutral soap, taking off any oil left by the coffee beans. Rinse and dry it carefully. Perform the same on the cover. Do not use the dish-washer.
6.3 GRINDING SYSTEM CLEANING
After having removed the lid, open the upper burr holder. Then, clean the blades and the other internal parts with a brush or a dry cloth. If necessary, use a vacuum cleaner or an air compressed jet. After having installed back the upper burr holder and the lid, install the hopper. For a complete cleaning, use detergent pills.

ATTENTION
Any cleaning operation must be performed with food use approved products.
6.4 MAINTENANCE
To ensure correct operation of the appliance check and possibly replace the blades every 250 kg of coffee. For burrs maintenance, unplug the grinder from the electric net and remove the coffee beans container. Then, unscrew the screw being on the lid and the screws fixing the upper burr holder. To clean the blades, use a brush or a dry cloth. If necessary, use a vacuum cleaner or air compressed jet.

ATTENTION
Maintenance must be performed only by trained technicians, authorised by the producer.

ATTENTION
Do not perform any approximate maintenance and always use original spare parts.
7 TROUBLESHOOTING
Contact skilled personnel.
1 ALLGEMEINE INFORMATIONEN
HERSTELLER:
CONTI VALERIO - Via Luigi Longo, 39/41 - 50019 Sesto Fiorentino (FI) – ITALY
MODELLE:
ZENITH NEO - OLYMPUS NEO
2 DATI TECNICI


- OLYMPUS NEO ZENITH NEO
- LIBRETTO ISTRUZIONI
- AVVERTENZE E SICUREZZE
- IMPORTANT WARNINGS
- CONSERVATION OF THE MANUAL
- UNPACKING THE GRINDER
- IMPORTANCE OF THE MANUAL
- WARNUNGEN UND
- CONSERVATION DU MANUEL
- IMPORTANCE DU MANUEL
- EC DECLARATION OF CONFORMITY
- MACINADOSATORE PER CAFFE' MODELLI:
- ACCENSIONE MACCHINA
- ZENITH NEO
- OLYMPUS NEO
- PRODUCT DESCRIPTION
- LOCKING THE CONTAINER
- INSTRUCTIONS FOR USE
- INTRODUCTION
- GRINDING SETTING
- DISPENSING SYSTEM REGULATION
- FILTERHOLDER FORK ADJUSTMENT
- APPLIANCE SETTING
- APPLIANCE SWITCH-ON
- DOSE DISPENSING AND SETTING (DISPLAY)
- CONTINUOUS DISPENSING MODE ACTIVATION
- PARTIAL DOSE COUNTER ZEROING
- FUNCTION BLOCK
- APPLIANCE SWITCH ON WITH CONCEALED CONTENTS
- (10)
- APPLIANCE DEFAULT VALUE SETTING
- CLEANING AND MAINTENANCE
- ATTENTION
- CLEANING
- HOPPER CELANING
- GRINDING SYSTEM CLEANING
- MAINTENANCE
- TROUBLESHOOTING
- ALLGEMEINE INFORMATIONEN
- HERSTELLER:
- MODELLE:
Brand : EUREKA
Model : Olympus Neo
Category : Coffee grinder