Pure One S11 - Vacuum Cleaner TINECO - Free user manual and instructions
Find the device manual for free Pure One S11 TINECO in PDF.

| Product type | Cordless stick vacuum |
| Brand | Tineco |
| Model | Pure One S11 |
| Rated voltage | 21.6 V |
| Power consumption | 450 W |
| Dust bin capacity | 0.6 L |
| Run time in AUTO mode | Approximately 40 minutes |
| Run time in MAX mode | Approximately 10 minutes |
| Charging time for one battery | 3 to 4 hours |
| Battery type | Lithium-ion rechargeable, not user-replaceable |
| Power supply | Power adapter 100-240 V~, indoor use only |
| Filtration | Pre-filter, mesh filter, washable HEPA filter |
| Cleaning modes | AUTO (intelligent dust detection) and MAX (maximum suction) |
| Display | Digital with dust, blockage, battery and Wi-Fi indicators |
| Connectivity | Wi-Fi, compatible with Tineco app (iOS/Android) |
| Included accessories | LED multi-task power brush, 2-in-1 combination brush, soft dusting brush, flexible extension tube, pre-filter cleaning tool, hair/string cleaning tool |
| Dust bin maintenance | Clean after each use with a damp cloth; do not wash the bin with water (contains a sensor) |
| Filter maintenance | Pre-filter: monthly washing, replace every 6 months; HEPA filter: wash every 3 months, replace every 12 months |
| Warranty | 2 years for the main unit, 1 year for motorized accessories and separately purchased battery |
| Recommended use | Indoor household use only; do not use on wet surfaces |
Frequently Asked Questions - Pure One S11 TINECO
User questions about Pure One S11 TINECO
0 question about this device. Answer the ones you know or ask your own.
Ask a new question about this device
Download the instructions for your Vacuum Cleaner in PDF format for free! Find your manual Pure One S11 - TINECO and take your electronic device back in hand. On this page are published all the documents necessary for the use of your device. Pure One S11 by TINECO.
USER MANUAL Pure One S11 TINECO
Smart Vacuum Cleaner
Instruction Manual
Manual De Uso
Mode D'emploi

natural_image
Exterior view of a modern office building (no signage)*Actual product may differ from illustration.
CONTENTS
Important Safety Instructions....2
Overview....5
Accessories....7
Assembly 9
Operation....11
Maintenance 18
Specifications 22
Troubleshooting....23
Warranty 25
Important Safety Instructions
SAVE THESE INSTRUCTIONS
Household use only.
When using an electrical appliance, basic precautions should always be followed, including the following:
READ ALL INSTRUCTIONS BEFORE USING (THIS APPLIANCE). Failure to follow the warnings and instructions may result in electric shock, fire and/or serious injury.

WARNING – To reduce the risk of fire, electric shock, or injury:
- This appliance can be used by children aged from 8 years and above and persons with reduced physical, sensory or mental capabilities or lack of experience and knowledge if they have been given supervision or instruction concerning use of the appliance in a safe way and understand the hazards involved. Children should not play with the appliance. Cleaning and user maintenance shall not be performed by children without supervision.
- The appliance is not to be used by persons (including children) with reduced physical, sensory or mental capabilities, or lack of experience and knowledge, unless they have been given supervision or instruction.
- For INDOOR use ONLY. Do not use the appliance in outdoors, nor in commercial or industrial environments. Do not use the appliance on wet surfaces or surfaces with standing water.
- Do not allow to be used as a toy. Close attention is necessary when used by or near children, pets or plants.
- Use only as described in this manual. Use only manufacturer's recommended attachments.
- Do not use with a damaged cord or plug. If appliance has been dropped, damaged, left outdoors, dropped into water, or is not working as it should, return it to a service center.
- Do not handle charger, including charger plug, and charger terminals with wet hands.
- Do not put any object into openings. Do not use with any openings blocked; keep free of dust, lint, hair, and anything that may reduce air flow.
- Keep hair, loose clothing, fingers, and all parts of your body away from openings and moving parts.
- Use extra care when cleaning on stairs.
- Do not use to pick up flammable or combustible liquids, such as gasoline, or use in areas where they may be present.
- Do not pick up anything that is burning or smoking, such as cigarettes, matches, or hot ashes.
- Do not use without a filter.
-
Prevent unintentional activation. Ensure the switch is in the off position before connecting to the battery pack, picking up or carrying the appliance. Carrying the appliance with your finger on the switch or powering on the appliance with the switch on may cause accidents.
-
Disconnect the battery pack from the appliance before making any adjustments, changing accessories, storing the appliance. Such preventive safety measures reduce the risk of starting the appliance accidentally.
- For the purposes of recharging the battery, only use the detachable supply unit provided with this appliance. A charger that is suitable for one type of battery pack may create a risk of fire when used with another battery pack.
- Use appliances only with specifically designated Tineco battery packs. Use of any other battery packs may create a risk of injury and fire.
- When battery pack is not in use, keep it away from other metal objects, like paper clips, coins, keys, nails, screws or other small metal objects, that can make a connection from one terminal to another. Shorting the battery terminals together may cause burns or a fire.
- Under improper usage, liquid may be ejected from the battery; avoid contact. If contact accidentally occurs, flush with water. If liquid comes into eye contact, seek medical help. Liquid ejected from the battery may cause irritation or burns.
- Do not use a battery pack or appliance that is damaged or modified. Damaged or modified batteries may exhibit unpredictable behavior resulting in fire, explosion or risk of injury.
- Do not expose a battery pack or appliance to fire or excessive heat. Exposure to fire or temperatures above 266^ F ( 130^ C) cause an explosion.
- Follow all charging instructions and do not charge the battery pack or appliance outside of the temperature range specified in the instructions. Charging improperly or at temperatures outside of the specified range may damage the battery and increase the risk of fire.
- Have servicing performed by a qualified repair person using only identical replacement parts. This will ensure that the safety of the product is maintained.
- This appliance contains battery cells that are non-replaceable. Do not modify or attempt to repair the appliance or the battery pack except as indicated in the instructions for use and care.
- Always turn off this appliance before connecting or disconnecting the motorized nozzle.
- Do not charge or store the appliance outdoors or inside a car. Only charge, store or use the battery in a dry indoor area where the temperature is higher than 39.2^ F ( 4^ C) but lower than 104^ F ( 40^ C). The charger is for indoor use only.
FCC Supplier's Declaration of Conformity
Tineco / PURE ONE S11 SERIES
This appliance complies with part 15 of the FCC Rules. Operation is subject to the following two conditions:
(1) This appliance may not cause harmful interference, and (2) this appliance must accept any interference received, including interference that may cause undesired operation.
Tineco INTELLIGENT, INC.
1700 WESTLAKE AVENUE N., SUITE 200, SEATTLE, WA, 98109, USA
WWW.TINECO.COM
1-855-292-8864
Changes or modifications not expressly approved by the party responsible for compliance could void the user's authority to operate the equipment.
Note: This equipment has been tested and found to comply with the limits for a Class B digital appliance, pursuant to Part 15 of the FCC Rules. These limits are designed to provide reasonable protection against harmful interference in a residential installation. This equipment generates uses and can radiate radio frequency energy and, if not installed and used in accordance with the instructions, may cause harmful interference to radio communications. However, there is no guarantee that interference will not occur in a particular installation. If this equipment does cause harmful interference to radio or television reception, which can be determined by turning the equipment off and on, the user is encouraged to try to correct the interference by one or more of the following measures:
(1) Reorient or relocate the receiving antenna.
(2) Increase the separation between the equipment and receiver.
(3) Connect the equipment into an outlet on a circuit different from that to which the receiver is connected.
(4) Consult the dealer or an experienced radio/TV technician for help.
FCC Radiation Exposure Statement
This equipment complies with FCC radiation exposure limits set forth for an uncontrolled environment.
Note
The manufacturer is not responsible for any radio or TV interference caused by unauthorized modifications to this equipment, such modifications could void the user's authority to operate this equipment.
IC Note
This appliance contains licence-exempt transmitter(s)/receiver(s) that comply with Innovation, Science and Economic Development Canada's licence-exempt RSS(s). Operation is subject to the following two conditions:
(1) this appliance may not cause interference.
(2) this appliance must accept any interference, including interference that may cause undesired operation of the appliance.
-This Class B digital apparatus complies with Canadian ICES-003.
-This equipment complies with ISED RSS-102 radiation exposure limits set forth for an uncontrolled environment. This equipment should be installed and operated with a minimum distance of 20cm between the radiator and any part of your body.
Overview

text_image
A B C D E F G H I J K LA. Dust sensor
B. Digital display
C. Dust empty release button
D. Dustbin
E. AUTO/MAX button
F. WiFi reset button (Remove the dustbin to access)
G. Trigger lock
H. Dustbin release button
I. Trigger
J. HEPA release button
K. Battery indicator light
L. Battery release button
Digital Display

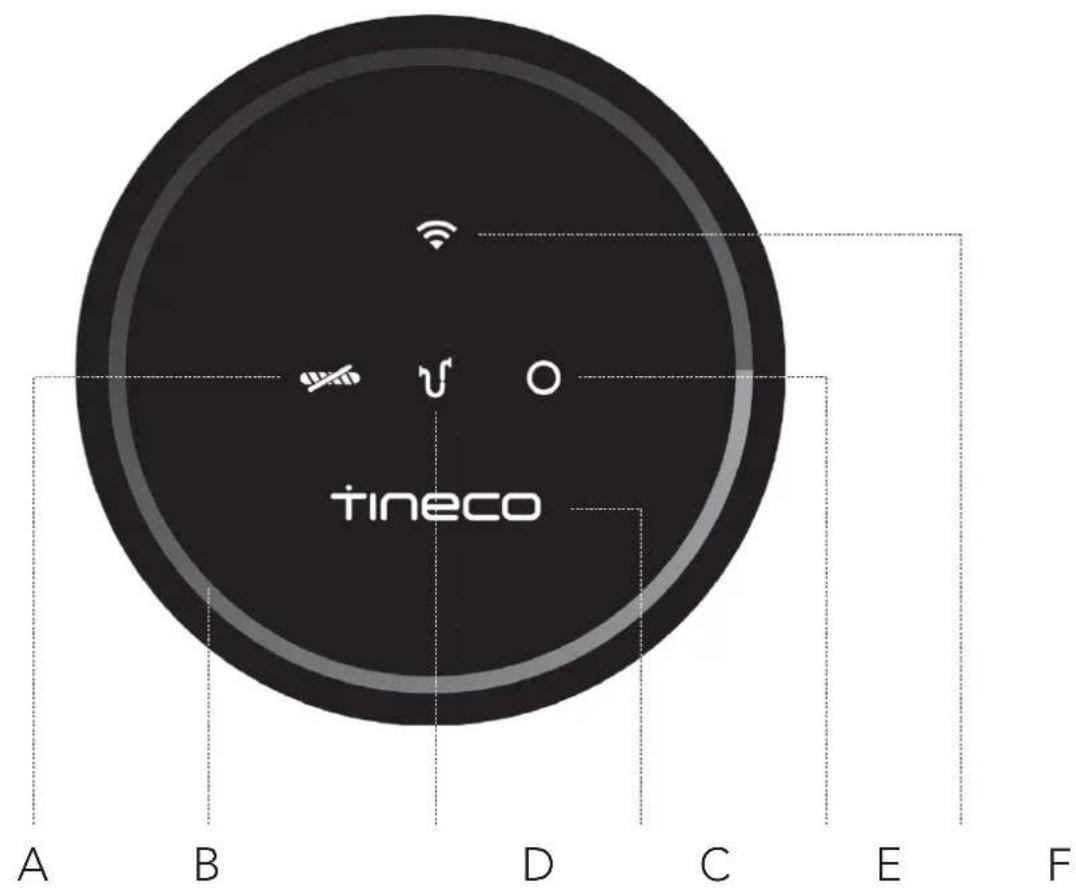
text_image
A B D C E F tinecoA. Brush roller tangled
B. Dust monitoring loop
(Blue to red according to the dust amount)
C. Air channel blocked
D. Tineco logo
E. Dust sensor malfunction
F. WiFi indicator
Accessories
Note:
- Test an accessory on a small, inconspicuous area before use on sensitive surfaces.
- The packaging box shows which accessories are included with your purchase.
- As shown below, there are many components compatible with this model. If you require more accessories, please go to www.tineco.com or store.tineco.com.

natural_image
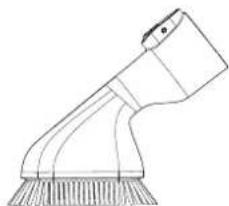
Technical line drawing of a mechanical component with no visible text or symbolsFull-size LED multi-tasker power brush
Ideal for both hard floors and carpets.
Very effective for agitating dirt embedded in the carpet.

natural_image
Technical line drawing of a mechanical component with no visible text or symbolsMini power brush
For vacuuming upholstered furniture, mattresses, etc. Vacuums pet hair and removes ingrained dirt.
natural_image
Line drawing of a handheld device with a bulb and two ports (no text or symbols)2-in-1 dusting brush
Switches between a wide and a soft brush by pressing the release button. The soft brush is most effective on hard-surface furniture while the wide brush is effective for upholstered furniture, curtains, etc.

natural_image
Line drawing of a cylindrical object with a pointed tip and rounded ends, resembling a stylus or tool (no text or symbols)Crevice tool
For corners, nooks, and other hard-to-reach places such as around car seats, picture frames, and cupboards.
natural_image
Line drawing of a mechanical component with grooves and a handle (no text or symbols)Soft dusting brush
Angled bristles on a slender, oval-shaped rim provide anti-static, cushioned contact. Suitable for dusting shelves, lighting, delicate surfaces, electronics and more.

natural_image
Line drawing of a mechanical tool or rod with multiple ports and a central shaft (no text or symbols)Flexible long crevice tool
Easy to bend, easy to reach tight spots. Suitable for cleaning dust behind and beneath furniture, around refrigerators, and many other tight gaps.

natural_image
Technical line drawing of a mechanical component with no visible text or symbolsFull-size LED soft-roller power brush
Perfect for hard floors, especially sensitive wood floor. Picks up coarse and fine dirt at the same time.

Multi-angle folding tube
An articulated joint makes it adjustable to allow for flexibility when cleaning from high to low.

natural_image
Pure electrical circuit lines without any symbolsFlexible extension hose
Excellent extension and flexibility to access hard-to-reach spaces; perfect for in-care use. Compatible with all non-motorized Tineco accessories.

natural_image
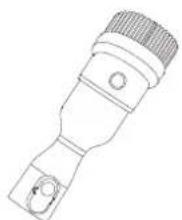
Line drawing of a mechanical device with a curved handle and circular components (no text or symbols)Pre-filter cleaning tool
A dirty filter is a leading cause of suction loss, and this device is designed to make your filter last much longer. Place the dirty filter inside the pre-filter cleaning tool and close the lid. Run the appliance in MAX mode, and rotate the side cover.

Hair cleaning tool
Use the end with the small blade to remove hair and debris wrapped around the roller. Use the end with the brush to clean the brush window, and the dustbin, as required.
Assembly
Tube Installation

natural_image
Technical line drawing of a mechanical device with a cylindrical shaft and a multi-hole tool, showing no text or symbols.Insert tube.

natural_image
Technical line drawing of a mechanical device with no visible text or symbolsPress the release button to remove the tube.
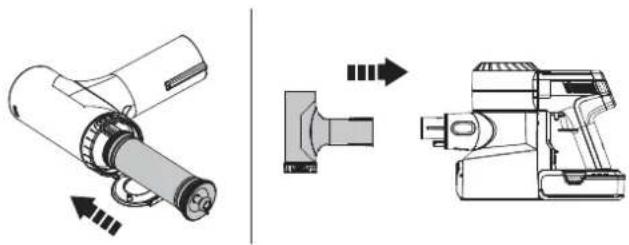
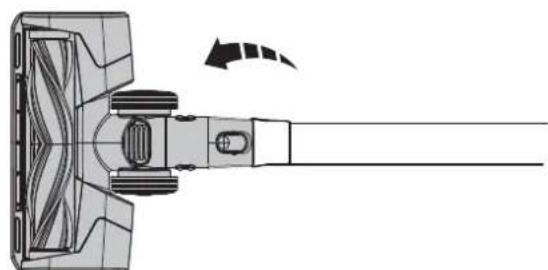
Brush Installation

natural_image
Technical diagram of a mechanical assembly with directional arrows indicating motion (no text or symbols)Insert the power brush.

natural_image
Technical diagram of a mechanical assembly with no visible text or symbolsPress the release button to remove the power brush.
Dustbin Installation

natural_image
Technical line drawing of a mechanical device with internal components and directional arrows (no text or symbols)To clean the dustbin more thoroughly, press the dustbin release button to detach from the appliance.
text_image
Technical diagram of a handheld device with labeled parts and directional arrows indicating assembly or operation.When re-attaching the dustbin, hold on an angle and slot the top of the dustbin into the hook on the main body. Push upwards until the hook is fixed into the slot on the dustbin and then it clicks back into place.
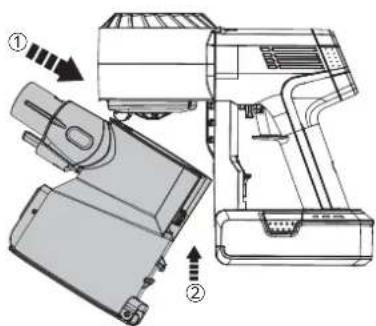
Battery Installation
natural_image
Line drawing of a portable air purifier device with control panel and indicator lights (no text or symbols)Press the battery release button, and remove the battery.

natural_image
Line drawing of a portable electric shaver with handle and control panel (no text or symbols)To replace, slide the battery into the slot at the base of the main body. The battery will click into position when correctly fitted.
Wall-mounted Dock Installation

text_image
47.25" (120cm)Determine the best wall location for mounting the dock. We recommend placing it 47.25" (120cm) from the lower screw hole to the floor (may need to be adjusted based on the actual situation).

text_image
clickAssemble the two bracket components, with a "click" to signify correct assembly. Once this is complete, use the screws provided by Tineco to affix the dock to the wall.

Warning:
- Ensure the wall surrounding the mounting area is free of gas, water pipes, electrical cables and wires.
- To avoid the dock falling, ensure it is firmly installed.
Operation
Preparing for Use
Note:
- Before the first use, please charge the appliance (see "Charging the Battery") for 3-4 hours in an area where the ambient temperature is between 39.2^ (4^) and 104^ (40^) .
- Select an accessory and attach it to the appliance before use (see "Accessories").

natural_image
Technical line drawing of a handheld device with a hand inserting a component (no text or symbols)Pull the trigger to activate the suction.

natural_image
Technical line drawing of a handheld device with an inset close-up showing internal components (no text or symbols)Pull the trigger lock to hold the trigger for continuous power mode.

- Keep sharp objects away from the digital display to avoid scratches and scrapes.

text_image
Digital display AUTO/MAX modeThe appliance will start in AUTO mode by default. After 3 seconds, press the AUTO/MAX button to switch to Max mode and the button lights up.
Cleaning Mode Selection
AUTO Mode
- In AUTO mode, the color of dust monitoring loop changes according to the amount of dust detected. A red dust monitoring loop indicates more dust is detected whereas a blue loop indicates less is detected. This mode automatically provides the best cleaning solution.
To enter AUTO mode:

①

natural_image
Line drawing of a handheld device with a hand inserting a button (no text or symbols)The default setting on startup is AUTO. The appliance then takes 3 seconds to initially detect blockages or dust. If no dust is detected, power is reduced to conserve energy.

text_image
AUTO-MAXWhen in MAX mode, press the AUTO/MAX button to enter AUTO mode.
MAX Mode

text_image
AUTO-MAXIn AUTO mode, press the AUTO/MAX button to enter MAX mode and the button lights up.
APP
- All the functions can be performed using the Tineco app. Download the Tineco app from the App Store, Google Play and Tineco Official Site.

flowchart
graph TD
    A["App Downloads"] --> B["www.tineco.com"]
    B --> C["Support"]
    C --> D["App Downloads"]

flowchart
graph TD
    A["Download on the App Store"] --> C["Tineco"]
    B["GET IT ON Google Play"] --> C
    C --> D["Mobile device with download icon"]
iOS 9.0 or later (iPhone 5s and above)
Android 5.0 or later
App Function Introduction

Battery
Battery level in real time.

Cleaning report
Displays the dust amount, working hours and working status.

Suction adjustment
When in manual mode, swipe the phone screen to adjust suction power.

Reminder of filter status
Records the severity of the dirty filter and provides a cleaning reminder as required.

Contact us
You can contact the Customer Service about any problems during the working hours.

Feedback
If you have any comments, please send us your feedback.

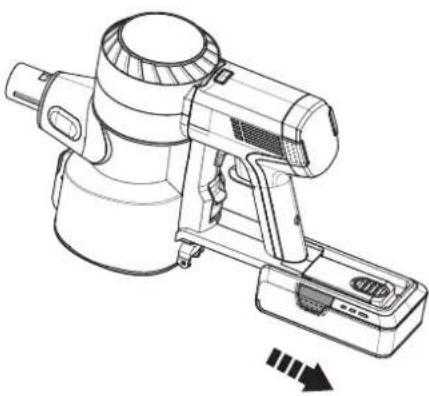
Emptying the Dustbin

natural_image
Line drawing of a hand using a handheld electric vacuum cleaner with a curved arrow indicating motion (no text or symbols)Press the release button on the side of the dustbin to empty the contents.
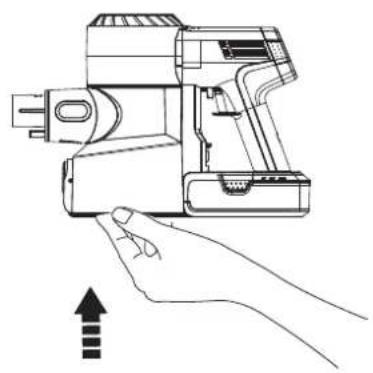
natural_image
Line drawing of a hand holding a handheld device with an upward arrow indicating motion (no text or symbols)Close and click the dustbin flap back into place.
- Place the appliance on the wall-mounted dock for convenient storage and recharging after use.

text_image
Technical diagram of a mechanical device with labeled components and directional arrows indicating motion or force vectors.
text_image
clickPlace the main body on the dock. To avoid bristle damage, always place attachments on the dock after use.
Charging the Battery
- When secured on the wall-mounted dock, the battery attached to the main body will charge first, followed by the spare battery.

text_image
* spare battery included in selected models
natural_image
Diagram of a vacuum cleaner with attached circuit board and wiring, showing internal components and connection (no text or symbols)Connect the adaptor to the dock and outlet.
To charge, secure the main body and/or the spare battery on the dock. The battery can be recharged while attached to the main body, or separately.
Note:
- If you need a spare battery, please purchase from Tineco.

Warning:
- Only use the Tineco-provided adaptor to charge the battery.
- During long periods of not being used, store the lithium battery in a cool, dry place. Ensure the battery is half-charged every 3 months (2 battery indicators illuminated).
- Store appropriately indoors in a dry place. Do not expose appliance to sunlight or freezing temperature. Recommended temperature range: 39.2°F (4°C)\~104°F (40°C).
Runtime
- When in AUTO mode, the runtime is approximately 40 minutes. When MAX power is used, the runtime is approximately 10 minutes.
- Estimated runtime data was obtained by a Tineco Laboratory using one battery and non-motorized accessories.
Charging Time
- A full charge takes approximately 3-4 hours for one battery.
- Estimated data was obtained by a Tineco Laboratory using ambient temperatures between 39.2^ (4°C) to 104^ (40°C).
Indicator
When in Use
Battery Indicator

Three solid blue lights: full power.

Two solid blue lights: medium power.

One solid blue light: low power.

One solid red light: out of power.

One blinking red light: fault, check the troubleshooting guide.
Main Body Indicator

Illuminated: working on MAX mode.

Blinking: motor failure.
Indicators on Display

Blinking: brush roller has a blockage.

Blinking: appliance has a blockage, either in the filter or the dustbin.
Blinking: sensor inside the dustbin is obstructed, or the dustbin is not correctly installed.

Illuminated: WiFi has successfully connected.

Blinking: WiFi is connecting.

Off: WiFi is not connected, please connect.
During Charging
- The spare battery will only charge when the one attached to the main body has been fully charged (spare battery included in selected models).


Three blue lights blinking successively: charging.

One blinking red light: fault, check the troubleshooting guide.
Fully Charged


In 5 minutes: three solid blue lights.


After 5 minutes: lights off.
Maintenance
Note:
- Clean the dustbin and filters after each use.
- Use the cleaning tool to thoroughly clean the pre-filter when the indicator light shows a blocked air channel. To maintain high performance, wash and dry the pre-filter monthly, replacing it every 6 months.
Wash and dry the HEPA filter every 3 months, replacing it every 12 months.
Dustbin and Mesh Filter
1

natural_image
Line drawing of a mechanical device with no visible text or symbolsPress the dustbin release button to remove the dustbin.
3

text_image
Mesh filter Pre-filterTurn counter-clockwise to remove the filters.
5

text_image
Technical diagram of a handheld device with numbered parts and directional arrows indicating assembly or operation.After cleaning, insert the clean pre-filter into the mesh filter properly and it clicks into place. Install the clean filter and dustbin back into the main body, then close the dustbin flap.
2

natural_image
Line drawing of hands operating a handheld device with a handle (no text or symbols)Clean with a damp cloth, taking care to prevent water entering the appliance main body and battery.
4


text_image
Technical diagram showing a hand holding a device with a 24-hour clock icon, alongside its mechanical assembly.Clean the dustbin and mesh filter with a damp cloth. Air dry completely before reinstalling.

text_image
Technical diagram showing mechanical assembly with cross-section view and warning symbol
Warning:
- Do not wash the dustbin as it contains a dust sensor. If it comes into contact with water, please dry it with a hair dryer.
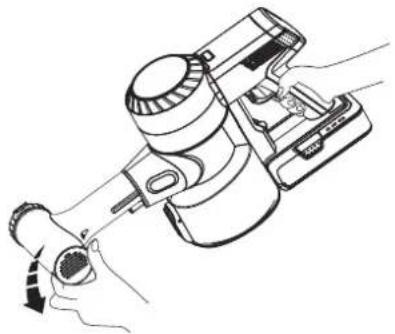
Pre-filter

natural_image
Technical line drawing of a handheld device with directional arrows indicating movement or force (no text or symbols)Ensure the appliance is switched off before cleaning, and remove the dirty pre-filter from the mesh filter-holder.
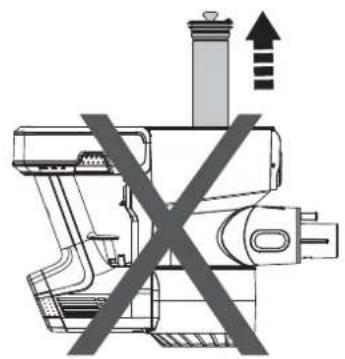
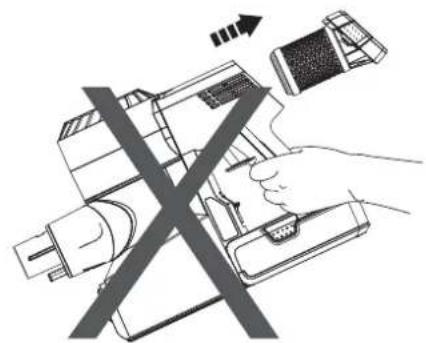
natural_image
Diagram of a mechanical device with crossed-out lines and an upward arrow, no text or symbols present.Do not turn the appliance upside down when removing or installing the filter to prevent dust from entering the motor.
natural_image
Technical line drawing of a handheld device with directional arrows indicating assembly or operation (no text or symbols present)Replace a clean filter to the main body. Put the dirty pre-filter into the cleaning tool and connect the cleaning tool to the main body.
natural_image
Line drawing of a hand operating a handheld device with a tool handle (no text or symbols)Run the appliance in MAX mode, and rotate the side cover to clean the dirty pre-filter.
HEPA Filter

natural_image
Line drawing of a hand inserting a device into a device housing, with no text or symbols present.Press the HEPA release button and gently remove for cleaning. Do not use the appliance without first installing the HEPA filter.
natural_image
Diagram showing a hand using a device to press a device with a crossed-out arrow (no text or symbols present)Do not place the appliance as above when removing or installing the HEPA filter, to prevent dust from entering the motor.
text_image
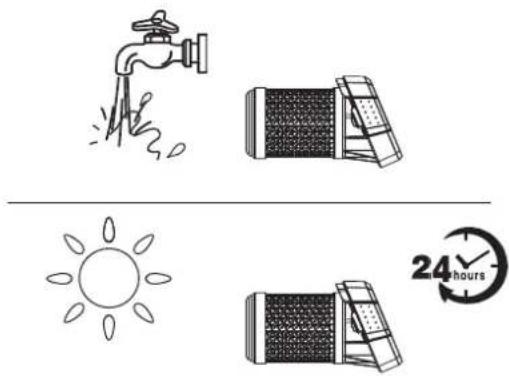
Illustration showing a faucet spraying water, sunlight, and two containers with time and duration indicators.The HEPA filter can be washed under running water and must be completely dry before reinstalling.
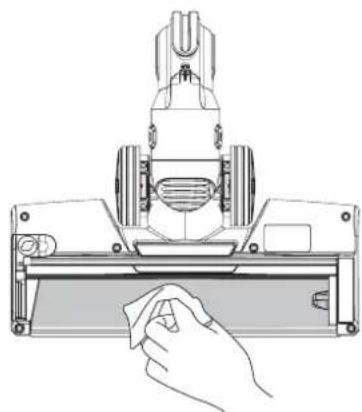
Dust Sensor

text_image
Diagram illustrating a sewing machine operation with a magnified view showing the process and detail of the component.To avoid dust accumulation which can affect cleaning performance, wipe the suction mouth with a damp cloth.
Mini Power Brush

natural_image
Line drawing of a hand using a handheld device to press or adjust a component, with no visible text or symbols.
natural_image
Technical line drawing of a mechanical device with no visible text or symbolsPress against the roller end cover downward. Pull out the brush roller.

natural_image
Technical line drawing of a mechanical device with internal components and a separate tool (no text or symbols)Remove the debris wrapped around the roller with the Tineco Hair Cleaning Tool.

text_image
clickFully reinsert the brush roller at an angle and push upward until it clicks securely back into place.
Brush Roller
1
natural_image
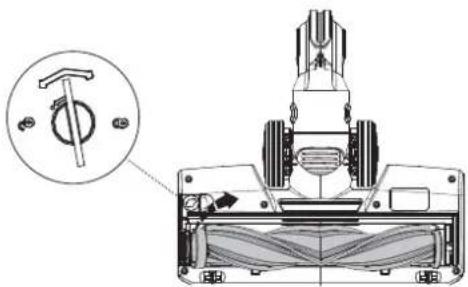
Technical diagram of a mechanical device with a close-up inset showing a tool and component (no text or symbols)Use a coin or other tool, to unlock the brush roller lock, then remove the brush from the brush window.
2
natural_image
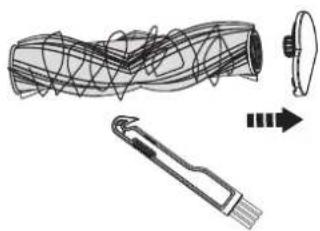
Diagram of a coiled tube with internal components and a separate view showing internal structure (no text or symbols)Remove the debris wrapped around the roller with the Tineco Hair Cleaning Tool.
3
natural_image
Line drawing of a hand holding a tool near a mechanical device (no text or symbols)4

natural_image
Technical line drawing of a mechanical component with no visible text or symbolsGently clean the transparent brush window. After cleaning, reinstall the brush.

Warning:
- The power brush contains electrical components which must not be soaked or washed with water.
Specifications
| Product PURE ONE S11 SERIES | |
| Voltage 21.6V | == |
| Rated Power 450W | |
| Dustbin Capacity 0.6L | |
| Charging Time 3-4 hrs for one battery | |
| AC Input 100-240V~ |
Disposal
- The battery contains materials that are harmful to the environment and must be removed from the appliance before it is discarded.
- When removing the battery, the appliance must be powered off.
- Batteries, chargers, accessories and packaging should be sorted for environmental friendly recycling. Do not put them into fire, water or soil. Do not dispose of batteries and chargers into household waste!
- If battery leakage contacts skin or clothing, immediately flush with water to avoid irritation and seek medical help.
Troubleshooting
| Problem Possible cause Solution | ||
| The appliance does not turn on | No power Charge the battery | |
| Auto protection for overheating Restart after cooling down | ||
| The appliance is blocked (i.e. the tube, suction mouth or some other parts) | Check and remove blockages | |
| Weak suction power | Dustbin and filters are full Clean the dustbin and filters | |
| The pre-filter is not installed Install the pre-filter | ||
| The appliance is blocked (i.e. the tube, suction mouth or some other parts) | Remove blockages | |
| The brush roller tangled with hairs or fibers | Clean the brush roller | |
| Abnormal motor sounds | The appliance is blocked (i.e. the tube, suction mouth or some other parts) | Remove blockages |
| Battery won't charge | The adaptor is not correctly inserted | Reinsert the adaptor correctly |
| Insufficient contact between the main body and battery | Check the main body and battery are correctly placed | |
| The adaptor is not designed for PURE ONE S11 | Use the original adaptor | |
Indicator light blinking on work  | Motor failure | Check the motor and cool it down |
Brush roller tangled indicator  blinking blinking | The brush roller is blocked Remove blockages | |
Air channel blocked indicator  blinking blinking | The appliance is blocked, or full of dust in filter and dustbin | Remove blockages, clean the filter and dustbin |
Dust sensor malfunction  indicator blinking indicator blinking | 1. The sensor inside the dustbin is blocked2. The dustbin is not installed | 1. Clean the dust on the inner sensor2. Install the dustbin correctly |
WiFi indicator is off  | WiFi is not connected | Follow the in-app guide to connect to WiFi |
Battery indicator blinking red on work  | Battery failure | Remove the battery pack and let it cool |
Note:
If the above troubleshooting guide fails to provide a solution, please visit our website
www.tineco.com for further support.
Warranty
2-YEAR LIMITED WARRANTY
- Only applies to purchases made from authorized retailers of Tineco.
- Is subject to the adherence of the requirements outlined in this instruction manual, and is subject to further conditions outlined below.
WHAT IS COVERED?
- Your Tineco appliance has a 2-year warranty against original defects in material and workmanship, when used for private household purposes in accordance with the Tineco Instruction Manual. Motorized accessories and battery bought separately come with a 1-year warranty.
- This warranty provides, at no extra cost to you, all labor and parts necessary to ensure your appliance is in proper operating condition during the warranty period.
- This warranty will only be valid if the appliance is used in the country in which it was sold.
WHAT IS NOT COVERED?
Tineco shall not be liable for costs, damages or repairs incurred as a result of:
- Appliances purchased from an unauthorized dealer.
- Careless operation or handling, misuse, abuse and/or lack of maintenance or use not in accordance with the Tineco Instruction Manual.
- Use of the appliance other than for normal domestic purposes, e.g. for commercial or rental purposes.
- Use of parts not in accordance with the Tineco Instruction Manual.
- Use of parts and accessories other than those produced or recommended by Tineco.
- External factors unrelated to product quality and use, such as weather, modifications, accidents, electrical outages, power surges or acts of God.
- Repairs or alterations carried out by unauthorized parties or agents.
- Failing to clear blockage and other hazardous material from the appliance.
- Normal wear and tear, including normal wearing parts, such as clear bin, belt, filter, HEPA, brush bar, and power cord (or where external damage or abuse is diagnosed), carpet or floor damage due to use not in accordance with manufacturer's instructions or failure to turn the brush bar off when necessary.
- Reduction in battery discharge time due to battery age or use.
WARRANTY LIMITATIONS
- Any implied warranties relating to your appliance including but not limited to warranty of merchantability or warranty of fitness for a particular purpose, are limited to the duration of this warranty.
- Warranty coverage applies to the original owner and to the original battery only and is not transferable.
- This limited warranty gives you specific legal rights. You may also have other rights which vary by region.
- Manufacturer's warranties may not apply in all cases, depending on factors such as use of the product, where the product was purchased, or who you purchased the product from.
Please review the warranty carefully, and contact the manufacturer if you have any questions.
WARRANTY SERVICE
Register: We highly recommend that upon purchase, you register your appliance on the Tineco official website (www.tineco.com) and enjoy exclusive benefits. To register, please enter the last 11 digits of the serial number (remove the dustbin to find the serial number).
Failure to register your product won't diminish your warranty rights.

text_image
E*******XXXXXXHow to Claim: Please retain your proof of purchase. To make a claim under our Limited Warranty, you need to provide your serial number and the original purchase receipt with the purchase date and order number on it.
All work will be carried out by Tineco or an authorized agent.
Any replaced defective parts will become the property of Tineco.
Service under this warranty will not extend the period of this warranty.
Contact our Customer Service
Hotline: 1-855-292-8864
or Visit Tineco website
www.tineco.com
for expert customer service.
CONTENIDO
text_image
A B C D E F G H I J K Lnatural_image
Technical line drawing of a mechanical component or assembly (no text or symbols visible)natural_image
Line drawing of a mechanical clamp or bracket component (no text or symbols)natural_image
Line drawing of a flashlight with handle and clasp (no text or symbols)natural_image
Line drawing of a cylindrical mechanical component with a flanged end (no text or symbols)Boquilla para ranuras
natural_image
Line drawing of a mechanical component with bristles and a handle (no text or symbols)natural_image
Technical line drawing of a cylindrical mechanical component with flanges and end caps (no text or symbols)natural_image
Technical line drawing of a mechanical component or housing (no text or symbols)natural_image
Pure electrical circuit lines without any symbolsnatural_image
Line drawing of a handheld device with a circular base and handle (no text or symbols)natural_image
Technical line drawing of a mechanical device with a cylindrical shaft and a multi-jointed lever, showing no text or symbols.Inserte el tubo.

natural_image
Technical line drawing of a mechanical device with a cylindrical shaft and lever mechanism (no text or symbols)natural_image
Technical diagram of a mechanical assembly with directional arrows indicating motion or force (no text or symbols)natural_image
Mechanical assembly diagram showing a rotating shaft and housing component (no text or symbols)natural_image
Technical line drawing of a device with internal components and directional arrows indicating movement (no text or symbols)text_image
Technical diagram of a device with labeled parts and directional arrows indicating assembly or operation.natural_image
Line drawing of a portable air purifier device with control panel and indicator lights (no text or symbols)natural_image
Line drawing of a portable electric shaver with control panel and indicator lights (no text or symbols)text_image
Technical diagram of a mechanical device with labeled components and an 'click' annotationnatural_image
Line drawing of a handheld electronic device with a hand inserting a cable (no text or symbols)natural_image
Technical line drawing of a handheld device with an inset close-up showing internal components (no text or symbols)natural_image
Line drawing of a hand operating a handheld device (no text or symbols present)text_image
AUTOIMAX ②natural_image
Line drawing of a hand using a handheld electric shaver with a curved arrow indicating rotation (no text or symbols)natural_image
Line drawing of a hand holding a handheld device with an upward arrow indicating motion (no text or symbols)text_image
Technical diagram of a mechanical device with labeled components and directional arrows indicating motion or force
text_image
Technical diagram of a vacuum cleaner with labeled parts and directional arrows indicating motion or assembly.natural_image
Three gray rectangular shapes connected by lines, no text or symbols presentTres luces azules parpadean sucesivamente: cargando.
natural_image
Line drawing of a portable air purifier device with no visible text or symbolsnatural_image
Line drawing of hands operating a handheld device with a handle (no text or symbols)text_image
4 24 hourstext_image
Technical diagram of a handheld device with numbered parts and directional arrows indicating assembly or operation.natural_image
Technical illustration of a mechanical device with a close-up inset showing a hand operating the wheel (no text or symbols present)
Advertencia:
natural_image
Technical line drawing of a handheld device with directional arrows indicating movement (no text or symbols)natural_image
Diagram of a mechanical device with crossed-out lines and an upward arrow, no text or symbols present.natural_image
Technical illustration of a hand pump assembly showing internal components and motion arrows (no text or symbols)natural_image
Line drawing of a hand operating a handheld device with a circular component (no text or symbols)natural_image
Line drawing of a hand inserting a device into a device housing, with no text or symbols present.natural_image
Diagram showing a hand using a device to switch over a device with a crossed-out X (no text or symbols present)text_image
Illustration showing water tap, sun, and two containers with a 24-hour clock, likely indicating water safety or rest.natural_image
Technical line drawing of a sewing machine with a magnified inset showing the detail (no text or symbols)natural_image
Line drawing of a hand inserting a device into a device holder, with no text or symbols present.natural_image
Technical line drawing of a mechanical device with internal components and an arrow indicating direction (no text or symbols)natural_image
Technical line drawing of a mechanical device with internal components and a tool (no text or symbols)natural_image
Technical diagram of a mechanical device with a close-up inset showing a pin and base plate (no text or symbols)natural_image
Diagram showing a coiled tube with internal structure and a separate view of a tool or component (no text or symbols)natural_image
Line drawing of a hand operating a mechanical device with a handle (no text or symbols)natural_image
Technical line drawing of a mechanical assembly with no visible text or symbolstext_image
A B C D E F G H I J K Lnatural_image
Technical line drawing of a mechanical component with no visible text or symbolsnatural_image
Line drawing of a mechanical clamp or bracket component (no text or symbols)Mini brosse turbo
natural_image
Line drawing of a handheld device with a handle and circular ports (no text or symbols)natural_image
Line drawing of a cylindrical mechanical component with a flanged end (no text or symbols)Suceur plat
natural_image
Line drawing of a mechanical component with bristles and a handle (no text or symbols)natural_image
Technical line drawing of a cylindrical mechanical component with flanges and end caps (no text or symbols)Long suceur plat flexible
natural_image
Technical line drawing of a mechanical component or fixture (no text or symbols)Tube flexible multi-angle
natural_image
Pure electrical circuit lines without any symbolsnatural_image
Line drawing of a handheld device with a cylindrical body and circular base (no text or symbols)natural_image
Technical line drawing of a mechanical device with a cylindrical shaft and internal components, showing a close-up view of the shaft (no text or symbols)Insérez le tube.

natural_image
Technical line drawing of a mechanical device with a shaft and lever assembly (no text or symbols)natural_image
Technical diagram of a mechanical assembly with directional arrows indicating motion (no text or symbols)Insérez la brosse.
natural_image
Technical diagram of a mechanical assembly with no visible text or symbolsnatural_image
Technical line drawing of a mechanical device with internal components and directional arrows (no text or symbols)text_image
Technical diagram of a handheld device with labeled parts and directional arrows indicating assembly or operation.natural_image
Line drawing of a portable air purifier device with control panel and indicator lights (no text or symbols)natural_image
Line drawing of a portable electric shaver with handle and control panel (no text or symbols)natural_image
Technical line drawing of a mechanical device with screw and pin components, no text or symbols presentnatural_image
Line drawing of a handheld device with a hand inserting a component (no text or symbols)natural_image
Technical line drawing of a handheld device with an inset close-up showing internal components (no text or symbols)natural_image
Line drawing of a hand operating a handheld device with a button and control panel (no text or symbols)natural_image
Line drawing of a hand using a handheld electric shaver with a curved arrow indicating rotation (no text or symbols)natural_image
Line drawing of a hand holding a handheld device with an upward arrow indicating motion (no text or symbols)text_image
Technical diagram of a mechanical device with labeled components and directional arrows indicating motion or forcetext_image
Technical diagram of a vacuum cleaner with labeled parts and directional arrows indicating motion or assembly.natural_image
Three gray rectangular shapes connected by dotted lines, resembling abstract or symbolic representations (no text or symbols present)natural_image
Line drawing of a portable air purifier device with no visible text or symbolstext_image
Technical diagram of a device with numbered parts and directional arrows indicating assembly or operation.natural_image
Line drawing of hands operating a handheld device with a tool handle (no text or symbols)text_image
4 24 hourstext_image
Technical diagram showing a mechanical device with a close-up view of the component and a prohibition symbol indicating water release.
Avertissement :
natural_image
Technical line drawing of a handheld device with directional arrows indicating movement (no text or symbols)natural_image
Technical line drawing of a mechanical device with no visible text or symbolsnatural_image
Technical illustration of a mechanical device with exploded view and side view (no text or symbols)natural_image
Line drawing of a hand operating a mechanical device with a tool (no text or symbols)natural_image
Line drawing of a hand inserting a device into a device housing (no text or symbols)natural_image
Diagram of a hand using a device to switch a cable with a crossed-out cable (no text or symbols present)text_image
Illustration showing water tap, sun, and two containers with a 24-hour clock symbolnatural_image
Technical line drawing of a mechanical device with an inset showing a close-up view of a component (no text or symbols present)natural_image
Line drawing of a hand holding a device with a curved arrow labeled 'θ' and 's' indicating direction (no text or symbols beyond labels)natural_image
Technical line drawing of a mechanical device with no visible text or symbolsRetirez le rouleau brosse.