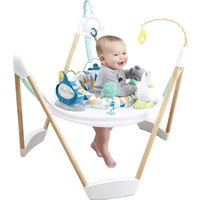
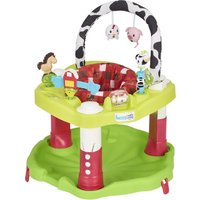
Exersaucer Woodland Wonder - Baby products Evenflo - Free user manual and instructions
Find the device manual for free Exersaucer Woodland Wonder Evenflo in PDF.


| Product Type | Activity Center (ExerSaucer) |
| Brand | Evenflo |
| Model | Exersaucer Woodland Wonder |
| Dimensions (max height) | 76 cm (30 in) |
| Approximate Weight | 6 kg |
| Musical Toy Power Source | 3 AAA alkaline batteries (not included) |
| Number of Included Toys | 7 toys (quantity and style may vary) |
| Main Features | Rotating seat, bouncing, interactive toys, two developmental stages (Stage 1 from 4 months) |
| Adjustable Height | Yes, multiple positions |
| Seat | Rotating padded seat with harness (not mentioned but included) |
| Materials | Plastic, wood, fabric (cover) |
| Care | Plastic/wood parts: clean with a damp cloth and soapy water. Cover: machine wash cold, gentle cycle, no bleach, tumble dry low for 10-15 minutes |
| Safety | Never leave child unattended, do not use near stairs, heat sources, or water, properly secure restraining straps, recommended age: from 4 months up to 76 cm or when child can walk |
| Assembly | By an adult, tools required: Phillips screwdriver. Do not use power tools |
| Warranty | Limited 90 days from original purchase date |
Frequently Asked Questions - Exersaucer Woodland Wonder Evenflo
User questions about Exersaucer Woodland Wonder Evenflo
0 question about this device. Answer the ones you know or ask your own.
Ask a new question about this device
Download the instructions for your Baby products in PDF format for free! Find your manual Exersaucer Woodland Wonder - Evenflo and take your electronic device back in hand. On this page are published all the documents necessary for the use of your device. Exersaucer Woodland Wonder by Evenflo.
USER MANUAL Exersaucer Woodland Wonder Evenflo
Lightweight Activity Jumper
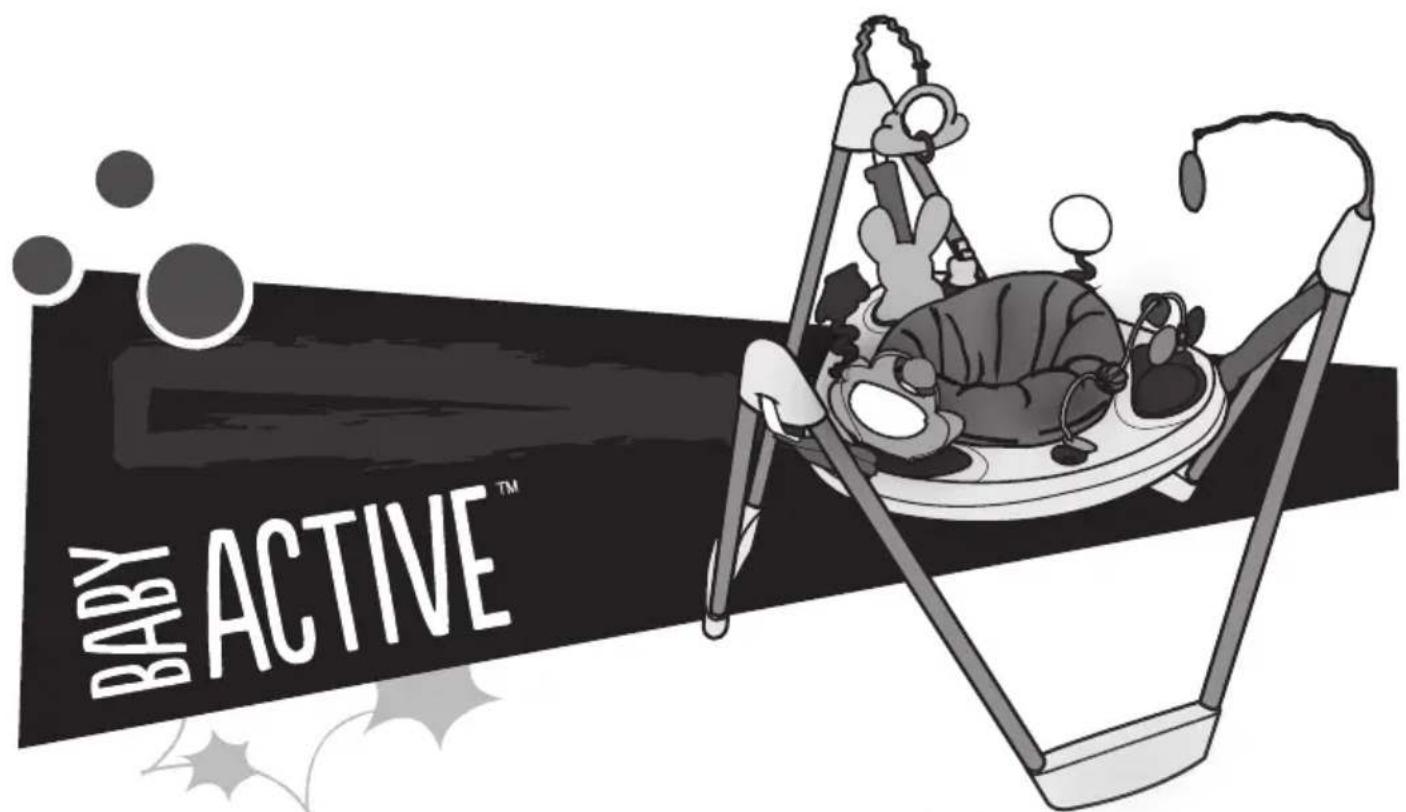
Read all instructions BEFORE assembly and USE of product.
KEEP INSTRUCTIONS FOR FUTURE USE.
| Warnings. | 1 |
| Assembling the ExerSaucer ^® . | 2 |
| Attaching the Toys. | 6 |
| Care and Maintenance. | 8 |
| Limited Warranty. | 9 |
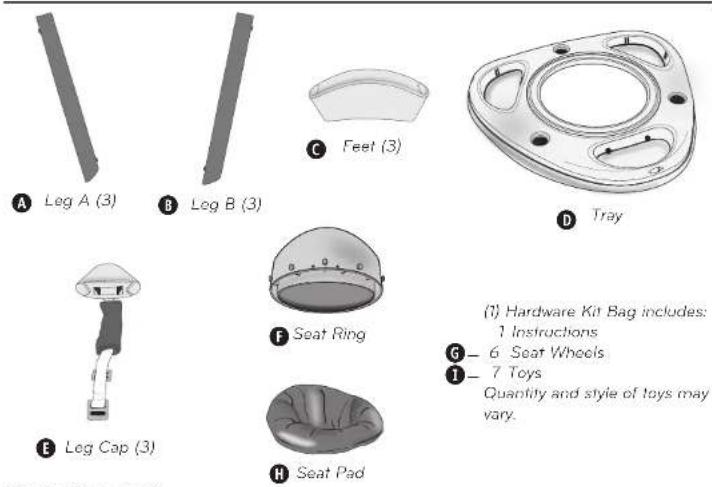
(1) Hardware Kit Bag includes: 1 Instructions
G-6 Seat Wheels
① - 7 Toys Quantity and style of toys may vary.
Tools Required
Phillips Screwdriver

⊕
CAUTION: Tighten all screws until snug; do not overlighten. Use only screws provided. DO NOT USE POWER TOOLS.
Registration Information
Please register this product so we can reach you if there is a safety alert or recall. We will not sell, rent, or share your personal information. To register your product, please complete and mail the card that came with it or visit our online registration at www.evenflo.com/registerproduct
For future reference, record the Model Number and Date of Manufacture below. Model Number: Date of Manufacture:
ParentLink.
answers, advice, affirmation.
• www.evenflo.com • USA: 1-800-233-5921, 8 AM - 5PM E.T.
• Canada: 1-937-773-3971 • México: 01-800-706-12-00
Warnings
WARNING
READ AND FOLLOW ALL WARNINGS AND INSTRUCTIONS! FAILURE TO DO SO COULD RESULT IN SERIOUS INJURY OR DEATH!
- NEVER leave child unattended. ALWAYS keep child in view while in the ExerSaucer.
- Read all instructions before assembly and use of the ExerSaucer.
- Keep instructions for future use.
- Keep children away from unassembled product.
- Adult assembly required. Take care when unpacking and assembling; contains small parts and some items with sharp edges.
• To prevent a possible choking hazard, remove and immediately discard packing material before using this product. -
Strings Can Cause Strangulation!
-
DO NOT place the ExerSaucer anywhere near cords from window blinds, draperies, phone, etc.
- DO NOT place items with strings, such as hood strings or pacifier cords, around your child's neck.
- DO NOT suspend strings over product or attach strings to toys.
NEVER use near stairs or steps.
- NEVER use ExerSaucer near ranges, radiators, space heaters, fireplaces or any other heat source.
- NEVER use ExerSaucer in or near swimming pools or other bodies of water.
• DO NOT fill the ExerSaucer tray with water.
• DO NOT adjust height while baby is sitting in ExerSaucer. - DO NOT use the ExerSaucer if any parts are missing, damaged or broken.
• DO NOT allow child to sleep in ExerSaucer.
• DO NOT spin baby in seat. Only permit baby to rotate the seat. - For use by children who are at least 4 months old AND can hold up their head and neck unassisted.
-
Stop using ExerSaucer when your child reaches any of the following developmental stages:
-
Can walk unassisted
• Is over 30" (76 cm) tall
• Can climb out of the product - Can stand flat-footed in the ExerSaucer in the highest adjustment level
- Allow only the baby's toes to touch the floor. DO NOT allow the baby to stand flat-footed on the floor.
• NEVER allow child to stand on tray.
• DO NOT use or store this product outdoors.
- If product has been in cold climate, allow time for product to warm to room temperature.
• To avoid tip-over, place product on flat, level floor.
- ALWAYS make sure the metal retainer plates are fully inserted in the retainer slots before placing child in the ExerSaucer.
• DO NOT mix old and new batteries.
- DO NOT mix alkaline, standard (carbon-zinc), or rechargeable (nickel-cadmium) batteries.
Warnings - continued Assembling the ExerSaucer
WARNING
READ AND FOLLOW ALL WARNINGS AND INSTRUCTIONS!
FAILURE TO DO SO COULD RESULT IN SERIOUS INJURY OR DEATH!
- Only batteries of the same or equivalent type, as recommended, are to be used.
• DO NOT dispose of batteries in fire, as batteries may explode or leak.
• The supply terminals are not to be short-circuited.
• DO NOT use rechargeable batteries.
• DO NOT recharge non-rechargeable batteries. - Rechargeable batteries are to be removed from the toys before being charged.
- Rechargeable batteries are to be charged under adult supervision.
- Promptly remove exhausted batteries from the toy.
- Remove batteries before storing unit for a prolonged period of time.
• DO NOT allow unit to get wet. - Dispose of used batteries properly.
Assembling the ExerSaucer
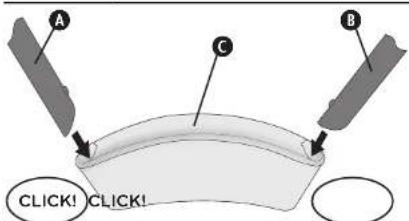
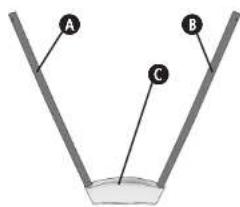
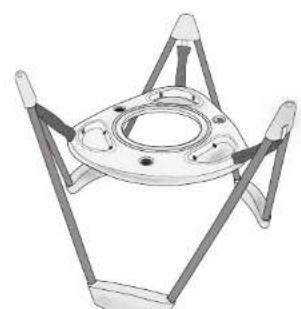
- Holding Foot C, as shown, press slanted end of Leg A into Foot C until you hear an audible click. Press slanted end of Leg B into Foot C until you hear an audible click, to create the Leg Assembly. Repeat these steps for the other two Leg Assemblies. Note: If Leg does not Click in place, and can be removed, it is the incorrect leg for that side. Try the other hole in the Foot.
natural_image
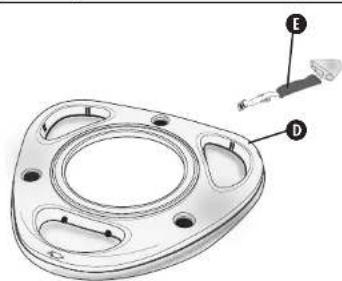
3D mechanical part diagram with labeled parts E and D (no text or symbols beyond labels)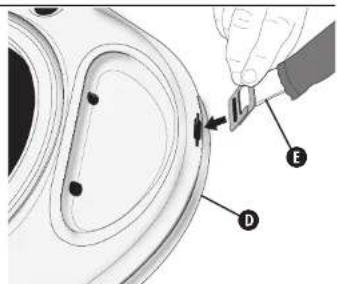
- Insert both metal tabs on Leg Cap into opening on top of Tray
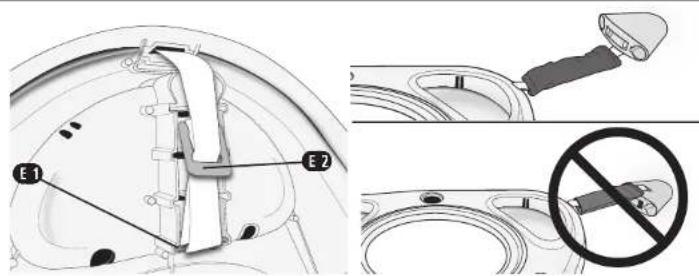
- Insert first metal plate E1 into the first retainer slot on the underside of the Tray D, as shown and push tab out of the way to install. Rest second metal plate flat against tray slots. E7 Repeat for other two Leg Caps E. Once plates are inserted pull on them to make sure they are securely attached.
natural_image
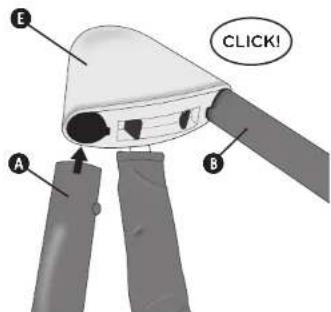
Technical line drawing of a mechanical component with three legs and a central circular feature (no text or symbols)4.SlideLeg A from lower leg assembly into opening in bottom of Leg Cap B until you hear an audible click. Then slide Leg B from lower leg assembly into other opening in bottom of Leg Cap B until you hear an audible click. Repeat these steps for the other two Leg Caps E.
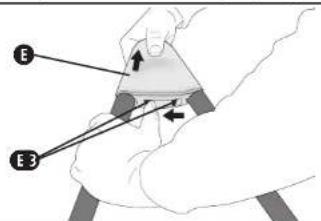
For future storage:
To remove Leg Caps E, press tabs E3 on bottom of Leg Cap and pull legs out.
Assembling the ExerSaucer
Assembling the ExerSaucer
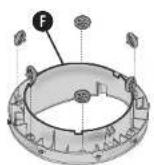
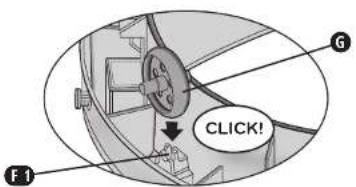
- Place Seat Ring F upside down and locate the wheel holders F1. Click six (6) Seat Wheels G into wheel holders, as shown.
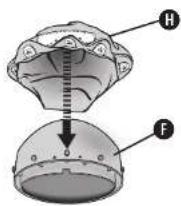
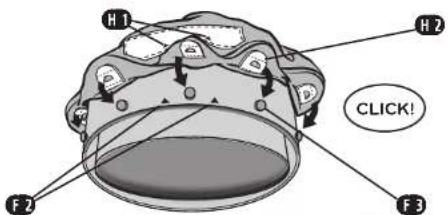
- Align triangles F2 on the back of the Seat Ring with the triangles H1 on the seat pad label. Snap the plastic tabs H2 on the pad over the pegs F3 on the Seat Ring. Continue this process until all tabs are attached to all pegs.
To remove Seat Pad:
Un-clip plastic tabs H2 from pegs F3 on the Seat Ring and lift out.
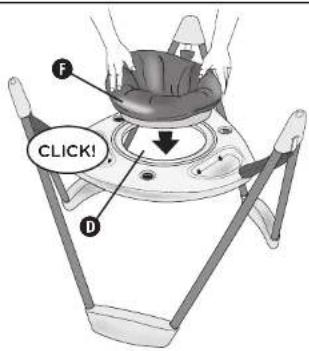
- Press Seat Ring down firmly onto the top of the Tray until it locks in place with an audible click, and spins freely.
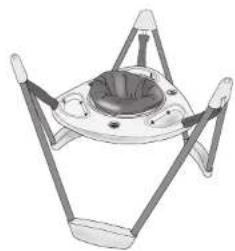
natural_image
Diagram of a mechanical device with a central circular component and four arms (no text or symbols)To adjust height:
ALWAYS remove baby from ExerSaucer before adjusting.
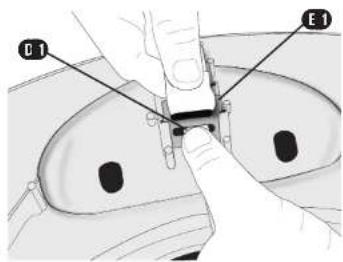
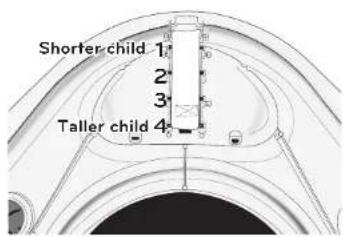
Push tab C1 to remove metal plate E1. Insert metal plate E1 into appropriate slot to obtain the desired height of the Tray D. Repeat for the other two Leg Caps.
IMPORTANT: When inserting Leg Cap plates, use the same slot in each of the other two Leg Cap retainers, or the ExerSaucer will not be level.

WARNING
To prevent serious injury or death make sure the metal retainer plates are fully inserted in the retainer slots and resting against tray.
- During use, allow the baby's toes only to touch the floor. DO NOT allow the baby to stand flat-footed on the floor. As baby grows and becomes more active, raise the Tray to the next level so that baby enjoys the most comfortable fit and maximum use of the spin, and bounce features.
• NEVER allow child to stand on tray. - ALWAYS make sure the metal retainer plates are fully inserted in the retainer slots before placing child in the ExerSaucer.
Attaching the Toys
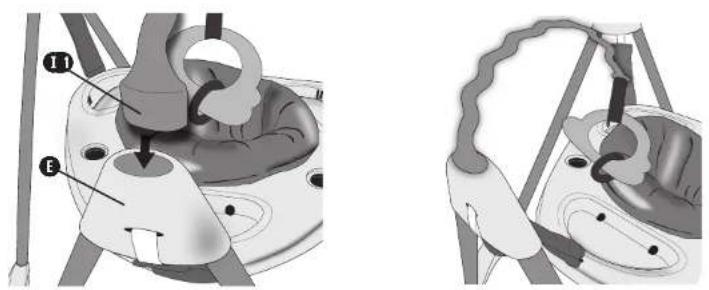
To place Cap Toy ⑪ into Leg Cap ⑫, push end of toy into opening in top of Leg Cap.
To remove Cap Toy from ExerSaucer, grab toy near Leg Cap and pull straight up.
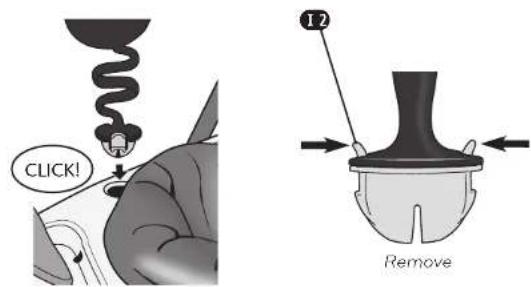
To install stalk toys, press firmly into tray until you hear an audible click. Pull up on stalk toys to make sure they are locked in place.
To remove stalk toys, squeeze tabs 12 and lift stalk toys from tray.
Attaching the Toys
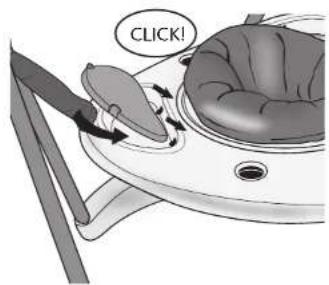
Attach toys by inserting straight edge into opening and rotating down, as shown. Press firmly into tray until you hear an audible click.
Note: Some toys cannot be removed after assembly.
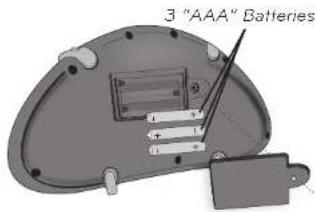
Refer to battery door for quantity and size of batteries.
To remove toy, press tabs from underside of Tray D and lift toy from Tray.
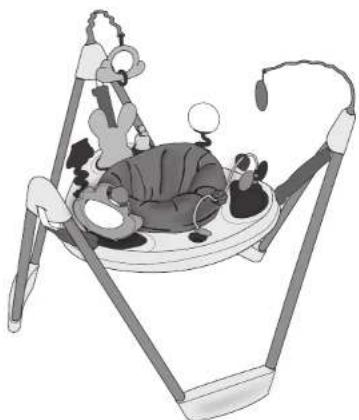
natural_image
Illustration of a baby in a babystrainer using a swing device (no text or symbols)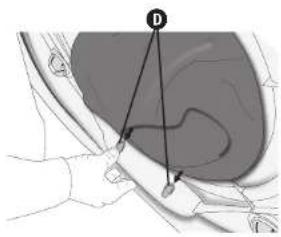
natural_image
Medical illustration showing a hand holding a device with a highlighted anatomical region (no text or symbols present)Care and Maintenance
Limited Warranty
For Plastic Parts:
Wipe surface clean with cloth slightly moistened with mild soap and water.
DO NOT use abrasive cleaners or solvents. Allow to air dry.
For Wood Parts:
Wipe surface clean with cloth slightly moistened with mild soap and water.
DO NOT use abrasive cleaners or solvents. Immediately wipe dry with clean cloth.
For Seat Pad:
Machine Wash Separately, Cold Water - Delicate Cycle. NO CHLORINE BLEACH.
Tumble Dry: 10 - 15 Minutes on Low Heat - Remove Immediately.
If musical toys fail to operate, check the batteries. Note: ONLY the batteries are replaceable. Dispose of old batteries safely.
DO NOT use this product if any parts are missing, damaged or broken.
Keep these instructions for future reference as they contain important information.
BATTERY INFORMATION:
Battery life varies with use. For longer life use only alkaline batteries.
BATTERY SAFETY INFORMATION: Batteries are small objects. Batteries must be replaced by adults. Follow the polarity (+/-) diagram in the battery compartment.
WARNING
• DO NOT mix old and new batteries.
- DO NOT mix alkaline, standard (carbon-zinc), or rechargeable (nickel-cadmium) batteries.
- Only batteries of the same or equivalent type, as recommended, are to be used.
- DO NOT dispose of batteries in fire, as batteries may explode or leak.
• The supply terminals are not to be short-circuited.
• DO NOT use rechargeable batteries.
• DO NOT recharge non-rechargeable batteries.
- Rechargeable batteries are to be removed from the toys before being charged.
- Rechargeable batteries are to be charged under adult supervision.
- Promptly remove exhausted batteries from the toy.
- Remove batteries before storing unit for a prolonged period of time.
• DO NOT allow unit to get wet.
- Dispose of used batteries properly.
Battery Replacement: To replace batteries, loosen screw and remove battery door.
Discard old batteries properly and replace with 3 AAA alkaline or standard batteries. Replace door and tighten screw.
Troubleshooting:
Toy does not turn on or does not respond.
- Make sure batteries are installed correctly.
- Make sure battery cover is correctly secured.
• Install new batteries.
Toy makes improper responses.
- Check or install new batteries.
• Power Off then Power On, to reset.
For a period of 90 days from the original purchase of this Product, Evenflo warrants to the original end user ("Purchaser") this Product (including any accessories) against defects in material or workmanship. Evenflo's sole obligation under this express limited warranty shall be, at Evenflo's option, to repair or replace any Product that is determined to be defective by Evenflo and determined to be covered by this warranty.
Repair or replacement as provided under this warranty is the exclusive remedy of the Purchaser. Proof of purchase in the form of a receipted invoice or bill of sale evidencing that the Product is within the warranty period must be presented to obtain warranty service. This express limited warranty is extended by Evenflo ONLY to the original Purchaser of the Product and is not assignable or transferable to subsequent purchasers or end users of the Product. For warranty service, contact Evenflo's ParentLink Consumer Resource Center at (800) 233-5921 or
www.evenflo.com.
EXCEPT TO THE EXTENT PROHIBITED BY APPLICABLE LAW, ANY IMPLIED WARRANTY OF MERCHANTABILITY OR FITNESS FOR A PARTICULAR PURPOSE ON THIS PRODUCT IS HEREBY DISCLAIMED. EVENFLO SHALL NOT BE LIABLE FOR ANY INCIDENTAL, CONSEQUENTIAL, SPECIAL OR PUNITIVE DAMAGES OF ANY KIND FOR BREACH OF THE EXPRESS LIMITED WARRANTY ON THIS PRODUCT, OR ANY WARRANTY IMPLIED BY OPERATION OF LAW. OTHER THAN THE EXPRESS LIMITED WARRANTY SET FORTH ABOVE, THERE ARE NO OTHER WARRANTIES THAT ACCOMPANY THIS PRODUCT AND ANY ORAL, WRITTEN OR ANY OTHER EXPRESS REPRESENTATION OF ANY KIND IS HEREBY DISCLAIMED.
For Australian Consumers - CNP Brands Standard Warranty
- Our goods come with guarantees that cannot be excluded under the Australian Consumer Law. You are entitled to a replacement or refund for a major failure and compensation for any other reasonably foreseeable loss or damage. You are also entitled to have the goods repaired or replaced if goods fail to be of acceptable quality and the failure does not amount to a major failure.
1.2 In addition to the guarantees that cannot be excluded under the Australian Consumer Law described in clause 1.1 and any other guarantee or warranty implied by law, when you purchase one of our products, you will also have the peace of mind in knowing that your product is covered by CNP Brands Standard Warranty. The Standard Warranty is provided by C.O. White Pty Ltd trading as CNP Brands (ABN 97 004 169 233) ("CNP Brands"). The terms and conditions of the Standard Warranty are further described below.
1.3 Subject to clause 1.1 and the terms below, CNP Brands warrants that this CNP Brand product, purchased by you in Australia or New Zealand:
a) is free from defects in workmanship and material, when the product is used for normal consumer use for a period of 90 DAYS from the date of purchase as evidenced by your proof of purchase ("Warranty Term"); and
b) will, when the product is used for normal consumer use, comply with the manufacturer's specifications during the Warranty Term.
For Australian Consumers - CNP Brands Standard Warranty - cont.
1.4 CNP Brands agrees to repair or replace at CNP Brands cost, the product and any accessory supplied with the product, which is proven upon inspection by CNP Brands or a CNP Brands Authorised Service Agent not to comply with either warranty contained in clause 1.3. Any decision to repair or replace a product is to be made by CNP in its absolute discretion. The extent of any repair will be to rectify any defect in workmanship and materials or to ensure that the product complies with the manufacturer's specifications.
1.5 To make a claim under this Standard Warranty you will need to:
a) Return the product within the Warranty Term to the place of purchase together with your proof of purchase, where the retailer will provide you with assistance to make your claim; or
b) Contact CNP Brands Customer Care Centre on toll free 1300 667 137 during the Warranty Term to register your claim and provide the details to enable CNP Brands to assess the claim.
1.6 You may also be required to make the product available to CNP Brands or a CNP Brands Authorised Service Agent. If you are required to return the product to a CNP Brands Authorised Service Agent, CNP Brands will provide details of the centre closest to you. Unless CNP Brands decides otherwise you are responsible for any costs associated with returning the product to CNP Brands. The product will be at your risk whilst in transit to and from the CNP Brands or CNP Brands Authorised Service Agent, unless transported by CNP Brands or its agents.
1.7 In order for your claim to be processed you will need to provide to CNP Brands with an original proof of purchase. For example an original retailer purchase receipt, bill of sale, invoice, lay-by docket, credit card receipt or similar proof of purchase.
1.8 If CNP Brands decide to repair a product, this product may be replaced by refurbished products of the same type rather than being repaired. Refurbished parts may be used to repair the product. Replacement of the product or a part does not extend or restart the Warranty Term.
1.9 Exclusions
a) This Standard Warranty does not cover products purchased as an ex-display, without being checked by CNP Brands or CNP Brands Authorised Service Agents.
b) This Standard Warranty does not cover faults or defects caused by:
i. Unsuitable, improper use or use not in accordance with the manufactures specifications;
ii. Incorrect installation or installation not in accordance with instructions provided;
iii. Normal wear and tear;
iv. Inadequate or complete lack of maintenance;
v. Chemical, electrochemical or electrical influences; or
vi. Harsh detergents or abrasive cleaners used on product finishes.
c) To the fullest extent permitted by law, CNP Brands excludes all liability for damage or injury to any person, damage to any property, and any indirect consequential or other loss or damage.
To contact CNP Brands or, to find the nearest CNP Brands Authorised Service Agent, please contact CNP Brands on 1300 667 137, email info@cnpbrands.com.au or write to CNP Brands, P.O Box 8 Deer Park Victoria 3023 Australia. Please also refer to our website www.cnpbrands.com.au.
This device complies with Part 15 of the FCC Rules. Operation is subject to the following two conditions: (1) this device may not cause harmful interference, and (2) this device must accept any interference received, including interference that may cause undesired operation.
WARNING
Changes or modifications to this unit not expressly approved by the party responsible for compliance could void the user's authority to operate the equipment.
Note: This equipment has been tested and found to comply with the limits for a Class B digital device, pursuant to Part 15 of the FCC Rules. These limits are designed to provide reasonable protection against harmful interference in a residential installation. This equipment generates, uses, and can radiate radio frequency energy and, if not installed and used in accordance with the instructions, may cause harmful interference to radio communications. However, there is no guarantee that interference will not occur in a particular installation. If this equipment does cause harmful interference to radio or television reception, which can be determined by turning the equipment off and on, the user is encouraged to try to correct the interference by one or more of the following measures:
• Reorient or relocate the receiving antenna.
- Increase the separation between the equipment and receiver.
- Connect the equipment into an outlet on a circuit different from that to which the receiver is connected.
- Consult the dealer or an experienced radio TV technician for help.
• This Class B digital apparatus complies with Canadian ICES-003.
ParentLink.
answers, advice, affirmation.™
• www.evenflo.com • USA: 1-800-233-5921, 8 AM - 5PM E.T.
• Canada: 1-937-773-3971 • México: 01-800-706-12-00
Table des matières
answers, advice, affirmation.
- www.evenflo.com • USA: 1-800-233-5921, 8 h à 17 h, heure normale de l'Est - Canada: 1-937-773-3971 • México: 01-800-706-12-00
Avertissements
▲ AVERTISSEMENT
LIRE ET SUIVRE TOUS LES AVERTISSEMENTS ET INSTRUCTIONS ! SINON CELA POURRAIT ÊTRE SOURCE DE BLESSURES GRAVES VOIRE MORTELLES !
natural_image
Technical illustration of a mechanical component with labeled parts (E and D), showing cross-sectional and side views without any readable text or symbols.natural_image
Technical line drawing of a mechanical component with mounting brackets and central hub (no text or symbols)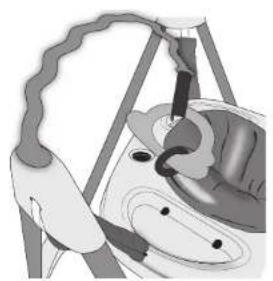
natural_image
Illustration of a hand holding a tool interacting with a device (no text or symbols visible)natural_image
Illustration of a person relaxing in a swing chair with accessories (no text or symbols)natural_image
Medical illustration showing a hand holding a device with a highlighted anatomical region (no text or symbols present)answers. advice. affirmation."
answers advice affirmation
- www.evenflo.com • USA: 1-800-233-5921, 8 AM a 5PM hora del Este - Canada: 1-937-773-3971 • México: 01-800-706-12-00
Advertencias
ADVERTENCIA
natural_image
Diagram showing a car seatbelt buckle and a prohibition symbol (no text or labels)natural_image
Technical line drawing of a mechanical component with four legs and central hub (no text or symbols)natural_image
Technical line drawing of a mechanical device with four legs and a central circular component (no text or symbols)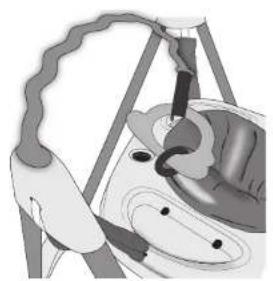
natural_image
Illustration of a hand using a tool to adjust or install a mechanical component (no text or symbols visible)natural_image
3D mechanical component diagram showing internal components and a tool inserted (no text or symbols visible)natural_image
Illustration of a person relaxing in a swing chair with accessories (no text or symbols)natural_image
Medical illustration showing a hand holding a device with a shaded area and labeled point D (no text or symbols present)answers, advice, affirmation.™
• www.evenflo.com • USA: 1-800-233-5921, 8 AM a 5PM hora del Este
- Canada: 1-937-773-3971 • México: 01-800-706-12-00
ParentLink.
answers. advice. affirmation.™
• www.evenflo.com • USA: 1-800-233-5921, 8 AM a 5PM hora del Este
- Canada: 1-937-773-3971 • México: 01-800-706-12-00
- Lightweight Activity Jumper
- Tools Required
- Registration Information
- ParentLink.
- Warnings
- WARNING
- READ AND FOLLOW ALL WARNINGS AND INSTRUCTIONS! FAILURE TO DO SO COULD RESULT IN SERIOUS INJURY OR DEATH!
- Warnings - continued Assembling the ExerSaucer
- READ AND FOLLOW ALL WARNINGS AND INSTRUCTIONS!
- FAILURE TO DO SO COULD RESULT IN SERIOUS INJURY OR DEATH!
- For future storage:
- Assembling the ExerSaucer
- To adjust height:
- Attaching the Toys
- Care and Maintenance
- Limited Warranty
- For Plastic Parts:
- For Wood Parts:
- For Seat Pad:
- Keep these instructions for future reference as they contain important information.
- BATTERY INFORMATION:
- Troubleshooting:
- www.evenflo.com.
- For Australian Consumers - CNP Brands Standard Warranty
- For Australian Consumers - CNP Brands Standard Warranty - cont.
- ▲ AVERTISSEMENT
- LIRE ET SUIVRE TOUS LES AVERTISSEMENTS ET INSTRUCTIONS ! SINON CELA POURRAIT ÊTRE SOURCE DE BLESSURES GRAVES VOIRE MORTELLES !
- ADVERTENCIA
Brand : Evenflo
Model : Exersaucer Woodland Wonder
Category : Baby products