USER MANUAL MES2001L Manta
natural_image
Abstract black-and-white circular logo design with interlocking curved shapes (no text or symbols)
MANTA
MANTA S.A.
And with following norms:
EMC:EN 55014-1:2017/A11:2020
EN 55014-2:2015
EN 61000-3-2:2019
EN 61000-3-3:2009
LVD: EN60335-1:2012+AC:2014+A11:2014+A13:2017+A1:2019+A14:2019+A2+2019 EN62233:2008
Machinery: EN ISO 12100:2010
EN 60204-1:2018
Person authorized to sign
the CE declaration
Bogdan Wiciiški
CEO for company Manta S.A.
Warszawa
10.08.2022
natural_image
Illustration of a person wearing a hard hat and casual clothing (no text or symbols)
llustracja 1.1
natural_image
Diagram of a wind turbine blade assembly with directional arrows indicating motion (no text or symbols)
natural_image
Technical line drawing of a mechanical component with no visible text or symbols
natural_image
Mechanical component diagram showing a shaft with threaded end and two attached parts (no text or symbols)
natural_image
Technical line drawing of a mechanical device with a curved top and attached bracket (no text or symbols)
Ilustracja 3.5
natural_image
Technical line drawing of a mechanical assembly with hoses and components (no text or symbols)
llustracja 3.6
natural_image
Mechanical assembly diagram showing a shaft and lever assembly (no text or symbols)
natural_image
Mechanical assembly diagram showing a lever mechanism with no visible text or symbols
natural_image
Simple line drawing of a vertical pole with a circular head and two curved connectors (no text or symbols)
llustracja 3.9.1
natural_image
Technical diagram of a mechanical assembly with no visible text or symbols
Ilustracja 3.9.2
4
Eksploatacja
Uruchomienie roweru

This manual contains important safety and use information. Keep this manual for future reference.
- Must read this entire manual
• Adult supervision is required at all times
About This Manual
It is important for you to understand your new e-bike.
By reading this manual before you go out on your first ride, you'll know how to get better performance, comfort, and enjoyment from your new e-bike. It is also important that your first ride on your new e-bike is taken in a controlled environment, away from cars, obstacles.
This manual contains important information regarding safety, assembly, use, and maintenance of the e-bike but is not intended to be a complete or comprehensive manual covering all aspects concerning e-bike ownership. We recommend consulting an expert if you have any doubts or concerns regarding your experience or ability to properly assemble and maintain the e-bike.
Disclaimer:
Before using our products, be sure to read this statement carefully.
In the event of using the company's products, you will be deemed to have understood and approved all the contents of this statement.
- When using this product, you must abide by the national laws and regulations and local traffic rules. The company is not responsible for any consequences caused by violation of the above laws and regulations.
- You must strictly follow the instructions in the instruction manual for correspon-
ding operations. The company is not responsible for any consequences caused by improper use, speeding, overloading, etc
1
Safety Warning Messages
performance and prolong its service life, for your safety and the safety of others,
• In order to take some time carefully to read this one, make it perform its best
do not use e-bike, and do not lend them to people who can't operate e-bike to
• Before reading this any damaged doctor, he is working the performance of e-bike, please
• For the safety and happiness of you and others, please abide by local traffic laws.
tact with metal at the same time, otherwise it will generate a large short circuit
• Donnell and bathe power plant of the battery box used in this e-bike, let alone con-
will also damage the battery life, so you should fully charge and store it in time after riding. If the battery is not used for a long time, please charge the battery to a half full. In sufficient battery that 80% affects the detrayed is mileage, red gate under 2 charges.
rage in places with high air humidity and corrosive gas, so as to avoid chemical corrosion and electrical parts damage on the electroplating and painted surfaces. The of bike should avoid long-term exposure to the sun and rain, and avoid sto-
into the brake pads because the brakes fail. When driving downhill on snowy, rainy
- Please regularly practice the take-during process to ensure safety. Do not inject oil
- Random modification of the e-bike, or replacement of the original e-bike, device will not guarantee the safety of the e-bike.
semble parts by yourself. If repair or replacement is required, please contact the
• For all personnel safety and maintenance rights, please do not disassemble or disas-
- EN - EN -
- Please carefully check whether the parts are in good condition before use to
- Please consciously abide by the traffic rules.
- Do not put the battery near high temperature or put it into fire. When charging, do not near flammable and explosive materials.
- When riding in crowded places, please ensure that the environment is safe to assist the riding or turn off the power to avoid danger.
- When disposing of the battery, please discharge the battery voltage to 0 volts. The lithium battery is a flammable. please do not throw it into the fire.
re leaving the factory. The technical parameters of the charger are fully matched with the parameter design of the battery protection board; the electronic anti-interference compatibility is good. If the charger is lost, use another manufacturer's charger. Due to the mismatch of electrical parameters and mutual interference, the battery pack may be damaged and its service life may be shortened. It is also
• The possible battery batteries of pack-will heat and battery phosphate stored by tested obtained.
rameter has been verified by many tests. Please use the original factory-configured controller. Because the under-voltage protection hedging design of the controller is based on the protection parameter design and matching compatibility performance of the battery pack protection board. If you use an unmatched controller, it may affect the over-discharge of the battery pack and damage the service life of the battery pack. It may also interrupt the power of the entire e-bike
- The dooming inditing and our battery recovery the life of theDEMotovery important. This pa
Personal Safety

Riding a e-bike without protective gear, clothing, shoes, or a helmet may result in serious injury or death. Always wear protective gear, clothing, and helmet when riding the e-bike. Ensure protective gear does not interfere with steering, or braking.
- Colors that are easily seen and, if possible, reflective clothing.
• Clothing appropriate for the weather conditions.
• Always wear shoes
- A properly fitted, ASTM or SNELL approved, helmet shall be worn at all times by riders of the e-bike.
Do not wear:
- Loose clothing parts, strings, or jewelry that may become entangled with moving parts on the e-bike or interfere with handling of the e-bike.
• Shoes with untied shoe laces.
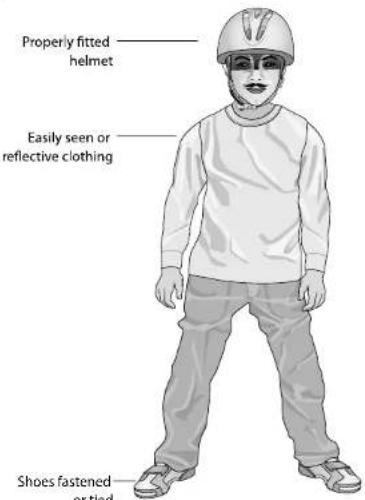
Figure 1.1
- EN - EN -
Battery warnings
Risk of Fire: No User Serviceable Electric Parts. The following safety hazards may result in serious injury or death to the user of the scooter:

- Using a battery or charger other than the supplied echargeable batteries and charger may cause a fire or explosion. Only use the supplied rechargeable battery and charger with the e-bike.
- Using the rechargeable batteries and charger for any other product may result in overheating, fire or explosion. Never use the rechargeable batteries with another product.
- Tampering or modifying the electric circuit system may cause a shock, fire or explosion and permanently damage the system. Exposed wiring, circuitry in the charger may cause electric shock. Always keep the charger housing closed.
- Charge the battery in a well-ventilated area. Do not charge the battery near heat or flammable materials.
- Contact between fire or explosion. Avoid direct contact between the terminals. Picking up the battery by the wires or charger can cause damage to the battery and may result in a fire. Always pick up the battery by its case or handles.

- Liquids on the battery may cause fire or electric shock. Always keep all liquids away from the battery and keep the battery dry.
- Stop using the e-bike if the battery begins to emit odor, overheats, or begins to leak. Do not touch any leaking materials or breath fumes emitted.
- Seek immediate medical assistance if you are exposed to any substance that is emitted from the battery.
- This battery or insert anything into the battery.
• Lithium-Ion batteries are considered hazardous materials. Please follow all local, state, and federal laws regards to recycling, handling, and disposing of Lithium-Ion batteries.
- Do not expose e-bike, batteries, or battery pack to excessive heat, such as prolonged direct sunlight or open flame.
- Never store at freezing temperatures. Freezing will permanently damage the battery.

Before beginning assembly, check to ensure that the parts are present. Some hardware is attached to the NOTICE sub assembly.
Package list
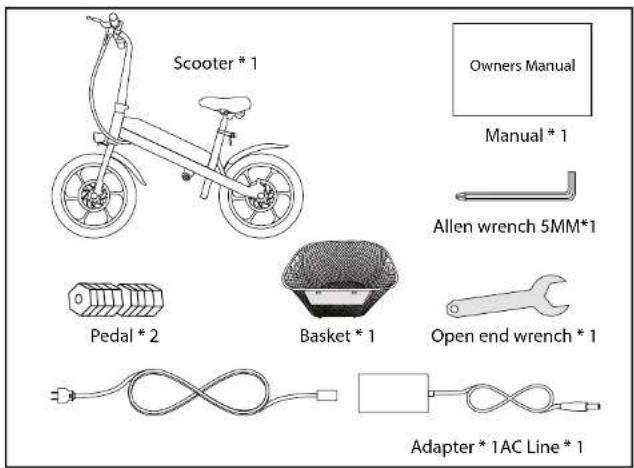
Figure 2.1 Figure 2.2
- EN - EN -
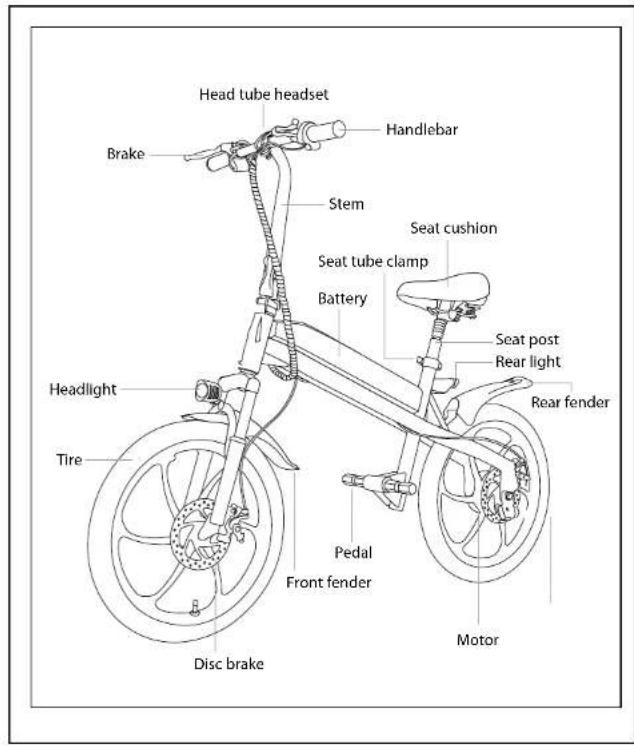
3
Assemble
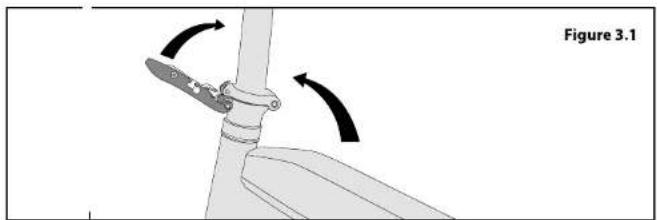
- The first step: After unpacking the entire kit, lift the steering column, set it in the right position and lock the latch (Always wear: Figure 3.1).
natural_image
Diagram of a mechanical lever mechanism with directional arrows indicating motion (no text or symbols)
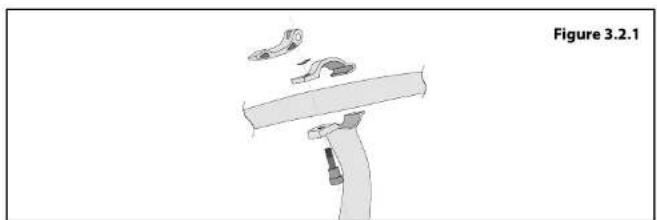
- The second step: Install the handle, adjust the angle of the driver.
natural_image
Diagram of a device with a handle and accessories, labeled as Figure 3.2.1 (no text or symbols on the diagram itself)
- EN - EN -
natural_image
Diagram of a mechanical clamp or lever assembly with motion lines, labeled as Figure 3.2.2 (no text or symbols on the diagram itself)

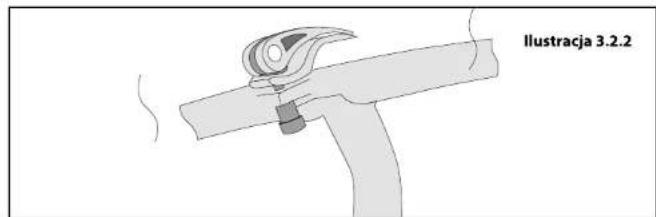
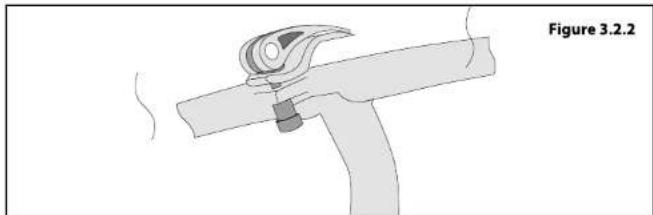
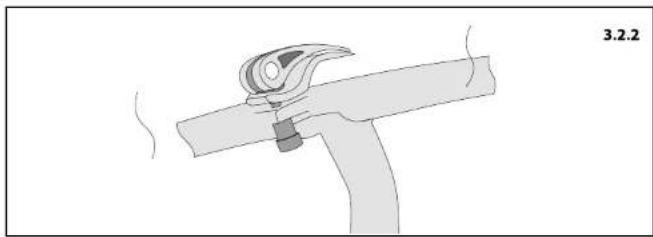
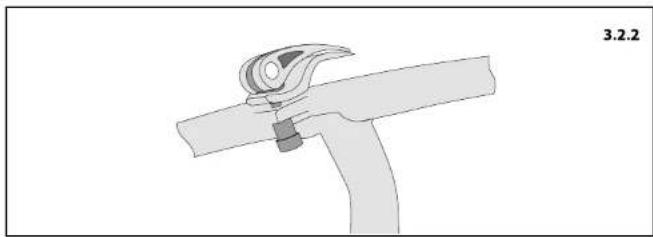
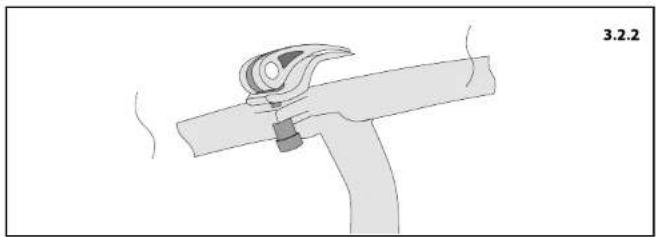
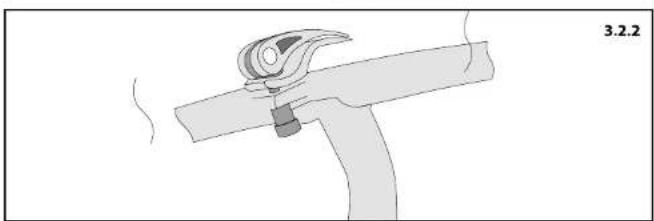
The seat tube and the front wheel are facing straight ahead at the same time. Then lock the handlebar on the riser, ensure the quick release be locked. Please pay attention to the angle and direction of the handlebar (the transmission and the battery display are on the left side of the front.
Please adjust the handlebar to a comfortable angle.
( As: Figure 3.2.1 & 3.2.2 ).
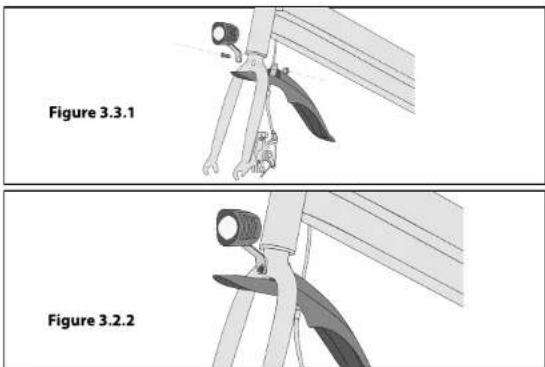
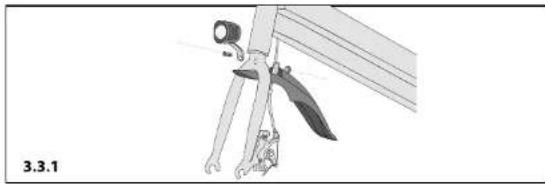
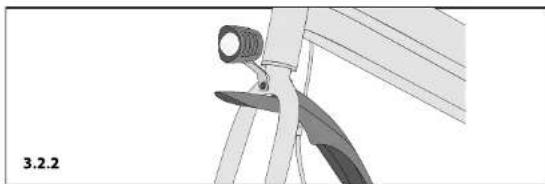
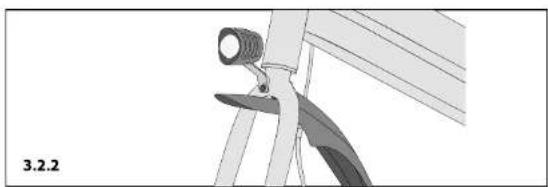
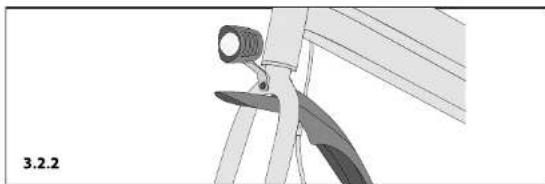
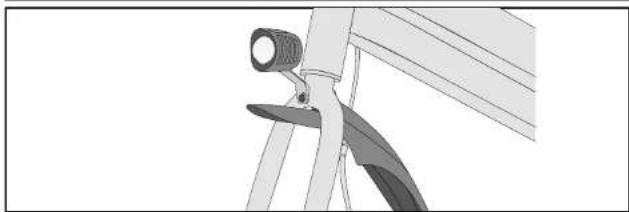
- Step 3: Install the headlights and mudgard onto the front fork using screws and nuts from the fitting. (As: Figure 3.3.1 & 3.3.2).
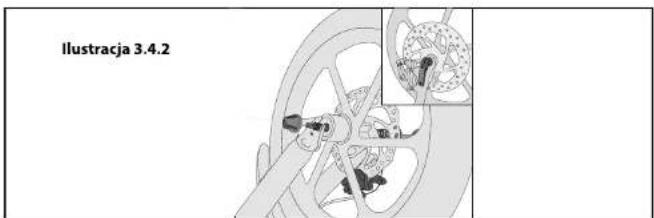
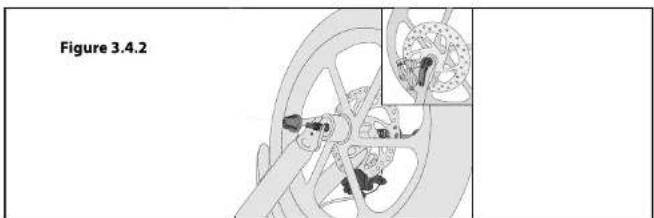
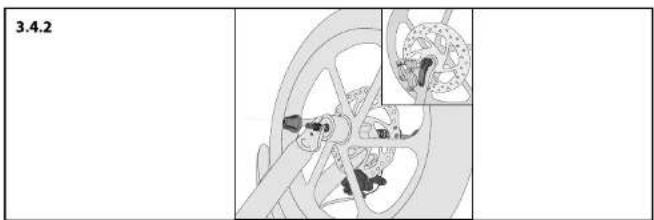
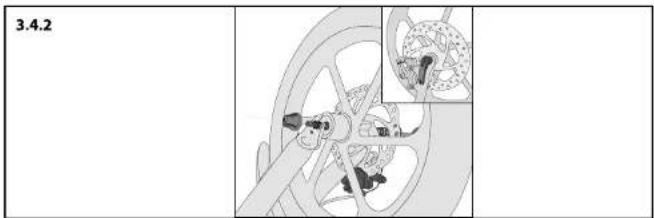
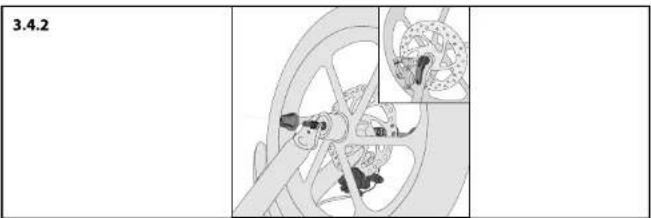
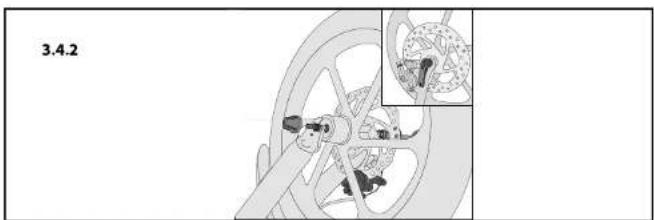
- Step 4: Upside down the bicycle, insert the front wheel, then insert the hook, washer, and nut on both sides accordingly, and tighten the nut to finish the assemble ( As: Figure 3.4.1 ).

natural_image
Mechanical component diagram labeled Figure 3.4.1, showing a shaft with bolts and a clamp (no text or symbols on the diagram itself)
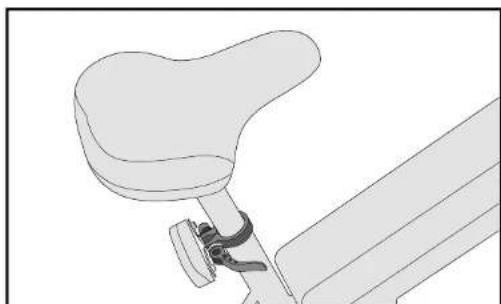
Step 5: Insert the seat tube, adjust the height of seat tube. When locking, please keep the seat cushion level (according to personal preference).
Important: The seat tube bundle must be locked, and the depth of the seat tube must be at or above the safety line.
(As: Figure 3.6)
natural_image
Technical line drawing of a mechanical device with a curved top and attached bracket (no text or symbols)
Figure 3.5
26
- EN - EN -
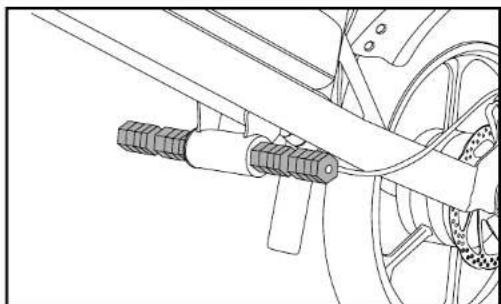
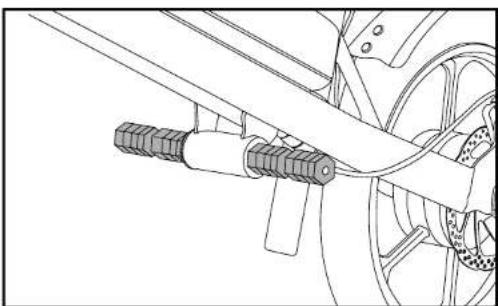
- Step 6: Because the tooth patterns on the left and right of the pedal are different, the installation method is different, L on the left / R on the right. Use R to lock the crank in the clockwise direction, and use L to lock in the counterclockwise direction on one side of the crank
( As: Figure 3.6 ).
natural_image
Technical line drawing of a mechanical assembly with hoses and components (no text or symbols)
Figure 3.6
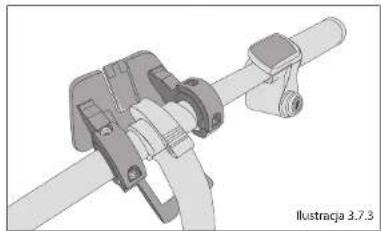
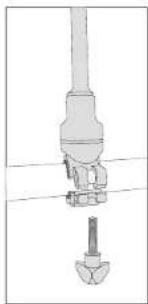
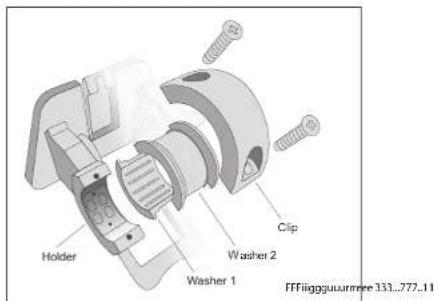
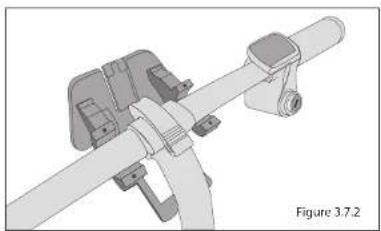
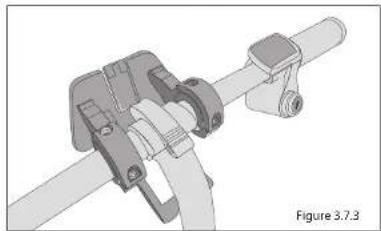
777... Step 7 Mount the holder on the handle bar:
7.1 Position washer 1 with holder & under the handlebar
7.2 Put on the washer 2 on the top of handle bar
7.3 Put the clip to cover the washer 2
7.4 Tighten with screws
( As: Figure 3.7.1 & 3.7.2 & 3.7.3 )
27
natural_image
Mechanical assembly diagram showing a shaft and lever assembly (no text or symbols)
natural_image
Mechanical assembly diagram showing a lever mechanism with no visible text or symbols
- Step 8: Hand on the basket to the mounted basket holder If take off the basket, push the button firstly, then down to up to take off the basket.
(As: Figure 3.8)
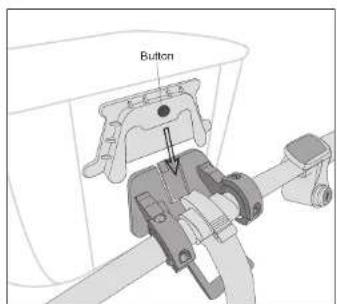
Figure 3.8
- EN - EN -
-
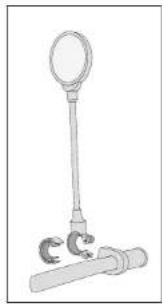
Step 9: Position the mirror on the handlebar,
-
Put on the big size washer firstly,
- Put on the the small PC washer secondly,
- Tighten the screws properly
( As: Figure 3.9.1 & 3.9.2 )
natural_image
Simple line drawing of a vertical pole with a circular head and a curved base (no text or symbols)
Figure 3.9.1
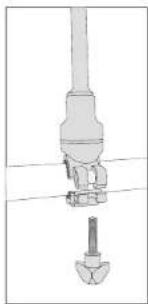
natural_image
Technical diagram of a mechanical assembly with a shaft and base component (no text or labels)
Figure 3.9.2
4
Use
Starting the scooter
When you start riding, you should to use the key to open the e-bike (the battery display light up), then turn the acceleration handle. (Always wear: Figure 4.1)..
Lights and horn
For the electric bike light switch, long press the "sign to turn on or off the electric bike lights, and press " - " rang. ( As: Figure 4.2 ).
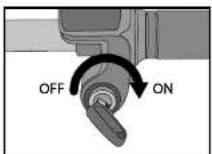
Figure 4.1
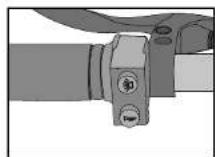
Figure 4.2

When driving on a road with water, the depth of the water does not exceed the lower edge of the motor wheel. If the depth of the accumulated water exceeds the lower edge of the motor wheel, it may cause water seepage in the motor wheel load and cause malfunction and damage.
The Brake
- When braking during driving, generally brake first, then brake, and then front brake. For emergency braking, the front and rear brakes must be used at the same time. Using them alone will reduce the braking effect. In addition, it is recommended not to continue using the brakes, as this will cause the brakes to overheat and reduce the braking effect.
- This electric bicycles has brake automatic power-off device. When he brake is used, the controller automatically cuts off the power (but please note: when the brake lever returns to its original position, it is still energized). In case of an emergency out of control, please turn off the power switch immediately after braking.
- When driving on wet weather, rainy weather or soft road, the braking distance will be reduced.
Therefore, for your safety:
- Be careful when braking, accelerating or turning.
- Drive at a slower speed and leave enough braking distance.
- Try to keep the electric bicycles upright.
- Pay more attention when passing smooth surfaces, such as railroad tracks, iron plates, hole covers, painted routes, etc.

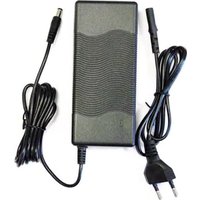
- The charger light is red when charging and turns green when charging is complete.
- Please do not approach flammable and explosive materials when charging. When using the charger, pay attention to the protection of the plug to avoid damage to the plug due to strong pulling and damage to the input and output lines. At the same time, pay attention to moisture-proof and waterproof measures.
-
It is forbidden to use the charger in an environment that is unstable, excessive smoking, dust, humidity, and direct sunlight; do not connect the charger when the voltage is unstable or lightning strikes.
-
EN -- EN -
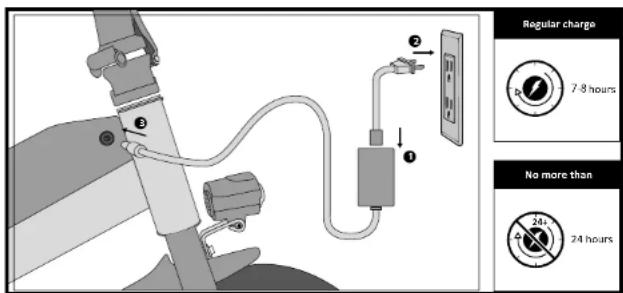

- When the charger is working, please keep good ventilation and heat dissipation conditions.
- Do not allow any liquid or metal objects to enter the charger, beware of impact.
- There is high voltage in the charger, non-professionals should not open it. Please do not replace the plug and wire of the charger by yourself to avoid safety accidents.
About the battery
- Due to factors such as transportation and inventory, the battery power of the newly purchased electric bicycle may be insufficient. Please fully charge the battery before electric riding.
- The special charger configured or designated by our company must be used, otherwise it will damage the battery and other related electrical appliances and even cause accidents. All consequences arising therefrom shall be borne by the parties themselves.
- Excessive discharge will affect the service life of the battery. Please charge the battery in time. If the battery is not used for a long time, please charge the battery once every two months for 1-2 hours each time (depending on the actual power).
- Be careful not to drop, impact and squeeze the battery pack to avoid danger.
- The battery is not allowed to be stored or used in the hot sun or in a high temperature ring above 60^ . Please charge it in an environment of 0 - 40^ . Please do not approach flammable and explosive materials when charging.
- Pay attention to waterproofing (the charging stand should be plugged after the rubber plug of the charging stand is fully charged), and water is strictly prohibited from the charging port of the battery.
5
Maintenance

Proper maintenance is critical to the performance and safe operation of the e-bike. Always inspect the e-bike and conduct necessary maintenance before each use of the e-bike. Failure to conduct maintenance on the e-bike may result in malfunction of a critical part or serious injury or death.
Basic Maintenance
The following procedures will help you maintain your e-bike for years of enjoyable riding
• For painted foam clean, wipe with a damp cloth soaked in a mild detergent mixture.
- Clear any debris between the wheels and frame
- Store your e-bike indoors when not in use. Prolonged exposure to UV rays, rain, and elements may damage the components.
- Riding on the beach or in coastal areas exposes your e-bike to salt which is very corrosive. Wash your e-bike frequently.
- If paint has become scratched or chipped to the metal, use touch up paint to prevent rust. Clear nail polish can also be used as a preventative measure.
- Check that the wheels are securely fastened to the e-bike and axle nuts are tight.
- SI -- EN -
Varnostni nasveti
natural_image
Diagram of a mechanical lever mechanism with directional arrows indicating motion (no text or symbols)
natural_image
Diagram of a mechanical device with a lever and attached bracket, labeled 3.2.1 (no text or symbols on the diagram itself)
natural_image
Diagram of a mechanical lever with motion lines indicating movement (no text or symbols)
SI--SI-
- Tretji korak: Namestite prednjo luč in blatnik na sprednje vilice – pritrdite z vijakom in matico. (Glejte sliki 3.3.1 in 3.3.2).
natural_image
Diagram of a mechanical device with lever and clamped parts, labeled '3.3.1' (no text or symbols on the diagram itself)
natural_image
Diagram of a mechanical device with a tool and cable, labeled '3.2.2' (no text or symbols on the diagram itself)
natural_image
Mechanical component diagram showing a shaft with bolts and a flanged end (no text or symbols)
natural_image
Mechanical diagram showing a wheel assembly with gears and levers, no text or symbols present
natural_image
Line drawing of a seatbelt buckle and side arm (no text or symbols)
3.5
- Šesti korak: Ker se navoji na levem in desnem pedalu razlikujejo, se načina namestitve razlikujeta, levi pedal mora biti na levi, desni pa na desni strani. Desni pedal uvijte z zasukavanjem v smeri hoda urinih kazalcev, levega pa v obratni smeri. (Glejte sliko 3.6).
natural_image
Technical line drawing of a mechanical assembly with hoses and components (no text or symbols)
- SI -
natural_image
Diagram of a mechanical lever mechanism with directional arrows indicating motion (no text or symbols)
natural_image
Diagram of a mechanical device with a lever and attached bracket, labeled '3.2.1' (no text or symbols on the diagram itself)
natural_image
Diagram of a mechanical clamp or bracket assembly with no visible text or symbols
-MES1001H-ES-
natural_image
Diagram of a mechanical assembly with a knife and lever, no visible text or symbols
natural_image
Close-up of a pair of scissors cutting through a metal frame (no text or symbols visible)
natural_image
Mechanical component diagram showing a shaft with bolts and a flanged end (no text or symbols)
MES1001H-ES-
natural_image
Technical line drawing of a mechanical device with a curved top and attached bracket (no text or symbols)
3.5
natural_image
Technical line drawing of a mechanical assembly with hoses and components (no text or symbols)
natural_image
Diagram of a mechanical lever mechanism with directional arrows indicating motion (no text or symbols)
natural_image
Diagram of a mechanical device with a bracket and attached parts, labeled 3.2.1 (no text or symbols on the diagram itself)
natural_image
Diagram of a mechanical lever with motion lines indicating movement (no text or symbols)
-PT--PT-
natural_image
Diagram of a mechanical device with lever and clamped parts, labeled '3.3.1' (no text or symbols on the diagram itself)
natural_image
Diagram of a pair of scissors cutting through a window frame, no text or symbols present
natural_image
Mechanical component diagram showing a shaft with bolts and a connector (no text or symbols)
natural_image
Mechanical diagram showing a gear and wheel assembly with no visible text or symbols
natural_image
Technical line drawing of a mechanical device with a curved top and lever mechanism (no text or symbols)
3.5
natural_image
Technical line drawing of a mechanical assembly with no visible text or symbols
natural_image
Illustration of a person wearing a helmet and casual clothing (no text or symbols)
Figure 1.1
natural_image
Diagram of a mechanical lever mechanism with directional arrows indicating motion (no text or symbols)
natural_image
Technical line drawing of a mechanical component with no visible text or symbols
natural_image
Diagram of a mechanical clamp or bracket with a spring, showing motion and assembly (no text or symbols)
60 61

natural_image
Illustration of a pair of scissors cutting through a metal frame, labeled '3.3.1' (no text or symbols on the diagram itself)
natural_image
Diagram of a mechanical device with a tool and blade assembly (no text or symbols)
-FR--FR-
natural_image
Mechanical component diagram showing a shaft with bolts and a flanged end (no text or symbols)
natural_image
Technical line drawing of a mechanical device with a curved top and attached bracket (no text or symbols)
3.5
62 63
natural_image
Technical line drawing of a mechanical assembly with hoses and levers (no text or symbols)
3.6
4
Utilisation

The manufacturer reserves the right to make changes to product specifications without notice.

MES2001L: Year of production: 2022
Net weight: 21.5kg
Max. user weight: 120 kg
Producent: MANTA S.A.