
CG-130859.1 - Coffee grinder Emerio - Free user manual and instructions
Find the device manual for free CG-130859.1 Emerio in PDF.

| Product type | Electric contact grill |
| Brand | Emerio |
| Model | CG-130859.1 |
| Power supply | 220-240 V ~ 50/60 Hz |
| Power | 2200 W |
| Dimensions (approx.) | 30 x 30 x 15 cm |
| Weight (approx.) | 3 kg |
| Plate material | Non-stick coating |
| Number of plates | 2 (upper and lower) |
| Adjustable thermostat | Yes |
| Indicator lights | Power (red) and heating (green) |
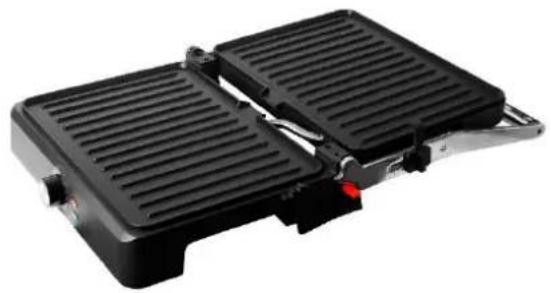
| Main functions | Cooking sandwiches, meats, fish, vegetables; open or closed use |
| Safety | Safety latch, hinge release lever, hot surface indicator |
| Oil drip tray | Yes, removable |
| Included accessories | Residue spatula |
| Care and cleaning | Wipe with a damp cloth; do not immerse; drip tray washable with warm water |
| Storage | Unplug and allow to cool before storing |
| Warranty | 2 years |
| Color | Black / Stainless steel (not specified, estimation) |
Frequently Asked Questions - CG-130859.1 Emerio
User questions about CG-130859.1 Emerio
0 question about this device. Answer the ones you know or ask your own.
Ask a new question about this device
Download the instructions for your Coffee grinder in PDF format for free! Find your manual CG-130859.1 - Emerio and take your electronic device back in hand. On this page are published all the documents necessary for the use of your device. CG-130859.1 by Emerio.
USER MANUAL CG-130859.1 Emerio
natural_image
Exterior view of a modern stainless steel grater with black and silver casing (no visible text or symbols)Multi Grill (EN)
Multi-Grill (DE)
Multigrill (FR)
Multi Grill (NL)
Instruction manual – English ...... - 2 -
Instruction manual – English
SAFETY INSTRUCTIONS
Before use make sure to read all of the below instructions in order to avoid injury or damage, and to get the best results from the appliance. Make sure to keep this manual in a safe place. If you give or transfer this appliance to someone else make sure to also include this manual.
In case of damage caused by user failing to follow the instructions in this manual the warranty will be void. The manufacturer/importer accepts no liability for damages caused by failure to follow the manual, a negligent use or use not in accordance with the requirements of this manual.
- This appliance can be used by children aged from 8 years and above and persons with reduced physical, sensory or mental capabilities or lack of experience and knowledge if they have been given supervision or instruction concerning use of the appliance in a safe way and understand the hazards involved.
- Children shall not play with the appliance.
- Cleaning and user maintenance shall not be made by children unless they are older than 8 years and supervised.
- Keep the appliance and its cord out of reach of children less than 8 years.
- If the supply cord is damaged, it must be replaced by the manufacturer, its service agent or similarly qualified persons in order to avoid a hazard.
- Regarding the instructions for cleaning the surfaces which come in contact with food or oil, please refer to the paragraph "CLEANING AND MAINTENANCE" of the manual.
- This appliance is not intended to be operated by means of an external timer or separate remote-control system.
- This appliance is intended to be used in household and similar applications such as: staff kitchen areas in shops, offices and other working environments; farm houses; by clients in hotels, motels and other residential type environments; bed and breakfast type environments.
- Before inserting the plug into the mains socket, please check that the voltage and frequency comply with the specifications on the rating label.
- Always plug the appliance into an earthed plug socket.
- If an extension cord is used it must be suited to the power consumption of the appliance, otherwise overheating of the extension cord and/or plug may occur. There is a potential risk of injuries from tripping over the extension cord. Be careful to avoid dangerous situations.
- Disconnect the mains plug from the socket when the appliance is not in use and before cleaning.
- Ensure that the mains cable is not hung over sharp edges and keep it away from hot objects and open flames.
- Do not immerse the appliance or the mains plug in water or other liquids. There is danger to life due to electric shock!
- To remove the plug from the plug socket, pull the plug. Do not pull the power cord.
- Do not touch the appliance if it falls into water. Remove the plug from its socket and send it to an authorized service center for repair.
- Do not plug or unplug the appliance from the electrical outlet with a wet hand.
- Never attempt to open the housing of the appliance, or to repair the appliance yourself. This could cause electric shock.
- Never leave the appliance unattended during use.
- This appliance is not designed for commercial use.
- Do not use the appliance for other than intended use.
- Do not wind the cord around the appliance and do not bend it.
- Place the appliance on a stable, level surface from which it cannot fall off.
- The use of accessory attachment not recommended by the appliance manufacturer may cause injuries.
- If you use products with non-stick surfaces, please make sure no birds are in the same room and that the room can be completely closed off and well-ventilated.
- Caution, hot surface.
WARNING!! Please do not touch surface while in use. The temperature of accessible surfaces may be high when the appliance is operating.
PARTS IDENTIFICATION
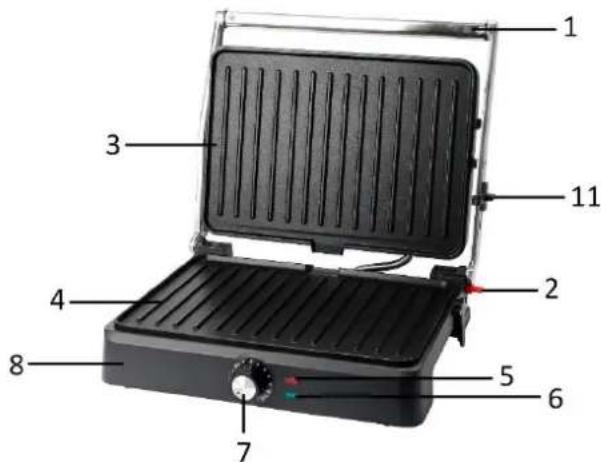
- Handle
- Hinge release lever
- Upper non-stick plate
- Bottom non-stick plate
- Power light
- Heating light
- Thermostat knob
- Bottom housing
- Upper housing
- Oil drip tray
- Securing latch
- Residue spatula
BEFORE INITIAL USE
- Remove all packaging.
- Clean the cooking plates by wiping with a sponge or cloth dampened in warm water.
DO NOT IMMERSE THE UNIT AND DO NOT RUN WATER DIRECTLY ON THE COOKING SURFACES. - Dry with a cloth or paper towel.
- For best results, lightly coat the cooking plates with a little cooking oil or cooking spray.
Notice: When your appliance is heated for the first time, it may emit slight smoke or odor. This is normal with many heating appliances. This does not affect the safety of your appliance.
HOW TO USE
- Close the grill and plug it into the wall outlet, rotate the thermostat knob to the maximum heating level.
- During the whole process, the heating light will turn on to indicate the grill is heating and turn off to indicate the setting temperature has been reached.
- Open the grill, put the sandwich, meat or other food on the bottom cooking plate.
- Close the grill. The cooking will take about 3 to 8 minutes depending on different food.
- When the food is cooked, use the handle to open the lid. Remove the food with the help of a plastic heat-resistant spatula. Never use metal tongs or a knife as these can cause damage to the non-stick coating of the cooking plates.
- Once finished cooking, turn the thermostat knob to the minimal position and then disconnect the plug from the wall outlet. Leave the unit open to cool.
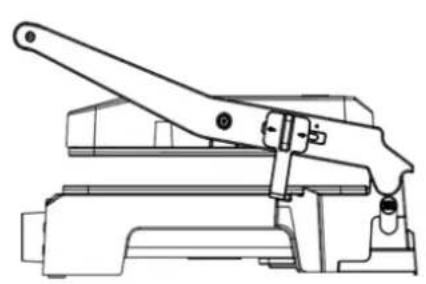
Note: Point the securing latch to different marks “☒ ☑|— = ≡”, you can open or close or incompletely close the grill. To leave a slight distance between the two plates, there are three states as below.
natural_image
Technical line drawing of a mechanical clamp or lever assembly (no text or symbols)
natural_image
Technical line drawing of a mechanical clamp or lever assembly (no text or symbols)
natural_image
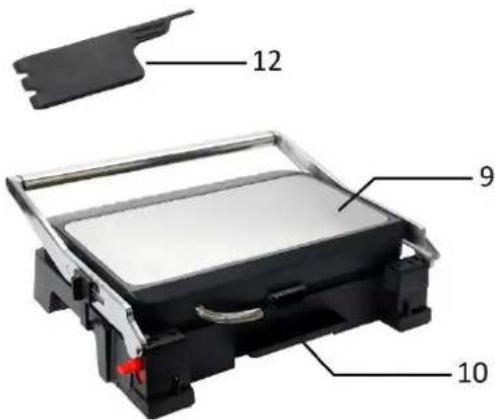
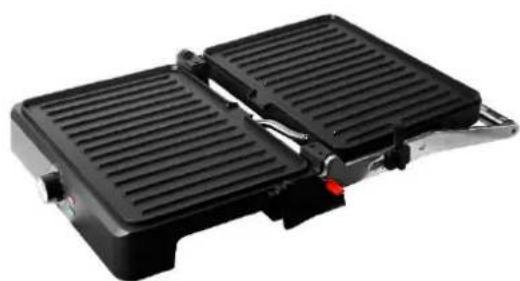
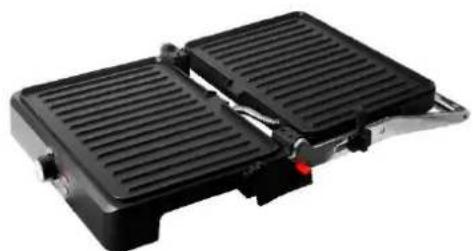
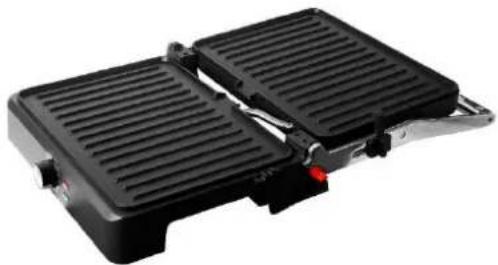
Technical line drawing of a mechanical device with lever and base components (no text or symbols)USE AS OPEN GRILL
natural_image
Black grating or flat-screen appliance with two side grilles and a red button (no visible text or symbols)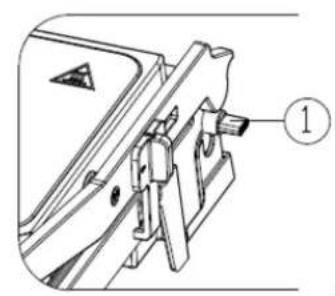
natural_image
Technical line drawing of a mechanical clamp or bracket assembly (no text or symbols)① --- Hinge release lever
- Place the grill on a clean flat surface where you intend to cook. The grill can be positioned in flat position.
- To make the upper plate be leveled with the bottom plate, push the hinge release lever downwards with one hand, and make the upper plate rest flat with the other hand.
- Use the grill as an open grill to cook burgers, steak, poultry (we do not recommend cooking bone-in chicken, since it does not cook evenly on an open grill), fish and vegetables.
CLEANING AND MAINTENANCE
- Unplug the appliance after use. Allow it to cool down before cleaning. The appliance is easier to clean when slightly warm.
- Clean the appliance with a soft damp cloth and then dry it thoroughly. For baked food residue, squeeze some warm water mixed with detergent over the food residue then clean with a non-abrasive plastic scouring pad or place wet kitchen paper over the grill to moisten the food residue.
- The provided residue spatula can also help to remove the residue. You can then clean the residue spatula in warm soapy water, rinse and dry it completely.
- Remove and empty the oil drip tray. Wash it in warm soapy water. Rinse and dry it completely.
- Never use abrasive cleaning agents or sharp objects (e.g. scrubbing brush or knife) for cleaning.
Caution: Do not immerse the appliance in water or other liquids. There is danger to life due to electric shock! Do not put any part in a dishwasher for cleaning.
STORAGE
• Always unplug the appliance before storage.
• Always make sure the appliance is cool and dry before storing.
TECHNICAL DATA
Operating voltage: 220-240V \~ 50-60Hz
Power: 2200W
GUARANTEE AND CUSTOMER SERVICE
Before delivery our devices are subjected to rigorous quality control. If, despite all care, damage has occurred during production or transportation, please return the device to your dealer.
For the purchased device we provide 2 years guarantee, commencing from the day of sale. If you have a defective product, you can directly go back to the point of purchase.
Defects which arise due to improper handling of the device and malfunctions due to interventions and repairs by third parties or the fitting of non-original parts are not covered by this guarantee. Always keep your receipt, without the receipt you can't claim any form of warranty. Damage caused by not following the instruction manual, will lead to a void of warranty, if this results in consequential damages then we will not be liable. Neither can we hold responsible for material damage or personal injury caused by improper use if the instruction manual is not properly executed. Damage to accessories does not mean free replacement of the whole appliance. In such case please contact our service department. Broken glass or breakage of plastic parts is always subject to a charge. Defects to consumables or parts subjected to wearing, as well as cleaning, maintenance or the replacement of said parts are not covered by the warranty and are to be paid.

The crossed out wheelie bin symbol means that this product shall not be disposed of with normal household waste. Electronic and Electrical Equipment not included in the selective sorting process are potentially dangerous for the environment and human health due to the presence of hazardous substances. Please dispose of responsibly at an approved waste or recycling facility.
Manufactured by: Emerio B.V.
Oudeweg 115, 2031 CC Haarlem, The Netherlands
SICHERHEITSHINWEISE
natural_image
Technical line drawing of a mechanical clamp or lever assembly (no text or symbols)
natural_image
Technical line drawing of a mechanical clamp or lever assembly (no text or symbols)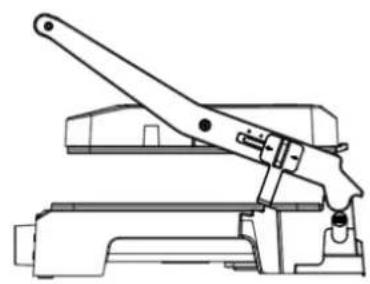
natural_image
Technical line drawing of a mechanical device with lever and base components (no text or symbols)natural_image
Black grating or flat-screen appliance with two side panels and a red button (no visible text or symbols)
natural_image
Technical line drawing of a mechanical clamp or bracket assembly (no text or symbols)- Attention, surface chaude.
natural_image
Technical line drawing of a mechanical clamp or lever assembly (no text or symbols)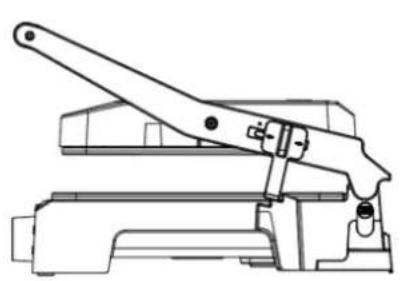
natural_image
Technical line drawing of a mechanical clamp or lever assembly (no text or symbols)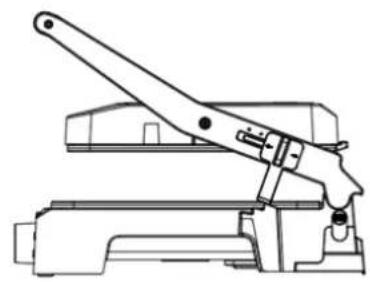
natural_image
Technical line drawing of a mechanical device with lever and base components (no text or symbols)UTILISATION EN TANT QUE GRIL OUVERT
natural_image
Black rectangular grating or flatboard appliance with ventilation slots and a red button (no visible text or symbols)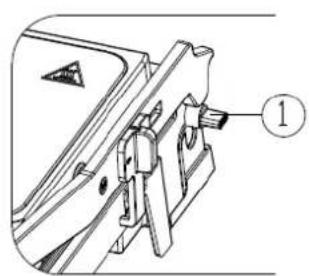
natural_image
Technical diagram of a mechanical clamp or bracket assembly (no text or symbols visible)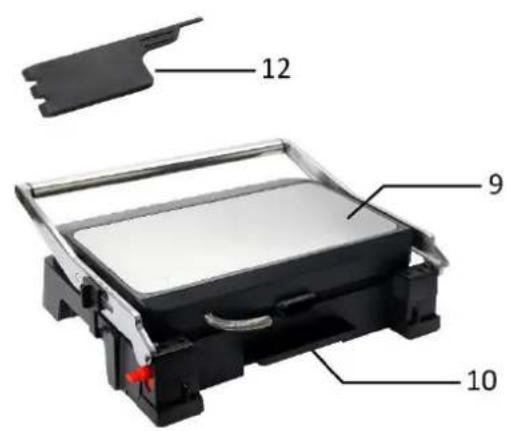
natural_image
Technical line drawing of a mechanical clamp or lever assembly (no text or symbols)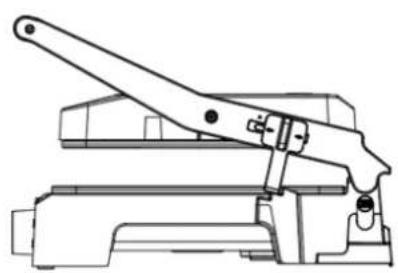
natural_image
Technical line drawing of a mechanical clamp or lever assembly (no text or symbols)
natural_image
Technical line drawing of a mechanical device with lever and base mount (no text or symbols)ALS OPEN GRILL GEBRUIKEN
natural_image
Two black rectangular grates with ventilation grilles and a red indicator light, placed side by side (no text or symbols visible)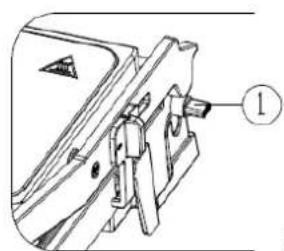
natural_image
Technical line drawing of a mechanical component with no visible text or symbolsnatural_image
Technical line drawing of a mechanical clamp or lever assembly (no text or symbols)
natural_image
Technical line drawing of a mechanical lever assembly (no text or symbols)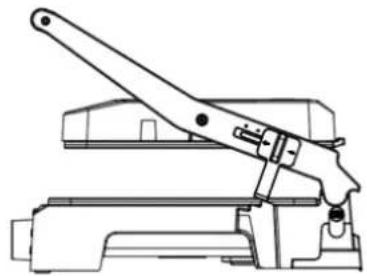
natural_image
Technical line drawing of a mechanical device with lever and base (no text or symbols)UŻYWANIE W CHARAKTERZE OTWARTEGO GRILLA
natural_image
Black grating or toaster appliance with two side grilles and a red button (no visible text or symbols)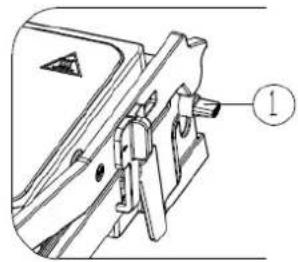
natural_image
Technical line drawing of a mechanical clamp or bracket assembly (no text or symbols)

Brand : Emerio
Model : CG-130859.1
Category : Coffee grinder