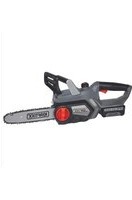
KX-AKS 1825 Li - Saw Kraftixx - Free user manual and instructions
Find the device manual for free KX-AKS 1825 Li Kraftixx in PDF.


User questions about KX-AKS 1825 Li Kraftixx
0 question about this device. Answer the ones you know or ask your own.
Ask a new question about this device
Download the instructions for your Saw in PDF format for free! Find your manual KX-AKS 1825 Li - Kraftixx and take your electronic device back in hand. On this page are published all the documents necessary for the use of your device. KX-AKS 1825 Li by Kraftixx.
USER MANUAL KX-AKS 1825 Li Kraftixx
GB Original operating instructions Cordless Chainsaw
natural_image
Mechanical device with handle and lever mechanism (no visible text or symbols)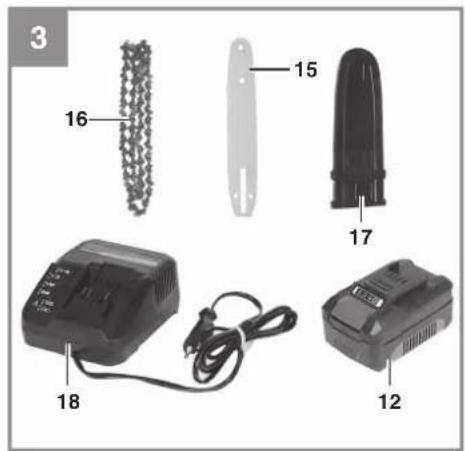
text_image
3 16 15 17 18 12-2-
natural_image
Mechanical device component with labeled parts (4 and 9), no readable text or symbols beyond labels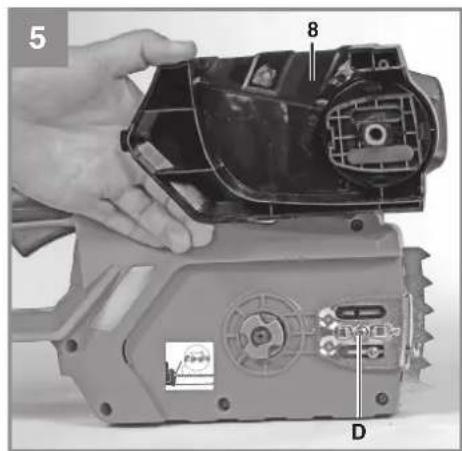
text_image
5 8 D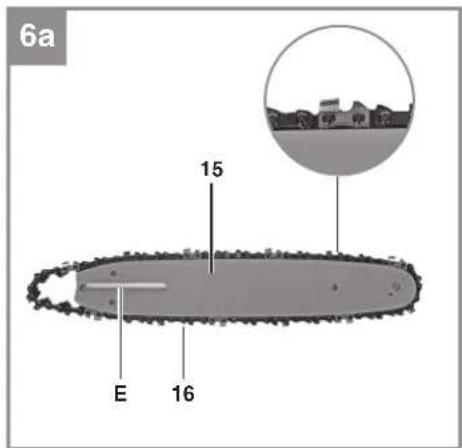
text_image
6a 15 E 16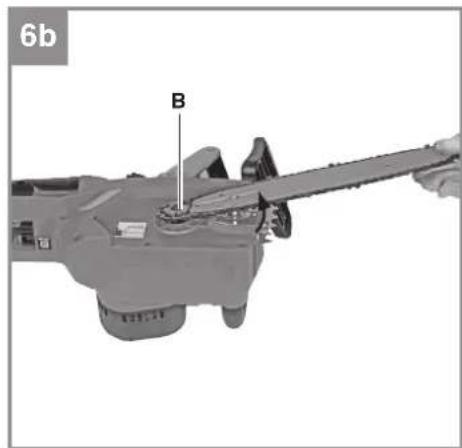
text_image
6b B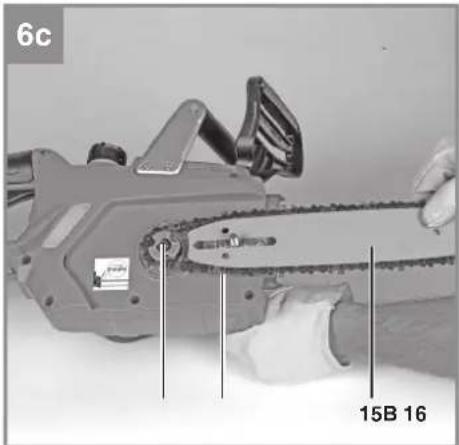
natural_image
Close-up of hands operating a chain-linking machine with labeled parts (6c and 15B 16), no readable text or symbols beyond labels.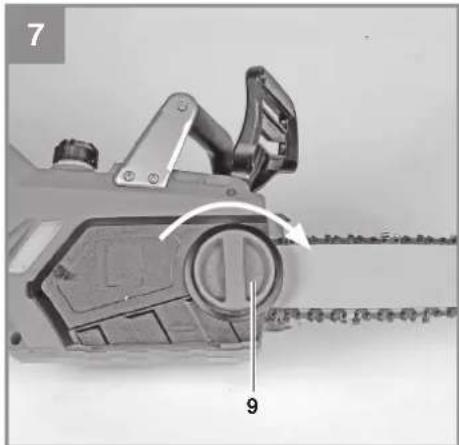
natural_image
Close-up of a mechanical chain attachment with labeled parts (7 and 9), no readable text or symbols beyond labels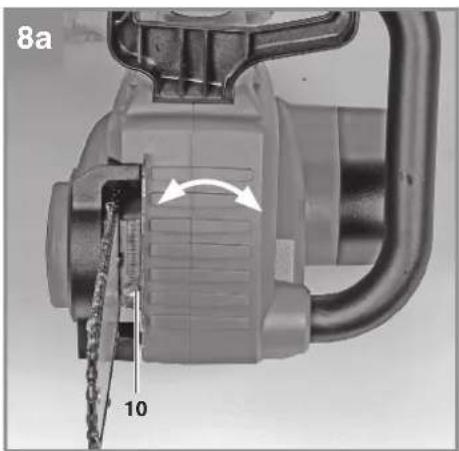
natural_image
Mechanical component with gear and chain, showing internal mechanism (no text or symbols)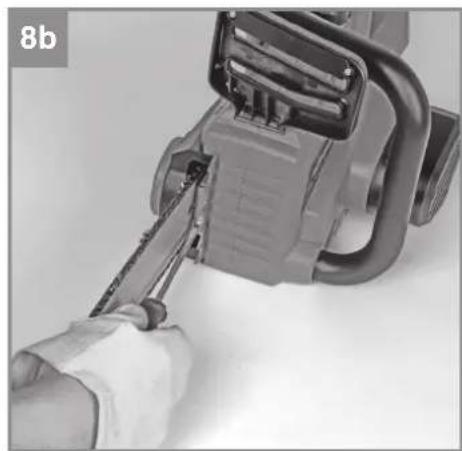
natural_image
Close-up of a hand using a tool to adjust or install a mechanical component, no visible text or symbols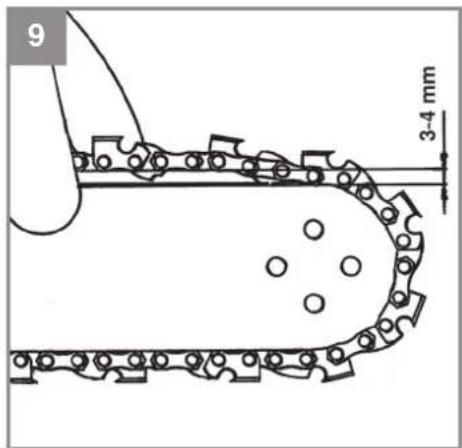
text_image
9 3-4 mm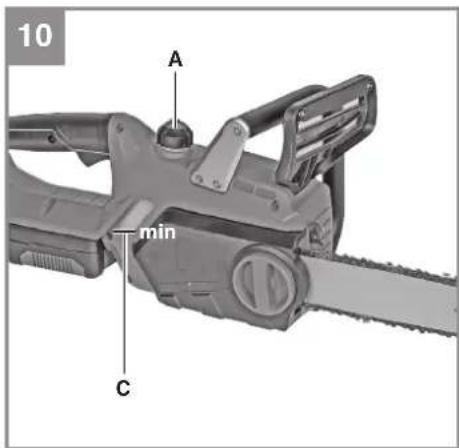
text_image
10 A min C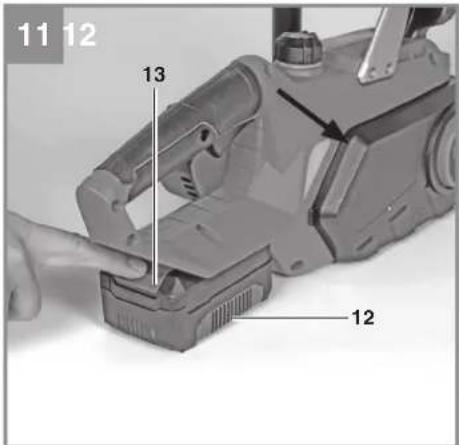
text_image
11 12 13 12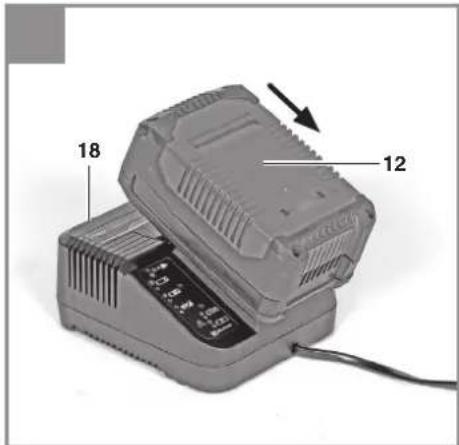
text_image
18 12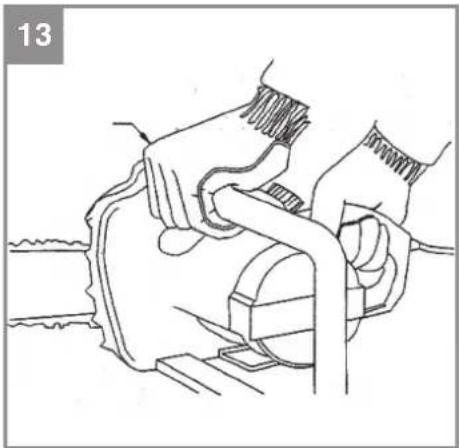
natural_image
Line drawing of hands operating a mechanical device with a tool (no text or symbols)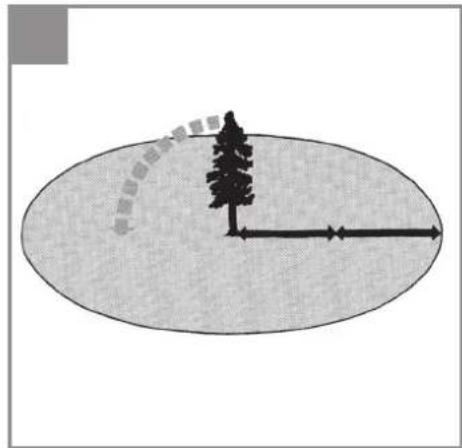
natural_image
Simple diagram showing a tree with directional arrows and a curved arc, no text or symbols present.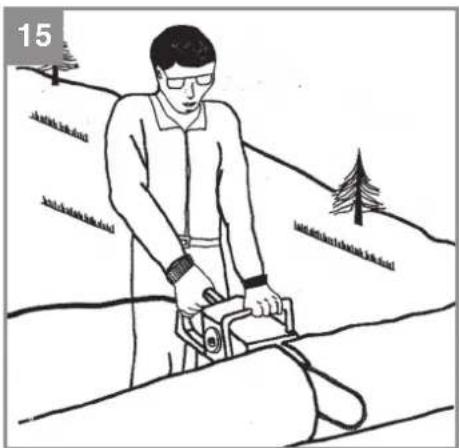
natural_image
Illustration of a person using a power tool in a rural landscape (no text or symbols)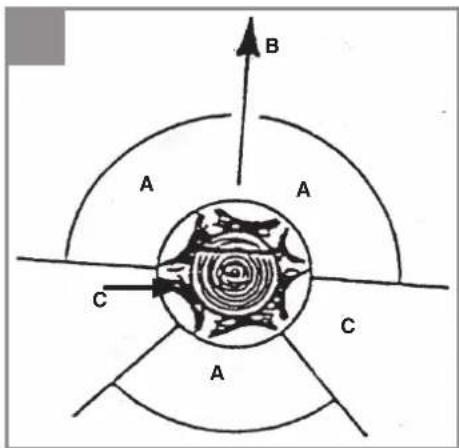
text_image
A B C A C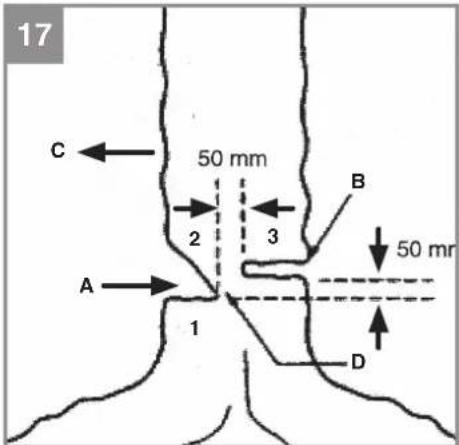
text_image
17 C ← 2 3 A → 1 B 50 mm 50 mr D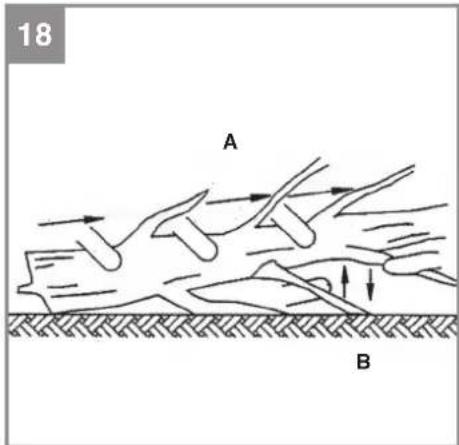
text_image
18 A B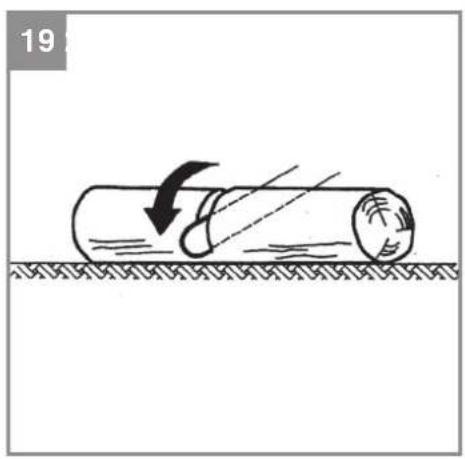
natural_image
Diagram of a cylindrical object with a curved arrow indicating force or motion, resting on a textured surface (no text or symbols)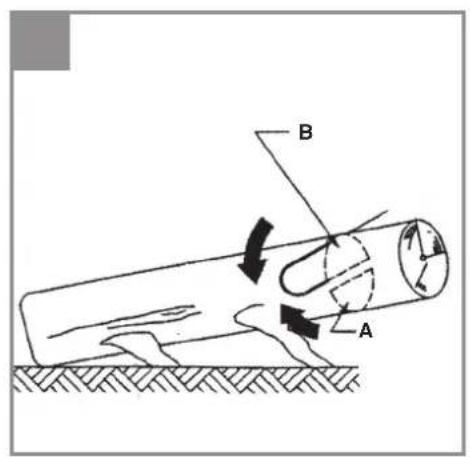
text_image
Technical diagram showing a mechanical or fluidic device with labeled components A and B, including directional arrows indicating flow or movement.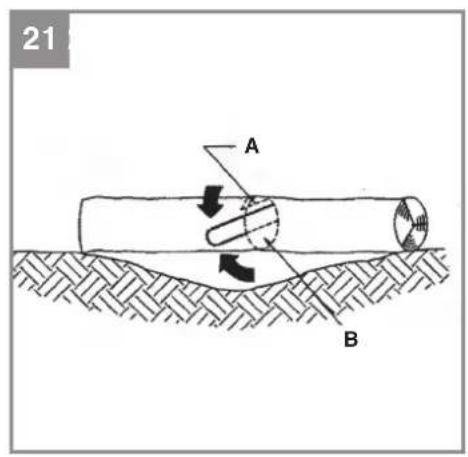
text_image
21 A B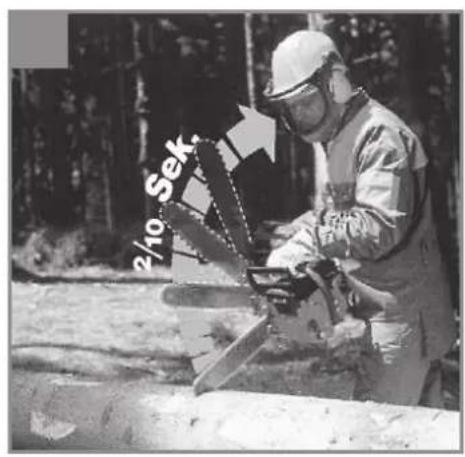
text_image
2/10 Sek.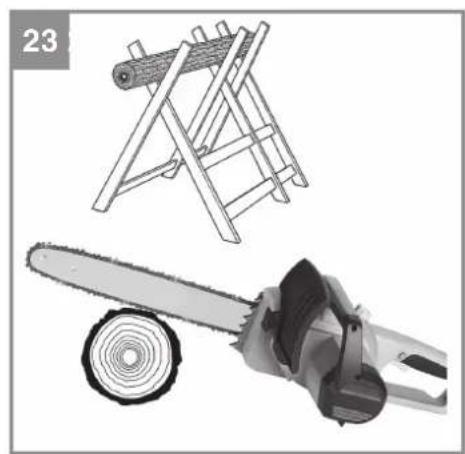
natural_image
Illustration of a wooden log stacker and a chain saw (no text or symbols)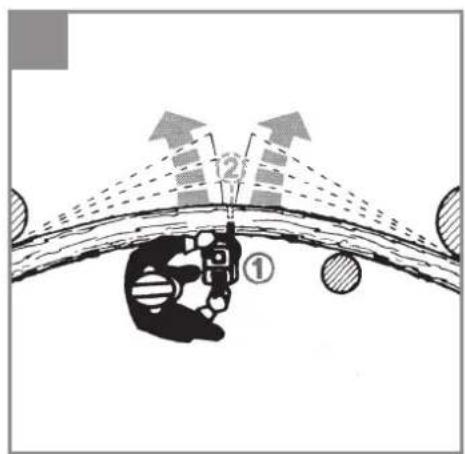
text_image
Diagram illustrating a mechanical or optical setup with labeled components and directional arrows, likely from an engineering or physics context.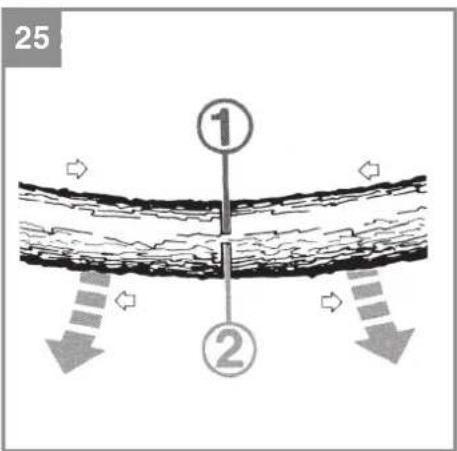
text_image
25 ① ②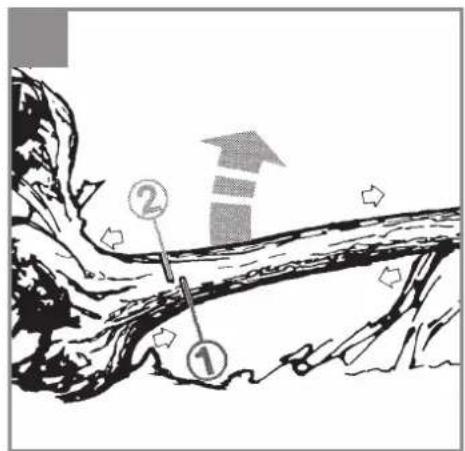
text_image
Diagram illustrating geological strata with numbered labels and directional arrows, likely depicting a rock or sedimentary feature.27




6

7
8

9
10
-7-
D
Gefahr!
When using the equipment, a few safety precautions must be observed to avoid injuries and damage. Please read the complete operating instructions and safety regulations with due care. Keep this manual in a safe place, so that the information is available at all times. If you give the equipment to any other person, hand over these operating instructions and safety regulations as well. We cannot accept any liability for damage or accidents which arise due to a failure to follow these instructions and the safety instructions.
1. Safety regulations
The corresponding safety information can be found in the enclosed booklet.
Danger!
Read all safety regulations and instructions. Any errors made in following the safety regulations and instructions may result in an electric shock, fire and/or serious injury.
Keep all safety regulations and instructions in a safe place for future use.
Explanation of the symbols on the machine (Fig. 27):
- Read the operating instructions.
- Wear safety goggles.
- Wear ear protectors.
- Never expose the device to rain.
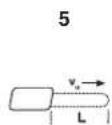
- Maximum cutting length / chain speed vu: 4.5 m/s
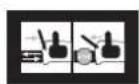
- Unlock chain brake before putting into operation!
- Store the battery only in dry rooms with an ambient temperature of +10°C to +40°C. Place only charged batteries in storage (charged at least 40%).
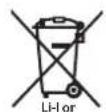
- The batteries must be removed from the tool before it is disposed of. How to dispose of batteries: Batteries are not allowed in household waste.
- Always hold the cordless chainsaw firmly with both hands.
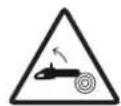
- Kick-back may result in fatal injuries from cuts.
2. Layout and items supplied
2.1 Layout (Fig. 1-3, 8a)
- Claw stop
- Front hand guard (chain brake)
- Front handle
- Rear handle
- Safety lock-off
- ON/OFF switch
- Oil tank cover
- Chain wheel cover
- Fixing screw for the chain wheel cover
- Chain tensioning screw
-
Chain oil fi ll level indicator
-
Battery (in the case of Art. No.: 45.140.62 not included)
-
Pushlock button
-
Rear hand guard
-
Cutter bar
-
Saw chain
-
Cutter guard
-
Charger (in the case of Art. No.: 45.140.62 not included)
2.2 Items supplied
Please check that the article is complete as specified in the scope of delivery. If parts are missing, please contact our service center or the sales outlet where you made your purchase at the latest within 5 working days after purchasing the product and upon presentation of a valid bill of purchase. Also, refer to the warranty table in the service information at the end of the operating instructions.
- Open the packaging and take out the equipment with care.
- Remove the packaging material and any packaging and/or transportation braces (if available).
- Check to see if all items are supplied.
- Inspect the equipment and accessories for transport damage.
- If possible, please keep the packaging until the end of the guarantee period.
Danger!
The equipment and packaging material are not toys. Do not let children play with plastic bags, foils or small parts. There is a danger of swallowing or suff ocating!
• Original operating instructions
- Safetyinstructions
GB
3. Proper use
The chainsaw is intended for felling trees and for cutting trunks, branches, wooden beams, boards etc. and can be used for cross cuts and longitudinal cuts. It is not suitable for cutting any materials other than wood.
The equipment is to be used only for its prescribed purpose. Any other use is deemed to be a case of misuse. The user / operator and not the manufacturer will be liable for any damage or injuries of any kind caused as a result of this.
Please note that our equipment has not been designed for use in commercial, trade or industrial applications. Our warranty will be voided if the machine is used in commercial, trade or industrial businesses or for equivalent purposes.
4. Technical data
Motor power supply: 18 V DC
Idle speed n_0 : 2,400 min ^-1
Battery charger output voltage: 21 V DC
Battery charger output current: 3 A
Battery charger supply voltage: ....
200-250V\~50-60Hz
Battery type: Li-Ion
Number of battery cells: 10
Battery capacitance: 3 Ah
Cutter rail length 250 mm
Max. cutting length: 230 mm
Cutting speed at rated rpm: 4.5 m/s
Saw chain: 91PJ040X
Oil tank capacity: 200 ml
Cutter rail: 100SDEA041
Weight: approx. 2.6 kg
Battery and charger
Please use only batteries such as the Kraftixx 18V 2.0Ah battery or the Kraftixx 18V 3.0Ah battery, and only the Kraftixx 18V charger.
Danger!
Sound and vibration
Sound and vibration values were measured in accordance with EN 62841-1 and EN 62841-4-1.
L_pA sound pressure level ..... 86,8 dB(A)
K_pA^pH uncertainty 3 dB
L_WA sound power level 96,6 dB(A)
K_WA uncertainty 2,75 dB
L_WA sound power level guaranteed ..... 99 dB(A)
Wear ear-muff s.
The impact of noise can cause damage to hearing.
Total vibration values (vector sum of three directions) were determined in accordance with EN 62841-1 and EN 62841-4-1.
Handle under load
Vibration emission value front handle
$$ a _ {n} = 3. 8 7 \mathrm{m} / \mathrm{s} ^ {2} $$
Vibration emission value rear handle
$$ a _ {b} = 3. 6 9 \mathrm{m} / \mathrm{s} ^ {2} $$
K uncertainty = 1.5 m/s ^2
The stated vibration emission levels and stated noise emission values were measured in accordance with a set of standardized criteria and can be used to compare one power tool with another.
The stated vibration emission levels and stated noise emission values can also be used to make an initial assessment of exposure.
Warning:
The vibration and noise emission levels may vary from the level specified during actual use, depending on the way in which the power tool is used, especially the type of workpiece it is used for.
Keep the noise emissions and vibrations to a minimum.
- Only use appliances which are in perfect working order.
• Service and clean the appliance regularly.
• Adapt your working style to suit the appliance.
• Do not overload the appliance. - Have the appliance serviced whenever necessary.
- Switch the appliance off when it is not in use.
• Wear protective gloves.
GB
5. Before starting the equipment
Warning!
Always remove the battery pack before making adjustments to the equipment.
Danger! Do not fit the battery until the chainsaw has been fully assembled and the chain tension has been set. Always wear protective gloves when working on the chainsaw to protect yourself against injury.
5.1 Assembly of the cutter rail and the saw chain
- Carefully unpack all parts and check that they are complete (Fig. 2-3).
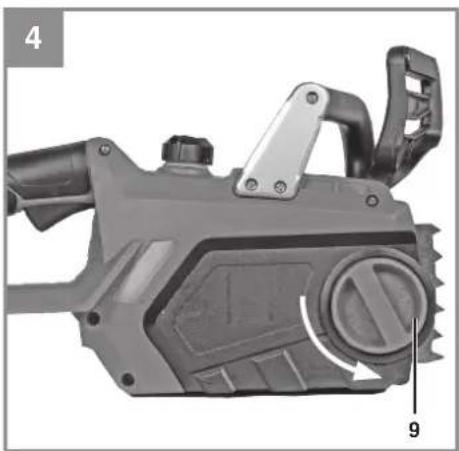
- Undo the fixing screw of the chain wheel cover (Fig. 4).
• Take off the chain wheel (Fig. 5). - Lay the chain as shown in the groove which runs around the cutter rail (Fig. 6a).
- Insert the cutter rail and chain as shown in the mounting in the chainsaw. At the same time guide the chain around the chain wheel (Fig. 6b/6c/Item B).
- The bolt (Fig. 5/Item D) of the chain tensioning mechanism must latch in the hole (Fig. 6a/Item E) in the cutter rail.
- Attach the chain wheel cover and secure it with the fixing screw (Fig. 7). Caution: Do not fully tighten the fixing screw until after adjusting the chain tension (refer to point 5.2).
5.2 Tensioning the saw chain
Warning! Always disconnect the mains plug before performing any checks or adjustments. Always wear protective gloves when working on the chainsaw to protect yourself against injury.
- Undo the fixing screw of the chain wheel cover a few turns (Fig. 4).
- Adjust the chain tension with the chain tensioning screw (Fig. 8a+8b/Item 10). Turning the screw clockwise increases the tension, turning it counter-clockwise decreases the chain tension. The saw chain is correctly tensioned if it can be lifted around 3 - 4mm in the middle of the cutter rail (Fig. 9).
- Tighten the fixing screw of the chain wheel cover (Fig. 7).
Danger! All of the chain links must lie properly in the guide groove of the cutter rail.
Notes on tensioning the chain:
The saw chain must be properly tensioned to
ensure safe operation. You can tell that the chain tension is perfect if the saw chain can be lifted by around 3-4 mm in the middle of the cutter rail. As the saw chain heats up during cutting and thus changes in length, please check the chain tension every 10 minutes and adjust it again as required. This applies in particular to new saw chains. When you have fi nished working slacken the chain again, as the chain will shorten when it cools down. This will prevent the chain from being damaged.
5.3 Saw chain lubrication
Warning! Always pull out the battery before performing any checks or adjustments. Always wear protective gloves when working on the chainsaw to protect yourself against injury.
Notice! Never operate the chain if it is not lubricated with saw chain oil. Use of the chainsaw without saw chain oil or if the oil level is below the "min" mark (Fig. 10/ Item C) will damage the chainsaw.
Notice! Be aware of the temperature conditions: different lubricants with completely different viscosities are required at different ambient temperatures. At lower temperatures you will need low viscosity oils in order to achieve a sufficient lubricating fi Im. However, if the same low viscosity oil is used during the summer it will become even thinner due to the ambient temperatures alone, and as a result the lubricating fi Im could break down, causing the chain to overheat and become damaged. In addition, the chain oil would burn and produce unnecessary pollutants.
Filling the oil tank:
- Place the chainsaw on a flat surface.
- Clean the area around the oil tank cover (Fig. 10/Item A) and then clean the oil tank cover.
- Fill the tank with saw chain oil. In the process, make sure that no dirt enters the tank, as this could cause the oil nozzle to become blocked.
- Close the oil tank cover.
5.4 Charging the Li battery pack (Fig. 11-12)
The battery is protected from exhaustive discharge. An integrated protective circuit automatically switches off the equipment when the battery is flat.
Warning! Do not actuate the On/Off switch any more if the protective circuit has tripped. This may damage the battery.
GB
- Remove the battery pack from the handle, pressing the pushlock button (13) downwards to do so.
- Check that your mains voltage is the same as that marked on the rating plate of the battery charger. Insert the power plug of the charger (18) into the socket outlet. The green LED will then begin to flash.
- Push the battery pack onto the battery charger.
In section 12 (Charger indicator) you will find a table with an explanation of the LED indicator on the charger.
If the battery pack fails to charge, check for the following:
• voltage at the power socket
- whether there is good contact at the charging contacts of the charging unit
If the battery pack still fails to charge, send
• the charger and charging adapter
• and the battery pack
to our customer service center.
To ensure that items are properly packaged and delivered when you send them to us, please contact our customer service or the point of sale at which the equipment was purchased.
When shipping or disposing of batteries and cordless tools, always ensure that they are packed individually in plastic bags to prevent short circuits and fi res.
To ensure that the battery pack provides long service, you should take care to recharge it promptly. You must recharge the battery pack when you notice that the performance of the device drops. Never allow the battery pack to become fully discharged. This will cause it to develop a defect.
6. Operation
6.1 Switching on/off
Switching on
• Plug in the battery on the equipment.
- Hold the chainsaw by the handles with both hands as shown in Fig. 13 (thumbs under the handles).
- Press and hold the safety lock-off (Fig. 1/Item 5).
- Switch on the chainsaw at the ON/OFF switch (Fig. 1/Item 6). You can then release the safety lock-off.
Switching off
Release the ON/OFF switch (Fig. 1/Item 6).
The integrated brake will bring the running chain-saw to a standstill within a very short space of time. Always disconnect the mains plug when you stop working, even if it is only for a short time.
Warning! Always carry the saw by the front handle. If the saw is plugged in and you carry it by the rear handle (which is where the switches are located), then there is a risk that you could accidentally press the safety lock-off and the ON/OFF switch at the same time, and the chainsaw could inadvertently start up.
6.2 Safety devices
Motor brake
The motor brakes the saw chain as soon as the ON/OFF switch (Fig. 1/Item 6) is released or the power supply is interrupted. This signifi cantly reduces the risk of injury that would otherwise be present if the chain continued to run after being switched off or disconnected.
Chain brake
The chain brake is a safety mechanism which is triggered via the front hand guard (Fig. 1/Item 2). If kickback causes the chainsaw to suddenly jerk back then the chain brake trips and stops the saw chain in less than 0.1 seconds. You must check the operation of the chain brake on a regular basis. To do this, fold the hand guard (Fig. 1/Item 2) forward and briefly switch the chainsaw on. The saw chain must not start up.
Pull back the front hand guard (Fig. 1/Item 2) until it engages to release the chain brake.
Danger! Never use the saw if the safety equipment is not working properly. Never try to repair safety related protection systems yourself – always have any work done by our service department or by a similarly qualified workshop.
Hand guard
The front hand guard (which also acts as the chain brake at the same time) (Fig. 1/Item 2) and the rear hand guard (Fig. 1/Item 14) protect against fi nger injuries resulting from contact with
GB
the saw chain if the chain breaks because it is overloaded.
7. Working with the chainsaw
7.1 Preparations
To ensure that you can work safely, check the following points before every use:
Condition of the chain saw
Inspect the chainsaw before the start of work for damage to the housing, the power cable, the saw chain and the cutter rail. Never use a chainsaw which is obviously damaged.
Oil container
Fill level of the oil container. Even while working, keep checking that sufficient oil is in the system. To avoid damaging the chainsaw, never run the saw if there is no oil in the system or if the oil drops below the "min" mark (Fig. 10/Item C). On average, a single fi lling will last around 15 minutes depending on the number of pauses in cutting and the loads involved.
Saw chain
Tension of the saw chain, condition of the cutting elements. The sharper the chainsaw, the easier and more controllable it is to operate the chainsaw. The same also applies to the chain tension. Again, while working also check the chain tension every 10 minutes in order to increase your safety. New saw chains in particular often tend to expand more.
Chain brake
Check the operation of the chain brake as described in the chapter "Safety devices" and then release it.
Safety clothing
Always wear appropriate tight-fi tting safety clothing like special trousers which protect against cuts, protective gloves and safety shoes.
Hearing protection and protective goggles.
When felling trees or performing forest work, always wear a protective helmet with integral face and hearing protection. This will offer protection against falling branches and any branches if they spring back.
7.2 Description of the correct procedures for basic use of the chainsaw
Felling a tree (Figs. 14-17)
If two or more persons are working at the same time on felling and cutting back then the minimum distance between the tree being felled and the tree being cut back should be at least twice the height of the tree being felled (Fig. 14). When felling trees, care must be taken to ensure that no other persons are endangered, no power supply lines are hit and no material damage is caused to equipment or property. In the event that a tree comes into contact with a power supply line, he responsible power supply company should be informed immediately.
When working with the saw on a slope, the operator of the chainsaw must be standing at a higher point on the slope than the tree being felled, as the tree will roll or slip downhill once it has been felled (Fig. 15).
Before felling the tree you must first plan and if necessary clear an escape route. This escape route must lead away diagonally in the opposite direction to the expected fall direction – this can be seen in Fig. 16 (A= danger zone, B= direction of fall, C= escape zone).
Before felling the tree you must take into account the natural inclination of the tree, the location of larger branches and the wind direction, as this will help you to correctly determine the direction in which the tree will fall.
Dirt, stones, loose bark, nails, staples and wire must be removed from the tree.
Making the felling notch (Fig. 17)
Cut a notch (A) at right angles to the fall direction to a depth of 1/3 of the tree diameter as shown in Fig. 17. First make the lower horizontal felling notch (1). This prevents the saw chain or the guide rail from becoming trapped when the second felling notch is made.
Making the felling cut (Fig. 17)
The felling cut should be positioned at least 50 mm above the horizontal felling notch. Make the felling cut (B) parallel to the horizontal felling notch. The felling cut should be cut to a depth which leaves a thin strip (felling hinge strip) (D) which can act as a hinge. This strip prevents the tree from rotating and falling in the wrong direction. Do not cut through the strip. When the felling cut gets close to the strip the tree should start to fall. If it becomes clear that the tree may well fall in a different direction to the desired fall direction (C)
GB
or it starts to lean back and traps the saw chain, interrupt the felling cut and insert wedges made of wood, plastic or aluminum to open out the cut and control the lean of the tree until it leans in the required direction.
When the tree starts to fall, remove the chainsaw from the cut, switch it off, place it on the ground and exit the danger zone via the planned escape route. Watch out for falling branches and take care not to trip.
Removing branches
Here we are talking about removing branches from the felled tree. When removing branches, leave any downward facing branches which are supporting the tree until the trunk of the tree has been cut up. Smaller branches should be removed as shown in Fig. 18 (A= cutting direction when removing branches, B= keep away from the ground! Supporting branches should be left until the trunk is cut up) in a single cut from the bottom to the top. Any branches which are under tension should be cut from the bottom to the top to prevent the saw from becoming trapped.
Cutting the tree trunk into lengths
Here we are looking at the process of cutting the felled tree into sections. Make sure you have a sure footing and distribute your body weight evenly onto both feet. If possible the trunk should be underlaid and supported with branches, beams or wedges. For easy cutting follow the simple instructions below.
If the full length of the tree trunk is evenly supported as shown in Fig. 19 then proceed by cutting from the top down. Take care not to cut into the ground in the process.
If the weight of the tree trunk is resting on one end as shown in Fig. 20, fi rst cut through 1/3 of the trunk diameter from the underside (A) in order to prevent it from splintering. Make the second cut from the top (2/3 of the diameter) to the height of the fi rst cut (B) (this prevents the chainsaw from being trapped).
If the weight of the tree trunk is resting on both ends as shown in Fig. 21, fi rst cut through 1/3 of the trunk diameter from the top (A) in order to prevent it from splintering. Make the second cut from underneath (2/3 of the diameter) to the height of the fi rst cut (B) (this prevents the chainsaw from being trapped).
When working with the saw on a slope, always position yourself at a higher point on the slope above the tree as shown in Fig. 15. In order to retain full control at the moment when the cut goes through, reduce pressure towards the end of the cut without releasing your firm grip on the handles of the chainsaw. Take care to ensure that the chainsaw does not touch the ground.
After completing the cut, wait for the chain saw to come to a standstill before removing the chainsaw. Always switch off the motor of the chainsaw before moving from tree to tree.
7.3 Kickback
The term “kickback” describes what happens when the running chainsaw suddenly kicks upward and backward. Usually, this is caused by contact between the tip of the cutter rail and the workpiece or the saw chain becoming trapped. In the event of kickback, large forces occur suddenly and violently. As a result, the chainsaw usually reacts uncontrollably. This can often result in very serious injuries to the worker or persons in the vicinity. The risk of kickback is particularly great when performing cross cuts, angled cuts and longitudinal cuts, as it is not possible to use the claw stop on these cuts. You should therefore avoid these cuts as far as possible and take particular care when they are unavoidable.
The risk of kickback is at its greatest when the saw is positioned for a cut in the region of the tip of the cutter rail, as the leverage effect is greatest there (Fig. 22). It is therefore safest to position the saw fl at and as close as possible to the claw stop before making the cut (Fig. 23).
Warning!
• Make sure that the chain tension is always correctly adjusted.
- Only use a chainsaw if it is in perfect working order.
- Only work with a saw chain that has been properly sharpened in accordance with the instructions.
• Never operate the saw above shoulder height.
- Never cut with the upper edge or the tip of the sword.
• Always hold the chainsaw firmly with both hands.
- Whenever possible, use the claw stop as a leverage point.
GB
Cutting wood which is under tension
Special care is required when cutting wood which is under tension. Wood which is under tension from which it is released by cutting may in some cases react completely unpredictably and uncontrollably. In the worst case this could result in extremely severe or even fatal injuries (Fig. 24-26). This type of work must only be performed by persons who have been specially trained.
8. Cleaning, maintenance and ordering of spare parts
Danger!
- Remove the battery each time before cleaning.
- Never immerse the unit in water or other liquids in order to clean it.
8.1 Cleaning
• Regularly clean the clamping mechanism by blowing it out with compressed air or cleaning it with a brush. Do not use tools for cleaning.
- Keep the handles free of grease so that you can maintain a firm grip.
- Clean the device as required with a damp cloth and, if necessary, mild washing up liquid.
- If the chainsaw is not to be used for an extended period of time then you should remove the chain oil from the tank. Briefly immerse the saw chain and the cutter rail in an oil bath and then wrap them in oil paper.
8.2 Maintenance
Replacing the saw chain and cutter rail
The cutter rail needs to be replaced if
• the guide groove of the cutter rail is worn;
- the nose sprocket in the cutter rail is damaged or worn.
Remove the adapter plate (Item 19) from the cutter rail as shown in Fig. 27. Now fi t the adapter plate to the new cutter rail. Proceed as described in the section "Assembly of the cutter rail and the saw chain".
Checking the automatic chain lubrication
You should check the operation of the automatic chain lubrication system on a regular basis in order to guard against overheating and the associated damage to the cutter rail and the saw chain. To do this, point the tip of the cutter rail towards a smooth surface (board, section of a cut tree) and
allow the chainsaw to run.
If an increasing oil trace becomes evident during this process then the automatic chain lubrication system is working properly. If no clear oil trace is evident then please refer to the corresponding instructions in "Troubleshooting". If the information contained there still fails to remedy the situation then please contact our service department or another similarly qualified workshop.
Danger! Do not actually touch the surface with the tip of the cutter rail when performing this test. Keep a safe distance (approx. 20 cm).
Sharpening the saw chain
Eff ective working with the chainsaw is only possible if the saw chain is in good condition and sharp. This also reduces the risk of kickback. The saw chain can be re-sharpened by any dealer. Do not attempt to sharpen the saw chain yourself unless you have the necessary special tools and experience.
8.3 Ordering replacement parts:
Please quote the following data when ordering replacement parts:
• Type of machine
• Article number of the machine
• Identification number of the machine
- Replacement part number of the part required For our latest prices and information please go to www.isc-gmbh.info
9. Notes on environmental protection / disposal
The equipment is supplied in packaging to prevent it from being damaged in transit. The raw materials in this packaging can be reused or recycled. The equipment and its accessories are made of various types of material, such as metal and plastic. Never place defective equipment in your household refuse. The equipment should be taken to a suitable collection center for proper disposal. If you do not know the whereabouts of such a collection point, you should ask in your local council offices.
GB
10. Storage
Store the equipment and accessories out of children's reach in a dark and dry place at above freezing temperature. The ideal storage temperature is between 5 and 30^ . Store the electric tool in its original packaging.
11. Troubleshooting
Danger!
Before troubleshooting, switch off the equipment and pull out the battery.
The table below contains a list of fault symptoms and explains what you can do to remedy the problem if your tool fails to work properly. If the problem still persists after working through the list then please contact your nearest service workshop.
| Cause Fault | Remedy | |
| Chainsaw does not work at all | - Quick stop brake (chain brake) tripped- No power supply | - Pull the hand protection back to the normal position.- Check the power supply. |
| Chainsawoperates intermittently | - Loose connection (external)- Loose connection (internal)- ON/OFF switch defective | - Consult a specialist workshop.- Consult a specialist workshop.- Consult a specialist workshop. |
| Saw chain dry - No oil in the tank- Oil tank cap breather blocked- Oil outlet blocked | - Fill up with oil.- Clean the oil tank cap.- Clear the oil outlet. | |
| Chain brake does not work | - Problem with the switch mechanism in the front hand guard | - Consult a specialist workshop. |
| Chain/guide rail hot - | No oil in the tank- Oil tank cap breather blocked- Oil outlet blocked- Blunt chain | - Fill up with oil.- Clean the oil tank cap.- Clear the oil outlet- Re-sharpen or replace the chain. |
| Chainsawjuddering, vibrating or not sawing properly | - Chain tension too loose- Blunt chain- Worn chain- Saw teeth pointing in the wrong direction | - Adjust the chain tension.- Re-sharpen or replace the chain.- Replace the chain.- Reinstall the saw chain with the teeth facing in the correct direction. |
12. Charger indicator
| Indicator status Explanations and actions | ||
| Red LED Green LED | ||
| Off | Flashing | Ready for useThe charger is connected to the mains and is ready for use; there is no battery pack in the charger |
| On Off Charging | The charger is charging the battery pack in quick charge mode. The charging times are shown directly on the charger.Important! The actual charging times may vary slightly from the stated charging times depending on the existing battery charge. | |
| Off | On | The battery is charged and ready for use. (READY TO GO)The unit then changes over to gentle charging mode until the battery is fully charged.To do this, leave the rechargeable battery on the charger for approx. 15 minutes longer.Action:Take the battery pack out of the charger. Disconnect the charger from the mains supply. |
| Flashing Off | Adapted charging | The charger is in gentle charging mode.For safety reasons the charging is performed less quickly and takes more time. The reasons can be:- The rechargeable battery has not been used for a very long time.- The battery temperature is outside the ideal range.Action:Wait for the charging to be completed; you can still continue to charge the battery pack. |
| Flashing Flashing Fault | Charging is no longer possible. The battery pack is defective.Action:Never charge a defective battery pack.Take the battery pack out of the charger. | |
| On On Temperature fault | The battery pack is too hot (e.g. due to direct sunshine) or too cold (below 0^ ).Action:Remove the battery pack and keep it at room temperature (approx. 20^ ) for one day . | |
GB

For EU countries only
Never place any electric power tools in your household refuse.
To comply with European Directive 2012/19/EC concerning old electric and electronic equipment and its implementation in national laws, old electric power tools have to be separated from other waste and disposed of in an environment-friendly fashion, e.g. by taking to a recycling depot.
Recycling alternative to the return request:
As an alternative to returning the equipment to the manufacturer, the owner of the electrical equipment must make sure that the equipment is properly disposed of if he no longer wants to keep the equipment. The old equipment can be returned to a suitable collection point that will dispose of the equipment in accordance with the national recycling and waste disposal regulations. This does not apply to any accessories or aids without electrical components supplied with the old equipment.
Please note that batteries and lamps (e.g. light bulbs) must be removed from the tool before it is disposed of.
The reprinting or reproduction by any other means, in whole or in part, of documentation and papers accompanying products is permitted only with the express consent of the iSC GmbH.
Subject to technical changes
GB
Service information
We have competent service partners in all countries named on the guarantee certificate whose contact details can also be found on the guarantee certificate. These partners will help you with all service requests such as repairs, spare and wearing part orders or the purchase of consumables.
Please note that the following parts of this product are subject to normal or natural wear and that the following parts are therefore also required for use as consumables.
| Category Example | |
| Wear parts* Cutter bar, Battery | |
| Consumables* Saw chain | |
| Missing parts |
* Not necessarily included in the scope of delivery!
In the effect of defects or faults, please register the problem on the internet at www.isc-gmbh.info. Please ensure that you provide a precise description of the problem and answer the following questions in all cases:
• Did the equipment work at all or was it defective from the beginning?
• Did you notice anything (symptom or defect) prior to the failure?
• What malfunction does the equipment have in your opinion (main symptom)?
Describe this malfunction.
GB
Warranty certifi cate
Dear Customer,
All of our products undergo strict quality checks to ensure that they reach you in perfect condition. In the unlikely event that your device develops a fault, please contact our service department at the address shown on this guarantee card. You can also contact us by telephone using the service number shown. Please note the following terms under which guarantee claims can be made:
- These guarantee terms apply to consumers only, i.e. natural persons intending to use this product neither for their commercial activities nor for any other self-employed activities. These warranty terms regulate additional warranty services, which the manufacturer mentioned below promises to buyers of its new products in addition to their statutory rights of guarantee. Your statutory guarantee claims are not affected by this guarantee. Our guarantee is free of charge to you.
- The warranty services cover only defects due to material or manufacturing faults on a product which you have bought from the manufacturer mentioned below and are limited to either the rectification of said defects on the product or the replacement of the product, whichever we prefer. Please note that our devices are not designed for use in commercial, trade or professional applications. A guarantee contract will not be created if the device has been used by commercial, trade or industrial business or has been exposed to similar stresses during the guarantee period.
-
The following are not covered by our guarantee:
-
Damage to the device caused by a failure to follow the assembly instructions or due to incorrect installation, a failure to follow the operating instructions (for example connecting it to an incorrect mains voltage or current type) or a failure to follow the maintenance and safety instructions or by exposing the device to abnormal environmental conditions or by lack of care and maintenance.
- Damage to the device caused by abuse or incorrect use (for example overloading the device or the use or unapproved tools or accessories), ingress of foreign bodies into the device (such as sand, stones or dust, transport damage), the use of force or damage caused by external forces (for example by dropping it).
-
Damage to the device or parts of the device caused by normal or natural wear or tear or by normal use of the device.
-
The guarantee is valid for a period of 24 months starting from the purchase date of the device. Guarantee claims should be submitted before the end of the guarantee period within two weeks of the defect being noticed. No guarantee claims will be accepted after the end of the guarantee period. The original guarantee period remains applicable to the device even if repairs are carried out or parts are replaced. In such cases, the work performed or parts fitted will not result in an extension of the guarantee period, and no new guarantee will become active for the work performed or parts fitted. This also applies if an on-site service is used.
-
To make a claim under the guarantee, please register the defective device at: www.isc-gmbh.info. Please keep your bill of purchase or other proof of purchase for the new device. Devices that are returned without proof of purchase or without a rating plate shall not be covered by the guarantee, because appropriate identification will not be possible. If the defect is covered by our guarantee, then the item in question will either be repaired immediately and returned to you or we will send you a new replacement.
Of course, we are also happy offer a chargeable repair service for any defects which are not covered by the scope of this guarantee or for units which are no longer covered. To take advantage of this service, please send the device to our service address.
Also refer to the restrictions of this warranty concerning wear parts, consumables and missing parts as set out in the service information in these operating instructions.
F
Danger!
Spanning motor: 18 V DC
Nullasttoerental n_0 : 2400 min ^1
Zaagketting: 91PJ040X
Vulhoeveelheid olietank: ....200 ml
Zwaard: 100SDEA041
Gewicht: ca. 2,6 kg
Accu en lader
Gebruik alleen accu's zoals de 18V 2,0Ah Kraftixx of de 18V 3,0Ah Kraftixx en de 18V Kraftixx lader.
Gevaar!
Geluid en vibratie
Negotovost K_pA 3 dB
Lanac pile: 91PJ040X
Kapacitet spremnika za ulje: ....200 ml
Sablja: 100SDEA041
Težina: ....... oko 2,6 kg
Baterija i punjač
Upotrebljavajte samo baterije poput 18 V 2,0 Ah
Kraftixx baterija ili 18 V 3,0 Ah Kraftixx baterija kao i 18 V Kraftixx punjač.
Opasnost!
Buka i vibracije
Vrijednosti buke i vibracija određene su prema normi EN 62841-1; EN 62841-4-1.
Razina zvučnog tlaka L _pA 86,8 dB (A)
Nesigurnost K_pA 3 dB
Intenzitet buke L_WA 96,6 dB (A)
Nesigurnost K_WA .....2,75 dB
Zajamčena razina zvučne snage L _WA : .... 99 dB (A)
Nosite zaštitu za sluh.
X 2000/14/EC\_2005/88/EC
X Annex V
Annex VI
Noise: measured L_out = 96.6 dB (A); guaranteed L_mA = 99 dB (A).
1 - KW, DØ = cm
Notified Body:
□2012/46/EU_(EU)2016/1628
Emission No.:
Standard references: EN 62841-1; EN 62841-4-1; EN 55014-1; EN 55014-2
Subject to change without notice
Archive-File/Record: NAPR027908
Documents registrar: Markus Jehl
Wiesenweg 22, D-94405 Landau/Isar
^1 GN Cordless Chainsew - F Tronconneuse as III - I Motocede e balteira - DNK Aku-kasessae - S Betterindven andjagász - CZ Akumulatora feizofrava pia - NK Akumulatora rofazofra pia - NL Akutokgattengae - M Losiotcera de balteira - FIW Akukatytömn lottjusena - SLO Akumulatorasak varitna Raga - H Akus-lantidárz - RO Fortstru cu lati acumulator - GR Axumpovpe jinapogra ^2 Pilla som firo - HR/BN Akumulatorasu lafanta pia - RS Akumulatorasu lafanta lesista. PL Akumulatorosa pia lafoucheva. TR Akulo zinciri testere. RUS Axuyamotera speno-vek naale - EE Alkunolatoris kiesges - SZ Akumulatoris grandinnis puoka - SG Ayushyotoroe seprimen trilon. ONT Axuyamotera levopictora tenua. MX Teta ca tanen, na otergneri - NG Balatirevel kiesges - SI Hlebsi-keuzsug
CE
D Konformitätserklärung: Wir erklären Konformität gemäß EU-Richtlinie und Nomen für Artikel
GB Declaration of conformity: We declare conformity in accordance with the EU directive and standards for article
F Déclaration de conformité : Nous déclarons la conformité conformément aux directives et normes UE pour l'article
I Dichiarazione di conformità: dichiariamo la conformità secondo la direttiva UE e le norme per l'articolo
DK Overensstemmelseserklæring: Vi attesterer overensstemmelse iht. EU-direktiv samt standarder for artikel
S Försäkran om överensstämmelse: Vi förklarar följande överensstämmelse enl. EU-direktiv och standarder för artikeln
CZ Prohlášení o shodě: Prohlašujeme shodu podle směrnice EU a norem pro výrobek
SK Vyhlásenie o zhode: Vyhlasujeme zhodu podľa smernice EÚ a noriem pre výrobok
NL Conformiteitsverklaring: wij verklaren conformiteit conform EU- richtlijn en normen voor artikel
E Declaración de conformidad; declaramos la conformidad a tenor de la directiva y normas de la UE para el artículo
FIN Standardinmukaisuustodistus: Me vakuutamme, että EU-direktiivin ja standardien vaatimukset täyttyvät tuotteelle
SLO IZJAVA O SKLADNOSTI potrjuje sledečo skladnost s smernico EU in standardi za izdelek
H Konformitási nyilalkozat: Az EU-irányvonal és normák szerinti konformitást jelentjük ki a cikkekhez
RO Declaratie de conformitate: Declaram conformitate conform directivei și normelor UE pentru articolul
GR Δήλωση συμμόρφωσης: Δηλώνουμε συμμόρφωση σύμφωνα με Οδηγία Εε και πρότυπα για τα προϊόντα
P Declaração de conformidade: Declaramos a conformidade de acordo com a diretiva CE e normas para o artigo
EU
HR IZJAVA O SUKLADNOSTI potvrduje sljedeću uskladenost prema smiernicama EU i normama za artikl
BIH IZJÁVA O SUKLADNOSTI potvrđuje sljedeć u usklađenost prema. smiernicama EU i normamaza artikl
RS DEKLARACIJA O USUGLAŠENOST potvrduje sledeću usklađenost prema smemicama EZ i normama za artikel
TR Uygunluk Deklarasyonu: AB direktifi ve ürün standartları uyanınca uygunluğunu beyan ederiz
RUS Заявление о соответствии товара: Настоящим удостоверяется, что следующие продукты соответствуют директивам и нормам EC
EE Vastavusdeklaratsioon: Tõendame toote vastavust EL direktiivile ja standarditele
LV Atbilstības deklarācija: Mēs apliecinām atbilstību ES direktīvai un standartiem tālāk minētajām precēm
LT Atitikties deklaracija: deklaruojame, kad gaminys atitinka ES direktyvą ir standartus
PL Deklaracja Zgodności - deklarujemy zgodność wymienionego poniżej artykułu z następującymi normami na podstawie dyrektywy EU
BG Декларация за съответствие: Ние декларираме съответствие на Директивите и нормите (EC) за изделия
UKR Декларація відповідності: ми заявляемо про відповідність згідно з Директивою ЄС та стандартами стосовно артикула
МК Изјана за сообразност: Изјануваме сообразност со регулативата и со нормите на ЕУ за артикли
N Samsvarserklæring: Vi erklærer samsvar i henhold til EU-direktiv og standarder for artikel
IS Samræmisyfirlýsing: Við útskurðum samræmi við EU-reglugerð og stöðlum fyrir vörutegund
Akku-Kettensäge\* KX-AKS 1825 Li (Kraftixx)
□2014/29/EU
2005/32/EC_2009/125/EC
□(EU)2015/1188
2014/35/EU
2006/28/EC
X 2014/30/EU
2014/32/EU
2014/53/EU
2014/68/EU
□(EU)2016/426
Notified Body:
□(EU)2016/425
2011/65/EU_(EU)2015/863
X 2006/42/EC
X Annex IV
Notified Body: TÜV SÜD Product Service GmbH · Ridlerstraße 65 · D-80339 München, Germany
Notified Body No: 0123
Reg. No.: M6A 024192 1963 Rev. 00
X 2000/14/EC\_2005/88/EC
X Annex V
Annex VI
Noise: measured L_out = 96.6 dB (A); guaranteed L_mA = 99 dB (A).
1 - KW, DØ = cm
Notified Body:
□2012/46/EU_(EU)2016/1628
Emission No.:
Standard references: EN 62841-1; EN 62841-4-1; EN 55014-1; EN 55014-2
Subject to change without notice
Archive-File/Record: NAPR027910
Documents registrar: Markus Jehl
Wiesenweg 22, D-94405 Landau/Isar
^1 GN Cordless Chainsew - F Tronconneuse as III - I Motocede e baltrate - DNK Aku-kasessaw - S Betterleidene andjagask - CZ Akumulatoris feizofrava pila - NK Akumulatoris feizofrava pila - NL Akutoklingzag - M Losiotra de baltrate - FIW Akukulatytönn iaklüssena - SLO Akumulatoris langtina raga - H Akus-lanitärztar - RO Forstruttu cui lati acumulator - GR Axumopovo jinapogra ^2 Pilla som firo - HR/BN Akumulatoris lafanta pila - RS Akumulatoris lafanta lesista. PL Akumulatoris pila faruchowa - TR Akulo zerilii testere - RUS Axuyamotera speno-vea nada - EE ^3 Serra som firo - SRA Akumulatoris lafanta pila - SCT Akumulatoris grandinna pfuka - SG Axuyamotera epinekem tron - NCK Axuyamotera leucifera tenua - MK Tota ca zaneu, no aegener - NG Bailterielvel kjasessae - SI Hlebsi-keuzsug
EH 04/2022 (01)