
ES2216 - Razor PANASONIC - Free user manual and instructions
Find the device manual for free ES2216 PANASONIC in PDF.

| Product type | Rechargeable shaver for women, use with or without foam |
| Brand | Panasonic |
| Model | ES2216 |
| Power supply | 120 V AC, 60 Hz, AC adapter RE7-31 |
| Motor voltage | 1.2 V DC |
| Charging time | 12 hours for a full charge |
| Runtime | Approximately 7 shaves of 3 minutes |
| Use | Dry or with foam, in the shower (waterproof) |
| Shaving head | Pivoting action, two trimmers and outer foil |
| Functions | Shaving, pop-up trimmer, 3-position bikini comb |
| Cleaning | Under running water with liquid hand soap |
| Maintenance | Replace outer foil once a year, inner blade every two years |
| Battery type | Nickel metal hydride (NiMH) rechargeable built-in |
| Recycling | Recyclable battery, call 1-800-8-BATTERY |
| Charge indicator | Light on during charging |
| Charging temperature | 0°C to 40°C |
| Package contents | Shaver, charging adapter, protective cap, bikini comb |
Frequently Asked Questions - ES2216 PANASONIC
User questions about ES2216 PANASONIC
0 question about this device. Answer the ones you know or ask your own.
Ask a new question about this device
Download the instructions for your Razor in PDF format for free! Find your manual ES2216 - PANASONIC and take your electronic device back in hand. On this page are published all the documents necessary for the use of your device. ES2216 by PANASONIC.
USER MANUAL ES2216 PANASONIC
natural_image
Line drawing of a pair of electric toothbrushes, one with a flat blade and the other with a flat blade (no text or symbols)- Before operating this unit, please read these instructions completely.
- Il est recommandé de lire attentivement ce manuel avant d'utiliser l'appareil.
- Antes de operar este aparato, lea este instructivo en su totalidad.
IMPORTANT SAFETY INSTRUCTIONS
When using an electrical appli- ance, basic precautions should always be followed, including the
following:
Read all instructions before using this appliance.
DANGER
To reduce the risk of electric shock:
- Do not reach for the appliance if it has fallen into water. Unplug immediately.
- Do not place or store the charging adaptor where it can fall into a tub or sink. Do not place or drop it into water or other liquid.
-
Before charging the shaver, wipe off any moisture from the shaver and charging adaptor. Always handle with dry hands.
-
Always charge the shaver in a cool, dry place.
- Except when charging, always unplug the charging adaptor from the electrical outlet.
- Unplug this appliance before cleaning.
- Charging adaptor is not for immersion or for use in shower.
- Do not use an extension cord with this appliance.
WARNING
To reduce the risk of burns, fire, electric shock, or injury to persons:
- Do not use this shaver with damaged shaving blades and/or foil.
- Close supervision is necessary when this shaver is used by, on or near children or invalids.
- Use this appliance only for its intended use as described in this manual. Do not use attachments not recommended by the manufacturer.
- Never operate the charging adaptor if it has a damaged cord or plug, if it is not working properly, if it has been dropped or damaged or dropped into water. Return the appliance to
a service center for examination and repair.
- Never drop or insert any object into any opening.
- Do not use outdoors or operate where aerosol (spray) products are being used or where oxygen is being administered.
- Always attach plug to appliance first, then to outlet. To disconnect, turn all controls to "off" then remove plug from outlet.
- Plug charger directory into receptacle - do not use an extension cord.
- Unplug charger before plugging or unplugging appliance.
SAVE THESE INSTRUCTIONS
Index
Indice
ENGLISH Page 7
FRANÇAIS Page 11
ESPAÑOL Página 16
natural_image
Diagram of a mechanical device with a blue arrow indicating direction (no text or symbols present)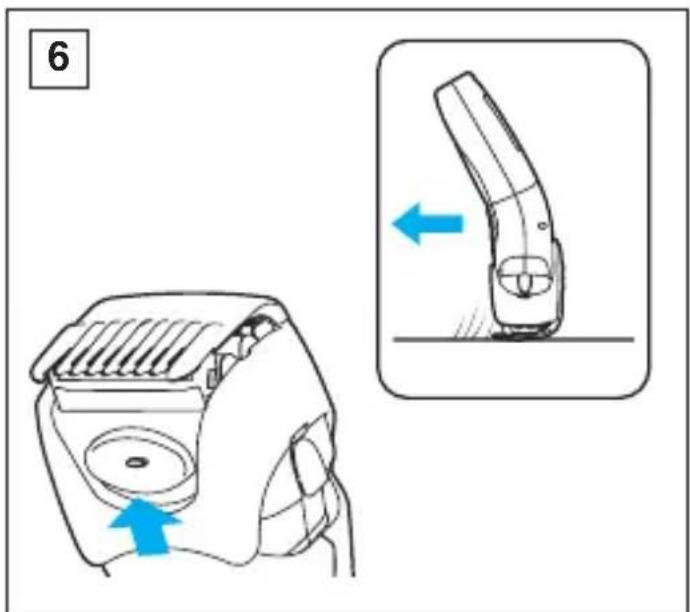
flowchart
graph TD
    A["Step 1: Hand press"] --> B["Step 2: Hand press with brush, presser, and brush tip"]
    B --> C["Step 3: Hand press with brush, presser, and brush tip"]
    C --> D["Step 4: Hand press with brush, presser, and brush tip"]
    D --> E["Step 5: Hand press with brush, presser, and brush tip"]
    E --> F["Step 6: Hand press with brush, presser, and brush tip"]
    F --> G["Step 7: Hand press with brush, presser, and brush tip"]
natural_image
Technical illustration showing a hand holding a mechanical component with an inset close-up of a mechanical component (no text or symbols present)

This Ladies Wet/Dry shaver can be used for wet shaving with shaving lather or for dry shaving. You can use this watertight shaver in the shower and clean it in water. The following is the symbol of Wet shaver. The symbol means that hand-held part may be used in a bath or shower.
natural_image
Simple line drawing of a showerhead spraying over water (no text or symbols)Our research has shown that you can enjoy closer and smoother shaves with the pivot action shaving system and the sharpest blades. And our pop-up trimmer will be able to cut longer hairs with ease. Treat yourself to wet lather shaves for at least three weeks and notice the difference.
Cleaning is so simple. Just rinse out the shaving head under the tap or shower. No mess, no fuss!
Charge the shaver for at least 12 hours before using it for the first time or when it has not been in use for more than six months.
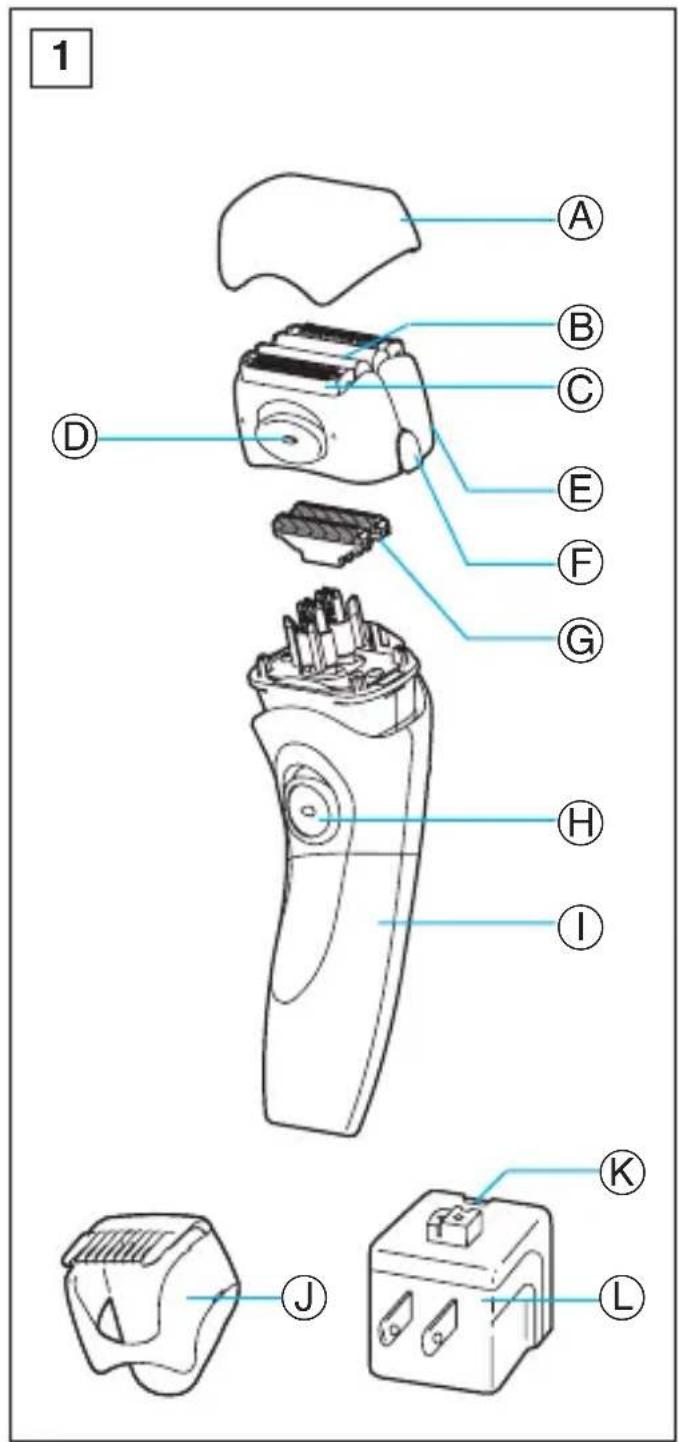
Parts Identification
(see fig. 1)
Ⓐ Protective cap
⑧ Outer foil
© Trimmer
(D) Pop-up trimmer switch
⑤ Outer foil frame
⑤ Outer foil frame release button
© Inner blade
H On/Off switch
① Shaver body
① 3-position bikini comb
K Charge indicator lamp
L Charging adaptor
Charging
Charge the shaver fully for 12 hours before using it for the first time, when it seems to be losing speed, or when it has not been used for an extended period. If not used regularly, the shaver should be recharged every six months to preserve battery life.
Charging once a week is recommended. A full charge will supply enough power for about 7 shaves (three minutes per shave).
Switch the shaver off and set it firmly into the charging stand. Keep the stand level. Plug into an AC outlet.
The charge indicator lamp will glow and it will stay on until the plug is removed from the AC outlet.
Using your shaver
Caution – The system outer foil is very thin and can be damaged if handled improperly. Before each use, always check the foil for damage. To avoid personal injury, do not use if the foil or other parts of the shaving head is damaged.
(see fig. 2 through 6)
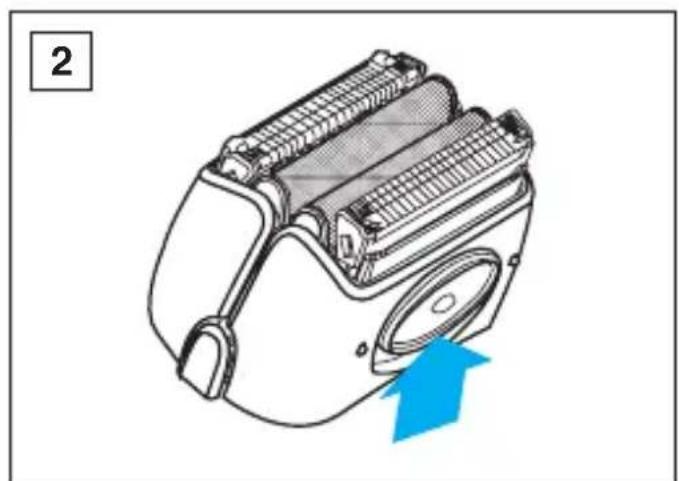
Remove the protective cap and apply shaving lather generously. For the best results, move the shaver in back and forth motion, while keeping the shaver head at a right angle (90°) to
your skin so that the two trimmers and outer foil work together at the same time. Slide the pop-up trimmer switch up when using the pop-up trimmer to cut long hairs (see fig. 2).
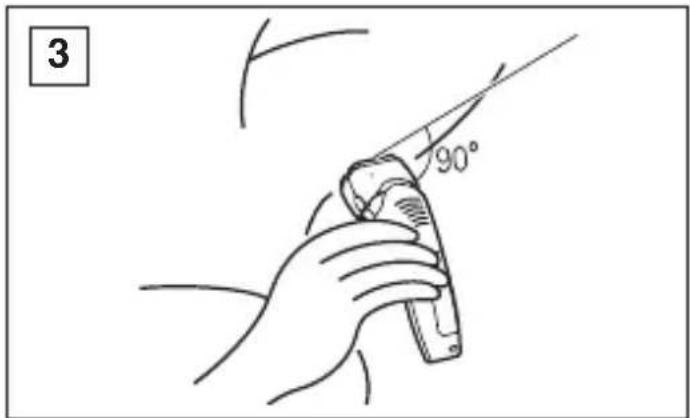
• Underarm (see fig. 3)
Hold your arm up enough to stretch your skin and shave back and forth.
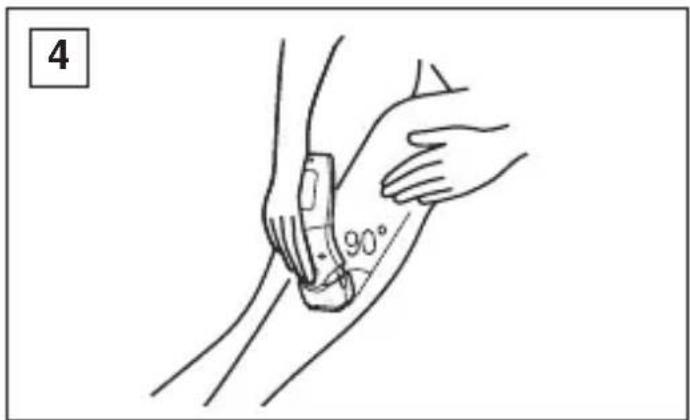
- Legs (see fig. 4)
Be sure to move the shaver from ankle to knee.
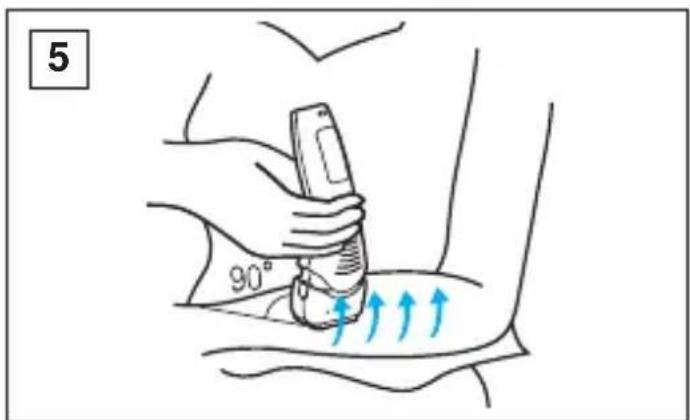
- Arms (see fig. 5)
Be sure to move the shaver from outside to inside.
- Bikini (see fig. 6)
You can use the 3-position bikini comb on the inside and outside of your bikini line.
-
To attach 3-position bikini comb, simply slide it onto the shaver head.
-
Depress button to release comb when adjusting comb length.
-
Slide the pop-up trimmer up when using the 3-position bikini comb.
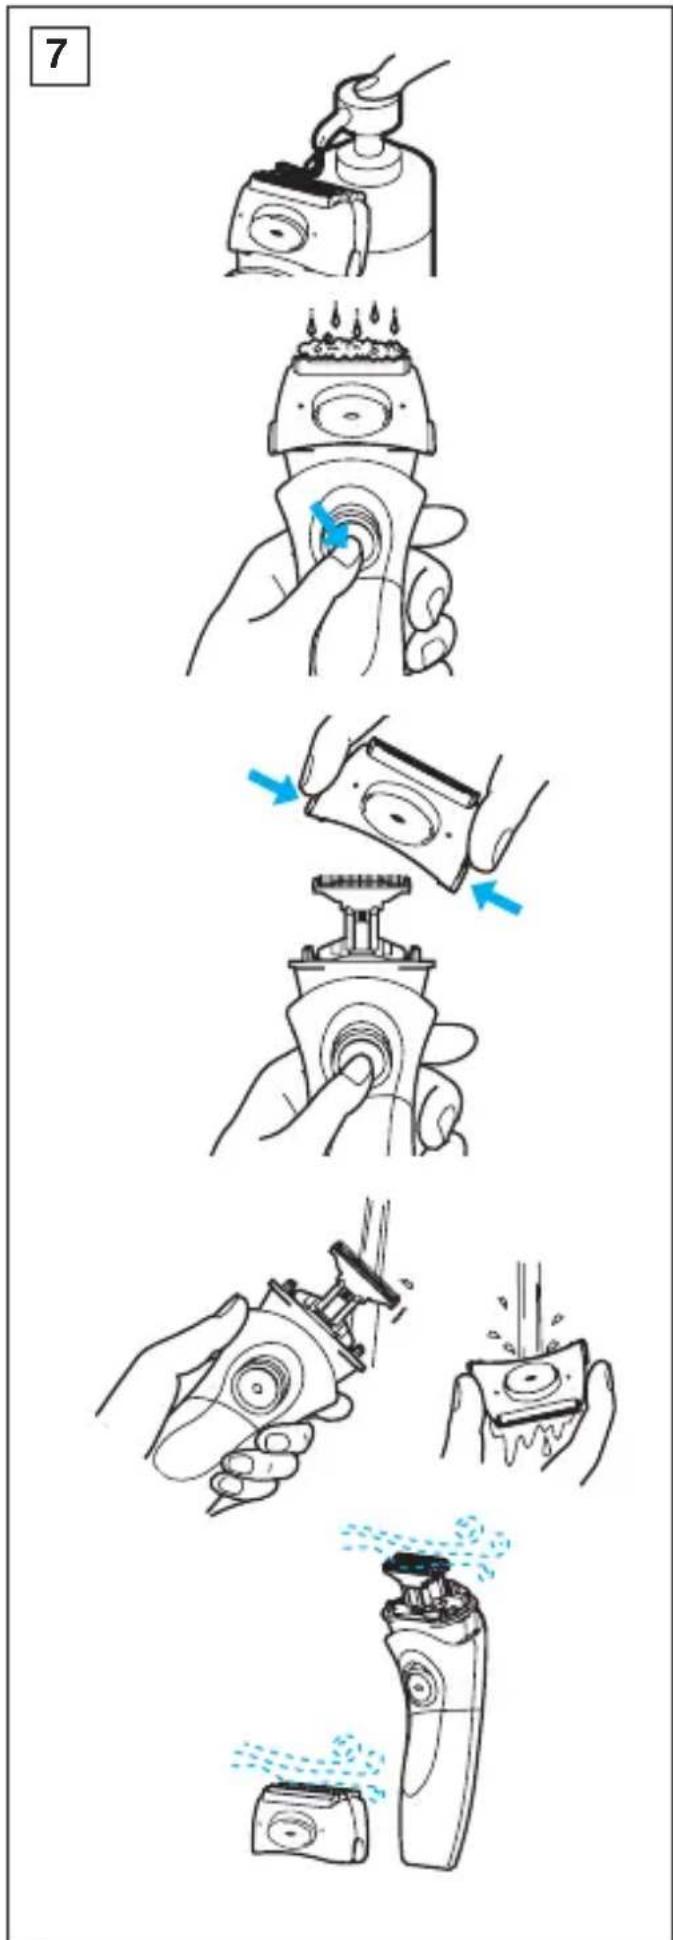
Cleaning
(see fig. 7)
For cleanliness and convenience, we recommend that you clean your shaver with water and a liquid hand soap. Regular cleaning will keep your shaver in good condition while preventing odors or bacteria from developing, and maintain the cutting performance.
With the outer foils in place, apply some hand soap onto the outer foils. Turn the shaver on and turn off after few seconds.
Next, press the outer foil frame release
buttons to remove the outer foil frame and rinse the inner blade/outer foils under running water or in a basin.
DO NOT USE BOILING WATER.
After the inner blade/outer foils and the shaving head are dry, close the outer foil frame and place the protective cap.
Replacing shaving head Components
It is recommended that you replace the outer foil at least once every year and the inner blade at least once every two years to maintain your shaver's cutting performance.
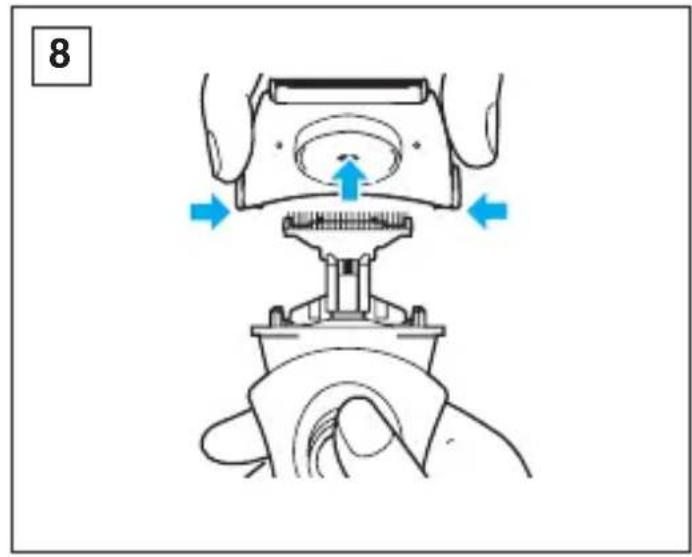
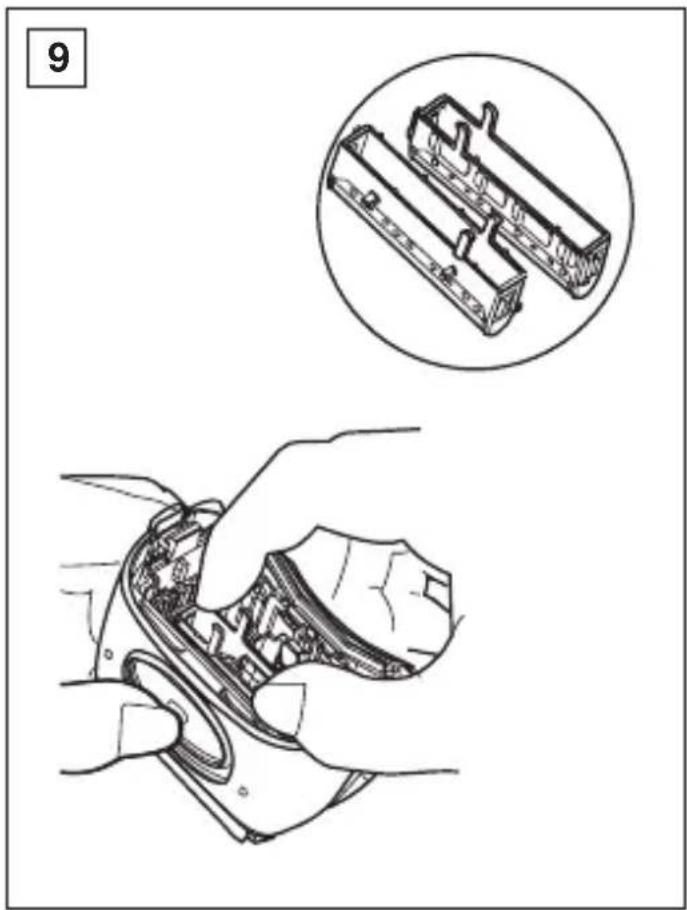
Replacing the outer foil
Press the outer foil frame release buttons to remove the outer foil frame (see fig. 8).
Then, squeeze the front and the back side of the foil frame and lift up one of the two knobs on the outer foil (see fig. 9).
Inserting the new outer foil
Slip the foil into the frame and guide the plastic edges onto the hooks into the frame until it clicks into the shaver.
Replacing the inner blade
(see fig. 10)
Squeeze the outer foil release buttons and lift the outer foil frame upward to remove it. Remove the inner blade by grasping it firmly at both ends and pulling straight away from the shaver. To insert the new inner blade, hold the blade at both ends and press downward until it snaps into the shaver.
ATTENTION:
A nickel metal hydride battery that is recyclable powers the product you have purchased. Please call 1-800-8-BATTERY for information on how to recycle this battery.

How to remove the built-in rechargeable battery before disposal of shaver
The battery in this shaver is not intended to be replaced by consumers. However, the battery may be replaced at an authorized service center. The procedure described below is intended only for removal of the rechargeable battery for the purpose of proper disposal.
WARNING:
Do not attempt to replace the battery for the purpose of reusing the shaver. This could result in the risk of fire or electric shock.
- Remove two screw covers (a) and tow screws (b). (see fig.11)
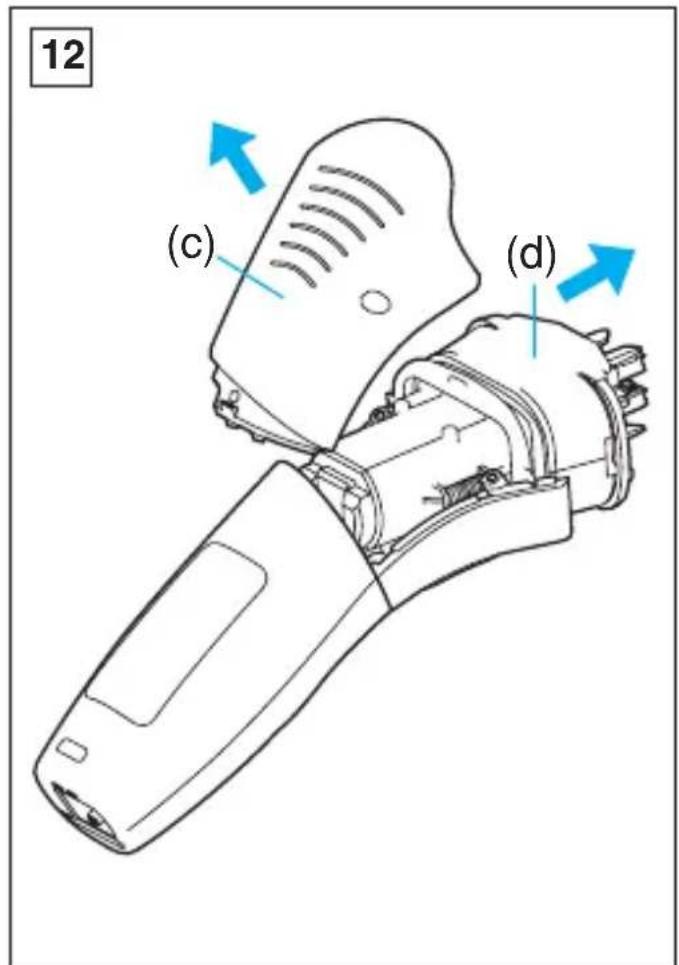
- Remove the back panel (c) and pull the shaver head's base (d). (see fig. 12)
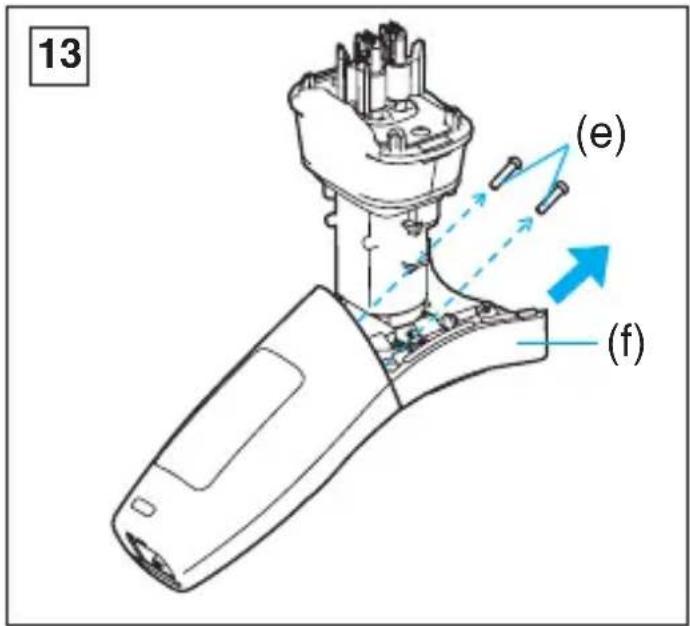
-
Remove the two screws (e) and remove the switch cover (f). (see fig. 13)
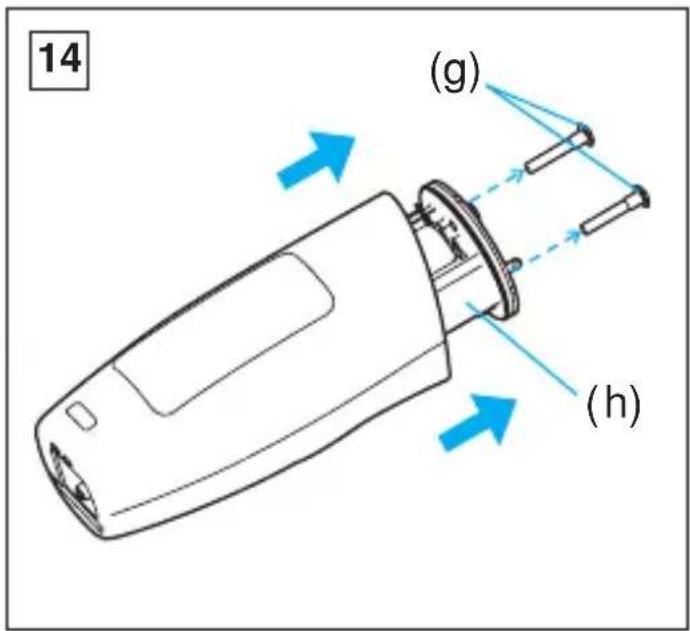
-
Remove two screws (g) and pull out the battery housing (h). (see fig. 14)
-
Remove the battery (i) with a flat screwdriver. (see fig. 15)
Caution
- Do not charge the shaver where the temperature is below 0°C (32°F) or above 40°C (104°F), where it will be exposed to direct sunlight or a heat source, or where there is a lot of moisture.
- Use only the included shaver charging adaptor RE7-31 to charge the ES2216 shaver.
- Dry the shaver completely before setting it in the charging adaptor.
- Keep the charging adaptor away from water and handle it only with dry hands. Do not use an extension cord to connect the charging adaptor to an outlet.
- The shaver may not immediately begin to charge after being placed into the charging adaptor after use. Allow the shaver to sit in the charging adaptor for a few minutes and check again to make sure that it is being charged.
- Grip the charging adaptor when disconnecting it from a receptacle.
- Store the charging adaptor in a dry area where it will be protected from damage.
-
The outer foil is very thin. If handled improperly, it can be easily damaged. To avoid personal injury, do not use the shaver if it has a damaged foil or inner blade.
-
Wash the shaver in tap water. Do not use salt water or boiling water. Also, do not use cleaning products that are designed for toilets, bathrooms or kitchen appliances. Do not submerge the shaver for a long time.
- Do not wipe any part of the shaver with thinner, benzine or alcohol. Clean it by using a cloth dampened with soapy water.
- Do not take the housing apart as this can affect the watertight construction.
- This charging adaptor unit is intended to be correctly oriented in a vertical or floor mount position.
Specifications
Power source: 120 V, 60 Hz
Motor voltage: 1.2 V DC
Charging time: 12 hours
This product is intended for household use only.
READ ALL INSTRUCTIONS BEFORE USE.
FOR YOUR CONVENIENCE, WE HAVE ESTABLISHED A TOLL-FREE (IN USA ONLY) NATIONAL ACCESSORY PURCHASE HOT LINE AT 1-800-338-0552.
INSTRUCTIONS DE SÉCURITÉ IMPORTANTES
natural_image
Simple line drawing of a showerhead spraying water into a wavy container (no text or symbols)natural_image
Simple line drawing of a showerhead spraying water into a wavy surface (no text or symbols)Panasonic Consumer Electronics Company
Division of Panasonic Corporation of North America
One Panasonic Way 1H-1 Secaucus, NJ 07094
IN PUERTO RICO CONTACT:
Panasonic Puerto Rico, Inc.
P.O.Box 2036, Carolina, Puerto Rico 00984 U.S.A.
IN CANADA CONTACT:
AU CANADA, CONTACTER:
Panasonic Canada Inc.
5770 Ambler Drive, Mississauga,
Ontario L4W 2T3
(905) 624-5010
Vancouver: (604) 278-4211
En México:
- IMPORTANT SAFETY INSTRUCTIONS
- DANGER
- To reduce the risk of electric shock:
- WARNING
- To reduce the risk of burns, fire, electric shock, or injury to persons:
- SAVE THESE INSTRUCTIONS
- Index
- Indice
- Parts Identification
- Charging
- Using your shaver
- Cleaning
- Replacing shaving head Components
- Replacing the outer foil
- Inserting the new outer foil
- Replacing the inner blade
- ATTENTION:
- How to remove the built-in rechargeable battery before disposal of shaver
- WARNING:
- Caution
- Specifications
- READ ALL INSTRUCTIONS BEFORE USE.
- INSTRUCTIONS DE SÉCURITÉ IMPORTANTES
Brand : PANASONIC
Model : ES2216
Category : Razor