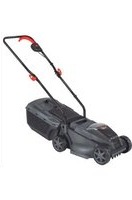
KX-ARM 1832 Li - Lawn mower Kraftixx - Free user manual and instructions
Find the device manual for free KX-ARM 1832 Li Kraftixx in PDF.


| Product type | Cordless lawn mower |
| Brand | Kraftixx |
| Model | KX-ARM 1832 Li |
| Operating voltage | 18 V |
| Motor rotation speed | 3700 rpm |
| Cutting width | 32 cm |
| Cutting height | 25 - 60 mm (3 levels) |
| Grass catcher volume | 30 liters |
| Weight | 9 kg |
| Protection class | III / IPX4 |
| Battery type | Li-ion 18 V, 3.0 Ah, 10 cells |
| Charger | Input 200-250 V~ 50-60 Hz, output 20 V DC, 3.0 A |
| Sound pressure level (LpA) | 79 dB(A) |
| Guaranteed sound power level (LWA) | 96 dB(A) |
| Vibration (handlebar) | 2.7 m/s² |
| Safety device | Start lock, safety contact plug |
| Intended use | Domestic garden and leisure (≤ 50 h/year) |
| Maintenance | Clean after each use; sharpen or replace blade if worn |
| Spare parts (blade) | Ref. 90.600.29 |
| Included accessories | Grass catcher, battery, charger, safety plug, mounting material |
Frequently Asked Questions - KX-ARM 1832 Li Kraftixx
User questions about KX-ARM 1832 Li Kraftixx
0 question about this device. Answer the ones you know or ask your own.
Ask a new question about this device
Download the instructions for your Lawn mower in PDF format for free! Find your manual KX-ARM 1832 Li - Kraftixx and take your electronic device back in hand. On this page are published all the documents necessary for the use of your device. KX-ARM 1832 Li by Kraftixx.
USER MANUAL KX-ARM 1832 Li Kraftixx
GB Original operating instructions Cordless lawn mower
natural_image
Hand placing a plastic bag labeled '9' into a closed basket (no text or symbols visible)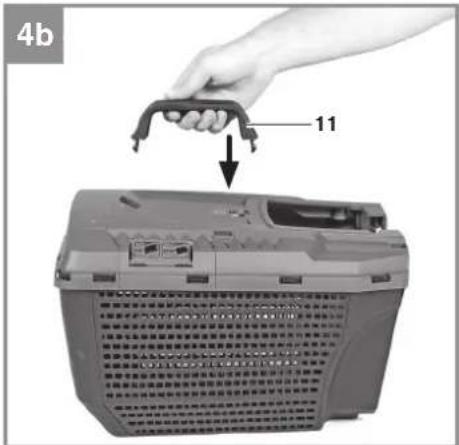
text_image
4b 11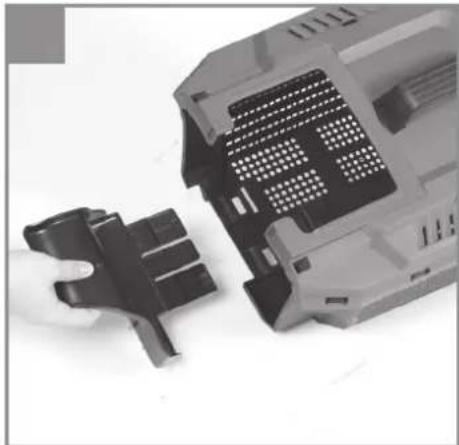
natural_image
Close-up of a mechanical component with internal grid structure and disassembled parts (no visible text or symbols)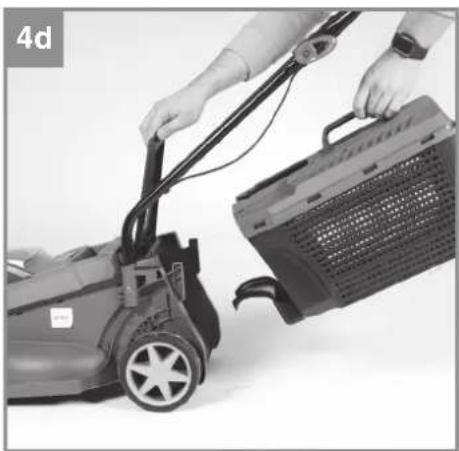
natural_image
Person using a lawn mower to lift a carton, no visible text or symbols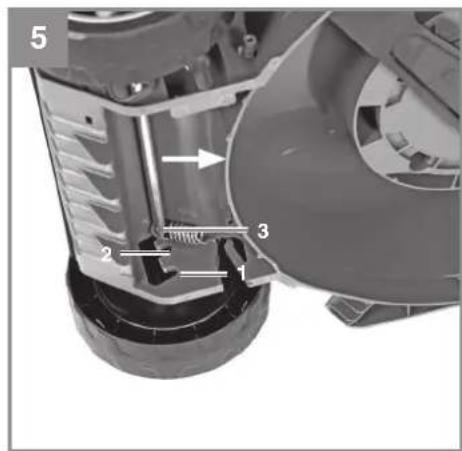
text_image
5 2 3 1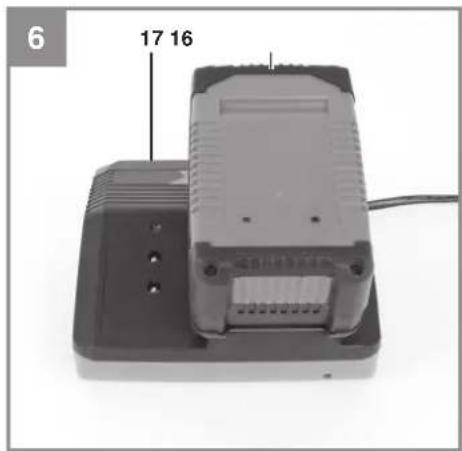
natural_image
Close-up of a black electronic device with labeled ports (17 and 16), no visible text or symbols beyond labels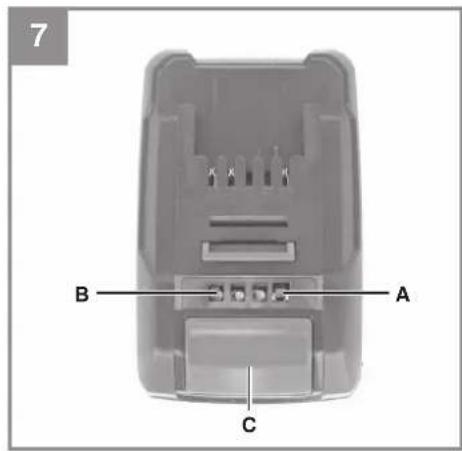
text_image
7 B A C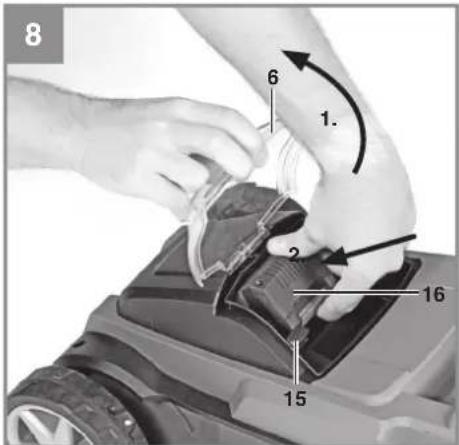
text_image
8 6 1. 2 15 16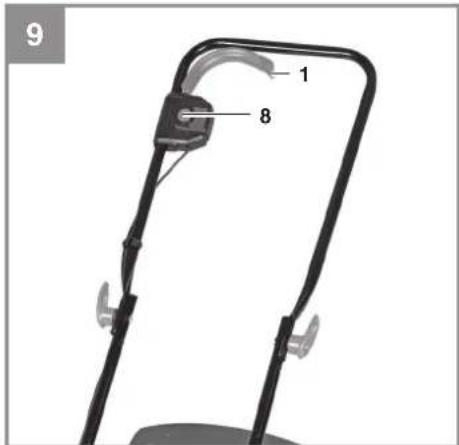
text_image
9 1 8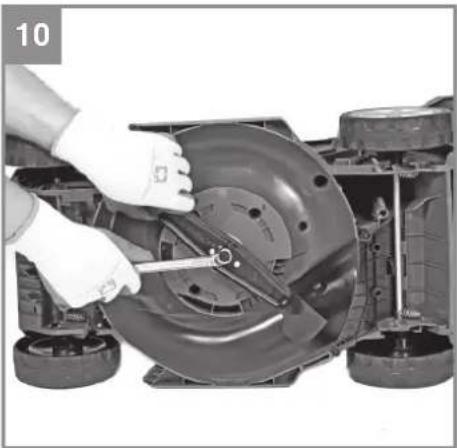
natural_image
Close-up of hands operating a mechanical component with a circular housing and tools (no visible text or symbols)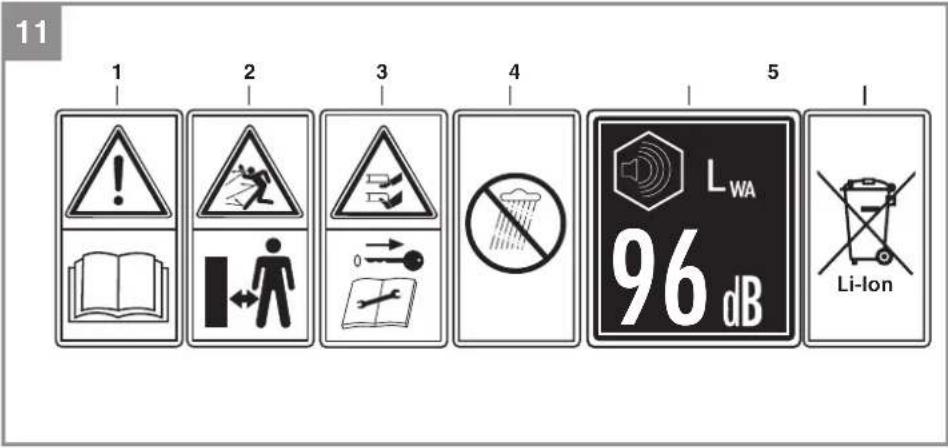
text_image
11 1 2 3 4 5 LWA 96 dB Li-IonD
Gefahr!
When using the equipment, a few safety precautions must be observed to avoid injuries and damage. Please read the complete operating instructions and safety regulations with due care. Keep this manual in a safe place, so that the information is available at all times. If you give the equipment to any other person, hand over these operating instructions and safety regulations as well. We cannot accept any liability for damage or accidents which arise due to a failure to follow these instructions and the safety instructions.
Explanation of the symbols used (see Fig. 11)
- Danger! - Read the operating instructions to reduce the risk of injury.
- Keep your distance!
- Caution: Sharp blades! Pull out the safety plug before carrying out any repair work or if the power cable is damaged. The blades will continue to rotate after the motor is switched off.
- Protect the equipment from rain and damp conditions
- Guaranteed sound power level
- Dispose of batteries correctly
1. Safety regulations
The corresponding safety information can be found in the enclosed booklet.
Warning!
Read all the safety information, instructions, illustrations and technical data provided on or with this power tool. Failure to adhere to the following instructions may result in electric shock, fi re and/or serious injury.
Keep all the safety information and instructions in a safe place for future use.
This equipment is not allowed to be used by children. Children should be supervised so that they do not play with the equipment. Children are not allowed to carry out the cleaning or maintenance. This equipment is not allowed to be used by people with limited physical, sensory or men-
tal capacities or by those with insufficient knowledge or experience unless they are supervised or instructed by a person who is responsible for them.
2. Layout and items supplied
2.1 Layout (Fig. 1/2)
- Switching bar
- Top push bar
- Bottom push bar
- Carry-handle
- Grass basket
- Ejector flap
- Safety lock-off
- Grass basket, top part of the housing
- Grass basket, bottom part of the housing
- Grass box handle
- Fastening screws for top push bar
- Nuts for top and bottom push bar
- Cable clips
- Safety plug
- Battery
- Charger
- Catch basket adapter
2.2 Items supplied and unpacking (Fig. 2)
Please check that the article is complete as specified in the scope of delivery. If parts are missing, please contact our service center or the sales outlet where you made your purchase at the latest within 5 working days after purchasing the product and upon presentation of a valid bill of purchase. Also, refer to the warranty table in the service information at the end of the operating instructions.
- Open the packaging and take out the equipment with care.
- Remove the packaging material and any packaging and/or transportation braces (if available).
• Check to see if all items are supplied. - Inspect the equipment and accessories for transport damage.
- If possible, please keep the packaging until the end of the guarantee period.
GB
Danger!
The equipment and packaging material are not toys. Do not let children play with plastic bags, foils or small parts. There is a danger of swallowing or suff ocating!
Items supplied
• Cordless lawn mower
Grass basket
- Safety plug
- Battery (in the case of Art. No.: 45.140.42 it is not included in delivery)
- Charger (in the case of Art. No.: 45.140.42 it is not included in delivery)
• Assembly material
• Original operating instructions
• Safety information
3. Proper use
The lawn mower is intended for private use i.e. for use in home and gardening environments.
Private use of the lawn mower refers an annual operating time generally not exceeding that of 50 hours, during which time the equipment is primarily used to maintain small-scale, residential lawns and home/hobby gardens. Public facilities, sporting halls, and agricultural/forestry applications are excluded.
Important. Due to the high risk of bodily injury to the user, the lawn mower may not be used to trim bushes, hedges or shrubs, to cut scaling vegetation, planted roofs, or balcony-grown grass, to clean (suck up) dirt and debris off walkways, or to chop up tree or hedge clippings. Moreover, the lawn mower may not be used as a power cultivator to level out high areas such as molehills.
For safety reasons, the lawn mower may not be used as a drive unit for other work tools or toolkits of any kind, unless they have been expressly permitted by the manufacturer.
The equipment is to be used only for its prescribed purpose. Any other use is deemed to be a case of misuse. The user / operator and not the manufacturer will be liable for any damage or injuries of any kind caused as a result of this.
Please note that our equipment has not been designed for use in commercial, trade or industrial applications. Our warranty will be voided if the machine is used in commercial, trade or industrial businesses or for equivalent purposes.
4. Technical data
Operating voltage 18V
Motor speed: 3700 min ^1
Protection class:....III
Weight: 9kg
Cutting width: 32 cm
Grass basket volume: 30 liters
Sound pressure level L_dA : 79 dB(A)
Uncertainty K_pA : 3dB(A)
Sound power level L_WA : 88.4 dB(A)
Uncertainty K_WA : 3,06 dB(A)
Guaranteed sound power level L_WA :.....96dB(A)
Vibration at the handlebars a_h : 2.7 m/s²
Uncertainty K: 1.4 m/s²
Cutting height adjustment: .....25-60 mm; 3 levels
Protection type: IPX4
Lithium-ion battery
Voltage: 18 V DC
Capacity: 3.0 Ah
Number of cells: 10
Battery charger
Input voltage: 200-250 V \~ 50 -60 Hz
Output voltage: 20 V DC
Output current: 3.0 A
Protection class: .....II /☐
Caution!
The equipment and the battery charger are allowed to be used only for lithium-ion batteries of the Kraftixx series!
Sound and vibration values were measured in accordance with the standards EN ISO 3744:1995, ISO 11094:1991 and EN ISO 20643:2008.
GB
Keep the noise emissions and vibrations to a minimum.
- Only use appliances which are in perfect working order.
• Service and clean the appliance regularly.
• Adapt your working style to suit the appliance.
• Do not overload the appliance. - Have the appliance serviced whenever necessary.
• Switch the appliance off when it is not in use.
• Wear protective gloves.
Residual risks
Even if you use this electric power tool in accordance with the instructions, certain residual risks cannot be eliminated. The following hazards may arise in connection with the equipment's construction and layout:
- Lung damage if no suitable protective dust mask is used.
- Damage to hearing if no suitable ear protection is applied.
Warning!
This equipment generates an electromagnetic fi eld during operation. Under certain circumstances this fi eld may actively or passively impede medical implants. To reduce the risk of serious or fatal injuries, we recommend persons with medical implants to consult their doctor and the manufacturer of the medical implant prior to using the equipment.
5. Before starting the equipment
The lawn mower is delivered partly assembled. The push bar and the grass basket must be assembled before using the lawn mower. Follow the instructions step by step and refer to the pictures when assembling.
Warning! Always pull out the safety plug before making adjustments to the equipment.
Fitting the push bar (Fig. 3a to 3c)
Take a bottom push bar (Fig. 2 /Item 3) and fasten it with the nut (Fig. 2/Item 13) as shown in Fig. 3a. The locking button (a) must engage noticeably. Proceed in the same way on the other side. Fasten the top push bar (2) to the lower push bar (3) with the help of the fastening screw (12) and the nut (13) as shown in Fig. 3b.
Then attach the power cable to the push bar (Fig. 2/Item 14) using the cable clips (Fig. 3c).
Mounting the catch basket (Fig. 4a to 4d)
Plug together the top and the bottom part of the catch basket housing (Fig. 4a/Item 9, 10). Ensure that all the plastic lugs engage correctly all around. Now press the catch basket handle (Fig. 4b/Item 11) and the catch basket adapter (Fig. 4c/Item 18) into the openings provided on the catch basket. Finally check that both parts are secure and correctly positioned. Before you fit the grass basket you must ensure that the motor is switched off and the blade is not rotating.
The grass box must be attached to the two hooks on the mower. To do this, open the ejector fl ap with one hand (Fig. 4d/Item 7) and attach the grass box with the other hand. The ejector fl ap is held against the grass box by a spring.
Adjusting the cutting height (Fig. 5) Warning!
Adjust the cutting height only when the motor has been switched off and the safety plug has been disconnected.
Before you begin to mow, check to ensure that the blade is not blunt and that none of the fasteners are damaged. To prevent any imbalance, replace blunt and/or damaged blades. To carry out this check, first switch off the motor and pull out the safety plug.
The cutting height is adjusted as shown in Figure 5. To do so, turn the equipment upside down or tilt it to the side. Position both the front and rear axle in the same notch, so that the cutting blade runs parallel to the lawn.
Position Cutting depth
1 60mm
2 45mm
3 25mm
Charging the battery (Fig. 6)
- Take the battery pack out of the equipment. Do this by pressing the side pushlock buttons (Fig. 7/Item C).
- Check that your mains voltage is the same as that marked on the rating plate of the battery charger. Insert the power plug of the charger into the socket outlet. The green LED will then begin to fl ash.
- Insert the battery pack into the battery charger.
GB
- In the section entitled „Charger indicator“ you will find a table with an explanation of the LED indicator on the charger.
The battery pack can become a little warm during the charging. This is normal.
If the battery pack fails to charge, check:
• whether there is voltage at the socket outlet
- whether there is good contact at the charging contacts
If the battery pack still fails to charge, send
• the charging unit
• and the battery pack
to our customer service center.
To ensure that items are properly packaged and delivered when you send them to us, please contact our customer service or the point of sale at which the equipment was purchased.
When shipping or disposing of batteries and cordless tools, always ensure that they are packed individually in plastic bags to prevent short circuits and fi res.
To ensure that the battery pack provides long service, you should take care to recharge it promptly. You must recharge the battery pack when you notice that the performance of the device drops. Never allow the battery pack to become fully discharged. This will cause it to develop a defect.
Battery capacity indicator (Fig. 7)
Press the button for the battery capacity indicator (Item A). The battery capacity indicator (Item B) shows the charge status of the battery using 3 LEDs.
All 3 LEDs are lit:
The battery is fully charged.
2 or 1 LED(s) are lit:
The battery has an adequate remaining charge.
1 LED fl ashes:
The battery is empty, recharge the battery.
All LEDs blink:
The battery temperature is too low. Remove the battery from the equipment, keep it at room temperature for one day. If the fault reoccurs, this means that the rechargeable battery has undergone
exhaustive discharge and is defective. Remove the battery from the equipment. Never use or charge a defective battery.
Installing the battery (Fig. 8)
- Open the battery cover.
- Insert the battery pack in the mount.
- Close the battery cover by flipping the cover down
6. Operation
Caution!
The lawn mover is equipped with a safety circuit to prevent unauthorized use. Directly before starting up the lawn mover insert the safety plug (Fig. 8/ Item 15) and remove the safety plug again whenever you interrupt or terminate your work.
Caution!
To prevent the equipment switching on accidentally, the lawn mower is equipped with a safety switch (Fig. 9/Item 8) which must be pressed before the switching bar (Fig. 9/Item 1) can be activated. The lawn mower switches itself off when the switching bar is released. The start time can amount to several seconds. The speed will drop after a few seconds when in idle mode and will rise again after a few second when in working mode. The lawn mower switches itself off when the switching bar is released. Repeat this process several times so that you are sure that the machine functions properly. Before you perform any repair or maintenance work on the equipment, ensure that the blade is not rotating and that the power supply is disconnected (Fig. 8).
Caution! Never open the chute fl ap when the grass bag has been detached (to be emptied) and the motor is still running. A rotating blade can cause serious injuries!
Always carefully fasten the chute flap and grass basket. Switch off the engine before emptying the grass basket.
Always ensure that a safe distance (provided by the length of the long handles) is maintained between the user and the mower housing. Be especially careful when mowing and changing direction on slopes and inclines. Maintain a solid footing and wear sturdy, non-slip footwear and long trousers.
GB
Always mow along the incline (not up and down). For safety reasons, the lawn mower may not be used to mow inclines whose gradient exceeds 15 degrees.
Use special caution when backing up and pulling the lawn mower. Tripping hazard!
Tips for proper mowing
It is recommended that you overlap the mowing swaths.
Only use a sharp blade that is in good condition. This will prevent the grass blades from fraying and the lawn from turning yellow.
Try to mow in straight lines for a nice, clean look. The swaths should overlap each other by a few centimeters in order to avoid stripes.
The operating time of the rechargeable batteries and therefore the area in square meters that can be covered with a single battery charge is largely dependent on the state of the grass (e.g. density, moisture, height, cutting height, etc.) and the mowing speed (walking speed). To adjust the area coverage to your individual requirements, it is recommended that you mow the lawn more often, with a higher cutting height and at an appropriate speed. Frequently turning the equipment on and off while mowing will also reduce the amount of area that you can cover. If the operating time of the rechargeable batteries (area coverage) is still unsatisfactory in spite of the above measures, you can remedy the problem by using rechargeable batteries with a larger capacity (Ah).
How frequently you should mow your lawn is determined primarily by the speed at which the grass grows. In the main growing season (May - June) you will probably need to mow the lawn twice a week, otherwise just once a week. The cutting height should be between 4 - 6cm and the amount of growth before mowing again should be 4 - 5cm. If the grass is allowed to grow somewhat longer for whatever reason, do not make the mistake of cutting it back to the normal height in one go. This will harm the lawn. Never cut it back by more than half the height in one go.
Keep the underside of the mower housing clean and remove grass build-up. Deposits not only make it more difficult to start the mower; they decrease the quality of the cut and make it harder for the equipment to bag the grass.
Always mow along inclines (not up and down). You can prevent the lawn mower from slipping down by holding a position at an angle upwards.
Select the cutting height according to the length of the grass. Make several passes so that no more than 4cm of grass are cut at one time. Switch off the motor before doing any checks on the blade. Keep in mind that the blade continues to rotate for a few seconds after the motor has been switched off. Never attempt to manually stop the blade. Regularly check to see if the blade is securely attached, is in good condition and is sharp. If the contrary is the case, sharpen the blade or replace it. In the event that the blade strikes an object, immediately switch off the lawn mower and wait for the blade to come to a complete stop. Then inspect the condition of the blade and the blade mount. Replace any parts that are damaged.
As soon as grass clippings start to trail the lawn mower, it is time to empty the grass basket. Important! Before taking off the grass basket, switch off the motor and wait until the blade has come to a stop.
To take off the grass basket, use one hand to lift up the chute fl ap and the other to grab onto the basket handle. Remove the basket. For safety reasons, the chute fl ap automatically falls down after removing the grass basket and closes off the rear chute opening. If any grass remains in the opening, it will be easier to restart the engine if you pull the mower back approximately 1m.
Do not use your hands or feet to remove clippings in or on the mower housing, but instead use suitable tools such as a brush or a hand broom.
In order to ensure that the majority of grass clippings are picked up, the inside of the grass basket must be cleaned after each use.
Reattach the grass basket only when the motor is switched off and the blade has stopped.
Lift up the chute flap with one hand and, holding the grass basket by its handle with the other hand, hang in the basket from the top.
GB
7. Cleaning, maintenance and ordering of spare parts
Danger!
Pull the safety plug before carrying out any cleaning work (Fig. 8).
7.1 Cleaning
- Keep all safety devices, air vents and the motor housing free of dirt and dust as far as possible. Wipe the equipment with a clean cloth or blow it with compressed air at low pressure.
- Do not clean the lawn mower with running water, particularly with high-pressure water.
• We recommend that you clean the device immediately each time you have finished using it. - Clean the equipment regularly with a moist cloth and some soft soap. Do not use cleaning agents or solvents; these could attack the plastic parts of the equipment. Ensure that no water can seep into the device.
- For best results, clean the lawn mower with a brush or rag.
7.2 Maintenance
- Worn out or damaged blades, blade mounts, and bolts should be replaced as a set by an authorized professional in order to keep the equipment in balance.
- Ensure that all mounting components (i.e. screws, bolts, nuts etc.) are always tightened so that the equipment can be safely operated at all times.
- Frequently check the grass catch assembly for signs of wear.
- Replace excessively worn or damaged parts immediately.
- In order to ensure that you enjoy the equipment for many years to come, all screwed parts, as well as the wheels and axles, should be cleaned and lubricated.
- Keeping your lawn mower in good condition not only ensures a long lifespan and high performance, but also enables the equipment to thoroughly cut your grass with minimal effort.
- The blade is subjected to more wear and tear than any other component. Therefore, routinely check the condition of the blade and make sure that it is tightly fastened. If the blade is completely worn out, it must be immediately replaced or ground sharp again. An excessively vibrating mower means that the
blade is not properly balanced or has become deformed from striking an object. In this case, the blade must be repaired or replaced.
- There are no parts inside the equipment which require additional maintenance.
7.3 Replacing the blade
For safety reasons, we recommend having the blade replaced by an authorized professional. Important! Wear work gloves! Only replace the blade with a genuine replacement blade, as this will ensure top performance and safety under all conditions.
Carry out the following steps to change the blade:
- Undo the fastening screw (see Fig. 10).
- Remove the blade and replace with a new one.
- When fi tting the blade, make sure it is installed in the right direction. The blade's air vanes must project into the motor compartment (see Fig. 10). The dome mounts provided on the equipment must be aligned with the punch holes provided in the blade.
- Then retighten the fastening screw with the universal wrench. The tightening torque should be approx. 25 Nm.
At the end of the season, perform a general inspection of the lawn mower and remove any grass and dirt which may have accumulated. At the start of each season, ensure that you check the condition of the blade. If repairs are necessary, please contact our customer service center. Use only genuine spare parts.
7.4 Ordering replacement parts:
Please quote the following data when ordering replacement parts:
• Type of machine
• Article number of the machine
• Identification number of the machine
- Replacement part number of the part required For our latest prices and information please go to www.isc-gmbh.info
Spare blade art. no.: 90.600.29
8. Storage and transport
Storage
Store the equipment and accessories out of children's reach in a dark and dry place at above freezing temperature. The ideal storage temperature is between 5 and 30^ . Store the machine in its original packaging.
Transport
- Switch the machine off and isolate it from the power supply before transporting it.
• Fit the shipping protectors, if any. - Protect the machine from damage and the strong vibrations that can occur particularly when transporting in vehicles.
- Secure the machine against slipping and tipping over.
9. Disposal and recycling
The equipment is supplied in packaging to prevent it from being damaged in transit. The raw materials in this packaging can be reused or recycled. The equipment and its accessories are made of various types of material, such as metal and plastic. Never place defective equipment in your household refuse. The equipment should be taken to a suitable collection center for proper disposal. If you do not know the whereabouts of such a collection point, you should ask in your local council offices.
GB
10. Charger indicator
| Indicator status Explanations and actions | ||
| Red LED Green LED | ||
| Off | Flashing | Ready for useThe charger is connected to the mains and is ready for use; there is no battery pack in the charger |
| On Off Charging | The charger is charging the battery pack in quick charge mode. The charging times are shown directly on the charger.Important! The actual charging times may vary slightly from the stated charging times depending on the existing battery charge. | |
| Off | On | The battery is charged and ready for use. (READY TO GO)The unit then changes over to gentle charging mode until the battery is fully charged.To do this, leave the rechargeable battery on the charger for approx. 15 minutes longer.Action:Take the battery pack out of the charger. Disconnect the charger from the mains supply. |
| Flashing Off | Adapted charging | The charger is in gentle charging mode.For safety reasons the charging is performed less quickly and takes more time. The reasons can be:- The rechargeable battery has not been used for a very long time.- The battery temperature is outside the ideal range.Action:Wait for the charging to be completed; you can still continue to charge the battery pack. |
| Flashing Flashing Fault | Charging is no longer possible. The battery pack is defective.Action:Never charge a defective battery pack.Take the battery pack out of the charger. | |
| On On Temperature fault | The battery pack is too hot (e.g. due to direct sunshine) or too cold (below 0^ ).Action:Remove the battery pack and keep it at room temperature (approx. 20^ ) for one day . | |
11. Troubleshooting
| Fault | Possible causes Remedies | |
| The motor fails to start | a) The connectors have become separated from the motorb) The mower is standing in high grassc) The mower housing is cloggedd) Safety switch is not insertede) Battery is not correctly inserted | a) Have repaired by the Customer Service Centerb) Start in low grass or on an area that has already been mowed; change the cutting height if necessaryc) Clean the housing so that the blade moves freelyd) Insert safety switch (see 6.)e) Remove the battery and reinsert (see 5.) |
| The motor performance drops | a) The grass is too high or too dampb) The mower housing is cloggedc) The blade is severely wornd) Battery performance decreasing | a) Correct the cutting height, change the electronics settingb) Clean the housingc) Replace the bladed) Check the battery performance and charge the battery if necessary (see 5.) |
| Cutting is irregular | a) The blade is wornb) Wrong cutting height | a) Replace or resharpen the bladeb) Correct the cutting height |
Notice! For protection, the motor is equipped with a thermal switch which cuts out when the motor is overloaded and switches on again automatically after a short cooling period
GB

For EU countries only
Never place any electric power tools in your household refuse.
To comply with European Directive 2012/19/EC concerning old electric and electronic equipment and its implementation in national laws, old electric power tools have to be separated from other waste and disposed of in an environment-friendly fashion, e.g. by taking to a recycling depot.
Recycling alternative to the return request:
As an alternative to returning the equipment to the manufacturer, the owner of the electrical equipment must make sure that the equipment is properly disposed of if he no longer wants to keep the equipment. The old equipment can be returned to a suitable collection point that will dispose of the equipment in accordance with the national recycling and waste disposal regulations. This does not apply to any accessories or aids without electrical components supplied with the old equipment.
Please note that batteries and lamps (e.g. light bulbs) must be removed from the tool before it is disposed of.
The reprinting or reproduction by any other means, in whole or in part, of documentation and papers accompanying products is permitted only with the express consent of the iSC GmbH.
Subject to technical changes
This consignment contains lithium-ion batteries.
In accordance with special provision 188 this consignment is not subject to the ADR regulations. Handle with care. Danger of ignition in case of damage to the consignment package. If the consignment package is damaged: Check and if necessary repackage. For further information contact: 0049 1807 10 20 20 66 (fixed network 14 ct/min, mobile phone max. 42 ct/min) Outside Germany charges will apply instead for a regular call to a landline number in Germany.
GB
Service information
We have competent service partners in all countries named on the guarantee certificate whose contact details can also be found on the guarantee certificate. These partners will help you with all service requests such as repairs, spare and wearing part orders or the purchase of consumables.
Please note that the following parts of this product are subject to normal or natural wear and that the following parts are therefore also required for use as consumables.
| Category Example | |
| Wear parts* Carbon brushes, Battery | |
| Consumables* Blade | |
| Missing parts |
* Not necessarily included in the scope of delivery!
In the effect of defects or faults, please register the problem on the internet at www.isc-gmbh.info. Please ensure that you provide a precise description of the problem and answer the following questions in all cases:
• Did the equipment work at all or was it defective from the beginning?
• Did you notice anything (symptom or defect) prior to the failure?
• What malfunction does the equipment have in your opinion (main symptom)?
Describe this malfunction.
GB
Warranty certifi cate
Dear Customer,
All of our products undergo strict quality checks to ensure that they reach you in perfect condition. In the unlikely event that your device develops a fault, please contact our service department at the address shown on this guarantee card. You can also contact us by telephone using the service number shown. Please note the following terms under which guarantee claims can be made:
- These guarantee terms apply to consumers only, i.e. natural persons intending to use this product neither for their commercial activities nor for any other self-employed activities. These warranty terms regulate additional warranty services, which the manufacturer mentioned below promises to buyers of its new products in addition to their statutory rights of guarantee. Your statutory guarantee claims are not affected by this guarantee. Our guarantee is free of charge to you.
- The warranty services cover only defects due to material or manufacturing faults on a product which you have bought from the manufacturer mentioned below and are limited to either the rectification of said defects on the product or the replacement of the product, whichever we prefer. Please note that our devices are not designed for use in commercial, trade or professional applications. A guarantee contract will not be created if the device has been used by commercial, trade or industrial business or has been exposed to similar stresses during the guarantee period.
-
The following are not covered by our guarantee:
-
Damage to the device caused by a failure to follow the assembly instructions or due to incorrect installation, a failure to follow the operating instructions (for example connecting it to an incorrect mains voltage or current type) or a failure to follow the maintenance and safety instructions or by exposing the device to abnormal environmental conditions or by lack of care and maintenance.
- Damage to the device caused by abuse or incorrect use (for example overloading the device or the use or unapproved tools or accessories), ingress of foreign bodies into the device (such as sand, stones or dust, transport damage), the use of force or damage caused by external forces (for example by dropping it).
-
Damage to the device or parts of the device caused by normal or natural wear or tear or by normal use of the device.
-
The guarantee is valid for a period of 24 months starting from the purchase date of the device. Guarantee claims should be submitted before the end of the guarantee period within two weeks of the defect being noticed. No guarantee claims will be accepted after the end of the guarantee period. The original guarantee period remains applicable to the device even if repairs are carried out or parts are replaced. In such cases, the work performed or parts fitted will not result in an extension of the guarantee period, and no new guarantee will become active for the work performed or parts fitted. This also applies if an on-site service is used.
-
To make a claim under the guarantee, please register the defective device at: www.isc-gmbh.info. Please keep your bill of purchase or other proof of purchase for the new device. Devices that are returned without proof of purchase or without a rating plate shall not be covered by the guarantee, because appropriate identification will not be possible. If the defect is covered by our guarantee, then the item in question will either be repaired immediately and returned to you or we will send you a new replacement.
Of course, we are also happy offer a chargeable repair service for any defects which are not covered by the scope of this guarantee or for units which are no longer covered. To take advantage of this service, please send the device to our service address.
Also refer to the restrictions of this warranty concerning wear parts, consumables and missing parts as set out in the service information in these operating instructions.
F
Danger!
1 60mm
2 45mm
3 25mm
1 60mm
2 45mm
3 25mm
1 60mm
2 45mm
3 25mm
1 60mm
2 45mm
3 25mm
1 60mm
2 45mm
3 25mm
H
1 60mm
2 45mm
3 25mm
1 60mm
2 45mm
3 25mm
X 2006/42/EC
Annex IV
Notified Body:
Reg. No.:
X 2000/14/EC_2005/88/EC
□ Annex V
X Annex VI
Noise: measured L_wa = 88.4 dB (A); guaranteed L_wa = 96 dB (A)
P = kW; L/∅ = 32 cm
Notified Body: TUV SÜD Industrie Service GmbH (NB 0036)
2012/46/EU_(EU)2016/1628 Emission No.:
Standard references: EN 60335-1; EN 60335-2-77; EN 55014-1; EN 55014-2; EN 62233
Subject to change without notice
Archive-File/Record: NAPR027661
Documents registrar: Thomas Fischer
Wiesenweg 22, D-94405 Landau/Isar
* SRI Cordless lawn mower - A fonteze a gaser a accumulator. I Taebera a betate - UKN Akul-grasslamaskine - S Belatlerden pläskiplipere: CZ Akumulatorové sekalka - SK Akumulatorové sekalka - NK Accugonamaal - E Contaspes e batete - FIN Akkultytöln ünioneliakart - SLO Akumulatoras kosilica na travu - H Akul-Konylogsp - RO Magnit de huns geraturi cu accumulator GR ASOARMOJIM μετηρομα - P Coça rekes som tio - HIN AKMUNAURZOSA kosilica za travu - RS Akumulatoras kosilica za travu - PL Akumulatorové sekalka do iravy - TR Aktili μm bigme - R KAMUNAURZOSA kosilica za travu - SP Akumulatorové sekalka da travy - DK Akumulatorové sekalka da travy - DK Akumulatorové sekalka da travy - DK Akumulatorové sekalka da travy - DK Akumulatorové sekalka da travy - DK Akumulatorové sekalka da travy - DK Akumulatorové sekalka da travy - DK Akumulatorové sekalka da travy - DK Akumulatorové sekalka d'inkemländlu

Declaration of conformity
We, Einhell UK Ltd
Champions Business Park, First Floor Unit 10, Arrowe Brook Rd, Upton, Wirral CH49 0AB, United Kingdom
declare the conformity to UK standards and legislation was assessed for:
Cordless Lawn Mower KX-ARM 1832 Li (Kraftixx)
UK legislation
□ Simple Pressure Vessels (Safety) Regulation
□ Electrical Equipment (Safety) Regulation
□ Radio Equipment Regulation
□ Personal Protective Equipment Regulation
☐ The Ecodesign for Energy-Related Products and Energy Information Regulation
X The Restriction of the Use of Certain Hazardous Substances in Electrical and Electronic Equipment Regulation
X Noise Emission in the Environment by Equipment for use Outdoors Regulation
X Electromagnetic Compatibility Regulation
□ Measuring Instruments Regulation
☐ Pressure Equipment (Safety) Regulation
Annex V
X Annex VI
Noise:measured L_wA = 88,4 dB (A); guaranteed L_wA = 96 dB (A)
P = kW; L/∅ = 32 cm
UK Approved Body:
X Supply of Machinery (Safety) Regulation
□ Annex IV
UK Approved Body:
UKTE Certifi cate No.:
Standards: BS 60335-1; BS 60335-2-77; BS 55014-1; BS 55014-2; BS 62233
Wirral, 2022.02.24
Tom Chambers, Managing Director Einhell UK Ltd.
Archive-File/Record: NAPR027661
Article Number: 45.140.40 I.-No.: 21022
Subject to change without notice Wiesenweg 22, 94405 Landau/Isar, Germany
Documents registrar: Thomas Fischer
CE
D Konformitätserklärung: Wir erklären Konformität gemäß EU-Richtlinie und Normen für Artikel
GB Declaration of conformity: We declare conformity in accordance with the EU directive and standards for article
F Déclaration de conformité : Nous déclarons la conformité conformément aux directives et normes UE pour l'article
I Dichiarazione di conformità: dichiariamo la conformità secondo la direttiva UE e le norme per l'articolo
DK Overensstemmelseserklæring: Vi attesterer overensstemmelse iht. EU-direktiv samt standarder for artikel
S Försäkran om överensstämmelse: Vi förklarar följande överensstämmelse enl. EU-direktiv och standarder för artikeln
CZ Prohlášení o shodě: Prohlašujeme shodu podle směrnice EU a norem pro výrobek
SK Vyhlásenie o zhode: Vyhlasujeme zhodu podľa smernice EÚ a noriem pre výrobok
NL Conformiteitsverklaring: wij verklaren conformiteit conform EU- richtlijn en normen voor artikel
E Declaración de conformidad; declaramos la conformidad a tenor de la directiva y normas de la UE para el artículo
FIN Standardinmukaisuustodistus: Me vakuutamme, että EU-direktiivin ja standardien vaatimukset täyttlyvät tuotteelle
SLO IZJAVA O SKLADNOSTI potrjuje sledečo skladnost s smernico EU in standardi za izdelek
H Konformitási nyilalkozat: Az EU-irányvonal és normák szerinti konformitást jelentjük ki a cikkekhez
RO Declaratie de conformitate: Declaram conformitate conform directivei și normelor UE pentru articolul
GR Δήλωση συμμόρφωσης: Δηλώνουμε συμμόρφωση σύμφωνα με Οδηγία Εε και πρότυπα για τα προϊόντα
P Declaração de conformidade: Declaramos a conformidade de acordo com a diretiva CE e normas para o artigo
EU
HR IZJAVA O SUKLADNOSTI potvrduje sljedeću usklađenost prema smiernicama EU i normama za artikl
BIH IZJAVA O SUKLADNOSTI potvrđuje sljedeću usklađenost prema smiernicama EU i normamaza artikl
RS DEKLARACIJA O USUGLAŠENOST potvrduje sledeću usklađenost prema smemicama EZ i normama za artikel
TR Uygunluk Deklarasyonu: AB direktifi ve ürün standartları uyanınca uygunluğunu beyan ederiz
RUS Заявление о соответствии товара: Настоящим удостоверяется, что следующие продукты соответствуют директивам и нормам EC
EE Vastavusdeklaratsioon: Tõendame toote vastavust EL direktiivile ja standarditele
LV Atbilstības deklarācija: Mēs apliecinām atbilstību ES direktīvai un standartiem tālāk minētajām precēm
LT Atitikties deklaracija: deklaruojame, kad gaminys atitinka ES direktyva ir standartus
PL Deklaracja Zgodności - deklarujemy zgodność wymienionego poniżej artykułu z następującymi normami na podstawie dyrektywy EU
BG Декларация за съответствие: Ние декларираме съответствие на Директивите и нормите (EC) за изделия
UKR Декларація відповідності: ми заявляемо про відповідність згідно з Дирентивою ЄС та стандартами стосовно артикула
МК Изјава за сообразност: Изјавуваме сообразност со регулативата и со нормите на ЕУ за артикли
N Samsvarserklæring: Vi erklærer samsvar i henhold til EU-direktiv og standarder for artikel
IS Samræmisyfirlýsing: Við útskurðum samræmi við EU-reglugerð og stöðlum fyrir vörutegund
X 2006/42/EC
□ Annex IV
Notified Body:
Reg. No.:
X 2000/14/EC_2005/88/EC
□ Annex V
X Annex VI
Noise: measured L_wa = 88.4 dB (A); guaranteed L_wa = 96 dB (A)
P = kW; L/∅ = 32 cm
Notified Body: TUV SÜD Industrie Service GmbH (NB 0036)
2012/46/EU_(EU)2016/1628 Emission No.:
Standard references: EN 60335-1; EN 60335-2-77; EN 55014-1; EN 55014-2; EN 62233
Subject to change without notice
Archive-File/Record: NAPR027662
Documents registrar: Thomas Fischer
Wiesenweg 22, D-94405 Landau/Isar
* SRI Cordless lawn mower - A fonteze a gaser a accumulator. I Taebera a betate - UKN Aktu-grasslamaskine - S Belatlerden pläskiplipere: CZ Akumulatorové sekotka - SK Akumulatorové sekotka - NL Accugonamaal - E Contaspes e batete - FIN Akkutyttöln ünioneliakart - SLO Akumulatoras kositica na travu - H Aktu-konytögp - RO Magnit de huns geraturi cu accumulator - GR ASOOMARMO μετηροσα - P Costa rekes som tio - HIN AKMUSORZOSA kositica za travu - RS Akumulatoras kositica za travu - PL Akumulatorové sekotka do iravy - TR Aktiši pim bigne - NK Akumulatorové sekotka - PK Akumulatorové sekotka - AL Akumulatorové sekotka - NK Akumulatorové sekotka - MK Tervekonskala na detafera - NC Belatlerdevi pläskiplipe - IS Stellvirel mõe lõsteulniõhlu -

Declaration of conformity
We, Einhell UK Ltd
Champions Business Park, First Floor Unit 10, Arrowe Brook Rd, Upton, Wirral CH49 0AB, United Kingdom
declare the conformity to UK standards and legislation was assessed for:
Cordless Lawn Mower KX-ARM 1832 Li (Kraftixx)
UK legislation
□ Simple Pressure Vessels (Safety) Regulation
□ Electrical Equipment (Safety) Regulation
□ Radio Equipment Regulation
□ Personal Protective Equipment Regulation
☐ The Ecodesign for Energy-Related Products and Energy Information Regulation
X The Restriction of the Use of Certain Hazardous Substances in Electrical and Electronic Equipment Regulation
X Noise Emission in the Environment by Equipment for use Outdoors Regulation
X Electromagnetic Compatibility Regulation
□ Measuring Instruments Regulation
☐ Pressure Equipment (Safety) Regulation
Annex V
X Annex VI
Noise:measured L_wA = 88,4 dB (A); guaranteed L_wA = 96 dB (A)
P = kW; L/∅ = 32 cm
UK Approved Body:
X Supply of Machinery (Safety) Regulation
□ Annex IV
UK Approved Body:
UKTE Certifi cate No.:
Standards: BS 60335-1; BS 60335-2-77; BS 55014-1; BS 55014-2; BS 62233
Wirral, 2022.02.24
Tom Chambers, Managing Director Einhell UK Ltd.
Archive-File/Record: NAPR027662
Article Number: 45.140.42 I.-No.: 21022
Subject to change without notice Wiesenweg 22, 94405 Landau/Isar, Germany
Documents registrar: Thomas Fischer
EH 03/2022 (01)