
ZOC1509M - TV signal amplifier Mr. Pizza - Free user manual and instructions
Find the device manual for free ZOC1509M Mr. Pizza in PDF.

| Product Type | Oven-barbecue cart |
| Brand | Mr. Pizza |
| Model | ZOC1509M |
| Manufacturer | Blue Rhino Global Sourcing, Inc. |
| Use | Outdoor only, not under a closed shelter |
| Approval | United States and Canada only |
| Propane cylinder capacity | Standard 20 lb (9 kg) cylinder with external thread valve |
| Main features | Support for oven-barbecue; foldable side shelves; propane cylinder storage; lockable casters; towel holder |
| Material | Steel with painted finish; sugarcane bagasse tray (75%) |
| Assembly required | Yes, about 30 minutes |
| Tools included | Phillips #2 screwdriver, M10-M8 wrench |
| Weight | Approximately 15 kg (approx.) |
| Dimensions (approx.) | 120 x 60 x 90 cm (approx.) |
| Safety | Do not use indoors; non-combustible flat surface; inspect before each use; do not modify; wear gloves during assembly |
| Maintenance and cleaning | Clean and inspect regularly; store protected from weather |
| Spare parts and repairability | Parts available at parts.bluerhino.com or at 1.800.762.1142 |
| Warranty | Limited 1-year warranty from date of purchase |
Frequently Asked Questions - ZOC1509M Mr. Pizza
User questions about ZOC1509M Mr. Pizza
0 question about this device. Answer the ones you know or ask your own.
Ask a new question about this device
Download the instructions for your TV signal amplifier in PDF format for free! Find your manual ZOC1509M - Mr. Pizza and take your electronic device back in hand. On this page are published all the documents necessary for the use of your device. ZOC1509M by Mr. Pizza.
USER MANUAL ZOC1509M Mr. Pizza
Pizza Oven & Grill Cart
Model No. ZOC1509M
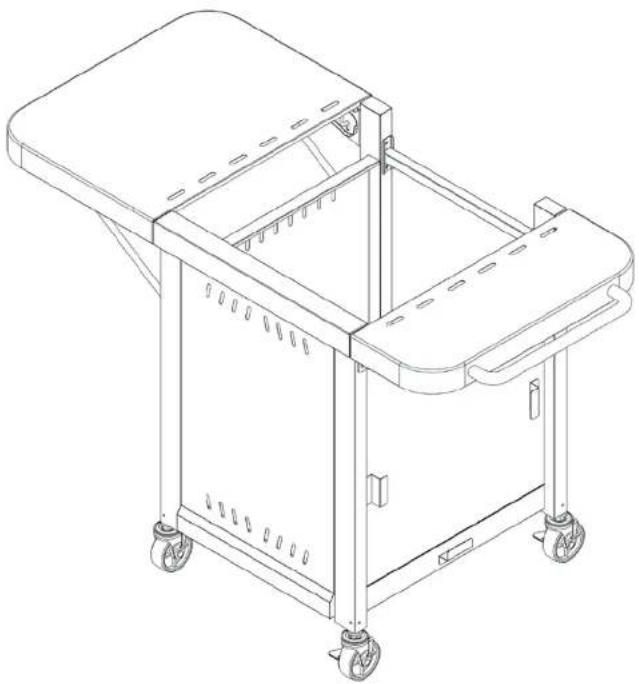
natural_image
Line drawing of a multi-wheeled cart with wheels and side panels (no text or symbols)
WARNING
FOR YOUR SAFETY:
For Outdoor Use Only (outside any enclosure)

WARNING
FOR YOUR SAFETY:
When using the oven & grill on the oven & grill cart, follow all Dangers, Warning, Cautions and instructions associated with the oven & grill.
Table of Contents
Important Safeguards Page 2
Expanded View & Hardware 3
Assembly Instructions. 4
Installing LP Gas Tank. 7
Inserting and Securing LP Gas Tank. 7
Connecting LP Gas Tank 7
Disconnecting LP Gas Tank 7
Operating Instructions. 7
Cleaning and Care 7
Product Registration 7
Replacement Parts 7
Limited Warranty 7
THIS INSTRUCTION BOOKLET CONTAINS IMPORTANT SAFETY INFORMATION. PLEASE READ AND KEEP FOR FUTURE REFERENCE.
If you are assembling this unit for someone else, give this manual to him or her to read and save for future reference.
Important Safeguards
▲ DANGER: Failure to follow the dangers, warnings and cautions in this manual may result in serious bodily injury or death, or in a fire or an explosion causing damage to property.
▲WARNINGS:
▲ For residential use only. This oven & grill cart is NOT for commercial use.
This oven & grill cart is safety certified for use in the United States and/or Canada only. Do NOT modify for use in any other location. Modification will result in a safety hazard and will void your warranty.
Inspect oven & grill cart before each use.
Do NOT alter oven & grill cart in any manner. Any alteration will void your warranty.
Do NOT use the oven & grill cart unless it is COMPLETELY assembled and all parts are securely fastened and tightened.
Do NOT build this model of oven & grill cart in any built-in or slide-in construction. Ignoring this warning could cause a fire or an explosion that can damage property and cause serious bodily injury or death.
▲ Exercise reasonable care when operating your oven & grill cart with the oven & grill.
Place the oven & grill cart on an outdoor stable level surface before placing the oven & grill on the cart.
Never set up the oven & grill cart on a sloping surface.
The oven & grill cart is meant for the use of the oven & grill only. Do NOT attempt to attach any other products or appliances to the oven & grill cart.
▲ Remove the oven & grill from the oven & grill cart before placing the oven & grill cart in a vehicle trunk, station wagon, mini-van, sport utility vehicle (SUV), recreational vehicle (RV), or any storage area.
▲ NEVER use the oven & grill cart as a step stool or ladder or climb on the oven & grill cart.
Do NOT use the oven & grill cart or place the oven & grill on the oven & grill cart if any parts are missing or damaged.
This oven & grill cart should be thoroughly cleaned and inspected on a regular basis.
▲ Clean and inspect before each use of the oven & grill cart. If there is evidence of abrasion, wear, cuts or breaks, fix or replace prior to operation.
Use only Blue Rhino Global Sourcing, Inc. factory-authorized parts. The use of any part that is not factory-authorized can be dangerous and will void your warranty.
A Do NOT operate this oven & grill cart without reading "Operating Instructions" in this manual.
Do NOT attempt to move oven & grill when in use. Allow the oven & grill cart to cool before moving or storing.
▲ Always place your oven & grill cart on a hard, non-combustible, level surface. An asphalt or blacktop surface may not be acceptable for this purpose.
▲Use protective gloves when assembling this product.
Do NOT force parts together as this can result in personal injury or damage to the product.
▲ Death, serious injury or damage to property may occur if the above is not followed exactly.
Parts List
| 1 | Left Side Shelf | 55-24-713 |
| 2 | Side Shelf Support* | 55-24-721 |
| 3 | Left Cart Frame | 55-24-722 |
| 4 | Right Side Shelf | 55-24-727 |
| 5 | Towel Bar | 55-24-730 |
| 6 | Rear Cart Frame | 55-24-724 |
| 7 | LP Gas Tank Retainer Bolt* | 55-24-726 |
| 8 | Base | 55-24-748 |
| 9 | Caster (2) | 55-24-728 |
| 10 | Front Base Panel | 55-24-731 |
| 11 | Right Cart Frame | 55-24-732 |
| 12 | Front Panel | 55-24-733 |
| 13 | Locking Caster (2) | 55-24-734 |
* Pre-assembled
Expanded View
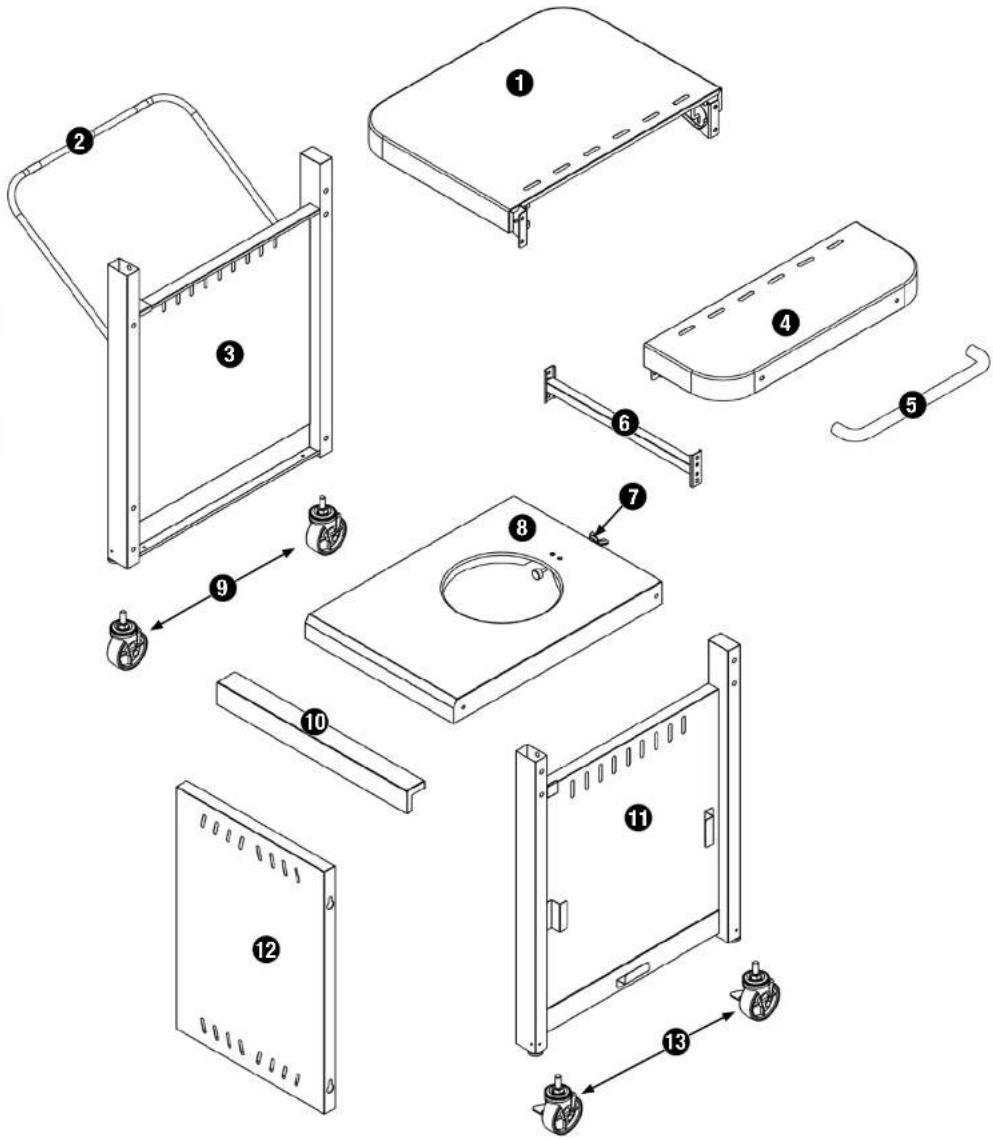
text_image
Exploded view diagram of a mechanical assembly with numbered components for identificationHardware
| A | Screw | M6x14 Nickel Plated Phillips Truss Head | 24 pcs |
| B | Washer | ø6.4 Nickel Plated | 2 pcs |
Tools Required for Assembly (Included)
2 Phillips Head Screwdriver 1 pc

M10-M8 Wrench 1 pc
Assembly Instructions
1
DO NOT RETURN TO PLACE OF PURCHASE.
For assistance, call 1.800.762.1142 toll-free. Please have your owner's manual and model number available for reference.
Assembly Tips:
- Select an area where you will assemble this product. To protect components, choose a smooth surface that's free of cracks or openings.
- Spread out all parts.
- Tighten all hardware connections by hand first. Then, before completing each step, go back and fully tighten all hardware. Be careful not to over-tighten. That could damage surfaces or strip threads.
- For best results, complete each step in the order presented.
Typical assembly is approximately 30 minutes.
2
Attach Casters
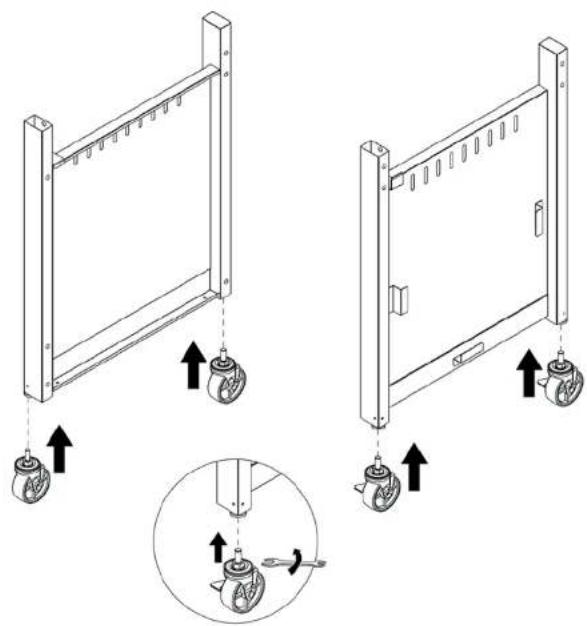
natural_image
Technical illustration of two mechanical frame assemblies with wheels and adjustment arrows, showing assembly steps (no text or symbols)3
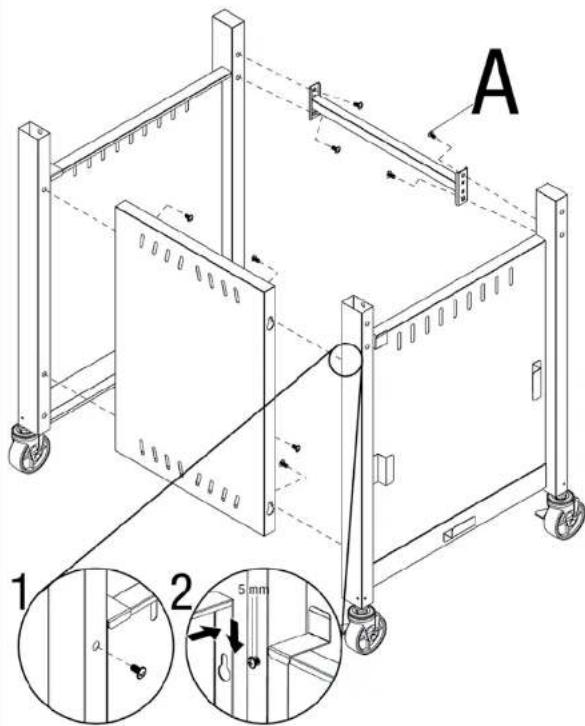
Attach Front Panel and Rear Cart Frame
text_image
A 1 2 5 mmA

x8
4
Attach Base

natural_image
Technical line drawing of a mechanical assembly with mounting brackets and a circular component (no text or symbols)A

x4
5
Attach Front Base Panel

natural_image
Technical line drawing of a mechanical frame structure with labeled component A (no text or symbols beyond label)
6
Attach Towel Bar
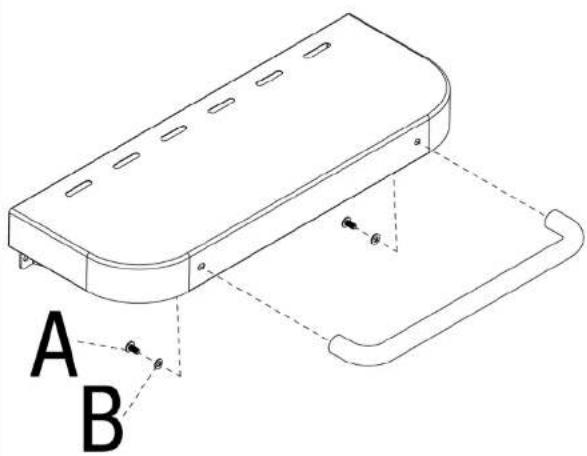
text_image
A B

7
Attach Side Shelves
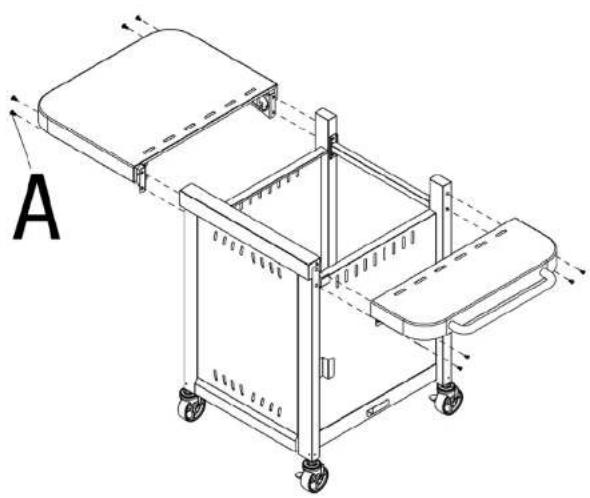
natural_image
Technical line drawing of a multi-level medical cart with wheels and a side panel, labeled A (no text or symbols on the diagram itself)
Assembly Instructions (continued)
8
Unfold Side Shelves
Note: Always lock side shelves into place before using cart.
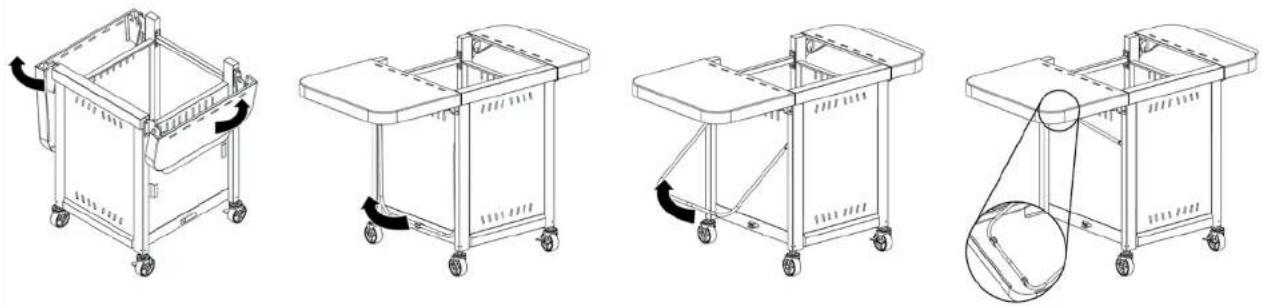
Fold Side Shelves
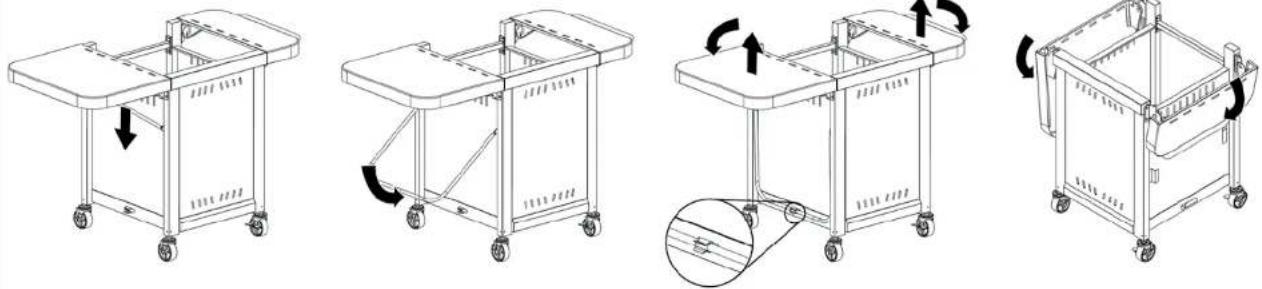
9
Insert Oven & Grill and Place Pizza Stone
Note: Oven & grill is sold separately.
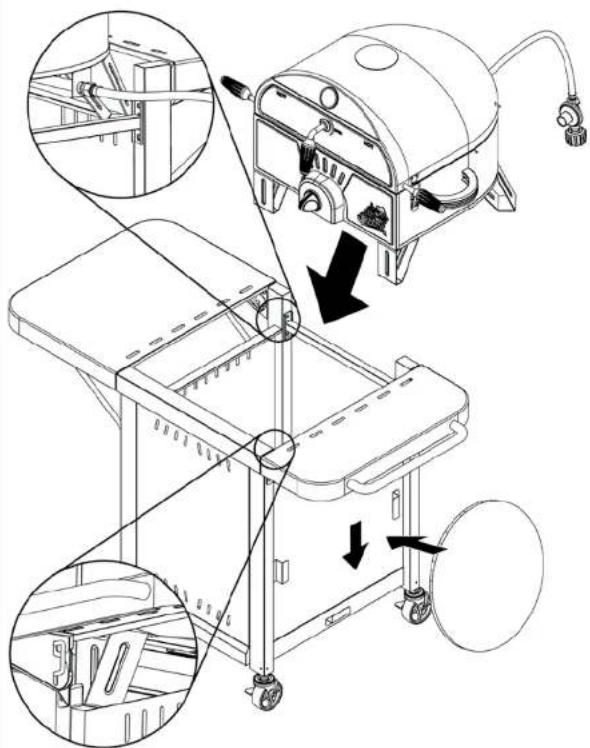
text_image
Technical diagram showing mechanical assembly steps with labeled components and directional arrows indicating motion or assembly.10
Remove Oven & Grill
▲CAUTION:
- NEVER remove oven & grill when in use.
- CAUTION: NEVER remove oven & grill until it is cool and with the fuel supply disconnected.
- Always place your oven & grill on a hard, non-combustible, level surface. An asphalt or blacktop surface may not be acceptable for this purpose.
- Always lock lid before moving.
- Always lift oven & grill by the side handles.
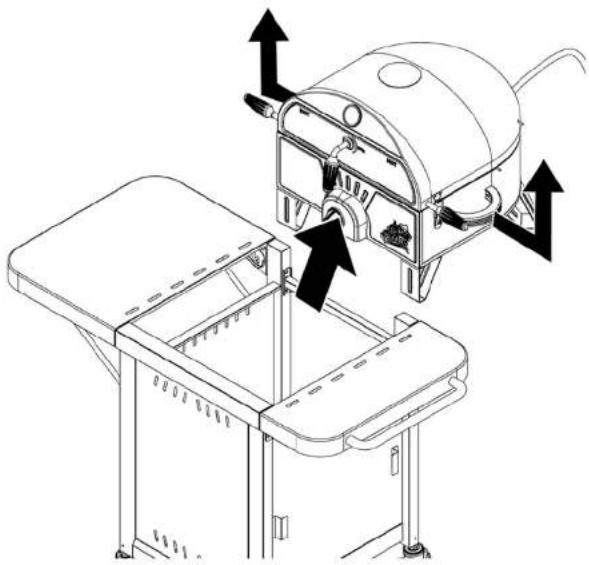
natural_image
Technical line drawing of a portable air conditioner unit with mounting base and control panel (no text or symbols)Installing LP Gas Tank
To operate, you will need one precision-filled standard grill LP gas tank with external valve threads.
▲CAUTION: LP gas tank must be properly disconnected and removed prior to moving this oven & grill.
Caution: Always place your oven & grill on a hard, non-combustible, level surface. An asphalt or blacktop surface may not be acceptable for this purpose.
▲Caution: Move gas hoses as far away as possible from hot surfaces and dripping hot grease.
Caution: The gas hose should be arranged so that it will not be pulled on or tripped over.
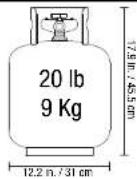
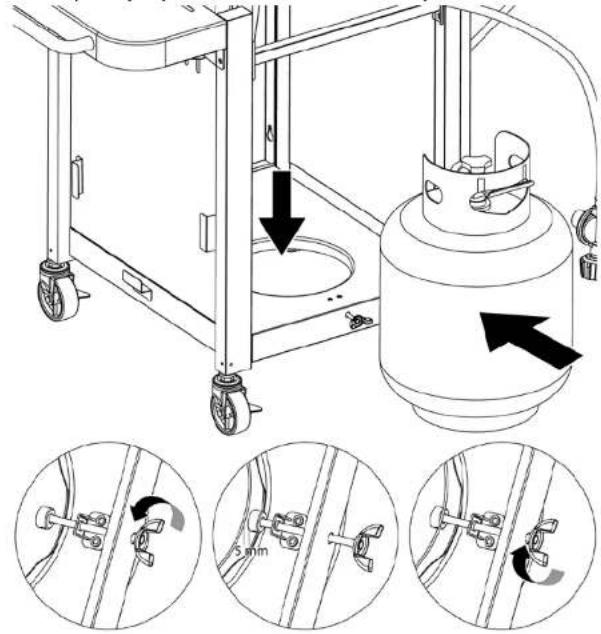
Inserting and Securing LP Gas Tank
Loosen LP gas tank retainer bolt by turning counter-clockwise.
Place precision-filled LP gas tank upright into hole in cart body so the tank valve is facing the gas line connection.
Secure tank by turning LP gas tank retainer bolt clockwise until tight.
text_image
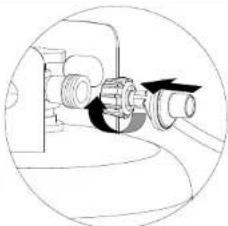
Technical diagram showing mechanical assembly with labeled parts and directional arrows indicating motion or movement, including a 5 mm scale indicator.Connecting LP Gas Tank
- Before connecting, be sure there is no debris caught in the head of the LP gas tank, head of the regulator valve or in the head of the burner or burner ports.
- Connect regulator/hose assembly to tank by turning knob clockwise until it stops.
Disconnecting LP Gas Tank
- Before disconnecting, make sure the LP gas tank valve is "CLOSED."
- Disconnect regulator/hose assembly from LP gas tank by turning knob counterclockwise until it is loose. ▲CAUTION: LP gas tank must be properly disconnected and removed prior to moving this oven & grill.
- Place the protective cap cover on the LP tank and store the tank outdoors in a well ventilated area out of direct sunlight.
natural_image
Diagram of a mechanical assembly with rotating components and directional arrows (no text or symbols)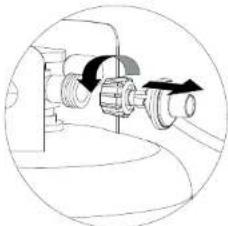
natural_image
Diagram of a mechanical device with rotating components and an arrow indicating motion (no text or symbols)Getting More Propane

Need a tank of gas? One option is to try propane exchange. It's easy, fast, safe, and available at tens of thousands of conveniently located retail outlets nationwide, which are typically open nights and weekends. You can purchase a fresh, precision-filled tank or exchange your empty for a fresh, precision-filled tank. Another option is to have your tank refilled at a refill station. Be sure to check the hours of operation for the refill station.
Operating Instructions
Follow all instructions in the Mr. Pizza® Pizza Oven & Grill owner's manual.
Cleaning and Care
Follow all instructions in the Mr. Pizza® Pizza Oven & Grill owner's manual.
Product Registration
For faster warranty service, register your product immediately at BlueRhino.com/warranty or by call 1.800.762.1142.
Replacement Parts
Replacement parts can be found at parts.BlueRhino.com or by calling 1.800.762.1142.
Limited Warranty
Blue Rhino Global Sourcing, Inc. ("Blue Rhino") warrants to the original retail purchaser of this product, and to no other person, that if this product is assembled, maintained, and operated in accordance with the printed instructions accompanying it, then for a period of one (1) year from the date of purchase, all parts in such product shall be free from defects in material and workmanship. Blue Rhino may require reasonable proof of your date of purchase. Therefore, you should retain your sales slip or invoice. This Limited Warranty shall be limited to the repair or replacement of parts, which prove defective under normal use and service and which Blue Rhino shall determine in its reasonable discretion upon examination to be defective. Before returning any parts, you should contact Blue Rhino's Customer Care Department using the contact information listed below. If Blue Rhino confirms, after examination, a defect covered by this Limited Warranty in any returned part, and if Blue Rhino approves the claim, Blue Rhino will replace such defective part without charge. If you return defective parts, transportation charges must be prepaid by you. Blue Rhino will return replacement parts to the original retail purchaser, freight or postage prepaid.
This Limited Warranty does not cover any failures or operating difficulties due to accident, abuse, misuse, alteration, misapplication, improper installation or improper maintenance or service by you or any third party, or failure to perform normal and routine maintenance on the product as set out in this owner's manual. In addition, the Limited Warranty does not cover damage to the finish, such as scratches, dents, discoloration, rust or other weather damage, after purchase.
This Limited Warranty is in lieu of all other express warranties. Blue Rhino disclaims all warranties for products that are purchased from sellers other than authorized retailers or distributors, including the warranty of merchantability or the warranty of fitness for a particular purpose. Blue Rhino ALSO DISCLAIMS ANY AND ALL IMPLIED WARRANTIES, INCLUDING WITHOUT LIMITATION THE IMPLIED WARRANTIES OF MERCHANTABILITY AND FITNESS FOR A PARTICULAR PURPOSE. Blue Rhino SHALL HAVE NO LIABILITY TO PURCHASER OR ANY THIRD PARTY FOR ANY SPECIAL, INDIRECT, PUNITIVE, INCIDENTAL, OR CONSEQUENTIAL DAMAGES. Blue Rhino further disclaims any implied or express warranty of, and assumes no responsibility for, defects in workmanship caused by third parties.
This Limited Warranty gives the purchaser specific legal rights; a purchaser may have other rights depending upon where he or she lives. Some jurisdictions do not allow the exclusion or limitation of special, incidental or consequential damages, or limitations on how long a warranty lasts, so the above exclusion and limitations may not apply to everyone.
Blue Rhino does not authorize any person or company to assume for it any other obligation or liability in connection with the sale, installation, use, removal, return, or replacement of its equipment, and no such representations are binding on Blue Rhino.
Blue Rhino Global Sourcing, Inc.
Winston-Salem, North Carolina 27105 USA
1.800.762.1142
natural_image
Line drawing of a multi-wheeled cart with wheels and side panels (no text or symbols)
AVERTISSEMENT
© Blue Rhino Global Sourcing, Inc.
text_image
Exploded view diagram of a mechanical assembly with numbered components for identificationQuincaillerie
NE PAS RETOURNER AU MAGASIN AVEC CET ARTICLE.
natural_image
Technical illustration of two mechanical frame assemblies with wheels and adjustment arrows, plus a close-up of the component (no text or symbols)3
natural_image
Technical line drawing of a mechanical assembly with mounting brackets and a circular component (no text or symbols)A

x4
natural_image
Technical line drawing of a mechanical frame structure with labeled component A (no text or symbols beyond label)
6
Fixer le porte-serviette

text_image
A B

natural_image
Technical line drawing of a multi-level medical cart with wheels and a side panel, labeled A (no text or symbols on the diagram itself)
natural_image
Line drawing of a mechanical cart with wheels and side supports (no text or symbols)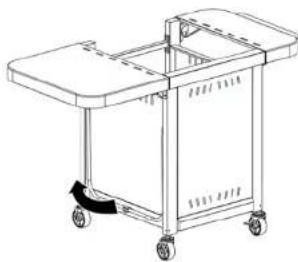
natural_image
Line drawing of a multi-wheeled cart with wheels and handle, no text or symbols present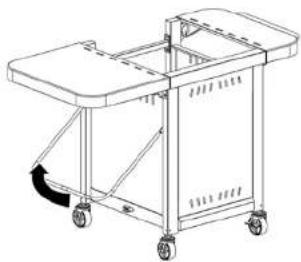
natural_image
Line drawing of a multi-wheeled cart with wheels and a curved arrow indicating rotation (no text or symbols)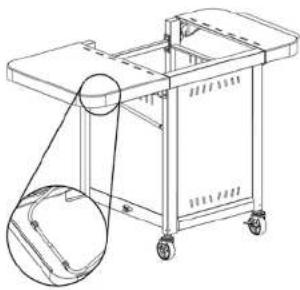
natural_image
Line drawing of a multi-wheeled cart with wheels and a handle, no text or symbols presentnatural_image
Line drawing of a mobile cart with wheels and a downward arrow indicating motion (no text or symbols)
natural_image
Line drawing of a multi-wheeled cart with wheels and a handle, no text or symbols present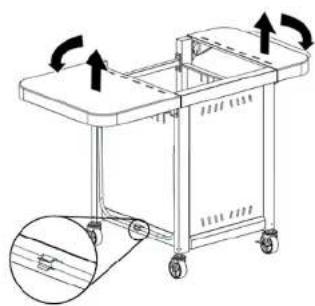
natural_image
Line drawing of a mechanical cart with wheels and directional arrows indicating rotation (no text or symbols)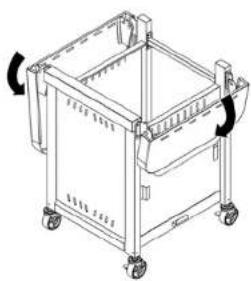
natural_image
Line drawing of a metal filing tray with wheels and handlebars (no text or symbols)9
text_image
Technical diagram showing mechanical assembly steps with labeled components and directional arrows indicating motion or assembly.10
Pour retirer le four-barbecue
▲ATTENTION :
natural_image
Technical line drawing of a portable appliance with directional arrows indicating movement or assembly (no text or symbols present)text_image
Technical diagram showing mechanical assembly with labeled parts and three progressive views of a device's internal structure.natural_image
Diagram of a mechanical component with rotating parts and directional arrows (no text or symbols)natural_image
Technical line drawing of a mechanical assembly inside a circular frame (no text or symbols)Blue Rhino Global Sourcing, Inc.